1
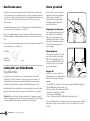
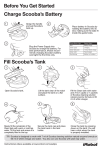
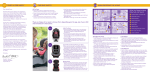
Roomba
®
Vacuum Cleaning Robot
Owner’s Manual
Dear Roomba owner,
How to get started
Thank you for choosing a new generation iRobot Roomba vacuum cleaning robot.
You’re joining a very special community of people - 4 million worldwide and growing
- who are discovering just how useful, convenient and straightforward having a home
robot is. In fact, owners tend to like their Roomba so much they’ve even given
them nicknames.
Before you first use your Roomba, turn
it upside down and remove the battery
pull tab. Use the Home Base™ to
charge the battery overnight. Charge
the Roomba at least 16 hours when
using it for the first time.
We’re passionate about our robots too. Not surprisingly, given that making robots is all
we’ve ever done in the 19 odd years of our existence.
Preparing your cleaning area
I hope you will have many enjoyable experiences with your Roomba and on behalf of all
the team thank you for choosing iRobot.
Your Roomba is pretty smart in getting
around, but it does need a little help.
Carpet tassels aren’t a problem, but
clear away any clutter and loose cables.
General dust, dirt and grime are what
it’s there for, but avoid anything wet,
such as spillages.
Best Wishes
Setting Roomba up
Now, you’re probably itching to give your Roomba a go, but it’s worth having a quick
read of this manual first. That way it will be even easier to use and save you even more
time.
First, set up the Home Base™. To keep
your Roomba on track, set up Virtual
Wall® or Auto Virtual Wall, which block
off areas, or Virtual Wall® Lighthouses™
(models 581 and 625 only), to enable
room-to-room cleaning.
Colin Angle
Chairman, CEO and Co-Founder, iRobot Corporation
Looking after your iRobot Roomba
Every little bit helps
Ready to Go!
If you have one, set up your Wireless
Command Centre or your Remote Control.
Otherwise, just start up your Roomba
manually:
For best results, use it often! After every use, empty the bin and clean the filter.
The brushes do a lot of the hard work, so just like a hair brush, every week or so
it’s best to take them out and remove the hair and fluff that collect around these,
and under the brush bearings (see diagrams in Essential Maintenance section).
Extend the battery life by recharging it as soon as possible and storing your Roomba
plugged in. For long-term storage, remove and store the battery in a cool, dry place.
*Safety first* As your Roomba contains electrical parts, don’t submerge or spray it
in water – clean with a dry cloth only. Before using your product for the first time please
refer to the important safety instructions towards the end of this manual.
Getting started | Looking after your Roomba
1
• Press CLEAN once to turn it on. You’ll hear a beep & the CLEAN button will light up.
• Press CLEAN again to start a cleaning cycle.
• When on the Home Base, simply press CLEAN
• To pause while cleaning, press CLEAN.
• To resume, press CLEAN again.
• To turn off, press and hold the CLEAN button until the lights turn off.
Then just walk away and let your Roomba get to work. Kids and pets tend to find Roomba fascinating, so make sure they realise it’s not a toy or an intruder. They’ll soon get
used to it.
2
Cleaning Modes and Pattern
Roomba uses iAdapt™ Responsive Cleaning Technology, an advanced, proprietary
system of software and sensors. iAdapt allows Roomba to actively monitor the cleaning
environment 64 times per second and respond with more than 40 different mobility
behaviors to clean the room more thoroughly.
Roomba models 500 and above have 3 cleaning modes you can select:
Clean Mode (all models) – Roomba automatically calculates the room size and adjusts
its cleaning time appropriately.
Spot Mode (all models) – Roomba will spiral approximately 1 meter in diameter
and then back to where it started – an intense, localized clean for those quick fixes.
Max Mode (625 model only) – For cleaning in larger rooms, or areas that need to be
cleaned more thoroughly.
Surfaces
Your Roomba works on pretty much anything – wood, carpet, tile, vinyl and lino,
adjusting to different floor types. It automatically senses stairs and other drops.
It might stall when confronting round edges and might slide over particularly slippery
surfaces. Very dark floors may impede its sensors. Roomba is not designed for use outdoors.
Anti-tangle system
A Roomba won’t get caught up in tassels or fringes. If it senses a tangle, it
automatically stops its main brushes and reverses to free itself. It may make a
clicking noise while doing this.
Virtual Walls create an invisible barrier that your Roomba won’t cross. That makes it easy
to confine it to a particular room or area, and prevent it from getting too close to anything
delicate or dangerous.
• Each Virtual Wall needs two C alkaline
batteries (not included).
• You can set the Virtual Walls to block an
opening up to two metres. It creates a
cone shape barrier, so the beam
gradually gets wider.
• For best results, place the Virtual Wall
on the outside of the doorway you
want to block. Point the arrows on the
top towards the opening.
Manual Virtual Wall
• Turn on a Manual Virtual Wall by hand at the beginning of the cleaning cycle.
It will shut off after 135 minutes. If the power light blinks green, it means you’ll
need new batteries soon.
Auto Virtual Wall
When an Auto Virtual Wall is set to “AUTO” mode, the power light continuously blinks to
indicate it is on. When battery levels are low, the Virtual Wall continuously blinks twice to
indicate that it needs new batteries. When in AUTO mode, the batteries should last for
around six months. To save on batteries, just switch it to OFF.
Virtual Wall Lighthouses™ Accessory for models 581 and 625 only.
Home Base
Position the Home Base on a hard, level surface against a wall. Make sure it’s at least
four feet from any stairs and that your Roomba has a clear path to reach it.
When Roomba has finished cleaning, it will return to its Home Base to charge. The light
on the Home Base stops blinking and turns solid green when Roomba makes a good
connection. Then, Roomba’s CLEAN button will pulse amber to show it is
charging, and will turn solid green when Roomba is fully charged and ready to clean
again!
Getting started | Cleaning modes & Virtual Walls
Virtual Wall® Optional accessory for all models
3
A Virtual Wall Lighthouse can act as both a Virtual Wall and a Lighthouse.
In Lighthouse mode, it helps your Roomba navigate around your home.
In Virtual Wall mode, it blocks off areas you don’t want cleaned.
Simply use the Mode Selector to make your choice. Either way, it turns on and off automatically as you turn your Roomba on and off. When on, the light on top shines. (A bit
like a real lighthouse.)
It takes two C alkaline batteries (not included). A flashing power light means the
batteries need replacing soon.
4
Battery storage and charging
Your Roomba is powered by a rechargeable battery. Before using your Roomba
for the first time, you’ll need to charge the battery overnight.
• Make sure your Roomba is fully charged before each cleaning cycle.
• For maximum battery life, always store your Roomba plugged in.
• When your Roomba is on the Home Base, make sure the Home Base
power light is on.
• If you return your Roomba to the Home Base / power supply after leaving it
off for a long time, it will start a special 16-hour Refresh Charge and the
CLEAN button light will pulse quickly. If possible, don’t interrupt the
Refresh Charge.
• For long-term storage, fully charge battery, remove, and store it in a cool,
dry place. When plugged in or on the Home Base, you should always leave
the battery inside.
How to use the Lighthouse mode
Simply place a Lighthouse in the doorway
with the logo facing forward. When it has
completed the first room the Lighthouse
will help Roomba navigate around your
home allowing it to clean room-to-room.
When Roomba has completed cleaning,
the Lighthouse will direct Roomba back
to its Home Base for recharging.
Charging lights
You can use Lighthouses and Virtual Walls
at the same time, but avoid placing them
too close to each other, to the Home Base, or to furniture that could block the beams.
Otherwise your Roomba might not recognise the Lighthouses or be able to return to
Home Base.
How to remove your battery (models 500 and above)
The CLEAN button light indicates the battery is charging.
How to use the Virtual Wall mode
In Virtual Wall mode, the Lighthouse creates an invisible barrier that your Roomba won’t
cross. It automatically turns off when your Roomba is turned off.
Simply place the Virtual Wall Lighthouse in the centre of the doorframe. Unlike a Virtual
Wall, a Virtual Wall Lighthouse features a range selector that you can use to adjust the
length of the barrier – 0 – 2 metres – (a longer range will drain the battery faster).
Battery storage & charging |
Charging lights
5
CLEAN button light
Solid red
Amber pulse
Solid green
Quick amber pulse
What it means
Battery empty
Charging
Fully charged
16-hour refresh charge
If you won’t be using your Roomba for an extended period, we recommend that you
remove the battery. To access the battery, turn Roomba over and remove the side brush
screw along with the 4 screws that hold Roomba’s bottom cover in place.
Or please visit www.irobot.com/international for further instructions or to download
a detailed user manual.
Wireless Command Centre
(Accessory for models 581 and 625 only)
Once you have installed 4 AA batteries into
the Command Centre, you can use this to
turn your Roomba on and off, schedule up
to seven cleaning times a week and even
steer it. Clever, eh?
6
Remote Control Optional accessory for all Roomba models
You use this just like your TV remote, pointing and clicking it to turn your Roomba on
and off, steer it, and control the SPOT and ... functions.
• First, install 2 AA batteries (not included).
• If you use it near a Virtual Wall or the Home
Base, it may get confused and not work.
• If it goes missing, try looking down the side
of or under the sofa. (Well, that usually works
for the TV remote.)
Directional
Buttons
SPOT
Button
...
CLEAN/power
Button
Button
Scheduling your Roomba Models 555 and above.
This lets you tell your Roomba exactly when to clean, even when you’re away
from home.
Viewing a schedule
1. Press and hold SCHEDULE.
2. While holding SCHEDULE, press the DAY button to look through the scheduled
cleaning times.
3. Release SCHEDULE.
Deleting a schedule
1. Press and hold SCHEDULE.
2. While holding SCHEDULE, press the DAY button to look through the scheduled
cleaning times.
3. When your Roomba is displaying the scheduled cleaning time you want to delete,
press and hold DAY to delete it. Your Roomba will beep to show it’s been deleted.
4. Release SCHEDULE.
Changing a schedule
1. Press and hold SCHEDULE.
2. While holding SCHEDULE, press the DAY button to look through the scheduled
cleaning times.
3. When your Roomba is displaying the scheduled cleaning time you want to change,
press the HOUR and MINUTE buttons to make the change.
4. Release SCHEDULE.
Setting the time
1.Press and hold CLOCK.
2.While holding CLOCK, use the DAY, HOUR and MINUTE buttons to set the time.
3.Release CLOCK. Your Roomba will beep to indicate that the time has been set.
Setting 12 / 24 hr
1. To switch between the two views, press and hold the DAY and MINUTE buttons
simultaneously for 3 seconds until Roomba beeps and the clock briefly illuminates,
indicating the clock format has been switched.
Roomba’s clock will switch back to the default 12 hour (AM/PM) format when
Roomba’s battery is disconnected or significantly discharged.
To keep your Roomba working perfectly, it’s a good idea to do a little
maintenance regularly. In particular, please note the following:
Setting a schedule
You can schedule your Roomba to clean once a day, up to seven times a week.
You must set the time before setting a schedule.
1. Press and hold SCHEDULE.
2. When holding SCHEDULE, use the DAY, HOUR and MINUTE buttons to set the
schedule.
3. Release SCHEDULE. Your Roomba will beep to indicate the schedule has been set.
Controlling and Scheduling your Roomba |
Regular maintenance
A little maintenance goes a long way
7
• Look for the yellow and green parts – these are designed to be removed
and cleaned.
• You should empty the bin and clean the brushes after each use, if possible.
• Excessive hair build-up could permanently damage your Roomba or your floor,
so clean the brush bearings and brush caps regularly.
For more information, and to order accessories, please visit
www.irobot.com/international
8
Essential maintenance
Emptying the bin
3. Use the included cleaning tool to
remove hair easily from the bristle
brush by pulling it over the brush.
4. To clean the side brush, use a small
Phillips screwdriver to remove the screw
from the centre. Remove the brush,
clean, reinstall.
You should do this after each use.
Cleaning the filter
AeroVac™ (564 model only)
Regular cleaning is important and
you should replace the filter after two
months of regular use.
Cleaning the front wheel
Push down and remove filter to clean.
A. Empty bin
B. Pull Yellow tab
to open and
empty filter
compartment
Cleaning the brushes and
associated parts
1. Pull firmly on the front wheel to remove it.
2. Remove any debris from inside the
wheel cavity.
3. Remove the wheel from its housing and
wipe clean. Pull firmly to remove the axle
and clear any hair wrapped round it.
4. Reinstall all parts when finished. Make
sure the wheel clicks right back into place.
Cleaning the cliff sensors
Simply wipe all four cliff sensor openings
with a clean, dry cloth.
1. Remove brush guard by lifting both
yellow tabs.
Cliff sensor
openings
Troubleshooting
Occasionally, something can go wrong. But
don’t worry – there’s an early warning system.
Bearings
Bearings
Your Roomba will go “uh-oh” and warn you what the problem is.
The troubleshooting light will also blink. To repeat an error message,
just press CLEAN.
2. Remove and clean the brushes,
brush caps and brush bearings. For more information you can download a detailed user manual at
www.irobot.com/international or by contacting your local distributor,
whose contact details can also be found on this page.
Essential Maintenance |
Step by step
9
10
Problems while running
Problems while charging
Your Roomba Your Roomba displays... Your Roomba
blinks…
(models 550+) says…
1 blink
-
Charging error 1
Your Roomba blinks… Your Roomba says…
Likely cause What to do
Error 1. Move Roomba to a new location then press CLEAN to restart.
Your Roomba is stuck
with a wheel hanging
down.
Ensure your Roomba’s
wheels are firmly on
the floor. Start in a
new location.
Error 2. Open Roomba’s
brush cage and clean
brushes.
Your Roomba’s main
brushes can’t turn.
Remove and clean your
Roomba’s brushes.
Error 5. Spin Roomba’s
side wheels to clean.
Your Roomba’s side
wheel is stuck.
1 blink
every
2 seconds
Clean your Roomba’s
side wheels. Push them
in and out and check
that they both turn freely.
Start in a new location.
Error 6. Move Roomba
to a new location then
press CLEAN to restart.
Your Roomba’s cliff
sensors are dirty or
your Roomba is
hanging over a drop.
Wipe your Roomba’s
cliff sensors with a dry
cloth. Start in a new
location.
Error 7. Spin Roomba’s
side wheels to clean.
Your Roomba’s side
wheel is stuck.
Clean your Roomba’s
side wheels of hair and
debris. Push them in
and out and check that
they both turn freely.
Start in a new location.
Error 9. Tap Roomba’s
bumper to clean.
Your Roomba’s bumper Briskly tap your Roomba’s
is compressed or the
bumper several times to
bumper sensor is dirty. dislodge any debris that
may be trapped
underneath.
Error 10. Spin Roomba’s
side wheels to clean.
Your Roomba’s side
wheel is stuck or its
bumper isn’t detecting
obstacles.
Please charge
Roomba.
Your Roomba’s battery
is flat.
Problem solving |
If your Roomba is circling
in one place, clean side
wheels. Push them in and
out and check that they
both turn. If it’s not circling
in one place, Roomba may
be in a very large room.
Use a Virtual Wall to create
a smaller cleaning area.
Plug your Roomba into the
charger or place it on the
Home Base to charge.
When running or charging
11
Likely cause
Your Roomba’s
battery isn’t
connected
What to do
Check that you
removed pull-tab
from the battery.
Remove the bottom cover of your
Roomba to remove
& reinstall battery.
2 blinks
Err 2
Charging error 2 Your Roomba
has a charging
error
Let your Roomba
cool down for at
least an hour & try
charging again.
3 blinks
Err 3
Charging error 3 Your Roomba
has a charging
error
Reset Roomba’s
software and try
charging again.
5 blinks
Err 5
Charging error 5 Your Roomba
has a charging
error
Reset Roomba’s
software and try
charging again.
6 blinks
Err 6
Charging error 6 Your Roomba
has a charging
error
Let your Roomba
cool down for at
least an hour & try
charging again.
7 blinks
Err 7
Charging error 7 Your Roomba’s
battery isn’t
cooling
Let your Roomba
cool down for at
least an hour & try
charging again.
Language selection mode
Your Roomba can provide troubleshooting messages in English, French, German, Spanish, Italian, Dutch, Danish, Swedish, Norwegian, Finnish, Polish, Russian,
Portuguese, Japanese, Korean and Chinese. So if you’ve always wondered what
“Tap Roomba’s bumper to clean” is in Finnish, now’s your chance to find out.
Setting the language
The default language is English. To change this:
1. Turn off your Roomba.
2. Press and hold CLEAN until it beeps and says the current language.
3. Release CLEAN.
4. Now press CLEAN repeatedly until you hear the language you want.
5. Press and hold CLEAN to turn off your Roomba and confirm language choice.
12
How to reset the software
Simultaneously hold down the two buttons above and below CLEAN for ten seconds.
This will clear all scheduled cleaning times, reset the clock and may resolve some software issues.
Frequently asked questions
Why does my Roomba’s side brush occasionally spin backwards?
When caught on items such as carpet tassels or wires, the side brush may spin slowly or even
backwards to free itself. This may also occur on deep-pile carpets. If it does this at other times,
you should clean the brush.
Why does my Roomba occasionally make a thumping sound?
When Roomba’s brushes encounter items such as carpet tassels or wires, the brushes will
briefly reverse direction to get free. This makes a thumping sound. If you hear a thumping
sound at any other time, you should clean the main brushes.
Why doesn’t my Roomba slow down as it approaches certain obstacles?
Your Roomba usually identifies obstacles quickly, allowing it to slow down and gently touch the
obstacle with its bumper before changing direction. However, it may be less effective at sensing
extremely dark surfaces, or objects under two inches wide. So stray bottle corks, toy bricks
and pet mice are best kept well way.
Important safety instructions
CAUTION: NO USER-SERVICABLE PARTS INSIDE. REFER SERVICING TO QUALITFIED SERVICE
PERSONNEL. CHARGE USING STANDARD EUROPEAN (220V-240V) OUTLET ONLY. Always be careful when using your Roomba. To reduce risk if injury or damage, keep these safety precautions in mind
when setting up, using and maintaining your equipment.
• Do not use this device without the particle bin in place.
• If the room to be cleaned contains a balcony, a physical barrier should be used to prevent access
to the balcony and ensure safe operation.
• Always remove the battery before long-term storage or transportation.
Roomba battery pack and charging
• Operate your Roomba from the type of power source indicated on the marking label. If you are
not sure of the type of power supplied to your home, consult your local appliance dealer or power
company.
• Charge using standard EUROPEAN (220V-240V AC) outlet only. Product may not be used with any
other type of power converter. Any such use will immediately void warranty.
• Use only the charger AC adapter supplied by the manufacturer to recharge this device.
• Do not use a charger AC adapter with a damaged cord or plug.
• Charge indoors only.
• Never handle charger AC adapter with wet hands.
• Remove the battery from the appliance before it is disposed of or recycled. Do not dispose of the
battery pack along with household waste. Please contact your local waste disposal agency for the
address of the nearest battery deposit site.
What if I need further help or accessories?
Visit www.irobot.com/international to:
• Order accessories for your robot
• Learn hints and tips to improve the performance of your robot
• Get answers to questions
• Download a detailed product manual
• Contact your local iRobot distributor
General
• Read all safety and operating instructions before operating Roomba.
• Retain the safety and operating instructions for future reference.
• Heed all warnings on Roomba, Battery, AC Adapter and in Owner’s Manual.
• Follow all operating and use instructions.
• Do not attempt to service Roomba yourself. Refer all non-routine servicing to qualified
service personnel.
Roomba use
• Roomba is for indoor use only.
• Do not use Roomba on wet surfaces or where contact with or immersion in water is a possibility.
• Before using this appliance, pick up objects like clothing, loose papers, pull cords for blinds
or curtains, power cords and any fragile objects. If the device passes over a power cord
and drags it around, there is a chance an object could tumble off a table or shelf.
• Roomba is not a toy. Do not sit or stand on this device. Small children and pets should be
supervised if Roomba is in use.
• Keep loose clothing, hair, fingers, feet and all body parts away from brushes & moving parts.
• Do not use this device to pick up anything that is burning or smoking, such as cigarettes, matches,
or hot ashes.
• Do not use this device to pick up fluids.
Problem solving |
Further help
13
14
Declaration of conformity
Roomba and Roomba SE Robotic Vacuum Cleaner and Accessories
Manufacturer: iRobot Corporation, 8 Crosby Drive, Bedford, MA 01730, USA
Declares that Roomba and Roomba SE Robotic Vacuum Cleaner, along with Model 11296 and 11267 Battery Chargers and the Home
Base, conform to the requirements of:
Low Voltage Directive 73/23/EEC as amended by 93/68/EEC and EMC Directive 89/336/EEC as amended by 92/31/EEC.
It is further declared that the Roomba and Roomba SE Robotic Vacuum Cleaner and Accessories conform to the following harmonised
European standards:
Year of CE Marking: 2004
EN 60335-1:2002 + A11:2004
Household and Similar Electrical Appliances - Safety Part 1 - General Requirements
EN 60335-2-2:2003
Household and Similar Electrical Appliances - Safety Part 2 - Particular Requirements for Vacuum Cleaners and Water-Suction Cleaning
Appliances
EN 60335-2-29:2002
Household and Similar Electrical Appliances - Part 2-29 - Particular Requirements for
Battery Chargers
EN 55014-1:2000 + A1:2001 + A2:2002
Electromagnetic compatibility - Requirements for household appliances, electric tools and similar apparatus -- Part 1: Emission
EN 55014-1:1997 + A2:2002
Electromagnetic compatibility - Requirements for household appliances, electric tools
and similar apparatus -- Part 2: Immunity - Product family standard
Low Voltage tests and EMC tests have been conducted by:
TUV Rheinland of North America
© 2010 iRobot Corporation, 8 Crosby Drive, Bedford, MA 01730. All rights reserved.
iRobot, Roomba and Virtual Wall are registered trademarks of iRobot Corporation. Dirt Detect, Home Base and Lighthouse are
trademarks of iRobot Corporation. [00154.1110.v3]
U.S. Pat. Nos. D556,961 | 6,594,844 | 6,690,134 | 6,809,490 | 6,883,201 |6,956,348 | 7,155,308 | 7,173,391 | 7,196,487 | 7,288,912 |
7,288,912 | 7,332,890 | 7,388,343 | 7,389,156 | 7,429,843 | 7,430,455 | 7,441,298 | 7,448,113. Additional patents pending.
15
16