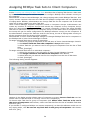
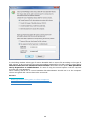
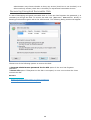
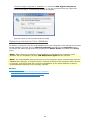
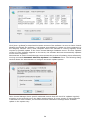
1
 Jetico Central Manager
Administrator Guide
Introduction
Deployment, updating and control of client software can be a time consuming and expensive task
for companies and organizations because of the number of workstations involved. Jetico Central
Manager – included as a feature in Enterprise Editions of Jetico software – is used to remotely
deploy the software across all workstations, automatically update the software, monitor usage
of encrypted containers and disk volumes, distribute security policies and centrally manage
recovery information necessary to access encrypted data in case of emergency.
Jetico client software provides a wide range of data protection solutions on remote workstations
– store selected files and folders in encrypted containers, encrypt whole disk partitions and
dynamic disk volumes, wipe selected files and folders manually or automatically.
Proper use of any security software requires maintaining a specified common policy for an entire
company. An IT Admin is able to use Jetico Central Manager to create special security tasks in a
central database and automatically distribute them to remote computers. To further ensure safe
usage of the client software, Jetico Central Manager gathers rescue information from remote
computers. An Administrator could then use the rescue information in case of emergency, such
as when users forget their passwords.
Beyond simply distributing tasks to remote computers and gathering information, Jetico Central
Manager also allows an IT Admin to monitor user activity when they are running the client
software. Log messages sent to the Jetico Central Manager Database report configuration
changes as well as other security related events. The Administrator can also create reports in
HTML format about the current state of the software on client computers.
Jetico Central Manager is a flexible and convenient tool for controlling client software on
remote computers. Centrally managing a network of workstations immediately results in
greater reliability and security – far superior to allowing a large organization of computers to
independently run data protection software on their own.
2
Main Functions
Jetico Central Manager provides an IT Admin with a wide range of functions to control client
software on remote computers. Such functions include deploying and updating client software,
remotely distributing security configuration data and gathering rescue and log information from
client computers.
Jetico Central Manager can manage the following software on client computers:
• BCWipe: permanently delete selected data files on active workstations, including wipe free
space
• BestCrypt Container Encryption: store selected files or folders in encrypted containers with
access to data through virtual drives
• BestCrypt Volume Encryption: encrypt all data stored on whole Windows partitions or
volumes
Jetico Central Manager allows an administrator to do the following:
• Deploy Jetico software remotely from Jetico Central Manager Console
• Update Jetico software automatically
• Distribute security policies that includes:
• Configure BCWipe on client computers to run wiping tasks according to a set schedule
• Initiate encryption of client computers from Central Manager Console.
• Gather information about encrypted containers created on remote computers; Administrator
can use the information for recovering data inside the containers in case of emergency
• Store rescue information about encrypted partitions/volumes from client computers;
Administrator can use the information for recovery decryption of partitions on client computers
Jetico Central Manager provides administrator with the means to monitor the correct use of
Jetico software on client computers:
• All client software can send log information to a central database about events on client
computers, such as when BCWipe successfully receives updated configuration from the server
• Administrator can monitor the status of client software, such as which disk partitions are
encrypted and which are not
• Administrator can create reports in HTML format with information about current security status
of client computers
Jetico Central Manager enables an administrator to automate his/her own work:
• Administrator can set a schedule for automatic update of client software;
• Administrator can set a schedule for automatic backups of the Jetico Central Manager Database
Jetico Central Manager handles security issues when sensitive information from client computers
is gathered in a central database:
• All network traffic between client computers and a server is encrypted with a unique session
key and public/private key technology
• Sensitive information in the Jetico Central Manager Database is encrypted
• Jetico Central Manager implements two-level database administration: Supervisor can run all
control functions and can delegate rights to Administrator; Supervisor can change Administrator
credentials or remove Administrator account at any time
Jetico Central Manager provides Administrator (or Supervisor) with a unified interface to run all
control functions. The user interface is designed to be intuitively clear to make all administrative
work as effective as possible.
See also:
Deployment of Client Software Remotely
3
Jetico Central Manager Prerequisites
Jetico Central Manager requires the following minimum computer configuration:
• Operating system:
•
•
•
•
•
•
Windows
Windows
Windows
Windows
Windows
Windows
10;
8/8.1 (32-bit and 64-bit versions);
7 (32-bit and 64-bit versions);
Vista (32-bit and 64-bit versions);
XP (32-bit and 64-bit versions);
2000;
• Windows Server 2012;
• Windows Server 2008 (32-bit and 64-bit versions);
• Windows Server 2003 (32-bit and 64-bit versions);
• 20 MB disk space for installation process
4
New features in Jetico Central Manager v.2
1. Version 2 of Jetico Central Manager can control BestCrypt Container Encryption,
BCWipe and BestCrypt Volume Encryption software on client computers. Jetico
Central Manager software architecture is designed so that support of other utilities can
easily be added in future.
2. Jetico Central Manager v.1 (initially known as BestCrypt Corporate Edition) requred
installation in Windows network with Domain Controller. The new version 2 of Jetico
Central Manager also uses all the advantages provided by Domain Controller network, but
now it is not an absolute requirement. The new version can work in a network without
Domain Controller. Furthermore, the Administrator of Jetico Central Manager can manage
a mixed network environment, including all workstations in Windows Domain as well as
guest computers not permanently included in the Domain.
3. Jetico Central Manager uses a platform-independent encrypted TCP/IP protocol for
client/server communication. Together with independence of Windows Domain Controller
protocols, this allows the software to manage Jetico client software running on computers
with non-Windows operating systems. The upcoming releases of BestCrypt for Linux and
MacOS will include client modules similar to the ones developed for Windows versions of
the software and can be managed by Jetico Central Manager software.
4. Jetico Central Manager v. 2 allows an Administrator to use Push and Manual
deployment methods. Administrator can also use a third-party program (e.g., Microsoft
SCCM, LANDesk) to deploy Jetico client software on remote computers (so called Outside
method).
5. Jetico Central Manager provides detailed logging of events happening on remote
computers as well as logging of all actions run by an Administrator in the Jetico Central
Manager Console. The user can configure the log output.
6. Administrator of Jetico Central Manager can create reports in HTML format about the
current state of Jetico software on client computers.
7. Administrator can group Computers in Jetico Central Manager Database and then
control a group of computers as if they were a single computer. For example, an
Administrator can set a common BCWipe wiping task for such a group; then if the
Administrator changes the task, it would automatically be changed for all computers in
that group.
8. Jetico Central Manager implements two-level database administration: by Supervisor
and by Administrator. Supervisor can run all control functions and can delegate rights to
Administrator; Supervisor can change Administrator credentials or remove Administrator
account at any time.
See also:
Deployment Client Software Remotely
Push deployment method
Outside/Manual deployment methods
Jetico Central Manager reports
Computers in Jetico Central Manager Database
Supervisor and Administrator of Jetico Central Manager Database
5
Jetico Central Manager Installation
Jetico Central Manager Installation
Microsoft Remote System Administration Tools (RSAT)
installation
6
Jetico Central Manager Installation
Jetico Central Manager software consists of two main modules:
• Jetico Central Manager Console - program with graphic user interface enabling an
Administrator to control all the software functionality
• Jetico Central Manager Database - service supporting the database and responding
to requests received from client computers
Jetico Central Manager Console and Jetico Central Manager Database can be installed on
different computers with Windows operating system or on the same computer.
The computer for installing Jetico Central Manager Console is typically the administration console
computer where an administrator runs programs to control the enterprise network and client
computers.
The computer for Jetico Central Manager Database should be a server computer that is always
available in the enterprise network because client computers may send requests to the Database
at any time.
The installation program installs Jetico Central Manager Console. Run the installation program
on a computer that is suitable for running the Jetico Central Manager Console program.
The Jetico Central Manager Setup program uses the standard Windows method for installing
software and provides all necessary explanations of the installation details. The only default
information the user may want to change during installation is the Program Folder name for the
Jetico Central Manager software and the Destination Directory name where to place program
files.
All dialog windows of the Setup program have the following buttons:
[Cancel] - click this button to abort installation
[Next] - click this button to proceed with the installation
[Back] - click this button to return to the previous step
NOTE: The Jetico Central Manager Setup program also writes data to the Windows Registry
database, places dynamic load libraries in the system WINDOWS\SYSTEM directory, and
prepares a file for the uninstall procedure. Please do not perform any manual manipulations to
install or uninstall the Jetico Central Manager software in order to prevent the appearance of
unused garbage software in the system directory or unused strings in the Registry database.
When you run Jetico Central Manager Console for the first time, the Jetico Central Manager
Wizard will guide you through the installation process for the Jetico Central Manager Database
module.
See also:
Jetico Central Manager Wizard
7
Microsoft Remote System Administration Tools
(RSAT) installation
When Jetico Central Manager (JCM) runs in Windows Domain network, the software can utilize
Microsoft Active Domain functionality available in the Domain like listing Domain computers or
running automated deployment of client software on the Domain computers.
To be able to do that JCM needs to have Microsoft Remote System Administration Tools (RSAT)
package installed on the computer where JCM Console runs.
General information about Microsoft RSAT is available on:
Remote Server Administration Tools (RSAT) for Windows Client and Windows Server
Informal example of installation of RSAT in Windows 7:
Install Group Policy and AD Tools on Windows 7
Download link for RSAT for Windows 8:
Remote Server Administration Tools for Windows 8.1
Remote Server Administration Tools for Windows 8
Download link for RSAT for Windows 7:
Remote Server Administration Tools for Windows 7 with Service Pack 1 (SP1)
Description and download link for RSAT for Windows Vista:
Description of Windows Server 2008 Remote Server Administration Tools for Windows Vista Service Pack 1
Download the Microsoft Remote Server Administration Tools for Windows Vista Service Pack 1 32-bit Edition
Download the Microsoft Remote Server Administration Tools for Windows Vista Service Pack 1 64-bit Edition
NOTE: Jetico Central Manager (JCM) detects Windows Domain network and if Microsoft RSAT
is not installed on the computer, JCM Console program dispays notification message suggesting
JCM Administrator should install RSAT package.
8
Jetico Central Manager Wizard
Jetico Central Manager Wizard provides an easy way to perform initial configuration of Jetico
Central Manager Database. The Wizard explains every step of the configuration in a separate
dialog window.
There are five steps to configure the software:
1. Select folder on local or remote computer for installation of Jetico Central Manager
Database. Please keep in mind the following considerations when you select folder for the
Database installation:
a. Jetico Central Manager Database is supported by special service. So the
program will install the service on the computer where the Database is located.
Confirm that installation of the service is allowed on the computer.
b. Computer with the Database should be powered on while remote client
workstations may need to contact it.
2. Enter credentials of administrator account valid on the computer where the Jetico Central
Manager Database is going to be installed.
If you have Windows network with Domain Controller, enter credentials of domain
administrator. Otherwise enter username and password of administrator of the computer
where Jetico Central Manager Database is going to be installed.
3. Enter TCP/IP port number for network communication between clients and Jetico Central
Manager server computers. Please be sure that TCP/IP port number you enter is not blocked
by firewall software installed on computers in the enterprise network.
4. Initialize password of Supervisor of Jetico Central Manager Database.
Note that there are two kinds of persons in Jetico Central Manager who can control the
software: Supervisor and Administrator.
Supervisor has all rights to administrate the Database and can delegate the rights to another
person - Administrator.
Administrator also has full rights to manage the Database, but Supervisor can change or
remove the Administrator Account at any time.
5. Select and download Jetico client software (i.e., BCWipe, BestCrypt Container Encryption,
BestCrypt Volume Encryption).
Jetico Central Manager can support any combination of the client software. For example,
some organizations may decide only use BCWipe, while others might use BestCrypt Container
Encryption with BestCrypt Volume Encryption or perhaps BestCrypt Volume Encryption and
BCWipe. It is also possible to initially start using Jetico Central Manager with just one
client software (such as BCWipe) and then extend licensing to include BestCrypt Container
Encryption.
Choosing the set of client software supported by Jetico Central Manager is done in the
configuration Wizard. Yet it is also possible to do the same at any later time by running
a List of Supported Client Software command from Software menu in Jetico Central
Manager Console.
NOTE: Before installation of the Jetico Central Manager Database please check the
network settings as written in the Pre-deployment Steps article. The instructions are
suitable for Database installation as well as for Jetico client software deployment.
See also:
Deployment of Client Software Remotely
Supervisor and Administrator of Jetico Central Manager Database
Pre-Deployment Steps
Deployment Error Codes
9
Using Jetico Central Manager
Using Jetico Central Manager
Deployment of Client Software
Central Management of Client Software
Jetico Central Manager Database
10
Using Jetico Central Manager
This section describes the main steps for using Jetico Central Manager software and provides
references to corresponding articles explaining them in greater detail.
The primary purpose of Jetico Central Manager is to provide an administrator of an enterprise
network with means to install Jetico client software on remote computers automatically and then
control the software from a central management console application (Jetico Central Manager
Console).
Articles in section Deployment Client Software Remotely explain how the administrator can
deploy Jetico client software on remote computers, which methods of deployment are preferred
in a network with Domain Controller, how client computers have to be pre-configured and other
issues related to the deployment process.
Articles in section Central Management of Client Software explain how the administrator can
manage BCWipe, BestCrypt Container Encryption and BestCrypt Volume Encryption software
deployed on remote computers and what information the administrator receives from the
computers.
Articles in section Jetico Central Manager Database explain how the administrator can backup
and restore the Database, automate updating client and server software, what is meant by
Administrator and Supervisor accounts and other management procedures.
See also:
Deployment of Client Software Remotely
Central Management of Client Software
Jetico Central Manager Database
11
Deployment of Client Software
Deployment of Client Software Remotely
Deployment Steps and States
Pre-Deployment Steps
Push deployment method
Outside/Manual deployment methods
Deployment Error Codes
12
Deployment of Client Software Remotely
Jetico Central Manager software allows Administrator of an enterprise network to deploy client
software on remote computers without visiting every computer and running setup program on
the computer.
The Administrator runs the deployment of the client software from the Jetico Central Manager
(JCM) Console. All the settings and procedures necessary to run the deployment are available
in Deployment tab in the right pane of the program.
JCM supports several software packages on client computers: BCWipe, BestCrypt Container
Encryption and BestCrypt Volume Encryption. The Administrator may wish to install only
one of these packages, then decide to install another one. It is also possible that number of
software supported by JCM will increase. To make the process of adding or removing client
software easier, JCM has a single deployment Agent distributed to client computers. Once
the Agent is installed on the client computer, it monitors settings the Administrator makes
for client software installation. Depending on the JCM settings the client deploys or removes
software on the client computer automatically.
To make all the processes of deployment client software and then to get them updated
automatically, the Administrator should only distribute/install JCM Agent to all the client
computers. There are three ways to do that:
• Manual deployment. The Administrator runs JCM Agent installation program on the client
computer manually.
• Outside deployment. The Administrator uses third-party deployment mechanisms
to distribute and run JCM Agent installation program on the client computers. For
example, System Center Configuration Manager - SCCM.
• Push deployment. The deployment method is avalable for computers that are members
of Windows Domain. With this method Administrator marks computers where the
Agent should be installed in JCM Console Deployment tab and JCM sends necessary
instructions to Windows Domain Controller Server to complete the task.
See also:
Pre-Deployment Steps
Deployment Steps and States
Push deployment method
Outside/Manual deployment methods
Deployment Error Codes
13
Pre-Deployment Steps
If computer where Jetico Central Manager Database is installed has Windows Firewall
active, configure the Firewall to allow TCP/IP port used by Jetico Central Manager (JCM) for
client/server communication. (Default port number is 5001. Administrator sets the port when
runs Jetico Central Manager Wizard to initialize Jetico Central Manager Database. You may also
get information about the port number by running command Select Server Computer from
Database menu.)
Configuration settings for Push deployment method
Push deployment method is available in JCM for computers that are members of Windows
Domain network. With this method the JCM Console Administrator marks client computers
that should get Jetico client software installed in JCM Console Deployment tab. Then JCM
sends all necessary instructions to Domain Controller to install Jetico software on remote client
computers.
To utilize the Push deployment method computer where JCM Console runs must have Microsoft
Remote System Administration Tools (RSAT) package installed. Read more about RSAT in
Microsoft Remote System Administration Tools (RSAT) installation article.
See also:
Jetico Central Manager Wizard
Microsoft Remote System Administration Tools (RSAT) installation
14
Deployment Steps and States
This article explains steps of deployment and uninstallation of Jetico client software on remote
computers and how an administrator controls the processes with Jetico Central Manager
Console.
The following picture illustrates states of the deployment and uninstallation processes.
Deployment process starts from State 1: Software is not deployed.
To run the deployment process Administrator should do the following:
1. Select a computer in the left pane of the Jetico Central Manager Console.
2. Select Deployment tab in the right pane of Jetico Central Manager Console.
3. For a certain computer, decide what client software should be deployed (for
example, BCWipe only, or all available client software).
4. Click corresponding check boxes in the table in the Deployment tab that lists
computers and software that should be deployed.
5. Choose a deployment method in Deployment method column.
6. Click [Apply].
Check boxes for software that has to be deployed appear in a checked state with a red colored
plus mark. The red mark means that Administrator has assigned the software for deployment
but has not yet applied the settings. Jetico Central Manager has not saved the settings to
database yet, so if Administrator quits the program or clicks [Cancel] , Jetico Central Manager
will forget the settings. Such a state of deployment process is State 2: Software is assigned
for deployment.
If Administrator clicks [Apply] in the Deployment tab, Jetico Central Manager saves all the
settings made on Step 2 to database.
If Push deployment method is assigned, the deployment proceeds in the following way:
• JCM sends the request to Domain Controller to configure Group Policy settings for the
client computer to start the software installation after reboot.
• When client machine is turned on or rebooted, and if the Group Policy is successfully
updated, the Installation Agent and the client software will be installed at the next
reboot.
If Outside/Manual deployment method is assigned, the deployment will be started after
running the [email protected] program on the client machine. Until then, the deployment process
will remain in State 3: Software is queued for deployment.
As soon as Jetico Central Manager deploys client software on remote computer, the database
sets State 4: Software is deployed for the computer.
The following picture illustrates Deployment tab in Jetico Central Manager Console where
different computers are in different states of the deployment process.
15
To uninstall the client software Administrator should do the following:
1. Click checkbox for corresponding software and computer in the Deployment tab.
2. If the software is in State 4 (software is deployed) or State 3 (software is queued
for deployment), Jetico Central Manager will set State 5: Software is assigned for
uninstallation for the computer. Red colored minus mark corresponds to the state,
because administrator has just clicked the checkbox, but not applied the new setting yet.
If Administrator quits the program or clicks [Cancel], the state will return back to a
previous state of the software.
3. If Administrator clicks [Apply] in the Deployment tab, Jetico Central Manager saves
all the settings made on Step 5 to database. Since that moment state of the uninstallation
process becomes State 6: Software is queued for uninstallation.
At State 6, Jetico Central Manager will run process of unistallation of the software from remote
computer when it will be possible. Uninstallation process can be run when the user logs on to
remote computer. When the client software gets uninstalled from the remote computer, Jetico
Central Manager sets initial State 1: Software is not deployed for the computer.
NOTE: There is another way to uninstall the client software: delete the computer from
JCM database. In that case, if the deleted client computer is turned on or rebooted, the
client software will be uninstalled and also Installation Agent will be removed.
Note that on every step of deployment or uninstallation software from remote computers
some problem may arise. The table with list of computers in the Deployment tab has the
Error code column with number of error occurred (or with No error status if everything is
going on correctly). Read article Deployment Error Codes to get detailed explanations and
possible solution for the problem.
Administrator can configure a whole group of computers for deployment of the client
software. In this case Administrator should just click checkbox with name of the group. Since
16
that time the state Administrator sets for the group will be automatically applied for all the
computers from the group.
See also:
Pre-Deployment Steps
Push deployment method
Outside/Manual deployment methods
Deployment Error Codes
17
Push Deployment Method
Push deployment method is available in JCM for computers that are members of Windows
Domain network.
To utilize the Push deployment method computer where JCM Console runs must have Microsoft
Remote System Administration Tools (RSAT) package installed. Read more about RSAT in
Microsoft Remote System Administration Tools (RSAT) installation article.
NOTE: only Domain Administrators are allowed to run the Push deployment on remote
computers. So when you run JCM Console, you should be logged on as a user from Domain
Administrators Group. Besides, computer where JCM Console runs should belong to the
Domain.
To run Push deployment Administrator should do the following:
1. Select Deployment tab in the right pane of Jetico Central Manager Console.
2. Select a group or computer in the list and set checkbox for the group or computer in
the Group or Computer column.
3. Set checkboxes in columns that correspond to the client software you want to get
deployed on the computer (for example, set checkbox in the BCWipe or BestCrypt
Container Encryption column).
4. Double-click combo-box from Deploy method column for the computer and select
Push string from the combo-box.
5. Click [Apply] to start the deployment process or click [Cancel] to restore previous
deployment settings for the computer.
The deployment proceeds in the following way:
• JCM sends the request to Domain Controller to configure Group Policy settings for the
client computer to start the software installation after reboot.
• When client machine is turned on or rebooted, wait until the Group Policy is successfully
updated on the client.
• The Installation Agent and the client software will be installed after next reboot of
the client, because the installation command is included in Windows Startup script.
• JCM Console updates the deployment status to Deployed and corresponding message
appears in the log file in the bottom part of Deployment tab.
See also:
Pre-Deployment Steps
Deployment Steps and States
Deployment Error Codes
18
Outside/Manual Deployment Methods
Jetico Central Manager (JCM) simplifies the process of deployment of the client software on
remote computers in the following way. There is a number of Jetico software that can be installed
on client computers (BestCrypt Container Encryption, BCWipe, BestCrypt Volume Encryption).
The JCM Administrator may wish to install or uninstall, or update any of them. To be able to do
that from JCM Console program without visiting the computers, the Administrator should install
so called JCM Deployment Agent on every client computer.
To install JCM Deployment Agent the Administrator should run its installation program
(JCIxxx.EXE) on client computers. Article Push deployment method describes how it can be done
if the client computers belongs to Windows Domain Network. This article describes alternative
methods to install the JCM Agent.
Manual deployment method
The JCM Administrator can install JCM Deployment Agent on client computer manually. It can
be done in the following way:
1. Click [Client software] in the Deployment tab. The following dialog window
will appear:
2. Choose Manual deployment method and mark checkboxes corresponding to the
software you plan to deploy on client computers (BCWipe and/or BestCrypt Container
Encryption and/or BestCrypt Volume Encryption).
3. Click [Make Copy] to copy the JCIxxx.EXE Agent installation program to the folder
where from you are going to run the program.
4. Click [Exit] to close the dialog window.
5. On every client computer, run the JCIxxx.EXE program.
19
When you run the Agent installation program, you will get message boxes on the client
computer informing you about results of deployment client software on the computer. Besides,
you will get the same information in the Log window in the Deployment tab in the JCM Console.
Outside deployment method
The JCM Administrator can use a third-party deployment software to automate installation of
JCM Deployment Agent on client computers. For such a software you should prepare JCIxxx.EXE
JCM Agent installation program almost in the same way as you prepare it for Manual installation
method described above.
The only difference is in choosing Outside method on step 2 of creating the JCIxxx.EXE file.
JCIxxx.EXE program created with Outside option will behave slightly differently on the client
computer: the program will not display any messages on the client computer that would inform
about any progress in running the program. Instead, all the messages will be sent to JCM
Database and displayed in the Deployment tab in the JCM Console.
NOTE: The JCM Administrator may add computers to JCM Database prior to running
JCIxxx.EXE program on client computers. Then the Administrator should choose Outside/
Manual deployment method for the computers. It is a recommended way to organize
the deployment, because in this case the Administrator can easily monitor status of the
installed software on the remote computers.
NOTE: It is also possible to run JCI.EXE program from \\JCM_SERVER_NAME\BCInstal
shared folder with command-line parameters: -R[server_name], -P[port_number] and S[name of the client software that should be installed].
JCM_SERVER_NAME - name of the computer where JCM Database is installed
<W> flag - BCWipe client software
<B> flag - BestCrypt Container Encryption client software
<V> flag - BestCrypt Volume Encryption client software
EXAMPLES:
>JCI.EXE -RJCM_SERVER_NAME
>JCI.EXE -RJCM_SERVER_NAME
>JCI.EXE -RJCM_SERVER_NAME
>JCI.EXE -RJCM_SERVER_NAME
-P5001
-P5001
-P5001
-P5001
-SW (install BCWipe)
-SB (install BestCrypt Container Encryption)
-SV (install BestCrypt Volume Encryption)
-SWBV (install all software)
See also:
Pre-Deployment Steps
Deployment Steps and States
Deployment Error Codes
20
Deployment Error Codes
When Jetico Central Manager encounters a problem during client software deployment, the error
number is reported in Error code column in Deployment tab in Jetico Central Manager (JCM)
Console. Column Action describes operation that caused the error and may also contain short
description of the problem.
There are three groups of errors that may be reported during client software deployment:
• Errors reported in JCM Console when Administrator chooses Push deployment method
for client computers.
• Errors happened when configuration of Push installation completed successfully in JCM
Console, but installation of JCM client software does not start even when the client
computer restarts.
• Errors reported on client computers when Administrator chooses Manual or Outside
deployment method and runs installation program on the computers.
The following sections describe the errors in more detail.
I. Errors reported in JCM Console for Push deployment method
Error 1
JCM Console program could not locate Windows Domain Controller computer in a local network.
Please check that Domain Contoller computer is running and accessible from the JCM Console
computer.
Error 2
Computer with JCM Console running appears as not belonging to Windows Domain.
Error 3
User logged on the computer is Local User, but should be Domain User.
Error 4
User logged on the computer with JCM Console has no rights of Domain Administrator.
Error 5
Computer where JCM Console runs must have Remote System Administration Tools (RSAT)
package installed. Read more about RSAT in Microsoft Remote System Administration Tools
(RSAT) installation article.
Error 6
JCM Console could not define Netbios name of Domain Controller computer. Please check that
Domain Controller Server can be accessed with its Netbios name from the computer where
JCM Console is running.
Error 7
Request from JCM Console to create new group of computers called JCM Group [server_name]
failed. JCM Console should create the group automatically inside a standard Computers
group in Domain. If it does not happen, try to find some entry in Windows Event log that
may relate the error. You may also send the text and error codes to Jetico Technical Support
([email protected]) for further assistance in solving the problem.
Error 8
JCM Console could not define define Fully Qualified Name for the client computer where Push
deployment should occur.
Error 9
JCM Console could not add the client computer to JCM Group of computers. Please check that
the group exists inside a standard Computers group on Domain Controller.
Error 10
JCM Console could not create Group Policy Object for JCM Group of computers.
NOTE: Windows Event Viewer may report errors related to the JCM Console attempt to
create JCM Group of computers or define Fully Qualified Name for the computer. If it does
not help, please note that JCM Console log window contains short description of the errors,
for example:
"Could not define Fully Qualified Name for the computer (error code 7, 200)".
You may send the text and error codes to Jetico Technical Support
([email protected]) for further assistance in solving the problem.
21
II. Configuration of Push installation completed successfully in JCM
Console, but installation of JCM client software does not start.
1. If files C:\Windows\jci.log or C:\Windows\smip.log exist, information inside them may help
to define source of the problem.
2. Check errors reported in Windows Event Viewer. Pay special attention to Events with
GroupPolicy source. For example, error may look like:
The processing of Group Policy failed. Windows attempted to read the file \\jetico\SysVol\jetico
\Policies\{EA385BE5-1A41-4A10-9808-DFC37053E2DA}\gpt.ini from a domain controller and
was not successful. Group Policy settings may not be applied until this event is resolved.
After solving the problem reported in the Event Viewer please restart the client computer and
check that JCM client software installation starts.
NOTE: After updating Group Policy on the Domain Controller, it is not updated on the client
machines at once. By default, the timeout is 90 minutes. For testing purposes, if administrator
wants to be sure that it works properly, it is possible to force the Group Policy updating for
one particular test client. To do so, run Command Prompt on the client 'as administrator' and
run the command gpupdate /force. See Windows Event Viewer. When the Group Policy has
been updated, reboot the client and installation should start (even before logon).
3. You may send files C:\Windows\jci.log or C:\Windows\smip.log to Jetico Technical Support
([email protected]) for further assistance in solving the problem.
III. Errors reported on a client computer when Manual or Outside
deployment method runs
When Administrator chooses Manual or Outside deployment method, JCM Console creates
installation program like jci@serw7@05001@[email protected]. Administrator should run the
program on client computers manually or use a third-party utility to distribute and run the
program on the computers.
The [email protected] program generates log files C:\Windows\jci.log and C:\Windows\smip.log
on the client machine. You may inspect contents of the files, perhaps text description of
encountered errors will help to solve the problem. If you are not sure, please send the files to
Jetico Technical Support ([email protected]) for assistance in solving the problem.
NOTE: The same log files are also available from JCM Console. To see the files, Administrator
should run Client Log File command from right-click menu of the selected client computer.
See also:
Microsoft Remote System Administration Tools (RSAT) installation
Pre-Deployment Steps
Deployment Steps and States
Push deployment method
Jetico Central Manager Wizard
22
Central Management of Client Software
Central Management of Client Software
Central Management of BCWipe
Central Management of BestCrypt Container Encryption
Central Management of BestCrypt Volume Encryption
23
Central Management of Client Software
The primary purpose of Jetico Central Manager is to provide the administrator of an enterprise
network with a program to control client software on remote workstations. Jetico Central
Manager controls the following client software:
• BCWipe: permanently delete selected data files on active workstations, including wipe
free space.
BCWipe can run different kinds of wiping tasks (wipe free space of disk drives, wipe temporary
files or remnants of activity of programs like Internet Browsers, etc.). Every BCWipe Task can
be run automatically according to schedule.
With Jetico Central Manager, an administrator can create a BCWipe Task Set which consists
of different types of BCWipe tasks. Then an administrator can configure BCWipe software on
remote computers to run wiping tasks according to the Task Set.
Administrator can create as many BCWipe Task Sets as needed. Every Task Set can be assigned to
different computers or group of computers in the company network. Article Central Management
of BCWipe explains how it can be done in detail.
• BestCrypt Container Encryption: store selected files or folders in encrypted
containers with access to data through virtual drives.
BestCrypt runs encrypt/decrypt operations transparently for the user as soon as a proper
password for the container is entered.
Administrator of Jetico Central Manager can configure BestCrypt Container Encryption on
client computers to send information about encrypted container files to central database.
Communication between client computers and server as well as information inside the database
is encrypted. Only Supervisor or Administrator of the Jetico Central Manager Database can use
the information about encrypted container in order to access the data inside the container in
emergency cases, for example, if the user forgets password for the encrypted container.
Read more about remote control of BestCrypt Container Encryption software in the Central
Management of BestCrypt Container Encryption article.
• BestCrypt Volume Encryption: encrypt all data stored on whole Windows partitions
or volumes.
Jetico Central Manager is used to monitor usage of encrypted disk volumes, distribute encryption
policies and centrally manage recovery information necessary to access encrypted data in case
of emergency.
With Jetico Central Manager, an administrator can initiate encryption/decryption of the client
computers remotely from JCM Console. On client side, end-user only needs to enter/set password
to initiate encryption as configured by Administrator in JCM. Besides, JCM provides a way to
set a protection policy for removable disks. Read article Removable Disks Protection for more
information.
The Jetico Central Manager Database receives information about encrypted disk volumes from
client computers through secure communication channel. The information includes disk volume
configuration of the computers and rescue information. Administrator can use the rescue
information for recovery purposes, for example, if file system on encrypted disk volume becomes
damaged.
Read more about remote administrating of the software in Central Management of BestCrypt
Volume Encryption article.
Jetico Central Manager provides logging of the events happened on remote computers and
logging of every action performed by Administrator in the Jetico Central Manager Console.
Log information can be viewed at the right pane of the Jetico Central Manager Console at the
corresponding client software tab. For example, to monitor BCWipe Log it is necessary to open
BCWipe tab.
Choose Show for all items option from the combo-box to display the events for all computers.
To view the Log for specific computers select the needed computers in the left pane, then choose
Show for selected items option from the combo-box at the right side. To hide the Log field
press Do not show. It is possible to view the log events starting from the specific date - tick
the box Since date and choose the date.
The following columns can be displayed in the Log field: Date, Time, Computer, Action and
others. To hide/show columns right-click on the column name and mark the desired columns.
The maximum size of the Log File can be set in the Reports and Logs menu of Jetico Central
Manager Console - Log File Settings command.
The picture in the article Central Management of BestCrypt Container Encryption shows how
the Log looks like.
24
See also:
Central Management of BCWipe
Central Management of BestCrypt Container Encryption
Central Management of BestCrypt Volume Encryption
25
Central Management of BCWipe
BCWipe on client computers
Central Management of BCWipe
Creating and editing BCWipe Task Sets
Assigning BCWipe Task Sets to client computers
26
BCWipe on Client Computers
BCWipe software on client computers provides secure deletion of sensitive information on
various types of disk volumes (local partitions, dynamic disk volumes, network disks).
What does secure deletion really mean? Well, when a user deletes files the operating system
does not erase the contents of these files from the disk - only the references to these files are
removed from file system tables. Sensitive data that you intended to erase remains intact on
your hard drive and could easily be restored with a widely available undelete tool.
Wiping is a term used to describe the process of overwriting contents of a file or disk space.
When files are properly wiped data is erased beyond recovery.
There are several types of information that should be wiped to avoid data leak:
• Wipe free disk space. When you delete sensitive files using a standard Windows Delete
command, the operating system does not shred contents of the documents from hard
drive, it just marks disk space earlier occupied by the files as 'free'. Wiping free disk space
completely removes all the traces of the earlier deleted files.
• Delete with wiping. The user can delete and wipe file or folder as well as selected
group of files or folders.
• Wipe Internet History. BCWipe can wipe all the traces of users' activity in the Internet
- cache, cookies, browsing history, search history, saved passwords, last active tabs, etc.
Besides of Internet Explorer, BCWipe supports Mozilla Firefox, Opera and Google Chrome
browsers.
• Wipe local history (Wipe names of recently used files). BCWipe can wipe names of
files opened with Windows components and some popular applications. It can wipe names
stored on a subfolder as well as in Windows Registry.
• Transparent Wiping. When Transparent Wiping is activated on the computer, BCWipe
will automatically wipe all contents of any file or folder that is deleted. This task can be
active or suspended, but it cannot be scheduled for a predefined time.
BCWipe can run wiping tasks for every type of wipe operation. Every wiping task can be run once
or configured to run automatically according to some schedule. The picture below illustrates
BCWipe Task Manager window with schedule for every wiping task.
Jetico Central Manager allows an administrator to manage BCWipe software on client computers
from a central management console. The idea of management is in the following.
1. In the Jetico Central Manager Console the administrator creates BCWipe Task
Set.
27
2. The Task Set includes one or more wiping tasks (The picture above illustrates
typical BCWipe Task Set with several wiping tasks: Delete with wiping, Wipe free
space and others).
3. The administrator defines schedule for every wiping task in the Task Set.
4. In the Console the administrator assigns configured Task Set on selected computer
or group of computers in a company network. If in future the administrator changes
the Task Set, the client computer or group of computers will get BCWipe configuration
updated.
5. The administrator can create as many Task Sets as needed for the company
network. As a result different groups of computers may get different BCWipe Task
Sets for their local configurations.
6. The administrator can monitor results of running tasks on client computers using
following sources:
• Log information reported in the BCWipe Log field in BCWipe tab of Jetico
Central Manager Console
• Status and Last error strings reported on the top part of BCWipe tab
• Detailed Log file generated by BCWipe process - the name and location of
the file is specified in the Log File tab of the corresponding wiping task
See also:
Central Management of BCWipe
Creating and editing BCWipe Task Sets
Assisgning BCWipe Task Sets to client computers
28
Central Management of BCWipe
After BCWipe deployment on remote computers the administrator of Jetico Central Manager can
do the following to manage BCWipe on the computers:
• Create BCWipe Task Sets. Every Task Set is a unit of configuration information
designed to be sent to remote computer where BCWipe client software is deployed.
BCWipe offers the following wiping tasks: Wipe Free Space, Wipe Local History, Wipe
Internet History, Delete With Wiping, Transparent Wiping and Swap File Encryption. Read
more about wiping tasks in the BCWipe on client computers article.
• Assign selected BCWipe Task Set to a remote computer or group of computers in
a company network to configure BCWipe client software on the computers. Since the
administrator can create a number of BCWipe Task Sets, different group of computers
can be configured with different Task Sets.
• Modify existing BCWipe Task Set.
• View log information concerning central management of BCWipe. It includes information
about creating and modifying Task Sets, information from remote computers about
changing configuration of BCWipe client software, about problems with BCWipe remote
configuration and about results of wiping.
Administrator controls BCWipe in an enterprise network with the Jetico Central Manager Console.
To start managing BCWipe on remote computers, select computer or computers' group in the
left pane of Console and BCWipe tab in the right pane. The following picture illustrates Jetico
Central Manager Console when BCWipe tab is selected:
There are a number of controls (radio buttons, lists and buttons) in the BCWipe tab.
• Selected Computer/Group text box shows name of computer or computers' group
selected in the left pane of Jetico Central Manager Console. All the changes in BCWipe
configuration administrator makes in the right pane will happen for the selected computer
or group.
• Status area - contains deployment status of BCWipe on the selected computer/group,
last operation performed on the selected computer and the last error happened on the
computer.
• [Workplace] button – to get information about all users who run BCWipe program
on the selected computer.
29
• [Reset error] button - to reset the information reported in the Last error field.
• Administrator can assign BCWipe Task Set to an individual computer or to group of
computers.
To assign selected Task Set to group of computers:
1. Select the group of computers in the left pane of Jetico Central Manager Console.
2. Set Inherit Task Set from the computers' Group radio button.
3. Select Task Set you want to use for the group of computers from the list of Task
Sets.
4. Click [Assign].
To assign selected Task Set to an individual computer:
5. Select the computer in the left pane of Jetico Central Manager Console.
6. Set Assign individual Task Set to the Computer radio button.
7. Select Task Set you want to use for the computer from the list of Task Sets.
8. Click [Assign].
After assigning or changing Task Set for computer or group, name of the Task Set will appear
in the Active Task Set text box. Information about the changes will appear in the BCWipe
Log window.
• Click [Create] to create a new BCWipe Task Set. Article Creating and editing BCWipe
Task Sets describes in detail how to create new Task Set.
• Click [Edit] to change some properties of the selected Task Set. Article Creating and
editing BCWipe Task Sets describes in detail how to edit existing Task Set.
• Set Block BCWipe for local user checkbox to prevent the user on the local computer
from running BCWipe commands. Note that you can set the option for individual computer
if Assign individual Task Set to the Computer option is set. If the option not set, the
computer will inherit setting Block BCWipe for local user from the computer group that
is a parent for the computer.
• BCWipe log area can show information concerning the selected computer only or all
computers in database. Each string contains information about date, time, client computer
name, user name, action performed, result and error code. Administrator can configure
the log window so that it displays only selected columns.
See also:
Deployment of Client Software Remotely
BCWipe on client computers
Creating and editing BCWipe Task Sets
Assigning BCWipe Task Sets to client computers
30
Creating and Editing BCWipe Task Sets
To manage BCWipe software on remote computers in a company network administrator of Jetico
Central Manager should create one or more BCWipe Task Sets. BCWipe Task Set is a unit of
configuration information designed to be sent to remote computer where BCWipe client software
is deployed.
Creating BCWipe Task Set
To create BCWipe Task Set administrator should click
following window will appear.
[Create] in the BCWipe tab and the
Enter Name and Comments for the new Task Set and click [OK] to create wiping tasks for the
Task Set. The following window appears:
After closing the information message box run command Create New Task from Tasks
menu and select type of wiping task you want to add to the Task Set (Wipe Free Space, Wipe
Local History, Wipe Internet History, Delete With Wiping or Transparent Wiping). You can
add as many wiping tasks to the task set as you want. For every type of wiping task you
can set a schedule for running the task regularly on client computer. Besides, every task
31
has settings specific for the selected type of wiping task. Please read help documentation of
BCWipe software to get a detailed information about all available types of wiping tasks and
about their specific settings.
After creating wiping tasks BCWipe Task Manager window will show all the tasks:
To save all the wiping tasks in a single Task Set file run command Save Task Set from Tasks
menu. Then you can exit BCWipe Task Manager by running Exit command and find the Task Set
listed in the BCWipe tab in the Jetico Central Manager Console.
Administrator can assign BCWipe Task Set to configure BCWipe client software on remote
computer as it is described in Central Management of BCWipe article.
Editing BCWipe Task Set
Administrator of Jetico Central Manager can edit existing BCWipe Task Set. As soon as some
Task Set is modified, group of remote computers where BCWipe is configured to use the Task
Set receives the modified Task Set. As a result, administrator does not need to modify BCWipe
settings on every computer, it is enough to modify a single Task Set used on all the computers.
To edit BCWipe Task Set select the Task Set in BCWipe tab of the Jetico Central Manager Console
and click [Edit]. The following window will appear.
If you want to change name or comments for selected Task Set, edit corresponding strings in
the Name or Comments edit boxes.
32
If you want to change or inspect wiping tasks in the selected Task Set, select Edit or View
wiping tasks in the Task Set checkbox and click [OK]. BCWipe Task Manager window will
appear with list of all the wiping tasks of the Task Set. You can select some wiping task and
view or change its settings. When you finish editing wiping tasks, run command Save Task
File from Tasks menu. Then you can exit BCWipe Task Manager by running Exit command.
To completely remove selected Task Set from the Jetico Central Manager Database click
[Delete] in the BCWipe tab.
NOTE: When you attempt to delete some Task Set, Jetico Central Manager checks is there
any computer in a company network that uses the Task Set for configuration, or not. If the
Task Set is used for configuration, Jetico Central Manager will send the warning message. If
you confirm deleting the Task Set, the computer will stop using the Task Set and BCWipe on
the computer will not run wiping tasks from the Task Set anymore.
See also:
BCWipe on client computers
Central Management of BCWipe
Assigning BCWipe Task Sets to client computers
33
Assigning BCWipe Task Sets to Client Computers
Article Creating and editing BCWipe Task Sets describes idea of wiping Task Set as a data sent
by Jetico Central Manager to remote computer to configure BCWipe client software running on
the computer.
Administrator of Jetico Central Manager can change wiping tasks inside BCWipe Task Set. As a
result, remote computer that uses the Task Set for BCWipe configuration will use updated set
of wiping tasks. Besides, administrator can change Task Set for the computer and it will start
using set of wiping tasks from other Task Set.
Jetico Central Manager supports computers united to Computer Groups. Administrator can
create any number of Computer Groups and include any computer to any Computer Group.
When the administrator manages BCWipe on remote computers, he/she can assign BCWipe
Task Set to individual computer or to Computer Group. In the latter case all computers from
the Group will get the same configuration for BCWipe software running on the computers. If
the administrator changes the Task Set used for the Group, the set of wiping tasks running on
all the computers from the Group will be updated.
Administrator of Jetico Central Manager assigns or changes BCWipe Task Set for computers in
the BCWipe tab in Jetico Central Manager Console.
To assign selected Task Set to group of computers:
1. Select the group of computers in the left pane of Jetico Central Manager Console.
2. Set Inherit Task Set from the computers' Group radio button.
3. Select Task Set you want to use for the group of computers from the list of Task
Sets.
4. Click [Assign].
To assign selected Task Set to an individual computer:
1. Select the computer in the left pane of Jetico Central Manager Console.
2. Set Assign individual Task Set to the Computer radio button.
3. Select Task Set you want to use for the computer from the list of Task Sets.
4. Click [Assign].
The following dialog window appears:
Caption of the dialog window shows name of computer or group, Current Task Set text box
shows name of Task Set that is currently used on the computer(s).
To choose other Task Set for group of computers click Select other Task Set to be run in
the group of computers radio button, select new Task Set from the list of available Task Sets
and click [OK].
If you decide to configure BCWipe on remote computer(s) so that the software would not run
any wiping tasks, click Do not run any Task Sets in the group of computers radio button
and click [OK].
34
After assigning or changing Task Set for the computer or group, name of the Task Set will
appear in the Active Task Set text box in the BCWipe tab in Jetico Central Manager Console.
Information about the change in BCWipe configuration will appear in the BCWipe Log window
in the BCWipe tab. Remote computers will get BCWipe configuration updated as soon as they
will be turned on and get access to a company network. Or, if the computers are active, after
some period of time (up to several minutes) to avoid simultaneous access to the Jetico Central
Manager Database and overloading company network or server computer.
See also:
BCWipe on client computers
Central Management of BCWipe
Creating and editing BCWipe Task Sets
35
Central Management of
BestCrypt Container Encryption
BestCrypt on client computers
Central Management of BestCrypt Container Encryption
36
BestCrypt Container Encryption on Client Computers
BestCrypt Container Encryption software allows the user to keep any form of data (files,
letters, pictures, databases) in encrypted form on the hard disk, networks disks, removable
disks, CDs/DVDs and floppies. BestCrypt Container Encryption then lets you access it from any
application.
BestCrypt Container Encryption allows the user to create a container (for example, 800 Mb
container file called Financials.jbc). Then the user can mount this container file as an additional
logical drive: it will show up as an additional 800 Mb drive (F:\, for example). When mounted
this logical drive looks and operates just like an ordinary disk drive: the user can store personal
files on it. All files stored on the drive are automatically encrypted. Every read operation which
addresses the drive causes decryption of the data, and every write operation causes encryption
of data to be written. Using this system data is always stored in safe encrypted form and appear
unencrypted only if the user enters a correct password for the container file and mounts it.
The following picture shows the BestCrypt Control Panel, which the user runs to perform all
control operations like creating and mounting containers, setting BestCrypt options and so on.
BestCrypt Container Encryption supports a number of well-known encryption algorithms (like
AES, Twofish, Blowfish, CAST, GOST28147-89, IDEA, RC6, Serpent). Since BestCrypt Container
Encryption uses strong encryption methods, it is practically impossible to access encrypted
data without knowing a proper password or encryption key. Please read BestCrypt Container
Encryption Help documentation to get more information about the functions of the software
client part.
Article Central Management of BestCrypt Container Encryption in this chapter explains in more
detail what kind of information Jetico Central Manager receives from BestCrypt programs
running on client computers and how administrator can set recovery password for some
encrypted container on client computer.
See also:
Central Management of BestCrypt Container Encryption
Central Management of Client Software
37
Central Management of BestCrypt Container Encryption
Jetico Central Manager gathers information about using BestCrypt Container Encryption
software on client computers. Administrator of Jetico Central Manager becomes informed when
some problems arise on the computers with the software. Besides, using BestCrypt Container
Encryption becomes safer with Jetico Central Manager support because administrator can
provide the user with access to the data inside encrypted containers in emergency cases.
After deployment of BestCrypt Container Encryption software on client computers the Jetico
Central Manager Database receives the following information from the programs running on
the remote computers:
• Information about container files on the computer: full path, description, encryption
algorithm, size.
• Information about the user who mounted the container and date of the latest mount
operation.
• Log information about BestCrypt Container Encryption events (creating and mounting
containers, management operations run by administrator).
The following picture illustrates the Jetico Central Manager Console when BestCrypt Container
Encryption tab is selected:
In BestCrypt Container Encryption tab select radio button Show containers of selected
computer/group if you want Jetico Central Manager to list only container files created on
computer/group selected in the left pane of the program. If you select Show all containers
option, Jetico Central Manager will show you a list of all container files registered in the Jetico
Central Manager Database.
There are also several buttons in the BestCrypt Container Encryption tab:
• When a user creates or mounts a container, BestCrypt Container Encryption saves
encryption key for the container in Jetico Central Manager Database. The database stores
the key in encrypted form so that only administrator can manage the key.
If the user forgets password for the container file or an urgent need arises to mount the container
file administrator can use the encryption key to get the container mounted. It can be done in
the following way:
1. Run Jetico Central Manager Console and enter password to get access to encrypted
information in the database.
2. Select the computer in the left pane of the program.
3. Select the container in BestCrypt Container Encryption tab in the right pane of the
program.
4. Click [Password] and the following window appears:
38
The password administrator enters in the dialog window is called Network password, because
when later the user (or administrator) enters this password to mount container file on client
computer, BestCrypt Container Encryption software on the computer will send request to Jetico
Central Manager Database over network. If correct network password is entered, BestCrypt
Container Encryption on client computer will be able to decrypt response from Jetico Central
Manager Database and use decrypted key to mount the container file.
If administrator does not need the Network Password for the container anymore, he/she
should select the container in BestCrypt Container Encryption tab and click [Password] . Then
in the Network password dialog window he/she should choose Remove Network Password
for selected container option and click [OK].
• Jetico Central Manager removes information about container file when the user deletes
the file from BestCrypt Control Panel on his/her computer. There are also other ways
to delete the files without running BestCrypt Container Encryption, for example, by
formatting drive with the files.
If administrator becomes aware of deleting some container file using not regular way and decides
to remove information about the container from database, he/she should select the container
in BestCrypt Container Encryption tab of Jetico Central Manager Console and click [Remove].
Program will warn Administrator about removing all information about the container file from
the database and if he/she confirms the operation, the information about the container file will
be erased from the database.
See also:
Deployment of Client Software Remotely
BestCrypt Container Encryption on client computers
39
Central Management of
BestCrypt Volume Encryption
BestCrypt Volume Encryption on client computers
Central Management of BestCrypt Volume Encryption
Rescue procedures on client computers
Removable Disks Protection
40
BestCrypt Volume Encryption on client computers
BestCrypt Volume Encryption software (or BCVE) allows the user to encrypt all data on
existing disk partitions and disk volumes including basic and dynamic disk volumes as well as
boot/system partitions. The following picture shows main window of BCVE program.
BCVE supports a number of well-known encryption algorithms (like AES, Twofish, RC6).
Encrypted data is protected by password only or by combination of password and hardware
token (Aladdin eToken). Since BCVE uses strong encryption methods, it is practically impossible
to access encrypted data without knowing a proper password or encryption key.
Please read BCVE Help documentation to get more information about the functions of BCVE
client part.
To reduce risk of loosing encrypted data BCVE always creates and updates rescue files necessary
to recover encrypted disk volumes in emergency cases. Besides of creating rescue file BCVE
recommends the user to save a copy of the file in a safe place every time the user encrypts
or re-encrypts disk volume.
Unfortunately if the user ignores the recommendation and then gets default BCVE rescue
file inaccessible, it becomes difficult to recover damaged encrypted disk volumes. With Jetico
Central Manager (JCM) all the rescue information from client computers becomes saved in a
central database in a secure form. As a result, Administrator of JCM can run recovery process on
client computer encrypted by BCVE without any special actions from the user of the computer.
The JCM Administrator can also enforce client computers to become encrypted or decrypted
and such a policy will concern fixed disks on the computers. Regarding removable disks, they
have a different way of usage because they may be exchanged between computers. So JCM
provides a different way to set a protection policy for removable disks. Read article Removable
Disks Protection for more information.
The next articles in this chapter explains in more detail what kind of information Administrator
of Jetico Central Manager receives from BCVE programs running on client computers (Central
Management of BestCrypt Volume Encryption) and how administrator can run recovery
decryption process on client computer (Rescue procedures on client computers).
See also:
Central Management of BestCrypt Volume Encryption
Rescue procedures on client computers
Removable Disks Protection
41
Central Management of BestCrypt Volume Encryption
After deployment of BestCrypt Volume Encryption (BCVE) on remote computers administrator
can manage BCVE on client computers through BestCrypt Volume Encryption tab of Jetico
Central Manager Console:
Jetico Central Manager Database receives and displays the following information from BCVE
program running on the client computers:
• 1 - Information about all disk volumes (partitions) on the computer, sizes and labels of the
volumes.
• 2 - Status of every disk volume (encrypted/partially encrypted/not encrypted).
• 3 - Log information about BCVE events (encrypting/decrypting volumes, installation of new
disk volumes, rescue information updating, etc.).
• Rescue information about all encrypted volumes. Click [Rescue] to prepare rescue file
or rescue bootable disk to recover encrypted disk volume on the selected computer. Article
Rescue procedures on client computers describes in detail how to recover encrypted disk
volumes on client computer.
Distributing encryption policies.
Administrator of JCM Console can manage encryption policy on client computers using the
following settings:
• Automatic encryption and decryption of client computers.
Administrator can set the options Encrypt fixed disks or Decrypt fixed disks to get all the
volumes on client computers encrypted or decrypted automatically. Alternatively, administrator
can transfer the right to manage a client computer to the local user by setting the option
Manage by local user.
After Encrypt fixed disks option is set, BCVE on the client computer will ask the user to
enter a password to encrypt the volumes. The encryption will start and will be performed
in the background. For automatic encryption, BCVE uses AES encryption algorithm and XTS
42
encryption mode. The process can be stopped, but it will be automatically resumed after
30 seconds or after reboot. As soon as the process starts, the user will have to enter the
password at boot time.
NOTE: The automatic encryption may NOT start (or not resume) for the following reasons:
1. The client computer was not rebooted after installation.
2. The client computer is currently using the option Manage by local user.
3. BCVE main window has been opened on the client computer.
3. The client-server connection has been lost.
• Removable disk policy.
JCM administrator can force encryption of removable devices on client computers. The
removable devices can be password-protected or JCM-protected inside the local network. See
Removable Disks Protection for more details.
Click [Recover Removable Disk] to recover encrypted removable disks in case the user
has forgotten password or if the disk appeared as damaged.
• Suspend Protection.
Administrator can temporarily suspend client protection, i.e. remove boot-time authentication
(note that the volumes are still encrypted). It may be required to allow the computer(s) to
automatically restart (Windows Updates, backup purposes, etc.). The feature is necessary to
manage servers that are required to function all around the clock.
The option is available only for the computers for which Encrypt fixed disks policy is set. As
soon as administrator sets this option, JCM Console will report it in the log file:
After that, if the client computer is ON, another report in the log file is expected:
If the client computer is OFF, it will receive the setting and send this report to the Console when
it is turned on. After getting this confirmation from the client, boot-time authentication has been
removed.
ATTENTION! The option Suspend protection exposes a security risk. For example, someone
can turn off the computer, take it out of the company, turn it on again and get access to the data.
Remember to turn the option OFF as soon as automatic reboot is not required anymore.
To set an encryption policy to a group of computers:
1. Select the group of computers on the left pane of Jetico Central Manager Console.
2. In Inherit Group settings drop-down list select one of the options:
• Encrypt fixed disks
• Decrypt fixed disks
• Manage encryption locally
3. Click Removable Disks Policy hyperlink to set the policy for removable disks.
4. Mark the checkbox Suspend protection if required.
To set an individual policy to a computer:
1. Select the computer on the left pane of Jetico Central Manager Console.
2. Set Use individual settings
3. In the drop-down list and select one of the options:
• Encrypt fixed disks
• Decrypt fixed didks
• Manage encryption locally
4. Click Removable Disks Policy hyperlink to set the policy for removable disks.
43
5. Mark the checkbox Suspend protection if required.
JCM Console can highlight the client computers that use individual settings by a different
icon. To enable this function, set the option Highlight computers with individual settings
for BCVE in Computers menu.
See also:
Deployment of Client Software Remotely
BestCrypt Volume Encryption on client computers
Rescue procedures on client computers
Removable Disks Protection
44
Rescue Procedures on Client Computers
The Jetico Central Manager (JCM ) Database stores information about disk volumes (partitions)
encrypted on remote client computers with BestCrypt Volume Encryption (or BCVE) software.
In case of emergency recovery decryption of disk volume may be required (for example, the
user has forgotten password or disk on the computer appears as damaged). In this case Jetico
Central Manager (JCM) Administrator can create rescue file and decrypt the volume. There are
several options for creating the rescue file depending on the case:
• The user remembers password and encrypted volume is not system or boot. If so,
administrator should do the following:
1. In the JCM Console create rescue file for the computer.
2. Run BCVE program on the computer with encrypted disk volume.
3. Run command Decrypt Volume with Rescue File from Rescue menu and
browse for the rescue file.
• The user remembers password and encrypted volume is system or boot (computer won't
boot). If so, administrator should create rescue bootable disk. With Jetico Central Manager
the Administrator can create several types of rescue bootable disk:
1. CD/DVD. The program creates ISO image file of the CD/DVD disk, then
Administrator can use any CD burning software to write the file to CD.
2. USB removable disk.
After creating rescue bootable removable disk the administrator boots the computer from the
disk. Recovery decryption program from the disk will start and ask to confirm the operation.
After confirmation recovery decryption process will run.
• The user has forgotten password for encrypted volume. Two ways of recovering is
possible:
1. The JCM Administrator selects option Generate password to access the
computer in the Rescue File dialog window. As a result, JCM will create password
the Administrator can use to access the computer.
2. The JCM Administrator creates rescue file or rescue bootable disk and enters
temporary password. The password will be required to enter by BCVE program
before running the recovery decryption process. The password is necessary to
secure information in rescue file so that even if the file is stolen, access to encrypted
data would be impossible.
To create rescue file or bootable disk, in the left pane of the Jetico Central Manager Console
select computer where encrypted disk volume should be recovered. Select BestCrypt Volume
Encryption tab and click [Rescue File]. The following dialog window will appear:
45
In the dialog window select type of rescue bootable disk or rescue file according to the type of
disk volume to be recovered. If the user remembers password for the disk volume, select option
Password the user has chosen for disk volumes. Otherwise select option New password
set by Supervisor or Administrator. In case of using the second option it will be required
to enter the new password.
After creating rescue file or rescue bootable disk administrator should use it on the computer
where encrypted disk volume has to be recovered.
See also:
BestCrypt Volume Encryption on client computers
Central Management of BestCrypt Volume Encryption
Removable Disks Protection
46
Removable Disks Protection
Jetico Central Manager (JCM) allows Administrator to control and manage encryption policies
for removable devices (e.g. USB sticks, USB external drives, SD memory cards) being used
on client computers. JCM Encryption Policy for Removable Devices can be set for a group of
computers or for individual computer. Once the policy is set, it will be applied for any removable
device inserted in the client computer or group of computers.
Setting Protection Policy for Removable Disks
To set new encryption policy for removable devices or change a previously applied one, the JCM
Administrator should click Removable Disks Policy hyperlink in the BestCrypt Volume Encryption
tab of JCM Console. The following window will appear:
The Encryption policy for removable disks dialog consists of the following controls:
• Enforce encryption for removable disks check box
Check this option if you want to force encreyption of removable devices on client
computers.
NOTE: the following three controls are only available when the Enforce encryption for
removable disks check box is checked:
• Password Protection radio button
If the JCM Administrator selects this option then after the policy is applied, clients are
asked to provide a password to encrypt the removable device with. This password is
then asked each time the removable device is inserted in client computer. Such devices
are accessible both in LAN with JCM Database and outside it (with BestCrypt Volume
Encryption personal version, or traveller version).
• JCM Protection radio button
If the Administrator selects this option, after the policy is applied, encryption process
starts automatically. The encryption key is then moved to and stored on the JCM Database.
No password is requested, the removable device is mounted automatically as it is inserted
in the client computer. Such devices are accessible only in the network where JCM Server
is active.
• Allow read-only access to unprotected removable disk check box
When Enforce encryption for removable disks option is set, once an unencrypted
removable device is inserted in a client computer, the user is notified about the current
Policy and asked whether he/she wants to apply it or not. If the user refuses to apply
the Policy, the removable device is considered as unprotected, access to it is limited. The
47
administrator may choose whether to deny any access (check box is not checked) or to
allow read-only access (check box is checked) to unprotected removable devices.
Recovering Encrypted Removable Disk
In case of damaging encrypted removable disk or if the user has forgotten the password, it is
necessary to decrypt the disk. To recover the disk click [Recover Removable Disk] in
BestCrypt Volume Encryption tab in the JCM Console. The following dialog window will appear:
Choose one of the following options to recover the disk:
• Generate administrator password for the disk option if the user has forgotten
password
• Rescue file option if filesystem on the disk is corrupted, or error occurs when the client
mounts the disk
See also:
BestCrypt Volume Encryption on client computers
Rescue procedures on client computers
48
Jetico Central Manager Database
Overview of the Jetico Central Manager Database
Computers in Jetico Central Manager Database
Configuration and Update of Client Software
Backup of Jetico Central Manager Database
Supervisor and Administrator of JCM Database
Jetico Central Manager Reports
49
Overview of the Jetico Central Manager Database
The Jetico Central Manager Database stores information about computers in a company
network. The information allows administrator of the Database to:
• Deploy Jetico Client Software (BCWipe, BestCrypt Container Encryption, BestCrypt
Volume Encryption) on computers in the enterprise network.
• Manage Jetico Client Software on remote computers.
The article Computers in Jetico Central Manager Database explains in detail how information
about computers from the company network can be added or removed from the Database, how
they can be organized in groups and what operations for them are available in Jetico Central
Manager.
Jetico Central Manager has a modular architecture and can support any number of client
software. Modules for each client software are implemented independently, so Jetico Central
Manager can be easily configured to manage only BCWipe on client computers, or any
combination of the client software (BCWipe, BestCrypt Container Encryption, BestCrypt Volume
Encryption). Read article Configuration and update of client software to get more information
about that.
Administrator can create backup of Jetico Central Manager Database at any time by running
command from menu in the Jetico Central Manager Console. Besides, it is possible to run
backup command automatically according to some schedule. Administrator can also restore the
Database from backup.
With Jetico Central Manager two-level administration of the client software in company network
is possible: with Supervisor and Administrator roles. Supervisor can create Administrator
account to perform all everyday administrative work. If because of some reason Administrator
cannot (or must not) manage the Database anymore, Supervisor can remove Administrator
account or change its credentials. Article Supervisor and Administrator of Jetico Central Manager
Database describes all the related procedures in more detail.
Jetico Central Manager Database Encryption and Initialization.
Jetico Central Manager encrypts sensitive information in its database. Encryption key for the
database does not appear on disk in a plain form. Instead the key is encrypted by Supervisor
and Administrator (if exists) public keys. Hence, Jetico Central Manager Database engine can
start to provide client computers with information from the database only when Supervisor or
Administrator activates the database by entering password for the public key.
So Supervisor (Administrator) must run Jetico Central Manager Console at least once after
rebooting computer to unlock the Jetico Central Manager Database. Jetico Central Manager has
a residential module that monitors activation of the database. If the computer with the Jetico
Central Manager Database is rebooted but the database is not activated (i.e. locked), Jetico
Central Manager will show notification message in the system tray icon, like the following picture
illustrates.
50
As soon as you click the notification icon, Jetico Central Manager will display dialog window for
entering password for the database. After entering the password the database will be activated
(unlocked) and Jetico Central Manager clients will be able to communicate with the database.
See also:
Computers in Jetico Central Manager Database
Configuration and update of client software
Backup of Jetico Central Manager Database
Supervisor and Administrator of Jetico Central Manager Database
Jetico Central Manager reports
51
Computers in Jetico Central Manager Database
Adminstrator of Jetico Central Manager handles client software deployed on remote computers
in a company network. Before starting to manage the computers the administrator should get
them listed in Jetico Central Manager Database. The article explains how to add the computers
to the database, remove them from the database and how groups of computers can be created.
All the operations with computers can be done via Jetico Central Manager Console.
Groups of computers
Administrator can group computers in the Jetico Central Manager Database according to any
scheme that would be convenient for further management. For example, computers can be
grouped by their locations according to room numbers, or according to the departments inside
the company. The picture below shows example of computers' groups.
To create new empty group of computers, run command New Computer Group from Group
menu. Alternatively it may be done from the context menu: right-click with your mouse
anywhere on the Computers tab field and run New Computer Group command. New group
with default name will be created and name of the group can be changed at that time. It is also
possible to edit the name at any time later by running Rename Group command from Group
menu, or using right-click menu.
52
To move a computer from one group to another, use drag-and-drop, or run Move Computer
to Group command from right-click menu of the computer.
NOTE: Using special icons JCM Console can highlight computers that use individual settings
for BCWipe or BestCrypt Volume Encryption software. In the screenshot above computer
with name TPMUEFI has an icon illustrating the use of individual settings for BCWipe and
BestCrypt Volume Encryption software. Note that options Highlight computers with
Individual Settings ... should be set in Computers menu to make JCM showing the
special icons.
Adding computers to database
• To add a number of computers to database, run command Add Computers to
Selected Group from Computers menu or run the command from the right-click
menu of the group. JCM will scan the local network looking for all computers that can
be managed by the software. If the option Browse only Windows Domain when
look for computers in Computers menu is enabled, the scan process will look for
domain computers only.
When list of the computers appears, select as many computers as you want to add to the
selected computer group and click [Add].
Show only computers not yet added to JCM database - mark the checkbox if
you want to see only those computers that have not been added to the Jetico Central
Manager (JCM) database earlier.
53
• To add a single computer to database, run command Add Single Computer to
Selected Group from Computers menu or run the command from the right-click
menu of the group. The following window will appear:
Type the name of the computer and click [OK].
Removing computers from database
To remove a computer from the JCM Database select the computer in the left tab of the Jetico
Central Manager Console and run Remove Computer command from Computers menu.
To remove the whole group select the group and run Delete Group command from Group
menu.
NOTE: After removing a computer from database and rebooting the computer, client
software will be uninstalled. As well, JCM Deployment Agent will be removed.
NOTE: the uninstallation process will not run if the computer cannot communicate with the
database (for example, if computer has no network connection with computer where service
is running). It prevents from the incorrect uninstallation of the client software in case of
accidental malfunctioning of the company network.
See also:
Overview of the Jetico Central Manager Database
Configuration and update of client software
Deployment Client Software Remotely
54
Configuration and Update of Client Software
Jetico Central Manager has a modular architecture and can support any number of client
software. Modules for each client software are implemented independently, so Jetico Central
Manager can be easily configured to manage only BCWipe on client computers, or any
combination of the client software (BCWipe, BestCrypt Container Encryption, BestCrypt Volume
Encryption).
Administrator can choose client software to be managed by Jetico Central Manager. To do that
run command Client Software from Software menu in the Jetico Central Manager Console.
After running the command the following dialog window appears.
In the dialog window set checkboxes for the client software you want to deploy and manage in
the company network. Note that the Jetico Central Manager Console will hide tabs in its right
pane corresponding to the client software that is not selected for management. For example, if
administrator selects only BCWipe for central management, the Jetico Central Manager Console
will show only BCWipe tab in its right pane and hide other tabs (BestCrypt Container Encryption
and BestCrypt Volume Encryption).
After selecting client software for management and clicking [OK] Jetico Central Manager
downloads all the necessary modules from Jetico website. If the software is already downloaded,
Jetico Central Manager compares versions of downloaded software and software available on the
website. If newer version is available, Jetico Central Manager displays status Update Required
for the software.
It is also possible to update the client software or check the most recent versions manually by
running command Update Jetico Central Manager from Software menu. After running the
command the following dialog window appears.
55
Click [Run update] to download the latest versions of the software. As soon as Jetico Central
Manager downloads the software, it will appear as available for update on client computers in
the company network. Every client computer where the software is running regularly sends
request for possible update to the Jetico Central Manager Database server. So when updated
version of client software appears on the server, the software becomes automatically updated
on the client computers.
Administrator of Jetico Central Manager can automate the process of updating client software by
running command Automatic Check for Updates from Software menu. The following dialog
window allows the administrator to configure automatic update options.
Jetico Central Manager has a special residential module that will check for updates regularly
according to the schedule set in the dialog window above. If newer version of client software
is detected on Jetico website, the module will show notification message about available
update in the system tray:
56
Jetico Central Manager uses Internet connection to download client software from Jetico website (http://
www.jetico.com). Visit Jetico Download Page to read release notes about enhancements made in the
latest versions of the software.
See also:
Overview of the Jetico Central Manager Database
57
Backup of Jetico Central Manager Database
Administrator of the Jetico Central Manager Database can create backup copy of the Database
manually or automatically. Command Backup Database from Database menu in the Jetico
Central Manager Console should be used for that purpose. If an administrator runs the
command, the following dialog window appears.
To automate the backup process check the Activate Automatic Backup checkbox and
choose period (Daily, Weekly, Monthly) and time or day for running the process.
Administrator can also use the dialog window to create backup copy of the Database manually
by setting checkbox Make backup now and clicking [OK].
To restore contents of the Jetico Central Manager Database from backup run command
Restore Database from Database menu. The following window appears after running the
command.
The dialog window lists all backup copies of the Database and information about the time
when the copy was created. Select the copy you want to use to recover the Database, click
[OK] and Jetico Central Manager will start using contents of the Database from the backup
copy.
58
Administrator of a company network may have several Jetico Central Manager Database
servers running in the network, for example, to manage different departments of the
company with their own Jetico Central Manager Database servers. Administrator also has the
option to use the same Jetico Central Manager Console to control all the Database servers.
In this case the administrator should be able to choose the Database server he/she wants to
manage. To do that the administrator should run command Select Server Computer from
Database menu. The following window appears when administrator runs the command.
After running the command the program starts searching for all Jetico Central Manager
Database servers running in the network. When the search process finishes, the window
shows all found servers. The administrator should choose one of the servers and click [OK].
The Jetico Central Manager Console will ask to enter password unique for the Database on the
server and will allow the administrator to control the database.
See also:
Overview of the Jetico Central Manager Database
Supervisor and Administrator of Jetico Central Manager Database
59
Supervisor and Administrator of JCM Database
Jetico Central Manager supports two levels in administration of an enterprise network:
• Supervisor level
• Administrator level
The Supervisor can run all the commands and manage everything in the Jetico Central Manager
software. When you run the software for the first time, the Jetico Central Manager Wizard asks
you to choose a password for the Supervisor account. If you are going to run all the management
of the software by yourself, you do not need to create additional administrative account, just
use one-level administrating scheme.
But it is also possible that some other person will be responsible of all the regular work on
managing the Jetico Central Manager Database. In this case the Supervisor can create additional
Administrator account by running command Create/Change Administrative Account from
Administrating -> Supervisor menu in the Jetico Central Manager Console. The Supervisor
enters a temporary password for the account and tells the password to the person who will
manage the Database.
Administrator should enter the password when running the Jetico Central Manager Console.The
Administrator can change the temporary password chosen by Supervisor to some other
password by running command Change Administrator Password from Administrating ->
Administrator menu.
NOTE: Supervisor cannot get information about password used by Administrator if
Administrator changed the temporary password created by Supervisor.
Administrator can manage all the data in the Jetico Central Manager Database as well as
Supervisor. The difference between Supervisor and Administrator is in the following: Supervisor
can change password of Administrator without knowing the password, but Administrator cannot
change anything in Supervisor account. So Supervisor can forbid access to the Jetico Central
Manager control functions simply by running command Create/Change Administrative
Account from Administrating -> Supervisor menu. If Supervisor runs the command, the
following dialog window appears.
As the window above shows, Supervisor gets the warning that Administrator account already
exists. If Supervisor changes password of Administrator, he/she should tell about new
password to the Administrator, otherwise the Administrator will not be able to manage the
Jetico Central Manager Database.
See also:
Overview of the Jetico Central Manager Database
Jetico Central Manager Wizard
60
Jetico Central Manager Reports
An Administrator of Jetico Central Manager can create a report about computers and users that
are registered in the database of the software. The report may contain the following information:
• Information about all computers and users in the database. The information contains
details about full user name, comments for computers and users, operating systems
running on the computers, Jetico client software deployed on the computers.
• Information about selected group of the computers.
• Information about selected computer.
• Information specific for each Jetico client software running on the computer. For
example, information about BCWipe tasksets or encryption status of disk volumes
provided by BestCrypt Volume Encryption.
• Information specific not for all client software, but for selected one (for example, for
BCWipe activity on client computers only).
• List of computers where problems are detected. All the problems are sorted by type
(Deployment problems, or problems specific for each client software).
To create a Jetico Central Manager report, run command Create Report from Reports and Logs
menu in the Jetico Central Manager Console. The following window will appear.
Select set of computers and users you want to be in the report (all computers and users or
computers from selected group only, or selected computer only).
If you check Report only problem computers, then Jetico Central Manager will only add a
computer to the report if some problem is detected on the computer.
You can select all Jetico client software for the report or only few of them. For example, if you
are interested to know what disk volumes are encrypted on client computers, you may select
only BestCrypt Volume Encryption for the report.
Enter name of file and path where the report should be saved and click [OK]. Jetico Central
Manager creates report in HTML format. After creating the report file Jetico Central Manager runs
default Internet browser to display contents of the report file. The following picture illustrates
how start part of the report may look like.
61
See also:
Computers in Jetico Central Manager Database
62
If You Want to Comment on the Software
At Jetico, we are always trying to improve our software, including Jetico Central Manager.
User feedback is important and extremely valuable to all our staff.
If you have a product suggestion or comments on how to improve Jetico Central Manager
documentation, please contact us at
[email protected]
Be sure to include your name, email and version number of Jetico Central Manager.
To learn more about all our data protection software products, please visit the Jetico website
at
http://www.jetico.com/download
Thank you for your time!
Jetico Team
63