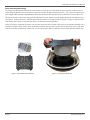
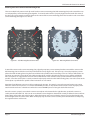
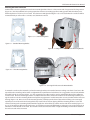
1
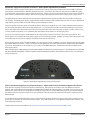
PTZ Camera Enclosure
Users Manual
Revision 1.2
PTZ Camera Enclosure Users Manual
Introduction
To the user:
Welcome. We would like to take this opportunity to thank you again for selecting our product for your use.
The X Stream Designs camera enclosure system is a high technology content device designed to provide the end user with the
most flexible and versatile camera enclosure that accommodates a wide range of use including modular accessory capacity,
climate control and power options. The web enabled control software (for the X|Smart™ Models) was designed to provide the user
many options for power monitoring, power management, cleaning and wiping event scheduling. The modular enclosure design
provides the user with the ability to add complementary hardware and accessory items for system integration along with the
pan/tilt/zoom camera.
Please take the time to review this product manual thoroughly prior to assembly and system integration. For technical support
or any questions regarding the use of the X Stream Designs product, please visit our website at: www.xstreamdesigns.com and
submit your questions at the contact/info section. You can also call us for additional support.
Thank you again for your patronage,
X Stream Design Team
Page 2
X Stream Designs, Inc.
PTZ Camera Enclosure Users Manual
Table of Contents
Copyright Information......................................................................................................................................................................................................4
Limited Warranty.................................................................................................................................................................................................................5
Installation Guidelines.......................................................................................................................................................................................................7
Special Care Items...............................................................................................................................................................................................................8
Safety.......................................................................................................................................................................................................................................9
Handling & Care..................................................................................................................................................................................................................10
Box Contents........................................................................................................................................................................................................................11
Detailed User Information & Instruction....................................................................................................................................................................12
General Operational Summary Of Enclosure Models............................................................................................................................................21
Page 3
X Stream Designs, Inc.
PTZ Camera Enclosure Users Manual
Copyright Information
This document is Copyright ©2014 by X Stream Designs, Inc. All rights reserved.
All trademarks are the property of their respective owners.
All parts of this product and design including but not limited to firmware, hardware design, schematics, PCB layout, concept,
graphics, users manual, etc., are the property of X Stream Designs, Inc. ©2014. X|Smart may not be opened, disassembled, copied
or reverse-engineered.
No part of this manual may be reproduced or transmitted in any form or by any means, electronic or mechanical, including
photocopying or scanning, for any purpose other than the personal use by the purchaser of this product. X Stream Designs, Inc.,
assumes no responsibility for any errors that may appear in this document.
Whereas reasonable effort has been made to make the information in this document as useful and accurate as possible, X Stream
Designs, Inc. assumes no responsibility for the application, usefulness, or completeness of the information contained herein.
Under no circumstance will X Stream Designs, Inc. be responsible or liable for any damages or losses including direct, indirect,
special, incidental, or consequential damages or losses arising from either the use of any information contained within this manual
or the use of any products or services referenced in this manual.
X Stream Designs, Inc. reserves the right to change any product’s features, specifications, documentation, warranties, fee schedules, and conditions at any time and without notice.
Page 4
X Stream Designs, Inc.
PTZ Camera Enclosure Users Manual
LIMITED WARRANTY
X Stream Designs warrants that, during the Warranty Period, the Product will, with normal use and service, be free from faulty
parts, manufacture or workmanship.
X Stream Designs extends the following warranty for all X Stream Designs Products unless otherwise stated, to the original owner/
purchaser of the Product for a period of 12-months, from date of shipment.
This warranty shall be voided if the article in question is improperly installed, applied, operated or maintained; subjected to
overload, misuse, negligence or an accident; or repaired or altered outside of the X Stream Designs warehouse or by anyone other
than an authorized X Stream Designs service partner under direction of X Stream Designs. Products manufactured by others, but
supplied by X Stream Designs as part of a X Stream Designs Product, are not warranted by X Stream Designs, and Customer’s sole
recourse if any such product should fail shall be under the warranty, if any, of such other manufacturer.
Customer’s sole and exclusive remedy against X Stream Designs and X Stream Designs’ only obligation, for breach of warranty,
shall be, at X Stream Designs’ option, the repair or replacement (with either a refurbished or new Product) of any Product that on X
Stream Designs’ examination is found to be defective at the time of delivery due to faulty workmanship and/or defective material,
but only if the Customer submits a claim in writing to X Stream Designs within the warranty period.
When making a warranty claim, the Customer must request an RMA from X Stream Designs. Upon issuance of the RMA, the
Customer will forward the Product to X Stream Designs for evaluation. Freight and insurance will be paid for by the Customer.
The
Customer is responsible for repackaging Products returned in suitable packing material to prevent damage in transit. If X Stream
Designs ascertains that the Product is defective due to faulty workmanship and/or defective material, X Stream Designs shall
send the repaired Product or a replacement Product to the Customer. X Stream Designs may choose the method of delivery and
will pay freight and insurance and credit the Customer for freight and insurance costs resulting from return shipment from the
Customer to X Stream Designs authorized by the RMA. Products or product parts which have been replaced shall be the property
of and retained by X Stream Designs. If X Stream Designs’ determines that the Product is not defective due to faulty workmanship
and/or defective material or that the warranty has been voided, the Product shall be returned to the Customer, if the Customer
requests. In such case, freight and insurance shall be paid by the Customer.
MAKING A WARRANTY CLAIM:
1. Customer must inform X Stream Designs as soon as the warranty claim arises by calling 1-858-768-2992 or sending an email
to [email protected].
2. Customer must provide original proof of purchase and a description of the fault and any other relevant material.
3. If the warranty claim is accepted, X Stream Designs will issue a RMA and give Customer authorization to ship faulty parts/and
or the entire Product to X Stream Designs for repair or replacement.
4. X Stream Designs will, at its cost, repair or replace any faulty parts and/or the entire Product and return the Product back to
Customer.
If you do not wish to be bound by any of the provisions in this warranty, please return the product(s) immediately to X Stream
Designs.
For further Warranty information contact:
X Stream Designs, Inc.
Customer Service Department
2120 Jimmy Durante Blvd., Suite 110
Del Mar CA 92014
U.S.A.
1-858-768-2992
Page 5
X Stream Designs, Inc.
PTZ Camera Enclosure Users Manual
LIMITED WARRANTY - Continued
Disclaimer of Warranties
EXCEPT FOR THE WARRANTIES STATED IN SECTION 11, THE PRODUCTS ARE SUPPLIED “AS IS”, “WHERE IS” AND “WITH ALL FAULTS”.
X STREAM DESIGNS DISCLAIMS ALL OTHER WARRANTIES WITH RESPECT TO THE PRODUCTS, EITHER EXPRESS OR IMPLIED, ARISING
BY OPERATION OF LAW, COURSE OF DEALING, USAGE OF TRADE OR OTHERWISE, INCLUDING BUT NOT LIMITED TO THE IMPLIED
WARRANTIES OF MERCHANTABILITY AND FITNESS FOR A PARTICULAR PURPOSE.
Indemnification Customer shall indemnify, defend and hold X Stream Designs harmless from all claims, including but not limited to all claims
filed by third parties, for injuries, harms, losses or damages of any kind, (a) caused by or resulting from, (i) the Product after it has
been delivered, (ii) the improper use, repair, maintenance or operation of the Product by Customer, (iii) the failure of Customer to
adequately train personnel in the operation of the Product, or (iv) the Customer’s failure to comply with applicable laws or regulations or (b) to products manufactured by the Customer or to products of which the Customer’s products form a part.
The Customer consents to the jurisdiction of any court or arbitral tribunal in which any third party files a claim for injuries, harms,
losses or damages allegedly caused by any Product sold to Customer.
Limitation of Liability
IN NO EVENT SHALL X STREAM DESIGNS BE LIABLE FOR ANY SPECIAL, INDIRECT, CONSEQUENTIAL, PUNITIVE OR EXEMPLARY
DAMAGES OR LOSSES ARISING OUT OF ANY BREACH OF WARRANTY, FAULTY PRODUCT, DELAY IN THE DELIVERY OF THE PRODUCT,
PRODUCT LIABILITY, FAILURE TO WARN, RECALL OR OTHERWISE, IRRESPECTIVE OF THE CAUSE, INCLUDING BUT NOT LIMITED TO,
LOSS OF PRODUCTION, LOSS OF PROFIT AND LOSS OF GOODWILL.
Notice of Claims
Claims or complaints as to defects and/or delay in delivery of the Products or other claims shall be submitted in writing by Customer to X Stream Designs without undue delay.
Page 6
X Stream Designs, Inc.
PTZ Camera Enclosure Users Manual
INSTALLATION GUIDELINES
•
•
•
The X Stream Designs enclosure system should be installed by qualified personnel.
This unit must not be used for medical, life saving purposes, or for any purpose where its failure could cause serious injury or
the loss of life.
This unit must not be used in any way where its function or failure could cause significant loss or property damage.
Security Notes
The X|Smart™ system employs a Linux operating system and does have the ability to support features such as telnet, FTP and SSH.
For this reason, there is a chance that someone can ‘break in’ to the X|Smart™ system and access other devices on your local
network. As with any device installed on a network, appropriate security precautions should be observed.
If X|Smart™ system is installed on the Internet, it is recommended that the control password be enabled. Passwords should be at
least 8 characters in length and use a combination of upper and lower case letters and numbers. For additional security, a firewall
may be used to limit access to selected IP addresses. Another option may be to set up a Virtual Private Network (VPN) between the
network where X|Smart™ resides and the client machine.
Final X|Smart™ Installation Notes
The X|Smart™ product and the integrated 5 port switch (4 available ports) supports 10Mbps ,100Mbps and 1000Mbps network
connections. Only one of the ports provides switched 48vdc Power Over Ethernet (POE).
Page 7
X Stream Designs, Inc.
PTZ Camera Enclosure Users Manual
SPECIAL CARE ITEMS
Please pay special attention to the following:
The X| Model enclosures are electro-mechanical devices that require basic knowledge of electronics and mechanical
mechanisms for safe use. Please take special note to the following preventive measures.
•
•
•
•
•
•
•
Power Consumption Must Not Exceed The Power Supply Max Output Current of 150 Watts .
Wires, Cables, Accessory Hardware Must Be Neatly Organized and Bundled To Not Interfere With The Mechanical Rotating Dome Assembly (X|Rain & X|Clear Models).
The Pathway Between The Housing and Door Must Be Free From Obstruction and Interference From Accessory Items and Cables When Closing The Housing.
Closing and Latching The Housing Requires Careful Alignment Of The Housing and Door To Ensure The Proper Seal Between
The Two Mating Surfaces.
A Secure Fit Between The Enclosure and Mounting Bracket Must Be Obtained When Mounting The Enclosure. Failure To Ensure Proper Engagement Between The Mounting Bracket and Enclosure May Result In The Enclosure Disengaging From The Mount And Falling To The Ground.
Keep Hands And Fingers Away From Operating Fans And The Rotating Dome Assembly Mechanism.
The X|Clear Model Enclosure Has A Refillable Reservoir Used To Contain The Fluid To Clean The Camera Dome During The
Cleaning Cycle. Plain Water (Distilled Or Purified) Is The Recommended Fluid For This System. However In Environments Where
The Temperature Is Expected To Drop Below The Freezing Point Of Water, The System Must Be Drained And Refilled With A DeIcer Such As Prestone De-Icer Windshield Washer Fluid Or Any Other Methanol Based Windshield Washer Fluid. The Material
Safety Data Sheet For The Chosen Product Should Be Reviewed Prior To Use To Ensure The Safe Use Of The Cleaning Fluid.
Page 8
X Stream Designs, Inc.
PTZ Camera Enclosure Users Manual
SAFETY
Electrical Connection, Power Supply & Electronic Components
1. Power Consumption Must Not Exceed The Power Supply Max Current Output (Reference Tables Page 14).
2. Wires, Cables, Accessory Hardware Must Be Neatly Organized And Bundled To Not Interfere With The Mechanical Rotating
Dome Assembly (X|Rain™ & X|Clear™ Models).
3. The Pathway Between The Housing And Door Must Be Free From Obstruction And Interference From Accessory Items And
Cables When Closing The Housing.
4. A Qualified And Licensed Electrician Must Make All Electrical Connections In Compliance With All Codes. Installation Of The
Camera Should Be Made By A Qualified Installer.
5. The Power Supply Chassis Should Not Be Removed From The Unit. There Is A Serious Risk Of Injury From Electric Shock Due To
Exposed Electrical And Electronic Components Contained Within The Power Supply Chassis.
6. Tampering With Any Of The Electrical Components Can Cause Damage And Pose A Serious Risk Of Injury From Electric Shock.
7. Keep Hands And Fingers Away From Operating Fans And Rotating Dome Assembly Mechanism.
8. Power Accessory Ports Are Identified With Output Voltage And Polarity. The Installer Must Proceed With Caution And Care To
Ensure That The Electrical Connections Are Connected Properly With The Correct Polarity And Voltage.
9. Some Enclosure Models Have A Source Of Heat Located On The Rear Side Of The 90-Degree Leg Of The Power Supply Chassis.
The Heat System Is Comprised Of A Flexible Silicon Pad Adhered To The Rear Side Of The Power Supply Chassis. Care Should
Be Taken To Avoid Touching This Area To Eliminate The Possibility Of A Burn.
10. There Are Two Fans Located Within The Power Supply Chassis And One Fan Located On The Housing Front Face (X|Heat™
Model). Care Must Be Taken Not To Obstruct These Fans With Cabling Or Cable Ties.
11. The X|Cold™ Model Enclosure Is Equipped With A Solid-State Air-Conditioning System That Cools The Inside Of The Enclosure.
This System Is Contained Within A Chassis Mounted On The Rear Housing. When Power Is Applied To This System, A Significant Amount Of Heat Is Generated On One Surface Of The Thermoelectric Module Nestled Between The Heat Sinks And Fans.
This Assembly Must Never Be Tampered With Or Disassembled.
Page 9
X Stream Designs, Inc.
PTZ Camera Enclosure Users Manual
HANDLING & CARE
Opening & Closing the Unit
• Housing To Door Alignment - To obtain proper seal when closing and latching the enclosure, all mating surfaces must be
aligned, and all internal components including cabling and cable ties must be clear of any opposing surfaces between the
door and housing to ensure that the door will close securely without interference. To align the mating surfaces of the housing
and door, lift housing from lower right hand corner applying a slight upward force while closing the housing door. All surfaces
should be evenly matched around the two mating surfaces before attempting to latch the latches. Caution: do not attempt to
close the enclosure without the four (4) ¼ -20 mounting bolts securely fastened to the mounting bracket. Without these bolts
in place, the enclosure may slip off of the mounting bracket and fall to the ground.
• Latches and Latching Force - Once all surfaces are aligned engage the latches and apply a light force to lock them in place.
These latches are designed to pull the two sections of the enclosure together and provide the necessary seal between the two
sections. Caution: Do not force the latches to close. If they feel tight, re-align the housing surfaces and apply a slight closing
force to the housing and engage the latches.
• Potential Cable Pinch Points & Improper Sealing - Prior to closing the housing door, all cables and accessory hardware must
be securely fastened within the enclosure and stowed to prevent interference between the two housing sections prior to closing.
Wiper and Fluid Delivery Hose Alignment
For all models that include a wiper and or fluid delivery hose, it is important for each of these to be positioned properly to ensure
proper wiping and cleaning of the dome surface. The wiper must be in full contact with the dome, and the fluid delivery hose
must be positioned to the right of the dome (looking at the enclosure from the front). For more detail regarding the alignment of
these items, please see the section titled “Self-Cleaning & Wiping X|Clear”.
Cleaning System Fluid
The X|Clear model enclosure has a refillable reservoir used to contain the fluid to clean the camera dome during the cleaning cycle. Plain water (distilled or purified) is the recommended fluid for this system. However in environments where the temperature
is expected to drop below the freezing point of water, the system must be drained and refilled with a de-icer such as PRESTONE
DE-ICER WINDSHIELD WASHER FLUID or any other methanol based windshield washer fluid. The material safety data sheet for the
chosen product should be reviewed prior to use to ensure the safe use of the cleaning fluid.
Mounting the Enclosure to a Structure
• The X| series of enclosures are design to mount specifically to the X Stream Designs mounting bracket. Do not attempt to
substitute the X Stream Designs mounting bracket with another brand. Doing so will void the product warranty and pose a
serious safety risk and damage to the product.
• A secure fit between the enclosure and mounting bracket must be obtained when mounting the enclosure. Failure to ensure
proper engagement between the mounting bracket and enclosure may result in the enclosure disengaging from the mount
and falling to the ground.
Care & Cleaning Of Dome
For all models with a stationary dome (non self-cleaning) the dome should be cleaned using a mild cleaner and soft cotton towel
to avoid scratching.
Page 10
X Stream Designs, Inc.
PTZ Camera Enclosure Users Manual
BOX CONTENTS
•
•
•
•
Camera Enclosure
Welcome Letter & Quick Start Guide
Accessory Box & Contents
Corrugated Camera Assembly Nest [2]
Accessory Box Contents
System
ITEM #
Camera Mounting
1
1” Camera Mount Spacers
4
2
5” Threaded Rod
4
3
3” Threaded Rod
4
4
2” Threaded Rod
4
5
Stainless Steel Black Oxide 1/4-20 x 3/8” Hex Bolt
1
6
Stainless Steel Black Oxide 1/4-20 Flat Washer
1
7
Stainless Steel Black Oxide 1/4-20 Lock Washer
1
8
Stainless Steel Black Oxide 4-40 x 1/2” Machine Screw
4
Cam Mount Plate Screw Kit
Enclosure Mounting
Power
Page 11
DESCRIPTION
QTY
9
Stainless Steel Black Oxide 4-40 Nylon Lock Nut
4
10
Stainless Steel Black Oxide 4-40 Flat Washer
4
11
Stainless Steel Black Oxide 8-32 x 3/8” Machine Screw
4
12
Stainless Steel Black Oxide 8-32 Nut
4
13
Stainless Steel Black Oxide 8-32 Flat Washer
4
14
Stainless Steel Black Oxide 8-32 Star Washer
4
15
Stainless Steel Black Oxide 10-24 x 1/2” Machine Screw
4
16
Stainless Steel Black Oxide 10-24 Nut
4
17
Stainless Steel Black Oxide 10-24 Flat Washer
4
18
Stainless Steel Black Oxide 10-24 Star Washer
4
19
XSD Enclosure Mount 2” x 5.5” O.C. Mounting Holes
1
20
XSD Short Enclosure Mount
1
21
1/4-20 Hex Bolts, Silicone & Stainless Washers
4
22
24VAC Power Input Cable
1
23
24VAC Accessory Power Cable
1
Network
24
12 Inch Cat5e Ethernet Cable
1
Misc.
25
Liquid Tight Connector
1
X Stream Designs, Inc.
PTZ Camera Enclosure Users Manual
DETAILED USER INFORMATION & INSTRUCTION
Power and Control Systems
X Stream Designs PTZ Enclosures feature two types of power and control systems. The standard control system (X|PSP) and our
smart control system (X|Smart_PSP) both featuring our Power Spectrum Platform power supply.
The X|PSP (Power Spectrum Platform) is the standard power platform for the enclosure models that do not offer rain wiping or
self-cleaning. The X|PSP power supply provides accesory power via multiple power ports (see table below) and is equipped with
mechanical thermostatic switches that open and close at pre-determined temperatures to turn on/off the heat and cooling systems within the enclosure.
The smart X|Smart_PSP system combines the attributes of the standard power spectrum platform along with advanced control
technology enabling the user to communicate with the X|Smart_PSP system via any internet enabled smart device or computer.
It is recommended that the user familiarize themselves with the X|Smart_PSP system by reviewing the user manual prior to startup of the system.
The tables below depict the similarities and differences between the two systems.
Power, Component Control & Monitoring System Comparison
X|PSP
X|Smart_PSP
115/230VAC Input
X
X
24VAC Input
X
X
24VDC Input
X
X
12VDC Ouput
X
X
24VDC Output
X
X
24VAC Output
w/ 24VAC Input
POE (48vdc)*
X
X
Ethernet Switch
w/ 3 Available Ports
Solar Charge Controller
w/ X|SOLAR Model
UPS Battery Backup
POE Power Input
w/ X|UPS Model
w/ Optional Hardware
Remote Power Control
X
Remote Power Monitoring
X
Remote Temp. Monitoring
X
Remote Temp. Control
X
* Both the X|PSP & X|Smart_PSP provide a 48VDC Power over Ethernet port with up to 38 Watts of power. Please note that this POE port
is NOT IEEEE 802.3at or IEEE 802.af compliant. It has been tested on numerous POE powered devices and IP cameras without issues. Use
of this port is at the risk of the user.
Power Supply Chassis
The X|PSP and X|Smart_PSP are contained in a power supply chassis located in the upper housing as shown in Figures 1& 2 below.
Figure 1 - X|PSP
Page 12
Figure 2 - X|Smart_P SP
X Stream Designs, Inc.
PTZ Camera Enclosure Users Manual
The power supply chassis is equipped with two power supply fans, an internal 150 Watt power supply (115/230VAC to 24VDC) and
one of two printed circuit board assemblies (PCBA). The X|PSP as depicted in (Figure 3) is the standard version PCBA, while the
X|Smart_PSP as depicted in (Figure 4) is the smart version PCBA used in the X|Rain, X|Clear, X|UPS and X|Solar enclsosure systems
and available as an option in all other enclosure models if the user desires remote monitoring and control. The following combinations of power input and output are available from the X|PSP and X|Smart_PSP systems.
Power Input and Output Options
INPUT Power
OUTPUT Power
X|PSP
115/230VAC, 24VAC & 24VDC
12VDC [2], 24VDC [2], 24VAC (ONLY when powered
by 24VAC) & 48VDC POE*
X|Smart_PSP
115/230VAC, 24VAC & 24VDC
12VDC [2], 24VDC [2] & 48VDC POE*
X|UPS Enclosure w/ X|Smart_PSP
115/230VAC, 24VAC, 24VDC & 9-28VDC
12VDC [2], 24VDC [2] & 48VDC POE*
X|Solar Enclosure w/ X|Smart_PSP
115/230VAC, 24VAC, 24VDC & 9-28VDC
12VDC [2], 24VDC [2] & 48VDC POE*
* Both the X|PSP & X|Smart_PSP provide a 48VDC Power over Ethernet port with up to 38 Watts of power. Please note that this POE port is NOT
IEEEE 802.3at or IEEE 802.af compliant. It has been tested on numerous POE powered devices and IP cameras without issues. Use of this port is
at the risk of the user.
Figure 3 - X|PSP PCBA
Figure 4 - X|Smart_P SP PCBA
When the system is powered via 115/230 VAC input, the internal power supply converts the voltage to 24 VDC and feeds this power to the internal PCBA. Power is conditioned on this board to provide several available power output options: 12 VDC x 2, 24 VDC
x2, and non IEEE 802.3 compliatnt 48VDC POE. When the system is powered by 24 VAC or 24VDC, the input power is fed directly
into the PCBA thus by-passing the internal power supply. Power is then conditioned to 12 VDC, 24 VDC, 48VDC POE and 24 VAC.
Only the X|PSP system provides 24 VAC to power accessories and only when powered by 24VAC. The X|Smart_PSP system does
not provide 24VAC Accessory power ports.
In addition to the X|PSP and X|Smart_PSP systems, The X|Cold Enclosure system includes two externally mounted 15 VDC power
supplies. These power supplies are located in the chassis box attached to the rear of the camera enclosure (Figures 5.1 & 5.2).
Power is supplied to these 15 VDC power supplies via the 115/230VAC connection inside the camera enclosure.
Page 13
X Stream Designs, Inc.
PTZ Camera Enclosure Users Manual
Available Accessory Port Power
The X|PSP and X|Smart_PSP power supplies along with the different enclosure models have various internal components which
use different amounts of power. If you are powering the system via 24VAC, you are by-passing the 150 Watt power supply
enclosed in the power supply chassis. In this case, the available power is equal to the rated wattage of the 24VAC power supply
minus the System Consumption. If you are powering the system via 115/230VAC, the available power is equal to 150 Watts minus
the System Consumption. Refer to the charts below to determine the available power. NOTE: Regardless of the accessory port
power available, DO NOT exceed the Max Usage for each voltage.
Available Power - When Powered by 115/230VAC
Model
System
Components
System Consumption
(Watts)
Available Power - Accessory Ports
(150 Watt Power Supply Minus Components Usage)
X|Mod
Power Supply & Fans +
Heater
6 + 10 = 16 Watts
150 Watts - 16 Watts = 134 Watts Available
Max Usage Per Accesory Voltage:
12VDC: 54 Watts, 24VDC: 70 Watts, 48VDC POE: 38 Watts
X|Heat
Power Supply & Fans +
Heater + Turbo Fan
6 + 40 + 3 = 49 Watts
150 Watts - 49 Watts = 101 Watts Available
Max Usage Per Accesory Voltage:
12VDC: 54 Watts, 24VDC: 40 Watts, 48VDC POE: 38 Watts
X|Cold
Power Supply & Fans
6 Watts
150 Watts - 6 Watts = 144 Watts
Max Usage Per Accesory Voltage:
12VDC: 54 Watts, 24VDC: 80 Watts, 48VDC POE: 38 Watts
X|Rain
X|Smart PSP Power Supply
Fans + Motor + Heater
7 + 7 + 10 = 24 Watts
150 Watts - 24 Watts = 126 Watts Available
Max Usage Per Accesory Voltage:
12VDC: 53 Watts, 24VDC: 70 Watts, 48VDC POE: 38 Watts
X|Rain w/ High
Heat
X|Smart PSP Power Supply
Fans + Motor + Heater
7 + 7 + 40 = 54 Watts
150 Watts - 54 Watts = 96 Watts Available
Max Usage Per Accesory Voltage:
12VDC: 53 Watts, 24VDC: 40 Watts, 48VDC POE: 38 Watts
X|Clear
X|Smart PSP Power Supply
Fans + Motor + Pump +
Heater
7 + 7 + 23 + 10 = 47 Watts
150 Watts - 47 Watts = 103 Watts Available
Max Usage Per Accesory Voltage:
12VDC: 53 Watts, 24VDC: 70 Watts, 48VDC POE: 38 Watts
X|Clear w/
High Heat
X|Smart PSP Power Supply
Fans + Motor + Pump +
Heater
7 + 7 + 23 + 40 = 77 Watts
150 Watts - 77 Watts = 73 Watts Available
Max Usage Per Accesory Voltage:
12VDC: 53 Watts, 24VDC: 40 Watts, 48VDC POE: 38 Watts
Available Power - When Powered by 24VAC
Model
System Consumption
(Watts)
Available Power - Accessory Ports
X|Mod
18 Watts
24 VAC Power Supply Watts - 18 Watts = Watts Available
Max Usage: 12VDC: 52 Watts, 24VDC: 70 Watts, 48VDC POE: 38 Watts
X|Heat
51 Watts
24 VAC Power Supply Watts - 51 Watts = Watts Available
Max Usage: 12VDC: 52 Watts, 24VDC: 40 Watts, 48VDC POE: 38 Watts
X|Rain
25 Watts
24 VAC Power Supply Watts - 25 Watts = Watts Available
Max Usage: 12VDC: 52 Watts, 24VDC: 70 Watts, 48VDC POE: 38 Watts
X|Rain w/ High Heat
55 Watts
24 VAC Power Supply Watts - 55 Watts = Watts Available
Max Usage: 12VDC: 52 Watts, 24VDC: 40 Watts, 48VDC POE: 38 Watts
X|Clear
48 Watts
24 VAC Power Supply Watts - 48 Watts = Watts Available
Max Usage: 12VDC: 52 Watts, 24VDC: 70 Watts, 48VDC POE: 38 Watts
X|Clear w/
High Heat
78 Watts
24 VAC Power Supply Watts - 78 Watts = Watts Available
Max Usage: 12VDC: 52 Watts, 24VDC: 40 Watts, 48VDC POE: 38 Watts
Note: Max Usage Per Accesory Voltage Is Only Avaiable If The Customer Provided 24VAC Power Supply
Provides Sufficient Power (Wattage).
Page 14
X Stream Designs, Inc.
PTZ Camera Enclosure Users Manual
Figure 5.1 - X|Cold External 15VDC Power Supplies
Figure 5.2 - X|Cold w/ Ext. Power Supply Chassis
Power & Ethernet Connections
Power is supplied to the enclosure power supply chassis via entrance through the black liquid tight cable connector located on
the lower left side of the enclosure door. (Note: To maintain a liquid tight connection after the external power is routed through
the liquid tight connector, silicone or a similar product should be used to seal any air gaps that may be internal to the liquid tight
connector due to irregular cable shape or diameter.) The input power cable is routed through this connector and connected to
the terminal block that is secured to the left hand side of the enclosure door in the upper left hand corner (Figure 5.3).
115/230VAC Input Terminal
Ethernet
Liquid Tight Cable Connector
24VAC Input
Figure 5.3 - Input Power Terminal
The connection of input power from the terminal block to the power supply chassis can either be 115/230 VAC, 24 VAC or 24VDC.
The input power connection to the power supply chassis exits from this terminal block via the 115/230 VAC cable – standard
configuration or the provided 24 VAC input cable and is routed to the power supply chassis for connection to the 115/230 VAC
or 24 VAC input ports using the supplied cable (Figure 5.3). The 24 VAC input port can be found on the underside of the power
supply chassis labeled as “24 VAC input”. 24VDC can be supplied to this same input port if you desire to power the system via DC.
If using the 24 VAC input, disconnect the 115/230 VAC cable from the terminal block and power supply chassis and remove from
enclosure.
Note: Upon power connection to the power supply chassis, the system will be live for the X|PSP power supply systems. The
X|Smart system takes approximately 10-15 seconds to boot up turning on the power supply fans unless they have been disabled
“On Startup” in the control interface settings. Depending on the power supply system - X|PSP or X|Smart_PSP, LED’s will light up
indicating power is available at that location. The X|Smart_PSP system has a blue system light on the face of the power supply
chassis that will blink every 5 seconds indicating the system is operational. It is recommended NOT to power up systems with the
X|Smart_PSP systems until you have reviewed the X|Smart Software Manual.
The input Ethernet connection for the X|PSP system is made via the RJ45 connector located on the face of the power supply chassis labeled “INPUT”. Unless you are planning to use the 48VDC POE port, there is no need to input an Ethernet connection into the
INPUT port. The X|Smart_PSP has an input Ethernet port on the underside of the power suppy chassis leaving two non POE ports
and one remotely switchable POE port on the face of the power supply chassis.
Page 15
X Stream Designs, Inc.
PTZ Camera Enclosure Users Manual
X|PSP Power Supply Accessory Power Connections - X|Mod, X|Heat & X|Cold Enclosure Models
The X| model enclosure systems are designed to accommodate a variety of accessory components (Cameras, NVRs, Cellular Modems, Routers, Network Switches, Encoders, IR Illuminators etc.). Accessory shelves slide into the enclosure at different heights
to accommodate mounted these devices within the enclosure. Devices may also be mounted to the top of the camera mounting
plate. Power is available for these devices from accessory power output ports located on the face of the power supply chassis.
The X|PSP (Power Spectrum Platform) is the standard power platform for the enclosure models that do not offer rain wiping or
self-cleaning. The X|PSP power supply is equipped with mechanical thermostatic switches that open and close at pre-determined
temperatures to turn on/off the heat and cooling systems within the enclosure.
The power options and power ports are located on the face of the power supply chassis. The 12 VDC & 24 VDC power ports function by inserting the power cable into the appropriate ports (-/+) to make the connection to the desired voltage. To release the
power cable, depress the white button above the port and remove the cable. Note: DC power is polarity sensitive. Make sure to
connect ground and positive(-/+) as specified by the manufacturer of the device you are trying to power.
The accessory connection for the 24 VAC (X|PSP version only) output is located on the face of the power supply chassis. This
power option is only available when the power supply chassis is powered by 24 VAC. A 24VAC accessory power cable & connector
is included in the accessory kit to make the connection to this port and the device.
If your camera supports Power over Ethernet(POE), you can power the camera via POE by running an ethernet cable from the RJ45
port labled “POE” to the camera. In this scenario, the incoming Ethernet connection will be made to the RJ45 port labeled “INPUT”
(Figure 5.4). If the POE port is not used, there is no need to use the INPUT RJ45 port - the Ethernet connection would be made
direct to the camera.
NOTE: The X|PSP power supply POE port provides atleast 30Watts of 48VDC Power over Ethernet power. This POE power port is NOT IEEE
802.3at or IEEE 802.af compliant. It has been tested on numerous POE powered devices and IP cameras without issues. Use of this port is
at the risk of the user.
Figure 5.4 - X|PSP Power Supply Chassis & Accessory Power Ports
X|Smart_PSP Power Supply Accessory Power Connections - X|Clear & X|Rain Enclosure Models & Optional Installations
Aside from the remotely accessible web interface of the X|Smart_PSP system and its features, the only differences between
X|Smart_PSP and the X|PSP is the integrated 10/100Mbps Ethernet Network Switch and there is no 24VAC accessory port on the
X|Smart_PSP system. On the face of the X|Smart_PSP power supply chassis are three RJ45 Ethernet ports connected to an Ethernet switch internal to the power supply chassis and one Ethernet port located on the underside of the power supply chassis for
Ethernet input.
It is the X|Smart web interface that allows you to control the dome washing and dome cleaning system, power on/off accessory
power ports and monitor and control the climate system. For specific instructions on the X|Smart interface and its features, refer
to the X|Smart User Manual.
Download the the X|Smart User Manual at: http://xstreamdesigns.com/downloads/XSD_XSmartManual.pdf
Page 16
X Stream Designs, Inc.
PTZ Camera Enclosure Users Manual
Figure 5.5 - X|Smart_PSP Power Supply Chassis & Accessory Power Ports
Good Wiring Practices
CAUTION: MAKE SURE THAT POWER IS COMPLETELY OFF BEFORE WIRING.
MIS-WIRING OR MIS-CONFIGURATION COULD CAUSE PERMANENT DAMAGE TO THE X|PSP and X|SMART_PSP PCBAs, THE
EQUIPMENT TO WHICH IT IS CONNECTED OR BOTH.
Correct Wiring Procedures:
1. Make sure that power is disconnected completely from the power supply chassis.
2. Strip each power wire approximately 4 to 5 mm.
3. Carefully insert the bare end of the wire into the appropriate (-/+) power port minding the voltage (12VDC or 24VDC).
4. Make sure that no bare wire shows.
5. Give the wire a slight tug to make sure that it is in the power port securely.
6. Re-Apply power to the X|Smart_PSP or X|PSP power supply chassis.
Making clean and proper connections to the accessory power ports on the X|PSP and X|Smart_PSP power supply chassis are important. See Figures 5.6 and 5.7 below.
Figure 5.6 - Exposed Wire & Poor Connection
Page 17
Figure 5.7 - Good Connections
X Stream Designs, Inc.
PTZ Camera Enclosure Users Manual
Camera Mounting Methodology
The camera mounting and leveling system accommodates cameras up to 9 inches tall for the stanard version enclosure, up to 11
inches tall for the X|Tended version enclosure and up to 6 3/4 inches in diameter for both versions. The system is designed to provide a ridged platform with the added flexibility of exact positioning and leveling of the camera within the enclosure dome lens.
This system includes a camera mounting plate, threaded rods, hex nuts, thumb screws for height adjustment and cylindrical spacers (Figure 6). A ridged structure is achieved when all of the hardware is secured and fastened in place. (Figure 7) shows how the
components of the system are assembled to achieve a solid camera mounted platform.
The basic concept in mounting the camera is to place the camera into the assembly so the camera is located approximately ¼ to ½
inch from the bottom of the camera dome surface. Once installed, there should be equal distance between the camera and dome
walls all around the circumference of the dome. It is also important to make sure that the camera is level within the bottom tray.
Figure 6 - Camera Mounting Hardware
Page 18
Figure 7 - Solid Camera Mounting
X Stream Designs, Inc.
PTZ Camera Enclosure Users Manual
Camera Mounting Process
Included in the enclosure packaging is a corrugated assembly nest designed to be removed from the packaging and used as an
assembly fixture for mounting the camera to the camera mount system.
Slide the assembly fixture from the packaging and set it on a flat surface. Lay the enclosure on its side and unlatch the two
latches. Open the enclosure while it is on its side. Using a Philips screwdriver, remove the two screws securing the bottom tray of
the enclosure (Figure 8.1). If the enclosure model has the self-wiping/self-cleaning system (X|Rain & X|Clear), the motor cable will
have to be disconnected prior to removing the bottom tray (Figure 8.2). Slide the tray out of the enclosure carefully so the camera
dome does not get scratched or damaged (Figure 8.3). Set the bottom tray and dome into the assembly fixture (Figure 8.4).
Figure 8.1 - Removing the tray screws.
Figure 8.3 - Removing the camera tray.
Figure 8.2 - Disconnecting the motor cables.
Figure 8.4 - Using the assembly nest.
The bottom tray assembly comes from the factory with the camera mounting plate and leveling system installed. This system will
accommodate cameras of different heights. It consists of threaded rod, locking nuts, spacers, adjustable thumbscrews and a camera mounting plate. The height adjustment is performed by rotating the thumbscrews to move the camera assembly up or down
to achieve the desired placement within the enclosure dome. The optimal camera placement within this assembly is to mount the
camera to the camera mounting system to within ¼ to ½ inch of the surface of the inside surface of the camera dome.
If additional height adjustment is necessary, the mounting kit includes threaded rod and spacers of different lengths to accommodate most all camera heights.
Page 19
X Stream Designs, Inc.
PTZ Camera Enclosure Users Manual
Setting the Height of the Camera in the Enclosure Camera Dome
To determine the correct combination of spacers and threaded rod lengths, measure the total height of the camera and any cover,
mounting plate or housing that the camera attaches too.
Enclosures without self-cleaning & wiping systems - X|Mod, X|Heat, X|Cold, X|UPS, X|Solar:
Subtract 3 ¾ inches from the total camera height. The resulting number is the distance required from the top of the thumb-screw
to the mating surface of the tray (Figure 9).
X|Rain & X|Clear Enclosure Models:
Subtract 5 ¾ inches from the total camera height. The resulting number is the distance required from the top of the thumbscrew
to the mating surface of the tray (Figure 9).
Figure 9 - Measuring the height of thumbscrew from tray surface.
Threaded Rod and Spacer Assembly Procedure
If the camera mount configuration as configured from the factory does not provide enough adjustment to achieve the correct
camera height within the dome, it will be necessary to disassemble the standard configuration and re-configure.
To accomplish this, assemble a hex nut to the bottom of the desired threaded rod leaving approximately ½ inch of threaded rod
exposed beneath the hex nut. Thread the rod into the female thread inserts located in four positions on the lower section of the
enclosure. Secure the threaded rod by tightening the hex nut securely at the base of the threaded rod where it meets the enclosure. Tighten securely. Note: over tightening may cause the female insert encapsulated within the polycarbonate to loosen.
Add the spacers to each threaded rod, and secure the spacers with a hex nut. Add the thumbscrew to each threaded rod and
position based upon the calculation performed above (Figure 9.1).
Hex Nuts
Spacers
Thumb Screw
Washer
Figure 9.1 - Threaded Rod Assembly
Page 20
X Stream Designs, Inc.
PTZ Camera Enclosure Users Manual
Attaching The Camera To The Camera Mounting Plate:
There are multiple hole patterns in the X| model enclosure camera mounting plate (XSD mounting plate) used to attach the camera and proprietary camera mounting plate together. To ensure that the camera is properly aligned and located in the center of
the dome, the camera must be mounted relative to the center of the 4 camera mounting plate holes located on each corner of the
camera mounting plate (Figures 10.1 & 10.2).
Figure 10.1 - XSD Mounting Plate & Corner Holes
Figure 10.2 - Mounting Plate & Corner Holes
To attach the camera to the camera mounting plate, align the proprietary camera mount plate that came with the camera to the
XSD mounting plate and check to see if the pre-drilled holes line up (Figure 10.2). If they line up, secure the proprietary camera
plate to the XSD mounting plate using the nuts and bolts in the provided camera mounting screw set. If the pre-drilled holes are
not lining up, center the camera plate on the XSD mounting plate, mark the desired hole locations using a marker and drill the
holes as required. It is suggested to secure the camera with at least 4 nuts and bolts evenly spread around the camera plate if
possible. Once the camera plate is securely mounted and properly centered on the XSD mounting plate, secure the camera to the
camera plate as specified in the specific camera instructions or user manual.
Note: Not all pan/tilt/zoom cameras are able to continuously spin 360º. For example, some only pan 340º leaving a 20º section
where the camera cannot pan too. For cameras that DO NOT pan 360º, it is important to make sure the camera is properly orientated inside the enclosure so that the area where the camera CANNOT pan too is facing the back of the enclosure.
Once the camera is properly secured to the camera mount plate and orientated in the right direction, position the camera assembly onto the threaded rods. Take care to ensure that the camera height was determined correctly and that the camera will not
hit the dome surface when in the final position. Adjust the leveling nuts to ensure that the camera is level and positioned to the
desired height above the camera dome. When leveled properly, secure the camera assembly to the threaded rod assembly using
the supplied washers and hex nuts.
Page 21
X Stream Designs, Inc.
PTZ Camera Enclosure Users Manual
Mounting the Camera Enclosure
Included in the accessory pack are two enclosure mounting brackets. There is a short version and a long version. The long version
(Figure 11.1) has the traditional hole spacing required to mount to an existing type of mounting system with the industry standard hole pattern of 2” W x 5.5” H on center. The shorter mounting bracket (Figure 11.2) can be used where the enclosure will be
mounted directly to a flat surface - concrete, steel, aluminum or wood.
Figure 11.3 - 1/4-20 Fastening Bolts
Figure 11.1 - Standard Mounting Bracket
Figure 11.4 - Sliding the Enclosure onto the Mounting Bracket
Figure 11.2 - Short Mounting Bracket
Figure 11.5 - Securing the Enclosure to the Mount Bracket
To mount the enclosure, first mount the selected mounting bracket to its intended structure making sure that it is level across the
top and that the mounting surface itself is straight without an pitch forward or backward. It is suggested to use 3/8 bolts whether
threaded, lag bolts or concrete anchors. It is also suggested to use either stainless steel or galvanized hardware for installations
near the coast. Once the mounting bracket is securely mounted and level, mount the enclosure to the mounting bracket by sliding the enclosure over the mounting bracket until positive engagement is made between the accessory bracket and the enclosure
housing (Figure 11.4). Once secure on the mounting bracket, carefully open the door of the enclosure taking care not to apply
upward pressure on the enclosure housing which may result in the enclosure slipping off of the mounting bracket. Secure the
enclosure housing to the mounting bracket with the supplied ¼-20 hex bolts (4), stainless washer and silicon washer (Figure 11.3
& 11.5). If mounting an X|Clear model enclosoure, you will have to remove the fluid bottle in order gain access to the four holes in
which the 1/4-20 hex bolts are inserted. Use caution to make sure that these bolts are tight eliminating and movement between
the enclosure and enclosure mount.
Page 22
X Stream Designs, Inc.
PTZ Camera Enclosure Users Manual
GENERAL OPERATIONAL SUMMARY OF ENCLOSURE MODELS
Solid State Air Conditioning – X|Cold
The air conditioning system is intended to keep the internal temperature of the enclosure within the safe operating range of the
electronics housed within the enclosure housing. The cooling system is triggered via an electro-mechanical switch located on the
X|PSP or X|Smart_PSP PCBA within the power supply chassis. The cooling system turns on when the internal temperature reaches
110º F and turns off when the internal temperature reaches 70º F.
Figure 12.1 depicts the components and locations of the Solid State Air Conditioning system.
Figure 12.1 - X|Cold Solid State Cooling Components
Figure 12.2 - X|Cold External Power Supply Chassis
The cooling system operates on the Seeback Effect and Peltier Technology integrating thermo-electric modules along with a combination of heat sinks and fans working together to cool the inside of the enclosure.
There is no exchange of air between the internal camera enclosure cavity and outside air leaving the enclosure completely sealed.
Heat is transferred via internal and external heat sinks through the conduction process.
The air conditioning system is powered via externally mounted power supplies located in the TE chassis box attached to the rear
of the enclosure (Figure 12.2). The system contains two 15 VDC power supplies. These power supplies are cycled on and off via
relays attached to the main power supply controlled by thermostats mounted on the main power supply board.
The mounting bracket for the X|Cold model is a metal bracket that has two vertical fins located on the left and right side of the upper portion of the mounting bracket. These fins fit into two slots located on the face of the power supply box attached to the rear
of the enclosure. To mount the enclosure to this bracket, slightly tilt the enclosure upward and engage the two vertical fins. Lower
the enclosure and secure the chassis box to the mounting bracket by inserting the two screws provided through the mounting
bracket into the chassis box.
At no time should the components of the Solid State Air Conditioning system be dis-assembled or removed from the camera
enclosure.
Page 23
X Stream Designs, Inc.
PTZ Camera Enclosure Users Manual
Heating System – X|Heat
All models with the exception of the X|Cold model are equipped with a flexible silicon heater. This heater is located just behind the
lower and perpendicular section of the power supply chassis (Figure 13).
CAUTION: This surface and surrounding surfaces can be very hot if the unit is turned on. Care must be taken when working near this
surface (Figure 13).
The intended purpose of this heater is to prevent condensation buildup, eliminate moisture, and provide a source of heat when
the temperature drops below 50ºF.
The X|Heat model has a higher wattage heater than the other models and is also equipped with a high circulation fan to facilitate
the movement of warm air throughout the enclosure. For all enclosures equipped with the standard power supply system (X|PSP),
the heater will turn on when the internal temperature of the enclosure drops below 50ºF and will turn off when the internal temperature reaches 70ºF. For the enclosures equipped with the smart system (X|Smart_PSP), the user can define the temperature
range parameters via the web interface.
CAUTION HOT
Figure 13 - X|Heat Power Supply Chassis
Self-wiping System - X|Rain
The self-wiping enclosure system is comprised of a motor, rotating camera dome, fixed wiper and X|Smart_PSP power supply.
This system is designed for use in areas of high moisture and used to keep the camera dome free from moisture and raindrops.
Monitoring and control of the system is achieved via the X|Smart web interface. The wiping function can be activated manually or
scheduled via the web interface. To learn more about the X|Smart web interface, please refer to the X|Smart User Manual.
Download the the X|Smart User Manual at: http://xstreamdesigns.com/downloads/XSD_XSmartManual.pdf
Page 24
X Stream Designs, Inc.
PTZ Camera Enclosure Users Manual
Self-Cleaning & Wiping - X|Clear
The self-cleaning enclosure system is comprised of a fluid reservoir, fluid pump, dome rotating motor, rotating camera dome, fixed
wiper, fluid tube, fluid tube check valves and spray nozzle. The fluid reservoir will take approximately 58 ounces or 1.7 liters of fluid
and should be filled completely prior to operation (Purified or Distilled Water is Recommended). Care must be taken not to spill
washing fluid on the electrical components housed within the enclosure.
Upon initial set up, the user should ensure that the fixed wiper and fluid dispense tube are positioned correctly and that they have
not been jarred out of alignment due to improper handling. Figure 14 show the correct positioning and alignment of the fixed
wiper and fluid dispense tube and nozzle. The dome rotates counter clockwise, therefore the wiper blade should be positioned to
the left of center on the dome lens when looking at the enclosure from the front.
1 Inch
Bottom of Black
Conical Ring
Center of Spray Nozzle
Space between edge of
Nozzle & Wiper = 3/4 Inch
Figure 14 - Dispense Tube Posistioning
When the system is activated via the X|Smart web interface, the following events will occur:
1. Fluid pump is activated and fluid is sprayed onto the surface of the dome
2. Approximately 250ms later, the motor activates rotating the dome against the fixed wiper
3. Aproximatgely 1 second later, the fluid pump turns off
4. Approximately 1 second later, the motor turns off and the dome stops rotating against the fixed wiper
Optional equipment for the X|Clear enclosure model is a fluid tube heater. This option is installed at the factory and is used to
keep the water in the exposed fluid tube from freezing during sub-freezing weather.
The user should test the system prior to leaving the installation site by accessing the X|Smart web interface as described in the
X|Smart User Manual and manually trigger the washing system to ensure best optimization of the fluid spray and dome coverage.
Page 25
X Stream Designs, Inc.
PTZ Camera Enclosure Users Manual
Washing Fluid
Plain water (distilled or purified) is the recommended fluid for this system. However, in environments where the temperature is
expected to drop below the freezing point of water, the system must be drained and refilled with a de-icer such as Prestone DeIcer Windshield Washer Fluid or any other methanol based windshield washer fluid. The material safety data sheet for the chosen
product should be reviewed prior to use to ensure the safe use of the cleaning fluid.
Refilling the Fluid Reservoir
Refilling the fluid reservoir can be achieved by removing the bottle from the enlcosure or leaving the fluid reservoir in the enclosure. Open the enclosure and swing the front housing to the left so clear access to the fluid reservoir can be made (Figure 15).
If re-filling the reservoir without removing the reservoir bottle, unscrew the reservoir cap and remove from bottle. Carefully fill the
reservoir, replace the reservoir cap and intake tube and ensure that the intake tube is positioned into the deepest section of the
reservoir. As you are tightening the cap onto the reservoir neck, hold the PVC output tube to keep it from spinning as the cap is
tightened.
To re-fill the reservoir bottle by removing it from the enclosure, disconnect the fluid level sensor cable connector from the cable
assembly connector. Remove the reservoir cap by turning it counterclockwise and pulling the cap off of the reservoir bottle along
with the fluid intake tube that is attached to the cap. Set aside the cap and tube assembly and remove the reservoir by pulling the
reservoir bottle from the two mounting brackets. Fill the reservoir completely and place it back into the enclosure by securing it
between the two mounting brackets. Replace the reservoir cap and intake tube and ensure that the intake tube is positioned into
the deepest section of the reservoir. As you are tightening the cap onto the reservoir neck, hold the PVC output tube to keep it
from spinning as the cap is tightened. Re-connect the fluid level sensor cable connector.
Flevel Level Sensor
Disconnect
Filler Cap
Fluid Pump
Dome Rotating
Motor
Fluid Bottle
Retaining Clips
Figure 15 - X|Clear Interior Components View
Page 26
X Stream Designs, Inc.