1
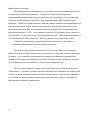
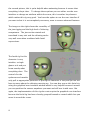
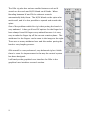
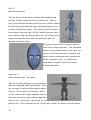
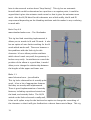
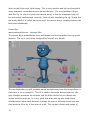
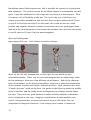
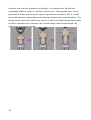
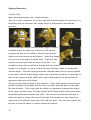
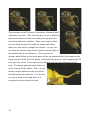
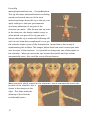
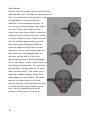
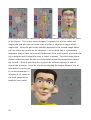
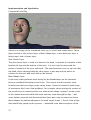
Innovations Report
Design and Implementation of Advanced Character Setup
Sam Ferrar
Bacva3 2007
Abstract
This project is an investigation into the Design and Implementation of advanced
character setup with an emphasis on techniques relevant to a “cartoony” style.
Research and analysis of current character setup techniques has been conducted
and design and implementation of rigging system has been documented.
Contents
1
Introduction
02
Research and Development
06
Online rigs – Ollie
06
Online rigs – Others
10
Rigging Demoreels
15
Gui Research
19
Literature
24
Design and Intentions
26
Implementation and Application
27
Testing and Evaluation
32
Conclusion
33
Bibliography
34
Acknowledgments
35
Appendices
36
Introduction
This project is an investigation into design and implementation of advanced
character rigging techniques. It requires at least a basic understanding of terms
and techniques related to character setup, foundation level terms are not
explained in this report. Setup has been applied to a character model which was
not created as part of this project. Research was conducted to gain information
about what new techniques are being developed and how they can be achieved.
Particular interest is paid to Squash and Stretch elements of setup, the purpose of
this is to develop techniques for “cartoony” character setup in 3D, not realistic
setup. A graphical user interface has been designed and produce as part of the rig
but not completely implemented.
The report documents successful solutions and some information about the
implementation of them, as well as areas of the design and implementation which
could be improved.
2
What I hope to achieve:
The importance and complexity of a rig often goes overlooked because it is
not featured in the final animation. I intend to explore the design and
implementation of character rigging techniques by developing a very advanced
character rig using Maya; specific to one character with a MEL graphical user
interface. I want to do this because I want to explore methods and applications of
squash and stretch in 3D. Squash and stretch is repeatedly referred to as the
most important principle of animation and I don't think that its application has
been fully explored in 3D. I am hoping to give the 3D animator more control of
the character, so it is almost as if he is animating in 2D. Walt Stanchfield talks of
a 2D technique he calls 'cheating'. Here is a quote from some of his notes.
“ 'Cheating' in drawing is a term used when some part of the figure is
adjusted to help make the pose read more clearly.”
This has not been fully explored in 3D. In my rig I hope to incorporate
features so that the the animator has the freedom to pose the character however
he wants. For example he may want to change the relationship between the
lengths of the upper and lower arm or have an elbow curved instead of pointed.
These features are not available in most current character rigs.
The key features which I hope to include in the rig are 'Silhouetting' and
'Volumetrics'. I intend to create controls with which the animator can change the
volume of parts of the character and alter the character to change the silhouette.
These features have not been extensively explored and I intend to develop an
appropriate method for application.
3
I have outlined four main properties the rig must possess upon completion.
These properties are;
Speed
The rig must evaluate fast enough for the animator to use it with ease
and convenience. It is a burden to have to wait around for aspects of the scene to
evaluate while animating.
Intuitiveness
It is important that the animator can look at the rig and immediately
understand what each control does and how it works.
Simplicity
If the rig is too complicated, and by this I mean that the
implementation of the advanced features crowd the base features, then animating
with it will become a great hassle.
Consistency
If the rig is not consistent it may lead the user astray.
The images opposite are from an animation test
found online at www.youtube.com. It is made
by Pixar and the character is from a film called
“Ratatouille” due for release summer 2007.
The squash and stretch features of this rig are
about as advanced currently developed. As you
can see in the first image it is possible to
stretch the limbs of the character with very nice
deformation. From the second image you can
see that it is possible to really squash the
character up; this combination of squash and
stretch gives the feeling of weight and impact
in the final animation.
4
Research Areas for this project
I have a reasonable experience in character rigging but have never
implemented squash and stretch or any other advanced features. In guidance for
the design of the rig I intend to look at a variety of sources. Online tutorials will
be significantly helpful because I will be able to use them to understand how to
build complexity into a character rig. I hope to get a lot of ideas for my rig from
freely distributed rigs available on the Internet. The complexity and usability of
these rigs is extremely varied but I hope that by combining the best features from
all the rigs I will create an appropriate, well developed solution. Because some of
the features that I hope to incorporate in my rig are very new and are still being
developed I will also look to Character Setup Demo reels for guidance. By looking
at Demo reels of character rigs created in other packages, XSI, MAX, etc. I will be
able to try to transfer these techniques and technologies to Maya. I will use
online forums and communities to research the opinions of animators on rigging
and their analysis of aspects of the free rigs. I also intend to use books for
techniques and design, two recommended books which I have looked over and
that I think will prove to be invaluable are “Stop Staring” written by Jason Osipa
and “The Art of Rigging” series from CGToolkit.
5
Research and Development
Online Rigs
Ollie v1.5
www.jugglersanimation.com
William Petrucelli
This is probably the most advanced rig
available freely for Maya. It generally
works very well, has a lot of squash
and stretch features implemented and
is a accompanied by a very full,
polished Graphical User Interface. A
problem with this rig which is obvious
in the picture opposite is that it is very
cluttered and not very intuitive. There
are many control circles on all of the limbs of the character and this is rather
confusing. In actuality the large circles(not present on the legs in this picture as
they are in IK mode) are the FK controls; the small circles are secondary shape
controls which alter the silhouette and volume of the limbs.
In the three images above we can see these controls being used. The first image
is the arm which has just been positioned using the primary arm controls. In the
second image the shape of the elbow has been smoothed away by translating the
secondary shape controls. The third image shows the secondary shape controls
6
having been scaled and therefore completely changed the volume of the arm. The
squash and stretch on the limbs of this character is completely consistent and
have other features such as auto stretch IK, where the limb length resizes if
desired, but with this rig the arm also gets thinner when stretching. This work
brilliantly and view port feedback is reasonably fast.
The pictures above demonstrate the squash and stretch implemented on the
characters head. This is done very nicely, when squashed or stretched the eyes
and mouth deform appropriately. There is only one problem with this and it is
that the controls for the eyelids do not follow the shape of the head. This means
the position of the controls is just a little misguiding and the animator doesn't get
proper feedback from the rig. Apart from basic squash and stretch Ollie also has
some quite advanced features, it has the ability deform as shown in the fourth
picture along and can do so in all three axis. The user can also use another “in
scene” control to manipulate and deform the head in any desired direction. All of
the squash and stretch features implemented on the head are also implemented
on the hands and feet.
You can change the level of geometry of the character, this is a very useful feature
because it means if you are animating in a very heavy scene you can use the low
geometry level and you will still get fast feedback from the rig. There is also an
option to have the characters left and right limbs coloured individually, shown in
7
the second picture, this is quite helpful when animating because it means that
everything is kept clear. To change these options you can either use the user
interface or change an attribute within the scene, this is another key element
which makes this rig very good. You have the option to use the user interface if
you want to but it is not completely necessary, even to access advanced features.
The image on the right shows the versatility of
the jaw rigging and the high level of skinning
competence. The jaw can be rotated and
translated in any axis and the skinning works
very well even when combined with facial
expressions.
The facial rig for this
character is very
intuitive; a single
glance at it and you
know exactly what
everything does. The
controls for the
eyebrows and mouths
only pull to appropriate positions so posing the character is easy and you do not
have to worry about the skinning messing up. You can also access this facial rig
using the graphical user interface window which is very helpful because it means
you can position the camera anywhere you want and still use it with ease. But
again, the implementation of this rig does not require the graphical user interface
because the facial rig has been cleverly grouped beneath a control which lets you
move it around the scene.
8
The Ollie rig also has various smaller features such as IK
stretch on the neck and IK/FK blend on all limbs. When
blending between IK and FK the relevant controls
automatically hide/show. The IK/FK blend on the spine also
works well, and it is also possible to squash and stretch the
spine.
One of the problems with this rig is that posing the hands is
very awkward. It has got IK and FK options for the finger bu I
have always found IK fingers very awkard because it is very
easy to take the finger tip off the correct rotation plane. The
attributes for the fingers can be seen in the image to the right.
There are so many attributes here and this makes posing the
hands a very lengthy process.
Ollie overall is a very advanced, very balanced rig but I think
there is room for improvement in the way the control system
has been designed.
I will analyse the graphical user interface for Ollie in the
graphical user interface research section.
9
Alf v3
www.mrmotion.net
This rig has all of the basic controls well implemented
and the control system for this rig looks nice. This rig
uses joint selection handles which are very useful in Maya
because they automatically show through geometry and
can be selected very easily. The rig for the Alf's hands is
much better than the rig for Ollie's hands because it has
two controls; with one you can alter the curl of the entire
finger and with the other you can define the pose by
altering individual joints.
The facial setup for this character can be
seen in the image opposite. This particular
setup is reasonably intuitive; you move the
curves on the graphical user interface and
each of those represents the relevant part
of the character's face. It is difficult to
read what a couple a few of the curves
actually represent.
Alien rig v1
www.shrtcww.com - Ian Jones
This rig is nicely designed, you know what
almost everything does immediately. There
are a couple of good and bad points about
this rig. The controls for the hips, which
can be seen on the image opposite and are
light blue, are very easily selected and they
also act as a “spirit level” type guide for the
Alien's hips. This character has an “Osipa style” facial GUI, which I will talk about
10
later in the research section about “Stop Staring”. This rig has no automatic
footroll which could be determined as a positive or a negative point; it could be
argued that it gives the animator total control or that it gives the animator more
work. Also the IK/FK blend for this character acts a little oddly, the IK and FK
snap around depending on the blending attribute and this makes it very confusing
to work with.
Basic Guy v2.0
www.timoberlander.com - Tim Oberlander
This rig has limb stretching implemented, it
allows you to stretch in IK and FK mode. It also
has an option of auto limb stretching for the IK
mode which works well. There are however a
few problems with the limb rig for this
character. It has a elbow position attribute
which doesn't work very well, the geometry is
broken very easily. An attribute to control the
position of the elbow is a good idea, it would
allow you to change the relationship between
the lengths of the upper and lower arm.
Bloke 1.1
www.3dcentral.com - Jason Baskin
This rig looks cluttered but it actually quite
good: it has a lot of appropriate features
and they are mostly well implemented.
There is good implementation of stretchy
features, including squash and stretch on
the head, and stretchy limbs. The IK/FK
switch on the limbs also works really well,
It has an IK spline setup for the back and an option to change the smoothing of
the character so that it will give feedback at a decent frame rate in Maya. This rig
11
also has the Osipa style facial setup. This is very intuitive and he has also added
some automatic secondary motion around the eyes. The only problem I found
with this rig, as a basic squash and stretch setup, is that the automatic foot roll
has not meant implemented correctly. After closely examining the rig I found that
the wrong kind of IK solver has been used, this means that is certain positions the
foot twists awkwardly.
Generi Rig
www.andrewsilke.com - Andrew Silke
The Generi Rig is probably the most well known and most popular free rig on the
Internet. The rig is very nicely designed but overall very simple.
The one thing that you will probably notice straight away from the image above is
that there is an on screen UI. This UI is used to select the desired controls, the
grey triangles minimise the controls and the blue crosses let you change the
screen position and size. It is very good that when this rig was made those
considerations were made because it allows the user to determine how intrusive
they want the UI to be, if they want it at all. This rig has a facial wide range of
12
blendshape based facial expressions; this is possibly the reason for its popularity
with animators. The control system for the blend shapes is unfortunately not that
great: it just has attributes for each shape and so posing is a slow process. They
is however a lot of flexibility in the jaw. The rig for the rest of the body is as
simple as possible, probably so that the user does not get confused at all. There
is only IK on the legs and only FK on the spine; this could be seen as a both
positive and negative because it means the animator does not get bogged down
with all of the controls(positive); but means the animator does not have the option
to use IK spine or FK legs if he/she wants(negative).
IKJoe and Packageman
www.rigging101.com - Lluis Llobera and Javier Solsona
IKJoe, on the left and, Packageman, on the right; are rigs which are also
reasonably popular. These rigs are very well designed and to make things easier
for the animators: there are a few different visual helpers. Both of the character
have visual helpers on the hips and shoulders, these are to show the relationship
of the rotation, between each other, and with the floor. Each character also has a
“X marks the spot” guide on the floor; the guide on the IKJoe rig marks the middle
point of the feet, and the guide on the Packageman rig is always directly below
the hips. These are very good because it makes checking whether a characters
pose is balanced or not easy, I imagine a combination of both would be very
useful. Packageman has a squash and stretch setup on his spine, this can
sometimes be dangerous because, if not enough care is taken, it means the
13
character can start the animation one height, in a relaxed pose, and finish a
completely different height, in another relaxed pose. Packageman has a visual
guide which shows how much the spine is squashed or stretched; this is a small
cube which deforms depending on the distance between hips and shoulders. The
images below show this guide more closely; in the first image Packageman's spine
has been squashed to an extreme; the second image show normal length; the
third show an extreme stretch.
14
Rigging Demoreels
Toulouse Rig
www.characteranimator.com – Bernhard Haux
This rig is from a character for a short film which involves physical comedy so it is
important that the character has a wide range of deformations and flexible
controls.
The surrounding images show the wide range of control
available within the character's facial rig. The rig was
designed so that it is possible to get very wide mouth
shapes and very narrow mouth shapes. In the first image
you can see an example of a wide pose. There are also
controls to move and scale the parts of the face. It is
possible to move the mouth up and down and the second
image is an example of a pose in which the eye has been made a considerable
amount larger. The third image shows the character with a lot of squash applied
to the head, and the fourth image shows one of the ways in which it is possible to
deform the character head. When all of these deformations are performed the
geometry stays very much intact.
The rig on the body and limb is very complex. It has been design so that it has a
broken hierarchy, this means that the user can freely translate parts of the body
like the shoulder. The rig give you the ability to completely changing the length
of the upper or lower parts of limbs and the IK/FK blend works perfect even when
interpolating between rotation and scale. You can also mix between the way in
which you want to control the part of the limb, for example you can control the
upper arm in FK with the lower arm in IK and vice versa. You can also smooth out
the arm so that the elbow is smooth instead of pointed.
15
These images show Toulouse's secondary silhouette and
volumetric controls. I like the way they are on a different
layer to the other controls, this makes the rig a lot less
confusing and more intuitive. There are controls which
you can drag around to change the shape and others
which you can scale to change the volume. As you can
see from the fourth image these controls are throughout
the whole body of the character. This rig also has
options which allow you to move parts of the rig automatically, like snapping the
hand controls of the IK to the hands, symmetrizing the pose, and snapping the FK
to IK and vice versa. These can be very helpful and save the animator a lot of
time. The image opposite shows the use
of the control at the elbow. This is a very
unique control which lets the user place
the elbow wherever desired. You can use
it to put a bend in the limb when it is
stretched and also break the joint.
16
Ferret Rig
www.giorgiobertolone.com - GiorgioBertolone
This rig has many advanced features including
squash and stretch but one of the most
interesting things about this rig is that you can
apply settings so that you get automatic
secondary animation of any part of the
character you want. I like the way this rig looks
in the view port, the design makes it easy to
select which ever part of the rig you wish. I
believe that this rig is made with Softimage XSI
and I do not know how complicated it is to get
the controls drawn on top of the character but I would like to find a way of
implementing this in Maya. The images below show how much control you have
over the eyes of the character. It is possible to change the size of the pupils on
the character. When you move the eyes around the eyelids and eye sockets
automatically move, this could be a very efficient feature.
When you move the IK control for the character's arm it automatically moves the
position of the shoulder, this is
shown in the images on the
right. This helps make the
skinning of the shoulder
considerably easier.
17
Face Machine
Found on forum at www.cgchar-animation.com
www.anzovin.com - Raf Anzovin and Jed Mitchell
This is a transferable facial rig which is still
in development, because of this the
interface is not completely finished. As
you can see from the image on the right it
uses the “Osipa style” facial controls.
Apart from using these sliders to pose the
character's face, you can also use a variety
of surface based controls. These controls
are very well designed because you can
drag them when viewing the character
from any angle and they slide correctly
along the surface. In the image opposite
the control has been dragged from the
view you can see and it is still in an
appropriate position instead of dragging
off out into space. A nice cheek crease has
also formed automatically. You also have
the freedom to display controls for many
layers of lower detail. This allows you to
make the slightest changes to the pose
and reshape any small detail. The mesh
appears to respond well to all of the
controls and you even have the possibility
of making big structural changes to the
face, such as completely moving the
positions of the corners of the eyes.
18
GUI Research
Ollie v1.5
www.jugglersanimation.com
William Petrucelli
This interface is very complete and very good
looking, but in my opinion it could have been
designed slightly better. This picker for the body
works very well and is nice and simple. It is very
helpful that you can select and key everything with
the click of a button, I think this will save a lot of
time.
I think this is a more appropriate use of a picker
for selection, it could be tricky to select the fingers
in the viewport and this makes it a lot easier.
I think this tab has been made to solve the
problem of the controls of the eyelids not also
showing relevant feedback for the animator. If you
squash and stretch the head the controls stay
completely still and can sometime be engulfed by
the geometry of the head. Having button to select
parts of the eyelids means that the user can always
select the relevant controls with ease.
19
Having a window with your facial interface is a good
idea because it means that the user can pan around
the character and still see the facial interface
clearly.
The next two images show the tabs for the
predefined poses on the brow and the mouth.
Predefined poses are a way nice way of posing the
character very quickly without moving all of the
controls, although I do not think that this is a very
good way of setting it out. With all of these
predefined poses you spend a lot of time looking
for the pose you want, I think it should be more
simple, with less poses and a way of setting brows
and mouth with less clicks and less time searching
for the pose you want. Also the images are quite
small which makes it quite difficult to distinguish
between poses.
There are also other tabs, info, bend and controls, I have chosen not to show
images because hey serve little relevance. The only relevant part is that on the
controls tab you have a button with which you can change the level of display of
the geometry as shown earlier in the Ollie main section.
20
Edgard 1.5
www.mrsolo.com – Marcelo R. Ortiz
This is a free character rig with a very extensive GUI
for XSI. I have not had the opportunity to use XSI
and test the rig and GUI but I have watched the
demo video of the rig to try and gain some ideas for
GUI design.
I really like the way he doesn't just have an image to display the pose he also has
a words to describe it. This works great and it makes it very easy to see and
select a pose. You can see this in the second image above. In the third image you
can see he has a lipsync section where he has pictures and text for the predefined
phoneme poses. I do not think the images are necessary here and they take up a
lot of space. The fourth image shows the predefined poses for the hands and this
is very useful because posing the hands can take a long time because there are a
lot of attribute which need altering. I think that he could have a better way of
setting it out though. I do not think it is necessary to have two sets of images, in
my opinion it would be better if there was just a button for the left hand and a
button for the right hand beneath each pose.
21
The
first image above show a part of the interface that can be used to select the joints
of the fingers. This is very nicely designed, it means that you can select any
single joint and also you can select rows of joints or all joints in finger with a
single click. Using the part of the interface depicted in the second image above
you can select any control on the character, I do not think this is a particularly
important thing to have an external GUI because if the main control system for the
rig is designed well it should be easy to select it anyway. The third image above
shows a selection panel for the one of the facial rig and the image below shows
the second. I think it good that the rig gives the animator options of how to
control the character. It can be very tricky selecting the tongue because it in an
area which is hard to get
to, an extra method of
selecting it, as shown in
the third image above
would be very useful.
22
Toulouse Rig
www.characteranimator.com – Bernhard Haux
This UI works really nicely and has a lot of really useful features. I am not sure
how it has been made but I think that the layout of this
GUI is a bit more complicated than I will be able to
achieve using MEL. One of the interesting features which
can be seem in the image opposite is IK to FK matching
and FK to IK matching. It also lets you snap the IK handle
of each limb to their relevant Joints; also a good feature
which will minimise IK snapping. It will also let you
symmetrize pose and animation, which could save a lot of
time when posing a cycle. There are also button to key
FK and IK for each limb.
The facial tab has predefined poses but the images are
cropped such that the area of interest is obvious.
Buttons to select/reset/key/hide/show the facial controls
system are very useful because it saves the user a lot of
time and hassle. This GUI has an area for the lipsync
blocking where the poses are just labeled by the
phonemes which means they do not take up a lot of
space but are extremely intuitive.
The hands tabs has predefined poses for the hands and
has an image for each pose and a button for each hand,
this works well and is saves space on the Gui. It also has
a picker for selection of the hands and a way of keying
and selecting all controls for each
23
Literature
Stop Staring Facial Modeling and Animation Done Right
Jason Osipa
“Stop Staring” is considered an exception reference for facial setup and animation
in 3d, but the part of the book in which I am interested is the slider panel setup.
“Interface is everything, everything, everything.”
The whole point of rigging a character is so that the animator has an easy way of
establishing the desired poses. With a blend shape based facial setup you have
are given one slider for every blend shape, which is counter intuitive because it
means that the more blendshapes the longer it will take to pose the character.
What Osipa suggests is a way of combining multiple blendshapes into a single
control, this means you have less attributes to place and less objects to key.
Eg. If you had the four blendshapes; smile_left, smile right, grimmace_left, and
grimmace right; you can combine these into a single control which is very intuitive
, quick and easy to use. It is a fantastic idea and very easy to set up because all
you need is a few connections/scripts to link the controlling sliders to the
blendshapes. Further more this is made even more simple because Jason Schleifer
has written a script to help you create these sliders. All you have to do once you
have your blendshapes is tell the script where to make the links and it does it for
you, creating text and frames. This means that you can concentrate on making
each slider intuitive and not worry about application.
24
Apple Human Interface Guidelines
As apple are pioneering in innovative interface solutions with the control system
on the Ipod and their operating system, OSX, I thought that it would make sense
to take a look at their design guidelines. I think the theories will be applicable to a
character rig because a rig is essentially an interface for the animator to control
the character. I read through a few chapters and picked a few self explanatory
quotes which I think are relevant to my project.
“Even software that uses the most optimal algorithms may seem slow if it spends
more time processing data than responding to the user.”
“Avoid waiting until end of your development cycle to do performance tuning.”
“Focus on solutions, not features.”
“Establish intelligent default settings for your program.”
“Try not to overwhelm users by presenting too much information at once.”
“Provide useful error messages...”
“Make sure your user interface behaves in a predictable way”
Although these all may seem very obvious it is not very often you find a rig which
complies with all of them. I intend to refer to these when designing my rig
because I think that it will vastly improve the performance and interactivity of my
rig.
25
Design and Intentions
Facial Rig Design
I want to create a very full facial rig, it must have a wide range of motion because
it is meant to be “cartoony”. I intend to build it in layers so that the animator can
make large changes and also tweak the poses as he wishes. I want the animator
to be able to work on each of the layers in any order he pleases. The rig should
have predefined poses to save the animator time and they should be a way of
selecting, reseting and keying each of the control layers. The main driving force
of the facial rig will be an “Osipa Style” slider panel.
Limb Rig Design
I want the animator to be able to stretch the limbs in IK and FK as well as change
the length relationship between the upper and lower parts of the limb. I will also
look into implementing some controls to alter the shape of the limbs.
Spine Rig Design
I think that it is necessary that the character has a stretchy spine and I will look
into techniques of how this can be implemented.
Graphical User Interface Design
I want the interface to be compact and efficient; the larger the interface the less
room you have in the viewport, so if there wasted space on the GUI then it will
be taking away space viewport space unnecessarily.
I have thought of a few ways of saving space which are also very intuitive
solutions to other problems. For predefined facial poses where you have an
image to display the pose, you could split the image vertically into three parts and
run commands so that the top part only changes the brows, the bottom part only
changes the mouth and the middle changes both. This is a very efficient use of
space. This could also be done with the hands, if you click on the left hand side it
changes the left hand and if you click on the right hand side it changes the right
hand. This would be a vast improvement on all of the GUIs seen in my research
section.
26
Implementation and Application
Completed Facial Rig
Above is an image of the completed facial rig, it is built with many layers. These
layers include a skin cluster layer, a blend shape layer, a wire deformer layer, a
lattice layer, and a cluster layer.
Skin Cluster Layer
The skin cluster layer is used as a base for the head, it controls the rotation of the
head at the top and the bottom of the neck. It is also used to preserved the
points of rotation of the eyes and teeth. The transformations are set up such that
the head can be changed with the other layers in any way and the points of
rotation for the eyes and teeth will not be altered.
Blend Shape Layer
I had some initial problems with setting up the blendshapes on the character
because standard blendshapes are linear. This means that the vertices move
linearly from the base shape to the target shape. Because I wanted a wide range
of movement this I had a few problems. For example, when moving the corners of
the mouth from a normal position to a wide mouth shape, vertices's at the corner
of the mouth intersected with the teeth and they show through the lips. I did
some further research and discovered that there was a way to create non linear
blend shapes by making inbetweens for each target shape. I found a few scripts
that would help speed up this process. I animated a ten frame sequence of the
27
character going from the base pose to each target pose using a temporary rig.
Then I used the animation as a target for a duplication of the mesh and used a
script called, animToBlend.mel, by Joe Harkins, this script makes a duplicate of
the animated mesh on each frame and renames them appropriately. I then used
his exportBlends.mel script to move all of the blends into their own files, this
meant that I could work and rework parts without affecting others. I brought all
these blendshapes back into the working scene and applied them to the base
mesh which was being affected by the skin cluster layer. I used a script called
importBlends.mel, again by Joe Harkins, it saves a lot of time because it loops
through a chosen directory and imports all of the files and links the target shapes
to the base shape. This was incredibly helpful because it meant that I could run
tests quickly and easily, and had the option of going back a stage without wasting
a lot of time. Once all of the blendshapes were finalised and applied to the base
mesh I used Jason Schleifer's jsFacialWin.mel script to set up the my own “Osipa
Style” slider panel. I tried to make it as intuitive as possible by linking appropriate
blend targets into the same control and arranging all of the finished sliders into a
easy to read panel. To finalize this panel I created a few scripts to save me time, I
made some loops that would go through the facial panel and reference the
objects that I did not want the animator to be able to select and color the controls
to make them more visible.
Wire Deformer Layer
After more research into rigging techniques I discovered the wire tool, it is a
deformer which uses a curve to deform the mesh. I saw a rig which used one
vertical wire tool inside the head and I assume this is what is used on the Ollie
character. I experimented with the placement of this deformer and tried using
more than one and tested how moving/altering them effected the head. I found a
really nice combination by applying one in each axis, in the order YXZ, once this is
done I tried some different combinations of weights. You can severely alter the
shape and volume of the characters head by moving a combination of vertices's
together. I created a control system for this that I thought was appropriate and
intuitive and can be seen in bright green on the image at the beginning of this
chapter.
28
Lattice Layer
I used a lattice create an overall squash and stretch on the character's head. To
make this simple for the animator I piped the inverse of the scaleY into the scaleX
and scaleZ so that you could very easily get a simple uniform squash or stretch on
the head and all objects associated with it eg. eyes, teeth.
Cluster Layer
The cluster layer is very important because it gives the animator the opportunity
to tweak the pose past the limitations of the blendshapes. The problem with
clusters when they are created is that they do not move with the mesh, this is the
problem which I explained with the Ollie rig in that his eyelid controls were not
moving when his face squashes and stretches. I did some research to see if there
were any tools out the to solve this problem and found a script by Erick Miller
called hyperRealMeshParent, this parents the clusters to the nearest point on the
mesh. This meant that the clusters moved with the deformations of the face and
the animator get perfect feedback where it is easy to tell which cluster effects
each area. The control system for the clusters is made by point constraining
control curves to the clusters, this is so that they also follow then mesh, then I
wrote a scriptJob so that when each of the controls is selected it select the cluster
beneath. This gives the illusion you are moving the control and means that the
transformation is applied properly to the cluster. The scriptJob is created when
the GUI is initiated.
Completed Limb Rig
I have made the limb rig so that the user has a lot of control in IK and FK. I made
joint chains for FK, IK and real as you would on a normal FK/IK blend but I altered
the way each joint chain worked slightly and added another chain myself. The IK
joint chain and control system is very similar to a normal IK setup but I have
added a stretchy attribute and created a utility node network that makes the limb
stretch to the IKHandControl if the stretchy attribute is correctly set. I spent a lot
of time getting used to utility nodes, it would have been a lot faster to make if I
had used expressions but using utility nodes means that the rig is a lot faster to
use. Utility nodes are much quicker than expressions because Maya does not
have to interpret them; they are built in, so Maya can just evaluate them. The FK
29
arm is very simple as well, just controls parented and constrained in a similar way
as usual. I connected the scaleX value of the controls to the translateX value of the
corresponding joints through a utility node network. This makes the joints and
controls scale together, and you can not only stretch the joint but you can change
the length relationship between the upper and lower arm. The joint chain which I
added myself is based on ideas from an IK setup but gives the user much more
control. I created a control at the elbow and one at the wrist and used Null
networks to get the length between the shoulder joint and the elbow control, and
the elbow joint and the wrist control. I used this value to drive the joint lengths,
then I point constrained two objects to the shoulder joint and elbow joint and aim
constrained them to the elbow control and wrist control respectively. I used these
objects to drive the rotations of the joints. This setup meant that you could move
the elbow or wrist anywhere and the joints not only point in the right direction but
change to the correct length. The next stage was to layer this on top of the IK
joint chain, I point constrained a locator as a holder to the IK elbow joint and then
parented the newly created elbow control to this. I parented the wrist control for
the new joint chain to the IKHandControl, now the new joint chain follows the IK
joint chain exactly and you can offset the elbow using the elbow control. This
means that you effectively have an IK joint chain where it is possible to change the
relationship between the lengths of the upper and lower arm and break the IK
arm. This is a good remedy for joint snapping because if you break the IK arm it
will not snap to straight it will snap when broken, so you can straighten the arm
completely without it snapping to position. It also means that you can offset the
stretched arm, a simple stretchy arm setup that you will see in many tutorials on
the Internet will mean that the IK arm must be straight before it will stretch. The
elbow control I have created allows you to offset the elbow when stretched so you
can have a bent or broken arm. Once all of the joint chains were complete I set
up the FK/IK blend to mix between the rotations of the new joint chain and the FK
joint chain and created another utility node network to blend between the relevant
joint lengths. This elbow control feature is not implemented in any of the free
rigs.
The foot rig was made with a normal reverse foot setup and a simple FK
setup. The hands rig allows the user a bit more control than normal, it lets you
30
choose whether you want the hand aligned with the joints of the lower arm or
parented to the world. Having the hands aligned with the arm makes animating
arm swing on a walk cycle easier because the hands follow the arms nicely. When
the hands are parented to the world it makes the animator life significantly easier
if the character is pushing or pulling objects because the hands will stay relative
to the object and not relative to the arm.
Completed Graphical User Interface
You can see all of the features designed into the Graphical User Interface in the
user manual, Appendix I. I am going to briefly explain a few of the most
interesting solutions.
The Squash&Stretch check box in the Bind frame on the Benny tab is one of my
favorite features. You can use this to toggle whether the advanced deformers
evaluate. I think this is a fantastic addition because it means that if the animator
doesn't want any squash and stretch on the head, he can turn this off while
working with the facial controls and the clusters and sliders will respond around
three times faster. I think this is an excellent solution to the problem of slow
viewport feedback.
The Character field is also something that was not particularly difficult to
implement but dramatically alters the versatility of the rig. This makes it possible
to have more than one of the same character in the scene and the Graphical User
Interface to work for both. Although simple to make this required quite a lot of
planning because it means that the character name had to be passed into every
procedure and used in every command.
I used scripts to generate the code needed for most of the procedures in my
Graphical User Interface. This saved me a lot of time because it meant that I did
not have to type out line after line of commands or all of the object names. I could
just copy and paste the output from my script editor into my procedures. For
example I created a script to save facial poses meant that instead of writing
setAttr commands for every attribute on every control of the facial sliders, I could
select all of the sliders, run the script and copy all of the code from the script
editor. This save pose script is applicable to anything, so I could use it on any
control system and very easily create shelf buttons to set predefined poses.
31
Testing and Evaluation
I did a lot of testing during the implementation of the project. Because I have not
made a complete rig it is not possible to get an animator test it. I am very
pleased with the direction the project took, I was very lucky to find a character
model which I could use for implementation, I also used the eyes textures and
eyebrow textures from the original file. This was fantastic because it meant that I
did not have to spend time designing and modeling the character and could
spend more time developing ideas for the rig and implementing them. There is
only one thing I would change about the model used and that is that it is that the
resolution of the mesh is a bit high.
I would love to spend more time on this rig so that it is complete and the
Graphical User interface is fully implemented. I would not change the design of
the Interface but I would improve the currently implemented features. At the
moment it is not possible to save the state of the interface so it takes a few clicks
to get it in sync with the character. I think I used my research wisely and it made
an incredible impact on my project, if I hadn't been so thorough I don't think I
would have achieved anywhere near the amount I have.
I believe that my project works as a solutions to the problem outlined in my
introduction. The Squash and Stretch systems I have implemented work great and
this is the area in which I was most concerned. In terms of the four properties I
outlined, speed, intuitiveness, simplicity and consistency, I think I have done well.
Everything which has been developed in the rig is optimised and runs as fast as it
possibly could, because of the layers of deformers it seems slow but there is not
other way to get that range of control. I am very pleased with the design of the
rig and I consider it to be intuitive to any user with a knowledge of character
setup. The rig has worked well in that it has many complex layers but when
presented to the user looks reasonably simple. I have kept the rig consistent in
that the limb rig and control system is as similar as possible on the arm and legs.
I am a bit annoyed that I didn't get the chance to more time researching into the
implementation of silhouetting controls on the limbs, I spent a reasonable amount
of time looking into the maths of adding a spline with which it would be possible
to deform the limbs and way of getting it to align correctly but unfortunately I
couldn't get anything final implemented.
32
Conclusion
I have learnt a lot about design and implementation of character setup from this
project. I think one of the most important things I have learnt is that there is no
perfect solution for a character rig, every animator will have a different opinion
about the design of the rig and this will depend on what he is trying to animate.
If possible it is best to give the animator as many opportunities to turn things on
and off as possible. For example, the IK limb rig on my character works exactly
the same as a standard IK control except that if the animator chooses he can use
the elbow control for more advanced manipulation.
My research saved me a lot of time because it meant that I had a good knowledge
of tools and scripts that were already out there and this meant that I did not
reinvent anything during implementation. One of the greater time savers I found
was a script at rigging101.com which is rigging101 wire controllers, which
launches an interface from which you can select controls made with nurbsCurves.
This is helpful because it meant that I did not have to create the curve shapes
myself.
I am quite annoyed that I have not had the opportunity to write about all of the
aspects of character setup I have developed in this project in the detail needed to
understand their implementation fully.
I have completely finished the facial rig and the all of the graphical user interface
elements which relate to it. I have finished the limb rig and implemented it on the
left arm and leg.
There are a few things which I intend to change when I start working on the rig
again, one of which is the placement of the joints in the spine. The structure of
the stretchy IK splines works well but I think that the joints on the neck should be
higher and will course a problem during skinning in their current position.
I would have liked to make a really nice demonstration video of the finished
solutions of the rig but because of software and hardware limitations I had to
settle for a very low frame rate video, without sound; and it does not look very
good. The only purpose this video could serve is as visual content for a verbal
presentation where a real time Maya demonstration is not possible.
33
Bibliography
I used the references below for general animation notes and principles. I used
these to help identify the problem.
Thomas, F. and Johnston, O., Illusion of Life
Williams, R., The Animators Survival Kit
http://www.animationmeat.com/
http://www.brianlemay.com/lipsyncbook/squash.html
http://home.comcast.net/~harrymott/principles2-1.html
The following references were used for rigging guidance and a basis for my
development. I found that there are very few books which are actually helpful
with 3d rigging techniques and any Maya specific books are extremely simple and
dated. I used the Internet as the main source for information on rigging.
Osipa, J., Stop Staring, Facial Modeling and Animation Done Right
SuperToon Facial Modeling and Rigging by Joe Harkins and Jeff Bernstein,
Distributed by AutoDesk
http://staff.ci.qut.edu.au/~barkerc/Final%20PAN%20website/charactersetup.htm
http://www.cane-toad.com/tuteRig_Shoulder.htm
http://www.anticz.com/eularqua.htm
http://www.jawa9000.com/technical/fk-ik-arm/fk-ik-arm.htm
http://www.darksuit.com/tutorials/StretchSpine.html
http://www.rigging101.com
I used the forums below to research animators opinions on rig design and
solutions.
http://www.cgchar-animation.com
http://forums.cgsociety.org
I used the Maya Help Documentation for help and instruction with MEL and
general Maya issues especially Maya Utility Nodes.
34
External scripts and files used in the implementation of this project
jsFacialWin.mel written by Jason Schleifer, www.jonhandhisdog.com
jsOrientJointUI2.mel written by Jason Schleifer, www.jonhandhisdog.com
rigging101wireControls.mel by www.rigggin101.com
superToonFacialProcs.mel written by Joe Harkins
hyperRealMeshParent written by Erick Millar
The character model used in this project is not made by myself and redistribution
conditions require that the following state is produced.
Copyright (c) 2006 Pixar
Another condition is that the name Pixar may not be used in the promotion or
endorsement of product derived from this software and thus Pixar is not
mentioned in the main body of this report.
Acknowledgments
Thank you to all of the people who distributed free rigs which enabled me to
conduct this research.
Thanks to James Whitworth, Henry Bush, Luke Titley, Tim Chauncey and Oleg
Troy.
Special thanks to Ari Sarafopoulos for guidance on this project.
35
Appendix I
Benny Rig User Manual
36
Appendix II
MEL code for Graphical User Interface
37


![Roostloggers [Titley] - An Introductory Manual](http://vs1.manualzilla.com/store/data/005649014_1-8c618e497bb2550a491bca85d50a292e-150x150.png)


![reply_card [Converted] - TheMysticHelming.mono.net](http://vs1.manualzilla.com/store/data/005649301_1-3a046a309a634867449ff92cdd957a65-150x150.png)