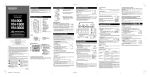
1
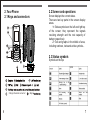
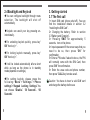
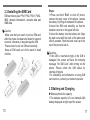
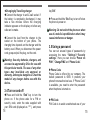
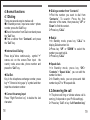
Copyright @ 2009 Olive Telecommunications. All rights reserved. Olive Telecommunication Private Ltd, Design and technology for the connected World. The Mobile Original Logos are registered trademarks of Olive Telecommunication. The information contained in this User's Guide is written for Olive V-G2300.Olive Telecommunication reserves the right to make changes to any of the products described in this document and also reserves the right to revise this guide at any time without any prior notice. This device may contain accessories, technology or software subjected to export laws. Statement The contents of this manual maybe different with the cell phone please refer to the menu according to the cell phone. Olive Telecommunication reserves the right to revise this document or withdraw it at any time without prior notice. Olive Telecommunication Private Limited CONTENTS 1. GENERAL INFORMATION 1.1INTRODUCTION 1.2 WARNINGS AND CAUTIONS 1.3 ABOUT YOUR DEVICE 1.4 NETWORK SERVICE 2.YOUR PHONE 2.1 KEYS AND CONNECTORS 2.2LCD AND OPERATIONS 2.3 STATUS SYMBOLS 2.4 BACKLIGHT AND KEYLOCK 3.GETTING STARTED 3.1 THE FIRST CALL 3.2 INSTALLING THE SIM CARD 3.3 BATTERY AND CHARGING 3.4 TURNING ON AND OFF 3.5 USING PASSWORDS 3.6 USING HANDFREE ACCESSORIES 4.NORMAL FUNCTIONS 4.1 DIALING 4.2 ANSWERING THE CALL 4.3 SELECTION DURING THE CALL 1 1 1 3 4 6 6 7 7 8 9 9 10 11 14 15 17 18 18 19 20 5.MENUS 5.1 MESSAGES 5.1.1 CREATE MESSAGE 5.1.2 INBOX/OUTBOX/DRAFTBOX 5.1.3 VOICE MAIL 5.1.4 MESSAGE SETUP 5.1.5 BROADCAST MESSAGE 5.1.6 DELETE ALL 5.2 CALL RECORDS 5.2.1 MISSED CALLS 5.2.2 RECEIVED CALLS 5.2.3 DIALED NUMBERS 5.2.4 CALL DURATION 5.2.5 DELETE CALLS 5.3 CONTACTS 5.3.1 SEARCH 5.3.2 ADD 5.3.3 STORAGE STATUS 5.3.4 STORAGE MEDIA 5.3.5 SPEED DIALS 5.3.6 CALL GROUPS 5.3.7 DELETE ALL 5.3.8 COPY 22 22 22 23 24 24 25 26 26 26 26 27 27 27 28 28 28 28 28 28 29 29 29 5.4.1 PROFILES 5.4.2 TONE SETTINGS 5.4.3 SHORTCUT SETTINGS 5.4.4 DISPLAY SETTINGS 5.4.5 TIME & DATE 5.4.6 CALL SETTINGS 5.4.7 PHONE SETTINGS 5.4.8 SECURITY SETTINGS 5.4.9 FACTORY DEFAULT 29 29 29 30 30 31 31 32 32 33 5.5 RADIO 33 5.6 NETWORK SERVICE 34 34 34 5.4 SETTING 5.6.1 NETWORK SELECT MODE 5.6.2 CALL WAITING(NETWORK SERVICE) 5.6.3 CALL FORWARDING (NETWORK SERVICE) 5.6.4 CALL BARRING 5.7 APPLICATIONS 5.7.1 ALARM 5.7.2 CACULATOR 5.7.3 CALENDAR 35 35 35 35 36 36 5.7.4 MEMO 5.7.5 STOPWATCH 5.7.6 TIME ZONE 36 36 37 5.8 GAMES 37 5.9 SIM TOOL KIT 37 6. APPENDIX 38 38 39 39 A: Text input B: Accessories C: Enhancement 1.General Information 1.1 Introduction Thank you for purchasing this product from our company. This booklet explains the features and functionality of this handset. Please note that from time to time our company may upgrade the software of a product and this may not always be reflected in the user guide. 1.2 Warnings and Cautions ACCESSORIES (CHARGER, BATTERIES,HEADSET) Use only accessories approved by producer for use with this particular model. The use of any other types may invalidate any approval or warranty, and may be dangerous. Make sure the temperature of phone is maintained from 10℃ to +50℃. SWITCH ON SAFELY Do not switch on the phone when wireless phone use is prohibited or when it may cause interference or danger. 1 ROAD SAFETY COMES FIRST Obey all local laws. Always keep your hands free to operate the vehicle while driving. Your first consideration while driving should be road safety. INTERFERENCE All wireless phones may be susceptible to interference, which could affect performance. SWITCH OFF IN HOSPITALS Follow any restrictions. Switch the phone off near medical equipment. SWITCH OFF IN AIRCRAFT Follow any restrictions. Wireless devices can cause interference in aircraft. SWITCH OFF WHEN REFUELING Do not use the phone at a refueling point. Do not use near fuel or chemicals. SWITCH OFF NEAR BLASTING Follow any restrictions. Do not use the phone where blasting is in progress. 2 QUALIFIED SERVICE Only qualified personnel may repair this product. WATER-RESISTANCE Your phone is not water-resistant. Keep it dry. BACK-UP COPIES Remember to make back-up copies or keep a written record of all important information stored in your phone. CONNECTING TO OTHER DEVICES When connecting to any other device, read its user guide for detailed safety instructions. Do not connect incompatible products. EMERGENCY CALLS Ensure the phone is switched on and in Service Dial 911 or 112 & then press send. Do not end the call until given permission to do so. 1.3 About your device The wireless device described in this guide is approved for use on GSM 900 and GSM 1800 3 networks. Contact your service provider for more information about networks. When using the features in this device, obey all laws and respect privacy and legitimate rights of others. When taking and using images, obey all laws and respect local customs as well as privacy and legitimate rights of others. your device. If so, they will not appear in your device menu. Your device may also have been specially configured. This configuration may include changes in menu names, menu order and icons. Contact your service provider for more information. 1.4 Network services To use the phone you must have services from a wireless service provider. Many of the features in this device depend on the wireless network . These network services may not be available in all networks or you may have to make specific arrangements with your service provider before you can use network services. Your service provider may need to give you additional instructions for their use and explain what charges will apply. Some networks may have limitations that affect how you can use network services. For instance, some networks may not support all language dependent characters and services. Your service provider may have requested that certain features be disabled or not activated in 4 5 2. Your Phone 2.1 Keys and connectors 2.2 Screen and operations Screen displays the current status. There are two key parts in the screen display areas: 1> Status symbols on the left and right top of the screen; they represent the signals receiving strength and the rest capacity of battery respectively. 2> Text and graphs in the middle of area, including numbers, texts and active symbols.。 10 ABC GHI PQRS JKL TUV DEF MNO 2.3 Status symbols WXYZ Symbols on the top: (Charger/Headset connector) 6 10 Right 7 2.4 Backlight and Keylock You can configure backlight through menu selection. The backlight will shut off automatically. Keylock can avoid your key pressing unintentionally . For unlocking keylock quickly, press key“ OK” then key“* “. For locking keylock manually, press key“ OK” then key“*”. It will be locked automatically after a short while as long as the phone is in standby mode(depends on settings). For setting keylock, please press the following:“Menu”>“Settings”>“Phone settings”>“Keypad Locking Settings”.You can choose “Disable”, “30 Seconds”, “60 Seconds”. 8 3. Getting started 3.1 The first call 1> Insert SIM card (phone shut off). You can find the installation details in section 3.2 “Installing the SIM Card”. 2> Charging the battery. Refer to section 3.3“Battery and Charging”. 3> Pressing “END” for approximately 5 seconds,turn on the phone. 4> Input a password if the screen says that you need to do so, then press “OK” for confirmation. 5> Enter a PIN code if asked to do so, the PIN will normally come with the SIM Card, then press “OK” for confirmation. 6> Enter the area code and phone number, then press “CALL”key to make a call. Caution: You have to insert a valid SIM card and charge the battery before use 9 3.2 Installing the SIM Card SIM card stores your PIN1, PIN2, PUK1, PUK2, IMSI, network information, contacts data and SMS data. Caution: ·Make sure that you insert or pull out SIM card after the phone has been shut down for several seconds, otherwise, it may damage the SIM. ·Please insert or pull out SIM card carefully. ·Keep all SIM cards out of the reach of small children. Steps: 1>Press and hold “End” to shut off phone, remove the back cover of the phone, remove the battery by lifting at the base of the phone。 2>Insert the SIM card smoothly, so that the beveled corner is on the upper left side. 3>Insert the battery into the battery slot. Align the back cover with the back of the phone and slide it upwards. Push the back cover up to the top of the phone to lock it.。 Cautions: ·If the SIM is inserted wrongly or the SIM is damaged, the screen will have the following message “No SIM Card” after turning on the phone. Please check the SIM status by shutting off phone. ·For availability and information on using SIM card services, contact your network operator 3.3 Battery and Charging Status symbols for capacity 1.The balance capacity of Li-ion battery& AAA battery displayed at right top of the screen 10 11 2.“Battery Low” indicator appears on the display when the balance capacity of Li-ion Battery is low. 3.Status symbol of AAA battery disappears when the AAA battery is exhausted or taken out. ★Charging by AAA Battery Remove the back cover of the phone ,Insert the AAA battery into the AAA battery slot then fit on the back cover. Stops charging by AAA battery automatically when Li-ion Battery is fully charged. Stops charging by AAA battery automatically when Li-ion Battery is charging by Travelling charger. Stops charging by AAA battery automatically when AAA Battery is exhausted. Starts charging by AAA battery automatically when Li-ion Battery is near full discharge. In Standby mode, press key “LEFT function” to select the “Go to” menu, Press key “UP” or “DOWN” to choose “AAA” , press key “OK ” to go to the “AAA” submenu. When the phone is power off caused by “Battery Low”, Please insert the AAA battery to start charging by AAA battery automatically. Press key “UP” or “DOWN” to choose “AAA Charging” , choose ”Enable”/”Disable” to start/stop charging by AAA Battery. Cautions: Take out the AAA battery if it is exhausted or you would not use it for a long time. Press key “UP” or “DOWN” to choose “Check Battery” , press key “OK ” to check the Storage status of the AAA Battery. Warning: If you want to take out the Li-ion Battery ,please take out the AAA Battery first. 12 13 ★Charging by Travelling charger Connect the charger to an AC wall socket. If the battery is completely discharged, it may take a few minutes before the charging indicator appears on the display or before any calls can be made. Connect the lead from the charger to the socket on the bottom of your phone. The charging time depends on the charger and the battery used. When you disconnect the power cord, grasp and pull the plug, not the cord. Warning: Use only batteries, chargers, and accessories approved by Olive for use with this particular model. The use of any other types may invalidate any approval or warranty, and may be dangerous. Check the model of any charger before use with this device. 3.4 Turn on and off Press and hold the “End” key to turn the phone on. If the phone asks for a PIN or security code, enter the code supplied with your SIM card (displayed as ****), and press 14 key“OK”. Press and hold the “End” key to turn off when the phone is power on. Warning: Do not switch the phone on when use of a mobile is prohibited or when it may cause interference or danger. 3.5 Using a password You can set several types of passwords by accessing the menu “Settings”>“Security settings”. Here you can choose “Power on PIN1”,“Change PIN2”and “Phone Code”. Phone Code Phone Code is offered by our company. The default password is 0000. It protects your phone from unauthorized use. If “Phone Code” is available, you need to enter the password when the phone is turned on. PIN Code PIN Code is to avoid unauthorized use of your 15 SIM card. The PIN code comes with the SIM Card from your network operator. If the PIN code is activated, you have to enter it whenever the phone is switched on. If you enter the wrong code 3 times, the SIM card will be locked. The unlocking method iis shown below: 1>Insert correct PUK Code. 2>Then insert the new PIN Code, and press “OK”. 3>Insert the new PIN Code again for confirmation. 4>If PUK Code is correct, SIM Card will be unlocked. PIN Code will be reset. Warning:PUK Code will be provided by the network operators. operator. It supports several functions. Please contact your network operator for more information. If you insert the wrong PIN2 code 3 times, PIN2 code will be locked. Only inserting correct PUK2 code can unlock PIN2: 1>Insert correct PUK2. 2>Then insert the new PIN2 Code, and press “OK”. 3>Insert the new PIN2 Code again for confirmation. PUK2 Code PUK2 Code is for unlocking PIN2 code. If you insert the wrong PUK2 Code 10 times, the SIM Card will be disabled. You will need to get a new SIM Card from your network operators. PUK Code PUK Code is for unlocking the pin code. If you insert the wrong PUK Code 10 times, the SIM will be disabled. You will need to get a replacement SIM from your network operator. Forbidding password It will be needed while using Call Barring. You can get this code from network operator when you apply this function. PIN2 Code PIN2 Code may be offered by your network The handsfree kit is plugged in to the base of the unit. 16 3.6 Using handsfree accessories 17 4. Normal functions 4.1 Dialing There are several ways to make a call: ● In Standby screen, input area code + phone number, press the “Call” key. ●Check the number from Dial record and press the “Call” key. ● Find a number from “Contacts” and press the “Call” key. International Dialing Press key“ ”twice continuously, symbol “+” * comes out on the screen.Then input the country code, area code, phone number and press the “Call” key. Dial Ext. Key in the telephone exchange number, press key“+” 3 times to bring up a “p” symbol and then input the extension number. Correct the wrong input Press “Right Function key” to delete the last character. 18 Dialing a number from “Contacts”: 1>Find the number you want to dial from “ C o n t a c t s ” . To s e a r c h : P r e s s t h e f i r s t character of the name, then press key “UP” or “Down” to find the contact. 2>Press key “CALL”. Redial 1>In Standby mode, press key “CALL” to display Dialed number list. 2>Press key “UP” or “DOWN” to select the number you want to dial. 3>Press key “CALL” Speed dials 1>In Standby mode, press key “OK”> “Contacts”> “Speed dials”, you can edit the number list here. 2>In Standby mode, you can press and hold number keys“2” to “9”to speed dial. 4.2 Answering the call 1> The phone will ring or vibrate when a call is coming. (It depends on your Profile settings). 2> Press key “Call” or key “Left function key” 19 > “Accept”to pick up the call. 1>To end the call, press the “END” key. 4> To reject the call, press the “END” or key “Right function key”. Cautions: The call number is displayed on the screen if it can be recognized. 4.3 Selection during the call Call waiting If the network supports this function and you have activated this, you will hear a call waiting sound when you are already on a call. 1>Press key “CALL” or “LEFT Function key”>“Accept” to answer a waiting call, the first call will go on hold automatically. Refer to “Hold / Switch”. 2>Press key “UP” or “DOWN” to highlight the call , press END key to end the call. 3>Press “RIGHT Function key” or “END” to reject the waiting call. Hold / Switch When there are two calls connected 20 1>Press the “RIGHT Function” key to swap and to place the current call on hold, and make the other active. 2>Press the “END” key to hang up one line, you can choose which line to hang up by pressing the navigation keys .Press the “END” key to hang up current call. Call holding If network supports this function, you can start a call when you are already on a call: 1>Press number keys and make a call. Then dial another number and press “CALL” to make the second call. 2>The first call will go on hold automatically. Mute This function switches on/off the microphone of the phone or other connected microphones. Press the “LEFT Function key” key >“Mute”/“Unmute” during a call. Other options in calling You can access the main menu during the call. 21 5. Menus You can find every function through “Menus” by pressing key “OK”. Pressing key “END” returns to the Standby mode. 5.1 Messages 5.1.1 Create message Note: Each text can only be up to a maximum of 160 characters. Any additional parts of the text will be carried over into another text. In the right top corner of the screen, you can find the number of characters and current section sequence of the message. For example: 160/1 Steps: 1> Press key “OK”> “Messages”> “Create message” 2> Insert name, number and template text while editing the message. 3>When you finish the text, press key “LEFT function”>“Send” (or press key“OK” to enter the desired number), or press the “OK” key to enter the phone book to select a number, than press “OK” to send the messages. If you want 22 to send to more people, press key “DOWN” when you finish the last number selection. Repeating these steps you can send to more people. Note: When you receive a message saying the text has been sent successfully, this means that the message has been sent to the message center you set, and does not mean that the text has been received. 4> You can choose the input language by pressing the “LEFT function key” key to select Input Language. 5.1.2 Inbox, Outbox, Draftbox When you receive a text message, you can find the information about the number of new messages on the screen in standby mode. Select “OK” you can check out the message or select “Cancel”, then you can press key “OK” > Messages >Inbox to check the message. In Draftbox, you can check the information about stored messages. 23 In Outbox, you can check the messages that have been sent out. 5.1.3 Voice Mail The voice mailbox is a network service and you may need to subscribe for it. For more information and for the voice mailbox number, contact your service provider. press key“OK” > Messages > Voice mail. To call your voice mailbox, select Listen to voice mail messages. To enter or edit your voice m a i l b o x n u m b e r, s e l e c t Vo i c e m a i l b o x number. 5.1.4 Message Setup Messages > Message setup Service Center: It stores the message center number which will be provided by network operator. Validity Period: You can select the available sending time. Status Report:It enables the return report when a message has been sent out successfully or not. This function depends on network operator support. 24 Storage media:Setting the location for message storage. Storage status:Check message storage information such as the total numbers of messages it can store. Saved sent item:It can enable the automatic saving of sent messages. 5.1.5 Broadcast message This function allows you to receive many kinds of text message, such as weather or Transportation report. You can get more information from your network operator. Topic/Channel: You can select (Select, Add, Edit & Delete) to receive broadcast message. Language: Select the language of the broadcast messages you received. Service Status:Turn on and off receiving broadcast messages. Cautions:Language support is network operator dependent. 25 5.1.6 Delete all 5.2.3 Dialed numbers Delete all messages or messages in each box Inbox/ Outbox & Draftbox. Here you can check the recently dialed number, other options are the same as for missed calls listed above. 5.2Call Records 5.2.1 Missed calls You can check missed calls. 1>Select one missed number. 2>Press key “LEFT function key” to enter option: Dial to: Dial the missed call. Send message to: Edit message and send it to the missed call number. Delete: Delete the missed call from the missed list. Save number: Save the selected number to the SIM or handset. Edit: Edit the selected missed number Show number: Show the missed number you want to check. 5.2.4 Call duration Dialed calls duration: Check the duration of all calls you dialed. Received calls duration: Check the duration of all calls you received. Last call duration: Check the duration of last call. All calls duration: Check the duration of all the calls. Clear timers:reset the timers. Cautions: Some operations need you to input PIN2 Code, please find the code from the network operator. 5.2.5 Delete calls 5.2.2 Received calls This function allows you to check received calls, other options are the same as for missed calls listed above. 26 Delete all Received calls ,Missed calls, Dialed calls, and Delete all calls . 27 5.3 Contacts 5.3.6 Caller groups You can store names and numbers in the handset or the SIM card. You can assign different ring tones based on different groups. 5.3.1 Search Caution: This function only works when numbers are stored in the handset memory. Input the first character of the name you want to search. The classified names will be displayed on the screen. 5.3.2 Add Add name and number. 5.3.3 Storage status Check the amount of numbers stored in the handset or SIM Card memory. The capacity depends on the type of SIM Card. 5.3.4 Storage media Select whether to use the handset memory or SIM Card for storage. 5.3.7 Delete all Delete all contacts at one time from handset/SIM. 5.3.8 Copy Copy all names and numbers from handset memory to SIM Card, or vice versa. 5.4Settings 5.4.1 Profiles You can personalise the profiles, and set one profile as default. 5.4.2 Tone Settings 5.3.5 Speed dials Activate Speed dials function and edit assigned keys. 28 P r e s s k e y “ O K ” > “ S e t t i n g s ” > ” To n e settings”.You can modify the settings of 29 current profiles such as: Ringing tone, SMS alert tone, Call alert, Ringing volume, Key volume, Vibrating alert, Alarm tone. 5.4.3 Shortcut settings Press key “OK”>“Settings”>“Shortcut settings”. You can define the shortcut key: Left, Right, Up & Down navigation keys. 5.4.4 Display settings LCD contrast:Adjust the light on the screen. Back light: You can set the light time (15S on, 30S on, or 60S on). Caution: The back light will light up when a call or a message comes. Wallpaper:Select one of the pictures stored in the handset as wallpaper. G r e e t i n g n o t e: G r e e t i n g n o t e c a n b e displayed when you turn on the phone. Theme:Supports three themes. 5.4.5 Time & Date You can modify Time & date settings manually or by sending SMS, Date display format, Date separator, Time display format, Time & date display. It may be necessary to reset the time and date if the battery is removed. 5.4.6 Call settings Hide your own number: Default setting, on, off. Caution: This function depends on network. Auto redial:Re-dials the last dialed number if set as Enable. Caution: This function needs to be supported by the network operator. Any key answer:Press any key to pick up the phone, except the “End” key and “Right function key”. Caution: Wallpaper will be changed if any theme is set. 30 31 5.4.7 Phone settings 5.4.9 Factory Default Language: You can select and change the language. Resets some function parameters and records to the factory setting if you input the correct password. Default password is 0000. Caution: The language of content stored in the SIM Card won't be changde if you select a different language. Own number:It can store your own name and number in the SIM Card. Keypad locking settings:This function stops the accidental pressing of the keys. The options are: Disable, 30 sec, 60 sec. Power on/off tone: Enable the on/off tone. 5.4.8 Security settings Power on PIN1: You can ON,OFF and change PIN1. Change PIN2:Modify PIN2 code. Phone Code:The default code is 0000. Cautios: PIN1 and PIN2 codes are supplied by your network operator. 32 5.5Radio The FM radio depends on an antenna other than the handsets internal antenna. A compatible headset or enhancement needs to be attached to the device for the FM radio to function properly. Warning: Listen to music at level. Continuous exposure to may damage your hearing. Do device near your ear when the is in use. a moderate high volume not hold the loudspeaker 1>When you enter “Radio” through Main Menu, you will find the current channel location number, the number of all channels and current frequency. 2>Press key “OK” to switch between “Manual” and “Preset”. Also you can press the “LEFT” or “RIGHT” keys to switch channel if you store 33 some channels when in Preset mode . In Manual mode, you can press and hold the “LEFT” or “RIGHT” keys to search channels. When it finds one channel, searching will be stopped. Caution: To switch to Preset, we need to save some channels first. 3>Press the “UP” or“DOWN” keys to adjust volume of headset. 4 > To t u r n o f f t h e R a d i o , p r e s s “ L E F T function”>Exit. 5.6Network Service 5.6.1 Network select mode You can select your network manually or automatically based on your current location. 5.6.2 Call waiting (Network service) The network will inform you about an incoming call when you are already on a call, after you activate this function. 34 5.6.3 Call forwarding (Network service) You can forward incoming call to another phone number. 5.6.4 Call barring (Network service) This function allows you to block certain calls. It needs a password when you want to enable it. Caution: Call waiting, Call forwarding, Call barring needs to be supported by your network operator. 5.7Applications 5.7.1 Alarm You can set the phone alarm at a desired time once or weekly. To stop the alarm, press the“RIGHT function” or “END” keys. If you press key “OK”, it will repeat 5 mins later. The alarm still works when the phone is switched off, press “STOP”, you will be asked whether to turn on. “RIGHT function” or “END” is the key to turn off the phone. 35 5.7.2 Calculator reset the timer. 1>Input number by number keys. Key “*” is decimal point. Key “#” represents negatives. 2> Keys“UP”,“DOWN”,“LEFT”,“RIGHT” represent + 、 - 、 ×、 ÷ as shown on the screen. 3> Pressing key “OK” will get the result. Here you can check the time of all famous cities in the world.You can set any city as default. Pressing the “UP” and “DOWN” keys can check other cities time. 5.7.3 Calendar You can find the week numbers here such as Week1, Week3 etc. 5.7.4 Memo To save a brief text with alarm, you can add/edit note in “Memo”. If the alarm rings, press the “RIGHT function”or “END” keys to stop the alarm and you can also press key “OK” for the alarm to ring again after 5 mins. 5.7.5 Stopwatch 5.7.6 Time zone 5.8Games 1>You can find 2 preloaded games in the phone Tetris & Sudoku. 2>You can find help for each game. 5.9Sim tool kit Some extended services may be offered by certain SIM cards. Services and the content depend on SIM Card and your network. You can find more information from the network operator. You can measure time and calculate time separately. Press key“OK” to start the watch, “OK” again can split the time, “LEFT function” can pause the watch, “RIGHT FUNCTION” can 36 37 6. Appendix A: Text input 1>Press key “#” to switch “SMT” , “abc” , “Abc” , “ABC” & numeric text input & press “*” key to input symbols. 2>“SMT” represents predictive text input .You can enter any letter with a single key press. Predictive text input is based on a built-in dictionary to which you can add new words. 1. Press key once for each letter. The word changes after each keystroke. Example: To write “Hello” when the English dictionary is selected, press 43556 2. Press navigation keys to switch other predictive words it offers. 3. When you finish the word and it is correct, press 0 to confirm the word and add a space. Pressing the key”0/backspace” also moves the cursor. 3>Traditional text input: “abc”, “Abc”, and “ABC” Press a number key repeatedly until the desired character appears. Not all characters available under a number key are printed on the key. The characters available depend on 38 the language you selected. If the next letter you want is located on the same key, wait until the cursor appears, then enter the letter. Tips: The most common punctuation marks and special characters are available with key“ * ”. B:Accessories ★Handsfree kit Handsfree kit is made up with earphone and microphone. ★Travelling charger You can charge the battery by plugging travel charger. C:Enhancement CARE AND MAINTENANCE Your device should be treated with care. The suggestions below will help you protect your warranty coverage. ▲ Keep the device dry. Precipitation, humidity and all types of liquids or moisture can contain minerals that will corrode electronic circuits. If 39 your device does get wet, remove the battery and allow the device to dry completely before replacing it. ▲Do not use or store the device in dusty, dirty areas. Its moving parts and electronic components can be damaged. ▲Do not store the device in extreme hot areas. High temperatures can shorten the life of electronic devices, damage batteries, and warp or melt certain plastics. ▲ Do not store the device in extreme cold areas. When the device returns to its normal temperature, moisture can form inside the device and damage electronic circuit boards. ▲Do not attempt to open the device other than as instructed in this guide. ▲ Do not drop, knock, or shake the device. Rough handling can break internal circuit boards and fine mechanics. ▲ Do not use harsh chemicals, cleaning solvents, or strong detergents to clean the device. ▲ Do not paint the device. Paint can clog the moving parts and prevent proper operation. Use chargers indoors. 40 Always create a backup of data you want to keep (such as contacts and calendar notes) before sending your device to a service facility. All of the above suggestions apply equally to y o u r d e v i c e , b a t t e r y, c h a r g e r, o r a n y enhancement. If any device is not working properly, take it to the nearest authorised service facility for service. ★ADDITIONAL SAFETY INFORMATION Your device and its enhancements may contain small parts. Keep them out of the reach of small children. ■ Operating environment Remember to follow any special regulation in force in any area and always switch off your device when its use is prohibited or when it may cause interference or danger. Use the device only in its normal operating positions. This device meets RF exposure guidelines when used either in the normal use position against the ear or when positioned at least 2.2 cm away from the body. In order to transmit data files or messages, this device requires a good quality 41 connection to the network. In some cases, transmission of data files or messages may be delayed until such a connection is available. Ensure the above separation distance instructions are followed until the transmission is completed. Parts of the device are magnetic. Metallic materials may be attracted to the device, and persons with a hearing aid should not hold the device to the ear with the hearing aid. Do not place credit cards or other magnetic storage media near the device, because information stored on them may be erased. ■ Medical devices Operation of any radio transmitting equipment, including wireless phones, may interfere with the functionality of inadequately protected medical devices. Consult a physician or the manufacturer of the medical device to determine if they are adequately shielded from external RF energy or if you have any questions. Switch off your device in health care facilities when any regulations posted in these areas instruct you to do so. Hospitals or health care facilities may be using equipment that 42 could be sensitive to external RF energy. ■Pacemakers Pacemaker manufacturers recommend that a minimum separation of 15.3 cm (6 in) be maintained between a wireless phone and a pacemaker to avoid potential interference with the pacemaker. These recommendations are consistent with the independent research by and recommendations of Wireless Technology Research. Persons with pacemakers should: Always keep the device more than 15.3 cm (6 in) from the pacemaker;Not carry the device in a breast pocket; and hold the device to the ear opposite t he pacemaker to minimise the potential for interference.If you suspect interference, switch off your device and move the device away. ■Hearing aids Some digital wireless devices may interfere with some hearing aids. If interference occurs, consult your service provider. 43 ■ Vehicles RF signals may affect improperly installed or inadequately shielded electronic systems in motor vehicles such as electronic fuel injection systems, electronic antiskid (antilock) braking systems, and electronic speed control systems, air bag systems. For more information, check with the manufacturer or its representative of your vehicle or any equipment that has been added. Only qualified personnel should service the device, or install the device in a vehicle. Faulty installation or service may be dangerous and may invalidate any warranty that may apply to the device. Check regularly that all wireless device equipment in your vehicle is mounted and operating properly. Do not store or carry flammable liquids, gases or explosive materials in the same compartment as the device, its parts, or enhancements. For vehicles equipped with an air bag, remember that air bags inflate with great force. Do not place objects, including installed or portable wireless equipment in the area over the air bag or in the air bag deployment area. If in-vehicle 44 wireless equipment is improperly installed and the air bag inflates, serious injury could result. Using your device while flying in aircraft is prohibited. Switch off your device before boarding an aircraft. The use of wireless teledevices in an aircraft may be dangerous to the operation of the aircraft, disrupt the wireless telephone network, and may be illegal. ■ Potentially explosive environments Switch off your device when in any area with a potentially explosive atmosphere and obey all signs and instructions. Potentially explosive atmosphere includes areas where you would normally be advised to turn off your vehicle engine. Sparks in such areas could cause an explosion or fire resulting in bodily injury or even death. Switch off the device at refueling points such as near gas pumps at service stations. Observe restrictions on the use of radio equipment in fuel depots, storage, and distribution areas, chemical plants or where blasting operations are in progress. Areas with a potentially explosive atmosphere are often 45 but not always clearly marked. They include below deck on boats, chemical transfer or storage facilities, vehicles using liquefied petroleum gas (such as propane or butane), and areas where the air contains chemicals or particles such as grain, dust or metal powders. 46