1
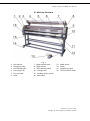
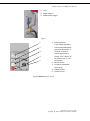
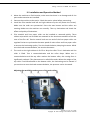
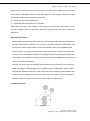
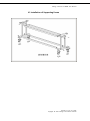
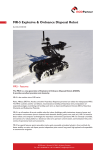
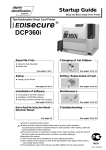
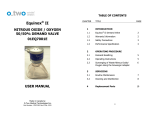
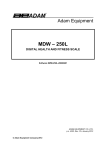
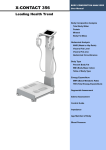
Eastsign Laminator II.WARM User Manual
Laminator
II.WARM
User Manual
Eastsign International Limited
Room 1818, 18/F., Shatin Galleria, 18-24 Shan Mei Street, Fotan, Shatin, N.T., Hong Kong
TEL: + 852 - 2117 0098
FAX: + 852 - 2117 0099
Website: www.eastsign.com
Email: [email protected]
Revised on July 15, 2013
Copyright © 2013 Eastsign International Limited
Eastsign Laminator II.WARM User Manual
I. Introduction
II.WARM is upgrade version of II.MULT due to high demand of entry level cold laminator
with heat assist, auto stripping and collecting back paper. It is simple in structure,
reasonable in price and user-friendly. This is working principle: the motor drives the
upper and lower laminating roller. The roller for feeding cold lamination film is linked to
that for collecting back paper. When the cold lamination film is pulled out, back paper is
collected at the same time. Continuous laminating or longer picture laminated are
possible due to additional feature of automatic stripping film and collecting back-paper
which is driven by upper and lower laminating rollers. Operator focuses on monitoring
the laminating result and collecting the media.
Heat Assist is the major feature of this machine. Silicon roller could be heated up to 60 0C
or 1400F to improve the laminating result.
Power rating of laminator is only 60W. It consumes less power. This machine supports
two types of power supply - 220V/240V and 110V. Buyers must clarify the power supply
before placing order. Also, they must check the voltage of machine and power supply
when the machine arrives.
Speed can be adjusted freely on control panel. This machine is equipped with foot-pedal.
You can operate the machine by manual-control switch or foot-pedal switch.
There is emergency button. If there is accident, the machine would stop immediately by
pressing the button.
As a result, the feedback from market is very good and most users are satisfied. Since it
was launched, it is still the most popular model at present.
Revised on July 15, 2013
Copyright © 2013 Eastsign International Limited
Eastsign Laminator II.WARM User Manual
II. Specification
Model
Roller Width
Laminating Speed
Nip Opening
Laminating Temperature
Motor Power
Heating Power
Power Supply
Roller Diameter
Machine Size
Machine Weight
Packing Size – Wooden Crate
Gross Weight
BU-1600II.WARM
1640mm or 64”
0 – 6 m/min or 19 feet/min
35mm or 1.3”
0 – 600C or 0 – 1400F
60W
1500W
Single Phase, 110V/220V/240V
120mm or 4.7”
1880mm x 540mm x 1330mm
74” x 21” x 52”
220kg or 484lb
2050mm x 630mm x 710mm
81” x 25” x 28”
250kg or 550lb
Revised on July 15, 2013
Copyright © 2013 Eastsign International Limited
Eastsign Laminator II.WARM User Manual
III. Machine Structure
1.
2.
3.
4.
5.
6.
Left cabinet
Emergency stop
Left bracket plate
Liner paper roll
Film mandrel
roller
Fig. 1
7. Right bracket plate
8. Right cabinet
9. Front working table
10. Lifting Crank
11. Feeding roll for media
12. Base plate
13.
14.
15.
16.
Pedal switch
Caster
Supporting frame
Tension control knob
Revised on July 15, 2013
Copyright © 2013 Eastsign International Limited
Eastsign Laminator II.WARM User Manual
1. Fuse
2. Power plug-in
3. Pedal switch plug-in
Fig. 2
1
2
3
4
5
1. Heating Switch
If you switch between
Celsius and Fahrenheit,
press this button for 3
seconds. Press this
button again until it
shows “D-4”. Select “0”
for Celsius and “1” for
Fahrenheit
2. Motor Switch
3. Forward / backward
laminating
4. Speed control
5. Power switch
Fig.3 II.WARM control panel
Revised on July 15, 2013
Copyright © 2013 Eastsign International Limited
Eastsign Laminator II.WARM User Manual
IV. Installation and Operation Method
1. Move the machine to final location; make sure that there is no damage and all the
parts and accessories are installed.
2. Connect the machine to the mains. Check the mains values before connecting.
3. Install the film mandrel and left and right cabinet of print roll (fasten the screws).
Make sure the ends are symmetrical. Press the start button and the rollers are
rotating. Make sure the machine run normally. Then try lamination and check the
effect and quality of lamination.
4. Film mandrel and liner paper roller can be installed or removed quickly. Three
rubber strips which can be rolled are mounted on the aluminum mandrel to lock the
core of the film roll. Tension control knob on one end of the liner paper roller can
regulate friction to synchronize the same speed of main rollers and liner paper roller
to ensure the laminating quality. Turn the knob clockwise, damping increases. While
turn the knob counterclockwise, the tension decreases.
3
5. The crank on the right cabinet is for lift or drop the roller. Turn it clockwise and the
roller is lifted. Turn it counterclockwise and the roller drops. When turn it
counterclockwise and the top roller reaches the bottom roller, the turning force is
significantly reduced. This phenomenon is called idle stroke. When the weight of the
top roller is well-distributed on the bottom roller, the laminating can be started. If
you continue to turn the knob counterclockwise, the pressure can be increased.
Adjusting the parallelism and pressure of the main rollers:
Revised on July 15, 2013
Copyright © 2013 Eastsign International Limited
Eastsign Laminator II.WARM User Manual
1.
Middle
bracket
3.
of compression
on the left
2.
Compression
spring
4.
Left cabinet
bracket
5.
Upper
Compression
bolt
compression
6.
Compression nut
4
The alignment of the main rollers is the crucial factor to ensure the balance of
pressure and further affect the quality of lamination and the off-tracking of image.
The main rollers are well-aligned before the shipment from factory. While violent
vibration in transportation or long-time operation may lead to the misalignment of
the main rollers. You can readjust the rollers with the following measures.
1. Reset the pressure of the main rollers
When the pressure of the main rollers is imbalanced, the image may be mounted off
track or show up wrinkles. Adjust the pressure with the following steps.
1) Observe and record the off-tracking direction of the image, turn off the power of
the machine and remove the board of the wheel cabinet.
Caution: comparing with the right cabinet, there are less parts on the left cabinet.
Please remove the left cabinet first to avoid excessive work or damage of other parts.
As the figure shown above, the middle bracket of the left compression and the upper
compression bracket are connected by two bolts. Each bolt has a spring and two
screws (see the figure above). One screw is welded with the compression plate and the
other below is moveable clamp nut.
2) If the image is off-tracking on the left right of the machine, it indicates the
pressure on the left side is higher than that on the right side. Adjust the screw bolt to
reduce the deflection of the spring on it. The range of adjustment of both bolts shall
be as the same as possible.
5
Note: You can use a ruler to measure the height of the two bolts and make sure they
are at the same level in the adjustment.
3) If the image is off-tracking on the right side, it indicates that the pressure on the
level side is lower than that on the right side. Increase the deflection of the spring on
the two bolts then. The range of adjustment depends on the range of off-track of
image.
Caution: When the deflection of spring is adjusted, please turn the pressure of the
Revised on July 15, 2013
Copyright © 2013 Eastsign International Limited
Eastsign Laminator II.WARM User Manual
machine to its maximum level to ensure there is margin for the deflection. Or else the
spring may be damaged. When the left side does not have margin, remove the right
side board to adjust the screw bolt on this side.
4) Tighten the nuts after adjustment.
5) Install the left side board on the machine.
Adjustment principle: if the image is off-tracking to the left side, the pressure of the
left side is higher than the right side. Loosen the spring on the left side to reduce its
deflection.
Align the main rollers
Set the space between the main rollers to 1-2mm. Observe the evenness of space by
eyes (or measured by a feeler). If it is not even, record the side with small space. Then
set the main rollers to idle stroke, cut the main power, open the side board of the
wheel carbine, as the figure shows below, screw out the bolt, increase or reduce the
number of the insert plates between the lifting plate and the compression plate (the
6
insert plates are supplied as the accessory of the machine) to align the main rollers and
then re-install the side board.
Caution: The main rollers are aligned and fixed before the shipment from the factory.
When the image is off-tracking or other problems occur in lamination, please check
the pressure balance of the main rollers first. Only after confirming the problems are
caused by the misalignment of the main rollers, the insert plates can be increased or
reduced. Reset the pressure of the main rollers after the adjustment.
Lamination process:
Figure 4
Revised on July 15, 2013
Copyright © 2013 Eastsign International Limited
Eastsign Laminator II.WARM User Manual
VI. Installation of Supporting Frame
Revised on July 15, 2013
Copyright © 2013 Eastsign International Limited
Eastsign Laminator II.WARM User Manual
V. Safety Cautions
1.
7
Read this manual carefully before starting the machine. Familiarize yourself
thoroughly with the structure, functioning and operation of this machine. Observe all the
warning symbols on the machine to prevent accidents.
2. The mains supply must match the type indicated on the machine identification label.
And reliable ground connection shall be ensured.
3. This machine does not have optical safety device. Do not approach the rolling rollers
to prevent injury.
4. Lift the roller after operation to prevent deformation after long-time pressure and
cut the power supply.
5. Keep distance with the rollers when cut the films or images to prevent damage to
the rollers by the edge tools. You can swipe the glue on the rollers by cotton cloth with
alcohol. You may not use organic solvent to swipe the roller or wash the roller by water,
which may lead to damage of the rubber or short circuit.
6. Install the machine in a dry and well ventilated environment. Make sure the ground
is free of water or moisture. Keep the machine from any inflammable and explosive
objects to prevent fire accident.
9
7. Check the electricity leaky of the machine and power lines regularly. If there is any
abnormal phenomenon in operation, please check and eliminate problem in time to
prevent further damage.
8
Revised on July 15, 2013
Copyright © 2013 Eastsign International Limited
Eastsign Laminator II.WARM User Manual
VI. Warranty
1) Fill in the warranty form in Eastsign website when you receive the machine.
http://www.eastsign.com/warranty_form.php
2) Standard warranty period of this machine is one year. Material and service fee will
be charged after this period.
3) Users are responsible for damages by improper usage.
Revised on July 15, 2013
Copyright © 2013 Eastsign International Limited