1
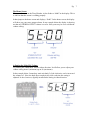
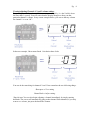
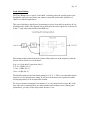
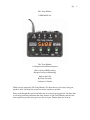
Pg. 1
The Tasty Blender
USER MANUAL
The Tasty Blender
A Unique Personal Monitor System
With Advanced DSP Limiting
Designed for In-ear Monitoring
Made in the USA
By Rock On Audio
Lafayette, Colorado
Thank you for purchasing The Tasty Blender! We hope that you will enjoy using our
product, and it will help you get the best audio experience possible.
Please read through this manual and take note on some of our suggestions. We hope that
it will help you better understand the many features of The Tasty Blender and have the
best experience possible using your new piece of gear. Thanks again and rock on!
Pg. 2
Table Of contents:
Warnings
Page 3
Introduction and Power
Page 4
The Inputs and Outputs
Page 5
The 4 control knobs/buttons
Page 6
The Home Screen
Page 7
Adjusting the main mix volume
Page 7
Viewing/adjusting volume for channels 1, 2 and 3
Page 8
Navigating to other parameters (i.e. Stereo/mono mode)
Page 9
NAVIGATION TABLE:
Page 10
-Volume
Page 10
-Stereo and mono mode
Page 11
-Limiter Thresholds
Page 11
-Bass Equalizer boost and cut
Page 12
-Channel 1 and 2 gain boost
Page 12
-Channel 3 input pad (for speaker level inputs)
Page 12
Audio Signal Chain
Page 13
Look Ahead Limiting
Page 14
3-Year Warrantee, Repairs, Contact Info
Page 15
Pg. 3
Warning: be careful.
Although this product has very sophisticated limiting that is designed to protect your
hearing, please always use caution when using this product in any audio environment. It
is always a good idea to start with your volumes low, and gradually increase your levels
to the desired settings. Also, please avoid hasty adjustments. Always try to make slow
and precise adjustments.
Threshold settings
We recommend using the factory preset thresholds:
L1: 55
L2: 50
L3: 37
LA: 01
These settings are designed to provide the optimal amount of limiting for a loud audio
environment (i.e. a rock band at rehearsal or during a live performance).
These settings were chosen using a set of Westone UM1s. If you use different IEMs, you
may consider changing these settings to better compliment your IEMs. However, we
advise using caution when adjusting threshold settings. Please do so in a controlled
environment (i.e. a studio or rehearsal space). It is not ideal to adjust these settings during
a sound check or during a live performance, as these situations are more prone to having
feedback and other harmful sounds.
Ringing after use
Ringing in your ears after use is a clear indication that your volumes are too loud and will
lead to long term hearing loss. If you hear ringing in your ears after any amount of use,
then please consider lowering your main mix volume and thresholds to keep your volume
at a lower level.
Notes on isolation
If you are having trouble hearing your mix at a lower level, then please consider using
some sort of better isolation. Here are some recommendations to help with isolation:
-Custom molded IEMs.
-Ensure that your IEMs are positioned properly in your ear canal, and that they are as
snug as possible.
-If you are using universal fit IEMs with foam plugs, then make sure that they are in good
condition and the foam still has plenty of expansion after you compress them each time.
If there is too much earwax build up on them, then they will fail to expand inside your ear
canal, and therefore fail to form the best isolation possible.
Pg. 4
Introduction
The Tasty Blender is a versatile little box. It has lots of features, and some of them are
only accessible once you understand how the control interface works. Please read through
this manual and get a chance to navigate to and adjust every feature. This will help you
become comfortable with the interface and make for a much smoother integration into
your sound setup.
Power
The Tasty Blender can accept a DC power supply of 5-16Vs.
It can accept either polarity of power (either pin-positive or pin-negative). This allows
you to daisy-chain power from a variety of other DC powered devices such as guitar
effects pedals.
The power supply that is included with the product is 9V pin-negative, capable of
supplying 650mA of current.
When you first power up, you should see that the center screen lights up red and the 4
control knobs light up green.
If you are having trouble with power, please verify that the plug mates properly with the
Tasty Blender.
Also, please verify that the unit does work with the supplied power supply.
Pg. 5
The Inputs
There are three 1/4” phono plug type inputs. They can accept a variety of signal types and
levels.
Input details:
Channel 1: Line level (bal/un-bal) tip-ring-sleeve (TRS)
Channel 2: Line level (bal/un-bal) tip-ring-sleeve (TRS)
Channel 3: Line or Speaker level (un-bal) tip-sleeve (TS)
*Although Channels 1 and 2 can be panned either center or hard left/right, Channel 3 is
always panned center.
The Outputs
The stereo output is designed to drive IEMs or over-the-ear headphones that have an
impedance of 16 ohms or greater.
When using different types of IEMs or headphones, the user may need to adjust the
thresholds of limiting and the output volume to find their desired output volume settings.
*Warning, NEVER plug a guitar cable into the output of the Tasty Blender. This will
damage the output driver. The TS type connector itself causes a short on the ring channel
to ground and will burn out the ring channel driver.
If you wish to plug the Tasty Blender into something other than a set of headphones or
IEMs, then please use an insert patch cable (aka “Y-Cable” or TRS to split-TS). This way
you can access the left and right channels individually.
Pg. 6
The 4 control knobs
The four knobs on the Tasty Blender will spin endlessly in either direction. This type of
knob is known as an encoder. It allows you to use a single knob for more than one
purpose. Sometimes you will use the encoders to adjust volume, and other times you may
adjust threshold settings or bass EQ. The onboard microprocessor stores your settings in
memory and recalls those setting each time it boots up. In this way, the Tasty Blender is
very similar to a digital mixing soundboard.
The knobs are also buttons
The knobs are also buttons. You can press them in, and this will change the display
option or navigate to different menu options. You can press them quickly or hold them
down for a few seconds.
Press a knob in for a quick instant (a short press) and this will show you your setting for a
particular parameter.
Press the knob and hold for 2 seconds (a long press) and this will navigate you to a new
parameter.
Pg. 7
The Home Screen
When you first turn on the Tasty Blender, it first flashes a “0000” in the display. This is
to indicate that the screen is working properly.
It then jumps to the home screen and displays, “St:00”. In the home screen, the display
will show you your stereo output volume. In my example below the display is showing
me that my STEREO OUTPUT volume is at zero. Note yours may be set to a different
volume setting.
Adjusting the Main Mix Volume
Try rotating the “Main MIX” knob in either direction. It will allow you to adjust your
volume setting from 0 (minimum) up to 99 (maximum).
In the example below, I turned my main mix knob 3 clicks clockwise, and so increased
the volume to 3. Note, the knob does not physically click each time the setting is
adjusted. It does, however, digitally increment the setting in either direction.
Pg. 8
Viewing/adjusting Channels 1, 2 and 3 volume settings
Try pressing knob 1 like a button. Make sure to press it quickly (i.e. don’t hold it down
for more than 1 second). You will notice that the display changes to show you that
particular channel’s volume. In my screen example below, you can see that my volume
for channel 1 is set to “00”:
In the next example, I have turned knob 1 clockwise three clicks:
You can do the same thing for channels 2 and 3. Just remember the two following things:
Short press = View setting
Rotate Knob = Adjust setting.
*Special note: You can also begin adjusting a channel immediately by simply rotating
that knob. The screen will automatically jump to that channel. But remember, if you only
want to see volume, just press the knob like a button.
Pg. 9
Navigating to other parameters (i.e. Stereo/mono mode)
In the home parameter (aka “home screen”), the knobs adjust volume. In order to adjust
other parameters, there is a three-step process:
1)
Navigate to the parameter by pressing a knob like a button for more than 2
seconds. This is what we call a “long press”. Doing a “long press” on different
knobs will take you to different parameters. Use the table (pg. 10) to find the
correct navigation actions.
2)
Adjust the setting by rotating a knob. Just like adjusting volume,
when you rotate a knob, it will make an adjustment on the active parameter.
*Note some parameters are simply “ON” of “OFF”. For example, the Speaker Pad on
Channel 3. In this case, you rotate the knob clockwise to engage the Pad and Counterclockwise to disengage the Pad.
3)
Wait 10 seconds for the adjustment to be saved and for you to be
automatically returned to the home screen.
Pg. 10
Use the following table to navigate and adjust specific parameters.
*Note, when you are finished making your adjustment, you can return to the home screen
by doing a “long press” on the “main mix” knob - cycling through the parameters to get
home. However, the Tasty Blender will not save your settings until it has been left alone
for 10 seconds. A quick flash on the upper right hand dot of the screen indicates that your
settings have been saved.
Parameter
Navigation action
Adjustment action
Volume
Wait 10 seconds, and the
unit will save your settings
and return to the home
screen.
Rotate knobs to desired
settings.
If you are editing another
parameter, then you can
cycle through all of the
parameters and you will
also return to the home
screen.
Knob 1 will adjust the
volume gain on the input for
channel 1. You can choose
from 0-64. For most
applications, it is good to
have this setting at 20-40.
Knob 2 will adjust the
volume gain on the input for
channel 2. You can choose
from 0-64. For most
applications, it is good to
have this setting at 20-40.
Knob 3 will adjust the
volume gain on the input for
channel 1. You can choose
from 0-7. For most
applications, it is good to
have this setting at 2-5.
Knob 4 will adjust the
volume on the stereo output.
You can choose from 0-99.
This gain is applied to the
audio signal digitally in the
DSP Core. For most
applications, it is good to
have this setting at 60-80.
Pg. 11
STEREO/ MONO mode
While in the home screen
(Volume), hold down
“main mix” knob for 2
seconds. Then Release.
clockwise = MONO
In this mode, all channels
are panned center.
counter-clockwise=STEREO
In this mode, channel 1 is
panned hard left, channel 2
is panned hard right, and
channel 3 is panned center.
LIMITER Thresholds
After you have entered
STEREO/MONO mode
parameter, hold down
“main mix” knob again for
2 seconds, then release.
Rotate knobs to desired
settings.
Knob 1 will adjust 1st stage
stereo output RMS limiter
threshold.
Knob 2 will adjust 2nd stage
stereo output RMS limiter
threshold.
Knob 3 will adjust the 3rd
stage stereo output peak
limiter threshold.
Knob 4 will select the
amount of “look ahead” used
in the 3rd stage stereo output
peak limiter.
LA: 0 = 0 ms
LA: 1 = 3.75 ms
LA: 2 = 7.5 ms
LA: 4 = 15 ms
Pg. 12
BASS boost/cut
After you have entered
Limiter Thresholds
parameter, hold down
“main mix” knob again for
2 seconds, then release.
The screen should read,
“bA:00”. This indicates that
there is no boost or cut on
the bass frequencies on the
stereo output bass EQ filter.
The Filter is a shelving type
EQ set at 120Hz.
Rotate the “main mix” knob
to desired settings. There are
18 steps that you can choose
from: -9 to +9.
Clockwise = add to setting.
Counter-clockwise =
subtract from setting.
Channel 1 20dB boost
While in any other
parameter, hold down knob
1 for two seconds and then
release.
Rotate the knob 1 to desired
settings.
Clockwise = boost ON
Counter-clockwise = boost
OFF.
Channel 2 20dB boost
While in any other
parameter, hold down knob
2 for two seconds and then
release.
Rotate the knob 2 to desired
settings.
Clockwise = boost ON
Counter-clockwise = boost
OFF.
Channel 3 pad (for speaker
level sound sources)
While in any other
parameter, hold down knob
3 for two seconds and then
release.
Rotate the knob 3 to desired
settings.
Clockwise = pad ON
Counter-clockwise = pad
OFF.
Pg. 13
Audio Signal Chain
The Tasty Blender has three main stages of the audio signal chain.
1. The analog line level input gains. This includes a 20dB boost for channels 1 and
2. And it also includes a PAD on Channel 3 for accepting speaker level signals.
2. The DSP core, which includes main mix volume, bass EQ, and three stereo
limiters (in series) with adjustable thresholds.
3. The analog output driver. This is designed to drive earphones with an impedance
of 16 ohms or greater.
Pg. 14
Look Ahead Liming
The Tasty Blender uses a special “look ahead” technology that can actually protect your
headphones (and your ears) before any spikes or transients in the audio signal have a
chance to reach the output driver.
This type of limiting is usually used in mastering sessions of an audio recording or in live
broadcast radio studios. The diagram below shows how the audio signal flow is processed
in the 3rd stage stereo peak limiter of the DSP core.
The amount of delay added before the limiter defines how low in the frequency band the
limiter will be effective as “look ahead”.
0 ms : no “look ahead” protection (LA:0)
3.75 ms : 256Hz (LA: 1)
7.5 ms : 120Hz (LA: 2)
15 ms : 60 Hz (LA: 3)
The Default setting for the look ahead protection is “LA: 1”. This is recommended for the
musician in a live performance setting. It will provide the best level of protection while
still keeping latency to an un-noticeable amount.
We also recommend setting the LA amount to 2 or 3 for sound check, because this is the
time when most commonly there are audio mistakes and feedback occurs. During your
performance, you may wish to drop it back down to 1 or 0.
Pg. 15
3-Year Limited Warrantee
The Tasty Blender comes with a 3-year Limited Warrantee. Within the first three years of
ownership from the date of purchase, if your Tasty Blender Malfunctions in any way with
normal use, then Rock On Audio will repair it or replace it free of labor and parts
charges. However, the customer will be responsible for any shipping charges.
We expect the user to take care not to physically damage any of the outer visible
components. Therefore, malfunction due to this type of damage, is not covered in this
limited warrantee.
More specifically, this Limited Warrantee does not cover physical damage to the plastic
enclosure, the decal, the 4 clear plastic control knobs, the screen, the input port nuts, and
the power input jack.
Repairs
If your Tasty Blender is malfunctioning due do something not covered in the 3-year
Warrantee, or your ownership has extended beyond 3 years and you are no longer
covered, Rock On Audio is always willing to do a repair. The cost of a standard repair
will be for Labor and Parts. The Customer will also be responsible for any shipping
charges.
To schedule a diagnosis and/or repair please contact us via our website here:
http://www.rockonaudio.com/?page=contact
Contact Information
You can also contact us direct via mail, email or phone.
Rock On Audio
1604 Minos Ct
Lafayette, CO
80026
USA
[email protected]
303-775-5053