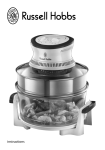
1
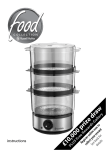
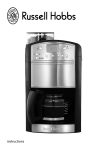
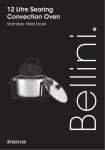
instructions
0
,0
0
0
pr
iz
e
dr
aw
X
w
w
T
w FR R
.ru E A
ss E
r ye
el
lh ew ar
R ob
eg b ar gu
d a
is s
Se ter .co s g ra
.
e on uk al nt
de bac lin /p ler ee
ta k e n rod y
ils fo o u
r w ct
!
re
gi
st
er
/
E
£1
r
`
hobs
door handle
temperature
fan
control
elements
timer
light
rack
hooks
tray handle
tray
oven temperature
control
c
60
230
90
200
180
150
120
timer T
N
n
6
2
_
3
£
1
2
0
20
120
40
100
80
60
Read the instructions, keep them safe, pass them on if you pass the appliance on.
Remove all packaging before use.
A IMPORTANT SAFEGUARDS
Follow basic safety precautions, including:
1 This appliance can be used by children aged from 8 years and
above and persons with reduced physical, sensory or mental
capabilities or lack of experience and knowledge if they have
been supervised/instructed and understand the hazards involved.
Children shall not play with the appliance. Cleaning and user
maintenance shall not be done by children unless they are older
than 8 and supervised. Keep the appliance and cable out of reach
of children under 8 years.
`Don’t immerse the appliance in liquid.
¬The surfaces of the appliance will get hot.
2 Don’t connect the appliance via a timer or remote control system.
3Don’t use the appliance near or below combustible materials (e.g.
curtains).
4If the cable is damaged, it must be replaced by the manufacturer,
its service agent, or someone similarly qualified, to avoid hazard.
5Don’t use the appliance for any purpose other than those
described in these instructions.
6Don’t operate the appliance if it’s damaged or malfunctions.
household use only
CPREPARATION
Sit the appliance on a stable, level, heat-resistant surface.
U BEFORE USING FOR THE FIRST TIME – CURE THE ELEMENTS
This generates fumes to cure the elements open a window for ventilation.
1 Check that there’s no packaging left inside the oven, or wedged round the elements.
2 Open the kitchen windows, and make sure the room is adequately ventilated.
3 Close the mini oven door.
4 Plug the mini oven into a power socket (switch the socket on, if it’s switchable).
5 To turn the hotplates on, turn the control knob to n ,turn the timer to 20, after the
timer returns to 0, and the bell sounds, leave the hobs to cool down.
6Turn the control knob to 1, Turn the oven temperature control c to 230,and turn
the timer to 20, after the timer returns to 0, and the bell sounds, leave the oven to
cool down.
7 When it’s cool, it’s ready for use.
3
C THE CONTROLS
temperature control c
grill
to grill, using only the top element, turn the temperature control to
230, and leave the door open, to prevent the thermostat operating.
keep warm if you’re using the bottom element to keep food warm after it’s been
thoroughly cooked, turn the temperature control down to 100, and
keep the door closed.
oven
to use as an oven, with both elements, turn the temperature control to
the cooking temperature you need.
fan
this works with any element combination.
C THE OVEN
2
3
1
top element – for grilling.
bottom element – for keeping food warm.
both elements – for oven cooking.
CHOTPLATES
£ operates the big hotplate.
_ operates the small hotplate.
n operates both hotplates.
C DEFROST FEATURE
Turn the control function to N,turn the timer anti clock wise to 6.
This function enables you to defrost most foods without heat faster than some
conventional methods as the oven fan circulates air around the food. It is particularly
suitable for delicate frozen foods which are to be served cold e.g. cream filled gateaux,
cakes covered with icings or frostings, cheesecakes, biscuits, scones etc.
Defrosting time will vary greatly depending on the size and amount of food being
defrosted.
Ensure all meat and poultry has thoroughly defrosted before cooking.
Always cook food straight after defrosting, do not re-freeze or store in the fridge.
Care must always be taken when handling raw food. Always follow the basic rules of
food hygiene to prevent bacterial growth and cross contamination when defrosting.
CTHE DOOR – OPEN OR CLOSED?
8 Keep the door open when using the top element as a grill 2, to prevent the
thermostat operating.
9 Keep the door closed when using the bottom element 3 or both the top and
bottom elements 1 together, to let the thermostat operate normally.
10 The door gets hot. Even though you’re using the handle, wear oven gloves.
CTHE RACK AND TRAY
11 The rack and tray slide on the shelf supports at the sides of the oven.
Use the lower supports for baking and roasting.
12 Use the upper supports for grilling, toasting, and browning toppings.
13 If you’re not cooking on the tray, put it on the bottom shelf support, to catch drips.
4
CTHE HANDLE
14To fit the tray handle:
a) catch the hooks on the top of the tray.
b)lower the handle till the bottom catches the underside of the tray.
c) lift the handle, and the tray comes with it.
CGRILLING AND SPITTING
15When grilling, or cooking anything that comes close to the top element, keep an eye
on the food, to avoid fat or juices spitting on the top element.
16If you see spitting, move the food down, away from the top element.
17You may have to extend the cooking time slightly, to make up for the extra distance.
18Spitting will make cleaning difficult.
19Residues burned on to the top element may shorten its life.
20Burned residues falling back into the food may affect the look of the food.
21In sufficient quantities, they might even affect its taste.
CTHE LIGHT
22The light will stay on when the mini kitchen is in use.
cTEMPERATURE
23Turn the oven temperature control to the cooking temperature you need.
24If you’re grilling, turn the control to 230 (and leave the door open).
C MANUAL
25Turn the timer anti-clockwise to 6 to turn the oven or hob(s) on without using the
timer.
26 Turn the control knob to the desired function.
27 After use turn timer knob to 0.
C TIMER
28Turn the timer clockwise to set the time – you can set the time upto 120 minutes.
29When the timer ends, it sounds a bell, and turns everything off.
30To turn the mini kitchen off manually, turn the timer knob to 0.
C PREHEATING
31To preheat the oven, you’ll find that setting the timer to 15 is usually sufficient.
COVEN GLOVES
32Use oven gloves to open and close the door, and when handling the rack and tray.
33We’ve made the knobs big enough to use while wearing oven gloves.
CPANS
34Use good quality, flat-bottomed pans that make good contact with the hotplate.
35The base of the pan should be the same size as the hotplate or slightly wider.
a) with too small a base, you’ll lose heat and overheat the pan sides and handle.
b)if it’s too big, the pan may distort, the hob may overheat.
c) if it covers both hotplates (like a catering pan), it’ll overheat the mini oven.
d)these may all cause damage to the mini oven.
5
CCOOKING TEMPERATURES
36Oven temperatures are comparable with those of a standard electric oven.
37As the oven is small, cooking times will generally be slightly shorter than with a
large conventional oven.
38These temperatures are for guidance only.
39They’re for fresh or fully defrosted food, using both elements, with the door closed.
40Check food is cooked through before serving. If in doubt, cook it a bit more.
41Cook meat, poultry, and any derivatives (mince, burgers, etc.) till the juices run clear.
42Cook fish till the flesh is opaque throughout.
43When cooking pre-packed foods, follow any guidelines on the package or label.
food setting
beef 190-210
bread 200-220
casseroles 140-160
chicken 190-210
fish 170-190
lamb 190-210
meringue 90-110
milk pudding 140-160
conversion chart
Celsius
50
100
130
140
150
160-170
180
190
200
210-220
230
Fahrenheit
122
212
250
275
300
325
350
375
400
425
450
food setting
pastry 190-210
pork 190-210
quiche/flan 160-180
rich fruit cake 140-160
scones 190-220
sponge cake 160-180
Yorkshire pudding 200-220
gas mark
-
¼
½
1
2
3
4
5
6
7
8
description
for plate warming
extremely cool
very cool
very cool
cool
warm
moderate
fairly hot
fairly hot
hot
very hot
6
CCARE AND MAINTENANCE
1 Unplug the mini oven and let it cool before cleaning and storing away.
2 Wipe up all spillages, to avoid discolouring the surfaces and corroding the hotplates.
3 Hand wash the tray, rack, and handle in warm soapy water.
4 Clean the glass with a proprietary glass cleaner.
5 Wipe the outside surfaces with a damp cloth (you may use a non-abrasive cleaner).
6 Use a non-abrasive proprietary oven cleaner on the internal surfaces of the oven.
Leave the oven door open afterwards, to dry the oven thoroughly.
7 Don’t put the mini oven in liquid.
8 Don’t use scourers, wire wool, or soap pads.
CDISCOLOURATION
10Over time, heat will cause discolouration of the surfaces. This is unavoidable, but it
won’t affect the functionality of the mini oven.
C NOTE
11. The combination of oven and hob(s) cannot be used at the same time.
7
ENVIRONMENTAL PROTECTION
W
To avoid environmental and health problems due to hazardous substances in
electrical and electronic goods, appliances marked with this symbol mustn’t be
disposed of with unsorted municipal waste, but recovered, reused, or recycled.
SSERVICE
If you ring Customer Service, please have the Model No. to hand, as we won’t be able
to help you without it. It’s on the rating plate (usually underneath the product).
The product isn’t user-serviceable. If it’s not working, read the instructions, check the
plug fuse and main fuse/circuit breaker. If it’s still not working, consult your retailer.
If that doesn’t solve the problem – ring Customer Service – they may be able to offer
technical advice.
If they advise you to return the product to us, pack it carefully, include a note with your
name, address, day phone number, and what’s wrong. If under guarantee, say where
and when purchased, and include proof of purchase (till receipt). Send it to:
Customer Service
Spectrum Brands (UK) Ltd
Fir Street, Failsworth, Manchester M35 0HS
email: [email protected]
telephone: 0845 230 9700 (local rate number)
EGUARANTEE
Defects affecting product functionality appearing within two years of first retail
purchase will be corrected by replacement or repair provided the product is used and
maintained in accordance with the instructions. Your statutory rights are not affected.
Documentation, packaging, and product specifications may change without notice.
JONLINE
www.russellhobbs.co.uk for more products
IREGISTER ONLINE FOR –
r
£10,000 prize draw,
EXTRA year guarantee,
FREE rewards gallery
T22-5001724
Visit www.russellhobbs.co.uk/productregister/
You must register within 28 days of purchase.
8