1
Storyspace™ software copyright © 1990–2001 by Eastgate Systems,
Inc. All Rights Reserved.
Documentation copyright © 2001 by Eastgate Systems, Inc. All Rights
Reserved.
The information in this document is subject to change without notice.
Eastgate Systems, Inc., makes no warranty of any kind regarding this
material and assumes no responsibility for errors that may appear in
this document.
Storyspace™ is a trademark of Eastgate Systems, Inc. Civilized
Software is a service mark of Eastgate Systems, Inc.
Microsoft®, Windows®, Windows NT®, and Internet Explorer® are
registered trademarks of Microsoft Corporation. IBM® and OS/2® are
registered trademarks of International Business Machines Corporation.
Pentium® is a registered trademark of Intel Corporation. Apple is a
registered service mark, Macintosh™ is a trademark, and Quicktime®
is a registered trademark of Apple Computer, Inc. Unix® is a registered trademark of AT&T. Netscape and Netscape Navigator® are
registered trademarks of Netscape Communications Corporation. Zip™
is a trademark of Iomega Corporation. Myst® is a registered trademark of Cyan, Inc.
Other product names mentioned in this document may be trademarks
or registered trademarks of their respective owners. Product names
are used for identification only, with no intent to infringe.
Mention of third-party products is for informational purposes only and
constitutes neither an endorsement nor a recommendation. Eastgate
Systems, Inc., assumes no responsibility with respect to the performance or use of these products.
Storyspace™ Software License Agreement
Eastgate Systems, Inc., grants you a nonexclusive license to use this copy of the
program on the following terms:
YOU MAY:
I)
Use the program on any ONE
computer;
II) allow anyone else to use the program,
so long as there is never more than
one user per licensed program at any
time;
III) make copies of the program in
machine-readable form, but only for
archival purposes, and only so long as
all proprietary notices are reproduced
on each copy;
IV) distribute documents created with this
program, including stand-alone hypertext applications known as Readers,
provided that the applications are not
altered or modified, and that all
proprietary notices remain intact.
YOU MAY NOT:
I)
Modify, translate, reverse engineer,
decompile, disassemble, create derivative works based upon, or copy (save
for archival purposes) the program or
the accompanying documentation;
II) rent, transfer or grant any rights in the
program or accompanying documentation in any form to anyone else
without the prior written consent of
Eastgate Systems, Inc.;
III) remove any proprietary notices, labels,
or marks on the program and accompanying documentation;
IV) use this program, or permit this
program to be used, on more than one
computer at any one time.
Non-compliance with any of the above
restrictions will terminate this license.
This license is not a sale. Title and copyrights to the program and accompanying
documentation and any copy remain with
Eastgate Systems, Inc.
Limited Warranty and Disclaimer
Eastgate Systems, Inc., warrants that this
product shall prove suitable to its intended
use. Eastgate Systems, Inc., further
warrants that for a period of ninety (90)
days from the date of purchase the diskette
upon which this program is furnished will
be free from defects in materials and
workpersonship, and that the software is
properly recorded therein.
The liability of Eastgate Systems, Inc., in
the event of any unsuitability or defects in
materials or workpersonship as described
above, shall be limited to the replacement
of the product or the refund of the
purchase price. This is the entire liability of
Eastgate Systems, Inc., and your exclusive
remedy. Save for the above express limited
warranty, Eastgate Systems, Inc., makes
no warranties or conditions express,
implied, statutory or in any communication
with you.
This agreement is the entire agreement. If
any provision of this agreement is held
invalid, the remainder of this agreement
shall continue in full force and effect.
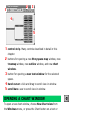
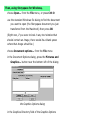
Hints on reading
Some suggestions for reading this manual with the Adobe
Acrobat™ Reader:
❚❚ A complete page of this PDF should be visible at 100%
scale, even on a moderately-sized screen. To switch to
100% scale, press Ctrl-H.
❚❚ On many systems, the text of this manual may be clearest
if you turn off text smoothing. To do this, open General
Preferences (Ctrl-Shift-G) and uncheck the option
“Smooth Text and Monochrome Images”.
❚❚ A detailed table of contents has been created for this
manual using Acrobat bookmarks. To see the bookmarks,
press Ctrl-7. (To hide them, press Ctrl-6.)
❚❚ Many (although not all) of the cross-references in this
manual have been linked. Place the cursor over text such
as “. . . are discussed in the chapter on . . .”. If the cursor
becomes a button-pushing hand
, you can click there to
follow the reference. (You can choose Go Back (Ctrl-minus)
to return from following a link.)
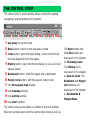
Chapter 1
SYSTEM REQUIREMENTS
Storyspace for Windows will run on any IBM PC-compatible
computer running one of: Windows 3.1, Windows 95, Windows
NT, OS/2, Windows 98, Windows 2000, Windows me, Windows
XP, or later, To install Storyspace, the computer should have:
❚❚ a 486 or faster processor (Pentium, Celeron, or faster
recommended).
❚❚ a hard disk drive
❚❚ a 3.5" floppy disk drive (to install from diskette); or CDROM drive (to install from CD); or Internet connection (to
download the Storyspace installer).
❚❚ at least 8 megabytes (MB) of free space on the hard disk
❚❚ at least 4 megabytes (MB) of RAM (memory) that is not
being used by Windows or other programs. (Minimum of 16
MB RAM recommended for Windows 3.1 systems, minimum
of 32 MB RAM recommended for Windows 95/98 systems.)
These recommended amounts of disk space and memory
should be sufficient for running Storyspace, but memory and
disk requirements can vary greatly among systems.
They can also depend on what else the computer is doing, and
can vary based on the size of your Storyspace project. Please
take these numbers as guidelines only.
To install Storyspace
Whether on a CD, on a diskette, or via download, you should
have a file named SETUP.EXE
In Windows,
run SETUP.EXE
follow any instructions given by the installer
After installation is complete, remember to eject the
Storyspace for Windows CD or diskette (if present) and store it
in a safe place.
To start Storyspace, open its program group and doubleclick the Storyspace icon. Or choose Storyspace from the
Storyspace submenu of the Start menu. Or, double-click a
Storyspace document.
What is installed
Installation creates a new program group named Storyspace,
containing:
❚❚ the Storyspace application;
❚❚ this manual;
❚❚ Welcome to Storyspace! —a quick overview of what
Storyspace is. View this file with your Web browser.
❚❚ Storyspace FAQ —answers to some common questions
about using Storyspace. View this file with your Web
browser.
If you do not specify otherwise during installation, the
Storyspace program group is added to Programs.
Installation places all the files it creates in a new directory
named Storyspace. If you do not specify otherwise during
installation, this directory is created within a directory named
Eastgate within the Program Files directory.
In addition to the files required by Storyspace itself, the
Storyspace directory contains two other directories:
❚❚ Samples: sample Storyspace files. (These files are referred
to in the paper manual Getting Started with Storyspace.)
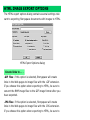
❚❚ Template: HTML export templates. (These files are
discussed in the chapters of this manual on Creating for
the World Wide Web and HTML Templates.)
UNINSTALLING
To remove Storyspace for Windows and all its associated files,
In Windows,
open Control Panel (from the Settings submenu of the
Start menu)
use Add/Remove Programs, and choose Storyspace
from the list of applications
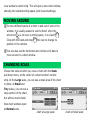
UPGRADING FROM AN
EARLIER VERSION
Installing Storyspace does not remove any older copies of
Storyspace for Windows software, or its associated files, that
you may have on your computer.
Before installing Storyspace, you may want to remove any old
copies of Storyspace from your hard disk drive.
If you do not remove any old copies of Storyspace, you can
end up with two copies of Storyspace on your hard drive: one
old, one new. This is not recommended. If you have two
versions, double-clicking a Storyspace document may start the
old version of Storyspace, rather than the new.
Chapter 2
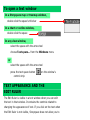
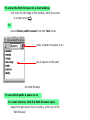
To save a document
From anywhere,
choose Save from the File menu, or press Ctrl-S
The first time that you save a new Storyspace document, you
must give it a name, so you will be saving your document
with a new name.
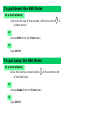
To save with a new name
From anywhere,
choose Save As… from the File menu
In the standard Windows file dialog, choose a directory to
save your document in, and type a name for the document
press OK
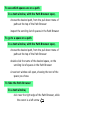
To open a saved document
From Windows
double-click its icon
or, from Storyspace,
choose Open… from the File menu
Use the standard Windows file dialog to find the
Storyspace document you want to open, and select it
press OK
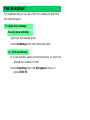
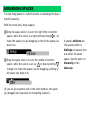
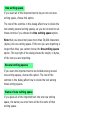
STRATEGIES FOR SAFETY
Saving a document is your best protection against the
unexpected:
❚❚ someone walks by and kicks out your computer’s plug . . .
❚❚ your floppy disk gets too close to the magnets in a loudspeaker . . .
❚❚ a microscopic dust particle visits your hard disk drive . . .
Your first line of defense against losing your work is to
Save Often
This protects you against mishaps. Get in the habit of pressing
Ctrl-S . . .
➢ when you stop to think
➢ when you take a sip of coffee
➢ before you try a new feature
➢ before you make a major change to your work
This way, when the unexpected happens, you have only lost
the five or ten minutes of work since the last time you saved.
Frequent saves cannot protect you from all dangers, however.
That’s why you should
Save Under Different Names
Your Storyspace file can become corrupt if your disk is slightly
damaged, or if Storyspace or Windows should make a
mistake.
Saving to a corrupt file is dangerous: You think that you are
doing the right thing, by saving often. When you come back to
work later, and try to open your file, you are informed that the
file is damaged and cannot be opened—and all your work is
lost.
It is a good idea to change the name of your document
periodically—every day, or every half-day. If you have been
working on MYFILE_2.SSP, for instance, you could Save As…
MYFILE_3.SSP
This protects you from a damaged file. If your Storyspace file
should become corrupt, you can return to an earlier version
saved under an earlier name. You might lose some work—but
not all your work.
Keep Backup Copies
The more copies you have of your work in Storyspace, the less
likely it is that all of them will become damaged, or lost (or
get eaten by the dog).
Are you done work for the day? Maybe it’s a good idea to copy
your Storyspace document onto a diskette or Zip disk that you
can put in your purse and take home.
Does your computer have two hard disk drives? Maybe you
should copy your work from one to the other at the end of the
day.
Do you work on a laptop? The day your laptop is stolen, or left
at a friend’s house, you’ll be very glad to have copies of all
your important files on your desktop machine.
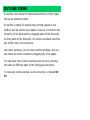
DEADLINES
Many Storyspace users periodically face the pressure of deadlines—publication dates, release dates, final exams. . . .
The temptation, when racing to meet a deadline, is to eliminate non-essential activities:
➢
➢
➢
➢
eating
sleeping
saving your work frequently under different file names
keeping backups
Eastgate Systems can’t offer advice about eating and sleeping.
But work under pressure is when saving properly is
most important.
If you wouldn’t want to lose an afternoon’s work at any time,
you can’t afford to lose that work under deadline pressure. If a
corrupt file would ruin your week, what if that week is finals
week? Finally, if a computer error might occur, it is most likely
to occur at the worst time—when you are using your computer
full time, working hard, changing and adding frequently.
Even if the deadline is tomorrow, you will be happy that you
took the time to save every few minutes, and Save As…
every few hours.
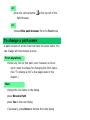
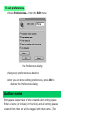
SSP AND SNI FILES
When you save Storyspace documents, Storyspace creates
two types of files:
.SSP files are Storyspace documents. These files are the
hypertexts you create.
.SNI files contain the settings of any Document Options for a
hypertext. If you never change any Document
Options in a hypertext, Storyspace will not create
an .SNI file. If you have modified any Document
Options, then saving that hypertext will create two
files: for instance, MY_FILE.SSP and MY_FILE.SNI.
To copy a hypertext to another computer or another disk, you
should copy both the .SSP and the .SNI file. If you copy only
the .SSP file, your hypertext will open on the second
computer, but various Document Options—such as the appearance of windows, or the colors of maps—will not appear as
intended.
The chapter on
Publishing a
Hypertext describes
ways you can let others
read your hypertext on
other computers.
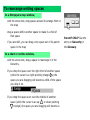
Chapter 3
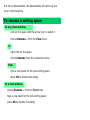
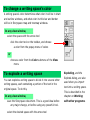
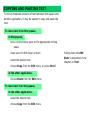
To create a writing space
In a Storyspace map window,
double-click with the hand cursor
. (When the arrow
tool is not over a writing space, it is the hand.)
type a name for the new writing space
press OK to dismiss the dialog
In any view window,
select the writing space tool from the toolbar
click in the view to create the new writing space
type a name for the new writing space
press OK to dismiss the dialog
In a chart view, click with the writing space tool on another
writing space to create a new space. If you click on the right
third of the writing space, the new space will be a child of the
space you click on. If you click near the middle of the writing
space, the new space will be a sibling of the space you click on.
In an outline view, click with the writing space tool on
another writing space to create a new space. The new space
will be a child of the space you click.
In a Chart, Outline, or Treemap window,
right-click on any space
choose Create Child or Create Sibling from the
contextual menu
type a name for the new writing space
press OK to dismiss the dialog
To delete a writing space
In any view window,
click on the space with the arrow tool, to select it
press the delete key, or choose Clear from the Edit menu
If you delete a space that has children, a dialog will ask
whether to delete only that space, delete the space and all its
descendants, or just cancel. If you choose to delete a space
A space’s children are
the spaces within it.
Siblings are spaces that
are within the same
space. See the entry on
hierarchy in the
Glossary.
A space’s descendants
are the spaces it
contains, and the spaces
they contain, and so on.
See the entry on
hierarchy in the
Glossary.
but not its descendants, the descendants will move up one
level in the hierarchy.
To rename a writing space
In any view window,
click on the space with the arrow tool, to select it
choose Rename… from the View menu
or
right-click on the space
choose Rename from the contextual menu
then
type a new name for the new writing space
press OK to dismiss the dialog
In a text window,
choose Rename… from the Text menu
type a new name for the new writing space
press OK to dismiss the dialog
To read or edit the text
in a writing space
In a Storyspace map or treemap window,
double-click the space’s title bar
This will open a text window for that space.
In a chart or outline window,
double-click the space
This will open a text window for that space.
In any view window,
select the space with the arrow tool
choose Text space… from the Windows menu
or
select the space with the arrow tool
press the text space button
control strip
on the window’s
After you have opened the text window, if you want to edit the
text, make sure the Edit Ruler is pulled down.
The Edit Ruler has the
controls for changing the
appearance of text. The
Edit Ruler must be
present to edit the text
in that text window.
Opening and closing the
Edit Ruler are described
next.
The chapter on Text
tells more about working
with the text in a writing
space.
To pull down the Edit Ruler
In a text window,
click near the top of the window, while the cursor
a down-arrow
is
or
choose Edit from the Text menu
or
type Ctrl-E
To put away the Edit Ruler
In a text window,
press the narrow vertical button
of the Edit Ruler
or
choose Read from the Text menu
or
type Ctrl-E
at the extreme left
The Edit Ruler has the
controls for changing the
appearance of text. The
chapter on Text tells
more about editing text.
To rearrange writing spaces
In a Storyspace map window,
with the arrow tool, drag spaces around to arrange them in
the map
drag a space within another space to make it a child of
that space
if you are deft, you can drag a tiny space out of its parent
space in the map
In a chart or outline window,
with the arrow tool, drag a space to rearrange it in the
hierarchy.
If you drop the space over the right third of another space
(while the cursor is a right-pointing triangle
) the
space you are dragging will become a child of the space
you drop it on.
If you drop the space over over the middle of another
space (while the cursor is an upor down-pointing
triangle) the space you are dragging will become a
Parent? Child? See the
entry on hierarchy in
the Glossary.
sibling of the space you drop it on.
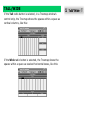
In a Treemap window,
with the arrow tool, drag a space to rearrange it in the
hierarchy. A space will become the child of whatever
space you drop it in.
To Copy and Paste a writing space
In any view window,
select the space with the arrow tool
choose Cut or Copy from the Edit menu
go to the view where you want to paste the space
then
In a Chart, Outline, or Treemap window,
choose Paste from the Edit menu
The space you paste will become a sibling of the
selected space in this view.
In a Storyspace map window,
choose Paste from the Edit menu
click where you want to put the space.
Note that you can copy a space from one Storyspace document, and paste it into another.
Note that if you want to copy many spaces, it may be easiest
to first put them all inside some other space. Copy and paste
the parent space, and all its children get pasted along with it.
This technique can help to transfer large portions of material
from one Storyspace document to another.
Note that spaces retain all their links when cut and pasted.
For instance,
❚❚ if space A is linked to space B, and both spaces are copied
then pasted into another Storyspace document, space A
will be linked to space B in the second document;
❚❚ or, if space X is linked to space Y, and space X is copied,
then pasted into the same Storyspace document—both
copies of space X will be linked to space Y.
The children of a space
are the spaces it
contains. See the entry
on hierarchy in the
Glossary.
To Locate a writing space
From anywhere,
choose Locate writing space… from the
Navigate menu, or press F9
The dialog will list every space in the document (in alphabetical order).
find the name of the space you want, and
double-click it in the list, or press Visit
to dismiss the dialog without visiting a space,
use its close box, or press Cancel
You can start typing the name of a writing space
in the field at the top of the dialog, and the list will
scroll to that space name.
If a view window was in front when you chose
Locate writing space, the view in that window
will now show the space you chose, and it will be
the selected space.
If a text window was in front when you chose Locate writing
space, a new text window will open, showing the text of the
space you chose.
To change a writing space’s color
A writing space’s color determines what color it will be in chart
and outline windows, and what color its title bar and border
will be in Storyspace map and treemap windows.
In any view window,
select the space with the arrow tool
click the color tool on the toolbar, and choose
a color from the popup menu of colors
or
choose a color from the Color submenu of the View
menu
To explode a writing space
You can explode a writing space to divide it into several other
writing spaces, each containing a portion of the text in the
original space. To do this,
In any view window,
save the Storyspace document. This is a good idea before
any major change, or before using any powerful tool.
select the desired space with the arrow tool
Exploding, and the
Explode dialog, are also
used when you import
text into a writing space.
This is described in the
chapter on Working
with other programs.
choose Explode… from the Storyspace menu
in the Explode dialog, modify the options controlling how
the text will be divided into many writing spaces. These
options are described next in this chapter.
press OK to dismiss the Explode dialog
Storyspace will explode the writing space. For very long
text, this may take a few seconds.
Exploding a writing space will create several new writing
spaces, each containing a portion of the text in the original
writing space. These spaces will all be within a new space that
is created within the space that was selected when you chose
Explode.
Exploding does not delete the original writing space.
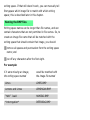
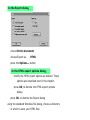
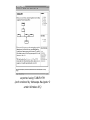
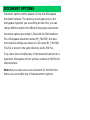
EXPLODE OPTIONS
Explode dialog
Name of new writing space
The new writing spaces will all be placed within another new
writing space, which will get the name you enter here.
Writing spaces should contain at least . . .
If dividing the text according to your criteria (as set below)
would result in a space containing fewer characters than the
minimum you set here, the explode process will skip division
points to ensure that all the spaces created contain at least
that minimum amount of text.
and no more than . . .
The explode process will divide the text and create new writing
spaces to ensure that no writing space gets more text than
the maximum you set here.
Divide spaces at: Symbol or string
Storyspace can divide the text into different writing spaces at
whatever divider you enter here.
The divider can be a single character, or a word or phrase.
For instance, you could prepare your text with a special tag,
such as ZZZ, wherever you want to begin a new writing space.
Then you could enter ZZZ into this field, and the text would be
divided into writing spaces as you intended.
To use this option, check the Divide spaces at: box, select
the Symbol or string radio button, and type the desired
delimiter into the “Symbol or string” text area.
Divide spaces at: Paragraph
Storyspace can put each paragraph of the text into its own
new writing space.
To use this option, check the Divide spaces at: box and
select the Paragraph radio button.
Title delimiter
The explode process can use the beginning of each section of
text as the title of the writing space containing that text.
If you enter a delimiter here, Storyspace will use the text from
the beginning of the section until that delimiter as the title of
the writing space. It will remove this title text from the writing
space.
The delimiter can be a single character, or a word or phrase.
If you do not enter a delimiter here, Storyspace will use the
first few words of the section as the title of the writing space.
It will not remove this title text from the writing space.
Delete delimiter
If you enter a Title delimiter, as described just above, you can
also have that delimiter deleted from the section of text after
stripping off the preceding text to use as the title. Check
Delete delimiter to have the delimiter text removed.
Chapter 4
To open a text window
In a Storyspace map or treemap window,
double-click the space’s title bar
In a chart or outline window,
double-click the space
In any view window,
select the space with the arrow tool
choose Text space… from the Windows menu
or
select the space with the arrow tool
press the text space button
control strip
on the window’s
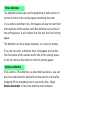
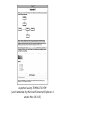
TEXT APPEARANCE AND THE
EDIT RULER
The Edit Ruler is visible in a text window when you can edit
the text in that window. It contains the controls related to
changing the appearance of text. If you click on the text when
the Edit Ruler is not visible, Storyspace does not allow you to
edit the text—it attempts to follow a link in the text.
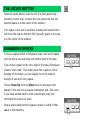
text window without the Edit Ruler
text window with the Edit Ruler pulled down
To pull down the Edit Ruler
In a text window,
click near the top of the window, while the cursor
a down-arrow
is
or
choose Edit from the Text menu
or
type Ctrl-E
To put away the Edit Ruler
In a text window,
press the narrow vertical button
of the Edit Ruler
or
choose Read from the Text menu
or
type Ctrl-E
at the extreme left
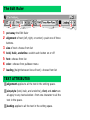
The Edit Ruler
1
1
2
3
4
5
6
7
2
3
4
5
6
put away the Edit Ruler
alignment of text (left, right, or center)—push one of three
buttons.
size of text—choose from list
bold, italic, underline—switch each button on or off
font—choose from list
color—choose from pulldown menu
leading (height between lines of text)—choose from list
TEXT ATTRIBUTES
❚❚ alignment applies to all the text in the writing space.
❚❚ size,style (bold, italic, and underline), font, and color can
all apply to any text selection—from one character to all the
text in the space.
❚❚ leading applies to all the text in the writing space.
7
To find text
From anywhere,
choose Find text… from the Navigate menu
Keyword? These are
discussed in the chapter
Keywords.
In the Find text dialog,
in the “Search For” (top) field of the dialog, type the
word or phrase you want to find, then press Find
The bottom area of the dialog will then list all the
writing spaces containing that word or phrase.
then
to go to one of the listed spaces, double-click its name
in the list.
If a view window was in front when you chose Find
text, the view in that window will now show the
space you chose, and it will be the selected
space.
If a text window was in front when you chose Find
text, a new text window will open, showing the
text of the space you chose.
To dismiss the dialog, use its close box.
or
To dismiss the dialog without visiting a space, use its
close box.
or
To change your search, enter different text in the
“Search For” field, then press Find again.
If you don’t want the text search to distinguish upper- and
lower-case letters, check Ignore case in the Find text dialog.
If you want the text search to include margin notes, check
Search margin notes. If you want the text search to include
the titles of writing spaces, check Search titles.
Margin notes? These
are discussed in the
chapter Bookmarks &
Margin Notes.
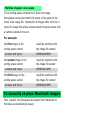
Special searching characters: you can use special characters
in the “Search for” field of the Find text dialog to search for
logical combinations of words in text.
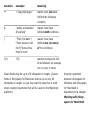
character
example
meaning
&
Ford&Chrysler
find spaces containing both
words
|
Ford|Chrysler
find spaces containing
either word (or both)
~Ford
find spaces that don’t
contain this word
Ford&(GM|Chrysler)
used to group combinations
of search terms
~
( )
MAXIMUM LENGTH OF TEXT
The maximum amount of text that can be in one writing space
is 32,768 characters. This is equivalent to about 5000 words,
or, very roughly, 14 typed pages.
Chapter 5
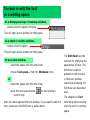
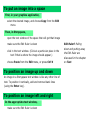
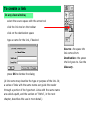
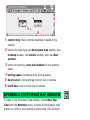
To put an image into a space
First, in your graphics application,
select the desired image, and choose Copy from the Edit
menu
Then, in Storyspace,
open the text window of the space that will get that image
make sure the Edit Ruler is down
click in the text window. (Click at a particular place in the
text if that is where the image should appear.)
choose Paste from the Edit menu, or press Ctrl-V
To position an image up and down
An image in a Storyspace text window is like any other line of
text. To position it vertically, add and remove blank lines
(using the Enter key).
To position an image left and right
In the appropriate text window,
make sure the Edit Ruler is down
Edit Ruler? Pulling
down and putting away
the Edit Ruler are
discussed in the chapter
on Text.
click once on the image to select it
while holding down the Shift key, click on the image and
drag it left or right
To delete an image from a space
An image in a Storyspace text window can be deleted just like
text. Select the picture, then press the delete key. Or, position the insertion point after the image, and back up over the
image with the backspace key.
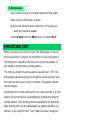
ABOUT WORKING WITH IMAGES
Images—particularly large images using thousands or millions
of colors—add appreciably to the size of a Storyspace document, and add appreciably to the memory required by
Storyspace to do its work. If you will be working with images,
please make sure that you have plenty of empty space on
your hard disk drive, and plenty of memory (RAM) for
Storyspace to work in.
As with any operation placing unusual demands on your
computer, please save early and often when working with
large images.
Chapter 6
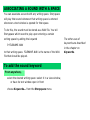
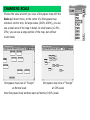
ASSOCIATING A SOUND WITH A SPACE
You can associate a sound with any writing space. Storyspace
will play that sound whenever that writing space is entered:
whenever a text window is opened for that space.
To do this, the sound must be stored as a WAV file. You tell
Storyspace which sound to play upon entering a certain
writing space by adding the keyword
P:FILENAME.WAV
to that writing space. FILENAME.WAV is the name of the WAV
file that should be played.
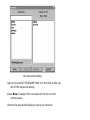
To add the sound keyword
From anywhere,
select the desired writing space: select it in a view window,
or have its text window open in front
choose Keywords… from the Storyspace menu
The other uses of
keywords are described
in the chapter on
Keywords.
the Keywords dialog
type the keyword P:FILENAME.WAV into the field at the top
left of the Keywords dialog
press New to assign that new keyword to the current
writing space
dismiss the Keywords dialog by using its close box
Note that Storyspace looks for the WAV file first in the same
directory as the Storyspace document, and then in the same
directory as Storyspace itself. If the file is in one of those
places, you only need to give the file name of the WAV file. For
instance,
P:CELLO.WAV
If the WAV file is in some other directory, you should give the
complete pathname for the file. For instance,
P:C:\MEDIA\SOUND\CELLO.WAV
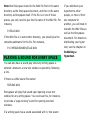
PLAYING A SOUND FOR EVERY SPACE
You can also have a sound play when any writing space is
entered: whenever a new text window is opened by following
a link.
If there is a WAV sound file named
SSPLINK.WAV
Storyspace will play that sound upon opening a new text
window for any writing space. You could use this, for instance,
to provide a “page turning” sound for opening new text
windows.
If a writing space has a sound associated with it, that sound
If you distribute your
hypertext to other
people, or move it from
one computer to
another, you will need to
transfer the WAV files as
well as the Storyspace
document. For details on
distributing your hypertext, see the chapter on
Publishing a
Hypertext.
will play instead of the default sound.
Storyspace looks for the SSPLINK.WAV file first in the same
directory as the Storyspace document, and then in the same
directory as Storyspace itself.
Chapter 7
To create a link
In any view window,
select the source space with the arrow tool
click the link tool on the toolbar
click on the destination space
type a name for the link, if desired
Source—the space the
link comes from.
Destination—the space
the link goes to. See the
Glossary.
press OK to dismiss the dialog
(A link name may describe the type or purpose of the link. Or,
a series of links with the same name can guide the reader
through a portion of the hypertext. Links with the same name
are called a path, and the section on “Paths”, in the next
chapter, describes this use in more detail.)
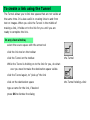
To create a link using the Tunnel
The Tunnel allows you to link two spaces that are not visible at
the same time. It is also useful in creating links to and from
text or images. When you click the Tunnel in the middle of
making a link, it holds on to the link for you until you are
ready to complete the link.
In any view window,
select the source space with the arrow tool
click the link tool on the toolbar
click the Tunnel on the toolbar.
the Tunnel
While the Tunnel is holding on to the link for you, do whatever you need to make the destination space visible.
click the Tunnel again, to “pick up” the link
click on the destination space
type a name for the link, if desired
press OK to dismiss the dialog
the Tunnel holding a link
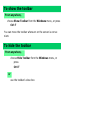
TYPES OF LINKS
Storyspace has three types of links:
❚❚ basic links — links that connect an entire writing space to
something. When you create a link by using the link tool to
click between spaces in a view, you are creating a basic
link.
❚❚ text links — links that connect a section of text within a
writing space to something. Text links are similar to the
links in text everywhere on the World Wide Web. Text links
are described next in this chapter.
❚❚ graphic links — links that connect an image, or a portion
of an image, within a writing space to something. Graphic
links are similar to links from images on the World Wide
Web. Creating graphic links is described later in this
chapter.
To create a link from text
In a text window,
make sure the Edit Ruler is down
select the text that should be the source of the link
The Edit Ruler contains
the controls for text
appearance. It must be
pulled down for you to
edit text, or to select
text for linking. The
chapter on Text
describes pulling the
Edit Ruler down, and
putting it away.
click the link tool on the toolbar
if
the destination of the link is visible, click on the
destination space
if not
click the Tunnel on the toolbar.
do whatever you need to make the destination space
visible.
click the Tunnel again
click on the destination space
then,
type a name for the link, if desired
press OK to dismiss the dialog
CHANGING THE TEXT IN A TEXT LINK
If you change the text that is the source of a text link, add
more text to the source of the link, or remove some text from
the source of the link, the link remains anchored to the modified text.
The source of a text
link is the text that the
link comes from. The
destination is where it
goes to. See the
Glossary.
If you delete all of the text that is the source of a link, the link
is deleted as well.
If you add more text to the end of a text link, the added text
also becomes part of the text link.
Note that you can type the special character shift-space to
tell Storyspace that the text you type after the shift-space is
not part of the preceding text link.
To see text links
In a text window,
hold down the Ctrl key
text that is the source of one or more links will appear
outlined in a rectangle
You can also have Storyspace automatically highlight text links
(just as many Web browsers do).
To automatically highlight text links
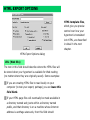
From anywhere,
choose Document options… from the File menu
in the Document Options dialog,
check Highlight text links (toward the lower right of
the dialog)
Other options are
described in the chapter
on Document Options.
decide whether linked text should be bold, underlined,
a special color, or some combination of these styles
press OK to dismiss the Document Options dialog
The appearance you choose will apply to text that is the
source of one or more links, whatever other styles are applied
to that text.
To create a link from an image
A link can originate from an image, or a portion of an image.
In a text window,
make sure the Edit Ruler is down
The Edit Ruler contains
the controls for text
appearance. It must be
pulled down for you to
edit text, or to select
text for linking. The
chapter on Text
describes pulling the
Edit Ruler down, and
putting it away.
click once on the image, to select it
click the link tool on the toolbar
Complete the link, as described previously: either by
clicking on the destination, or by using the Tunnel and
then clicking on the destination.
type a name for the link, if desired
press OK to dismiss the dialog
To create a link from
a portion of an image
In a text window,
make sure the Edit Ruler is down
click once on the image, to select it
place the cursor at the upper-left corner of the area of the
image that will originate the link
click-and-drag to the lower-right corner of the rectangle
that will originate the link
click the link tool on the toolbar
complete the link, as described previously: either by
clicking on the destination, or by using the Tunnel and
then clicking on the destination
type a name for the link, if desired
press OK to dismiss the dialog
To create a link to text
A link to text will take the reader to that particular text, in that
writing space, when it is followed. A link to text may originate
from anything.
From anywhere,
begin the link as described previously, and click the Tunnel
to hold the link for you
open the text window of the destination
make sure the Edit Ruler is down
with the cursor, select the text that is the link’s destination
click the Tunnel, to pick up the link
click on the selected text
type a name for the link, if desired
press OK to dismiss the dialog
Source—where the link
comes from.
Destination—where the
link goes to. See the
Glossary.
To create a link to an image
A link to an image will take the reader to that image, in that
writing space, when it is followed. A link to an image may
originate from anything.
From anywhere,
begin the link as described previously, and click the Tunnel
to hold the link for you
open the text window of the destination
make sure the Edit Ruler is down
click once on the image, to select it
click the Tunnel, to pick up the link
click on the image
type a name for the link, if desired
press OK to dismiss the dialog
To create a link to
a portion of an image
From anywhere,
begin the link as described previously, and click the Tunnel
to hold the link for you
open the text window of the destination
make sure the Edit Ruler is down
click once on the image, to select it
place the cursor at the upper-left corner of the area of the
image that will be the link’s destination
click-and-drag to the lower-right corner of the rectangle
that will be the link’s destination
click the Tunnel, to pick up the link
click on the selected rectangle
type a name for the link, if desired
press OK to dismiss the dialog
Source—where the link
comes from.
Destination—where the
link goes to. See the
Glossary.
Chapter 8
To view links
The Links dialog lets you see all the links originating from the
selected writing space, and edit them if you want.
In any view window,
click on the space with the arrow tool, to select it
choose Browse Links from the Storyspace menu, or
press F2
or
right-click on the space
choose Links from the popup menu
In a text window,
press the Links button
control strip
on the window’s
From anywhere,
hold down the Ctrl key while you click the navigate tool
on the toolbar
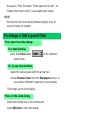
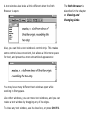
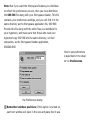
THE LINKS DIALOG
The Links dialog lets you see all the links originating from the
selected writing space, and edit them if you want.
Guard Fields control
when, or whether, a link
can be followed. They
are discussed in the
chapter on Special
Links.
the Links dialog
For every link originating from the selected writing space, the
Links dialog shows:
❚❚ the Link Name — the name of the link (if it has one)
❚❚ the Destination — the name of the space the link goes to
❚❚ the Guard Field
In the far left of the list, symbols may appear for some links:
T indicates that the link is a text link
G indicates that the link is a graphic link
> indicates that the link’s guard field could be satisfied at
the present time.
A text link is a link that
departs from a section
of text. A graphic link
is a link that departs
from an image, or a portion of an image. Guard
fields are discussed in
the chapter on Special
Links. These terms are
all in the Glossary.
To dismiss the Links dialog, use its close box, or press Done.
THE STORYSPACE MAP MENU OF LINKS
A Storyspace map view gives you quick access to the links
arriving at or departing from any of the writing spaces shown.
In the Storyspace map, make sure that show links is checked
at the top of the window. Then click on the arrowhead of the
links arriving at any space, or the arrowhead of the links
departing from any space:
A contextual menu will open, showing all the links arriving at,
or departing from, that space. The menu show the name of
each link, followed by an arrow ->, followed by the destination
of that link. Links that have no name show three dashes --before the arrow.
Select any link from the menu to delete or modify that link (as
described next). Or click anywhere else to dismiss the menu.
To delete a link
In a Storyspace map window,
make sure that show links is checked at the top of the
window
in the map, click on the arrowhead of the links arriving at
the desired link’s destination; or click on the links
departing from the desired link’s source
choose the desired link from the contextual menu of links
press Delete in the dialog
In any view window,
select the source space with the arrow tool
choose Browse Links from the Storyspace menu; or use
Source—the space the
link comes from.
Destination—the space
the link goes to. See the
Glossary.
another method of opening the Links dialog
in the Links dialog, select the desired link in the scrolling
list
press Delete link in the Links dialog
press Done to dismiss the Links dialog
In a text window,
press the Links button
control strip
on the window’s
in the Links dialog, select the desired link in the scrolling
list
press Delete link in the Links dialog
press Done to dismiss the Links dialog
To delete a text link or a graphic link
A text or graphic link can be deleted like any other link, as
described above. Or,
In a text window,
make sure the Edit Ruler is down
select text containing the desired text link (but no other
text links)
choose Cut from the Edit menu
immediately choose Paste from the Edit menu. The text
you just cut is pasted right back in, but without its link
(or links).
To change a link
First, select the link:
In a Storyspace map window,
make sure that show links is checked at the top of the
window
in the map, click on the arrowhead of the links arriving
at the desired link’s destination; or click on the links
departing from the desired link’s source
choose the desired link from the contextual menu of
links
or, in any view window,
select the source space with the arrow tool
choose Browse Links from the Storyspace menu; or
use another method of opening the Links dialog
in the Links dialog, select the desired link in the
scrolling list
press Edit Link in the Links dialog
or, in a text window,
press the Links button on the window’s control strip
in the Links dialog, select the desired link in the
scrolling list
press Edit Link in the Links dialog
then:
change the Link Name or Guard Field in the dialog
press Okay to dismiss the dialog
if necessary, press Done to dismiss the Links dialog
PATHS
A path consists of all the links that have the same name.
Two important uses for paths are:
❚❚ to label types of links. Every time you link a word to its
definition, for instance, you could label that link “definition”.
If you later decide that all those links should be named
“explanation” instead, you could change the names of all
those link in one step—by changing the path name.
❚❚ to label a sequence of links through part of the hypertext.
In a hypertext novel, for instance, links named “Amy’s
story” could chronologically link scenes told from Amy’s
point of view.
Storyspace has facilities for seeing which paths a space is on,
and for changing the names of all links on a path.
THE PATH BROWSER
The Path Browser shows which paths the current space is on,
and which spaces are on each of those paths. A Path Browser
pane may be opened in any text window.
text window with the Path Browser
To show the Path Browser In a text window,
click near the left edge of the window, while the cursor
is a right-arrow
or
choose Show path browser from the Text menu
menu of paths the space is on
list of spaces on the path
the Path Browser
To see which paths a space is on
In a text window, with the Path Browser open,
inspect the pull-down menu of paths, at the top of the
Path Browser
To see which spaces are on a path
In a text window, with the Path Browser open,
choose the desired path, from the pull-down menu of
paths at the top of the Path Browser
inspect the scrolling list of spaces in the Path Browser
To go to a space on a path
In a text window, with the Path Browser open,
choose the desired path, from the pull-down menu of
paths at the top of the Path Browser
double-click the name of the desired space, on the
scrolling list of spaces in the Path Browser
A new text window will open, showing the text of the
space you chose.
To hide the Path Browser
In a text window,
click near the right edge of the Path Browser, while
the cursor is a left-arrow
or
press the vertical button
Path Browser
at the top left of the
or
choose Hide path browser from the Text menu
To change a path name
A path consists of all the links that have the same name. You
can change all those names at once.
From anywhere,
choose any link on that path, and—however is convenient—open the dialog for changing the link’s name.
(See “To change a link” a few pages back in this
chapter.)
then
change the Link Name in the dialog
press Rename Path
press Yes in the next dialog
if necessary, press Done to dismiss the Links dialog
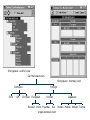
THE ROADMAP
The roadmap lets you see all of the links leading to and from
the selected space.
To open the roadmap
In any view window,
right-click the desired space
choose Roadmap from the contextual menu
or, from anywhere,
in a view window, select the desired space; or, have the
desired text window in front
choose Roadmap from the Storyspace menu, or
press Shift-F2
the roadmap
❚❚ The list at the left shows the name of every space that has
a link to the selected space. If the link is named, the name
is shown in parentheses following the space name.
❚❚ The center of the roadmap shows the name of the space
that the roadmap is focused on, and the first few lines of
the text in that space.
❚❚ The list at the right shows the name of every space that the
selected space has a link to. If the link is named, the name
is shown in parentheses following the space name.
To change the focus of the roadmap
double-click the name of a space in either list. The
roadmap will change to show that as the central space,
with the links leading in and out of it in the two lists.
To open one of the listed spaces
double-click the space in either list to make it the central
space
press Locate; the roadmap will close.
If a text window is in front, a text window will open
showing the located space. If a view window is in front,
the view will change to show the located space. (If that
space is already visible—even a little bit—the view will
not change.)
To dismiss the roadmap
use its close box, or press OK
Chapter 9
To follow a link
In a text window, with the Edit Ruler pulled down,
click the navigate tool on the Toolbar
In a text window, with the Edit Ruler put away,
click the navigate tool on the Toolbar
or
press Enter
or
click anywhere in the text window except on a text link.
(Clicking on a text link will follow that link.)
In any view window,
click the navigate tool on the toolbar
The space at the end of the link will become selected; and
the view will change (if necessary) to put that space in
view.
To follow a link backwards
You can follow a link backwards—from the current space to the
space you came from. To do this,
From anywhere,
hold down the Shift key while you click the navigate
tool on the toolbar
In a text window,
press the Back button
control strip
on the window’s
or, with the Edit Ruler put away,
press the backspace key
To see text and graphic links
In a text window,
hold down the Ctrl key
❚❚ Text that is the source of a link will appear outlined in a
rectangle.
❚❚ An image, or portion of an image, that is the source of a
link will appear outlined in a rectangle.
A text link is a link that
departs from a section
of text. A graphic link
is a link that departs
from an image, or a
portion of an image.
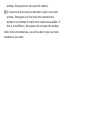
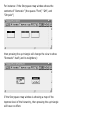
with the Ctrl key held down, the links from
Anthony Grafton, Edward Gibbon, and Nicholson Baker,
appear outlined in rectangles
To follow a text link
In a text window, with the Edit Ruler pulled down,
click to place the insertion point within the text of the
link
click the navigate tool on the Toolbar
or
while holding down the Ctrl key, click within the text of
the link
A text link is a link that
departs from a section
of text.
In a text window, with the Edit Ruler put away,
click within the text of the link
Note that you can click within a text link to follow it while
holding down the Ctrl key to see the text links.
To follow a graphic link
In a text window, with the Edit Ruler put away,
click on the image within the link
Note that you can click within a graphic link to follow it while
holding down the Ctrl key to see the graphic links.
To choose which link to follow
A writing space may have many links departing from it:
several basic links, several text links, several graphic links. . . .
You can see what these links are and choose which one to
follow.
First, open the Links dialog:
In a text window,
press the Links button
control strip
on the window’s
A graphic link is a link
that departs from an
image, or a portion of an
image.
Or, in any view window,
select the source space with the arrow tool
choose Browse Links from the Storyspace menu,
or press F2
or
right-click the space
choose Links from the contextual menu
Or, from anywhere,
hold down the Ctrl key while you click the
navigate tool on the toolbar
This brings up the Links dialog:
Then, in the Links dialog,
select the desired link in the scrolling list
press Follow link
OVERLAPPING TEXT LINKS
When you try to follow a link from a section of text that is the
source of more than one text link, Storyspace will display a
dialog listing all the links departing from that text.
In that dialog,
select the desired link in the scrolling list
press Follow link
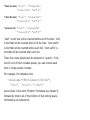
WHICH LINK WILL BE FOLLOWED?
When you follow a link from a space that is the source of
many links, Storyspace must know which link to follow.
Storyspace uses the same list of links that you see in the Links
dialog to do this.
When you follow a link from a space—by clicking on text, or by
clicking the navigate tool, for instance—Storyspace goes
through this procedure:
Was the click within a single text or graphic link?
If so, then follow that link. If not . . .
Was the click within overlapping text links?
If so, then display a dialog allowing the choice of which link
to follow. If not . . .
Follow the first (uppermost) link
in the list of links . . .
❚❚ that is not a text or graphic link;
❚❚ and that is not blocked by its guard field.
Inspecting the list of links in the Links dialog can tell you
which link from a space will be followed. Re-arranging the
order (priority) of links in the Links dialog can control which
link from that space will be followed, under which circumstances.
Note that in some cases no link can be followed. For instance,
if all of the links are text links, but there was no click within
any of them; or if every link is blocked by its guard field. In
that case, Storyspace will not follow any link.
Guard Fields control
when, or whether, a link
can be followed. They
are discussed in the
chapter on Special
Links.
To change a link’s priority
First, open the Links dialog:
In a text window,
press the Links button
control strip
on the window’s
Or, in any view window,
select the source space with the arrow tool
choose Browse Links from the Storyspace menu; or
use another method of opening the Links dialog
This brings up the Links dialog.
Then, in the Links dialog,
select the desired link in the scrolling list
press Promote to move the selected link one line up in
the list
press Demote to move the selected link one line down
in the list
when you are done changing link priorities . . .
press Done to dismiss the Links dialog
Chapter 10
GUARD FIELDS
A link with a guard field can be followed only under certain
circumstances. For instance, only if a certain writing space has
been visited; or only if certain text has been selected.
❚❚ A guard field could ensure that the link to a space
describing a dangerous procedure could only be followed if
the space describing safety precautions had already been
visited.
❚❚ With a guard field, links from the title page of a work could
go to the copyright information—but only the first time the
link is followed. After that, the copyright information has
been seen, so the reader can enter the work directly.
❚❚ Links with guard fields in a hypertext novel could ensure
that readers don’t encounter Peter and Donna’s wedding
until they have seen some writing spaces mentioning how
Donna met Peter.
Guard fields can be very useful in creating hypertexts for
wider audiences—works that you might distribute as standalone hypertexts, or to other Storyspace users.
Ways to distribute your
hypertext—even to
readers who don’t have
Storyspace—are
described in the chapter
Publishing a
Hypertext.
Every link has a:
source — where it comes from
destination — where it goes
link name — optional. Describes the link.
guard field — optional. Describes under what conditions that
link may be followed.
Guard fields are not required, although every link may have
one.
WRITING GUARD FIELDS
A link’s guard field determines when that link can be followed,
according to a simple syntax.
notation
example
meaning
text in
quotes
"safety precautions"
reader must already
have visited the space
with its name in quotes
text, no
quotes
word
reader must have
selected that text in the
writing space
notation
example
meaning
~
~"copyright page"
reader must not have
fulfilled the following
condition
&
"safety precautions"
&"warning"
reader must have
fulfilled both conditions
|
"Their first date"|
"Peter steps on her
foot"|"Donna fires
Peter’s mom"
reader must have
fulfilled one (or more)
of the conditions
?(n)
?(5)
randomly allows the link
to be followed, on average
one in every n times
Guard fields may be up to 195 characters in length. (Guard
fields in Storyspace for Macintosh may be up to only 63
characters in length, so you may want to keep this in mind
when creating hypertexts that will be used on the Macintosh
platform.)
Sharing hypertexts
between Storyspace for
Windows and Storyspace
for Macintosh is
described in the chapter
Working with Storyspace for Macintosh
GUARD FIELD EXAMPLES
"safety precautions"
Prevents this link from being followed unless the space
“safety precautions” has already been visited.
hypertext
Prevents this link from being followed unless the word
hypertext is selected in the text of the space.
hypertext|hypermedia
Prevents this link from being followed unless either the
word hypertext or the word hypermedia is selected in the
text of the space.
~"copyright page"
Prevents this link from being followed unless the space
“copyright page” has not yet been visited.
"safety precautions"&"warning"
Prevents this link from being followed unless both the space
“safety precautions” and the space “warning” have already
been visited.
"Their first date"|"Peter steps on her foot"|"Donna fires
Peter’s mom"
Prevents this link from being followed unless at least one of
the spaces “Their first date”, “Peter steps on her foot”, or
“Donna fires Peter’s mom”, has already been visited.
?(10)
Prevents this link from being followed roughly 9 out of
every 10 times, at random.
To change a link’s guard field
First, open the Links dialog:
In a text window,
press the Links button
control strip
on the window’s
Or, in any view window,
select the source space with the arrow tool
choose Browse Links from the Storyspace menu; or
use another method of opening the Links dialog
This brings up the Links dialog:
Then, in the Links dialog,
select the desired link in the scrolling list
press Edit Link in the Links dialog
change the link’s guard field in the dialog.
press Okay to dismiss the dialog
press Done to dismiss the Links dialog
WHICH LINK WILL BE FOLLOWED?
Guard fields affect which link will be followed when you follow
a link from a space that is the source of many links.
To determine which link should be followed, Storyspace uses
the information you see in the Links dialog, including any
guard fields associated with those links.
When you follow a link from a space—by clicking on text, or by
clicking the navigate tool, for instance—Storyspace goes
through this procedure:
Was the click within a single text or graphic link?
Is that link permitted by its guard field?
If so, then follow that link. If not . . .
Was the click within overlapping text links?
If so, then display a dialog allowing the choice of which link
to follow. If not . . .
Follow the first (uppermost) link
in the list of links . . .
❚❚ that is not a text or graphic link;
❚❚ and that is not blocked by its guard field.Inspecting the
list of links in the Links dialog can tell you which link
from a space will be followed, under which circumstances. Carefully writing guard fields, as well as
re-arranging the order (priority) of links in the Links
dialog, can control which link from that space will be
followed, under which circumstances.
Note that in some cases no link can be followed. For instance,
if all of the links are text links, but there was no click within
any of them; or if every link is blocked by its guard field. In
that case, Storyspace will not follow any link.
TESTING GUARD FIELDS
If you have created some guard fields, you will probably want
to test those links to make sure that the guard fields take
readers along the links you intended.
❚❚ Clicking in various areas of a text window will show you
what links are followed when the reader has or has not
clicked in various text links; or has or has not selected
various portions of text.
❚❚ Clicking the navigate tool, or pressing Enter (when the Edit
Ruler is not pulled down in the text window) will show you
what link is followed if the reader does not follow a text
link.
❚❚ Clearing the History list (described below) and then
visiting or not visiting various spaces, before testing your
links, will show you what links will be followed if the reader
has or has not visited various spaces before trying those
links.
To use the History list
The History list is a list of every space you have visited in
reading (or working with) the hypertext. To open the history
list:
From anywhere,
choose History… from the Navigate menu, or press F3
or, from a text window,
on the control strip, press the History button
The history dialog will list every space you have visited, in the
order you visited them.
To go to one of the spaces listed,
double-click its name in the scrolling list, or select its name
and press Visit
The dialog will close.
If a view window was in front, the view in that window will
now show the space you chose, and it will be the
selected space. If a text window was in front, a new
text window will open, showing the text of the space
you selected.
To clear the History list,
press Clear
All the space names will be cleared from the History list—
as if you had just opened the hypertext, and not visited
any spaces yet.
The dialog will close.
To rewind the History list,
select a space in the scrolling list
press Rewind
All the space names after the space you selected will be
cleared from the History list—as if you had not visited
them.
The dialog will close.
If a view window was in front, the view in that window will
now show the space you chose, and it will be the
selected space. If a text window was in front, a new
text window will open, showing the text of the space
you selected.
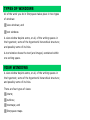
SPECIAL KEYWORDS
Several special keywords can change which writing space is
the destination when a link is followed.
To assign one of these keywords to a writing space, follow the
instructions in the chapter on Keywords.
The other uses of keywords are described in
the chapter on
Keywords.
>next
When a link to a space with the >next keyword is
followed, the link instead goes to the first unvisited space
that is a child of the space with the keyword. If there is no
unvisited child space, the link goes to the original destination (the space with the >next keyword).
For instance, if the writing space “Domestic” contains the
spaces “Ford”, “GM”, and “Chrysler”, and the space
“Domestic” has been assigned the >next keyword, then:
The first time that a link to “Domestic” is followed, the
space “Ford” will open. The second time that a link to
“Domestic” is followed, the space “GM” will open. The third
time that a link to “Domestic” is followed, the space
“Chrysler” will open. Any further times that a link is
followed to “Domestic”, the space “Domestic” will open.
A space’s children are
the spaces it contains.
See the entry on
hierarchy in the
Glossary.
>random
When a link to a space with the >random keyword is
followed, the link instead goes to a random unvisited
space that is a child of the space with the keyword. If
there is no unvisited child space, the link goes to any
space, at random, that is a child of the space with the
keyword.
For instance, if the writing space “Domestic” contains the
spaces “Ford”, “GM”, and “Chrysler”, and the space
“Domestic” has been assigned the >random keyword,
then: When a link to “Domestic”, is followed, one of “Ford”,
“GM”, or “Chrysler”, will open—chosen at random.
>reset
When a link to a space with the >reset keyword is
followed, the History list is cleared and then the link is
followed.
The History list, clearing the History list, and its interaction
with guard fields, are all described earlier in this chapter.
Chapter 11
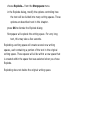
THE NOTE TOOL
The note tool provides a quick way to annotate a selected
word or phrase. In one click, it:
❚❚ creates a new writing space;
❚❚ creates a text link from the selected text to the new writing
space;
❚❚ creates a link from the new writing space back to the
selected text.
The selected text becomes the name of the new writing space.
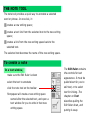
To create a note
In a text window,
make sure the Edit Ruler is down
select the text to annotate
click the note tool on the toolbar
Storyspace will create a new writing space
named after the selected text, and open a
text window for you to write in that new
writing space.
The Edit Ruler contains
the controls for text
appearance. It must be
pulled down for you to
edit text, or to select
text for linking. The
chapter on Text
describes pulling the
Edit Ruler down, and
putting it away.
There will also be a new text link from the selected text to
the new writing space, and a new link from the new
writing space back to the selected text.
Note that this new writing space is like any other writing
space. You can write in it, add images, and add more links as
you choose. You can close its text window, and the text
window you came from will still be open.
Creating writing spaces and links with the note tool can be
handy for adding definitions, explanations, footnotes, or other
quick annotations. You can easily follow the text link from the
annotated text to the note, and easily follow the link from the
note back to the annotated text.
Following links and text
links is described in the
chapter Following
Links.
LOCATING YOUR NOTES
When you create a new writing space using the note tool,
Storyspace first creates a new writing space named “Notes”
that is a sibling of the space you are annotating. Storyspace
then names your new writing space after the annotated text,
and puts it within “Notes”.
If there is already a writing space named “Notes” that is a
sibling of the space you are annotating, Storyspace puts your
new writing space within this “Notes” space.
Siblings are writing
spaces that are
contained within the
same writing space. See
the Glossary entry on
hierarchy.
If you annotate spaces in different parts of your Storyspace
document, you may end up with several different spaces
named “Notes”, each containing the note spaces for that area
of the document.
These “Notes” spaces, and the spaces they contain, are
writing spaces like any others. You can write in them, move
them around, rename them, or delete them if desired.
(If you rename “Notes”, and later use the note tool again in
that area of the hypertext, Storyspace will create a new space
named “Notes” to contain the new notes.)
To locate the spaces you have created with the note tool, you
can always use Locate writing space… from the Navigate
menu, and look for spaces named after the text you selected,
or spaces named “Notes”.
Locate writing
space… is described in
the chapter on Writing
Spaces
Chapter 12
KEYWORDS
Keywords are tags you can attach to writing spaces. Keywords
can help you to find writing spaces, and can help indicate the
type, purpose, or contents of a writing space.
Any writing space can have many keywords, one keyword, or
no keywords assigned to it. The same keyword can be
assigned to many different spaces.
A keyword can be a word or phrase, and you create whatever
keywords you want.
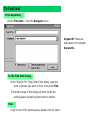
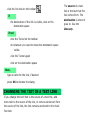
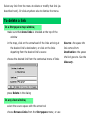
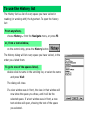
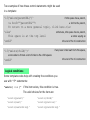
To open the Keywords dialog
The keywords dialog shows you what keywords are associated
with the selected writing space, and what keywords are used
in the document. It allows you to create new keywords, and
assign keywords to a writing space.
From anywhere,
choose Keywords… from the Storyspace menu
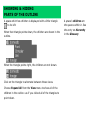
the Keywords dialog
❚❚ The list at left shows all the keywords used in the hypertext.
❚❚ The list at right shows the keywords assigned to the
current writing space.
❚❚ The Writing Spaces field shows how many writing spaces
the selected keyword is assigned to.
❚❚ Press Export to create a text file listing all of the keywords
used in the hypertext. (Each line in the file will consist of
one keyword, a tab, and then the number of writing spaces
that keyword is assigned to.)
To dismiss the Keywords dialog, use its close box.
To assign an existing keyword
From anywhere,
choose Keywords… from the Storyspace menu
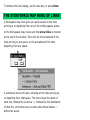
in the Keywords dialog, choose the desired keyword from
the list at the left
press Assign to assign that keyword to the current writing
space
when you are done editing keywords, dismiss the
Keywords dialog by using its close box
To create and assign a new keyword
From anywhere,
choose Keywords… from the Storyspace menu
type the new keyword into the field at the top left of the
Keywords dialog
press New to assign that new keyword to the current
writing space
when you are done editing keywords, dismiss the
Keywords dialog by using its close box
Note that a “keyword” can be a phrase of several words.
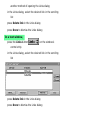
To delete a keyword
From anywhere,
choose Keywords… from the Storyspace menu
in the Keywords dialog, choose the desired keyword from
the list at the right
press Remove to remove that keyword from the list of
those assigned to the current writing space
when you are done editing keywords, dismiss the
Keywords dialog by using its close box
Note that when a keyword is no longer assigned to any
writing spaces, it is eliminated from the list of keywords at the
left of the Keywords dialog.
COLORS AND KEYWORDS
When you assign a color to a writing space (by using the color
tool on the toolbar, or by using the Color submenu of the
View menu) you also assign the name of that color to that
space as a keyword. For instance, all writing spaces that have
been colored green in view windows have the keyword
“green”.
❚❚ If you remove this color keyword from a writing space, it
will also lose its color.
❚❚ If you assign a color keyword to a writing space, it will
become that color.
❚❚ If a writing space is assigned several color keywords, it will
take the color of the first such keyword listed.
A writing space’s color
determines what color it
will be in chart and
outline windows, and
what color its title bar
and border will be in
Storyspace map and
treemap windows.
Changing a space’s color
is described in the
chapter on Writing
Spaces.
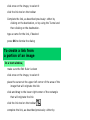
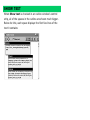
To find a writing space using keywords
From anywhere,
choose Find text… from the Navigate menu
In the Find text dialog,
in the “Keyword:” field of the dialog, choose the
keyword whose spaces you want to find, from the
choice list of keywords
press Find
The bottom area of the dialog will then list all the
writing spaces that are assigned that keyword
Using the Find text
dialog to search for text
in writing spaces is
described in the chapter
on Text.
then
to go to one of the listed spaces, double-click its name
in the list.
If a view window was in front when you chose Find
text, the view in that window will now show the
space you chose, and it will be the selected
space.
If a text window was in front when you chose Find
text, a new text window will open, showing the
text of the space you chose.
To dismiss the dialog, use its close box.
or
To dismiss the dialog without visiting a space, use its
close box.
or
To change your search, choose a different keyword in
the “Keywords” field, then press Find again.
SPECIAL KEYWORDS
Several keywords have special effects on the behavior of the
hypertext when they are assigned to writing spaces.
Transition effects keywords
If the name of a transition effect is assigned as a keyword to a
space, that transition effect will be used whenever a new text
window opens for that space. The transition effects available
are:
wipe_left
wipe_right
wipe_top
wipe_bottom
dissolve
slide_left
slide_right
slide_top
slide_bottom
The sound keyword
The chapter on Sound describes using a special keyword to
assign a sound to play whenever a new text window opens for
that space.
Keywords affecting links
The special keywords >next >random and >reset affect
what space is opened when a link to their space is followed.
These keywords are described in the chapter on Special Links.
You can choose a
transition effect to use
when a new text window
is opened on any space.
See the chapter on
Document Options.
Chapter 13
BOOKMARKS & MARGIN NOTES
Bookmarks let you mark spaces of interest so you can go to
them quickly. Margin notes let you comment on writing
spaces. Both of these let you customize a Storyspace hypertext without modifying the hypertext. Adding bookmarks
and margin notes to a hypertext is more like adding yellow
sticky notes to a book than like stapling in new pages, or even
like writing in the margins.
Note that your bookmarks and margin notes are stored in a
file, called a Reading file, which is separate from the hypertext
file. (This is described below, in Saving bookmarks and margin
notes.)
To create a bookmark
In a text window,
choose Mark this space from the Bookmark menu
or
press the Bookmark button
control strip.
on the window’s
In a bookmarked text window, the Bookmark button looks like
this:
To go to a bookmarked space
From anywhere,
choose the desired space name from the Bookmark menu
A text window will open for that writing space.
To remove a bookmark
In a text window,
choose Unmark this space from the Bookmark menu
or
press the Bookmark button
control strip.
on the window’s
To create a margin note
In a text window,
choose Margin note… from the Text menu
or
press the Margin Note button
control strip.
on the window’s
type the text of your note in the Margin Note dialog
press OK to close the margin note.
In the text window of a space that has a margin note, the Margin
Note button changes to show writing in the margin:
Note that margin notes are very different from notes you
create with the note tool (described in the Note Tool chapter).
The note tool modifies the hypertext by adding a writing space
and creating two links. Margin notes do not add any writing
spaces or links.
To delete a margin note
In a text window,
choose Margin note… from the Text menu
or
press the Margin Note button
control strip.
on the window’s
delete all of the text in the Margin Note dialog
press OK to close the margin note.
SAVING BOOKMARKS AND
MARGIN NOTES
The bookmarks and margin notes you add are not stored in
the same file as the hypertext document itself. This means
that if you close the document without saving your bookmarks
and margin notes, they won’t be there the next time you open
that hypertext.
Bookmarks and margin notes are saved in a reading file—a file
with the extension .RDG
To save a reading file
From anywhere,
choose Save this reading… from the File menu
In the standard Windows file dialog, choose a directory
to save your reading file in, and type a name for
the file
press OK
To open a reading file
From anywhere,
choose Open a saved reading… from the File menu
Use the standard Windows file dialog to find the
reading file you want to open, and select its name
press OK
If someone opens the same Storyspace document that you
were working on, but they don’t open the reading file you
created, they won’t see the bookmarks and margin notes that
you added.
If you want a collaborator to see your margin notes and bookmarks, you can give them your reading file. Or, many readers
can each can each create their own reading files for the
hypertext, containing their own bookmarks and margin notes.
READING (RDG) FILES
Reading files (files named with a .RDG extension, such as
MY_FILE.RDG) contain more than the bookmarks and margin
notes that were present when they were saved. Reading files
also record what writing space was being read at the time
they were saved, and which spaces had been visited, and in
what order. (That is, they save the history list, which is
described in the chapter on Special Links.)
When you open a reading file, the bookmarks and margin
notes in that file will be restored, as well as your place in the
document when you saved the reading.
A reading file, obviously, only makes sense when opened with
the Storyspace document to which it refers. Storyspace will
not permit you to open a reading file created from one hypertext while you are working on a different hypertext.
Chapter 14
THE TOOLBAR
Arrow tool—use this to
select, drag, and
rearrange writing spaces
in view windows. Cursor
is the hand cursor
when not over a writing
space.
Note tool—click here to
create a new writing
space linked to the
selected text.
Color tool—a popup
menu of colors. In a
view window, use this to
change the color of the
selected space. In a text
window, use this to
change the color of the
selected text.
Writing space tool—
select this tool, then
click in a view window to
create a new writing
space.
Navigate tool—click
here to follow a link.
Link tool—to create a
link, select the source,
then click here, then
click on the destination.
Tunnel—click here after starting a link, to hold the link
until you have brought the destination into view.
To show the toolbar
From anywhere,
choose Show Toolbar from the Windows menu, or press
Ctrl-T
You can move the toolbar wherever on the screen is convenient.
To hide the toolbar
From anywhere,
choose Hide Toolbar from the Windows menu, or
press
Ctrl-T
or
use the toolbar’s close box
Chapter 15
TYPES OF WINDOWS
All of the work you do in Storyspace takes place in two types
of windows:
❚❚ view windows; and
❚❚ text windows
A view window depicts some, or all, of the writing spaces in
the hypertext; some of the hypertext’s hierarchical structure;
and possibly some of its links.
A text window shows the text (and images) contained within
one writing space.
VIEW WINDOWS
A view window depicts some, or all, of the writing spaces in
the hypertext; some of the hypertext’s hierarchical structure;
and possibly some of its links.
There are four types of views:
❚❚
❚❚
❚❚
❚❚
charts;
outlines;
treemaps; and
Storyspace maps.
Storyspace map view window
chart view window
treemap view window
outline view window
You may keep many view windows open while working in
Storyspace, of whatever types.
(Having several view windows open can be very helpful while
working with a hypertext. A chart window might, for instance,
show you the entire structure of your work, while a Storyspace
map window lets you work with the details of one section. Or,
if you are creating many links between two parts of your
hypertext, you could have a view window open on each area.)
To open a new view window choose New . . . view from the
Windows menu, or press the appropriate button on a text or
view window’s control strip:
new chart window
new outline window
new treemap window
new Storyspace map window
If you open a new view window when a text window is in
front, the new view window will show the portion of the document’s hierarchy that includes that space.
If you open a new view window when another view window is
in front, the new view window will show the portion of the
document’s hierarchy that includes the selected space.
TYPES OF VIEW WINDOWS
A chart view shows the hierarchical structure of the hypertext
very clearly, as a tree chart. A chart is also handy for seeing
many writing spaces in one window. It is easy to re-structure
the hierarchy of the document in a chart window, by dragging
parts of the hierarchy to other parts of the hierarchy. A chart
view does not show any of the links in the document.
An outline view shows the hierarchical structure of the hypertext very clearly, as an indented outline. An outline is also
handy for seeing many writing spaces in one window. It is
easy to re-structure the hierarchy of the document in an
outline window, by dragging parts of the hierarchy to other
parts of the hierarchy. An outline view does not show any of
the links in the document.
A treemap view shows the hierarchical structure of the
hypertext as boxes within boxes, taking up the entire window.
You can re-structure the hierarchy of the document in a
treemap window by dragging the box representing a writing
space (and the boxes it contains) into another box in the
Each type of view
window is described in
detail in a following
chapter.
window. A treemap view does not show any of the links in the
document.
A Storyspace map view shows writing spaces as rectangular
boxes. You can move these boxes around in the map however
you like. A Storyspace map view shows one level of the document’s hierarchy, by showing the children of a writing space as
contained within its box. You can re-structure the hierarchy of
the document in a Storyspace map window by dragging the
box representing a writing space (and the boxes it contains)
into another box in the window.
A Storyspace map view also shows many of the links between
writing spaces. If both the source and destination of the link
are in the map, the link is drawn as a curving arrow between
the boxes, with the link name at the midpoint of the arrow. If
the source or the destination of the link is outside the map,
the link is drawn as a short arrow departing from or arriving at
a box.
TEXT WINDOWS
A text window shows the text (and graphics) contained within
one writing space.
text window
HOW MANY OPEN WINDOWS?
You may open many view and text windows while working in
Storyspace. The only limit on how many windows you can
have open at one time is the availability of “resources” from
the Windows operating system. These resources are
consumed by open windows in Storyspace, in Windows itself,
and in any other open application.
❚❚ If resources are low and you attempt to open a new view
Text windows are
described in detail in the
next chapter, Text
Windows. Working with
text in a text window is
described in the chapter
on Text.
window, Storyspace will not open the window.
❚❚ If resources are low and you attempt to open a new text
window, Storyspace will first close the rearmost text
window in an attempt to make more resources available. If
this is not sufficient, Storyspace will not open the window.
Under most circumstances, you will be able to open as many
windows as you want.
Chapter 16
TEXT WINDOWS
A text window shows the text (and graphics) contained within
one writing space.
When the Edit Ruler is pulled down in a text window, you can
edit the text in the window:
Using the Edit Ruler is
described in the chapter
on Text.
A text window also looks a little different when the Path
Browser is open:
Also, you can hide a text window’s control strip. This makes
some controls less convenient, but allows a little more space
for text, and presents a more streamlined appearance:
You may have many different text windows open while
working in Storyspace.
Like other windows, you can move text windows, and you can
resize a text window by dragging any of its edges.
To close any text window, use its close box, or press Ctrl-F4.
The Path Browser is
described in the chapter
on Viewing and
Changing Links.
OPENING A TEXT WINDOW
To open a new text window, select the desired space with the
arrow tool in any view window. Then choose Text space…
from the Windows menu; or press F12; or press the text
space button
on the view window’s control strip.
In a Storyspace map or
treemap window, double-click the space’s
title bar with the arrow tool.
In a chart or outline
window, double-click the space
with the arrow tool.
THE CONTROL STRIP
The control strip in a text window offers controls for reading,
navigating, and annotating the hypertext.
1
2
1
2
3
4
5
6
7
8
9
10
3
4
5 6
7 8 9 10
put away the control strip
Back button: return to the last space visited
Links button: open the Links dialog, to see (and edit) all
the links departing from this space
History button: open the History dialog, to see a list of all
spaces visited
Bookmark button: mark this space with a bookmark
Margin note button: edit this space’s margin note
new Storyspace map window
new treemap window
new outline window
new chart window
The control strip can be shown or hidden in any text window.
New text windows open with the control strip showing, but you
The Back button and
the Links button are
discussed in the chapter
on Following Links.
The History list is
discussed in the chapter
on Special Links. The
Bookmark and Margin
note buttons are
discussed in the chapter
on Bookmarks &
Margin Notes.
can choose to have text windows open by default without the
control strip. All of the functions of the control strip are available through menu choices, so you can hide the control strip if
you want the extra bit of screen space for text. Or you may
want to present a simpler interface, particularly in a hypertext
you will distribute to others.
To show a text window’s control strip
choose Show control strip from the Text menu
or
type Ctrl-L
To hide a text window’s control strip
choose Hide control strip from the Text menu
or
type Ctrl-L
or
press the narrow vertical button
the control strip
at the extreme left of
To hide text window control strips
by default
From anywhere,
choose Document options… from the File menu
in the Document Options dialog,
in the Document Behavior section of the dialog (left
side), turn off the Open text windows with . . .
control strip check box
Other document options
are described in the
chapter on Document
Options.
press OK to dismiss the Document Options dialog
The setting you choose for Open text windows with . . .
control strip will apply to text windows for new writing
spaces you create, and all other text windows in which you
have not specifically shown or hidden the control strip.
THE EDIT RULER
The Edit Ruler is visible in a text window when you can edit
the text in that window. It contains the controls related to
changing the appearance of text. If you click on the text when
the Edit Ruler is not visible, Storyspace does not edit the
text—it attempts to follow a link in the text.
Using the Edit Ruler to
edit text is discussed in
the chapter on Text.
Edit Ruler
{
To pull down the Edit Ruler in a text window,
click near the top of the window, while the cursor
a down-arrow
is
or
choose Edit from the Text menu
or
type Ctrl-E
To put away the Edit Ruler in a text window,
choose Read from the Text menu
or
type Ctrl-E
or
press the narrow vertical button
of the Edit Ruler
at the extreme left
BEHAVIOR WITHOUT THE EDIT RULER
When the Edit Ruler is not visible in a text window, several
keyboard and mouse shortcuts are active to facilitate reading
and moving around in the hypertext:
❚❚ click in a text or graphic link to follow that link.
❚❚ click anywhere not in a link to follow the default link.
❚❚ press the Enter key to follow the default link.
❚❚ press the Home key to go to the cover page of the
hypertext.
❚❚ press the backspace key to follow the last link backward—
like pressing the Back button, or clicking the navigate tool
while holding down the shift key.
❚❚ press the spacebar to scroll down one screen in text that
is longer than the window. If you are already scrolled to the
bottom of the window, pressing the spacebar will scroll
back to the top.
❚❚ press the Page Down key to scroll down one screen in text
that is longer than the window. If you are already scrolled
to the bottom of the window, pressing Page Down will scroll
back to the top.
Default links are mentioned in the Glossary.
The cover page is mentioned in the Glossary,
and in the “Publishing
Suggestions” section of
the chapter on Publishing a Hypertext.
❚❚ press the Page Up key to scroll up one screen in text that
is longer than the window.
Chapter 17
STORYSPACE MAP VIEWS
A Storyspace map view shows writing spaces as rectangular
boxes which you can arrange as you like. You can use this
flexibility to create maps whose neighborhoods and shapes
convey information about the hypertext. (Or, you can keep all
of the boxes in a neat rectangular grid.)
A Storyspace map view shows one level of the document’s
hierarchy, by showing the children of a writing space as
contained within its box. You can re-structure the hierarchy by
dragging the box representing a writing space into another
box in the window.
The dotted rectangle in a Storyspace map shows which part of
the map will be visible, at a tiny scale, within the enclosing
writing space in a Storyspace map one level out.
Like other windows, you can move Storyspace map windows,
and you can resize a Storyspace map window by dragging any
of its edges.
You can open many Storyspace map windows, showing the
same or different parts of the Storyspace document.
To close any Storyspace map window, use its close box, or
press Ctrl-F4.
2
1
4
3
4
6
5
6
1
control strip. Many controls described in detail in this
chapter.
2
buttons for opening a new Storyspace map window, new
treemap window, new outline window, and new chart
window.
3
button for opening a new text window for the selected
space.
4
5
6
writing space, containing other writing spaces.
hand cursor—click and drag to scroll view in window
scroll bars—use to scroll view in window
OPENING A STORYSPACE MAP WINDOW
To open a new Storyspace map window, choose New Map
view from the Windows menu, or press the Storyspace map
button on a text or view window’s control strip. This will open
a new Storyspace map window, showing the selected writing
space (and its surroundings).
MOVING AROUND
❚❚ To move different parts of a Storyspace map in and out of
view in the window, it is usually easiest to use the hand:
when the arrow tool
is not over a writing space, it is a
hand
. Click with the hand and drag
the view to
change its position in the window.
❚❚ You can also use the horizontal and vertical scroll bars to
move around in a Storyspace map window.
❚❚ Right-click in any part of a Storyspace map that is not over
a writing space for a contextual menu of the spaces in that
map. Choose a writing space from the menu, and the map
will move to center that space in the window.
CHANGING SCALE
Choose the scale at which you view a Storyspace map with the
Scale pull-down menu, at the center of a Storyspace map
window’s control strip. At large scales (200%, 400%), you can
see a small area of the map in detail. At small scales (12.5%,
25%) you can see a large portion of the map, but without
much detail.
Storyspace map view of “foreign”
at Normal scale
Storyspace map view of “foreign”
at 50% scale
New Storyspace map windows open at Normal (100%) scale.
THE LOCATE BUTTON
Press the locate button, near the left of a Storyspace map
window’s control strip, to move the view around so that the
selected space is at the center of the window.
If no space in the view is selected, pressing the locate button
will move the map so that the first (top-left) space in the view
is in the center of the window.
ARRANGING SPACES
To move a space within a Storyspace map, click on the space
with the arrow tool and drag it to another part of the map.
If you move a space to the very edge of the map, Storyspace
creates “more map”. This makes sure that a space is never
hanging off the edge—you can always move the map far
enough to see all of every space.
Choose Clean Up from the View menu to arrange all the
spaces in the view into a regular rectangular grid. Take care—
if you have worked hard to craft a meaningful map, this
command will undo your work.
Drag a space inside another space to make it a child of that
space in the hierarchy.
A careful hand on the mouse can drag a tiny space out of its
parent in the map.
DOUBLE-CLICKING INSIDE A SPACE
To see what spaces are within a space on the map, doubleclick within that space. This changes the map to show what
spaces are inside that space.
If you double-click in a space that contains no other spaces
(that is, one that has no children), then the new Storyspace
map window will show an empty map.
If you double-click in a space and the new Storyspace map
looks blank—but you know that it contains spaces—it could be
that all the spaces are out of view. Try moving around with the
hand or the scroll bars, or press the locate button. Or, rightclick in the map for a contextual menu of space names.
THE UP-TRIANGLE
If you press the up-triangle, near the left of a Storyspace map
window’s control strip, the view will “zoom out” to show a map
of one level up in the hierarchy.
For instance: if the Storyspace map window shows the
contents of “Domestic” (the spaces “Ford”, “GM”, and
“Chrysler”)
then pressing the up-triangle will change the view to show
“Domestic” itself (and its neighbors):
If the Storyspace map window is showing a map of the
topmost level of the hierarchy, then pressing the up-triangle
will have no effect.
DOUBLE-CLICKING A SPACE’S TITLE BAR
Double click a space’s title bar in a Storyspace map to open a
new text window for that space.
If a text window for that space is already open, this will bring
that window to the front.
SHOW LINKS
When Show links is checked in a Storyspace map window’s
control strip, links between spaces on the map are shown as
curving arrows between those spaces. If a link is named, the
name is shown at the midpoint of the arrow.
Links that start at spaces not shown in the map are shown as
arrowheads arriving at their destination space in the map.
Links that end at spaces not shown in the map are shown as
arrowheads departing from their starting space in the map.
Links that neither start nor end at spaces shown in the map
are not shown in the map.
New Storyspace map windows usually open with Show links
turned on. If a map contains more than 75 links, a new
window showing that view will open with Show links turned
off.
SHOW TEXT
When Show text is checked in a Storyspace map window’s
control strip, each space displays the beginning of the text it
contains below its title bar.
New Storyspace map windows open with Show text turned
off.
CHANGING A MAP’S COLORS
You can change the colors that Storyspace uses to draw
writing spaces, links, the map background, and other
elements of Storyspace maps. To change these colors:
From anywhere,
choose Document options… from the File menu
in the Document Options dialog,
press Colors…
in the Colors dialog,
press the button of any map element whose color
you want to change
in the Color dialog, choose a new color and press
OK
when you are done changing colors, press OK to
dismiss the Colors dialog
press OK to dismiss the Document Options dialog
Note that the colors you choose apply to all view windows—
Storyspace maps, treemaps, charts, and outlines.
The chapter on Writing Spaces describes how to change the
Other document options
are described in the
chapter on Document
Options.
color of a particular writing space.
PRINTING A STORYSPACE MAP
To print a Storyspace map, first adjust the scale and map
options as desired. Then,
choose Print Setup… from the File menu to set up your
printer
choose Print… from the File menu
To print the view, Storyspace may reduce the scale to fit the
view on the page. To print a very large view, Storyspace may
crop some of the image, as it will not reduce the scale so far
that items become invisible.
Chapter 18
TREEMAP VIEWS
A treemap view shows the hierarchical structure of the hypertext
as boxes within boxes, taking up the entire window. Treemaps
use space very efficiently, so you can see many spaces at once.
You can re-structure the hierarchy of the document in a treemap
window by dragging the box representing a writing space (and
the boxes it contains) into another box in the window. A
treemap view does not show any of the links in the document.
1
1
2
3
4
2
4
4
4
3
4
control strip. Many controls described in detail in this
chapter.
buttons for opening a new Storyspace map window, new
treemap window, new outline window, and new chart
window.
button for opening a new text window for the selected
space.
title bar of writing space. Double-click to open a text
window on that space.
Like other windows, you can move treemap windows, and you
can resize a treemap window by dragging any of its edges.
You can open many treemap windows, showing the same or
different parts of the Storyspace document.
To close any treemap window, use its close box, or press CtrlF4.
OPENING A TREEMAP WINDOW
To open a new treemap window, choose New Treemap view
from the Windows menu, or press the Treemap button on on
a text or view window’s control strip. This will open a new
treemap window, showing the selected writing space (and its
surroundings).
SMALL/LARGE
The Small and Large radio buttons control the size of writing
spaces’ title bars in that Treemap window.
TALL/WIDE
If the Tall radio button is selected, in a Treemap window’s
control strip, the Treemap shows the spaces within a space as
vertical columns, like this:
If the Wide radio button is selected, the Treemap shows the
spaces within a space as stacked horizontal boxes, like this:
ARRANGING SPACES
In a treemap window, drag a space inside another space to
make it a child of that space in the hierarchy.
If the space you are dragging into is mostly covered up
(because it has children), you can drop the space you are
dragging onto the target space’s title bar.
You can drag spaces into and out of each other in a treemap
window, to completely re-arrange the hierarchy.
DOUBLE-CLICKING INSIDE A SPACE
Double-click within a space to focus the treemap, showing
only the spaces that are inside that space.
If you double-click in a space that contains no other spaces,
then the treemap window will show a large empty rectangle.
THE UP-TRIANGLE
If you press the up-triangle, at the left of a treemap window’s
control strip, the view will “zoom out” to show a map one level
up in the hierarchy.
For instance: if the treemap window shows the contents of
“Domestic” (the spaces “Ford”, “GM”, and “Chrysler”)
then pressing the up-triangle will change the view to show
“Domestic” itself (and its neighbors):
If the treemap window is showing a map of the topmost level
of the hierarchy—that is, the entire document—then pressing
the up-triangle will do nothing.
DOUBLE-CLICKING A SPACE’S TITLE BAR
Double click a space’s title bar in a treemap to
open a new text window for that space.
If a text window for that space is already open, this will bring
that window to the front.
CHANGING A TREEMAP’S COLORS
The colors you set for various elements in views—writing
spaces, the view background, and so on—apply to all types of
views: Storyspace maps, treemaps, charts, and outlines. See
the description in the chapter on Storyspace map views for
how to change these colors.
The chapter on Writing Spaces describes how to change the
color of a particular writing space.
PRINTING A TREEMAP
To print a treemap, first adjust the view options as desired.
Then,
choose Print Setup… from the File menu to set up your
printer
choose Print… from the File menu
Chapter 19
CHART VIEWS
A chart view shows the hierarchical structure of the hypertext
as a tree chart. The “root” of the tree is at the left of the
window, and the branches extend towards the right.
A chart is handy for seeing many writing spaces in one
window, and a chart view makes it easy to re-structure the
hierarchy of the document by dragging parts of the hierarchy
to other parts of the hierarchy. A chart view does not show
any of the links in the document.
Like other windows, you can move chart windows, and you
can resize a chart window by dragging any of its edges.
You can open many chart windows, showing the same or
different parts of the Storyspace document.
To close any chart window, use its close box, or press Ctrl-F4.
2
1
3
4
5
1
control strip. Many controls described in detail in this
chapter.
2
buttons for opening a new Storyspace map window, new
treemap window, new outline window, and new chart
window.
3
button for opening a new text window for the selected
space.
4
5
hand cursor—click and drag to scroll view in window.
scroll bars—use to scroll view in window.
OPENING A CHART WINDOW
To open a new chart window, choose New Chart view from
the Windows menu, or press the Chart button on a text or
view window’s control strip. This will open a new chart window,
showing the selected writing space (and its surroundings).
MOVING AROUND
❚❚ To move different parts of a chart in and out of view in the
window, it is usually easiest to use the hand: when the
arrow tool
is not over a writing space, it is a hand
.
Click with the hand and drag
the view to change its
position in the window.
❚❚ You can also use the horizontal and vertical scroll bars to
move around in a chart window.
CHANGING SCALE
Choose the scale at which you view a chart with the Scale
pull-down menu, at the center of a chart window’s control
strip. At the Large scale, you can see a small area of the chart
in detail. At Small and
Tiny scales, you can see a
large portion of the chart,
but without much detail.
New chart windows open
at Normal scale.
chart at Large scale
chart at Small scale
ARRANGING SPACES
You can drag spaces in a chart window to rearrange the document’s hierarchy.
With the arrow tool, drag a space:
❚❚ Drop the space while it is over the right third of another
space—while the cursor is a right-pointing triangle
—to
make the space you are dragging a child of the space you
drop it on.
❚❚ Drop the space while it is over the middle of another
space—while the cursor is an upor down-pointing
triangle—to make the space you are dragging a sibling of
the space you drop it on.
(If you let go anywhere else in the chart window, the space
you dragged will snap back to its starting location.)
A space’s children are
the spaces within it.
Siblings are spaces that
are within the same
space. See the entry on
hierarchy in the
Glossary.
THE COMPASS
The compass, near the left of a chart window’s control strip,
changes which space is selected in the chart window.
❚❚ press the up-arrow to change the selection to the space
above the selected space in the chart window.
❚❚ press the down-arrow to change the selection to the
space below the selected space in the chart window.
❚❚ press the right-arrow to change the selection to the space
to the right of the selected space in the chart window—the
first child of the selected space.
❚❚ press the left-arrow to change the selection to the space
to the left of the selected space in the chart window—the
parent of the selected space.
The chart view will show more of the document if necessary
to show the selection after the left-arrow has been pressed.
If there is no space in the chosen direction, pressing that
arrow will do nothing.
You can use the arrow keys on the keyboard instead of clicking
on the compass arrows.
THE LOCATE BUTTON
Press the locate button, at the left of a chart window’s control
strip, to move the view around so that the selected space is
visible in the window.
DOUBLE-CLICKING A SPACE
Double click a space in a chart to open a new text window
for that space.
If a text window for that space is already open, this will bring
that window to the front.
CHANGING A CHART’S COLORS
The colors you set for various elements in views—writing
spaces, the view background, and so on—apply to all types of
views: Storyspace maps, treemaps, charts, and outlines. See
the description in the chapter on Storyspace map views for
how to change these colors.
The chapter on Writing Spaces describes how to change the
color of a particular writing space.
PRINTING A CHART
To print a chart, first adjust the view options as desired. Then,
choose Print Setup… from the File menu to set up your
printer
choose Print… from the File menu
To print the view, Storyspace may reduce the scale to fit the
view on the page. To print a very large view, Storyspace may
crop some of the image, as it will not reduce the scale so far
that items become invisible.
Chapter 20
OUTLINE VIEWS
An outline view shows the hierarchical structure of the hypertext as an indented outline.
An outline is handy for seeing many writing spaces in one
window, and an outline view makes it easy to re-structure the
hierarchy of the document by dragging parts of the hierarchy
to other parts of the hierarchy. An outline view does not show
any of the links in the document.
Like other windows, you can move outline windows, and you
can resize an outline window by dragging any of its edges.
You can have many outline windows open at once, showing
the same or different parts of the Storyspace document.
To close any outline window, use its close box, or press CtrlF4.
1
2
4
3
5
5
1
control strip. Many controls described in detail in this
chapter.
2
buttons for opening a new Storyspace map window, new
treemap window, new outline window, and new chart
window.
3
button for opening a new text window for the selected
space.
4
5
hand cursor—click and drag to scroll view in window.
scroll bars—use to scroll view in window.
OPENING AN OUTLINE WINDOW
To open a new outline window, choose New Outline view
from the Windows menu, or press the Outline button on a
text or view window’s control strip. This will open a new
outline window, showing the selected writing space (and its
surroundings).
MOVING AROUND
❚❚ To move different parts of an outline in and out of view in
the window, it is usually easiest to use the hand: when the
arrow tool
is not over a writing space, it is a hand
.
Click with the hand and drag
the view to change its
position in the window.
❚❚ You can also use the horizontal and vertical scroll bars to
move around in an outline window.
SHOWING & HIDING
PARTS OF THE OUTLINE
A space which has children is displayed with a little triangle
to its left.
When that triangle points down, the children are shown in the
outline.
When the triangle points right, the children are not shown.
Click on the triangle to alternate between these views.
Choose Expand All from the View menu to show all of the
children in the outline—as if you clicked all of the triangles to
point down.
A space’s children are
the spaces within it. See
the entry on hierarchy
in the Glossary.
SHOW TEXT
When Show text is checked in an outline window’s control
strip, all of the spaces in the outline are shown much bigger.
Below its title, each space displays the first few lines of the
text it contains:
ARRANGING SPACES
You can drag spaces around in an outline window to rearrange the document’s hierarchy.
With the arrow tool, drag a space:
❚❚ Drop the space while it is over the right third of another
space—while the cursor is a right-pointing triangle
—to
make the space you are dragging a child of the space you
drop it on.
❚❚ Drop the space while it is over the middle of another
space—while the cursor is an upor down-pointing
triangle—to make the space you are dragging a sibling of
the space you drop it on.
(If you let go anywhere else in the outline window, the space
you dragged will snap back to its starting location.)
A space’s children are
the spaces within it.
Siblings are spaces that
are within the same
space. See the entry on
hierarchy in the
Glossary.
THE COMPASS
The compass, at the left of an outline window’s control strip,
changes which is the selected space in the outline window.
❚❚ press the up-arrow to change the selection to the space
above the selected space in the outline window—a sibling of
the selected space.
❚❚ press the down-arrow to change the selection to the
space below the selected space in outline chart window—a
sibling of the selected space.
❚❚ press the right-arrow to change the selection to the space
to the right of the selected space in the outline window—
the first child of the selected space.
❚❚ press the left-arrow to change the selection to the space
to the left of the selected space in the outline window—the
parent of the selected space.
The outline view will show more of the document if necessary to show the selection after the left-arrow has been
pressed.
If there is no space in the chosen direction, pressing that
arrow will do nothing.
You can use the arrow keys on the keyboard instead of clicking
on the compass arrows.
THE LOCATE BUTTON
Press the locate button, at the left of an outline window’s
control strip, to move the view around so that the selected
space is visible in the window.
DOUBLE-CLICKING A SPACE
Double click a space in an outline to open a new
text window for that space.
If a text window for that space is already open, this will bring
that window to the front.
CHANGING AN OUTLINE’S COLORS
The colors you set for various elements in views—writing
spaces, the view background, and so on—apply to all types of
views: Storyspace maps, treemaps, charts, and outlines. See
the description in the chapter on Storyspace map views for
how to change these colors.
The chapter on Writing Spaces describes how to change the
color of a particular writing space.
PRINTING AN OUTLINE
To print an outline, first adjust the view options as desired.
Then,
choose Print Setup… from the File menu to set up your
printer
choose Print… from the File menu
To print the view, Storyspace may reduce the scale to fit the
view on the page. To print a very large view, Storyspace may
crop some of the image, as it will not reduce the scale so far
that items become invisible.
Chapter 21
WAYS TO PUBLISH
If you want others to be able to read a Storyspace hypertext
you have created, you have three choices:
❚❚ If your prospective readers also own Storyspace, you can
give them the Storyspace files, which they can then read
and write in as you would.
For a hypertext named “MY_FILE”, give your collaborator a
copy of MY_FILE.SSP and a copy of MY_FILE.SNI (if it
exists).
This allows your readers or collaborators the full power of
Storyspace in reading or extending your work, but it also
requires that every one have a copy of Storyspace.
❚❚ You can use Storyspace’s facilities to convert your
Storyspace document into a collection of HTML files, suitable for viewing with a Web browser.
This is an easy way to distribute your work, either by
making your HTML files available via the World Wide Web
on a Web server, or by distributing them to be read locally
on any computer with a Web browser. Adding special
features may require some knowledge of HTML, though;
and many aspects of the Storyspace interface, such as all
If your collaborator will
be reading and writing
using Storyspace for
Macintosh, issues relevant to transferring
documents between the
Windows and Macintosh
platforms are described
in the chapter Working
with Storyspace for
Macintosh.
the views, searching, and guard fields, cannot be recreated in HTML.
Translating your document into HTML is described in the
chapter Creating for the World Wide Web.
❚❚ If you want to convey your hypertext in essentially the
form you have created it—with the Storyspace interface—
you can distribute your Storyspace files along with the
Storyspace Reader. The Storyspace Reader can be distributed to whomever you like, free of charge, and allows
anyone to read your work using the Storyspace tools and
interface.
The remainder of this chapter. discusses creating and
working with Storyspace Readers.
DISTRIBUTING STORYSPACE READERS
The Storyspace Reader is a version of the Storyspace application that you are allowed to distribute freely. It provides most
Storyspace capabilities, but without the ability to create or
modify a hypertext. Since it does not provide writing capabilities, the Storyspace Reader interface is slightly simpler than
the Storyspace interface.
To provide your audience with a read-only version of your
hypertext, you need to supply them with four files. These are:
1 The Storyspace file of your hypertext. This is the file with
the “.SSP” extension, such as MY_FILE.SSP
2 The document preferences file of your hypertext. This is the
file with the “.SNI” extension, such as MY_FILE.SNI
(You will only have this file if you have made changes to
the document options for your hypertext. If there is no .SNI
file corresponding to your .SSP file, then you do not need
to provide an SNI file with your hypertext. )
The other two files are the Storyspace reader application and
its associated tools. These files are named:
3 SSREAD.EXE
4 WIDGETS.DLL
If you give a colleague a diskette with these four files, she can
copy them to her hard disk. Then, she can run the
SSREAD.EXE application, and use it to open your hypertext
(such as MY_FILE.SSP).
Note: The Storyspace Reader program is named SSREAD.EXE.
The Storyspace program is named SSP.EXE. You may NOT
make copies of SSP.EXE or redistribute it without the express
written permission of Eastgate Systems, Inc.
Sound: If your Storyspace hypertext includes sounds associated with various writing spaces, you must distribute the WAV
files in addition to the files mentioned above in order for the
sounds to play. Make certain that the keyword referring to
each sound provides only the file name of the WAV file (rather
than a complete pathname to a location on your particular
hard disk). And make certain that the WAV files will be copied
by your audience into the same directory as the SSP and SNI
files.
THE READER INTERFACE
The Storyspace Reader looks like Storyspace, without the tools
for making any changes or saving the work.
In particular, the Storyspace Reader lacks:
❚❚ the Toolbar
Most of the tools on the Toolbar are used to create or
modify writing spaces or links, so these are not needed in
the Storyspace Reader. The link-following activities of the
navigate tool are available in the Reader by clicking in text
windows, or using the Links dialog.
Associating sounds with
writing spaces is
described in the chapter
on Sound.
❚❚ the Edit Ruler
Since the Storyspace Reader cannot modify a hypertext,
text windows in the Reader never have the Edit Ruler available.
❚❚ Document Options and Preferences
Using full Storyspace, you may use Document Options and
Preferences to set some aspects of your hypertext’s
appearance and behavior. Since you may not want your
audience altering these aspects of your work, the
Storyspace Reader does not give users access to the
Document Options and Preferences dialogs.
❚❚ Cut and Paste
Since the Storyspace Reader cannot modify a hypertext, it
does not allow users to cut text from spaces, or paste text
into spaces; or to cut or paste writing spaces. The Copy
command is available in the Reader, to copy all of the text
in the front text window.
❚❚ Save and Save As
Since the Storyspace Reader cannot modify a hypertext,
there is no reason to save the hypertext.
❚❚ Import and Export
The Storyspace Reader does not allow users to import text
into the hypertext, or to export the hypertext as text or
HTML.
❚❚ re-arranging spaces in view windows
Since the Storyspace Reader cannot modify a hypertext, it
does not allow users to change the arrangement of writing
spaces in Storyspace maps, or to alter the structure of the
hypertext by moving spaces in chart, outline, treemap, or
Storyspace map view windows.
❚❚ editing links
The Links dialog in the Storyspace Reader allows users to
choose which link to follow, but does not allow users to
change the name or guard field of a link, or to change the
priority of links.
Note that although the Storyspace Reader does not allow
users to modify the hypertext, it does allow them to add
margin notes and bookmarks, and save these in their own
reading files. This allows readers to save their places in
reading the hypertext, and to add small notes for themselves.
Bookmarks and margin
notes are described in
the chapter Bookmarks
& Margin Notes.
DOCUMENT OPTIONS FOR READERS
The Document Options chapter describes the many aspects of
your Storyspace hypertext that can be set using the Document
Options dialog. Some of these options may be particularly
helpful when you are preparing a Storyspace hypertext for
distribution with the Storyspace Reader:
❚❚ Title: The title you choose will appear at the top of the
Storyspace window, and at the top of view windows. This
title is not bound by the eight-character limit on the file
name.
❚❚ Allow View Windows: If this box is checked, then your
document (both in Storyspace and in the Storyspace
Reader) can have view windows. This is the default
behavior of Storyspace.
If this box is unchecked, then no chart, outline, treemap, or
Storyspace map view windows can be opened in the document. In such a hypertext, the only windows will be text
windows, and navigation will be primarily accomplished via
text links and basic links. (Many hypertext novels, such as
Michael Joyce’s afternoon, a story, and Stuart Moulthrop’s
Victory Garden, have chosen this route. Not allowing views
give you more control over what parts of your work will be
read in what order.)
If you want your audience to explore using the various
views, then leave this box checked. If you do not want your
audience to see the views, uncheck the Allow View
Windows box before saving the version of your work
which you will distribute.
❚❚ Open text windows with . . . Path Browser: In a complex
document which uses paths and link names to guide the
reader among spaces, you may want every text window to
open by default with the Path Browser visible. If so, check
this box. (The complex nonfiction hypertext Socrates in the
Labyrinth: Hypertext, Argument, Philosophy, by David Kolb,
uses this technique: many links are labelled with the type of
information they link to (“*illustration”), many other links
are labelled to create pathways through the work (“-philosophy-”), and text windows open by default with the Path
Browser visible, to make these possibilities more evident.)
❚❚ Open text windows with . . . control strip: The control
strip, at the top of text windows, provides users with tools
to navigate the hypertext. These include the Back button,
to follow the last link backwards; the Links button, to open
the Links dialog, see all the links leading from the space,
and choose which link to follow; and the History button to
The Path Browser is
described in the chapter
on Viewing and
Changing Links.
The control strip is
described in the chapter
on Text Windows.
see a list of all spaces visited, and return to one of them if
desired. In full Storyspace, by default, text windows open
with the control strip visible.
If you want to simplify your audience’s experience of your
hypertext, you can uncheck the control strip box before
saving the version of your work which you will distribute.
Text windows in the Reader will then not show the control
strip, so readers will navigate your hypertext primarily via
the links you have created. Menus will still give access to
control strip functions.
❚❚ Highlight text links: If this box is checked, text that is
linked in your hypertext is automatically highlighted with
the combination of bold, underline, and color that you
choose. If you are distributing your work to an audience
that is familiar with browsing the World Wide Web, where
most text links are highlighted, checking this box can make
your hypertext easier to use.
PREFERENCES FOR READERS
The Preferences chapter describes the many aspects of
Storyspace that can be set using the Preferences dialog. You
may want to set some of these particularly for a Storyspace
hypertext and Storyspace Reader you will distribute.
Automatically
highlighting text links
is described in the chapter on Creating Links.
Note that if you want the Storyspace Readers you distribute
to reflect the preferences you set, then you must distribute
the SSP.INI file along with your Storyspace Reader. This file
contains your preferences settings, and you will find it in the
same directory as the Storyspace application file, SSP.EXE.
Provide this file along with the other files you distribute for
your hypertext, and make sure that those who read your
hypertext copy SSP.INI into the same directory, on their
computers, as the Storyspace Reader application,
SSREAD.EXE.
How to set preferences
is described in the chapter on Preferences.
the Preferences dialog
❚❚ Remember window positions: If this option is turned on,
each text window will open in the size and place that it was
last opened. If you have hand-tuned your text windows to
appear in locations and sizes that are appropriate to the
text each writing space contains, then you will want to
make certain that this option is turned on in your
Storyspace Reader.
❚❚ Keep windows open: If this option is turned on, many
text windows can be open at one time. If this option is off,
opening a text window will close the text window that is
already open.
If you want your readers to explore your work with many
text windows open, you will want to make certain that this
option is turned on in your Storyspace Reader. If you want
to provide a simpler interface for readers who are new to
hypertext, you could create a work that is intended to be
read with only one text window open at one time. You
would then want to make sure that this option was turned
off in your Storyspace Reader.
PUBLISHING SUGGESTIONS
When you create a hypertext for distribution, you must
consider some new issues: how familiar is your audience with
hypertext? How familiar are they with using Storyspace? Is
this a work in which they should explore at will, or is it impor-
tant that they read certain sections in a certain order? If you
offer your audience many options, will they be confused and
put off by the choices? Will they be confused by the features
of the interface? Or will they take advantage of these possibilities? What is the very first thing that a reader should see on
opening your work, in order to start off on the right foot?
A special edition
Based on your answers to these and other questions, you may
craft an edition of your work particularly intended for distribution. After every other aspect of your work is satisfactory, you
might set some of the document options and preferences,
described above, to meet the needs of your audience (rather
than your needs while working in Storyspace). You then might
open a particular view window or windows, and a particular
text window or windows (the “Title Page”?), and save a
version of your work intended for distribution with the
Storyspace Reader.
Guiding readers
If your intended readers are experienced Storyspace users
who should just jump in to the work and look around, then
your job is done. If they may be less familiar with hypertext,
or with the Storyspace interface, or with the material you want
to convey, then you may want to offer your readers more
guidance in approaching your hypertext.
(Anticipating the needs of different readers, and facilitating
their journeys through the text, can be a very challenging and
satisfying part of hypertext writing. Guiding readers through
hypertexts is also one of the most active areas of hypertext
research today.)
Storyspace provides an abundance of ways to help guide
readers through a hypertext. Some methods include:
❚❚ Explicit instructions in the text
The text itself may direct readers by calling attention to
links of particular interest. For example, the first page of a
hypertext often includes the phrase, “Click here for instructions”, linked to a writing space that explains the elements
of reading the document and of using Storyspace.
❚❚ Thoughtful arrangement of maps
Storyspace maps may be arranged to display relationships
among writing spaces, and to encourage exploration.
❚❚ Cover page
The “cover page” is simply the very first writing space in
the document. This is the first space listed in an outline
window that shows the whole hypertext; equivalently, the
upper-left space in a Storyspace map that shows the
uppermost level of the hypertext.
This space can always be reached easily by choosing Cover
page from the Navigate menu. For this reason, you may
choose to make this space useful as a place that your
readers may return to many times. Your cover page could
hold an introduction; or an overview with links to sections
of the work; or a table of contents. . . .
❚❚ Link names, paths, and the Path Browser
Paths are collections of links that share the same name.
Various paths that move through the hypertext, following
different courses among the writing spaces, can add valuable structure to a work. The Path Browser helps readers
visualize their position on a path and explore intersecting
paths.
Links can also be named to denote their type or purpose—
such as “Reference”, “illustration”, “rebuttal”—giving
readers another kind of direction in exploring the hypertext.
The Path Browser is
described in the chapter
on Viewing and
Changing Links.
❚❚ Guard fields
Guard fields—discussed in the chapter on Special Links—
direct the reader to different spaces by making some links
accessible only under certain circumstances. This can structure what parts of your work will be read in what order.
❚❚ Instructions
Telling your readers to use various parts of the Storyspace
Reader interface—chart views, Storyspace map views, the
Links dialog, the Back button, for instance—can help them
to see all the possibilities of your work.
Chapter 22
COPYING AND PASTING TEXT
To move moderate amounts of text between Storyspace and
another application, it may be easiest to copy and paste the
text.
To move text from Storyspace,
in Storyspace,
have a text window open on the appropriate writing
space
make sure the Edit Ruler is down
select the desired text
choose Copy from the Edit menu, or press Ctrl-C
in the other application,
choose Paste from the Edit menu
To move text into Storyspace,
in the other application,
select the desired text
choose Copy from the Edit menu
Pulling down the Edit
Ruler is described in the
chapter on Text.
in Storyspace,
open a text window on the appropriate writing space
make sure the Edit Ruler is down
position the insertion point where you want the text
choose Paste from the Edit menu, or press Ctrl-V
You can also copy, cut, and paste text within Storyspace: from
one writing space to another, or to move the text around
within a writing space. Note that when you cut or copy text in
Storyspace, then paste that text within Storyspace, the pasted
text will not retain any of its text links.
COPYING AND PASTING IMAGES
To place an image into Storyspace, first copy the image in
your graphics application (or any other program that gives you
access to the image); then paste it into a writing space in
Storyspace.
To move an image into Storyspace,
in the graphics application,
select the desired image
choose Copy from the Edit menu
in Storyspace,
open a text window on the appropriate writing space
make sure the Edit Ruler is down
position the insertion point wherever in the text you
want the image to appear
choose Paste from the Edit menu, or press Ctrl-V
IMPORTING TEXT
When you have a lot of text to get into Storyspace, it can be
more convenient to import the text than to copy and paste it.
Importing text can place that text into one writing space, or
can divide it among many writing spaces.
The text you import must be saved as a plain text (TXT) file.
Storyspace cannot keep style information (such as bold, italic,
font choices and sizes) in text it imports. Storyspace cannot
import images.
Importing text is most useful when you want to bring in a long
section of text and have it automatically divided into several
writing spaces. Text import provides capabilities for automatically dividing the text by paragraphs, by special dividers you
choose, or by length of text. Text import can also recognize
the first element in each section of text as the title of that
text, and use it to title the writing space. How to import text,
and how to set these controls, are described below.
To import text into a
Storyspace document
From anywhere,
save the Storyspace document. This is a good idea before
any major change, or before using any powerful tool.
choose Import… from the File menu
use the standard Windows file dialog to find the text document you want to import, and select it
press OK
then, in the Explode dialog,
modify the options controlling how the text will be
imported, and how it will be divided into many writing
spaces (if desired). These options are described next in
this chapter.
press OK
Storyspace will import the text. For very long text, this
may take a few seconds.
If you imported the text into one writing space, the imported
text will be in a new writing space that is created within the
space that was selected when you chose Import.
If you imported the text into several writing spaces, the
imported text will be divided among several new writing
spaces. These will all be within a new space that is created
within the space that was selected when you chose Import.
TEXT IMPORT AND EXPLODE OPTIONS
Explode dialog
One writing space
If you want all of the imported text to be put into one new
writing space, choose this option.
The rest of the controls in this dialog affect how to divide the
text among several writing spaces, so you do not need to set
those controls if you choose the One writing space option.
Note that you should not place more than 30,000 characters
(bytes) into one writing space. If the text you are importing is
longer than that, you cannot choose the One writing space
option. The top-right of the dialog shows the length, in bytes,
of the text you are importing.
Several writing spaces
If you want the imported text to be divided among several
new writing spaces, choose this option. The rest of the
controls in this dialog affect how to divide the text among
these writing spaces.
Name of new writing space
If you place all of the imported text into one new writing
space, the name you enter here will be the name of that
writing space.
If you divide the imported text among several new writing
spaces, those new writing spaces will all be placed within
another new writing space, which will get the name you enter
here.
Writing spaces should contain at least . . .
If dividing the text according to your criteria (as set below)
would result in a space containing fewer characters than the
minimum you set here, the import process will skip division
points to ensure that all the spaces created contain at least
that minimum amount of text.
and no more than . . .
The import process will divide the text and create new writing
spaces to ensure that no writing space gets more imported
text than the maximum you set here.
Note that you should not place more than 30,000 characters
(bytes) into one writing space. This control can ensure that
you do not.
Divide spaces at: Symbol or string
Storyspace can divide the imported text into different writing
spaces at whatever divider you enter here.
The divider can be a single character, or a word or phrase.
For instance, you could prepare your text with a special tag,
such as “ZZZ”, wherever you want to begin a new writing
space. Then you could enter “ZZZ” into this field, and the
imported text would be divided into writing spaces as you
intended.
To use this option, check the Divide spaces at: box, select
the Symbol or string radio button, and type the desired
delimiter into the “Symbol or string” text area.
Special characters: You can indicate several special characters in this field: /n means a carriage return and line feed
/r means a carriage return
/l means a line feed.
/t means a tab character.
Use two slashes, //, to mean a slash.
Divide spaces at: Paragraph
Storyspace can put each paragraph of the imported text into
its own new writing space.
To use this option, check the Divide spaces at: box and
select the Paragraph radio button.
Title delimiter
Text import can use the beginning of each section of text as
the title of the writing space containing that text.
If you enter a delimiter here, Storyspace will use the text from
the beginning of the section until that delimiter as the title of
the writing space. It will remove this title text from the writing
space.
The divider can be a single character, or a word or phrase.
Special characters: You can indicate several special characters in this field: /n means a carriage return and line feed. /r
means a carriage return. /l means a line feed. /t means a tab
character. Use two slashes, //, to mean a slash.
If you do not enter a delimiter here, Storyspace will use the
first few words of the section as the title of the writing space.
It will not remove this title text from the writing space.
Delete delimiter
If you enter a Title delimiter, as described just above, you can
also have text import delete that delimiter from the section of
text after stripping off the preceding text to use as the title.
Check Delete delimiter to have the delimiter text removed.
EXPORTING TEXT
Exporting text creates a text file containing the text from all or
some of the writing spaces in your hypertext. You can then
use a word processing application to read this file, do a
spelling check, or print the text. You can also import this text
into a page layout program if you need to print the text in a
complex layout.
Text is saved as plain text, without formatting or styles, in a
file with the .TXT extension.
To export all the text in the document
From anywhere,
save the document. This is a good idea before any major
change, or before using any powerful tool.
choose Export… from the File menu
In the Export dialog,
choose Entire Document
choose Export as ... Text
press the Options… button
In the Text export options dialog,
modify the text export options as desired. These
options are described next in this chapter.
press OK, to dismiss the Text export options dialog
press OK, to dismiss the Export dialog
using the standard Windows file dialog, choose a directory
in which to save your text file, and type a name for the
file
press OK
TEXT EXPORT OPTIONS
Text Export options dialog
Export text
If this box is checked, the exported text file will contain the
text of all the writing spaces in the document.
If this box is not checked, the text of the writing spaces will
not be exported. You might un-check this box if you wanted to
export only the titles of the writing spaces (this option is
described below).
Insert text after each space
In this field, type the text that you would like to appear after
the text of each writing space. This might be some sort of
divider, letting you easily pick out where the text of one
writing space ends and the next writing space begins.
Special characters: You can indicate several special characters in this field: /n means a carriage return and line feed
(you can use this to add
extra blank lines between writing spaces).
/r means a carriage return.
/l means a line feed.
/t means a tab character.
Use two slashes, //, to mean a slash.
The default text in this field is simply some hyphens and
spaces followed by a new line: “- - - - -/n”
Export titles
If this box is checked, the title of each writing space will be
exported preceding its text. The titles of all writing spaces will
be exported, even those spaces that do not have any text.
Number titles
If this box is checked, the title of each writing space will be
numbered in the exported file.
The numbering will proceed as a hierarchical outline—so the
first top-level space would be numbered 1, its children would
be numbered 1.1, 1.2, 1.3, and so on.
Indent
If this box is checked, the name and number of each space
will be indented to reflect how deeply it is situated in the hierarchy.
To export some of the text
in the document
You can also choose to export only the text in a particular
writing space, or the text of a writing space and the spaces it
contains, or the text in the spaces along a path.
To export the text in one writing space,
In any view window,
select the desired space with the arrow tool
choose Export… from the File menu
In the Export dialog,
choose This writing space
set the other text export options, and complete the
export, as described earlier in this chapter
To export the text in a writing space and
its descendants,
In any view window,
select the desired space with the arrow tool
choose Export… from the File menu
In the Export dialog,
choose This writing space and spaces within it
set the other text export options, and complete the
A space’s descendants
are all the spaces it contains, and all the spaces
they contain, and so on.
See the entry on hierarchy in the Glossary.
export, as described earlier in this chapter
To export the text in spaces along a path,
In any view window,
select a space on the desired path with the arrow tool
choose Export… from the File menu
In the Export dialog,
choose Writing spaces on path:
choose the desired path from the menu that
appears below this option
set the other text export options, and complete the
export, as described earlier in this chapter
Note that to determine what spaces are on the chosen path,
Storyspace starts with the selected space, and adds all spaces
linked to it by links of the chosen name; and all spaces linked
to them by links of the chosen name; and so on.
A path is a series of
links that have the same
name. The chapter on
Viewing and Changing
Links discusses paths.
Chapter 23
To transfer to Storyspace for Macintosh
On the Windows computer,
save your Storyspace document, using Storyspace for
Windows
Then, transfer the file
Copy the .SSP file to your Macintosh computer, in whatever
way is convenient. You might copy the file via a network
that both computers are on. Or you can copy the file to
media—such as a floppy disk or a Zip disk—that both
computers can read.
Remember that Macintosh computers can read and write
to Windows-formatted 3.5" disks—a convenient way to
transfer your work back and forth, if it fits on a floppy disk.
On the Macintosh computer,
start Storyspace for Macintosh
while holding down the option key, choose Open… from
the File menu
use the standard Macintosh file dialog to find the document
you want to open (the document you just transferred
from Windows) then press Open
save this document on your Macintosh, using Save as… to
give it a new name.
After you first transfer the Storyspace document and open and
save it in this way, you should be able to double-click the
document to open it with Storyspace for Macintosh in the
usual way.
RE-PLACING WINDOWS IMAGES
A Storyspace for Windows document will not include any of its
images after being transferred to a Macintosh computer.
(This is because Storyspace for Windows uses the Windows
standard image format—the BMP—to store images. Storyspace
for Macintosh can only work with the Macintosh standard
image format—the PICT.)
To transfer a Windows document
and re-place the images
First, transfer the Storyspace document from Windows to
Macintosh as described previously.
Then, for each image in your hypertext
copy it to an image-editing application
save it as a file that your image-editing application on
the Macintosh will be able to read
Then, transfer the images:
copy all the image files to your Macintosh computer (as
before, you might do this via a network, or via disks
that both computers can read)
On the Macintosh computer,
open your Storyspace document, as described previously
Again, for each image,
use a Macintosh image-editing application to open
the image
copy the image
go to the appropriate space in the Storyspace document
paste in the image
Finally,
don’t forget to save this new version of the
Macintosh hypertext after your work.
You may want to
give each image a
distinctive name—such
as the name of the
writing space it appears
in—so you can remember where it should go.
Many image-editing
applications have both
Windows and Macintosh
versions, and many such
applications can both
create and read a variety of file types, making
it easier to create image
files in Windows that
you will be able to open
on the Macintosh.
WHAT WILL NOT TRANSFER
Graphic Links
Because transferring graphics from a Storyspace for Windows
document to a Storyspace for Macintosh document involves
pasting the pictures in again, any graphic links—links from
images or portions of images—will be lost.
To add those links to your Storyspace for Macintosh document,
you will have to create the links over again.
To minimize this extra work:
❚❚ If you know you will be transferring your hypertext back
and forth between the two platforms many times during the
course of the project, you may want to add graphics and
graphic links only at the end of the project.
❚❚ If your work will involve many graphics and graphic links,
you may want to add these on the Macintosh platform, and
then transfer your work to Storyspace for Windows. In
most cases, transferring in this direction—from Macintosh
to Windows—can incorporate images and graphic links
without having to re-place the pictures and re-create the
graphic links.
Long Guard Fields
Guard fields in Storyspace for Windows can up to 195 characters long, but guard fields in Storyspace for Macintosh can be
no longer than 63 characters. Guard fields longer than 63
characters will have their extra characters deleted when the
Storyspace document is transferred from Storyspace for
Windows to Storyspace for Macintosh. This will almost
certainly break those guard fields.
If you know that you will be using guard fields and that you
plan to create a version of your work for the Macintosh platform, you may want to restrict yourself to shorter guard fields
to avoid this problem.
Sounds
Sounds you have associated with writing spaces in Storyspace
for Windows will not play after you transfer the hypertext to
Storyspace for Macintosh.
(It is possible to translate all of your Windows WAV files into
Macintosh SND resources, and use the sound facilities of
Storyspace for Macintosh to re-associate each sound with its
writing space. Adding sounds to writing spaces is described in
the Storyspace for Macintosh manual.)
Associating sounds with
writing spaces is
described in the chapter
on Sound.
Storyspace for Macintosh does not have an equivalent to the
Storyspace for Windows facility for playing a sound upon
entering every writing space.
OTHER INTERFACE DIFFERENCES
Window size
Text windows in Storyspace for Macintosh do not have the
control strip that is usually at the top of text windows in
Storyspace for Windows. Also, they have smaller margins on
the right between the edge of the window and the text. If the
precise appearance and placement of text windows is
important in your Storyspace document, you may want to
adjust the sizes of text windows in the Macintosh version of
your Storyspace hypertext.
Fonts
When a Storyspace for Windows hypertext is opened in
Storyspace for Macintosh, text will not appear in the fonts that
were used on the Windows computer. Text will retain its size,
color, and style, but all the text will be in a default Macintosh
font (such as Geneva).
Storyspace for Macintosh does not have:
❚❚ treemap views
❚❚ the Path Browser
❚❚ wallpaper (background in chart, outline, and Storyspace
map windows)
❚❚ automatically highlighted text links
❚❚ transition effects
Links in Storyspace maps
Storyspace map windows, in Storyspace for Macintosh, draw
links as straight lines, rather than the curvy lines of
Storyspace for Windows. If curvy links are essential to a
particularly elegant Storyspace map view that you have
crafted, you may want to look over the appearance of that
Storyspace map in Storyspace for Macintosh.
To transfer from
Storyspace for Macintosh
On the Macintosh computer,
save your Storyspace document, using Storyspace for
Macintosh
Wallpaper is described
in the “Pictures and
Graphics” section of the
chapter on Document
Options.
Automatically highlighted text links are
described in the chapter
on Creating Links.
change the name of your document to a name no longer
than eight characters, with the .SSP extension on the
end—such as MY_FILE.SSP
Then, transfer the file
Copy the file to your Windows computer, in whatever way
is convenient. You might copy the file via a network that
both computers are on. Or you can copy the file to media—
such as a floppy disk or a Zip disk—that both computers
can read.
Remember that Macintosh computers can read and write
to Windows-formatted 3.5" disks—a convenient way to
transfer your work back and forth, if it fits on a floppy disk.
On the Windows computer,
start Storyspace for Windows
choose Open… from the File menu, or press Ctrl-O
use the standard Windows file dialog to find the document
you want to open (the document you just transferred
from the Macintosh) then press OK.
TRANSFERRING MACINTOSH IMAGES
A Storyspace for Macintosh document will not include any of
its images after being transferred to a Windows computer.
(This is because Storyspace for Macintosh uses the Macintosh
standard image format—the PICT—to store images.
Storyspace for Windows can only work with the Windows standard image format—the BMP.)
Once you create a BMP version of each image, however,
Storyspace for Windows can replace each missing image with
the correct Windows version of the image. It can do this automatically, by matching the name of each image file with the
name of a writing space that is missing an image. Or you can
tell Storyspace which image file goes with which writing space.
This replacement procedure is usually quicker and easier than
pasting in a new Windows version of each image by hand. In
addition, replacing images in this way maintains any graphic
links from those images.
Both of these replacement procedures are described below.
A graphic link is a link
that departs from an
image, or a portion of an
image. See the chapter
on Creating Links.
To automatically re-place
Macintosh images
First, transfer the Storyspace document from Macintosh to
Windows as described previously.
Then, for each image in your hypertext,
copy it to an image-editing application
save it as a .BMP (Windows bitmap) file
Transfer the images:
copy all the BMP image files to your Windows computer (as
before, you can do this via a network, or via disks that
both computers can read)
And rename the images:
Storyspace for Windows knows which BMP file should go
with which missing image by matching the name of a
writing space that is missing an image with a BMP file
that has the same name. Since writing spaces can have
longer and more complex names than BMP files,
renaming the BMP files so they will be matched
correctly is described after this procedure.
Then, using Storyspace for Windows,
choose Open… from the File menu, or press Ctrl-O
use the standard Windows file dialog to find the document
you want to open (the Storyspace document you just
transferred from the Macintosh) then press OK
(Right now, if you were to look in any text window that
should contain an image, there would be a blank space
where that image should be.)
choose Document options… from the File menu
in the Document Options dialog, press the Pictures and
Graphics… button near the bottom-left of the dialog
the Graphics Options dialog
in the Graphics Directory field of the Graphics Options
dialog, type the complete path name of the directory
that holds the BMP image files. (For example, if you
saved these files in the “Htext” directory within the
“Work” directory on the C drive, type C:\WORK\HTEXT )
press OK to dismiss the Graphics Options dialog
press OK to dismiss the Document Options dialog
use Save As… to save your Storyspace document under a
new name
close the document
open the document (the new one, that you just created
with the new name)
If you look now in any text window that should contain an
image, the image should be there, along with any graphic
links leading from that image.
Note that even after you enter the correct path name for the
graphics directory, the images do not appear in the writing
spaces until you save the file, close it, and then open it again
(as described above).
Note that if you follow the above procedure and an image is
still missing, check the directions below for naming the BMP
image file so that Storyspace will correctly match it to its
writing space. If that still doesn’t work, you can manually tell
Storyspace which image file to match with which writing
space; this is described later in this chapter.
Naming the BMP files
Writing space names can be longer than file names, and can
contain characters that are not permitted in file names. So, to
create an image file name that will be matched with the
writing space that should contain that image, you should:
❚❚ remove all spaces and punctuation from the writing space
name; and
❚❚ cut off any characters after the first eight.
For example:
if it were missing an image,
the writing space named
would be matched with
the image file named
Limes
LIMES.BMP
Lemons and Limes
LEMONSAN.BMP
“Hah!” I said
HAHISAI.BMP
*interrogation*
INTERROG.BMP
Multiple images in one space
If one writing space contains more than one image,
Storyspace cannot just match the name of the space to the
name of an image file. Instead,for all images after the first, it
looks for image files whose names match the space name with
a number added at the end.
For example:
the first image in the
writing space named
Lemons and Limes
the second image in the
writing space named
Lemons and Limes
the third image in the
writing space named
Lemons and Limes
would be matched with
the image file named
LEMONSAN.BMP
would be matched with
the image file named
LEMONSA1.BMP
would be matched with
the image file named
LEMONSA2.BMP
To manually re-place Macintosh images
First, transfer the Storyspace document from Macintosh to
Windows as described previously.
Then, for each image in your hypertext,
copy it to an image-editing application
save it as a .BMP (Windows bitmap) file
Transfer the images:
copy all the BMP image files to your Windows computer (as
before, you can do this via a network, or via disks that
both computers can read)
Then, using Storyspace for Windows,
choose Open… from the File menu, or press Ctrl-O
use the standard Windows file dialog to find the document
you want to open (the Storyspace document you just
transferred from the Macintosh) then press OK
(Right now, if you were to look in any text window that
should contain an image, there would be a blank space
where that image should be.)
choose Document options… from the File menu
in the Document Options dialog, press the Pictures and
Graphics… button near the bottom-left of the dialog
the Graphics Options dialog
in the Graphics Directory field of the Graphics Options
dialog, type the complete path name of the directory
that holds the BMP image files. (For example, if you
saved these files in the “Htext” directory within the
“Work” directory on the C drive, type C:\WORK\HTEXT )
Then, in the Graphics Options dialog,
for each image,
click on the name of a writing space under Unassigned
Pictures
the name of that writing space will appear at the leftcenter of the dialog
in the field to the right of the space name, type the
name of the image file that contains the image
missing from that space (e.g., LIME.BMP )
press Add to add that space-image match to the list at
the top of the dialog
Finally,
when you have made all the space-image matches, press
OK to dismiss the Graphics Options dialog
press OK to dismiss the Document Options dialog
use Save As… to save your Storyspace document under a
new name
close the document
open the document (the new one, that you just created
with the new name)
If you look now in any text window that should contain an
image, the image should be there, along with any graphic
links leading from that image.
Note that even after you enter the space-image matches, the
images do not appear in the writing spaces until you save the
file, close it, and then open it again (as described above).
TRANSLATING MACINTOSH FONTS
When a Storyspace for Macintosh hypertext is opened in
Storyspace for Windows, Storyspace substitutes similar
Windows fonts for common Macintosh fonts, such as Times
and Courier.
For other fonts, or to change these font assignments, after
you have transferred a hypertext from Storyspace for
Macintosh to Storyspace for Windows, you can decide which
Windows fonts on your computer should be substituted for
which Macintosh fonts used in the Macintosh version of the
hypertext.
To substitute for Macintosh fonts,
have the Windows version of the hypertext open
choose Document options… from the File menu
in the Document Options dialog, press the Font substitution… button
In the Font substitution dialog,
select a font in the list at the top of the dialog
Unfortunately, since font names do not transfer, you
will have to guess which font in the list corresponds to
which Macintosh font in the Macintosh version.
in the right-hand field beneath the list, type the name
of the Windows font that you want to substitute for
this font. You should use the name of a Truetype
font that is available on your Windows computer.
press Change to enter your change
repeat this process to change the assignments of other
fonts
when you are done changing font substitutions, press
OK to dismiss the font substitution dialog
press OK to dismiss the Document Options dialog
remember to Save your changed hypertext
The changes should take effect immediately.
Note that this procedure can be used to change one font for
another in any hypertext, including hypertexts that have not
been transferred from Storyspace for Macintosh.
WHAT WILL NOT TRANSFER
Sounds
Sounds you have associated with writing spaces in Storyspace
for Macintosh will not play after you transfer the hypertext to
Storyspace for Windows.
(It is possible to translate all of the Macintosh SND resources
used in your Storyspace for Macintosh hypertext into Windows
WAV files. Then, in Storyspace for Windows, you could reassociate each sound with its writing space, as described in
this manual’s chapter on Sound.)
Video
Storyspace for Macintosh text windows can include QuickTime
video in addition to text and images. Storyspace for Windows
does not currently have this ability.
OTHER INTERFACE DIFFERENCES
Window size and layout
Text windows in Storyspace for Windows usually show the
control strip at the top of the window, a feature absent from
Storyspace for Macintosh. Also, they have larger margins on
the right between the edge of the window and the text. If the
precise appearance and placement of text windows is
important in your Storyspace document, you may want to
adjust the sizes and shapes of text windows in the Windows
version of your Storyspace hypertext.
Font size
The same size text can appear smaller on a Windows screen
than on a Macintosh screen. To improve the legibility of a
Storyspace hypertext originally written for the Macintosh,
Storyspace for Windows can increase the size of all the text in
text windows.
To enlarge text in a Storyspace document
From anywhere,
choose Document options… from the File menu
in the Document Options dialog, enter a number in
the “Magnify text by” field
press OK to dismiss the Document Options dialog
Text in text windows will now appear that many points larger.
(A point, in this case, is one pixel on your computer screen.)
Note that this control can be used to make the text in any
Storyspace document easier to read, not just a document that
was transferred from Storyspace for Macintosh.
Chapter 24
PRINTING TEXT
To print the text in one writing space
open a text window on the desired writing space
if necessary, choose Print Setup… from the File menu,
and set any print options
choose Print… from the File menu, and press OK to print
If you want more control over the appearance of the text that
you print—margins, layout, and so on—you can select the text
in a writing space, copy it, and paste it into any application—
such as a word processor—that can print it.
To print the text in many writing spaces
To print the text in many spaces, or in the entire hypertext,
you can export that text into a text file. (Exporting is
described in the chapter on Working with Other Programs.)
Then you can import that text into your favorite wordprocessing application, page layout application, or other
application, and print it in the appearance and format that suit
your task.
PRINTING A VIEW
To print a chart, outline, treemap, or Storyspace map view,
first bring the desired view window to the front. Make sure
that it is displaying the spaces you want to show, and adjust
the scale and view options as desired. Then,
choose Print Setup… from the File menu to set up your
printer
choose Print… from the File menu
Storyspace will attempt to print that view as it appears in the
window. When printing a chart, outline, or Storyspace map
view, Storyspace may reduce the scale to fit the view on the
page. To print a very large view, Storyspace may crop some of
the image, as it will not reduce the scale so far that items
become invisible.
Chapter 25
THE WORLD WIDE WEB
The World Wide Web is a public hypertext system accessible
throughout the world via the Internet. Web documents can be
stored on machines anywhere in the world, and can be read
from any machine equipped with an Internet connection and
the necessary software (primarily, a Web browser, such as
Netscape Navigator or Microsoft Internet Explorer).
Because it is so widespread, the Web is a good way to give
large audiences access to hypertexts that you have developed
with Storyspace.
World Wide Web hypertexts are built of Web pages—these are
roughly equivalent to Storyspace writing spaces—containing
text and images. Each Web page is stored as one or more
separate file, whereas Storyspace stores many writing spaces
in one file. World Wide Web files use a language called HTML
(Hypertext Markup Language) to describe their structure and
their links. The Web equivalent of a single Storyspace document will be composed of many HTML files, many containing
mostly HTML instructions and the text of a writing space, and
some containing an image from a writing space.
To be accessible via the Internet, the HTML files containing
your hypertext must be stored on a Web server—a computer
that is connected to the Internet, and has the software to
provide whatever Web page is requested to someone wanting
to read it. To turn your Storyspace document into a part of the
World Wide Web, you will first use Storyspace to translate your
work into a collection of HTML files. Then—perhaps with the
help of a system administrator, Webmaster, or technical
support department—you will copy these files to a Web server.
The rest of this chapter assumes some familiarity with the
World Wide Web and HTML. (Good introductions to the Web
are contained throughout the Web itself, and books on every
aspect of the Web occupy many shelves in most bookstores.)
WEB AUTHORING TOOLS
For some Web projects it would be appropriate to learn HTML
and to hand-write all the HTML instructions for displaying and
linking your content. For other projects, a dedicated Webcreation tool would be best, letting you create roughly “what
you see is what you get” Web pages without worrying about
HTML. Storyspace is an appropriate part of a Web project if:
❚❚ you have a Storyspace hypertext that you want to make
available via the Web;
❚❚ you want to create a Web site with complex structure and
links, making Storyspace tools for visualizing and linking
content important to your task.
After you have exported your hypertext from Storyspace to
HTML, you can use other Web authoring tools to modify these
HTML files if this is necessary or desired.
Remember that there are differences between the Storyspace
interface and the interface provided by Web pages and a Web
browser. You may want to keep this in mind in creating a work
for the World Wide Web.
WHAT WILL TRANSFER TO THE WEB
Text
The text in your writing spaces translates to text on Web
pages. (Special characters (such as © and “curly quotes”) that
are not part of the standard ASCII 128-character set will also
be translated appropriately for the Web.)
Images
Images will be placed in the translated Web pages where they
appear in the Storyspace writing spaces. You must, however,
use other software to translate the image files into formats
suitable for the Web (JPEG or GIF files).
Text links
Storyspace links from portions of text will translate into links
from that text on the Web page.
WHAT WILL TRANSFER IN PART
Text appearance
Storyspace’s translation attempts to translate text styles, such
as italics, boldface, and relative size, to similar text styles on
most Web browsers.
The translation also attempts to recognize such meaningful
items as headings and lists, and create appropriate HTML to
display those items. (Storyspace lets you control whether
these latter sorts of translations are attempted.)
Your text on the Web will not appear exactly as it does in
Storyspace, or even exactly as it does on your Web browser.
Different browsers, on different computers, render Web pages
differently.
Basic links
All links on the Web originate from text or an image. If you
choose, Storyspace can add links to each Web page corresponding to the basic links from that writing space. (HTML
Basic links are links
that depart from a
writing space as a
whole—not from any
particular text or image
in that space.
templates—described in the next chapter—give you precise
control over the appearance of translated basic links.)
Hierarchy
Storyspace interface elements such as the Compass, and view
windows, give you access to writing spaces that may not be
linked to the current space, but are close to it in the hierarchy: the current space’s parent, siblings, and children. Web
pages, unlike Storyspace writing spaces, are not part of any
structural hierarchy. If you choose, Storyspace can create
additional links from text on each Web page to provide access
to the spaces that are nearby in the Storyspace hierarchy.
(HTML templates—described in the next chapter—give you
precise control over the appearance of these additional links.)
Overlapping text links
Text on a Web page cannot be the source of more than one
link. Text in a writing space that is the source of more than
one link is linked on the Web to a special Web page listing the
links that can be followed.
Parent? Sibling? See
the entry on hierarchy
in the Glossary.
WHAT WILL NOT TRANSFER
Views
View windows—Storyspace map views, chart views, outline
views, and treemap views—are not available on the Web.
Guard fields
World Wide Web links cannot implement guard fields. Links
that are translated to the Web will be translated without guard
fields.
Link names
Guard Fields control
when, or whether, a link
can be followed. They
are discussed in the
chapter on Special
Links.
World Wide Web links do not have names, so links that are
translated to the Web will not have their names.
Graphic links
Storyspace is not currently able to export links from images or
portions of images to links from those images on Web pages.
Sounds
Web pages will not play any sounds you may have associated
with writing spaces.
Other interface items
Other items of the Storyspace interface are also unavailable
Associating sounds with
writing spaces is
described in the chapter
on Sound.
on Web pages, including:
❚❚ the Path Browser
❚❚ Find text, to search for text throughout the hypertext
❚❚ Locate writing space, to find a space by name
❚❚ the Links dialog, to see all the links leading from a space
❚❚ Keywords, Margin notes, and Bookmarks
To export a document to HTML
From anywhere,
save the document. This is a good idea before any major
change, or before using any powerful tool.
choose Export… from the File menu
In the Export dialog,
choose Entire document
choose Export as . . . HTML
press the Options… button
In the HTML export options dialog,
modify the HTML export options as desired. These
options are described next in this chapter.
press OK, to dismiss the HTML export options
dialog
press OK, to dismiss the Export dialog
using the standard Windows file dialog, choose a directory
in which to save your HTML files
press OK
Note that when you export your Storyspace hypertext into
HTML, Storyspace creates many HTML files and also many new
directories to put them in. For instance, if the writing space
“Domestic” contains the spaces “Ford”, “GM”, and “Chrysler”,
Storyspace will create the HTML file DOMESTIC.HTM, as well
as the new directory DOMESTIC. The directory DOMESTIC will
contain the HTML files FORD.HTM, GM.HTM, and
CHRYSLER.HTM.
HTML EXPORT OPTIONS
HTML template files,
which give you precise
control over how your
hypertext is translated
into HTML, are described
in detail in the next
chapter.
HTML Export Options dialog
URL (Web Site)
The text in this field should describe where the HTML files will
be stored when your hypertext is available for Web reading
(no matter where they are originally saved). Some examples:
❚❚ If you are creating HTML files to read locally on your
computer (to test your export, perhaps) you can leave this
field blank.
❚❚ If your HTML page files will eventually be made available in
a directory named web_texts within a directory named
public, and that directory is on a machine whose Internet
address is carthage.utara.edu, then this field should
contain
http://carthage.utara.edu/public/web_texts/
❚❚ The Eastgate Systems Web site is located at www.eastgate.com. To create files that will go on that site, I can
leave this field blank. (The links between pages created
this way will all be relative to www.eastgate.com, and will
link properly both when the files are tested locally, and
after the files are uploaded to Eastgate’s Web server.)
❚❚ The Storyspace section of the Eastgate Systems Web site is
located at www.eastgate.com/storyspace. To create files
that will go on that portion of the site, I can enter
storyspace/
in this field. (The links between pages created this way will
all be relative to the Storyspace section of the Web site.
These links will not work for testing the files locally, but will
link properly after the files are uploaded to Eastgate’s Web
server.)
Note that changing the URL (Web Site) will not change where
Storyspace stores the HTML files—when you export, you use
the standard Windows file dialog to choose that. This information only describes where those files should be for the links to
work.
Template file
This field contains the path and file name showing which HTML
template will be used to translate your document into HTML.
To specify a template file, press the Browse button and use
the standard Windows file dialog to locate and select a
template file.
The default value for this field is “Template\basic.htm”—this
indicates the template file named basic.htm in the directory
Template within the directory containing the Storyspace application. This is one of the standard template files that come
with Storyspace.
Text links
If this option is turned on, Storyspace will translate the text
links in your Storyspace hypertext into links in the Web hypertext. This feature is turned on by default.
Since text links are the hypertextual feature that is most
nearly the same in Storyspace and the World Wide Web, it is
unlikely that you would turn this option off.
Basic links
Storyspace basic links—the links that connect one entire
HTML template files,
which give you precise
control over how your
hypertext is translated
into HTML, are described
in detail in the next
chapter.
writing space with another—are not text links, so HTML cannot
directly support them. If this option is turned on, Storyspace
will add linked text to each Web page for every basic link
leading from the Storyspace writing space. These extra links
will lead where the original Storyspace basic links led.
The contents and format of the text added for the basic links
depends on the template file you choose for your HTML
export. (If that template file contains no provisions for
exporting basic links, turning this option on or off has no
effect.)
This option is turned on by default.
Hierarchical links
If this option is turned on, Storyspace will add linked text to
each Web page to provide access to the spaces that are
nearby in the Storyspace hierarchy. (Parents, children, and
siblings.)
The contents and format of the text added for the hierarchical
links depends on the template file you choose for your HTML
export. (If that template file contains no provisions for
exporting hierarchical links, turning this option on or off has
no effect.)
This option is turned on by default.
Detect headings and lists
If this option is turned on, Storyspace scans your text for lines
that look like you intend them to be headings—lines that are
larger and bolder than the text around them. Storyspace then
marks these lines as headings in HTML, so that they will
preserve their typographic emphasis in the Web version of
your work.
If this option is turned on, Storyspace also scans your text for
sequences of paragraphs that look like you intend them to be
lists. Storyspace then marks these lines as unordered lists in
HTML so that they will appear typographically as lists in the
Web version of your work.
This option is turned on by default.
Paragraphs as in . . .
standard text: if this option is selected, paragraph breaks
(carriage returns) in text are exported as paragraph markers
<P> in HTML. This is standard HTML for most applications. On
most Web browsers, this separates paragraphs of text with a
bit of extra white space.
This option is selected by default.
poetry, lists, etc.: if this option is selected, paragraph breaks
(carriage returns) in text are exported as break markers
<BR> in HTML. This can be useful if you are using line breaks
to separate lines—as in poetry, or lists of data—that should
not be separated by extra white space when converted to Web
format.
Image export:
The options in this section work with exporting the images in
your hypertext. They are described later in this chapter..
THE THREE STANDARD TEMPLATES
Storyspace comes with three HTML export templates,
providing three basic formats for creating Web pages of your
Storyspace hypertext. (Look for more templates at
http://www.eastgate.com/storyspace.htm/
You also can create new HTML export templates, to provide
exactly the look and features you want; this is described in the
next chapter.)
BASIC.HTM
This is the simplest template. It places the content of the
writing space in the Web page, followed by a list of the basic
links from that writing space (if there are any), followed by a
list of links to the children of that writing space (if there are
any).
TEMPLAT2.HTM
This template places the title and content of the writing space
in the Web page. If the space is not the cover page, it then
adds a ”Home” button linking to the cover page. After that, it
places a list of links to the children of that writing space (if
there are any). After that, the template creates a one-row
table, titled “Related pages”, listing the basic links from that
writing space (if there are any). Finally, the template places a
sentence describing the dates the writing space was last modified and exported to Storyspace. The various elements (body
of the writing space, basic links, and links to children) are
separated by dashed horizontal rules, as necessary.
This template requires that the image file HOMEBUT.GIF
(provided in the Template directory) be copied into the same
directory as the top-level exported HTML files, for the picture
of the “Home” button to appear.
TABLE.HTM
This template fills the Web page with one big table. The lefthand column of the table occupies most of the window, and
shows the the title and content of the writing space. The right
hand column contains three cells: On top, a list of links to the
children of that writing space. In the middle cell, a list of the
basic links from that writing space. On the bottom, links to
nearby spaces in the hierarchy: the parent, the next sibling,
the previous sibling, the next space in outline order, and the
previous space in outline order. After the table, the template
places a sentence describing the dates the writing space was
last modified and exported to Storyspace.
The same writing space from Socrates in the Labyrinth,
by David Kolb, exported with the three different
templates:
exported using BASIC.HTM
(and rendered by Netscape Communicator 4
under Windows 3.1)
exported using TABLE.HTM
(and rendered by Netscape Navigator 3
under Windows 95)
exported using TEMPLAT2.HTM
(and rendered by Microsoft Internet Explorer 4
under Mac OS 8.5)
EXPORTING WITH IMAGES
The World Wide Web uses a separate file for every image. So,
the Web version of a writing space named “Party” containing a
picture of a party hat would consist of two files:
❚❚ party.htm—the HTML file for the space itself
❚❚ party.gif or party.jpg—the file containing the picture of a
party hat, in a Web-standard graphics format (GIF or
JPEG).
To create this Web version of your hypertext, you would need
to do two things:
1. Export the Storyspace hypertext to HTML
2. Use an image-editing application to convert the picture into
GIF or JPEG format.
(If one space contains more than one picture, Storyspace
HTML export uses automatic numbering to create unique file
names. So if “Party” had two separate pictures of party hats,
you would get three files after exporting: party.htm—the
HTML file for the space itself; party.gif—the first picture of a
party hat; part_423.gif—the second picture of a party hat.)
When you export your Storyspace document to HTML, you
Note that pictures must
be converted because
different computers
have different file formats for pictures—e.g.,
Windows computers use
.BMP files, whereas
Macintosh computers
use PICT files. The GIF
and JPEG standards are
used by virtually all Web
browsers.
must specify whether you will be converting your images to
GIF format or JPEG format. This allows the export to create
links to the correct file names for the images—names that end
in either .GIF or .JPG—so that the images will appear correctly
on their Web pages.
To export a document to HTML with images
In Storyspace,
save the document, then choose Export…, and in the
Export dialog, press the Options… button—all as
described previously
In the HTML export options dialog,
modify the HTML export options as desired. These
options are described previously in this chapter.
choose one of Create links to . . . .JPG files, or
.GIF files
press OK, to dismiss the HTML export options
dialog
finish exporting to HTML, as described previously
The export will have created many HTML files (files with the
extension .HTM), as well as files with the extension .BMP
With an image-editing application,
open each BMP image file created by the Storyspace
export.
convert each image to the GIF or JPEG format. You
must use the format that you chose in the HTML
Export Options dialog.
save each image in the new format, in the same directory it was in, with the same name, but with the
correct .GIF or ,JPG extension.
After you have exported your Storyspace document and
converted its images, you should be able to view the exported
version with a Web browser, and see your Web pages with the
images in place.
Many applications are
available that can
convert images into the
GIF or JPEG format.
These include drawing
and painting applications, dedicated graphics
conversion applications,
and Web creation tools.
Keep in mind that Web
images should be compact.
You may want to use
higher compression or
fewer colors in the Web
versions of your images
than in your Storyspace
document.
HTML IMAGE EXPORT OPTIONS
The HTML export options dialog contains several settings relevant to exporting Storyspace documents with images to HTML.
HTML Export Options dialog
Create links to . . .
.GIF files: if this option is selected, Storyspace will create
links in the Web pages to image files with the .GIF extension.
If you choose this option when exporting to HTML, be sure to
convert the BMP image files to the GIF image format after you
have exported.
.JPG files: if this option is selected, Storyspace will create
links in the Web pages to image files with the .JPG extension.
If you choose this option when exporting to HTML, be sure to
convert the BMP image files to the JPEG image format after
you have exported.
Don’t export images
Ordinarily, this option is turned off. When it is off, Storyspace
will create a new .BMP file for every picture it encounters while
exporting to HTML.
When this option is turned on, Storyspace will not create any
.BMP files while exporting to HTML. If you are exporting a
portion of your hypertext that you have modified—but you
have not modified your images, or the hierarchy of that
section of the hypertext—you may want to turn this option on.
Then Storyspace will not create BMP files for graphics that you
may have already converted to GIF or JPEG format.
To export a portion of a document
to HTML
You can also choose to export only a portion of your
Storyspace document into HTML files. This can be particularly
useful if :
❚❚ you want to quickly test a new HTML export template;
❚❚ you want to export part of your document with one HTML
export template, and the rest with another;
❚❚ you have changed part of your Storyspace document, and
you only want to export the changed section.
Note that this allows you to export parts of your document at
different times, and still make them part of the same linked
Web site. If you have not changed the name of a writing
space, or its place in the hierarchy, then Web links to that
page from parts of the document that you exported previously
will still link correctly to the page you create when you export
a new version of that space.
You can export only a particular writing space, or a writing
space and the spaces it contains, or the spaces along a path.
To export one writing space to HTML,
In any view window,
select the desired space with the arrow tool
choose Export… from the File menu
In the Export dialog,
choose This writing space
set the other HTML export options, and complete
the export, as described earlier in this chapter
To export one writing space and its descendants
to HTML,
In any view window,
select the desired space with the arrow tool
choose Export… from the File menu
In the Export dialog,
choose This writing space and spaces within it
set the other HTML export options, and complete
A space’s descendants
are all the spaces it
contains, and all the
spaces they contain, and
so on. See the entry on
hierarchy in the
Glossary.
the export, as described earlier in this chapter
To export spaces along a path to HTML,
In any view window,
select a space on the desired path with the arrow tool
choose Export… from the File menu
In the Export dialog,
choose Writing spaces on path:
choose the desired path from the menu that
appears below this option
set the other HTML export options, and complete
the export, as described earlier in this chapter
Note that to determine what spaces are on the chosen path,
Storyspace starts with the selected space, and adds all spaces
linked to it by links of the chosen name; and all spaces linked
to them by links of the chosen name; and so on.
A path is a series of
links that have the same
name. The chapter on
Viewing and Changing
Links discusses paths.
Chapter 26
HTML TEMPLATES
HTML template files describe features that are common to
each exported Web page. By creating the appropriate
template, you customize the appearance and features of the
Web pages that Storyspace exports.
Storyspace comes with three standard HTML templates. You
can also create new templates in order to export your work in
exactly the form you want.
(The remainder of this chapter assumes familiarity with HTML
concepts and syntax, in order to better describe the use of
templates.)
A Storyspace HTML template is simply an HTML file, in which
special codes, or “placeholders”, indicate where Storyspace
should insert what portions of information from each writing
space. These placeholders include codes indicating where to
put the title of the writing space, where to put the body (text
and graphics) of the writing space, and where to put various
links from the writing space.
When you export a hypertext, Storyspace takes each writing
space, inserts its information into the appropriate places in the
template, and thus creates a new HTML file for each writing
space. Each Web page Storyspace creates combines the HTML
code in the template with the information from one writing
space.
USING TEMPLATES
To choose which template should be used when you are
exporting, press the Browse button on the HTML Export
Options dialog, and use the standard Windows file dialog to
locate and select a template file.
In creating new templates, it will often be easiest to start with
an existing template file and modify it to fit your needs.
Storyspace HTML template files have the .HTM extension, and
the three templates that come with Storyspace are stored in
the Template directory within the directory containing the
Storyspace application. (Look for more templates within
http://www.eastgate.com/storyspace.htm/ .) To make sure
that you always have unaltered versions of the templates
provided, you should copy a template file before making your
changes to the copy.
To modify a template file, simply open the template file in an
HTML editor or text editor, and make the desired changes. A
template file should be saved as a plain text file, with the
.HTM extension. The templates provided with Storyspace
include comments that should help you in understanding the
structures in those templates, so you can use them to create
the features that you want.
THE SIMPLEST TEMPLATE
An HTML export template can be very simple. Here is the
simplest possible template:
Begin the Web page
<HTML>
<HEAD><TITLE>^title^</TITLE></HEAD>
Put the title of the writing space into
the browser title bar
<BODY>
Begin the body of the Web page
^text^
Place the content (text and images)
of the writing space
</BODY>
</HTML>
TEMPLATE CODES
Every template code is enclosed by ^carets^. Everything in a
template that is not enclosed in carets is assumed to be
regular HTML, and is placed unaltered into the Web pages
End the Web page
created.
Storyspace does not care how you capitalize template codes—
^parentURL^ is the same as ^parenturl^ is the same as
^PARENTURL^.
Content
Some template codes indicate basic elements from a writing
space:
^title^
the title of the writing space
^text^
the body (text and graphics) of the writing
space
Writing space information
Some template codes indicate information about the writing
space or the HTML export:
^sectionNumber^ the hierarchical number of this writing
space; a number such as “1.3.2”
^today^
the date that this writing space was exported to
HTML
^created^
the date that this writing space was created in
Storyspace
^lastModified^ the date that this writing space was last
modified in Storyspace
^creator^
the creator of this writing space
Navigational links
Some template codes can be used to add navigational links in
addition to the text links in the body of the writing space:
^coverURL^
the URL of the Web page for the cover page of
this hypertext (the very first Storyspace writing
space).
^parentURL^ the URL of the Web page for the parent of this
writing space (if any).
^childURL^
the URL of the Web page for the first child of
this writing space (if any).
^PreviousSiblingURL^ the URL of the Web page for the
next older sibling of this writing space (if any).
^NextSiblingURL^ the URL of the Web page for the next
younger sibling of this writing space (if any).
^PreviousURL^ the URL of the Web page for the previous
writing space in outline order (if any).
(See the entry on
“Author Name” in the
Preferences chapter to
change the “Creator”
listed for writing
spaces.)
the URL of the Web page for the next writing
space in outline order (if any).
^NextURL^
Sets of navigational links
Some template codes include a whole set of additional navigational links, such as all the basic links leading from the writing
space, or links to all the children of the writing space.
^basicLinks^ inserts all of the basic links from this writing
space, formatted as an unordered list
inserts links to all of the children of this
writing space (if any), formatted as an
unordered list
^childLinks^
^ancestors^
inserts links to all of the ancestors of this
writing space (if any), formatted as an
unordered list
These three codes can also be used with a special syntax that
allows you to format the group of links as an HTML list or table
in the exact format you want:
Basic links are defined
in the Glossary. For
children and
ancestors, see the
entry on hierarchy in
the Glossary.
^basicLinks( "start", "item-prefix",
"item-suffix", "end" )^
^childLinks( "start", "item-prefix",
"item-suffix", "end" )^
^ancestors( "start", "item-prefix",
"item-suffix", "end" )^
"start" is text that will be inserted before all of the links. "end"
is text that will be inserted after all of the links. "item-prefix"
is text that will be inserted before each link. "item-suffix" is
text that will be inserted after each link.
These four items should each be enclosed in "quotes"; if the
text for one of them includes quotes, you can enclose each
item in 'single quotes' instead.
For example, the template code
^childlinks("<H5>Children:</H5><OL>",
"<LI>", "</LI>", "</OL>")^
would result in the word “Children” formatted as a Header 5,
followed by links to all of the children of that writing space,
formatted as an ordered list.
Building links
These template codes can be useful for creating navigational
links leading from items of your choice—such as special text,
or button graphics.
^URL( item )^
the URL of the Web page for the indicated
item.
^title( item )^
the title of the indicated writing space.
These are the possible choices for ^URL()^ and ^title()^:
^URL(parent)^
^URL(child)^
^URL(next)^
^URL(previous)^
^URL(nextsibling)^
^URL(prevsibling)^
^title(parent)^
^title(child)^
^title(next)^
^title(previous)^
^title(nextsibling)^
^title(prevsibling)^
Recall that ^URL^ and ^Title^, without any parentheses, give
you the URL and the Title of the current Web page.
^root^
the relative path from the current file to the
directory that contains the cover page.
Using ^root^ lets you refer to an element that is stored in the
top-level directory, and use it from every Web page. For
example, the template code
<IMG SRC="^root^image_1.gif">
would refer to the picture file IMAGE_1.GIF stored in the toplevel directory of the exported files, from any exported Web
file.
If-then codes
Some template codes control which parts of the template will
be used and which will not:
^if( condition )^ if the condition is true, then include
everything from the ^if^ statement to the
^else^ or the ^endif^
^else^
an alternative: if the condition is not true, then
include everything from the ^else^ statement
to the ^endif^
^endif^
indicates the end of the alternatives indicated by
the ^if^ statement.
Two examples of how these control statements might be used
in a template:
^if(^exists(parentURL)^)^
if this space has a parent,
<a href="^parentURL^">
a link to the parent,
To return to a more general topic, click here.</a>
^else^
otherwise, this space has no parent,
This space is at the top level
a notice saying so
^endif^
the end of the if construction
if any basic links lead from this space,
^if(^exists(child)^)^
some code to format a list of links to the child spaces
the end of the if construction
^endif^
Logical conditions
Some template codes help with creating the conditions you
use with ^if^ statements:
^exists( item )^
if the item exists, this condition is true.
The valid choices for the item are:
^exists(parent)^
^exists(next)^
^exists(nextsibling)^
^exists(child)^
^exists(previous)^
^exists(prevsibling)^
^not( condition )^ if the condition is true, ^not(condition)^ is false.
^equal( thing 1, thing 2 )^ if thing 1 is equal to thing 2,
this condition is true.
^contains( data, target )^ if the data is somewhere
within the target, this condition is true. For
instance, ^contains(emo, lemon)^ is true.
^beginsWith( data, target )^ if the target begins with
the data, this condition is true. For instance,
^beginsWith(le, lemon)^ is true.
^endsWith( data, target )^ if the target ends with the
data, this condition is true. For instance,
^endsWith(on, lemon)^ is true.
^days( date, count )^ “date” is one of ^today^,
^created^, or ^modified^; and “count” is a
number. If that date is within count days of
today, this condition is true.
In addition, for conciseness, almost any template code can
be used as a condition. If the item for that code exists, the
condition is true; if it does not, it is false. For instance,
^if(^exists(parent)^)^
is identical to:
^if(^parentURL^)^
Miscellaneous codes
Some miscellaneous template codes can also be helpful:
^comment( stuff )^ all of the stuff within the parentheses
of the comment is ignored when using the
template to create Web pages. This can be
useful for testing and debugging an HTML
template: you can put a portion of the template
inside a ^comment( )^ instead of deleting it
outright.
^^
use two carets in a row if you want to put a
caret into your text. (If you use just one caret,
Storyspace will think you are beginning a
template code.)
^URL^
the URL of this Web page
^host^
the host of the site of this Web page. Taken
directly from the“URL (Web Site)” field on the
HTML Export Options dialog.
^file^
the filename of the file for this Web page.
^path^
the relative pathname—from the directory which
you selected for storing HTML files, to this
particular file—for the file for this Web page
^version^
the version of Storyspace used to create this
Web page
^version(major)^ the major version number of the version
of Storyspace used to create this Web page
^version(minor)^ the minor version number of the version
of Storyspace used to create this Web page
^doctitle^
the title of the Storyspace document (as set in
the Title field of Document Options)
TEMPLATES AND
HTML EXPORT OPTIONS
❚❚ If Basic links is turned off in the HTML Export options
dialog, then ^basicLinks^ is false, even if the space has
basic links leading from it.
❚❚ If Hierarchical links is turned off in the HTML Export
options dialog, then ^childLinks^ and ^ancestors^ are
both false, even if the space has children or ancestors.
If the template makes no mention of basic links, child links, or
ancestors, then turning on Basic links or Hierarchical links
in the HTML Export options dialog will have no effect.
AN EXAMPLE TEMPLATE
<HTML>
<HEAD><TITLE>^title^</TITLE></HEAD>
Put the title of the writing space into
the browser title bar
<BODY bgcolor="#FFFFFF">
^text^
The content (text and images)
of the writing space
<FONT SIZE="-1">
^if(^not(^equal(^URL^, ^coverURL^)^)^)^
<HR height=3 width=75% align=center>
<a href="^coverURL^">
<IMG SRC="^root^homebut.gif"
ALT="Home" vspace="2"></a>.
^endif^
^if(^childLinks^)^
<HR height=3 width=75% align=center>
<H5>Children:</H5>
^childLinks("<OL>", "<LI>", "</LI>", "</OL>")^
^endif^
if this is not the cover page,
add a horizontal rule
a link to the cover page, attached to
the button image “homebut.gif”
end of the if condition
if this space has children,
add a horizontal rule
a list of links to the child spaces,
formatted as an ordered list
end of the if condition
AN EXAMPLE TEMPLATE, continued
^if(^basicLinks^)^
if this space has basic links leading from it,
^basicLinks('<table border="2" cellspacing="0"
cellpadding="3" width="100%">
<caption>
<STRONG>Related pages:</STRONG>
</caption><TR>',
'<TD>', '</TD>', '</TR></TABLE>')^
^endif^
a list of the basic links,
formatted as a table
end of the if condition
</FONT>
<FONT SIZE="-2">
<HR height=3 width=75% align=center>
<CITE>This page was last modified on ^lastModified^, by
^creator^, and was exported to HTML on ^today^ using
version ^version^ of Storyspace for Windows. </CITE>
</FONT>
</BODY>
</HTML>
a horizontal rule
some export and
credit information
Chapter 27
PREFERENCES
Preferences control how Storyspace behaves on your
computer. The preferences you choose apply to all Storyspace
documents that you open on that computer; and they do not
affect the behavior of hypertexts that you create but then
transfer to another computer.
Your Storyspace preferences are stored in a file named
SSP.INI, in the same directory as the Storyspace application
(SSP.EXE). To move your preferences to another computer
that has Storyspace, replace the SSP.INI file on the new
machine with the SSP.INI file from your machine. (Note that
this will eliminate any preferences that had been set on the
second machine.)
To set preferences,
choose Preferences… from the Edit menu
the Preferences dialog
change any preferences as desired
when you are done editing preferences, press OK to
dismiss the Preferences dialog
Author name
Storyspace keeps track of who created each writing space.
Enter a name (or initials) in this field, and all writing spaces
created from then on will be tagged with that name. (The
author name can be seven characters or fewer.)
To see who has created a particular writing space, select that
space in a view window, and choose About this writing
space… from the Help menu. The Creator field shows who
created that space. (You can change the creator of that one
writing space by typing a different name into that field.)
This can be useful in tracking additions to collaborative work.
Remember window positions
If this option is turned on, each text window will open in the
size and place that it was last opened.
If this option is off, every text window will open in a standard
size, and in a position slightly offset from the frontmost other
text window.
This option is on by default.
Keep windows open
If this option is turned on, many text windows can be open at
one time.
If this option is off, opening a text window will close the text
window that is already open.
If Keep windows open is off and Remember window positions is off, then one text window, of a standard size, will be
used to show the text of any writing space.
This option is on by default.
Show status bar
If this option is turned on, the bottom border of the
Storyspace frame window will show the status bar, containing
useful information.
the Status bar, at the bottom of the Storyspace window
When the cursor is over a writing space in a view window, the
status bar shows the name of the writing space. When the
cursor is over a tool on the toolbar, the status bar shows a
brief description of the tool.
If this option is off, the status bar is not displayed.
This option is on by default.
Open text windows with control strip
If this option is turned on, text windows will open by default
with the control strip visible, with controls for navigating the
document, bookmarking the writing space, and opening view
windows. The text window control strip is described in the
chapter on Text Windows.
This option is turned on by default.
Use Animation
If this option is turned on, Storyspace animates the action of
zooming in or out in a Storyspace map window.
If you are running Storyspace on a slow machine, you may
want to turn this option off.
This option is on by default.
Colors . . .
You can change the color of many aspects of view windows.
To set colors, from the Preferences dialog,
press Colors…
In the Colors dialog,
press the element whose color you want to change
in the Color dialog, choose a new color, then press OK
when you are done editing colors, press OK to dismiss
the Colors dialog
when you are done editing preferences, press OK to
dismiss the Preferences dialog
Chapter 28
DOCUMENT OPTIONS
Document options control aspects of how that Storyspace
document behaves. The options you set apply only to the
Storyspace hypertext you are editing at that time; you can
choose different options for different Storyspace documents.
Document options are stored in files with the SNI extension.
For a Storyspace document named MY_FILE.SSP, the document options settings are stored in a file name MY_FILE.SNI.
This file is stored in the same directory as the SSP file.
If you have never modified any of the document options for a
hypertext, Storyspace will not yet have created an SNI file for
that document.
Note that you must save a new document for the first time
before you can modify any of that document’s options.
To set document options,
choose Document options… from the File menu
the Document Options dialog
change any document options as desired
when you are done editing document options, press OK to
dismiss the Document Options dialog
DOCUMENT OPTIONS AND PREFERENCES
Document options control some aspects of how a Storyspace
document behaves. Preferences (described in the previous
chapter) control some aspects of how all Storyspace documents behave on that computer.
Some aspects of a hypertext can be set by either document
options or preferences, or both. If these settings do not agree,
the document options determine how that hypertext will
behave. The preferences will determine the behavior of all
hypertexts which do not have document options specifying
otherwise.
Title
The title you enter in this field will appear at the top of the
Storyspace window for this document, and at the top of view
windows. This title is not bound by the eight-character limit on
the file name.
Show status bar
If this option is turned on, the bottom border of the
Storyspace frame window will show the status bar, containing
useful information.
the Status bar, at the bottom of the Storyspace window
When the cursor is over a writing space in a view window, the
status bar shows the name of the writing space. When the
cursor is over a tool on the toolbar, the status bar shows a
brief description of the tool.
If this option is off, the status bar is not displayed.
This option is on by default.
Label Font
This is the font in which writing space names are shown in all
view windows, and in which link names are shown in
Storyspace map views.
Transition Effect
A transition effect is a visual effect that is displayed whenever
a link is followed from one text window to another. The transition effects available are:
wipe_left
wipe_right
wipe_top
wipe_bottom
dissolve
slide_left
slide_right
slide_top
slide_bottom
This transition effect applies to all text windows.
The default transition effect is none.
Open text windows with … Path Browser
If this option is turned on, new text windows will open with
the Path Browser visible. (The Path Browser is described in the
chapter on Viewing and Changing Links.)
This option is turned off by default.
Open text windows with … control strip
If this option is turned on, new text windows will open with the
control strip visible, with controls for navigating the document,
You can choose a
transition effect to apply
only to the text window
for one particular writing
space. See the “Special
keywords” heading of
the chapter on
Keywords.
bookmarking the writing space, and opening view windows.
The text window control strip is described in the chapter on
Text Windows.
This option is turned on by default.
Show space title
If this option is turned on, every text window will show the
title of the writing space at the top of the text area. After you
check this option, you can choose the font, size, and alignment for showing the title.
This option is turned off by default.
Standard Text Font
This is the standard font, size, and alignment for text in text
windows.
Compass in control strip
If this option is turned on, the control strip in each text
window will include a compass control. Clicking on the arrows
of this compass will navigate among writing spaces according
to the hierarchical structure of the hypertext.
❚❚ press the up-arrow to open a text window on the space
that contains this space—its parent.
❚❚ press the down-arrow to open a text window on the first
child of this space.
❚❚ press the right-arrow to open a text window on the next
younger sibling of this space.
❚❚ press the left-arrow to open a text window on the next
older sibling of this space.
If there is no space in the chosen direction, pressing that
arrow will do nothing.
This option is turned off by default.
Highlight text links
You can have Storyspace automatically highlight text links
(just as many Web browsers do). If this option is turned on,
linked text will be displayed bold, underlined, a certain color,
or whatever combination of these styles you choose.
The appearance you choose will apply to text that is the
source of one or more links, whatever other styles are applied
to that text.
This option is turned off by default.
Parent? Child?
Sibling? See the entry
on hierarchy in the
Glossary.
Magnify text by
If you enter a value in this field, text in text windows will all be
displayed that many points larger than its actual specifications.
(A point, in this case, is one pixel on your computer screen.)
This can help make all the text more legible on your screen,
and can be useful for reading a hypertext that was created
with Storyspace for Macintosh (since Macintosh documents
tend to use smaller fonts).
HTML Export…
Press the HTML Export… button to open the HTML Export
Options dialog, for setting many aspects of how to translate
your hypertext into HTML. These options are described in the
“HTML export options” section of the chapter Creating for the
World Wide Web.
Colors…
Press the Colors… button to open the Colors dialog, in which
you can change the color of many aspects of view windows.
The chapter on Preferences describes how to change these
colors.
In the Colors dialog, you can press Reset to change all of your
color choices back to the colors chosen in Storyspace preferences.
Pictures and Graphics
Press the Pictures and Graphics… button to open the
Graphic Options dialog.
Wallpaper: the graphics file you specify in this field will be
used as wallpaper in the background of chart windows, outline
windows, and Storyspace map windows. The file should be in
Windows bitmap (BMP) format. You can specify a file name in
the Wallpaper field (such as “PAPER.BMP” ) for a file that is in
the same directory as the Storyspace application. Or, you can
enter a complete pathname (such as
“C:\MEDIA\IMAGES\PAPER.BMP”).
The other controls in the Graphic Options dialog are used for
incorporating images that were transferred from a Storyspace
for Macintosh hypertext. These facilities are described in the
chapter on Working with Storyspace for Macintosh.
Font substitution
The controls in the Font Substitution dialog are used to substitute one font for another in all of the text in the Storyspace
document. This is particularly useful in working with a hypertext that has been transferred from Storyspace for Macintosh,
since the Macintosh fonts used will not be available on your
Windows computer. You can use these controls, however, to
change the fonts in any Storyspace hypertext.
These facilities are described in the chapter on Working with
Storyspace for Macintosh.
ancestor
In Storyspace, a writing space’s ancestors are the writing
space that contains it, and the space that contains that space,
and so on. See hierarchy.
basic link
In Storyspace, a link from one entire writing space to
another entire writing space. As distinct from a text link,
which links from or to a section of text within a writing space;
or a graphic link, which links from or to a portion of an
image within a writing space.
A basic link is usually created in a view window, by selecting
the writing space that is the source of the link, then clicking
the link tool, and then clicking the writing space that is the
destination of the link.
child, children
In Storyspace, a writing space’s children are the writing
spaces it contains. See hierarchy.
conditional link
A link that can only be followed under certain conditions. Or, a
link that leads to different destinations under different conditions.
In Storyspace, conditional links are created primarily by
creating links with guard fields, and also with certain special
keywords.
cover page
In Storyspace, the very first writing space in the document.
The first space listed in an outline window that shows the
whole hypertext; equivalently, the upper-left space in a
Storyspace map that shows the uppermost level of the hypertext.
default link
In Storyspace, the link that will be followed from a writing
space if no text link or graphic link is selected. The topmost
link listed in the links dialog that is not a text link or a graphic
link. Or, the topmost link listed in the links dialog that is not a
text link or a graphic link, and that is not blocked by its guard
field.
The default link is the link that will be followed if the reader
clicks the navigate tool, or—in a text window with the Edit
Ruler hidden—presses Enter, or clicks on unlinked text.
descendant
In Storyspace, a writing space’s descendants are the writing
spaces it contains, together with the spaces they contain, and
so on. See hierarchy.
destination
Where a link goes. A link connects its source to its destination.
In Storyspace, the destination of a basic link is a particular
writing space; the destination of a text link might be a
section of text within a particular writing space.
export
To move information out of a computer program, into a form
that can be used in some other computer program.
Storyspace can export text: it can take the text in one writing
space or in many writing spaces, and put it into a text file that
another computer program could use. Storyspace can also
export a Storyspace hypertext into HTML files: these are files
that can be viewed by Web browsers over the World Wide
Web.
graphic link
In Storyspace, a link that starts from an image or a section
of an image within a writing space, or goes to an image or a
section of an image within a writing space (or both). As
distinct from a basic link, which links one entire writing space
to another entire writing space.
graphics
See image.
guard field
In Storyspace, a link can have a guard field. The guard field
puts conditions on when that link can be followed.
hierarchy
Any structure of divisions and subdivisions. An organization in
which the vice presidents report to the CEO, and the department heads report to the vice presidents, is one example of a
hierarchy. A book which is divided into chapters, with each
chapter divided into sections, is another example of a hierarchy.
In Storyspace, one writing space can contain other writing
spaces—just like a chapter containing sections—creating a
hierarchy.
On this and the next page are four views of the same hierarchical structure:
Storyspace: chart view
Storyspace: outline view
Car Manufacturers
Storyspace: treemap view
Domestic
Ford
GM
Foreign
Chrysler
European
Korean
Renault Volvo Hyundai
Kia
organizational chart
Japanese
Honda Mazda Nissan Toyota
Several terms are used to describe relationships within a
hierarchy:
parent: the item one level up. Domestic is the parent of Ford.
Foreign and Domestic both have the same parent—Car
Manufacturers.
siblings: items that have the same parent. Domestic and
Foreign are siblings. Kia is the younger sibling of Hyundai.
child: an item one level down. In Storyspace, when a writing
space contains other writing spaces, those spaces are its
children. Domestic has three children: Ford, GM, and
Chrysler. Volvo has no children.
descendant: a child, or a child of a child, and so on. Foreign
has many descendants, including European, Japanese, Kia,
and Nissan.
ancestor: a parent, or a parent of a parent, and so on.
European’s ancestors are Foreign and Car Manufacturers.
root: the item that has no parent. Car Manufacturers is the
root of this hierarchy.
HTML
Acronym for HyperText Markup Language. World Wide Web
pages are written in HTML; a Web browser interprets the
HTML to display the pages on a computer screen.
hypermedia
Hypertext that makes extensive use of media other than the
written word. Drawings, photography, film, sound, music, the
spoken word, and computer interactivity (games, for instance)
may all be part of hypermedia. These media may be used in
addition to, or to the exclusion of the written word.
Many sites on the World Wide Web are examples of hypermedia, as are most popular encyclopedias on CD-ROM, and
many computer games, (such as the famous Myst).
hypertext
Interlinked writing, usually read on a computer. Any document
in which, from one sentence, paragraph, or page, there is no
single “next” sentence paragraph or page: from one element,
the reader can go to any of several relevant elements for
further reading. Or, any document which provides such choices
in addition to its linear structure.
Hypertext exists on paper—choose-your-own-adventure
stories, and a highly cross-referenced encyclopedia are two
examples. Computer technology, and reading on the computer
screen, make hypertext much easier to read and write, and
much more common, than ever before.
Storyspace is one way of creating and distributing hypertext.
Many World Wide Web sites are hypertextual.
image
Pictorial information—a picture, a drawing, a photograph, and
so on. In this manual, the the only images of interest are
those that are available in computer-usable form (as distinct
from a solid, physical, oil painting). A writing space can
contain such images, as well as text.
import
To bring information into a computer program, or into a document on the computer. Storyspace can import text: it can take
a file of text that was created with a word processing program,
and put that text into a writing space or many writing spaces.
keyword
In Storyspace, a word or phrase that is used to tag writing
spaces. Keywords can help identify types of writing spaces,
and can help with finding writing spaces.
lexia
Academic and technical term for the basic unit of hypertext:
a relatively self-contained and focused unit of text and
images. Also called a hypertext node or page. In Storyspace,
each writing space is a lexia. On the World Wide Web, many
Web pages are lexia (although many other Web pages are so
long that they stretch the concepts of “self-contained” and
“focused”). Lexia are linked to create hypertexts.
The plural is lexia or (barbarously but accepted) lexias.
link
The idea of a connection between one portion of a text and
another, or the realization of that idea via technology. The link
is what makes hypertext “hyper”, distinguishing it from traditional text.
A link has a source (where it comes from) and a destination
(where it goes to). In Storyspace, a link may also have a
name and a guard field. Storyspace has basic links, text
links, and graphic links.
links dialog
In Storyspace, a dialog that lists all of the links leading from
the selected writing space. The list allows you to see which
links are text links or graphic links, and which links have
guard fields. The order in which they are listed allows you to
see which is the default link.
parent
In Storyspace, the parent of a writing space is the writing
space that contains it. See hierarchy.
path
A route through part of a hypertext, from one writing space to
the next. Paths are one useful tool for organizing material in a
large and complex hypertext.
In Storyspace, a path consists of all the links with the same
name. By creating a series of links with the same name, a
Storyspace author can create a path for a reader to follow.
Reader
Capitalized, short for a Storyspace Reader: a piece of software
that allows anyone with a personal computer to read a
Storyspace hypertext, using the Storyspace interface, but
without the controls for modifying the hypertext.
Not capitalized—someone who reads.
root
In a hierarchy, the item that is the ancestor of all other
items. The root has no parent. Every other item in the hierarchy is a descendant of the root.
sibling
In Storyspace, the siblings of a writing space are the writing
spaces that are contained within that writing space’s parent.
See hierarchy.
source
Where a link starts. A link connects its source to its destination. In Storyspace, the source of a basic link is a particular
writing space; the source of a text link might be a section of
text within a particular writing space.
text link
In Storyspace, a link that starts from a section of text within
a writing space, or goes to a section of text within a writing
space (or both). As distinct from a basic link, which links one
entire writing space to another entire writing space. The term
“text link” is sometimes used to mean “text link or graphic
link”, since those types of links behave similarly.
text space
A writing space. Particularly, a writing space conceived of as
a container for text and images. (As distinct from a writing
space conceived of as a container for other writing spaces.)
text window
In Storyspace, a window that shows the text and images of
one writing space. You can have many different text
windows open at one time, each showing the contents of a
different writing space.
As distinct from a view window.
view window
In Storyspace, a window that shows a graphic representation
of all or part of the hypertext.
Storyspace has four types of views—charts, outlines,
treemaps, and Storyspace maps—and all of them represent a
writing space as some sort of rectangle in the view. You can
have many different view windows open at one time.
As distinct from a text window.
web
Sometimes (especially capitalized) short for the World Wide
Web.
Otherwise, any hypertext. Particularly a hypertext that is
complexly or densely linked (so that a map of its links might
look like a spider’s web), or a hypertext that is intended for
collaborative work, to be altered and extended by many of its
readers.
Web browser
A piece of software that fetches Web pages over the World
Wide Web, and displays them on a personal computer or a
computer terminal. At this writing, two common Web browsers
for personal computers are Netscape Navigator and Microsoft
Internet Explorer.
writing space
The basic unit of a Storyspace hypertext. A writing space
may contain text and images. A writing space may also
contain other writing spaces—these are its children in the
hierarchy. The rectangular objects that Storyspace displays
in view windows represent writing spaces.
See also lexia.
Colophon
Body and headings are set in Verdana, with occasional use of
Midnight Bold. Designed, written, illustrated, and produced on
Macintosh computers using BBEdit Lite, Adobe Photoshop,
Macromedia Freehand, and Quark XPress 3.3. Converted to
PDF with Adobe Acrobat 4.0.
Thanks
Thanks to Team Storyspace — Jay David Bolter, Michael Joyce,
John B. Smith, and Mark Bernstein — for creating Storyspace
software. Thanks to Eastgate’s long-time friends and the many
users of Storyspace, who keep after us to improve the software and the documentation.
Help improve the manual
This is the first time that Storyspace has had a separate User’s
Manual. Please help fix it! Send your corrections, comments,
and suggestions, to me at [email protected] so
the next edition can be better.
Thanks —E.A. Cohen
This manual is created with recyclable electrons. If you are certain you no longer
need it, just delete the file from your hard drive. That space can now be re-used!
To contact us:
Eastgate Systems, Inc.
134 Main Street
Watertown, MA 02472 USA
phone: 800-562-1638
+1 617-924-9044
fax: +1 617-924-9051
e-mail: [email protected]
Web: www.eastgate.com