1
User's Manual
AAEL
n-rufliTAFl
.:.:.::._
li
it
rtarat!:...- d,::,:::ll,
.,.l#:M
,--*''ffi-
'qs$''-;q&
t
b&\ ,*ffi
wffi}
&ffi--:. '-.--
m
ffi
i-!.
jlrc
jrc
T].]F
lry*1t\tv
i.
'11
Si'
\
1-J!
aa]:'
ffi
@
lfilrouT:-l
fHqwTo U-st:l
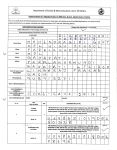
Camera
i}
'
ini{{lii ^
ffit;
a---
o Digital
{o
--@
@)
;i,11,,,-.o
o Built-in 5v rechargeable Li-battery
o Battery charging time: 2.5 hours
o Battery powercan be used for4.5 hours afterfull charging
.,..,@:' -o
,
1+.,
..
----O
!i)
Receiver
. Camera
O ON/0FF power button
rower button
@ 2.4" LCD display
O Power indicator light, the red led light on when
ight for night vision
charging. The led light offwhen battery power is full
i0r
light. lt's bright
when charging is ful.
i0ht, it will flash when can't find the
@ Power indicator
lormal is green
OWorking indicator. ltlightsonwhenworking
icator light. The red led light on
@ Brightness adjustment button (brightness level lower)
rging. The led light off when battery
@ Brightness adjustment button (brightness level highe0
ull
@ TALK
ldicator light. lt is green light when
r
o 8 LEDs for night vision (Effective Range: 5M)
o Built-in microphone for audio monitoring
.:'
,ili
RF modulation with frequency (Automatically switch RF channels)
button. Keep pressrng the 6utton. you can
talk to baby (the camera side)
rYou can connect the adapte(DC 5V) to camera and monitor for using, also
can use built-in battery after charging withoutAC adapter. When use the
device with adaptor, it can recharge battery at the same time.
Please press ON/OFF button (button 1 ) for 3 seconds on bolh camera and monitor to start
power for using. Please put camera away from the monitor with at least 5 meters distance,
otherwise electric current will cause some noice.
Press bulton 11 on lhe monitor, you can have some setting as below:
1. ZOOM
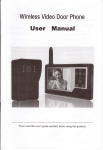
Receiver
shift image up and down. Press butto-n 1'l twice again, the image will be zoom back.
o Dynamic select clean channel to avoid interference from other 2.4GHz
2. LCD AUTO OFF: Scroll button 1 1 down to "LCD AUTO OFF", press button 1 1 again to
enterintosubmenu. SelectlMin,2Min,3MinorDisableforLCDautoofftime. Press
buttonllagaintoconfirm. PressbuttonTtoexit. Thisfunctionisactivewhensetting
"VOXOFF"(perfollowingitem#4). Themonilorscreenwill beautooffwhenreachingyour
devices
o 2.4:TFT LCDwith 480'240 resolutions;15fps
o Built-in 5V rechargeable Li-battery
o Battery charging time: 2.5 hours
settingtime. lfyouwanttostartthemonitoragain,pressanybultontoawakethemonitor
screen, which will be auto off again when reaching your setting time.
Battery power can be used for 4.5 hours after full charging
o Two lntercom Way; free of interference
o Testing room temperature function
o 100 meters transmission range in open space
3. EFFECT SET: Press button 1 1 to enter into submenu as below:
(1) Vertical: press button 6 or 7 to flip image up-side'down, press it again to flip back.
(2) Horizontal: Press button 6 or 7 to mirror the image, press it again to mirror image back.
(3)Brightness:Adjustthebrightnessofthescreen.
@ l\4ircophone and loudspeaker
supply input connector: DC5V
re and loudspeaker
@ Power
ut connector: DC5V
@ Menu button: Press it to enter menu, scroll up and
11
Transmission Frequency: ISM 2,400-2,483 [4Hz
LCD Screen Type
lmaging Sensor Type: 1/4' CMoS
Etfective Pixels: 480x240
4.vOX SETTING: lf choose "VOX 0N", the monitor screen will be auto off if there's no any
Horizontal Resolution: 380TV Lines
Receiving Sensitivitys -85dBm
soundormovementfromthecamera.0nthecontrary,themonitorscreenwillbeautoon
Picture Total Pixels: 640x480 Pixels;
Balterv Workinq Time:4.5 hours
when there's any sound or movement from camera side.
Anqler62 Deoree
Consumplion Current: 200m4(Max.
lf choose "VOX OFF", the monitor screen will be controlled by your "LCD AUTO OFF' setting.
BandWidth 3[4Hz
DC:5V
(Please refer to above item #2 "LCD AUTO OfF').
to shift image up & down
TO OFF: Screensaver settinq lor
'1
:
Min, 2 Min,
rble
i
fSET:Hereyoucansetimageflip(Vertical),, :
ontal), brightness, saturation & camera
re)
volume
:
,
TTING: Here you can set VoX on/off and VOX sense (High/Low)
rction to detect the sound then to control the LCD on or off automatically
'Y
PressbuttonOtoreduce,pressbuttonTtoincrease.
(5) BabyVolume: Can adjustthevolume of receiving sound from camera side. Press button
button bgain to confirm, fiially press button 7 to exit
lor enlarging the image, press button 6 & 7 to
ight & left, scroll button
(4)Saturation:Adjustcolorsaturation.
Fl6.alvet
Camera
Setting it by pressing button 6 & 7, then press menu
@ Plastic cradle
N:
Pressbutton6toreducethebrightness,
press button 7 to increasethe brightness. Press button 11 to confirm.
asff-ctF-tcr-f-ON-)
down to choose, press it again to enter into submenu,
rdle
lN: When the stripe cursor on "ZOO[/ lN", press button 11, the image will be
enlarged. Nowyoucanpressbuttori6&Ttoshiftimagefight&left,andscrollbuttonllto
CHOOSE: Can set temperature mark to be shown on screen or n0i
:2.4 inches TFT-LCD
Niqht Vision Ranqe 3m
Dlmensions(WiDxH):80-47.7-1
Battery Working Time 4.5 hours (lR OFF)
Weioht:1 300
6
38mm
VOXSENSE:istosetthesensitivityofthesoundreaction.
5, DISPLAY CHOOSE: Press button 6 or 7 to let the temperature mark be shown on lhe screen
Unobskucled Etfective Ranqe: 100m (Min.)
ornot.
Power: DC 5V
Weioht: 110
o
Pressbutton6orTtochooseHigh
or Low.
Sound Control Sensilivity >63dB
Dimensions(Wx Dt H):75.44.2"1 1 5mm
to reduce, press button 7 to increase volume.
.
f:?:
(.
Press button 11 to confirm.
lr!:t.lI.:lltiLq:
.1:l:.'.q191:9.P19::. f vllgL 1.t: :Li1:
.
.
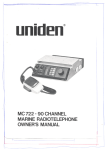
n=el-!:Ta[?Er.1l
2.monitorxl
l.cameraxl
4.AdaDterformonitorxl
4
3.AdapterforCameraxl
s.User'sManual x1
@
1. Keep all parts and accessories out of young children's reach.
2. Fingerprints or dirt on the lens surface can adversely affect camera
performance. Avoid touching the lens with your fingers.
3. Should the lens become dirly, use a blower to blow off dart and dust, or use a
soft dry cloth to wipe off the lens.
4. Keep the camera dry. Precipitation, humidity and other liquid contain
minerals will corrode eletronic circuit.
5. Do not use or store in dusty or dirty areas.
6. Do not store in hot areas. High temperature can shorten the life of electronic
devices and warp or melt certain plastic.
7. Do not store in very cold areas. When the system warms up, the moisture
can form inside the case, which may damage electronic circuit board.
8. Do notattemptto open the case. Non-expert handing of the device may
demage the system.
9. Avoid dropping or strong shocks to the devices.
1 0. Operate the product using only the power supply included or provided as an
accessory.
I 1. Do not overload electrical outlets or extension cords. This can resu lt in fire or
electric shocks.
12. Do remember that you are using puulic air\ryavcs when you use the system
and that sound and video may be broadbasted to other 2.4GHz receiving devices
Conversations even from the room nearlhe camera may be broadcasted. To
protect the privacy of your home, always turn the camera off when not i n use