1
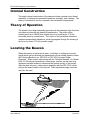
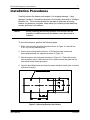
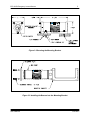
ELP-362D Emergency Locator Beacon User’s Manual Revision L, June 2011 P/N 001815 Teledyne Benthos, Inc. 49 Edgerton Drive North Falmouth, MA 02556 www.benthos.com Tel: 508-563-1000 Fax: 508-563-6444 e-mail: [email protected] ELP-362D Emergency Locator Beacon i Preface This manual describes the installation and operation of the ELP-362D: P/N 001722 (30 day), 008400 (90 day) Emergency Locator Beacon, a water– activated acoustic beacon designed for use on aircraft flight recorders. This manual is divided into the following six sections: 1 2 3 4 5 6 Description Specifications Installation and Checkout Beacon Maintenance Return Procedures Warranty Proprietary Information The information, description, and illustrations in this manual are the property of Teledyne Benthos, Inc. Materials may not be reproduced or disseminated without the prior written consent of Teledyne Benthos, Inc. Changes Teledyne Benthos, Inc. reserves the right to make changes to meet new specifications at any time without incurring any obligation to modify previously installed units. This manual is provided for informational and reference purposes only and is subject to change without notice. Notes and Warnings Where applicable, special notes and warnings are presented as follows: NOTE: A reminder to check that certain criteria are met before proceeding further in a step or sequence. WARNING: A reminder that dangerous consequences could result if certain recommended procedures are not followed User’s Manual June 2011 ELP-362D Emergency Locator Beacon ii Table of Contents 1 Description ....................................................................................................................... 1 External Construction............................................................................................. 2 Internal Construction.............................................................................................. 3 Theory of Operation ................................................................................................. 3 Locating the Beacon ............................................................................................... 3 2 Specifications ................................................................................................................. 4 General Specifications........................................................................................... 4 TSO Testing Qualification Summary............................................................... 5 3 Installation and Checkout ........................................................................................ 6 Installation Considerations ................................................................................. 6 Installation Procedures ......................................................................................... 7 Pre-Deployment Tests ............................................................................................ 9 ATS-260 Acoustic Test Set ............................................................................................ 9 ATS-260 Acoustic Test Set Service ............................................................................. 10 Alternative Battery Check ........................................................................................... 11 4 Beacon Maintenance................................................................................................. 12 Beacon Cleaning...................................................................................................... 12 Periodic Beacon Test............................................................................................ 12 Beacon Maintenance Precautions ................................................................. 12 Battery Maintenance............................................................................................. 13 Tooling Requirements ................................................................................................. 13 Torque Requirements .................................................................................................. 14 Parts List..................................................................................................................... 14 Beacon Disposal ...................................................................................................... 14 Beacon Storage........................................................................................................ 14 5 Return Procedures...................................................................................................... 16 6 Warranty........................................................................................................................... 18 User’s Manual June 2011 ELP-362D Emergency Locator Beacon iii List of Figures Figure 1-1 ELP-362D and Mounting Bracket ............................................................................. 1 Figure 1-2 ELP-362D Installed in Mounting Bracket ................................................................. 2 Figure 1-3 ELP-362D Dimensions................................................................................................ 2 Figure 1-4 Locating the Aircraft After Water Activation............................................................. 3 Figure 3-1 Mounting Bracket Hole Pattern ................................................................................. 7 Figure 3-2 Securing the Mounting Bracket.................................................................................. 8 Figure 3-3 Installing the Beacon into the Mounting Bracket ..................................................... 8 Figure 3-4 Connecting the ATS-260 Acoustic Test Set.............................................................. 10 Figure 4-1 Standard Battery Kit Replacement Instructions....................................................... 15 Figure 4-2 Optional Battery Kit Replacement Instructions ....................................................... 16 User’s Manual June 2011 ELP-362D Emergency Locator Beacon 1 1 Description The ELP-362D Emergency Locator Beacon is a durable, water-activated, underwater location aid. The beacon transmits an acoustic signal at 37.5 kHz once every second for 30 days after activation with the standard lithium battery, or 90 days with an optional lithium battery. Teledyne Benthos, Inc. also offers both a standard mounting bracket kit (P/N B362-05591) and a customer specific mounting bracket kit (P/N B362-08320). Either kit allows the beacon to be securely mounted (Please contact Teledyne Benthos, Inc. if the standard mounting bracket does not meet your needs). The beacon and its standard mounting bracket are shown in Figure1-1. The beacon is also shown installed in its standard mounting bracket in Figure 1-2, and a dimensional outline of the beacon is shown in Figure 1-3. This section provides a general descriptive overview of the beacon, its theory of operation, and use. Figure 1-1 ELP-362D and Mounting Bracket User’s Manual June 2011 ELP-362D Emergency Locator Beacon 2 Figure 1-2 ELP-362D Installed in Mounting Bracket External Construction The beacon is contained in a water-tight aluminum case capable of withstanding high-impact shock and deep-water immersion. As shown in Figure 1-2, one of the end caps has a water-activated built in switch that causes the beacon to begin transmitting when the switch comes in contact with water. 49 Edgerton Drive North Falmouth, MA 02556 U.S.A. P: 508.563.1000 F: 508.563.6444 Figure 1-3 ELP-362D Dimensions User’s Manual June 2011 ELP-362D Emergency Locator Beacon 3 Internal Construction The major internal components of the beacon include a printed circuit board assembly, a urethane-encapsulated transducer assembly, and a battery. The battery is contained in its own, separate, user accessible compartment. Theory of Operation The printed circuit board assembly generates all the necessary logic functions to produce a pulse with the desired characteristics. The pulse is then transformed from a CMOS level square wave to a much larger 37.5 kHz sinusoidal pulse by a transformer. The output of the transformer drives the urethane-encapsulated transducer, which propagates through the housing in the form of a tuned 37.5 kHz acoustic signal. Locating the Beacon When the beacon is immersed in water, it will begin to radiate an acoustic signal which can be received and transformed into an audible signal by either the Teledyne Benthos, Inc. APR-272 or DPL-275A Acoustic Pinger Receivers. When used in conjunction with the Teledyne Benthos, Inc. Model DHA-151 Directional Hydrophone, either pinger receiver can be used as a shipboard portable receiver to determine the general vicinity of the aircraft. After the area is known, a diver can be deployed with the DPL-275A, which will give the exact location of the aircraft. Other equivalent pinger receivers may also be used. Figure 1-4 Locating the Aircraft After Water Activation User’s Manual June 2011 ELP-362D Emergency Locator Beacon 4 2 Specifications This section provides information on the operating and environmental specifications on the ELP-362D Emergency Locator Beacon. General Specifications Operating Frequency: 37.5 kHz, + 1 kHz Operating Depth: 0 to 20,000 feet (6,096 meters) Pulse Length: ≥ 9 ms Pulse Repetition Rate: ≥ 0.9 pulses per second Battery: Lithium P/N C362-04270-2, standard (Lithium content = 0.7grams) Lithium P/N C362-04270-1, optional (Lithium content = 1.8 grams) Operating Life: ≥ 30 days with standard lithium battery ≥ 90 days with optional lithium battery Battery Storage Life in Beacon: 7 years Acoustic Output: ≥ 160.5 dB re 1 µPa @ 1 meter Acoustic Output After 30 Days: (with standard lithium battery) ≥ 157.0 dB re 1 µPa @ 1 meter Acoustic Output After 90 Days: (with optional lithium battery) ≥ 157.0 dB re 1 µPa @ 1 meter Activation: Fresh or salt water immersion Beam Pattern: 80% sphere Case Size: 1.30 in. (3.30 cm) diameter 3.92 in (9.95 cm) long Case Material: 7075 T6 aluminum Weight: 6.7 ounces (190 grams) maximum Storage Temperature: -55ºC (-67ºF) to 71ºC (160ºF) Operating Temperature: -2ºC (28ºF) to 38ºC (100ºF) User’s Manual June 2011 ELP-362D Emergency Locator Beacon 5 TSO Testing Qualification Summary The beacon is designed to meet the performance specifications of RTCA D-160, as required by TSO-C121. A summary of the testing qualifications is presented in the table below. ELP-362D TSO Testing Qualification Summary RTCA D-160 Section No. Description of Test Conducted Altitude 4.6.1 Equipment tested to Category D (50,000 ft.) Decompression 4.6.2 Overpressure 4.6.3 Testing Conditions Vibration 8.0 Sand and Dust 12.0 Equipment tested to Category D Fungus 13.0 Equipment tested to Category F Salt Spray 14.0 Equipment tested to Category S Magnetic Effect 15.0 Equipment tested to Category Z 19.0 N/A — Performance, environmental and Crash Survivability Testing performed as required by AS 8045. Induced Signal Susceptibility Other Tests User’s Manual Equipment tested to RTCA DO-160D Figure 8-2 Curve J (Fixed Wing) and Figure 8-4 Curve Y (Rotary Wing) June 2011 ELP-362D Emergency Locator Beacon 6 3 Installation and Checkout This section encompasses the installation considerations and procedures for mounting the beacon using the mounting bracket kit, and a pre-deployment test that can be conducted using a Teledyne Benthos, Inc. ATS-260 Acoustic Test set. NOTE: The conditions and tests required for the TSO approval of this article are minimum performance standards. It is the responsibility of those installing this article either on or within a type or class of aircraft to determine that the aircraft installation conditions are within the TSO standards. TSO articles must have separate approval for installation in an aircraft. The article may be installed only if performed under 14 CFR part 43 or the applicable airworthiness requirements. Installation Considerations To minimize the probability of physical damage or inadvertent activation, the following precautions should be considered when mounting the beacon: The beacon should normally be mounted in the aft mid-section of the aircraft depending on the environmental conditions and should be mounted to a sturdy structure without weakening the structure itself. The beacon should be mounted in an area guarded against heavy equipment tearing loose and striking the beacon and should be mounted in a way that provides convenient access during regular inspections and tests. The beacon should be mounted in a clean, dry area to decrease the probability of inadvertent activation. Also, if possible, the beacon should be mounted with the water switch facing down to minimize the possibility of moisture gathering on the end cap. The beacon should be mounted in an area that is protected from the outside elements. This will assist in the long-term prevention of corrosion. The beacon should be mounted in an area where sound absorbent materials are not present. Avoid affixing labels to the beacon or any other material that would affect the acoustic beam. The shelf life of the battery will be decreased when exposure to higher than normal temperatures. The maximum temperature where the beacon is mounted should not exceed 71ºC (160º F). Nonconformance to the mounting instructions or intended use may void the warranty. User’s Manual June 2011 ELP-362D Emergency Locator Beacon 7 Installation Procedures Carefully unpack the beacon and inspect it for shipping damage. If any damage is evident, it should be reported to the freight carrier and to Teledyne Benthos, Inc. The mounting bracket kit includes an aluminum mounting bracket, an aluminum end plate, three drilled (for lockwire) socket head cap screws, and three lock washers. NOTE: Before installing the mounting bracket, be sure that it will be possible to install and remove the beacon once the bracket is installed. To mount the beacon, perform the following steps: 1. Refer to the mounting bracket hole pattern shown in Figure 3-1 and drill four 0.191 in (0.48 cm) diameter holes. 2. Secure the mounting bracket with four 10-32 stainless steel screws and associated hardware (not supplied) as shown in Figure 3-2. 3. Slide the beacon into the bracket as shown in Figure 3-3. Rotate the beacon until the battery date is visible and secure it in place with the end plate and the three drilled socket head cap screws. 4. Lockwire the drilled screws and clean the water activation switch (refer to section 4 Beacon Cleaning). Figure 3-1 Mounting Bracket Hole Pattern User’s Manual June 2011 ELP-362D Emergency Locator Beacon 8 49 Edgerton Drive North Falmouth, MA 02556 U.S.A. P: 508.563.1000 F: 508.563.6444 Figure 3-2 Securing the Mounting Bracket 49 Edgerton Drive North Falmouth, MA 02556 U.S.A. P: 508.563.1000 F: 508.563.6444 Figure 3-3 Installing the Beacon into the Mounting Bracket User’s Manual June 2011 ELP-362D Emergency Locator Beacon 9 Pre-Deployment Tests A pre-deployment test on each beacon should be performed before and after mounting using the Teledyne Benthos, Inc. ATS-260 Acoustic Test Set. The test set can be used to check both the beacon’s battery condition and operation. Also, an alternative method using a digital voltmeter can be used to check the beacon’s battery condition. ATS-260 Acoustic Test Set To use the ATS-260 Acoustic Test Set to verify the battery condition and test the operations of the beacon, use the following procedure: 1. Attach the cable clip directly to the beacon housing as shown in Figure 3-4. It is not necessary to remove the beacon from the mount to conduct the test. Although the cable clip can touch the beacon label, it is important that at least part of the clip touch the bare aluminum surface of the beacon. 2. Apply the test set probe to the water activation switch as shown in Figure 3-4. 3. Hold down the button labeled PUSH TO TEST on the test set handle. 4. Check the beacon battery condition by observing the green and red indicators on the test set. If the green indicator is lit, the battery is good. If the red indicator is lit, the battery should be replaced. (See Section 3 Alternate Battery Check) 5. Check the beacon operating condition by listening for an audible tone from the test set and /or observing the amber indicator. If there is an audible tone and /or the amber indicator is flashing, the beacon is operating properly. If there is no audible tone and the amber indicator is not flashing, the beacon is not operating properly. NOTE: User’s Manual If the beacon does not operate properly, return it Teledyne Benthos, Inc. for service. (See Section 5 Return Procedures for instructions on how to return the beacon.) June 2011 ELP-362D Emergency Locator Beacon 10 Figure 3-4 Connecting the ATS-260 Acoustic Test Set ATS-260 Acoustic Test Set Service The ATS-260 Acoustic Test Set is factory calibrated at the date of manufacture. Under normal operating conditions the tester does not require re-calibration; however, should service be required, contact Teledyne Benthos, Inc. (See Section 5 Return Procedures for instructions on how to return the test set.) User’s Manual June 2011 ELP-362D Emergency Locator Beacon 11 Alternative Battery Check In addition to using the test set to check the beacon’s battery condition, a highimpedance (minimum input impedance of 10 Megohms) digital voltmeter can be used to measure the battery voltage. Use the following procedure to measure the battery voltage: 1. Place the negative meter lead on the water activation switch. 2. Place the positive meter lead on the bare aluminum surface of the beacon housing. Do not place the meter lead on the label. 3. Read the voltmeter. If the voltmeter reading is 6.0 volts or more, the beacon has sufficient operating power. If the voltmeter reading is less that 6.0 volts, DO NOT remove the battery access end cap. (See Section 5 Return Procedures for instructions on how to return the beacon.) WARNING: User’s Manual Failure to observe these precautions could result in the release of hazardous chemicals. June 2011 ELP-362D Emergency Locator Beacon 12 4 Beacon Maintenance This section covers the cleaning, recommended testing interval, disposal, storage procedures, and battery replacement for the ELP-362D Emergency Locator Beacon: P/N 001722 or 008400. Beacon Cleaning The end cap with the water switch should remain free and clear of dirt, grease, and dust. The end cap should be cleaned with a mild detergent and dried thoroughly with a clean cloth. This process should be repeated periodically depending on the local environment. Periodic Beacon Test When the beacon is installed on a flight data or voice recorder, the recommended maintenance interval is the same as that of the recorder, or 24 months, whichever is shortest. Follow the Pre-Deployment Tests referenced in Section 3 of this User’s Manual. Beacon Maintenance Precautions The following precautions should be exercised when handling or storing the beacon: The beacon should not be exposed to temperatures in excess of 71ºC (160ºF), as the battery life can be reduced by storage in a high temperature environment. Any situation that could possibly crush or penetrate the case of the beacon should be avoided. User’s Manual June 2011 ELP-362D Emergency Locator Beacon 13 Battery Maintenance Replace the battery by the date stamped on the beacon label, where the three letters represent the month, and the four numbers represent the year. Example: MAR2001 is March of 2001 Other date codes prior to this manual revision include the following: 1. Three letters represent the month and two numbers represent the year: Example: MAR 01 is March of 2001 2. Two numbers to the left of a “/” represent the month and two numbers to the right of the “/” represent the year Example: 03/01 is March of 2001 WARNING: Hazardous chemicals are used in the beacon battery. Dispose of the battery in accordance with local regulations. Use the battery replacement procedure provided with the lithium battery replacement kit P/N B362-06192-2 (standard lithium battery) or P/N B362-06192-1 (optional lithium battery). A copy of the standard lithium battery replacement instructions is found in Figure 4-1. A copy of the optional lithium battery replacement instructions is found in Figure 4-2. Battery replacement should be performed by authorized personnel only. Tooling Requirements Item Manufacturer Part Number Torque Wrench Commercially Available --------- 1/2” Socket Commercially Available --------- Torque Adapter Teledyne Benthos, Inc. ATS-260 Test Set Teledyne Benthos, Inc. User’s Manual 008407 (B362-09111) 006108 June 2011 ELP-362D Emergency Locator Beacon 14 Torque Requirements Location Torque Bottom End Cap 25 to 30 inch-pounds Parts List 30 DayStandard Part Number Quantity 90 DayOptional Part Number Quantity ELP-362D 001722 1 008400 1 Serial Number Label 004119 1 B-362-20 1 B362-06192-2 1 B362-06192-1 1 (C362-04270-2) (0.7g Li) 1 (C362-04270-1) (1.8g Li) 1 O-Ring 000634 1 000634 1 Lubricant Packet 009663 1 009663 1 Instructions 008839 1 008840 1 Item Battery Replacement Kit Battery Pack 007923 001533 Beacon Disposal If it is necessary to dispose of the beacon, perform the Alternative Battery Check referenced in Section 3 of this User’s Manual first. If the battery voltage is 6.0 volts or more, remove the battery and dispose of the battery and beacon in accordance with local regulations. If the battery voltage is less than 6.0 volts, DO NOT remove the battery access end cap and dispose of the beacon in accordance with local regulations. WARNING: Failure to observe these precautions could result in the release of hazardous chemicals. Beacon Storage When long-term storage is required, the beacon should be stored in a cool, dry environment in its original shipping container. User’s Manual June 2011 ELP-362D Emergency Locator Beacon 15 Figure 4-1 Standard Battery Kit Replacement Instructions User’s Manual June 2011 ELP-362D Emergency Locator Beacon 16 Figure 4-2 Optional Battery Kit Replacement Instructions User’s Manual June 2011 ELP-362D Emergency Locator Beacon 17 5Return Procedures If you need to return an ELP-362D Emergency Locator Beacon for warranty service, contact Teledyne Benthos, Inc. for a Return Material Authorization (RMA) number and shipping instructions. Teledyne Benthos, Inc. Tel: 508-563-1000 Fax: 508-563-6444 e-mail: [email protected] You will need to provide the following information to receive a Return Material Authorization (RMA): Reason for return Number of beacons to be returned Serial number of each unit Shipping method, if applicable NOTE: User’s Manual Do not ship a beacon without a Return Material Authorization. June 2011 ELP-362D Emergency Locator Beacon 18 6 Warranty LIMITED WARRANTY. Teledyne Benthos, Inc. warrants that the products sold hereunder shall be free from defects in materials and workmanship under normal use and service when correctly installed, used and maintained for a period of 72 months from date of shipment from Teledyne Benthos, Inc. Purchaser’s receipt of any product delivered hereunder shall be an unqualified acceptance of and a waiver by Purchaser of the right of Purchaser to make a claim with respect to such product unless Purchaser gives Teledyne Benthos, Inc. notice of any claim within 72 months after the receipt of such product. This warranty is limited to repair or replacement of the said product at Teledyne Benthos, Inc. plant in North Falmouth, Massachusetts, providing the product was not abused or operated other than in accordance with the Teledyne Benthos, Inc. instruction manuals. Since all Teledyne Benthos, Inc. oceanographic instruments are pressure tested to rated depth prior to shipment, Teledyne Benthos, Inc. does not assume responsibility for any damage due to leakage or implosion. Teledyne Benthos, Inc. reserves the right to modify its warranty at any time, in its sole discretion. THIS LIMITED WARRANTY IS NOT TRANSFERABLE. LIMITATION OF LIABILITY. TELEDYNE BENTHOS, INC. MAKES NO OTHER WARRANTY REGARDING ITS PRODUCTS OR THE PRODUCTS OF OTHERS EITHER EXPRESS OR IMPLIED; AND, ANY IMPLIED WARRANTY OF MERCHANTABILITY OR FITNESS FOR A PARTICULAR PURPOSE WHICH EXCEEDS THE FORGOING WARRANTIES IS HEREBY DISCLAIMED BY TELEDYNE BENTHOS, INC. AND EXCLUDED FROM ANY AGREEMENT MADE BY ACCEPTANCE OF ANY ORDER. TELEDYNE BENTHOS, INC. DOES NOT ACCEPT LIABILITY BEYOND THE REMEDIES SET FORTH HEREIN INCLUDING ANY LIABILITY FOR PRODUCTS NOT BEING AVAILABLE FOR USE OR FOR LOST OR CORRUPTED DATA, LOSS OF BUSINESS, LOSS OF PROFITS, LOSS OF USE OF THE PRODUCT OR ANY ASSOCIATED EQUIPMENT, COST OF CAPITAL, COST OF SUBSTITUTE OR REPLACEMENT PRODUCT, FACILITIES OR SERVICES, DOWN-TIME, CHARGES FOR PURCHASER’S TIME AND EFFORT, THE CLAIMS OF THIRD PARTIES, INJURY TO PROPERTY, OR ANY OTHER DIRECT, INDIRECT, SPECIAL, RELIANCE, INCIDENTAL OR CONSEQUENTIAL DAMAGES, REGARDLESS OF THE NATURE OF THE CLAIM AND WHETHER OR NOT FORESEEABLE AND WHETHER OR NOT BASED ON BREACH OF WARRANTY, CONTRACT OR TORT (INCLUDING NEGLIGENCE) OR STRICT LIABILITY, EVEN IF TELEDYNE BENTHOS, INC. HAS BEEN ADVISED OF THE POSSIBILITY OF SUCH DAMAGES, OR FOR ANY CLAIM BY ANY THIRD PARTY EXCEPT AS EXPRESSLY PROVIDED HEREIN. THIS LIMITATION OF LIABILITY APPLIES BOTH TO PRODUCTS AND SERVICES AND SUPPORT PROVIDED PURCHASER UNDER THIS AGREEMENT. NO ORAL OR WRITTEN INFORMATION OR ADVICE GIVEN BY TELEDYNE BENTHOS, INC., ITS AGENTS OR EMPLOYEES SHALL CREATE A WARRANTY OR IN ANY WAY INCREASE THE SCOPE OF THE LIMITED WARRANTY PROVIDED ABOVE. ANY AND ALL LIABILITY OF TELEDYNE BENTHOS, INC. IS EXPRESSLY LIMITED TO THE PRICE PURCHASER HAS PAID FOR THE PRODUCTS. PURCHASER’S SOLE REMEDY AGAINST TELEDYNE BENTHOS, INC. IN ANY DISPUTE UNDER THIS AGREEMENT SHALL BE TO SEEK RECOVERY OF THE AMOUNTS PURCHASER PAID, PURSUANT TO THE LIMITED WARRANTY PROVIDED ABOVE, UPON THE PAYMENT OF WHICH TELEDYNE BENTHOS, INC., ITS AGENTS AND EMPLOYEES, AND AFFILIATES, WILL BE RELEASED FROM AND DISCHARGED OF ALL FURTHER OBLIGATIONS AND LIABILITY TO PURCHASER. THE LIMITED WARRANTY OF TELEDYNE BENTHOS, INC. GIVES PURCHASER SPECIFIC LEGAL RIGHTS, AND PURCHASER MAY ALSO HAVE OTHER RIGHTS THAT VARY FROM STATE TO STATE. SOME STATES DO NOT ALLOW LIMITATIONS ON HOW LONG AN IMPLIED WARRANTY LASTS OR THE EXCLUSION OR LIMITATION OF INCIDENTAL OR CONSEQUENTIAL DAMAGES, SO THE ABOVE LIMITATIONS OR EXCLUSIONS MAY NOT APPLY TO PURCHASER. User’s Manual June 2011