1
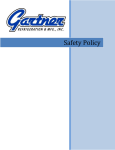
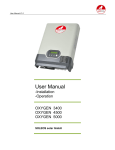
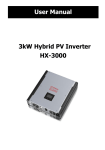
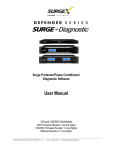
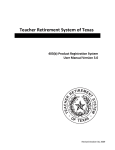
PV SYSTEM OWNER’S MANUAL For advice, repairs and service Phone: 0407760838 Table of Contents 1. Introduction 2. How Your System Works 3. System Performance 4. Factors Affecting Performance 5. Energy conservation 6. Solar Power System Start-up Procedure 7. Solar Power System Shutdown Procedure 8. Operating & Safety instructions 9. Maintenance 10. Warranty 11. Customer Obligations 12. Important reminder 13. System Wiring Diagram 1. Introduction Congratulations on the purchase of your solar electricity system. Not only are you insulating yourself from current and future costs of electricity, you are also saving significant CO2 emissions which helps reduce global warming and climate change. Please take the time to read and understand this solar power system user manual. It contains some useful information regarding the operation of individual components of your solar power system. Please keep this user manual in safe place for future reference. Your system is designed to meet all Australian conditions and codes as well as your satisfaction and enjoyment. Although it is very low maintenance, it must always be remembered that it generates electricity and we strongly recommend that you do not attempt to service it yourself unless you are suitably qualified. Your safety is our primary concern. 2. How Your System Works The following illustration and narrative explains how your solar electricity system works – 1. The solar electric panels, or modules, are usually fitted to the roof. The number of modules will depend on the nominal size of your system and, collectively, they are known as the solar array. The solar array converts sunlight into direct current (DC) electricity. 2. The DC electricity is fed to the inverter which is normally accessible from ground level. The inverter converts the DC electricity to alternating current (AC) electricity which is compatible with the electricity supplied to your house from the grid. Some inverters have a digital readout so you can monitor information like how much solar electricity is produced, etc. Refer to the separate inverter Owner’s Manual for more information. 3. Your solar electricity system is connected to the grid on the “net metering” system. With “net metering”, if electricity is being used in the house during the day, some or all of the solar electricity will be used up immediately. Any excess will be fed through the meter into the electricity grid (called export or “feed-in”). If you generate more electricity than you use, your electricity provider will credit your electricity account. These “feed-in” tariff electricity credits will help to offset your household consumption. 4. The standard meter located in your meter box will need to be replaced with a bidirectional meter which will measure how much solar electricity is exported from your solar system into the electrical grid as well as the electricity you import from the grid. This new meter will be installed by Energex at no charge. 5. Once the bi-directional meter is installed, your electricity retailer will buy your solar generated electricity at the applicable ‘feed in’ tariff. This will be shown as a new line on your electricity bill. Systems approved by Energex prior to July 09, 2012 attracted a minimum “feed-in” tariff of 44c/kWh, (Tariff 9900). After this date, the Queensland Government reduced the rate to 08c/kWh, (Tariff 7500). Your electricity retailer will sometimes offer a higher “feed-in” tariff and this should be checked with them ASAP. During the Night At night your solar power system automatically shuts down with no sunlight (the inverter goes into "overnight shutdown mode") and the house is powered only from the mains electricity grid. This is recorded as electricity import on your electricity meter, which you will be charged for from your electricity provider. Loss of Mains Grid Supply In the event of an electricity grid failure (blackout), the inverter will automatically detect this and will shut the system off (shutdown condition). This is an important safety feature is called “anti-islanding” and complies with the Australian Standard AS-4777. This prevents possible electrical injuries to the maintenance personnel that may be repairing the mains grid electrical network. Future Expansion Your solar power system may be expandable. Additional solar panels and inverters can be added to increase your system's electrical production capacity, as long as space and budget permits, although it is strongly recommended to install the largest system possible to begin with, as this will save you money both on installation and due to your larger system producing more power. Each inverter can work with a maximum number of solar panels depending on its maximum power rating. The amount of expandability allowed for your inverter can be found on our website or by contacting our office. Once the inverter has reached its maximum operating limit (maximum number of solar panels) another inverter unit can then be added to work with the existing one, increasing your system's operating capacity. Please contact Negawatts Electrical about expansion options of your solar power system. 3. System Performance During daylight hours, your system will be generating electricity at varying levels depending on the local environment. The more sunlight falling on the solar array the more electricity is generated; therefore variables like cloud cover, seasonal solar angle variations, shading or soiling of the solar array, will have an effect. Note that you need not change your energy usage lifestyle to correspond with your solar system. Your energy consumption will be supplied by both solar and the grid. The table below shows expected system performance using a 1kW nominal PV array facing True North at a tilt angle equal to the Latitude with no shading. NOTE: A detailed monthly production estimate for your system is included separately. 4. Factors Affecting Performance 1. Standard Test Conditions (STC) PV arrays are rated under standardised conditions, such as specified illumination (1000 W/m2), an air mass of 1.5 standard reference, and specified temperature of 25 "C, these standard test conditions (STC) allow for a uniform measuring of performance between various manufacturers of PV panels. Due to varying factors such as those listed below, performance will vary from manufacturer specified standard test conditions. 2. Temperature and reduced output PV array temperature affects the output of the entire system. As the temperature on the array surface heats rises, the energy output will decrease. 3. Angle of the sun The angle of the sun in relation to the PV array surface (orientation) will affect the PV array output. The array energy output will vary depending on the time of day and time of year as the sun's angle in relation to the array changes. Incident sunlight decreases when the sun is near the horizons due to the greater atmospheric air that it must penetrate. This reduces both the light intensity that strikes the array's surface and spectrum of the light. 4. Partial shade Shading of only a single module of the array will reduce the output of the entire system. Such shading can be caused by something as simple as the shadow of a mains power cable or tree branch on part of the array's surface. This condition, in effect, acts like a weak battery in a flashlight, reducing the total output, even though the other batteries are good. However, the output loss is not proportionate to shading. Inverters are designed to maximize energy production in all of the above situations using its MPPT algorithm. 5. Other environmental conditions Solar irradiance, wind and cloudy conditions can all affect the performance of a solar power system. Solar irradiance is continually varying throughout the day with a peak level generally around noon or early afternoon. A higher irradiance level will result in higher solar generation. Solar irradiance is also affected by cloud cover, which will substantially reduce the level of solar generation. High wind speeds can enhance performance by reducing the core temperature of the PV panel. 6. Other factors that contribute to system losses are: • Dust or dirt on the array • Fog or smog • Inverter efficiency 5. Energy conservation Your solar electricity system represents an investment in your future energy needs as well as the environment. Unlike conventional sources of electricity that have been causing major environmental problems like smog, acid rain and global warming, your system produces no air or water pollution while it is generating electricity. Considering that it generates free electricity from sunlight, it makes sense to consider the other side of the energy equation – your electricity demand. You need not make any significant changes to your comfortable lifestyle, but there are some simple things you can do to conserve energy: • Install a solar hot water system that will provide all of your hot water using a combination of free solar energy and purchased conventional energy. • Replace any other inefficient appliances, like old refrigerators, with new high efficiency appliances. • Consider installing an Energy Efficient Pool Pump, and change your Pool to Tariff 33 – Off-Peak. • Replace incandescent light bulbs with energy efficient LED or Fluorescent lighting. Typical Domestic Power Consumption 6. Solar Power System Start-up Procedure Please follow this procedure when turning your solar power ON. Switch ON in the sequence: 1, 2, 3 (or 1,2 if 3 is not supplied on your system) Note: Do not wait to long between switching 2 and 3; otherwise the inverter will treat this as a fault condition. After the system is switched ON, the inverter will run through a testing and initialising process. It will begin correct operation when the green Operation indicator lights up, located on the front panel. Confirm correct solar power system operation by reading the generated voltage and power values from the inverters LCD user menu, located on the front panel of the inverter. Note: The SOLAR ARRAY MAIN SWITCH circuit breaker may in some cases be installed in a sub-board in your house or shed adjacent to the inverter, rather than on the main house switchboard. 7. Solar Power System Shutdown Procedure Please follow this procedure when turning your solar power system OFF. Switch OFF in the sequence: 1,2,3 (or 3,2 if 1 is not supplied on your system) 8. Operating & Safety instructions Save standby power by switching off appliances at the power point when not in use; Switch off lights and other appliances when not needed. Thus you will be saving money on both sides of the energy equation – on the supply side by generating your own free electricity, and on the demand side by practising sound energy conservation. Your solar electricity system is designed for automatic operation with no need for user interaction. There are no moving parts and, apart from normal performance monitoring, there is no need for the owner to intervene in its operation. In the case of mains grid supply failure the inverter will be automatically and immediately disabled. This is known as anti-islanding. Once the power has been restored, the inverter will be automatically re-enabled. If you notice your system is not operating correctly, please call your system supplier and they will arrange to send a technician to resolve the problem. Do not attempt to service the system yourself – contact Negawatts Electrical. In the event of an “Earth Fault Alarm” your system should be shut down immediately, if it is not shut down automatically. Please contact Negawatts Electrical immediately to have your system inspected. All service work must be carried out in strict compliance with all local and national electrical codes and standards. Review and follow all safety instructions supplied with all components of the solar electricity system as well as those supplied by the Clean Energy Council. Avoid working on the system in wet or damp conditions. Remove all jewellery such as rings, bracelets, etc. prior to servicing the system to reduce the risk of electric shock. The solar array will generate electricity during sunlight. They should be covered prior to servicing. Do not attempt to clean or come in contact with the surface of a solar module with broken glass. This could result in a dangerous electric shock. Be aware that power may be present at any point in electrical circuits despite the opening of circuit breakers. Circuit breakers can trip automatically if problems occur. If the circuit breaker is switched back to the closed or “on” position and it immediately trips back to the open or “off” position an ongoing problem is indicated. Do not substitute materials supplied with the solar electricity system. Appropriate precautions must be taken when working on rooftops or at heights in accordance with local and national occupational health and safety regulations. 9. Maintenance Your solar power system requires little maintenance, as there are no moving parts to fail or adjust. For your safety, we do not recommend that you attempt any self-service unless you are suitably qualified. The solar panels work best when clean. Regular rainfall or washing with a hose will do the job. If they do become excessively soiled they can be cleaned with cold water. It is recommended to keep the panels clean from a build-up of dust, dirt and mold, and to check that the solar panels have minimal shading from new vegetation or surrounding objects. We strongly recommend that you do not climb onto the roof, unless you are qualified and trained in occupational health and safety procedures. Plant and tree growth that can cause shading at different times of the year should be monitored and dealt with. Likewise, leaves and other debris coming to rest on the solar modules should be removed. If you notice your system is not operating correctly, please contact us immediately and we will send a technician to resolve the problem. If you need to shut down the system, please follow these steps in the “Solar Power System Shutdown Procedure” 1. Switch off the Solar Supply Main Switch in the main switchboard or meter box. 2. Switch off the AC isolator (if supplied), and then the DC isolator adjacent to the inverter. Following these steps will isolate the solar array. To switch it back on, you simply reverse the procedure. Always remember that your system will be generating electricity during daylight hours and care should always be taken to eliminate the risk of electric shock. Refer to the OPERATING SAFETY INSTRUCTIONS for more information. However, The following maintenance schedule is recommended Weekly Check to make sure the inverter is working correctly by checking Green LED is on. Also check the front LCD display is working correctly. Check the inverter operation (e-today, etotal etc. depending on your inverter) should be consistent with the prevailing weather conditions and season. 6 Monthly Check for vegetation growth that may be shading the solar panels, and cut back accordingly. Yearly Visually check that the PV array framing and fastening screws are ridged and have no corrosion or damage. Visually inspect the panels for any damage. Visually inspect the inverter and isolator box for any loose connections. Clean the solar panels surface (if required) with water and a mop or soft brush. We recommend the use of experienced roofers when cleaning panels on the roof Carefully clean the outside of the inverter with a clean dry cloth or rag. DANGER: The inverter operates at very high voltages. There is risk of fatal electrical shock if the inverter is opened during use. The inverter must only be opened by Negawatts Electrical technicians for either maintenance or modifications. DANGER: Do not touch or pull any of the electrical wiring cables around the inverter. Do not remove the front cover of the inverter. Do not switch the system on if there are damaged or exposed electrical cables due to risk of fatal electrical shock! DANGER: Do not touch or come in contact with a solar module if it is found to be broken or has cracked glass, as this could result in a fatal electrical shock. WARNING: We recommend using professional services when working at heights. It is recommended that only qualified personnel who are trained and hold current certification attempt maintenance activities on roofs due to the potential hazards when working at heights. 10. Warranty Your solar electric system comes with the following warranties: Solar electric modules – 10 Years on Manufacturing, 10 years limited warranty of 90% power output, 25 years limited warranty of 80% power output Inverter – 10 Year Standard on Delta Solivia Inverter 5 year standard on Aurora, SMA & Power Router Inverters. Upgrade options are available – please call to discuss if required. Roof mounting frames – 10 year standard Installation – 5 Years Parts & Labour First System Annual Performance Check This check is provided free of charge– Please email [email protected] to arrange a system inspection, 12 months from date of installation. This warranty does not cover the following conditions: Your existing electrical installation, wiring, and switchboard or fuse box. Any malicious damage. Any damage caused by vermin, animals or pests. Any consequential or other loss suffered by you in connection with the installation of our products or our products failing or breaking. Any damage to your property (other than products we sold you) caused by our products failing or breaking. If anyone other than an authorised Negawatts Electrical installer, or Negawatts Electrical sub-contractor or Negawatts Electrical authorized person works on the Solar installation at any time, then this warranty is no longer valid. Note1: We recommend the installation of DC and AC surge protection to help protect your inverter from possible mains grid voltage fluctuations and from lightning strike. Your system is not covered by warranty for electrical damage relating to power surges, spikes or lightning strikes. Note2: We recommend that you notify your insurance company prior to installation of your solar power system to ensure your new investment is covered by your insurance. Accidental breakage is not covered by this warranty, and should be added separately to your general household insurance policy. Warranty Exclusions These conditions shall cause the system warranty to become void. Any work associated with rectification of these conditions may incur a service charge and costs for parts should they be necessary. Any service required to electrical wiring. Major variations or faults in electrical energy supply, causing damage to the Inverter or other supplied equipment. If the system is sold, repaired or altered by any third party without the consent of Negawatts Electrical. Accidental breakage is not covered by this warranty, and should be added separately to your general household insurance policy. Negawatts Electrical do not accept any responsibility for any loss or damage to any person or property of any type, whether direct or consequential arising from the installation, maintenance or operation of the solar PV system or any of its components. 11. Customer Obligations The customer agrees to the following: (a) Periodically clean the PV panels and especially after dust storms. (b) Periodically remove any branches or droppings affecting the output of the panels. (c) Periodically observe of any shading by trees on the Installation Site or nearby trees or buildings which could affect the performance of the System. (d) Provide adequate protection for the inverter if placed outside. A canopy may be required to prevent direct heat and rain. The canopy must not obstruct airflow. Customer must refer to Inverter Instructions Manual for details on how to protect the inverter. The customer may wish to consult with the installer on the proper way to erect the canopy. (e) Provide adequate ventilation - if the inverter is installed in a garage or a confined space. Customer must refer to Inverter Manual for details on how to protect your inverter. (f) Periodically check the inverter display for output performance particularly the total energy (kWh) generated to date. (g) Refrain from switching on and off the DC or AC circuit breakers and follow proper start-up and shut-down procedures as indicated. IMPORTANT REMINDER Please keep this owner’s manual in a safe and easily locatable place together with all other documentation supplied with your system. In the case of a service being required, please supply all the documentation to the service technician as the information contained therein will be useful to that technician. Note that the manufacturers’ warranties may be voided if the system is serviced or interfered with by an unqualified person. NOTES: ________________________________________________________________________________ ________________________________________________________________________________ ________________________________________________________________________________ ________________________________________________________________________________ ________________________________________________________________________________ ________________________________________________________________________________ ________________________________________________________________________________ ________________________________________________________________________________ ________________________________________________________________________________ ________________________________________________________________________________ ________________________________________________________________________________ ________________________________________________________________________________ ________________________________________________________________________________ ________________________________________________________________________________