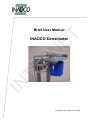
1
ET
Brief User Manual
IN
TE
R
N
INADCO Densimeter
Translation from original user-manual
ET
R
N
TE
IN
Z:\Documenten\SG-bepaler\Handleiding\Docs\Docs actual\ENG\Brief User Manual V4.2.doc
Page 2 of 13
INADCO , Meerheide 18, 5521DZ Eersel (Netherlands)
Phone :+31 (0) 497 51 72 91 Fax :+31 (0) 497 51 74 69
E-mail :[email protected] Website : www. inadco.nl
Warning
Starting Up
ET
CAUTION: DANGER!!!!!!!!!!!
The Densimeter is a fully automated machine.
Because the machine is started remotely, it can be very dangerous for men and
machine to do checking on the machine
Always switch off the mains switch of the Mode Cabinet or the safety switch near the
motor, when working on, or checking the machine.
Welding
R
N
Whenever the mains voltage disappears, or a glitch in the voltage occurs, the
machine will always return in AUTO-mode.
It will start instantaneously, if the status of the start signal is high.
In most cases, data of already finished measurements will be lost. If a sticker has to
be printed, the printout will not show the correct data.
The weighing-signal and position-signal of the Densimeter are very sensitive. When
any welding is necessary nearby the Densimeter it is important to place the groundclamp nearby the place that needs to be welded.
It is not allowed to do any welding on the Densimeter.
When these precautions are not taken, the Densimeter can be damaged.
TE
Mechanical overload
IN
When the weighing-section of the Densimeter is overloaded by a long time, or
severely overloaded a short time (impact) then the loadcell of the Densimeter will be
destroyed.
In normal use the Densimeter can be loaded until 40kg.
The weighing-section are the black cylinder, the bottom and the arm to open the
bottom.
Z:\Documenten\SG-bepaler\Handleiding\Docs\Docs actual\ENG\Brief User Manual V4.2.doc
Page 3 of 13
INADCO , Meerheide 18, 5521DZ Eersel (Netherlands)
Phone :+31 (0) 497 51 72 91 Fax :+31 (0) 497 51 74 69
E-mail :[email protected] Website : www. inadco.nl
ET
R
N
TE
IN
Z:\Documenten\SG-bepaler\Handleiding\Docs\Docs actual\ENG\Brief User Manual V4.2.doc
Page 4 of 13
INADCO , Meerheide 18, 5521DZ Eersel (Netherlands)
Phone :+31 (0) 497 51 72 91 Fax :+31 (0) 497 51 74 69
E-mail :[email protected] Website : www. inadco.nl
Introduction
IN
TE
R
N
ET
The INADCO Densimeter is a machine which can determine fully automatic the bulk density
of your materials.
The Densimeter is built on basis of the known EN-cylinder. This cylinder is mounted on a
very sensitive and accurate weighing system, and the machine can be operated by means of
an Operator Panel (short: O.P.).
Op this O.P. you can find all relevant data of the measured product, and also shows you if
errors occur. On the next pages is explained what you can see on this Operator Panel, and
how to act if errors occur.
Z:\Documenten\SG-bepaler\Handleiding\Docs\Docs actual\ENG\Brief User Manual V4.2.doc
Page 5 of 13
INADCO , Meerheide 18, 5521DZ Eersel (Netherlands)
Phone :+31 (0) 497 51 72 91 Fax :+31 (0) 497 51 74 69
E-mail :[email protected] Website : www. inadco.nl
Operating The Densimeter
The Densimeter is controlled by an Operator Panel. This Operator Panel (O.P.) has several
screens on which you can follow the measurement and enter or change settings.
C 7.450
D 0.456
Order:
cal
fill
B 0.00 ton
Da 0.423 kg/l
123456789
data
sys
ET
The screen of the O.P. is built in different
parts.
1. Textscreen:
Here you can see all the relevant data
of the measured product.
R
N
2. Functionkeys:
These keys are used to switch to
other screens.
3. Keyboard:
IN
TE
These keys are used to change settings of
the Densimeter.
Z:\Documenten\SG-bepaler\Handleiding\Docs\Docs actual\ENG\Brief User Manual V4.2.doc
Page 6 of 13
INADCO , Meerheide 18, 5521DZ Eersel (Netherlands)
Phone :+31 (0) 497 51 72 91 Fax :+31 (0) 497 51 74 69
E-mail :[email protected] Website : www. inadco.nl
The Screens
The Operator Panel comprises different screens.
Screen 1 (Startup-screen):
ET
On this screen the user can see the following:
This is the actual weight in the Cylinder
B:
Weight from weighing belt or weighing
bridge [tons] (if applicable)
D:
Last determined bulkdensity [kg/l]
Da:
Average bulk density [kg/l] of actual
batch
C 7.450
D 0.456
Order:
calib
fill
B 0,00 ton
Da 0.423 kg/l
123456789
data
sys
R
N
C:
Order: Here you enter the Order number before
you start your measurement. (not necessary in
all applications)
TE
By pressing the appropriate function key you
can go to other screens. (See last page of
document Description Operator Panel Densimeter for a layout.)
IN
Some customers have a custom-designed start screen. (See Appendix A for an example.)
Z:\Documenten\SG-bepaler\Handleiding\Docs\Docs actual\ENG\Brief User Manual V4.2.doc
Page 7 of 13
INADCO , Meerheide 18, 5521DZ Eersel (Netherlands)
Phone :+31 (0) 497 51 72 91 Fax :+31 (0) 497 51 74 69
E-mail :[email protected] Website : www. inadco.nl
Screen 2:
When you push function key F2 (Fill) in screen 1 you
get screen 2.
On this screen there are the same data as on screen
1 completed with:
This is the measured EN-m3.
Screen 3:
R
N
ET
EN volume:
C
7.450
B 0.00 ton
D 0.456
Da 0.423 kg/l
EN volume:
15 m3
m/a
emerg
sett
i/o
TE
Press in screen 2 on function key F1 (M/A) and you
will get into screen 3.
This screen looks the same as screen 2 but with an
addition on the mode of the Densimeter.
Behind the loaded EN-m3 stands the actual mode of
the Densimeter. This is AUTO when the Densimeter
starts en stops automatically, and MAN when the
Densimeter is in manual mode.
C 7.450 S
B 0.00 ton
D 0.456
Da 0.423 kg/l
EN:
15 m3
M: AUTO
man
cycle
IN
Use the function key F1 to change the actual state of
the Densimeter.
The Densimeter will start in the automatic mode after
power falls down and comes up again.
Z:\Documenten\SG-bepaler\Handleiding\Docs\Docs actual\ENG\Brief User Manual V4.2.doc
Page 8 of 13
INADCO , Meerheide 18, 5521DZ Eersel (Netherlands)
Phone :+31 (0) 497 51 72 91 Fax :+31 (0) 497 51 74 69
E-mail :[email protected] Website : www. inadco.nl
Alarms
ET
Mains Voltage was switched off.
Sometimes there goes something wrong
during measurement which effects the working
of the Densimeter. When this happens an
alarm will be generated which can be seen in
the text-screen. At the same time a red led will
light. This led will only turn out when all the
occurring alarms are acknowledged and
solved.
R
N
To acknowledge an alarm push the yellow
button with the text ACK on the operator panel.
You have to do this for every alarm that will be
present.
TE
By looking at the Alarm message, the operator can determine what caused the
alarm. Down below are some examples of alarms.
* Warning! Accretion in the Cylinder. Please clean.
When de Densimeter is used with a sticky product or one with long fibers, accretion
can occur in de cylinder. When this message appears, the Densimeter has to be
cleaned.
IN
* Alarm! Accretion in the Cylinder. Please clean
If you wait too long to clean the Densimeter then you can have this message. The
Densimeter switches to Manual mode, and cannot be operated in Auto mode any
longer. You have to clean the Densimeter and after that change the mode to Auto (in
screen 3).
* Error Frequency Converter,
When the Shovel of the Densimeter cannot rotate any more, the frequency converter
will fall in error. De mode of the Densimeter is changed to Manual. Remove the
cause of the error, press the Fn-key of the frequency converter, change the mode of
the Densimeter to Auto (screen 3) and restart the measurement, You can also switch
the power Off and On. You possibly loose your actual measurement data of the
already measured part of the batch by solving this error in the last way.
* Skid of the arm has occurred, safety switch is off or fence is open
The Arm cannot rotate (completely), although the control equipment tries to do so.
Remove the cause of this blocking and reset the error.
Maybe the Safety Switch near the Motor is switched off (or the fence, if installed, is
not closed). Another cause can be a (small) branch blocking the rotating of the Arm.
Z:\Documenten\SG-bepaler\Handleiding\Docs\Docs actual\ENG\Brief User Manual V4.2.doc
Page 9 of 13
INADCO , Meerheide 18, 5521DZ Eersel (Netherlands)
Phone :+31 (0) 497 51 72 91 Fax :+31 (0) 497 51 74 69
E-mail :[email protected] Website : www. inadco.nl
* Leakage occurs: The Bottom of the Cylinder is not closed completely
After the Cylinder is emptied, it sometimes happens that the Bottom does not close in
the correct way.
Check why this occurs and resolve the possible cause.
ET
If this error occurs frequently, and there is no excess grow of filth, maybe the closing
of the Bottom has to be re-adjusted, in such a way that the Spring applies more force
on closing the Bottom. This re-adjustment can be done by loosening the two M8
bolts in the Arm Spring, rotating this Arm a bit, and tightening the M8 bolts again.
R
N
* Densimeter in Manual mode; no Automatic start possible.
When the Densimeter is in Manual mode, and a Start-signal is applied, the above
message appears on the Operator Panel. In most cases this happens because an
error did change the mode of the Densimeter from Auto to Manual. In this case you
have to resolve the cause of the error first, and after that you bring the Densimeter
back in Auto mode.
Switching the Densimeter from Manual to Auto mode can be done by doing the
following: Press escape until Screen 1 is displayed. Then press F2 (fill). Then press
F1 (M/A) to switch over from Manual to Auto. Now the installation can be started
again. On the actual screen you can see the mode being changed from Manual to
Auto, on the right side of the Operator Panel.
TE
* Printer off-line or out-of-paper
This message can appear when you have a printer attached to your Densimeter.
Maybe the printer is off-line because it is out-of–paper, a printer-cable is no longer
connected properly or the power is simply switched off. Check the printer, and after
the is on-line again, acknowledge the error message at the Operator Panel and set
the Densimeter to Auto. See previous error).
This printer-error can be bypassed for ONE batch at a time, by entering ordernumber: 99999999. You should only use this bypass if you cannot resolve the error
which caused this alarm, because you will miss your sticker.
IN
* Error Ramsey Indicator: See display Ramsey to error-text
Whenever the Densimeter is attached to an INADCO Weighing belt this error can
occur. The display on the Ramsey Indicator shows a text, so that you can take away
the cause of this error.
* Mains voltage was switched off
Every time the main power is switched off, or when a serious glitch occurs, the
Densimeter will show this alarm text. It does not influence the starting of the
machine; it is just a text.
* Order number not entered
Before you can start the Densimeter, an order number has to be entered (not
applicable to all installations).
For an overview of all possible alarms, see document Description Operator Panel
Densimeter.
Z:\Documenten\SG-bepaler\Handleiding\Docs\Docs actual\ENG\Brief User Manual V4.2.doc
Page 10 of 13
INADCO , Meerheide 18, 5521DZ Eersel (Netherlands)
Phone :+31 (0) 497 51 72 91 Fax :+31 (0) 497 51 74 69
E-mail :[email protected] Website : www. inadco.nl
LEDS
On the Operator Panel there are four Led lights,
which provide you with important information.
C 7.450
B 0.00 ton
D 0.456
Da 0.423 kg/l
EN volume:
15 m3
m/a
emerg
sett
i/o
ET
The Led in the upper left corner of key K1 shows
whether the operating mode of the Densimeter
is Auto or Manual. When Manual, the LED will
blink. When in Auto mode, the Led is off.
R
N
The Led on key K2 will light if the Bottom is or
was open. If the Bottom opens, the Led will light
immediately, and stay light until two seconds
after the moment the Bottom is closed again
correctly. Hence, during normal operating, the
Led will light every time the Bottom opens.
The Led on key K3 has four modes.:
TE
-It will light constantly if the external Start Signal
is available after start-up delay.
-A blinking Led with an interval of 0,5 seconds
shows the Densimeter is during Start-delay or
Stop delay.
-If the case a Pause signal is applied, the LED will blink with a interval of 1 second.
If the Densimeter is switched to PAUSE mode, the Densimeter finishes its actual movement ,
and stop in with the Shovel in Loadingposition. If the PAUSE signal is removed while the
START signal is still available, the Densimeter proceeds with its normal operation. If
however the PAUSE signal is still there while the START signal disappears, the Densimeter
ends its measurement, empties the cylinder and the Shovel rests at its Checkfull position,(as
normal)
The Led on key K4 will light only if the Densimeter is in Manual mode AND only during the
time the motor is energized.
IN
The Led near the exclamation mark lights when an alarm has occurred. You can view the
text of this alarm by pressing several times on the ESC key. Pressing ACK will acknowledge
the alarm. In most cases you have to resolve the cause of the alarm, before you can
proceed.
Z:\Documenten\SG-bepaler\Handleiding\Docs\Docs actual\ENG\Brief User Manual V4.2.doc
Page 11 of 13
INADCO , Meerheide 18, 5521DZ Eersel (Netherlands)
Phone :+31 (0) 497 51 72 91 Fax :+31 (0) 497 51 74 69
E-mail :[email protected] Website : www. inadco.nl
Maintenance
ET
The Densimeter does not need intensive maintenance. Nevertheless we advise to do checks
on a regular basis, for instance every week. This check should comprise cleaning, and
optical checking is everything looks to be in right order. In this way you ensure the proper
functioning of your Densimeter.
The Densimeter checks itself for accretion in the cylinder.
In any case the display of the Densimeter shows (see screen 1) a weight above 100 grams,
when empty, you should clean the Densimeter. After cleaning the weight of the empty
cylinder should not exceed 0,025 kg (25 gram).
IN
TE
R
N
Whether the Densimeter does weigh well is easy to check.
Put a known weight (not necessarily a calibration weight) in the Cylinder. Read the display.
This should show the weight of your known weight. After removing that weight from the
cylinder, the display should show the same weight as it did before you entered your known
weight, within a margin of around 10 grams (0,010 kg).
Z:\Documenten\SG-bepaler\Handleiding\Docs\Docs actual\ENG\Brief User Manual V4.2.doc
Page 12 of 13
INADCO , Meerheide 18, 5521DZ Eersel (Netherlands)
Phone :+31 (0) 497 51 72 91 Fax :+31 (0) 497 51 74 69
E-mail :[email protected] Website : www. inadco.nl
Appendix A
Example Startup screen:
Ordernr. :
This is the place to enter the
ordernumber.
Ordernr.
:
Itemnumber. :
123456789
987654321
ET
On this user-specific screen the user can enter
and/or view the following parameters:
IN
TE
R
N
Itemnumber. :
This is the place to enter the article
code.
Z:\Documenten\SG-bepaler\Handleiding\Docs\Docs actual\ENG\Brief User Manual V4.2.doc
Page 13 of 13
INADCO , Meerheide 18, 5521DZ Eersel (Netherlands)
Phone :+31 (0) 497 51 72 91 Fax :+31 (0) 497 51 74 69
E-mail :[email protected] Website : www. inadco.nl
Next screen