1
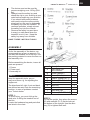
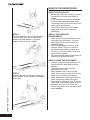
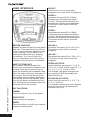
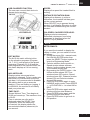
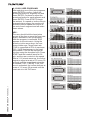
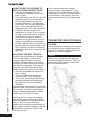
PURE RUN 2.1
USERMANUAL
WWW.TUNTURI.COM
SERIAL NUMBER
ENGLISH
CONTENTS
SAFETY INSTRUCTIONS ................... 2
ASSEMBLY .......................................... 3
BASICS ON EXERCISING ................... 4
USER INTERFACE... ........................... 6
PROGRAMS......................................... 8
MAINTENANCE .................................11
TRANSPORT AND STORAGE........... 12
MALFUNCTIONS ............................... 14
TECHNICAL SPECIFICATIONS......... 15
W E L C O M E TO T H E W O R L D
OF TUNTURI EXERCISING!
Your choice shows that you really
want to invest in your well-being and
condition; it also shows you really value
high quality and style.
With Tunturi Fitness Equipment,
you’ve chosen a high-quality, safe and
motivating product as your training
partner. Whatever your goal in training,
we are certain this is the training
equipment to get you there. You’ll find
information about using your exercise
equipment and what makes for efficient
training at Tunturi’s website at WWW.
TUNTURI.COM.
OWNER’S MANUAL
•
PURE RUN 2.1
SAFETY INSTRUCTIONS
2
This Owner’s Manual is an essential
part of your training equipment: reading
all instructions in this manual before
you start using this appliance. It is the
responsibility of the owner to be sure that
all users of this treadmill are informed
of all warnings and precautions. The
following precautions must always be
followed:
WARNING
Never use extension cords between
the treadmill and your wall outlet. The
device’s maximum power consumption is
10 A. Outlets with fluctuating voltage
of more than 10 % may result in erratic
performance or cause damage to
treadmill electronics. Using electrical
power other than that, which has been
specified in this manual will ultimately
void any warranty, implied or otherwise.
WARNING:
To reduce any risk to persons:
• Keep hands clear of any moving
parts. Never place hands, feet or any
other objects into any opening or
under the treadmill.
• Never leave the treadmill unattended
when plugged in. Unplug from outlet
when not in use, before putting on or
taking off parts. To disconnect, turn
all controls to the off position, then
remove plug from outlet.
• Close supervision is necessary
when the treadmill used by, on, or
near children, invalids, or disabled 2
persons.
• Keep pets and small children away
from the treadmill at all times.
• Use the treadmill only for its
intended use as described in this
manual. Do not use attachments not
recommended by Tunturi.
• Before you start using the treadmill,
make sure that it functions correctly
in every way. Do not use a faulty
device.
• Keep the cord away from heated
surfaces.
• Treadmill must not be used outdoors.
Treadmill tolerates an environment
measuring +10°C to +35°C. Air
humidity must never exceed 80 %.
• Do not attempt any servicing
or adjustment other than those
described in this manual. The
given instructions must be followed
carefully.
• Never operate this treadmill if it has a
damaged cord or plug, if it has been
dropped or damaged, or dropped
into water. Return the treadmill to a
service center for repair.
• Never operate the appliance with
the air opening blocked. Keep the
air openings free of lint, hair, and the
like.
• Do not operate where aerosol (spray)
products are being used or where
oxygen is being administered.
OWNER’S MANUAL
•
•
•
•
PURE RUN 2.1
GB
The device must not be used by
persons weighing over 135 kg (298
lbs).
Always insert the safety key and
attach the clip to your clothing at your
waist before beginning your workout.
If you should encounter problems
and need to stop the motor quickly,
simply pull on the cord to disengage
the safety key from the console. To
continue operation, simply reinsert
the safety key into the console
Remove the safety key and store
it away in a safe place when the
treadmill is not in use. Keep the
safety key away from children.
S AV E T H E S E I N S T R U C T I O N S !
ASSEMBLY
As for the assembly of the device, we
recommend two grown-up persons. Do
not take the treadmill out of the box: use
the packing material to cover the floor on
the assembly site.
Before assembling the device, insure all
parts are present:
1. Frame
2. Power cord
3. Assembly kit
NOTE:
keep the assembly tools, as you
may need them e.g. for adjusting the
equipment.
The directions left, right, front and back
are defined as seen from the exercising
position. In case of problems contact
your Tunturi dealer.
STEP 1:
To avoid injury, you must fold up the
deck prior to lifting the treadmill out of
the box.
Locate the hardware bag and parts that
are listed in the chart.
part # description
A
main frame incl.
user interface
B
Screw (M8x20L)
C
Screw (M4x8L)
D
Washer (Ø8xØ19x1.5)
E
Washer (Ø8xØ18x1.5
F
Screwdriver
G
Allen key
H
Lube
I
Base side cap
J
Washer (Ø10xØ25x1.5)
Q’ty
1
8
4
2
4
1
1
1
2
2
STEP 2
Lift up the upright, then place the screws
(B) and washers (D, E) inside holes at
the bottom of the upright. Use the allen
key (G) to tighten them well.
3
BASICS ON EXERCISING
ABOUT YOUR HEALTH
• Before you start any training, consult
a physician to check your state of
health.
• If you experience nausea, dizziness
or other abnormal symptoms while
exercising, stop your workout at once
and consult a physician.
• To avoid muscular pain and strain,
begin and end each workout by
stretching.
STEP 3
Put the console to the correct position.
Use the allen key (G) to tighten the
screws (B) and washers (J) inside
holes at the top of the upright.
OWNER’S MANUAL
•
PURE RUN 2.1
STEP 4
Attach side cap (I) with the screws (D)
at the bottom of the upright, and tighten
them well.
4
ABOUT THE EXERCISE
ENVIRONMENT
• Make sure the exercise environment
has adequate ventilation. To avoid
catching cold, do not exercise in a
draughty place.
• Place the treadmill on a firm, level
surface. Allow 120 cm or 4 feet of
clearance behind the treadmill and
60 cm or 2 feet on either side and in
front of the treadmill.
• We recommend that the equipment is
placed on a protective base.
ABOUT USING THE EQUIPMENT
• Always unplug the treadmill from the
electrical outlet after each training
session.
• Only one person may use the
equipment at a time.
• Keep hands clear of any moving
parts. Never place hands, feet or any
other objects under the treadmill.
• Wear appropriate clothing and shoes
when exercising. Make sure your
shoelaces are properly tied. To avoid
injury and unnecessary wear on your
treadmill, be sure your shoes are
free of any debris such as gravel and
small pebbles.
OWNER’S MANUAL
BEGINNING AN EXERCISE SESSION
• To avoid muscular pain and strain,
begin and end each workout by
stretching.
• Stand on the landing rails to the left
and right of the running belt. Do not
stand on the running belt.
• Always hold the handrail for support
when getting on or off the treadmill
and when changing the speed during
exercise. Do not jump off the running
belt while it is moving!
• If you experience nausea, dizziness
or other abnormal symptoms while
exercising, stop your workout at once
• and consult a physician.
FINISHING AN EXERCISE SESSION
• Never leave the safety tether key in
the treadmill.
• Use the main power switch to turn
the unit off.
• Unplug the electrical cord from the
wall outlet and from the treadmill.
• If necessary clean the treadmill from
sweat with a damp cloth. Do not use
solvents.
• Store the electrical cord where it is
clear from all pathways and out of
childrens’ reach.
HOW TO MOTIVATE YOURSELF TO
CONTINUE
In order to reach the goals you have set,
you’ll need to keep finding the motivation
to continue so you achieve your ultimate
goal: life-long health and a new quality of
living.
•
•
•
•
•
•
Set yourself realistic targets.
Progress step-by-step according to
your schedule.
Keep a fitness diary and write down
your progress.
Change your way of exercising from
time to time.
Use your imagination.
Learn self-discipline.
•
PURE RUN 2.1
GB
HEART RATE
No matter what your goal, you’ll get the
best results by training at the right level
of effort, and the best measure is your
own heart rate. First find your maximum
heart rate i.e. where the rate doesn’t
increase with added effort. If you don’t
know your maximum heart rate, please
use the following formula as a guide:
220 - AGE
The maximum varies from person
to person. The maximum heart rate
diminishes on average by one point per
year. If you belong to one of the risk
groups mentioned earlier, ask a doctor
to measure your maximum heart rate
for you. We have defined three different
heart-rate zones to help you with
targeted training.
BEGINNER:
50-60 % of maximum heart rate
Also suitable for weight-watchers,
convalescents and those who haven’t
exercised for a long time. Three
sessions a week of at least a halfhour each is recommended. Regular
exercise considerably improves
beginners’ respiratory and circulatory
performance and you will quickly feel
your improvement.
TRAINER:
60-70 % of maximum heart rate Perfect
for improving and maintaining fitness.
Even reasonable effort develops the
heart and lungs effectively, training for
a minimum of 30 minutes at least three
times a week. To improve your condition
still further, increase either frequency or
effort, but not both at the same time!
ACTIVE TRAINER:
70-80 % of maximum heart rate Exercise
at this level suits only the fittest and
presupposes long-endurance workouts.
One important aspect of your training
is versatility. Varying your training
exercises different muscle groups and
helps maintain motivation.
5
USER INTERFACE
SELECT:
Switches from one to one another
programs in an order of the 19 programs.
SPEED +:
Increases the speed(0.8 to 16Kph).
Pressing once increases the speed
0.2 kph. Pressing and holding for two
seconds will increase the speed faster.
This button is also used to scroll the
programs.
OWNER’S MANUAL
•
PURE RUN 2.1
SPEED -:
Decreases the speed(0.8 to 16Kph
).Pressing once decreases the speed
0.2 kph. Pressing and holding for two
seconds will decrease the speed faster.
This button is also used to scroll the
programs.
6
BEFORE STARTING
Straddle the belt and stand on the plastic
side rails. Place the safety key onto the
circle on the overlay and attach the rope
to your clothing. Do not stand on the
walking belt while starting or stopping
the treadmill. If you are a new user,
stay at a slow speed and hold onto the
handrails until you become comfortable.
INCLINE +:
Increases the incline (0% to 12% ±1%).
This button is also used to scroll the
programs.
SAFETY TETHER KEY
The treadmill cannot be used if the
tether key is not properly installed on the
console; if the key is removed from its
place, the treadmill will immediately stop.
Place the safety tether key in ts place on
the console. Ensure that the clip of the
safety tether key is properly attached to
your lothing; as the cord tightens, make
sure the clip does not detach itself from
your clothing before the safety tether key
disconnects from the console.
SPEED HOT KEYS:
Speed Hot Keys are set as 2, 3, 4,6, 8,
10, 12, 14, 16 and 18 KPH or set as 1, 2,
3, 4, 5, 6, 7, 8, 9, 10 and 11 MPH.
For example, the speed changes from
any speed to 8 KPH by pressing the
Speed Hot Key 8.
KEY FUNCTIONS
POWER:
Press this button to turn on the power.
START/STOP:
Starts or stops the program.
ENTER:
Press this button to confirm your desired
program or setting value.
INCLINE -:
Decreases the incline(0% to 12% ± 1%).
This button is also used to scroll the
programs.
ELEVATION HOT KEYS:
Incline Hot Keys are set 3, 4, 5, 6, 7, 8, ,
9, 10, 11 and 12%
For example, the elevation level changes
from any level to 4% by pressing the
Elevation Hot Key 4.
OWNER’S MANUAL
USB CHARGER FUNCTION
The user can connect their device to
charge during workout.
•
PURE RUN 2.1
GB
SPEED:
Displays the speed the treadmill belt is
moving.
DISTANCE/ ELEVATION GAIN:
Displays the distance, in miles or
kilometers, the treadmill belt has gone
on the current workout.
When SELECT key is pressed during
workout, it will display Elevation in meter,
the user has climbed during the current
workout.
LCD DISPLAY
CALORIES/ CALORIES PER HOUR:
Displays calories consumed.
Estimated calories per hour being
consumed is displayed when the
SELECT key is pressed..
NOTE:
METRIC/MILES:
DOT MATRIX:
The 8x10 dot matrix reflects incline
on the elevation programs (Program
1-4, 7,10-11) and speed on the speed
programs (Program 5-6, 8-9) and the
user programs.In the manual mode, the
dot matrix displays a 0.4 km running
track.
INCLINE/PULSE:
Displays pulse rate except when
elevation is changed. To get a pulse rate,
place both of your hands on the pulse
grip bars. It is recommended to straddle
the walking belt to get an accurate
reading. If you are walking or jogging, it
is difficult for the monitor to accurately
read your pulse rate.
TIME/ PACE:
Shows Workout Time. Time begins at
00:00 and counts up. The maximum time
is 99:59.
Pace is minutes per mile and is
displayed when the SELECT key
is pressed. When the safety key
is inserted, this display shows the
accumulated distance (odometer) for
one second.
If you want the treadmill to display the
values in miles, you can switch to miles
as follows:
1. During the power ON - manual mode,
first hold the ENTER button then
press the SELECT button together to
enter the Engineering Mode.
2. Calories window shows model no.,
Speed window shows software
version, Incline window shows year.
Time window shows date.
3. By pressing the ENTER button – the
Incline window shows ISP, Time
window shows ISP version, Speed
window shows 001, Distance window
shows LDU and Calories window
shows LDU version.
4. Press ENTER button again to enter
KM/MILE switch mode, Press SPEED
+ - or ELEVATION + - to select KM or
MILE.
5. Press ENTER button again and the
window will show total distance.
6. Press ENTER button again and the
window will show total hours.
7. Press ENTER button to go back to
ON position.
7
7
ODOMETER:
An odometer showing accumulated
distance will appear in the time window
for one second when the safety key is
placed on the monitor.
TIME-OUT:
If the treadmill is turned on, and the belt
is not moving, the monitor will hibernate
after five minutes and shutdown after
seven minutes.
RE-START :
If the Treadmill is stopped during use,
when the START button is pressed
again, the treadmill will ramp-up the
speed to where it was stopped. If the
treadmill is stopped for 5 minutes or
more, Power is lost and the treadmill will
have to be re-started by pressing the
power button.
PURE RUN 2.1
•
OWNER’S MANUAL
PROGRAM MODE:
After pressing POWER, choose the
desired program by keep pressing
SELECT key or after press SELECT then
using the speed + - or incline + - keys to
choose one of the 6 preset programs.
Note the program layout appears in
the dot matrix display. Press ENTER
to verify the selection. Press START to
begin the program. All programs have
ten one-minute segments. The program
repeats the ten-minute segments until
the user presses STOP.
PROGRAMS
PROGRAMS:
OPERATION INSTRUCTION
(Please read carefully before using the
treadmill):
P-1 ROLLING HILLS:
This is an elevation program that goes
from 0% to 3% grade.and the treadmill
will start at 0.8 kph. Each minute, the
elevation changes.
The speed is controlled by the user
SAFETY TIPS:
To Start attach the safety key to the
monitor. The treadmill will not operate
without the safety key. Please clip the
other end of the safety key to your
clothing before exercising to ensure
the machines will stop in case the user
accidentally walks off the treadmill. If
the user falls off the treadmill, the safety
key will come off the monitor and the
treadmill will stop at once to avoid further
injury.
8
MANUAL MODE:
If you select to operate the treadmill
in manual mode, press START. The
treadmill will start at 0.8 kph after a 3,2,1
countdown. You may then adjust the
speed and incline using the quick keys
or the up/down arrow keys.
P-2 MOUNTAIN PASS:
This is an elevation program that goes
from 0% to 6% grade.
The speed is controlled by the user.
P-3 MOUNTAIN PEAK:
This is a challenging elevation program
that goes from 0% to 8% grade.
The speed is controlled by the user.
PRESS POWER:
This turns the electronic power on. The
treadmill will not start unless POWER is
pressed first.
P-4 CALORIE BURN:
This is an interval elevation program
where the elevation alternates between
0% and 4%.
The user controls the speed.
ENTER WEIGHT:
After pressing the POWER key, WT will
appear in the dot matrix and the previous
user weight will appear in the Calories
window. Enter the weight of the user by
using the speed or incline arrow keys.
Press ENTER to confirm the weight.
P-5 WALKING I:
This is a speed controlled program that
goes up to 5.5 kph, and is an excellent
program for intermediate walkers.
The user controls the elevation.
OWNER’S MANUAL
P-6 JOGGING:
This is a speed program that varies the
speed up to 7.2 kph. This is a good
program for beginner joggers and very
fast walkers. The user controls the
elevation.
P-7 CARDIO BURN :
This is an interval elevation program that
alternates between 2% and 6%. The
user controls the speed.
P-8 WALKING II :
This is a speed controlled program that
goes up to 5.6 kph, and is an excellent
program for beginner walkers. The user
controls the incline.
P-9 JOGGING INTERVAL :
This is an interval speed program that
has alternating rest and work intervals.
The defaults are 6.4 kph and 8.0 kph.
When a lower interval in changed, all the
rest intervals go to this value. When the
higher, or work interval is changed, all
the work intervals go to this value. The
user controls the incline.
P-10 HILL INTERVAL :
This is an interval elevation program that
has alternating rest and work intervals.
The defaults are 0% and 4%. When a
lower interval in changed, all the rest
intervals go to this value. When the
higher, or work interval is changed, all
the work intervals go to this value. The
default speed is 3.2 kph. The speed is
controlled by the user.
P-11 MOUNTAIN INTERVAL :
This is an interval elevation program that
has alternating rest and work intervals.
The defaults are 1% and 5%. When a
lower interval in changed, all the rest
intervals go to this value. When the
higher, or work interval is changed, all
the work intervals go to this value. The
default speed is 3.2 kph. The speed is
controlled by the user.
•
PURE RUN 2.1
GB
P-12 TARGET DISTANCE :
This program counts down the distance
goal that the user sets before exercising.
After confirming the program, the user
enters the distance goal using the speed
or incline arrow keys. Increments are
0.5 kilometers. Press ENTER to confirm
the distance goal, press START, the
treadmill belt starts and the user controls
the speed and incline. The
distance will count down in the distance
window.
P-13 TARGET CALORIES :
This program counts down the calorie
goal that the user sets before exercising.
After confirming the program, the user
enters the calorie goal using the speed
or incline arrow keys. Increments are 10
calories. Press ENTER to confirm the
calorie goal, press START, the treadmill
starts and the user controls the speed
and incline. The calorie goal will count
down in the Calories window.
P-14 TARGET TIME :
This program counts down the time goal
that the user sets before exercising.
After confirming the program, the user
enters the time goal using the speed or
incline arrow keys. Increments are 1
minute. Press ENTER to confirm the
time goal, press START, the treadmill
starts and the user controls the speed
and incline. The time goal will count
down in the time window.
P-15 TARGET ELEVATION GAIN :
This program counts down the
elevation gain goal that the user sets
before exercising. After confirming the
program, the user enters the elevation
gain goal using the speed or incline
arrow keys. Increments are 10 minutes.
Press ENTER to confirm the elevation
gain goal, press START, the treadmill
starts and the user controls the speed
and incline. The elevation gain goal will
count down in the elevation gain window.
9
U-1/U-2/U USER PROGRAMS:
After selecting one of the user programs,
press ENTER to confirm. Adjust the
speed and incline for segment one and
press ENTER. Continue to adjust the
speed and incline for each segment and
press ENTER. Press START to begin
the workout. If a speed or incline value is
changed during usage, the monitor will
store the value of speed and incline at
the end of each segment and will retain
these values.
OWNER’S MANUAL
•
PURE RUN 2.1
HRC:
The user should hold the hand pulse
sensor all the time or wear the heart rate
strap if available to use this program.
After the program is confirmed, AGE
appears on the dot matrix. Using the
speed or incline arrow keys, the user
enters his/her age. Target heart rate
(THR) is computed at 65% of maximum
(220 – AGE) and appears in the heart
rate window. THR can be changed at
this time using the elevation keys. Press
START and the treadmill starts at 0.8
kph, and the user controls in the speed.
After a 3 1/2 minute warm-up, the incline
begins to adjust at a rate of 1% every 30
seconds until the target heart rate zone
is reached (THR +- 5BPM). If the THR
zone is exceeded, the incline declines at
a rate of 1% every 30 seconds until the
heart rate is in the THR zone.
10
OWNER’S MANUAL
MAINTENANCE
The equipment is safe to use only when
periodically maintained and inspected for
faults and wear.
CAUTION!
Do not attempt any servicing or
adjustment other than those described
in this manual. Any other servicing must
be performed by an authorized service
representative. Check the tightness of
all fixing screws once a year. Do not
overtighten.
CLEANING AND LUBRICATING THE
TREADMILL
FA I L U R E TO L U B R I C AT E Y O U R
T R E A D M I L L M AY I N VA L I D AT E T H E
P R O D U C T ’ S WA R R A N T Y !
Wipe the treadmill surfaces, especially
the handlebars and console from dust
with a damp cloth or towel. Do not use
solvents. Use a small vacuum nozzle
to carefully vacuum around all visible
components (belt, running deck, side
rails etc.). Also keep the area near
the treadmill clean. While in use,
the treadmill gathers dust that may
cause problems in the operation of the
equipment.
In average domestic use (60 minutes a
day), you should check the lubrication
once a month – however, lubricate the
belt only if needed. In more demanding
use, the lubrication needs be checked
at shorter intervals. This is best done
before you begin a training session.
Check the lubrication as follows:
• Ensure the treadmill is powered off!
• Step on the treadmill belt .and stand
steadily where you normally run on
the belt.
• Take hold of the horizontal handlebar
and push the belt with your feet so
that it slides back and forth.
• The belt should move softly and
evenly, without a sound.
If you notice jerky movement or if the
belt will not slide check for lubrication by
sliding your hand under the belt.
•
PURE RUN 2.1
GB
LUBRICATE THE RUNNING DECK
ACCORDING TO THE FOLLOWING
INSTRUCTIONS:
1. Attach the nozzle of the lubrication
tube to the T-Lube S container.
2. Lift the running deck and lock it.
3. Position the nozzle between the belt
and the board. Try to reach the spray
as far into the center of the running
deck as possible.
4. Spray the lubricant for 2-3 seconds.
5. Lower the running deck into its
normal position. Use treadmill for
your training session. Or allow the
treadmill to run for at least 5 minutes
at 5 KM/H (3 Mile/H).
NOTE!
Lubricate your treadmill only with T-Lube
S silicon lubricant. Contact your local
Tunturi distributor for further supplies
of T-Lube or further information on
lubrication and maintenance.
ALIGNING THE RUNNING BELT
Monitor belt tracking during exercise and
make adjustments as needed. The belt
should run in the center of the treadmill.
Alignment is not usually needed,
provided
• The treadmill is placed on an even,
solid and horizontal surface and the
belt is correctly tensioned
• The alignment of the belt is correct
It is, however, possible for the belt
to be pushed to one side due to the
user’s running style (e.g. more weight
on one foot). The alignment of the
belt is adjusted by turning the two
bolts at the back of the treadmill.
11
OWNER’S MANUAL
•
PURE RUN 2.1
ALIGN THE BELT ACCORDING TO
THE FOLLOWING INSTRUCTIONS:
1. Turn the power switch on and
increase the treadmill’s speed to 5
km/h (3 mph).
2. If the belt drifts to the left, turn the left
adjustment bolt 1/4 turn clockwise
and the right adjustment bolt 1/8
turn anti-clockwise. If the belt drifts
to the right, turn the right adjustment
bolt 1/4 turn clockwise and the left
adjustment bolt ¼ turn anti-clockwise.
3. If the belt remains centered the
adjustment is correct. If not, continue
to make small adjustments as above
until the belt is correctly aligned.
If the belt is allowed run across to
one side for long periods of time the
edges of the belt may be damaged
and the treadmill may not continue to
operate correctly. Any damage to the
belt caused by the lack of necessary
adjustment will not be covered by the
warranty.
12
ADJUSTING THE BELT TENSION
The belt must be tensioned if it begins
to slip on the rollers. In normal use,
however, keep the belt as loose as
possible! The belt tension is adjusted
by turning the same screws as used for
aligning the running belt. If turning the
screws will not effect the belt tension,
please contact your local Tunturi dealer.
1. Increase the treadmill’s speed to 5
km/h (3 mph).
2. Turn both adjustment screws an
equal amount, ¼ turn clockwise.
3. Try to slow the belt down by holding
onto the handrails and braking as
you walk (as if you were walking
downhill).
If the belt slips, turn another 1/4 turn and
repeat the test. When braking heavily the
belt may slip. If the belt keeps slipping
despite repeated adjustments, please
contact your local Tunturi dealer.
power switch on to reset the treadmill.
This should clear incidental errors and
ready the treadmill for normal operation
again. If after you have reset the
treadmill by turning the power switch off
and on again, and the treadmill is still not
operational, contact your local Tunturi
dealer for service.
If you require spare parts, always
give the model, serial number of your
equipment and the spare part number
for the part you need. The spare part list
is at the back of this manual. Use only
spare parts mentioned in the spare part
list.
TRANSPORT AND STORAGE
FOLDING
After assembly is complete, you may fold
the machine into the upright position for
storage. To hold the machine, raise the
desk until it locks into position.
NOTE!
Make sure you hear the click sound of
the deck locking into position. This is to
ensure the deck is locked in place and
will not drop back down.
OWNER’S MANUAL
•
PURE RUN 2.1
GB
NOTE!
Make sure the treadmill’s elevation
is at 0% before folding the deck. If
the elevation is not at 0%, folding will
damage the mechanism.
UNFOLDING
Lightly kick the switch indicated in the
middle of the shock absorb rod to fold
down the frame deck.
NOTICE!
This vertical rod (shock) has a built-in
safety unfolding feature to help lower the
deck slowly.
Please make sure there are no children
or other things under the deck when you
lower it.
NOTE!
Transport the treadmill with extreme
caution over uneven surfaces, for
example over a step. The treadmill
should never be transported upstairs
using the wheels over the steps, instead
it must be carried. We recommend
that you use a protective base when
transporting the equipment.
NOTE!
TO MOVE THE TREADMILL
Before moving the treadmill, be sure the
power cord is unplugged from the wall
and the treadmill. Fold up the running
deck until it is locked and push the
equipment on the transportation wheels.
The running belt needs to be realigned
and centered after moving.
To prevent malfunctioning of the
treadmill, store it in a dry place with as
little temperature variation as possible,
protected against dust. Always unplug
the treadmill from the electrical outlet
when not in use.
13
MALFUNCTIONS
NOTE!
TREADMILL WILL NOT START
1. Not plugged in.
Plug into suitable outlet
2. Safety key not attached correctly.
Insert safety key
3. Treadmill circuit breaker tripped.
Reset circuit brear
4. On/Off switch not turned on.
Switch On/Off switch on
5. Auto Shut Down Time Out.
Unplug and replug power cord.
When you encounter unusual behavior
from the treadmill, simply turn the power
switch off, wait 1 minute and turn the
power switch on to reset the treadmill.
This should clear incidental errors and
ready the treadmill for normal operation
again. If after you have reset the
treadmill by turning the power switch off
and on again, and the treadmill is still not
operational, contact your local Tunturi
dealer for service.
TREADMILL BELT SLIPPING
• Walking belt too loose
Check belt tension.
• Deck needs lubrication.
Check deck/ belt lubrication.
ERROR CODES
ERR1:
Speed sensor error. Unplug the electrical
cord from the wall outlet and from the
treadmill, wait 1 minute and turn the
power switch on again. If treadmill
recovers to normal operation, you may
continue to use the treadmill. Otherwise,
call the dealer for service.
•
PURE RUN 2.1
The user interface will display
nformation about operational faults.
OWNER’S MANUAL
TROUBLE SHOOTING
Despite continuous quality control,
defects and malfunctions caused by
individual components may occur
in the equipment. In most cases it’s
unnecessary to take the whole device
in for repair, as it’s usually sufficient
to replace the defective part. Always
give the model, serial number of your
equipment and in case of malfunctions
also conditions of use, nature of
malfunction and any error code.
If you require spare parts, always
give the model, serial number of your
equipment and the spare part number for
the part you need. The spare part list is
at the back of this man
14
continue to use the treadmill Otherwise,
call the dealer for service.
ERR3:
Lift motor error. Unplug the electrical
cord from the wall outlet and from the
treadmill, wait 1 minute and turn the
power switch on again. If treadmill
recovers to normal operation, you may
TREADMILL NOISY
• Loose hardware.
Tighten visible srews, nuts and bolds.
• Motor straining.
Belt tension to high.
• Clicking sound – roller knocking.
Adjust rear rollers – check the
tension.
INACCURATE PULSE RATE -HAND• Too much hand movement.
Stand on side rails to obtain accurate
pulse reading.
• Palms too wet.
Dry palms.
• Gripping handgrips too tight.
Grip using moderate pressure
• Wearing rings.
• Remove all rings
• Deck needs lubrication
Check deck lubrication
INACCURATE HEART RATE -STRAP• Chest strap pick-ups not moist.
Moisten pick-ups on chest strap.
• Electronical interference.
Keep at least six feet away from TV,
computer and fluorescent lights.
• Strap battery power low.
Replace strap battery.
OWNER’S MANUAL
•
PURE RUN 2.1
GB
TECHNICAL
SPECIFICATIONS
PRODUCT
Motor ............................2.5-4.0 HP-DC
Speed ................................. 0.8-18 km/h
Incline ............................................. 12%
Running Surface ( Lxw) ....510x1420mm
Power Supply ...................220-240V-AC
Foldable ........................................... Yes
Shock Absorbing System ................. Yes
Length / Folded ...............188cm/ 106cm
Width / Folded ....................86cm/ 86cm
Max User Weight ............. 135kg/ 300lbs
MONITOR
Program Display .............. 1 LCD screen
Feedback Display ...... 3LED + 2 op LCD
Programs Total .................................. 20
Pre-Set Programs ................................ 6
User Programs .................................... 3
Hrc Programs ...................................... 2
Quick Start/ Manual ............................. 1
Fitness Test .......................................No
User Register .....................................No
ERGONOMICS
Running Belt (Lxw) ....3000x510x1,8mm
Running Deck Thickness ............. 18mm
Handgrip Speed Control .................. Yes
Handgrip Incline Control .................. Yes
Contact Heart Rate .......................... Yes
Telemetric Hr Receiver .................... Yes
Chest Strap Option .................... 5,4 kHz
Bottle Holder .................................... Yes
Storage Pocket ................................ Yes
Transport Wheels ............................ Yes
EXTRA
Operating Environment .................Home
Speed Quick Buttons ......................... 10
Elevation Quick Buttons .................... 10
Usb Charging ................................... Yes
En-957 Class .................................... HB
15
Buble
Description
A01
Main frame
1
A02
Console base
1
A03
Upright support post (LH)
1
A04
Upright support post (RH)
1
A05
Incline frame bracket
1
A06
Front support frame
1
A07
Power switch bracket
1
A08
Gas spring
1
A09
Front roller
1
A10
Rear roller
1
A11
Incline support bracket
2
A12
Foot rail fixing slider bracket
6
B01
User interface
1
B02
Bottle holder cover (LH)
1
B03
Bottle holder cover (RH)
1
B04
Book rack
1
B05
USB socket dummy plug
1
B06
Running deck shock absorber
4
B07
Sensor holder
3
B08
Handpulse sensor cover (upper)
2
B09
Handpulse sensor cover (lower)
2
B10
Console base handlebar foam
2
B11
Console base handlebar end plug
2
B12
Wire (upper)
1
B13
Handlebar toggle switch top cover
2
B14
Handlebar toggle switch bottom cover
2
B15
Safety key
1
B16
Motor dust cover
1
B17
Rear roller end cap (LH)
1
B18
Rear roller end cap (RH)
1
B19
Base side cover (LH)
1
B20
Base side cover (RH)
1
B21
Front support frame end cap
2
B22
Side landing profile
2
B23
Running deck
1
PURE RUN 2.1
B24
Running belt Grey
1
B25
Rubber running deck bumper
2
B26
Main frame wheel
2
B27
Speed sensor
1
B28
Motor drive belt
1
•
B29
Drive motor (2.0HP DC)
1
OWNER’S MANUAL
PARTS LIST
B30
main frame end plug
2
B31
Overcurrent protector
1
B32
On/ Off switch
1
B33
Power cable socket
1
B34
Power cable
1
B35
Lift motor
1
B36
Incline bracket transport wheel
2
16
Qty
B37
Rubber deck mount (45*36*10)
4
B38
Incline frame bracket slide wheel
2
B39
Front support frame wheel
2
B40
Wire clip
2
B41
Wire (lower)
1
B42
Power board
1
B43
EMI Filter (EU)
1
B44
Transformer
1
B45
Ferrite
2
B46
Wire ( 53cm) .
1
B47
Wire ( 12cm)
2
B48
Wire ( 70cm)
1
B49
Wire ( 45cm)
1
B50
Grounding wire
1
B51
wire fixer
3
B52
Fixer
2
C01
E shape hood bracket
2
C02
Fixed pin for motor (Φ10.2*96L)
1
C03
Motor hook (M6)
1
C04
Washer (4mm)
1
C05
Nut (12.5L*&18*&10.2)
2
C06
Washer (8*16*1.5T)
4
C07
Washer (8*18*1.5T)
14
C08
Washer (8*19*1.5T)
2
C09
Washer (8*25*1.8T)
2
C10
Screw (4*16)
29
C11
Screw (4*12)
2
C12
Screw (4*12)
17
C13
Screw (3*10FB)
2
C14
Screw (8*55)
3
C15
Screw (8*15)
6
C16
Screw (8*35/12MM)
4
C17
Screw (10*40/10MM)
1
C18
Screw (8*26/10MM)
2
C19
Screw (8*37/15MM)
4
C20
Screw (8*48/20MM)
2
C21
Screw (10*25 hex socket)
21
C22
Screw (10*25 hex bolt)
22
C23
Nylon nut (M8)
12
C24
Nylon nut (M10)
5
C25
Screw (10*25 hex bolt)
2
C26
Nylon nut (M6)
1
C27
Screw (M6*20MM)
8
C28
Screw (M6*25)
4
C29
Screw (8*20L)
8
C30
Screw (3*23)
8
C31
Screw (4*8)
4
C32
Screw (4*16)
6
Assembly kit
1
User manual
1
Membrane set
1
OWNER’S MANUAL
•
PURE RUN 2.1
GB
EXPLODED VIEW
17
www.tu n tu r i.com
TUNTURI FITNESS B.V.
P.O. BOX 60001
1320 AA
THE NETHERLANDS
www.tunturi.com
Version 20140402