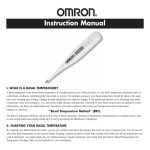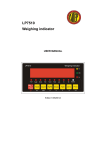
1
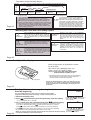
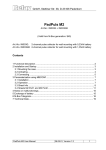
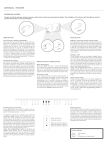
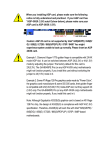
Multi-Purpose Women's Thermometer BT-16R
Sophia Ray
Instructions for Use
Thank you for purchasing this Sophia product. Please read the
"cautions for safe use" in the Instructions to insure that you use it
to full advantage.
CAUTION:
This Instructions for Use, English version is a translation
from the original Japanese instructions, for the purpose of
the end users who have difficulties to read Japanese.
All warranty is based on the original Japanese instructions.
WARRANTY IS EFFECTIVE ONLY IN JAPAN.
Manufactured and sold by:
NISHITOMO CO., LTD.
449-3 Hiruda, Tamaki-cho, Wataraigun
Mie-prefecture, JAPAN
Should you require assistance regarding
this product and its operation, please contact
our customer service centre.
Nishitomo Customer Service Centre
Free Phone:
0120-01-6987
JAPAN ONLY
Available from 8:30 to 12:00 from 13:00 to 17:30
(except for Saturdays, Sundays, Holidays and
company holidays)
E-mail: [email protected]
Homepage: http://www.nishitomo.com/ (Japanese)
CONTENTS
Caution for safe use ............................................... 2
Contents of product ................................................ 5
Parts name ..............................................................6
Setting the battery ...................................................7
Life time of the battery ............................................ 8
Setting the date & time (Radio-wave clock) ........... 9
Setting the date & time (manual clock) ..................11
Setting the alarm time (measuring time) ................13
Truning off the alarm ..............................................14
Basal Body Temperature (BBT) ............................15
Taking your BBT every morning ............................17
Inputting 1st day of menstruation .......................... 21
Deleting 1st day of menstruation .......................... 22
Correcting 1st day of menstruation ....................... 23
Inputting memo of bodily conditions ..................... 25
Page 1
Check the stored data .......................................... 28
(how to recall and check the data)
Fertile days ........................................................... 33
Predicted ovulation ............................................... 35
Next menstruation ................................................ 36
Heart symbol tells you a possible pregnancy ....... 37
Doctor symbol tells you a possibility
of your bodily abnormalities ............................. 38
Rhythm in your menstrual cycle ........................... 40
Back light of the display screen .............................43
Deleting all data and once again using the
device from the beginning .................................44
Optional product ................................................... 45
Optional service .................................................... 47
When something happened ...................................48
How to take care of the device ............................. 48
After services ........................................................ 49
Specification ......................................................... 49
Conditions of guarantee ....................................... 50
Guarantee ................................................ back page
CAUTION FOR SAFE USE
Be sure to read before using the device
(page 2 to page 4)
Please read the instruction carefully to insure that you use it to full advantage. "Caution for safe use"
(page 2 - page 4) helps toward correct usage and in order to prevent possible accidents, many kinds
of signs are showed. The signs and its meanings are as mentioned below.
This sign means possibilities of death or injury of
WARNING persons when operating wrong against this warning.
CAUTION
This sign means possibilities of injury of persons or
material damage when operating wrong against this warning.
This sign means DO NOT do what follows.
Page 2
This sign means DO what follows.
WARNING
Keep the device away from the range of children's hands.
Please avoid that children take the battery cover and swallow down the battery.
Consult your doctor immediately when the children have swallowed down the battery and its cover.
Avoid pricking your eyes with the thermometer probe. Your eyes might be damaged.
CAUTION
Do not disassemble the device, do not drop it, and
avoid hard shocks. These may cause malfunctioning.
Never place the device near a fire.
These may cause malfunctioning.
Avoid getting any water on Petit Sophia.
This can result in malfunctioning.
Keep Petit Sophia away from: humidity, direct sunlight, sudden changes in temperature, and dust.
Never put the thermometer probe into boiling
water in order to disinfect it.
Do not hold the probe cable and swing it. This
can result in malfunctioning.
Keep the device carefully to avoid accidents such as your pet might bite or swallow the battery.
Page 3
Under some conditions (in the concrete building or underground), the radio-wave clock may be unable to
receive the radio signal. Place your device near the window of your room to facilitate signal receiving. And
if you place the device near electronic home appliances such as cell phone or personal computer, it may be
unable to receive the radio signal. See the page 11 and 12 of this instructinon to adjust the clock manually.
This device is for measuring the basal body temperature(BBT). Never use this for any other purposes than measuring
body temperature. It is, however, possible to measure your body temperature(not BBT) in the range of 34 - 42
Please measure your BBT every morning to get the precise data. Getting continuously the BBT
data can secure the evaluation of the data (secured display of the fertility symbol).
This device is for helping you detect a possible pregnancy and check your bodily conditions.
Consult your doctor for a secure diagnosis.
Do not throw the device or the battery into
fire. The battery may explode.
Page 4
Insert a new battery within 3 days after
the battery symbol appears.
Be sure to use CR2032 only. Using any other batteries causes malfunctionings.
Keep the battery out of the reach of children. If swallowed accidentally, please consult your doctor immediately.
Do not recharge, short-circuit, disassemble, heat or throw the battery in fire.
We are not responsible for deleted data due to a dead battery or other causes.
We recommend that you use the data check function to take note of the data periodically. Or you can print out the stored
data in accordance with the optional service on page 45 - 47.
When disposing of battery, tape the both side(pole) of battery to insulate it. Contacting with other metals or batteries may
cause heat or fire. Follow the local regulation where you live, when you dospose the battery.
Contents of product
Battery for inspection
Body
1 x Coin lithium battery
(inserted in the device)
Please remove the protection
film before use.
* Battery life will be 6 months under normal use
condition. It might be shorter because this was
used for factory inspection. And it will be shorter
when you often use the backlight.
Instruction for use / guarantee (back cover of this booklet)
Please make sure that you have all the contents.
If some items are missing, please phone Nishitomo Service Center immediately.
FREE DIAL: 0120-01-6987 (Japanese language only)
Page 5
Parts name
Display screen
(Start button)
Cable
Starts the measurement. Lights on at alarm time.
(Delete button)
Operating panel
Cancels the operating you did.
(Confirm/Menu button)
Calls the operating menu, and confirms the operatings.
Left shift/
(Call button)
Calls the temperature data and shift backwards the numbers.
Right shift/Heart button
Displays the no. of days after fertile day starts and due date,
and shift forwards the numbers.
Thermometer probe
(Alarm/Clock setting button)
Hold the thermometer probe to
Sets alarm time and receives the wave signal.
take temperature.
- Light button
Turns on the backlight for 30 seconds.
Battery cover
-
Bottom of device
Rating
label
Interface socket
For optional interface software kit only.
Page 6
Remove the plastic
protection film
Setting the battery
Reverse the device and slide the battery cover to open
the compartment. Remove the plastic protection film.
You will hear a beep and the display will appear in the
LCD screen.
CR2032
Bottom of device
The small hole beside the battery
is for factory inspection only.
Do not prick or insert anything into it.
Page 7
Changing the battery
Pick up the battery with a sharp stick.
Insert a new battery with +(positive)
pole upwards(facing to you).
* When changing the battery, be sure to adjust the date and time of the clock.
Life time of the battery
The battery lasts for approx. 6 months. When the battery is low,
(low battery) will appear.
Change the battery within 3 days after
the low battery symbol appears.
* The stored data does not disappear when you change the battery. However, the
calendar function stops when changing the battery. Please set the time and date again
after inserting a new battery. The attached battery has been used for inspection and
may not last for a full 9 months.
For the details of changing battery, see page 4 carefully.
Page 8
Setting the date and time (Radio-controlled clock)
This means the sensivity
of wave reception. Place
the device where all bars
appears to receive the
time radio wave.
Radio-controlled clock can work only in Japan.
If you are out of Japan, please ingnore this function and jump to page 11
to set the date and time manually.
Month
1. Press the
(Clock setting) button for 2-3 seconds.
Day
It sounds first one beep and soon after sounds another beep.
The clock starts to receive the radio signal.
2.
(Time signal reception symbol) will appear to indicate that the
device received the radio signal properly.
Time signal reception symbol does not appear when the device did not
receive the time signal properly !!
Case when the device cannot receive the time signal
Page 9
During receiving the time signal and updating
time, this block(temperature graph) will scroll
up & down and left & right to indicate that the
device is now updating the clock time.
Reception of radio signals will be interferred by the conditions of your place
and houses (concrete buildings and underground). For better reception, place the device near the window and away
from electrical appliances, PCs or cell phones. When this happens, see page 11 - 12 for manual settings.
3. One short beep sounds 2-3 minutes later when the signal reception
is complete.
When the reception is properly complete, the time signal reception symbol will appear.
When the signal reception symbol does not appear, please see page 11 to set the date
and time manually. Reception takes up to 10 minutes when the strength of the radio
signal is not enough.
The reception symbol appears when
proper reception was made. When
the reception symbol does not appear,
reception was failed.
Do not place the device near cell phones, PCs and home appliances.
Those may interfer the signal reception.
The clock of this device automatically syncronizes the current time and updates it everyday.
Radio-controlled clock will automatically syncronize the time signal twice a day (2:00 am and 4:00 pm). This automatic
syncronization is made sirently. When you wish to operate the device during signal reception, just do it. The device will
stop the signal reception and accept your operatings. Press the Del button to stop the manual signal reception, the device
will go back to clock mode. In this case, the clock is not updated.
The time signal reception symbol does not appear when the clock is not updated. Set the clock manually.
CAUTION: Adjust the date and time after you replaced the battery. Otherwise the clock remains incorrect.
Page 10
Setting the date and time (manual clock)
Example: 10:00 am, 1st of April, 2007
1. Press (Menu button) at normal clock mode.
Blink
"Operating guidance symbols(guidance symbols)" appear in the display.
2. Select
press
(clock) symbol using shift button and
(Confirm button). (symbol blinks when selected)
Enters to date & time setting mode. Year will blink.
3. Set the year using shift button and press
(Confirm button).
Year is confirmed and Month will blink.
* At first "2006" is displayed. You cannot go back before 2006.
Set the year correctly for proper display in leap year.
4. Set the month using shift button and press
(Confirm button).
Blink
Month is confirmed and Day will blink.
* At first "1"(January) is displayed. After 12(December), it returns to 1.
Page 11
Blink
5. Set the day using shift button and press
(Confirm button).
Day is confirmed and Hour will blink.
* At first "1" is displayed. It displays 31, 30, 29 or 28(leap year) in accordance with
each calendar month.
6. Set the hour using shift button and press
(Confirm button).
Blink
Hour is confirmed and Minute will blink.
* The ckock is 24-hour mode.
7. Set the minute using shift button and press
(Confirm button).
Minute is confirmed and returns to clock mode(normal mode).
Now the manual settings of date and time is complete.
* After 59, it returns to 00.
Page 12
If you do not operate any buttons longer than 1 minute during
the setting, the display will return to initial mode.
Blink
Setting the alarm time (measuring time)
Example: Alarm time at 07:00 am
CAUTION: you can NOT store your basal temperature without setting the alarm time.
1. Press the
OFF
ALM
(Clock setting) button at clock mode.
It enters to the alarm setting mode.
* When you set the alarm for the first time, "OFF" is set.
2. Set the alarm hour using shift button and press
(Confirm button).
Alarm hour is confirmed and alarm minute will blink.
* Alarm clock is 24-hour display.
3. Set the alarm minute using shift button and press
ALM
(Confirm button).
Alarm minute is confirmed and it returns to clock mode(normal mode).
(ring) will appear in the display when you activate the alarm.
* It returns to 00 after 59.
By setting the clock and alarm time, the device can store your temperature.
If you change the clock or alarm time settings, the stored data will not be deleted.
ALM
Page 13
Turning off the alarm time
"OFF" will blink and press
OFF
(Confirm button).
ALM
device will store the temperature only when the alarm is truned on(activated).
CAUTION! The
The only measurement that is stored is the one taken one hour before or after the alarm time.
Selecting the sound volume of the alarm and operatings.
1. Press the
(Menu button) at clock mode.
It enters to the operating guidance mode.
2. Select the
(sound volume setting) using shift button and
press
(Confirm button). Selected symbol will blink.
It enters to the sound volume setting display.
3. Select the sound volume using shift button and press
(Confirm button).
You can select 3 sound volumes of Hi(max), Lo(min) and 0(mute).
The button operating sound will be minimum when Hi or Lo is selected and will be
mute when 0 is selected.You can select two levels of operating sounds.
LVH l
Page 14
Hi(maximum)
LVL o
Lo(minimum)
LV 0
(mute) symbol will appear when
you have set the mute.
Lo(minimum) is set at shipping.
0 (mute)
Basal Body Temperature (BBT)
The Basal Body Temperature(BBT) is the body temperature at basal metabolism(at
awakening). BBT of a woman draws clear two phases, low and high. A woman has
two ovaries, in the left and right, and an ovulation occurs from each ovary
alternately. This cycle varies from person to person, but the typical length of the
cycle is 28 to 30 days. Measuring the BBT helps you check whether the ovaries are
functioning, and to know when ovulation has occurred. The BBT of a woman goes
through the low phase but shifts to the high phase during ovulation. The BBT shows
a double-phase as shown in the above graph.
Yellow body hormone after ovulation causes this high temperature. The yellow
body hormone increases the endometrium(inside surface of womb), as it is making
a soft bed for the coming baby. This yellow body hormone will continue to secrete
for approx. 3 months when you become pregnant. When, however, a pregnancy
has not been achieved, the unused endometrium will come out with the menstrual
bleeding. Thus a menstruation begins.
Page 15
BBT Graph
.80
HIGH Phase
.70
.60
Average
36.50
temp.
.40
.30
1st day of
.20 menstruation
1st day of
LOW Phase OVULATION
menstruation
.10
36.00
Most
MenstruMenstruInfertile
Fertile days fertile Fertile
ation
ation
days
days
days
Sophia Ray stores your basal
temperature and automatically
makes the graph of BBT.
Standard
temperature
Low phase
Ovulation
High phase
0.2C per one dot
Page 16
Taking your BBT every morning
The
(Start button) will iluminate green and you will hear
the alarm beep at your alarm setting time
1. Open the lid of device and take our the thermometer probe.
The thermometer probe is placed in the back of device.
(Do not pull the cable strongly)
2. Hold the thermometer probe under your tongue. Close your
mouth and press the
(Start button).
Stops theh alarm and starts the measurement. At start of measurement, the backlight will
be on for 5 seconds.
Do not speak and open your mouth during measuring.
Under your
tongue!
3. The display shows the status of measurement.
At beginning of measurement
Lo
"1" appears 1 min after the start, "2" appears 2 min after...
(Start button) has
two small round patches to easily
distinguish from other buttons in a
dark room.
1 2
Page 17
4. Completion beep tells you the end of measurement.
You will hear the 1st beep when your temperature is stable. And the display
indicates the completion of 1st measurement.
* At this stage, the measurement is complete, but the 2nd completion
beep will sound when 5 minutes passed after start of measurement.
For more secured measurement, you can continue taking temperature 5 minutes
after the start of measurement and will hear the 2nd beep.
Your temperature will be automatically stored.
The 1st measurement will be stored when you stop at the 1st beep and the
2nd measurement will be stored when you stop at the 2nd beep.
The device returns to clock mode, and the M symbol will appear to indicate that
the temperature is stored.
* For secured measurement, stop the measurement at the 1st or 2nd and always
do the same
1st completion
(backlight is
on for 15 sec)
2nd completion
(backlight is
on for 15 sec)
12 3
12 34 5
M symbol
(temp is stored)
9
3
M
Never hold the probe cable and swing around the device.
This causes malfunctionings.
Page 18
How the alarm beep sounds
The alarm goes off for 10 minutes continouesly when not deactivated.
Press
(Delete button) when the alarm goes off, to turn off the alarm and skip the measurement.
* If you took your temperature within one hour before the alarm time, the alarm does not go off.
Or when the M symbol is in the display, the alarm does not go off even if you altered the alarm
time settings.
Error indicator
If the alarm beep goes off during the measurement
When during measuremnt you moved, rised or the thermometer probe falled out
from your mouth, the reading becomes unstable. Intermittent beep will go off for 10
minutes to warn you of a measurement error. Press the Start button again to start
from the beginning.
12
* You can re-start the measurement 4 times. After the 5th error the display returns
to clock mode.
And also, it returns to clock mode after the error beep went off for 10 minutes.
Press the Start button after the dislpay returns to clock mode if you wish to measure.
Page 19
When you wish to delete the measurement and start again.
You can cancel the measured temperature on that day after the
measurement is finished.
1. Press and hold down the
d.EL
(Delete button) for 2 seconds.
The measurement of today and "dEL" will blink alternately for one minute.
2. Press the
of today.
3. Press the
(Confirm button) to delete the measurement
(Start button) to start the measurement.
(The only measurement that is stored is the one taken one hour before or after the alarm time)
If you wish to cancel this operating, press the
(Delete button) during the measurement of today and
"dEL" are blinking or do not any button operatings for one minute and let the symbol blink.
The measurement is not deleted.
To achieve an accurate temperature recording.
Page 20
-
When the alarm beed sounds, take the temperature just as you are(on the bed). Do not rise, do not go to toilet.
Be sure to take temperature under your tongue.
Do not speak, do not open your mouth while measuring.
Be sure to set the alarm time. Without setting of the alarm, the device cannot store the data.
Be sure to take temperature at the alarm time.
flashes
alternately
Be sure to do it at the menstruation
after the start of your device.
Inputting 1st day of menstruation
1. Press the
(Menu button) at clock mode.
It enters to the operating guidance mode.
2. Select the
(Input mens) using shift button and press
(Confirm button).
9
3
9
3
The date of that day will blink.
3. Press the
(Confirm button) during the date is blinking.
Input of the 1st menstruation is complete.
* You cannot input it on the day when you purchased the device !!!
Please input the next menstruation.
Page 21
Be sure to input the 1st day of menstruation each time. You can do it any time during
the day. You cannot input it within 10 days from the last 1st day of menstruation.
* When you press the
(Delete button) during the operating or do not any operatings for
one minute, the above operatings will be canceled and the device returns to clock mode.
Deleting 1st day of menstruation
1. Press the
M
When 1st mens was properly
recorded, the temp graph shows
day 1.
If you recorded incorrectly, you can delete
the 1st menstruation, but only on that day.
(Menu button) at clock mode.
It enters to the operating guidance mode.
2. Select the
(Deleting mens) using the shift button and press
the
(Confirm button).
blinks alternately
The date of that day(when you recorded 1st mens) and dEL will blink alternately.
3. Press the
9
3
9
3
dEL
(Confirm button) during blinking alternately.
For deleting the input after that day
Deleting the input of 1st menstruation is NOT possible after that day.
If you failed to delete it on that day, see page 23 to shift the 1st menstruation to today.
After this procedure, follow the above process to delete the input.
* Press
(Delete button) during each operating or do not any button operatings
for one minute to cancel the operatings and return to clock mode.
Page 22
Correcting 1st day of menstruation
1. Press the
(Menu button) at clock mode.
It enters to the operating guidance mode.
2. Select the
(Correcting mens) using the shift button and press
the
(Confirm button).
The date will blink for one minute.
3. Set the date you wish using the shift button during the date is blinking
and press the
(Confirm button).
Correcting the date of 1st menstruation is complete.
* The date of today does not change even though you changed the 1st day of menstruation.
It is impossible to input it within 10 days from the last 1st day of menstruation, and to forward
the 1st day of menstruation.
After you corrected the 1st day
of menstruation, the device will
re-calculate the data.
By this re-calculations the
standard temperature and
fertile days may change.
* Press
(Delete button) during each operating or do not any button operatings
for one minute to cancel the operatings and return to clock mode.
Page 23
When you failed too input the 1st day of menstruation
1. First input the temporary date (see page 21).
2. Next shift the date to the correct one (see page 23).
Correcting the date of 1st menstruation is complete.
You may have failed to input the 1st day of menstruation.
You may have failed to input the 1st day of menstruation when the high phase
continues for over 10 days and your BBT drops under the average
temperature for several days. You will be informed as follows.
symbol wil blink and the fertile symbol
will be displayed.
Automatic input of 1st day of menstruation.
Page 24
In case of the following, the 1st menstruation day is recorded automatically.
- If you set the bleeding
for three consecutive days and
symbol is
displayed. (That is set to the first day you recorded the bleeding memo)
- If 100 days passed without recording the 1st day of menstruation.
(It will be recorded on 100th day as max. length of a cycle is 99 days.)
9
1
3
5
M
Inputting memo of bodily conditions
Cervical mucus (3 levels)
Bleeding
Bleeding at the time of menstruation and on other occasions.
Cramps
Pains at the pelvic area at the
time of menstruation.
Sexual
intercourse
Three types of cervical mucus.
Check how long the mucus stretches. First, open your legs wide and put your fingers
into the vagina. When you reach the cervix of uterus(womb), take out the mucus there.
Spread the mucus with the thumb and index finger. The mucus increases when the time
of ovulation approaches.
2-3 days before
ovulation,
stretches1.2"2.0"(3 - 5cm).
Before ovulation, barely
stretches.
Please input this when yo have an
intercourse for your family planning.
At the time
ovulation,
stretches 3.9"-5.9"
(10- 15cm).
02
01
03
Page 25
Fever Please input this when
you have a fever.
Medication
Please input this when you are taking
cold tablets such as asprin, etc.
How to input the memo of bodily conditions Operate this
on that day
1. Press the
(Menu button) at clock mode.
It enters to the operating guidance mode.
2. Select the
(bodily memo) using the shift button and press
the
(Confirm button).
Symbol for "measured"
appears when stored.
M
Bleeding symbol of bodily memo will blink.
Press the shift button to select the symbol you wish. Selected symbol will blink.
3. Press the
(Confirm button) during the symbol you wish is blinking.
The memo symbol you wish and the "measured" symbol(M symbol) will appear and
inputting the memo is complete.
* Press
(Delete button) during each operating or do not any button operatings
for one minute to cancel the operatings and return to clock mode.
Page 26
When you could not input the memo on that day, follow the page 31
to record it the following day.
How to delete the memo of bodily conditions
1. Press the
Operate this on that day
when you have input the
wrong memo.
(Menu button) at clock mode.
It enters to the operating guidance mode.
2. Select the
(bodily memo) using the shift button and press
the
(Confirm button).
The bodily memo recorded and "measured" symbol(M symbol) will blink.
Press the shift button to select the symbol you wish. Selected symbol will blink.
Symbol for "measured"
disappears when deleted.
3. Select the memo symbol you wish to delete using the shift button and
press the
(Confirm button).
M
The memo symbol you wish and the "measured" symbol(M symbol) will appear and
inputting the memo is complete.
* Press
(Delete button) during each operating or do not any button operatings
for one minute to cancel the operatings and return to clock mode.
When you could not input the memo on that day, follow the page 31
to record it the following day.
Page 27
Check the stored data How to recall and check the data stored in the device.
The device stores up to 12 cycles of data.
The memory holds data of up to 12 cycles, including the record of each individual day from beginning to end,
with a maximum limit of 500 days. To check the contents of each cycles, you can retrieve the cycle, one at
a time, up to 12 cycles, or as many as are recorded in 500 days. When a new cycle begins and the memory
already has 12 cycles, the oldest cycle is deleted from the memory.
Each cycle begins with the first day of menstruation and ends
with the final day before the next menstruation.
Cycle 12
(12th cycle)
You can retrieve and check the cycle one
by one, and check the temperature
and memo recordings of each day.
Cycle day is the no. of days in a cycle counted
from the 1st day of menstruation. One cycle lasts
normally 28 - 30 days from the 1st day of mensruation
to the next 1st day of menstruation.
Page 28
Cycle 1
(first cycle)
No of cycles(upper) and standard temperature(down) will appear alternately
How to retrieve and check the data
1. Press the
(Recall button) at clock mode.
In the display screen, the no. of cycles and standard temperature will appear
alternately, and the 1st day of menstruation, basal temperature and
recall symbol
will appear.
* After the 3rd cycle the standard(average) temperature will be calculated to
show your own one. Until then, the standard temperature is preprogrammed
to 36,50 at factory.
When your standard temperature is calculated, the standard temperature
symbol will appear on the left of display screen.
1st day
of mens
4
25
Recall
symbol
Basal temperature graph
Average temperature is the standard temperature to detect the high and low phase, and that is preprogrammed
to 36.50 until the end of the second cycle. From the third cycle, the device begins displaying your own average
temperature which is calculated from the previous data. This average temperature is your own particular one.
When you skip the measurement for a few days, or when the difference between the high and low phase is unclear
and too small, the device is NOT able to calculate the average temperature. Please measure your BBT every day.
Page 29
Temperatures under 34.00 are not recorded, and the above 37.50
are recorded, but not used for evaluation.
This is to avoid mis-calculation and calculating the temperature of fever. The temperature graph might show the low
phase only or the high only, when the average temperature is not calculated.
2. Select the cycle you wish to check by using the shift button
and press the
(Confirm button).
The data of the last day in the cycle you chose will appear.
- Dispyal of temperature graph
The graph you are checking will blink.
- Temperature value
- Display of date and cycle day
will blink alternately
- Display of bodily conditions memo
The memo in the day you are checking will appear
- Display of "measured" symbol
will appear on the day when you measured
- Display of bodily conditions message symbol
"measured" symbol
Cycle day(upper)
and month/day(down)
will blink alternately.
Temperature value
14
4
Symbol of
bodily conditions
message
25
M
3
Bodily conditions memo
3. You can check the data day by day by using the shift button
Page 30
Basal temperature graph
* Press
(Delete button) during each operating or do not any button operatings
for one minute to cancel the operatings and return to clock mode.
Recording/deleting the bodily memo at data check mode
1. Recall the day when you wish to record or delete the bodily
memo in accordance with the procedure on page 29.
2. Press the
4
25
M
3
(Menu button) when you enter the day.
It enters the screen for recording the bodily memo.
3. Select the memo symbol you wish to record or delete by
using the shift button. The symbol will blink.
Press the
(Confirm button).
When you recorded
The "measured" symbol (M symbol) will blink together with the memo symbol you
just recorded by the procedure.
When you deleted
The "measured" symbol (M symbol) will disappear when you deleted the memo.
Page 31
Press the
(Menu button)
on the day you wish to change
When recorded, M symbol will appear
when deleted, it will disappear.
4
25
M
3
* Press
(Delete button) during each operating to return to the previous stage.
or do not any button operatings for one minute to cancel the operatings and return to clock mode.
How to utilize the basal temperature graph
2.You can detect whether you ovulate or not
The BBT of a woman who ovulates will record a double-phase temperature, first a low then a high phase;
wheareas if there is no ovulation the bi-phasic pattern does not develop. A woman in puberty may experience
menstruation without ovulation because her ovarian functions are still immature. However, if a mature woman
does not ovulate, or if her high temperature phase continues only for a week or so before the next menstruation
begins(progesterone malfunction)she is advised to consult a physician since her ovaries may not be
functioning normally. If you experience such conditions see a physicain at your earliest convenience.
(A) ovulating
High phase
(B) not ovulating
Low phase
Low phase
will
continue
Case (A): If the low phase continues for a longer time than usual, you are not pregnant but your ovulation is delayed.
Hormonal imbalances, stress, other causes may delay ovulation. Or a menopause, when hormonal imbalance or insufficiencies
occur, may be the reason Case (B): If the high phase continues for 21 days and more and your menstruation does not start,
you may be pregnant. In this case, the symbol will inform you of that. Thus, taking your BBT will be helpful to detect the reasons.
(A) delayed ovulation
Page 32
(B) may be pregnant
High phase
continues
21 days and more.
Fertile days [the period when are likely to get pregnant]
symbol indicates your fertile days, in addition,
blink to indicate the most fertile days.
symbol will
This device displays symbol(birth control symbol) to inform you that you are
at fertile days. And when you enter the most fertile days, in addition to the above
symbol
(flash) symbol will blink. Thus, the device will inform you of the fertile
days by two steps.
* This symbol will disappear a few days after entering the high phase. It may appear
again when after that your temperature lowers under the standard temperature.
4
25
M
3
Fertile
days
4
Most
fertile
days
25
M
3
Display of fertile days is calculated by
combination of Knaus-Ogino, basal temperature and cervical mucus methods
(when you input the mucus only).
Press and hold the Heart button to
display the no. of days after
entering the fertile days.
(the time during this symbol appears)
PLEASE USE THIS INFORMATION
AS A REFERENCE ONLY. WE TAKE NO
RESPONSIBILITIES FOR THE RESULTS.
Page 33
Display of the flash symbol
This indication will appear from the 3rd cycle from your new purchase. And when the device cannot detecet your
ovulation, it will not appear. If your menstural cycle is not stable, actual ovulation day and the day of flash symbol
will not same.
Display of the fertile day symbol
Page 34
At an early stage since you started measuring, Sophia Ray cannot detect your ovulation due to lack of data.
The following should happen.
- On the 1ST CYCLE after starting BBT measurement(no input of 1st day of menstruation), the fertile symbol
appears everyday.
- On the 2ND CYCLE after starting BBT measurement(one input of 1st day of menstruation), the fertile symbol
appears everyday from the 6th day of that cycle.
- From the 3RD CYCLE after starting BBT measurement, the fertile days are detected by the stored data.
* The fertile symbol may appear during the period of the menstruation.
Should one of the following happen, Sophia Ray cannot detect your ovulation, therefore the fertile
symbol does not appear properly
- If you forget to input the 1st day of menstruation.
- If your temperature shift(from low to high phase) is too small.
- If you often skip the daily measurement.
If your menstrual cycle is not stable, you are not ovulating or you skip often the measurement, the fertile day symbol
continues to be "on". When you record the 1st day of menstruation during (flash) symbol is blinking, it blinks on that day.
During the
(flash) symbol is blinking, the backlight ilumination of display screen changes from GREEN to ORANGE colour.
Predicted ovulation
1. Press the
(Menu button) at clock mode.
The memo items will appear in the display screen.
2. Select the
Press the
symbol(predicted ovulation) using the shift button.
(Confirm button). The symbol will blink.
The date of the predicted ovulation will blink for one minute.
* "-- --" will appear on the top left of screen when it is over the ovulation in that
cycle. On the next cycle, the date of predicted ovulation will appear there.
This indication can be available after the 3rd cycle
Page 35
Predicted
ovulation
(month/day)
This appears when
it's over the
predicted ovulation.
1 25
-- --
* Press
(Delete button) during each operating, or do not any button operatings
for one minute to cancel the operatings and return to clock mode.
Next menstruation (predicted menstruation)
1. Press the
(Menu button) at clock mode.
The memo items will appear in the display screen.
2. Select the
Press the
symbol(predicted ovulation) using the shift button.
(Confirm button). The symbol will blink.
Predicted
menstruation
The date of the predicted menstruation will blink for one minute.
This indication can be available after the 3rd cycle
Page 36
This appears when
the predicted
menstruation cannot
be calculated.
* Press
(Delete button) during each operating, or do not any button operatings
for one minute to cancel the operatings and return to clock mode.
1 25
-- --
(Heart) symbol tells you a possible pregnancy
25
4
M
You might be pregnant if the high phase continues for over 21 days after
the low phase. Sophia Ray informs you of that with
(heart) symbol.
About the Heart symbol indication
- The heart symbol can appear beginning with the second cycle
after you begin to use Sophia Ray.
- If you set the 1st day of menstruation for a new cycle, the heart symbol will disappear.
- If your BBT data is very irregular, the heart symbol can appear on the days on which you
could be fertile, for reasons of protection.
If the high phase continues for
over 21 days, this appears.
But, it may not appear depending
on the temperature shift from low
to high phase .
When yellow body hormone(progesterone) is secreted after ovulation, this raises a woman's BBT.
If conception does not occur, the next menstruation will begin after 14 days. In general, if the high
phase continues more than 21 days, a woman could be pregnant. Petit Sophia informs you of a
possible pregnancy by the heart symbol beginning with the 21st day. The BBT will drop down
beginning with the 13-14th week of pregnancy, until this the high phase will continue. The BBT changes particular to women
can be used for health care even after a conception is confirmed. When you detect any irregularity on your BBT or feel
an abnormal body condition, we recommend you to consult your doctor at your earliest convenience.
Page 37
Due date (when the heart symbol appears)
25
4
M
When the Heart symbol appears, press and hold the Heart button at clock mode
to display the due date.
* Due date is calculated from the stored temperature data.
Please use this for your reference only.
Due date
About the Heart symbol and Due data
If the Sophia Ray was not able to detect the ovulation on the current cycle, the Heart symbol does not
appear even though you are pregnant.
It is not able to detect the ovulation if the temperature shift from low to high phase is too small or you often skip
the daily measurement.
It is very important for the health care of you and your baby to detect a possible pregnancy
at an early stage. When a pregnancy is detected, we recommend you to consult your
doctor immediately.
Page 38
Doctor symbol tells you a possibility of your
bodily abnormalities
25
4
M
Based on the stored data and the memo recordings, the doctor symbol
will appear for 3 days to warn you that you might need to consult a doctor.
Doctor symbol
* The doctor symbol will appear beginning with the 2nd cycle after you begin
the use of the device. Your daily stored temperature data and memo recordings
enable the device to detect your bodily abnormalities.
Doctor symbol will appear:
- For 3 days after the heart symbol appears.
- When your temperature drops lower than average for 2 days in succession after the heart symbol appears.
- When you record bleeding, cramps or mucus in the memo starting 3 days after your high phase begins.
- When bleeding is recorded in the memo for over 10 days.
- When you set the 1st day of menstruation after fewer than 7 days from the entry of high phase.
Page 39
When the doctor symbol appears and you feel any bodily abnormalities,
we recommend you to consult your doctor.
During the period when the doctor symbol appears, the backlight of the screen changes from GREEN to ORANGE.
Next menstruation (predicted menstruation)
4
The bodily condition goes through 5 phases during the course of a cycle. By paying
attention to these one can access the most effective times for dieting and skin care.
With the display in the time mode, an index number below the
time and to the left tells in which phase your body is at present.
These indications will appear from the 2nd cycle.
And also they will not be displayed when the Heart symbol
appears because a possible pregnancy means that you are
not on any phase 1 to 5. (in this case, "5" continues to be on
the display until the Heart symbol appear)
And if your temperature cuve does not show a clear bi-phase,
phase 3 might be always displayed.
And also, "4" may appear after "2" beyond "3".
"1" may blink when "4" or "5" appears on the display.
Page 40
25
M
3
1 During
menstruation 2
4
Ovulation
3
Before-after
ovulaiton
Yellow body
hormone
5
Before
menstruation
Temperature Graph and Bodily Rhythm
Cycle day
BBT Graph
Phase
1 2 3 4 5 6 7 8 9 10 11 12 13 14 15 16 17 18 19 20 21 22 23 24 25 26 27 28 1 2
HIGH PHASE
LOW PHASE
Menstruation Folicle hormone
Around ovulation
During
Ovarian deBefore-after
menstruation
velopment
ovulation
Yellow body hormone
Before
menstruation
Yellow body
hormone
For your effective dieting
Page 41
The least effective time
The least effective times to lose weight are
during phases 1,4 and 5. During about 7-10
days before the expected menstruation and
during that, the bodily metabolism is sluggish,
the physical condition begins insecure, the
body tend to swell and take on weight. Even if
you diet hard at this time, do not expect too
much success. It's good to relax during this
time and to wait for the next phases to slim.
The effective time
The most effective times to lose weight by dieting are during
the roughly two weeks of phases 2-3, i.e. the ovarian
development and peri-ovulation times. After menstruation
before the next menstruation the body tends naturally to
return to its basic weight. It is during this time one's sense of
good feeling and the bodily condition itself combine to make
it the prime time for reducing weight. Bodily metabolism
begins in top condition at this time, simple gymnastics and
care in eating are effective.
Matching skin care with one's bodily rhythm
During
menstruation
One's metabolism is sluggish, the skin becomes oily, acne or rashes tend to break out.
This is not a good time to change your basic
make up materials. Give your skin a rest during
this phase.
The skin tends to be soft, tender, and
glowing. Metabolism is in prime condition and
new cells are produced. It's a good time to
Ovarian
test a change of cosmetics to try something
development new.
Before-after
ovulation
Similar to the phase 1, the metabolism
becomes less active and the skin becomes
Yellow body oily, acne and rashes tend to break out.
hormone
And also the skin becomes sensitive for UV
light. Give your skin a rest during this
phase.
Before men
struation
Three days before and after ovulation, the skin
is in its best and most beautiful condition. It's
the perfect time to check the skin and to shave
one's face. However, some people's skin
become super-sensitive at this time.
Same as phase 4. Your mental condition
becomes unstable, and skin goes to a bad
condition. Constipation migh be possible
during this phase. Pay your attention to the
nutrition, try to take much of Vitamin B6,
Magnesium and fibre. Do not take too
much water.
Page 42
Backlight of the display screen
Press the light button to illuminate the screen
for 30 seconds.
Two colours of the backlight inform you:
Green: you are in normal condition
Orange: you are in the most fertile days
and the doctor symbol is on.
* The backlight does not illuminate when you are measuring,
during the device is receiving the radio time signal and
when you press and hold the heart button.
Light button
Please use this backlight in a dark room. Day time and in a
bright room, you cannot use this function to full advantage.
If you frequently turn on the backlight, the battery life will
be shorter.
Page 43
Deleting all data and once again using the device
from the beginning.
CLrn
You can initialize the device, that is you can delete the date settings,
temperature data,bodily memo recordings, 1st day of menstruation, etc.
1. Remove the battery first.
2. Press
(Confirm button) and simultaneously insert the battery.
"C L r n" will appear and "n" will blink.
3. Let "y" blink using the shift button and press
(Confirm button).
By the above operating, all the data is competely deleted. It is impossible to return.
If you stop to delete the data, press
(Confirm button) during the "n" blinks or
press
(Delete button) after the above operating 2 to cancel the operating.
* Press
(Delete button) during each operating, or do not any button operatings
for one minute to cancel the operatings and return to clock mode.
Page 44
Press and hold
(Confirm button)
and insert the battery. "n" blinks at
"CLrn" display
CLry
Let "y" blink using the shift button
and press
(Confirm button).
When you use the device again after deleting all the data, please do the basic settings, Now all data is deleted.
such as the month/day, clock and alarm time.
"MADONNA" Personal Computer Software Kit
You can transfer the stored data from your Sophia Ray to your personal computer.
1. Store accurate temperature records and other data for long-term usage. This is
especially useful for fertility treatment.
2. Display your basal body temperature on the screen to review it.
3. Calculate the length of your progesterone period, which is useful for fertility treatment.
4. Print out your basal body temperature data.
5. Use it for teaching purposes in school.
You can order at your local drug store or home appliance store.
MADONNA software kit is not displayed at store shelf.
MADONNA software kit is available only in Japanese version.
If you have Japanese windows in your PC, you may use this.
However, we do not guarantee that you can use it out of Japan.
Page 45
Check your personal computer
It can be used for Windows 95, 98, 2000, Me and XP.
Macintosh cannot be used.
Check the type of your computer cable
Find the cable socket for peripheral instruments on the back or front side of your computer.
USB port
RS232C (9 pins)
USB Madonna
Model no: US-02
Page 46
Petit Madonna
Model no: MD-02
MADONNA software kit is available only in Japanese version.
If you have Japanese windows in your PC, you may use this.
However, we do not guarantee that you can use it out of Japan.
Optional Service
Print our service Data Shuttle "Hikyaku" (=postman)
charged service
For those who does not have a personal computer.
1. You send a request to Nishitomo Service Centre
2. Nishitomo sends the Data Shuttle "Hikyaku" to you.
3. You copy the stored data to the data shuttle and send ti back to Nishitomo.
4. Nishitomo prints out your data copied in the data shuttle and send them to you.
Page 47
Data Shuttle "Hikyaku" is available only in Japan.
If you accept Japanese but live out of Japan, you are unable to
enjoy this optional service. We ask for your kind understanding.
When something happened
No display
Inserted the battery correctly? Is battery not low?
Alarm does not sound
Make sure whether you have set the alarm time.
Loudness adjusted to zero
See page 13
See page 14
Beep during measurement
Error buzz for wrong measurement
See page 19
Display of "out of range"
During measurement Lo or Hi may appear.
(Lo appears when lower than 34C, Hi appears when over 42C)
symbol blinks
and lights up.
When it is already
in a new cycle
symbol does
not disappear
symbol appears
See page 7and 8
Did you for sure input the 1st day of menstruation?
See page 24
1st day of menstruation was automatically recorded.
See page 24
Due to not enough data since start of use.
See page 34
Battery is low, Please change the battery.
See page 8
Maintenance
To clean the thermometer probe, use tissue paper moistened with water or wipe it with a
soft cotton cloth soaked in cleanser, then dry it. Clean the device itself with a cotton cloth.
Page 48
CAUTION NEVER use a flammable liquid(thinner or benzene).
NEVER disinfect the thermometer probe with a boiling water.
After Service and Guarantee
CAUTION: The GUARANTEE is effective ONLY in Japan. When you buy the Sophia device
in Japan and use it in a foreign country, you use it at your own risk.
- The guarantee is valid for one year from the date of purchase.
The service centre will do repairs in accordance with the contents of the guarantee. See the document for details.
- Repair after expire of the guarantee period
After one year of guarantee had expired, consult the service centre for repairs if
necessary. The centre will do the repairs for pay in accordance with the request of the customer.
- On issues not clear
Consult with the store of purchase or with our service centre. (you can email in English)
Product Specification
* Design, specifications etc. are subject to change without prior notice.
Name for sale:
Woman's electronic thermometer BT-16
Nick name:
Woman's thermometer Sophia Ray BT-16R
Measurement method: Five minute measurement in two phases,
with thermistor, peak holding method with
zero gradient.
Measurement range: 34.00 to 40.00
Accuracy:
+/-0.05 (35.00-38.00 )
+/-0.1 (34.00-34.99 & 38.01-40.00 )
Details of display:
4 digits, 0.01 range
Graph display:
Voltage:
Power:
view of 20 days display (4 levels)
DC 3Volts (1 x CR2032)
Approx. 2mA(when measuring)
Approx. 30 A(when on OFF)
Operating temperature: + 5 to + 40
Storage temperature: - 20 to + 60
Size:
90mm x 22mm x 74mm
Weight:
Approx. 94 grammes (incl. battery)
Attachment:
Coin lithium battery, 1 x CR2032
Instructions for Use
EMS Compliance
This product is complied with the EMC standard JIS T 0601-1-2: 2002
Medical device approval no.: 218AGBZX00032000 (JAPAN)
Page 49
Conditions of Guarantee
1. Even during the duration of the guarantee, a charge for repairs will be made in the following cases.
a) If it was used wrongly, or if it was damaged or broken by reconstructing it or by repairing it badly.
b) If the damage was caused after purchase by dropping, moving, shipping, etc.
c) If the harm or damage was caused by fire, earthquake, flood, lightning, or other natural causes, or by public turmoil,
or by the wrong electric voltage, or by other external cause.
d) If it was used for purposes other than described in the manual.
e) If this certificate is not presented, or if the date of purchase, name of purchaser, and specification of the
place or purchase are not filled out in this certificate, or if the contents were altered.
f) For the parts of consumption.
g) If the damage was done by causes other than the device itself.
2. In case you move, consult in advance the store where you purchased the device.
3. If by reason of purchase by mail, or other you cannot entrust a dealer for repair, please consult directly
with the manufacturer.
4. This certificate is effective only in Japan.
5. Because this certificate cannot be re-issued, please preserve it carefully.
6. This certificate guarantees repair of the instrument without cost during the time specified and under
the conditions mentioned. If after the specified time expired there is any question about repair please
inquire at the store where you purchased it, or at the service centre of the manufacturer as listed in the manual,
as this certificate puts on no limitations on the legal rights of the purchaser.
Page 50
CAUTION
Certificate of Guarantee
This is just a translation of the Certificate of Guarantee for the purpose of showing, what is
mentioned. Only the original Japanese one is effective. Please fill out the original Japanese one
in the user's manual. DO NOT USE THIS SECTION FOR GUARANTEE.
The guarantee will not be available if you did not fill in this form.
Duration of
guarantee
Model No. : BT-016, Woman's electronic thermometer
1 YEAR
Your Name
Your address
Telephone
Reference only
Name and address of the store where you purchased
Date of purchase
(day)
(month)
(year)
Without filling section the guarantee will not be effective. Be sure to fill them out in the
oirginal Japanese one.
Back cover