1
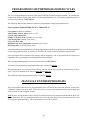
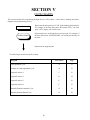
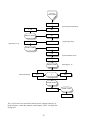
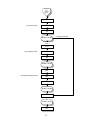
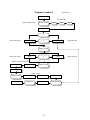
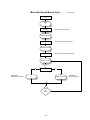
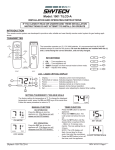
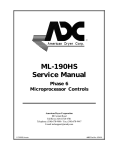
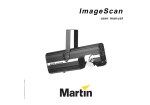
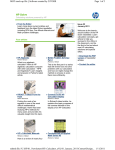
PHASE 3
OPL
USER’S
MANUAL
American Dryer Corporation
88 Currant Road
Fall River, MA 02720-4781
Telephone: (508) 678-9000 / Fax: (508) 678-9447
e-mail: [email protected]
080194
061197JEV/tf
110999JEV/tilly
ADC Part No. 450146
Retain This Manual In A Safe Place For
Future Reference
Please read this manual carefully to thoroughly familiarize yourself with the Phase 3 OPL computer system
features, operational instructions, and programming characteristics. This manual contains important
information on how to employ all the features of your new ADC dryer in the safest and most economical way.
American Dryer Corporation products embody advanced concepts in engineering, design, and safety.
If this product is properly maintained, it will provide many years of safe, efficient, and trouble-free operation.
We have tried to make this manual as complete as possible and hope you will find it useful. ADC reserves the
right to make changes from time to time, without notice or obligation, in prices, specifications, colors, and
material, and to change or discontinue models at any time.
Replacement parts can be ordered from your distributor or the ADC factory. When ordering replacement
parts from the factory, you can FAX your order to ADC at (508) 678-9447 or telephone your orders directly
to the ADC Parts Department at (508) 678-9000. Please specify the dryer model number and
serial number in addition to the description and part number, so that your order is processed accurately and
promptly.
“IMPORTANT NOTE TO PURCHASER”
Information must be obtained from your local gas supplier on the instructions
to be followed if the user smells gas. These instructions must be posted in a
prominent location near the dryer.
IMPORTANT
YOU MUST DISCONNECT and LOCKOUT THE ELECTRIC
SUPPLY and THE GAS SUPPLY or THE STEAM SUPPLY BEFORE ANY
COVERS or GUARDS ARE REMOVED FROM THE MACHINE TO
ALLOW ACCESS FOR CLEANING, ADJUSTING, INSTALLATION, or
TESTING OF ANY EQUIPMENT per OSHA (Occupational Safety and Health
Administration) STANDARDS.
FOR YOUR SAFETY
DO NOT STORE OR USE GASOLINE OR OTHER FLAMMABLE VAPOR
AND LIQUIDS IN THE VICINITY OF THIS OR ANY OTHER APPLIANCE.
DO NOT DRY MOP HEADS IN THE DRYER.
DO NOT USE DRYER IN THE PRESENCE OF DRY CLEANING FUMES.
WARNING
CHILDREN SHOULD NOT BE ALLOWED TO PLAY ON OR IN THE
DRYER(S).
CHILDREN SHOULD BE SUPERVISED IF NEAR DRYER(S) IN
OPERATION.
CAUTION
DRYER(S) SHOULD NEVER BE LEFT UNATTENDED WHILE IN
OPERATION.
IMPORTANT
PLEASE OBSERVE ALL SAFETY PRECAUTIONS displayed on the
equipment and/or specified in the installation/operator's manual
included with the dryer.
Dryer(s) must not be installed or stored in an area where it will be
exposed to water and/or weather.
Table of Contents
SECTION I
INSTRUCTION TO PHASE 3 ..................................................................................... 3
SECTION II
L.E.D. DISPLAY CODES ............................................................................................. 5
SECTION III
OPERATING INSTRUCTIONS .................................................................................. 8
A. Operating Sequence .......................................................................................................................... 8
B. Operating Notes ............................................................................................................................. 12
SECTION IV
INTRODUCTION TO PROGRAMMING ................................................................. 13
Description of Basic System Parameters ................................................................................................ 14
Programming of Pre-Programmed Cycles .............................................................................................. 16
Manually Entered Programs .................................................................................................................. 16
Description of Parameters for Pre-Programmed and Manually Loaded Cycles ....................................... 17
SECTION V
FLOW CHARTS .......................................................................................................... 18
Pre-Programmed Cycle Programs ......................................................................................................... 19
Example of a Pre-Programmed Cycle ................................................................................................... 21
Program Location 1 .............................................................................................................................. 23
Program Location 2 .............................................................................................................................. 24
Program Location 3 .............................................................................................................................. 26
Program Location 4 .............................................................................................................................. 27
Manually Entered Automatic Cycle ........................................................................................................ 28
Manually Entered Manual Cycle ............................................................................................................ 29
SECTION VI
FACTORY PRESET PARAMETERS (PROGRAMS)............................................... 30
Phase 3 OPL Parameters (Pre-set by the factory for REVERSING DRYERS) ...................................... 30
System Parameters ............................................................................................................................... 30
Phase 3 OPL Parameters (Pre-set by the factory for NON-REVERSING DRYERS) ............................ 31
System Parameters ............................................................................................................................... 31
Phase 3 OPL Programming Limits ......................................................................................................... 32
SECTION I
INSTRUCTION TO PHASE 3
PROGRAMMABLE
ALL programming for the Phase 3 OPL computer is done through the computer keyboard and the programs are
displayed for verification. Dip switches are eliminated to avoid the possibility of switch failure, due to an
accumulation of lint or moisture. To enter the programs, a security code is entered into the computer through the
keyboard. The security code prevents unauthorized entry.
MANUALLY LOADED CYCLES
These cycles are not stored in the computer memory. They are entered by the operator when the cycle is
needed.
A. AUTOMATIC MODE - This program will cycle the dryer off when the preprogrammed dryness levels
have been reached. The operator will enter the dryness level (1 - 225 peaks) and the drying temperature.
At the end of the drying cycle, the dryer will begin an automatic preprogrammed cooling cycle.
B. MANUAL MODE - In this program, the operator will enter the dry time (0-99 minutes), the cool down time
(0-99 minutes) and drying temperature.
DRYING TEMPERATURE
Operating temperature can be programmed from a minimum of 110° F to 200º F (44° C to 94º C) in one-degree
increments.
PREPROGRAMMED CYCLES
The Phase 3 OPL computer can store in its memory six (6) preprogrammed cycles (A through F on the keyboard)
which are entered complete into the computer prior to operation. Any of these programs can be started
by pressing one button. These preprogrammed cycles can best be set in either the automatic or manual mode and
are displayed at the beginning of each cycle start up.
SYSTEM PARAMETERS
The function of the dip switches in our previous computers has been to set the basic system parameters. With the
elimination of the dip switches, these parameters are now entered through the keyboard and stored in four
program locations. These programs are entered only once and are called up to each cycle selection when
required.
PREPROGRAMMED CYCLE CHECK
To check the parameters of the preprogrammed cycles, without entering the program mode, the operator can
open the tumbler door and press any of the preprogram keys (A through F on keyboard). The cycle parameters
will be displayed for verification only, a cycle will not begin with the door open.
TEMPERATURE CONVERSION STATUS
Temperature-related circuits are programmable, to be operated in Fahrenheit or Celsius. Programs affected are:
a. Temperature Display Mode
b. Temperature Selection
c. Cool Down Temperature
3
L.E.D. FLASH DISPLAY
The display is programmed to allow the L.E.D. (light emitting diode) readout to display while a cycle is in
progress, a choice of cycle time or temperature. Programming also allows the L.E.D. readout to flash back and
forth from cycle to temperature, which can be set from 1 - 15 seconds.
If the temperature display program is not used, the temperature can be viewed through the L.E.D. display by
pressing the enter/start button at any time while a cycle is in progress.
ANTI-WRINKLE CYCLE
This program helps keep permanent press items, wrinkle free, when they are not removed from the dryer promptly
at the end of the drying and cooling cycle. Programming allows the dryer to automatically restart in the cool down
cycle, if the clothes are not removed in a preprogrammed amount of time. Anti-Wrinkle program settings:
a. Guard Delay Time: 15 - 4095 seconds in one-second increments.
b. Guard On Time: 10 - 63 seconds in one-second increments.
c. Maximum Guard Time: 1 - 127 minutes in one-minute increments.
AUDIBLE TONE
A tone will sound each program entry. In addition, programming allows the tone to sound from 1 - 15 seconds at
the end of the drying and cooling cycle to indicate that the cycle is complete.
REVERSING OPTION
Program allows:
a. Select reverse or always reverse or, in the case of the preprogrammed cycle, Reverse or No Reverse.
b. Stop Time: 4 - 19 seconds in one-second increments.
c. Spin Time: 30 - 93 seconds in one-second increments.
BATTERY BACK-UP
This feature allows the computer to maintain its operating status, should a momentary power interruption occur,
while the dryer cycle is in progress.
DIAGNOSTICS
ALL major circuits, including door, microprocessor, temperature sensor, heat, and motor circuit, are monitored.
4
SECTION II
L.E.D. DISPLAY CODES
The L.E.D. (light emitting diode) display informs the user of cycle status, program verification, and displays
important diagnostic and fault codes.
A. DISPLAY OPERATING STATUS
1. Cycle in Progress - while the dryer is operating the display will read which cycle is in progress. For
example, in the Drying Cycle (Mode), the display will read “dr,” and in the Cool Down Cycle (Mode), the
display will read “CL.”
2. Cycle Status - while a cycle is in progress the display will show the progress (in time) of the cycle (load)
that is being processed.
a. Automatic Drying Cycle - Cycle Status portion of the display will show the elapsed time in minutes and
will continue to count upward (i.e. “00,” “01,” etc.) until the dryness level selected/preprogrammed is
reached.
b. Timed (manual) Drying Cycle - Cycle Status portion of the display will show the drying or cool down
time and will count down (in minutes) until the selected/programmed drying and cool down time has
expired.
3. Temperature Display - While a cycle is in progress the temperature in the tumbler (basket) can be viewed
at any time by pressing (and holding in) the “ENTER/STOP” key.
4. Alternate Display Programs - Programming allows for the display to read just the basket (tumbler)
temperature or flash back and forth from cycle in progress or tumbler (basket) temperature while the dryer
cycle is in progress. The Phase 3 OPL microprocessor (computer) controller is programmed by the
factory not to flash and to read the cycle in progress.
NOTE: Refer to the illustration on the following page (page 6) for details.
5. Indicator Dots - Located at the top of the display is a series of dots which indicate the various Phase 3
OPL microprocessor controller output functions while a cycle is in progress.
a. Illustration No. 3 - On indicator - this indicator dot is on whenever a cycle is in progress. In the case of
a non-reversing dryer this dot would indicate that the drive/fan motor should be on. For a reversing
dryer, this dot would indicate that the blower (impeller/fan) motor should be on.
Additionally, when the Anti-Wrinkle Program is active, this indicator dot will be on whenever the Phase
3 OPL microprocessor controller is in the Guard On Time Program.
b. Illustration No. 4 - Heat Indicator - this indicator dot is on whenever the microprocessor controller
(computer) is calling for the heating unit (gas burner, electric oven or steam heating unit) to be active
(on).
5
c. Illustration No. 5 - Hi/Lo Gas Valve circuit - this indicator is functional for gas dryers with the optional
Hi/Lo gas valve system. When both indicator dot No. 5 and indicator dot No. 4 are on, the burner is in
Hi fire. When only No. 4 is on the burner is in low fire.
For non Hi/Lo gas, electrically and steam heated dryers, even though this indicator dot may go on and
off throughout the drying cycle; it serves no purpose and should be ignored.
d. Illustration No. 6 - Tumbler (Basket) Rotation Indicator - this indicator dot is functional for your dryer
models with Reversing Action Option ONLY. When this is on, it’s indicating that the basket (tumbler) is
rotating (either in the forward or reverse direction).
Additionally, when the Anti-Wrinkle Program is active, this indicator dot will be on whenever the Phase
3 OPL microprocessor controller (computer) is in the Guard On Time Program (Mode).
B. PHASE 3 OPL L.E.D. (LIGHT EMITTING DIODE) DISPLAYS
1. CYCLE IN PROGRESS
a. dr - Drying Cycle
b. CL - Cooling Down Cycle
2. CYCLE STATUS
a. Automatic mode - displays drying or cool down time in elapsed minutes.
b. Timed (manual) cycle - displays drying and cool down time (counts downward).
3. ON INDICATOR - dryer is in the operating mode.
4. HEAT ON INDICATOR - heating unit should be active (ON).
5. HI/LO GAS VALVE CIRCUIT INDICATOR - refer to item 5c on previous page (page 5) for
explanation.
6. BASKET ROTATION INDICATOR - for reversing models only. Indicates basket (tumbler) should be
turning.
6
C. L.E.D. DISPLAY CODES
AUtO
ArEv
bUZ
bUZ--tinE
°CEL
CL
COOL--tinE
COOL-tEnP
CY A
CY b
CY C
CYd
CY E
CY F
CYCL--tinE
d
donE
door
dr
drY--LEvL
drY--tEnP
dSFL
F
°FAr
Automatic Mode
Always Reverse
Buzzer (tone)
Buz Time
Degree in Celsius
Cool Down Cycle in Progress
Cool Down Time
Cool Down Temperature
Pre-programmed Cycle A
Pre-programmed Cycle b
Pre-programmed Cycle C
Pre-programmed Cycle d
Pre-programmed Cycle E
Pre-programmed Cycle F
Cycle Display Time
Dryness Level (auto peak)
Drying or Cooling Cycles Complete
or Dryer is in Anti-Wrinkle Cycle
Door Circuit is open
Drying cycle in progress
Dryness Level (auto peak)
Drying Temperature
Dryer Sensor Circuit Failure
Fabric (temperature)
Degree in Fahrenheit
FILL
FLS
GdLY
G on--tinE
Grd
LC
Ld
nAnU
nGrd
nbUZ
nFLS
nGrd
nrEv
ProG
rEv
SPin--tinE
SrEv
StOP--tinE
tEnP
tEnP--tinE
tinE
No Cycle In Progress
Flash Display Active
Anti-Wrinkle Delay Time
Anti-Wrinkle On Time
Anti-Wrinkle Program Active
Load Cool Down Time
Load Drying Time
Manual Mode/Timed Cycle
No Guard
No Buzzer (tone)
No Flash Display
No Anti-Wrinkle Cycle
No Reverse
Program Mode
Reverse
Spin Time
Select Reverse
Stop Time
Temperature
Temperature Display Time
Time
D. FAULT CODES:
1. “dSFL” - indicates that there is a fault somewhere in the heat microprocessor controller’s heat sensing
circuit;
a. Failed microprocessor temperature sensor.
b. Blown microprocessor controller (computer) 1/8-amp fuse.
c. Failed microprocessor controller (computer).
d. Open circuit or loose connection in wires between the microprocessor controller (computer) and
microprocessor temperature sensor.
2. “door” - indicates that there is a fault in the D.C. portion of the door switch circuit;
a. Attempt was made to restart a cycle with the main door open.
b. Failed door switch.
c. Main door switch is not adjusted properly.
d. Open circuit in D.C. door switch wiring.
7
SECTION III
OPERATING INSTRUCTIONS
The Phase 3 OPL (On Premise Laundry) computer system allows the operator to choose from six (6)
preprogrammed cycles (keys “A” through “F”) which have been preprogrammed by the factory with the
parameters shown on page 30 and page 31.
Additionally, for occasional one-time special loads, the manually loaded cycles can be used where the operator
must set the specific program(s) needed.
NOTE: Refer to Sections I or III of this manual for a complete explanation of the various program
cycles/selections available.
After the load is put into the basket (tumbler) and the main door is closed, determine which cycle will suit the
application (type of load). We recommend using the automatic drying cycles.
A. OPERATING SEQUENCE
1. Preprogrammed Cycles
a.
Automatic drying cycle ...
1) Display reads “FILL” (no cycle in progress).
2) Press the letter on the keyboard corresponding to the cycle desired (i.e., Key “A”)
a) The L.E.D. (light emitting diode) display will quickly preview the parameters (programs)
set ;
190° F (88º C) - drying temperature
d 09 (Automatic dryness level)
b) The dryer will then start (rotate).
3) The L.E.D. display will now show the Cycle in progress and the Cycle status (i.e., “dr00”)
meaning that the dryer is in the Drying Cycle (Mode). During the drying cycle, the Phase 3
OPL microprocessor controller (computer) is monitoring the amount of moisture in the load
which is achieved by counting the amount of times the heat cycles on and off (Peaks). The
cycle status portion will show the elapsed time in minutes (i.e. 01, 02, etc.). The cycle status
of the display will continue to count upward until the dryness level programmed is reached.
NOTE: To stop the dryer at any time, open the main door. To continue the cycle, close the main door
and press the “ENTER/START” Key. The dryer will now continue from where it left off, or,
the dryer may also be stopped by pressing the “CLEAR/STOP” key. However, the cycle that
was in progress will be cancelled, and the display will return to the “FILL” (no cycle in
progress) mode.
8
4) Once the preprogrammed dryness level is reached, the drying cycle will end, and the Cycle in
Progress portion of the L.E.D. (light emitting diode) display will read “CL” meaning that the
dryer is now in the Cool Down Cycle (mode). The cycle status portion of the display will
show the elapsed time in minutes (i.e., 01, 02, etc.). The cycle status portion of the display
will continue to count upward until the programmed cool down time or cool down temperature
is reached. Whichever comes first.
5) Once the Cool Down cycle is completed, the dryer will shut off, the tone (buzzer) will sound
(i.e., 7 seconds) and the display will read “donE.” The display will read “donE” until the main
door is opened.
6) If the Anti-Wrinkle program is active, once the drying and cooling cycles are completed and
the display reads “donE”, the Phase 3 OPL microprocessor controller will then proceed into
the Anti-Wrinkle program. If the main door is not opened within the Anti-Wrinkle delay time
(i.e., 90 seconds), the basket (tumbler) will rotate (without heat) for the programmed AntiWrinkle On time (i.e., 20 seconds). The Phase 3 OPL microprocessor controller (computer)
will repeat this process until the programmed Maximum Anti-Wrinkle On Time has expired
(i.e., 10 minutes) or until the main door is opened, whichever comes first. The display will
read “FILL” no cycle in progress).
b.
Timed (Manual) Drying Cycle
1) Display reads “FILL” (no cycle in progress)
2) Press the letter on the keyboard corresponding to the cycle desired (i.e., Key “D”).
a) The L.E.D. display will quickly preview the parameters (programs) set;
“Ld40” (drying time)
“LC 6” (cool down time)
“F190” (drying temperature)
3) The dryer will then start (rotate).
4) L.E.D. display will now show Cycle In Progress and Cycle status (i.e., “dr40”), meaning that
the dryer is in the Drying Cycle (Mode) for 40 minutes. During the Drying Cycle, the Cycle
Status time will count downward until the drying time programmed has expired.
NOTE: To stop the dryer at any time, open the main door. To continue the cycle, close the main door
and press the “ENTER/START” key. The dryer will now continue from where it left off, or, the
dryer may also be stopped by pressing the “CLEAR/STOP” key. However, the cycle that was
in progress will be canceled, and the L.E.D. display will return to the “FILL” (no cycle in
progress) mode.
5) When the programmed drying time has expired, the Phase 3 OPL microprocessor controller
(computer) will proceed into the Cool Down Cycle (Mode), and the Cycle in Progress portion
of the L.E.D. display will read the programmed Cool Down Time (i.e., 06 minutes) and count
downward until this time has expired.
6) Once the Cool Down Cycle is completed, the dryer will shut off, and the L.E.D. display will
read “donE.” The L.E.D. display will read “donE” until the main door is opened.
9
7) If the Anti-Wrinkle Program is active, once the drying and cooling cycles are complete and
the display reads “donE,” the Phase 3 OPL microprocessor controller (computer) will proceed into the Anti-Wrinkle Program. If the main door is not opened within the Anti-Wrinkle
Delay Time (i.e., 90 seconds) the basket (tumbler) will rotate (without heat) for the programmed Anti-Wrinkle On Time (i.e., 20 seconds). The Phase 3 OPL microprocessor controller will repeat this process until the programmed Maximum Anti-Wrinkle Time has expired
(i.e., 10 minutes) or until the main door is opened, whichever comes first. The L.E.D. display
will continue to read “donE” until either the main door is opened or the Maximum AntiWrinkle Time has expired, at which time, the L.E.D. (light emitting diode) display will read
“FILL” (no cycle in progress).
2. Manually Loaded Cycles
a.
Automatic drying cycle
1) Display reads “FILL” (no cycle in progress).
2) Press Key “2.”
3) The L.E.D. display will now read “F,” meaning select Fabric (temperature) desired. Enter
the temperature desired (from 110° F to 200° F [40º C to 95° C] in one degree increments).
For example, for 190° F (88º C), press key “1,” key “9,” key “0” and then press the “ENTER/
START” key.
4) L.E.D. display will now read “d” (dryness level). Enter the amount of dryness desired (1 to
225 in increments of 1).
IMPORTANT: For ALL models other than “GAS DRYERS” manufactured with the ADC Hi/Lo gas
valve system, Automatic dryness level must not be set higher than 9 or 10. To do so
will cause the dryer to run for an extended period of time and can result in damage to
items being dried.
For example, for a dryness of 9, press key “0,” key “9,” and then press the “ENTER/START”
key.
5) For optional reversing models, if the system parameters are set for Select Reverse, the L.E.D.
display will now read “Sr,” meaning Select Reverse. If reversing basket (tumbler) actions is
desired, press the “ENTER/START” key. If No Reverse is desired, press “0” key.
6) The dryer will now start, and the display will show the Cycle In Progress and Cycle Status
(i.e., “dr00”), meaning that the dryer is in the Drying Cycle (mode). During the Drying Cycle,
the Phase 3 OPL microprocessor controller (computer) is monitoring the amount of moisture
in the load which is achieved by the amount of times the heat cycles on and off (peaks).
The Cycle status portion of the L.E.D. display will show the elapsed time in minutes (i.e., 01,
02, etc.) and will count upward in time until the dryness level selected is reached.
10
NOTE: To stop the dryer at any time, open the main door. To continue the cycle, close the main door
and press the “ENTER/START” key. The dryer will now continue from where it left off, or,
the dryer may also be stopped by pressing the “CLEAR/STOP” key. However, the cycle that
was in progress will be cancelled, and the L.E.D. (light emitting diode) display will return to the
“FILL” (no cycle in progress) mode.
7) When the selected dryness level is reached, the drying cycle will end, and the Cycle In
Progress portion of the display will read “CL” meaning that the dryer is now in the Cool
Down Cycle (mode). The Cycle Status portion of the display will show the elapsed time in
minutes (i.e., 01, 02, etc.). The Cycle Status portion of the display will continue to count
upward until the programmed cool down time or cool down temperature is reached, whichever of the two comes first.
8) Once the Cool Down Cycle is completed, the dryer will shut off, the tone (buzzer) will sound
(i.e., 7 seconds), and the display will read “donE.” The display will read “donE” until the main
door is opened.
9) If the Anti-Wrinkle Program is active, once the drying and cooling cycles are completed and
the L.E.D. display reads “donE,” the Phase 3 OPL microprocessor controller (computer) will
then proceed into the Anti-Wrinkle Program. If the main door is not opened within the AntiWrinkle Delay Time (i.e., 90 seconds) the basket (tumbler) will rotate (without heat) for the
programmed Anti-Wrinkle On Time (i.e., 20 seconds). The Phase 3 OPL microprocessor
controller (computer) will repeat this process until the programmed Maximum Anti-Wrinkle
Time has expired (i.e., 10 minutes) or until the main door is opened, whichever comes first.
The L.E.D. display will continue to read “donE” until either the main door is opened or the
Maximum Anti-Wrinkle Time has expired, at which time the L.E.D. display will read “FILL”
(no cycle in progress).
b. Timed (manual) Drying Cycle
1) L.E.D. display reads “FILL” (no cycle in progress).
2) Press key “5.”
3) L.E.D. display reads “Ld” (Load Drying Time). Enter drying time desired (from 0 to 99 minutes in
one minute increments). For example, for 40 minutes, press key “4,” key “0,” and then press the
“ENTER/START” key.
4) L.E.D. display reads “LC” (Load Cool down Time). Enter cool down timer desired (from 0 to 99
minutes in one minute increments). For example, for 10 minutes, press key “1,” key “0,” and then
press the “ENTER/START” key.
5) L.E.D. display reads “F” (Fabric .. drying temperature). Select temperature desired (from 110° F
to 200° F [44º C to 94º C] in one (1) degree increments). For example, 182° F (83º C), press key
“1,” key “8,” key “2,” and then press the “ENTER/START” key.
6) For optional reversing models, if the system parameters are set for Select Reverse, the L.E.D.
display will now read “Sr,” meaning Select Reverse. If reversing basket (tumbler) action is desired, press the “ENTER/START” key. If No Reverse is desired, press “0” key.
11
7) The dryer will now start, and the display will show the Cycle In Progress and Cycle Status (i.e.,
“dr40”), meaning that the dryer is in the Drying Cycle (mode). During the Drying Cycle, the Cycle
Status portion of the L.E.D. (light emitting diode) display will count downward in time until the
drying time selected (i.e., 40 minutes) has expired.
NOTE: To stop the dryer at any time, open the main door. To continue the cycle, close the main door
and press the “ENTER/START” key. The dryer will now continue from where it left off, or,
the dryer may also be stopped by pressing the “CLEAR/STOP” key. However, the cycle that
was in progress will be cancelled, and the L.E.D. display will return to the “FILL” (no cycle in
progress) mode.
8) When the programmed drying time has expired, the Phase 3 OPL microprocessor controller (computer) will proceed into the Cool Down Cycle (mode), and the Cycle In Progress portion of the
L.E.D. display will read the programmed Cool Down Time (i.e., 10 minutes) and count downward
until this time has expired.
9) Once the Cool Down Cycle is completed, the dryer will shut off, the tone (buzzer) will sound (i.e.,
for 7 seconds), and the L.E.D. display will read “donE.” The L.E.D. display will read “donE” until
the main door is opened.
10) If the Anti-Wrinkle Program is active, once the drying and cooling cycles are completed and the
L.E.D. display reads “donE,” the Phase 3 OPL microprocessor controller (computer) will proceed
into the Anti-Wrinkle Program (mode). If the main door is not opened within the Anti-Wrinkle
Delay Time (i.e., 90 seconds) the basket (tumbler) will rotate (without heat) for the programmed
Anti-Wrinkle On Time (i.e., 20 seconds). The Phase 3 OPL microprocessor controller (computer)
will repeat this process until the programmed Maximum Anti-Wrinkle Time has expired (i.e., 10
minutes) or until the main door is opened, whichever comes first. The L.E.D. display will read
“FILL” (no cycle in progress).
B. OPERATING NOTES
1. With no cycle in progress and the display reading “FILL,” if a preprogrammed cycle keyboard entry
(keys A through F) is made while the main door is in the open position, the L.E.D. display will preview
the basic parameters that the preprogrammed cycle is set for. For example, press key B and display will
scroll ... “F 190” ... “d 08” and then return back to “FILL.”
2. If during a cycle the main door is opened (dryer shuts off) and a key board selection is made while the
main door is still open, the display will read “door.” The display will continue to read “door” until the
main door is closed and the “ENTER/START” key is pressed at which time the cycle will continue
where it left off.
3. If the system parameters are not programmed for Flash Display or Temperature Display, the
temperature in the basket (tumbler) can be viewed at the L.E.D. display while a cycle is in progress by
pressing the “ENTER/START” key.
4. Preprogrammed Cycle “F” has been programmed by the factory as a “Touch-Up Cycle” (unless
otherwise advised at the time of ordering). This “Touch-Up Cycle” is programmed to operate as a
Timed Cycle for 10 minutes of drying time at 170° F (77º C) and a 2 minute cool down period.
5. When using the manual selection cycle and an error is made while making an entry, press the “CLEAR/
STOP” key once, and the entry will be cancelled. Reenter selection.
12
SECTION IV
INTRODUCTION TO PROGRAMMING
In order to enter the program mode, to access the four program locations (basic system parameters) or the six
preprogrammed cycles, the security code is as follows:
First, make sure no cycle is in progress and the display shows “FILL.” Then press the “ENTER/START” key
once and the 0 key three (3) times. The three zeroes must be entered within 2 seconds after pressing “ENTER/
START.” If this sequence is not entered correctly, the computer will deny access into the program mode. If the
code is entered correctly, the computer will display “ProG.” From this point, any of the program locations or
preprogrammed cycles can be accessed.
PROGRAMMING OF SYSTEM PARAMETERS
The four program locations, containing the system parameters (basic program information) are located at keys 2,
5, 8, and 0 on the touchpad (keyboard). By touching any of those keys when the display reads “ProG” will access
that particular program.
The parameter stored in each location are listed below and a description of each parameter follows the cart.
ALL of these parameters affect the manually loaded program cycles and some affect the preprogrammed
cycles. The chart below also shows which parameters affect which programs.
To alter the programming of the system parameters, the operator will first locate the parameter he wishes to
change. If the change is a numerical one (time or temperature), the operator will simply enter the numerical value
desired. If the change is a status change, such as changing the temperature readout from °F (Fahrenheit) to °C
(Celsius), the operator will press the 0 key. This zero key acts as a flip-flop switch to change the programming of
a parameter.
The actual programming steps are covered in the flow charts in SECTION V.
These parameters will be preset at the factory and may suit your needs as is. The preset parameters are listed
on page 30 and page 31 and the limits for these parameters are listed on page 32.
PHASE 3 OPL PROGRAM LOCATIONS
Program Location 1 (Key 2)
Temperature Conversion Status (°F or °C)
Select Reverse or Always Reverse
Reverse Stop Time (Dwell)
Reverse Spin Time
Program Affected
MLC & PPC
MLC ONLY
MLC ONLY
MLC ONLY
MLC = Manually Loaded Cycles
Program Location 2 (Key 5)
Flash or No Flash (Time or Temperature)
Cool Down Temperature
Cool Down Time
Flash Cycle Display Time
Flash Temperature Display Time
MLC
MLC
MLC
MLC
MLC
& PPC
ONLY
ONLY
& PPC
& PPC
PPC = Preprogrammed Cycles
13
Program Location 3 (Key 8)
With or Without Anti-Wrinkle Features
With or Without Anti-Wrinklebuz (tone)
Maximum Anti-Wrinkle Time
Anti-Wrinkle On Time
MLC
MLC
MLC
MLC
ONLY
& PPC
& PPC
& PPC
MLC = Manually Loaded Cycles
Program Location 4 (Key 0)
Anti-Wrinkle Delay Time (Dwell)
Buz (Tone) Time
MLC & PPC
MLC & PPC
PPC = Programmed Cycles
DESCRIPTION OF BASIC SYSTEM PARAMETERS
PROGRAM LOCATION 1:
TEMPERATURE CONVERSION STATUS
This program controls whether the temperature-related programs will be operated in Fahrenheit or Celsius.
Program affected are:
1. Temperature display mode.
2. Selection cycling temperature.
3. Cool down temperature.
SELECTION REVERSE (Sr) REVERSING DRYERS ONLY
When this parameter is chosen (Sr), the computer will prompt the operator to decide whether or not the Manually
Loaded Cycle being entered is to be a reversing cycle. After loading the cycle the computer will display “Sr__.”
At this point, if the operator presses the “ENTER/START” key a reversing cycle will begin. If however, the
operator presses the 0 key a non-reversing cycle will begin.
ALWAYS REVERSE (ArEv) REVERSING DRYERS ONLY
When this parameter is chosen (ArEv) any Manually Loaded Cycle will be a reversing cycle.
REVERSING STOP TIME (StOP---tinE) REVERSING DRYERS ONLY
The computer will prompt the operator to enter the dwell time (time tumbler stops rotating before changing
direction) for Manually Loaded cycles ONLY. This time is programmable from 4 to 19 seconds in one-second
increments.
REVERSING SPIN TIME (SPin---tinE) REVERSING DRYER ONLY
The computer will prompt the operator to enter the spin time (time tumbler rotates in one direction before stopping
to change direction) for Manually Loaded Cycles ONLY. This time is programmable from 30 to 93 seconds in
one-second increments.
PROGRAM LOCATION 2:
FLASH DISPLAY (FLS)
When the Flash Display is chosen (FLS) the L.E.D. (light emitting diode) readout will alternate during the drying
cycle between displaying the time remaining in the cycle when programmed in the time mode (or the time elapsed
when programmed in the automatic mode) and the basket (tumbler) temperature.
NO FLASH DISPLAY (nFLS)
When the No Flash display is chosen (nFLS) the operator will choose whether the display will read the cycle time
(tinE) or the tumbler temperature (tEnP) during the cycle. The L.E.D. display will not alternate between the two.
14
COOL DOWN TEMPERATURE (COOL---tEnP)
The operator will be prompted to enter the minimum Cool Down Temperature for Manually Loaded Cycles. This
time is programmable from 70º F to 100º F (21º C to 38º C) in one-degree increments.
COOL DOWN TIME (COOL---tinE)
The operator will be prompted to enter the maximum Cool Down Time for Manually Loaded Cycles in the
automatic mode. This time is programmable from 0 to 15 minutes in one-minute increments.
FLASH CYCLE DISPLAY TIME (FLS---tinE)
If the Flash Display (FLS) was chosen at the beginning of Program Location 2 (PL02), the operator will now be
prompted to enter the time the L.E.D. (light emitting diode) display will read the cycle time (tinE) before flashing
to the tumbler temperature (tEnP). The time is programmable from 1 to 15 seconds in one-second increments.
FLASH TEMPERATURE DISPLAY TIME (FLS---tEnP)
If the Flash Display (FLS) was chosen at the beginning of program location 2, the operator will now be prompted
to enter the time the L.E.D. display will read the basket (tumbler) temperature (tEnP) before flashing to the cycle
time (tinE). The time is programmable from 1 to 15 seconds in one-second increments.
PROGRAM LOCATION 3:
ANTI-WRINKLE ACTIVE (Grd)
When this feature is chosen (Grd) the Anti-Wrinkle program will be active in the Manually Loaded Cycles. In this
program, when the drying and cooling cycles are completed, the dryer will shut off, the toner will sound, and the
L.E.D. display will read “donE.” If the door is not opened, the computer will wait until the Anti-Wrinkle Delay
Time (Program Location 4) has expired, at which time the clothes will be tumbled (without heat) for the programmed Anti-Wrinkle On Time (Program Location 3). The computer will repeat this process until the programmed maximum Anti-Wrinkle Time (Program Location 3 [PL03]) has expired or until the dryer door is
opened, at which time the L.E.D. display will read “FILL.” The operator may also choose to activate this feature
in each preprogrammed cycle.
BUZ/TONE (buz)
When in the Anti-Wrinkle program, the option is available to have the tone sound at the end of each Anti-Wrinkle
On Time cycle.
MAXIMUM ANTI-WRINKLE TIME (nGrd---tinE)
This parameter controls the maximum time that Anti-Wrinkle Cycle will be in progress is programmable from 1 to
127 minutes in one-minute increments.
ANTI-WRINKLE ON TIME (G on---tinE)
This parameter controls the amount of time that the tumbler will turn without heat when anti-wrinkle is selected.
The on time is programmable from 10 to 63 seconds in one-second increments.
PROGRAM LOCATION 4:
ANTI-WRINKLE DELAY TIME (GdLY---tinE)
This parameter control the dwell (stop) time and activation of the Anti-Wrinkle On Time. The dwell time can be
programmed from 15 to 4095 seconds in one-second increments.
BUZ TIME (bUZ---tinE)
This parameter allows the operator to adjust the time the signal tone sounds from 1 to 15 seconds in one-second
increments.
15
PROGRAMMING OF PREPROGRAMMED CYCLES
The six (6) preprogrammed cycles are located at keys A through F on the touchpad (keyboard). By touching any
of those keys when the display reads “ProG” will access that particular cycle. The actual programming steps are
covered in flow chart A, in SECTION V.
The following chart lists the parameters which are programmed in each preprogrammed cycle.
Preprogrammed PARAMETERS (KEYS A THROUGH F)
Cycle Status (manual or automatic)
Anti-Wrinkle features status (active or off)
Cycle drying temperature
Number of dryness levels (automatic cycles Only)
Cycle drying time (manual cycles Only)
Cycle cool down time
Minimum cool down temperature (automatic cycles Only)
Reversing status (reversing dryers Only)
After programming a preprogrammed cycle, the operator then has the choice of entering any of the preprogrammed
cycles or program locations or, by pressing “CLEAR/STOP” on the keyboard, exiting the program mode.
Once the program has been stored in the memory, and the computer is out of program mode, the operator can
begin that cycle by pressing the corresponding letter on the keyboard.
The actual programming steps are covered in flow chart A in SECTION V.
An example for programming a preprogrammed cycle is shown on page 21.
The preprogrammed cycles are preset at the factory and may already suit your needs without having to reprogram. The preset parameters are listed on page 30 and page 31.
The limitations of the preprogrammed cycles are listed on page 32.
MANUALLY ENTERED PROGRAMS
There may be times when the six (6) preprogrammed cycles will not suit the needs of the operator. At that time,
a manually entered cycle can be used. This cycle can be set to run in the automatic mode or manual mode and
will not be stored in the computer memory.
ALL the basic system parameters have already been entered into the four program locations and the dryer will
operate from them. The only parameters that now have to be entered to begin a cycle are certain specifics, such
as drying time and temperatures. The exact parameters are listed as follows:
16
MANUALLY ENTERED AUTOMATIC CYCLES (KEY 2)
Cycle drying temperature
Number of dryness levels
Reversing Status (reversing dryers set in select, reverse mode Only)
MANUALLY ENTERED MANUAL CYCLES (KEY 5)
Cycle drying time
Cycle cool down time
Cycle drying temperature
Reversing Status (reversing dryers set in select, reverse mode Only)
DESCRIPTION OF PARAMETERS FOR
PREPROGRAMMED AND MANUALLY LOADED CYCLES
TIMED OR MANUAL MODE (nAnU)
When this parameter is selected (nAnU) the cycle has been set to run on time only. The dryer will continue to run
until the presettime including the cool down period has elapsed, at which time the dryer will cycle off or go into
optional Anti-Wrinkle program.
AUTOMATIC MODE (AUtO)
When this parameter is selected (AUtO) the cycle has been set to run for a preset level of dryness. At the end
of the drying cycle, the dryer will go into the cool down cycle for the time period programmed or until the
temperature has dropped to the programmed cool down temperature.
CYCLE DRYING TEMPERATURE (drY---tEnP)
The cycle Drying Temperature (drY---tEnP) is programmable from 110º F to 200º F (44º C to 94º C) in onedegree increments.
DRYNESS LEVEL (drY---LEvL)
When in the automatic mode, the dryer will run until the preset level of dryness (number of auto peaks) has been
reached. The dryness level is programmable from a minimum of 1 to 127 peaks for ALL pre-programs and from
1 to 255 in ALL Manually Loaded Cycles.
CYCLE DRYING TIME (drY---tinE)
When in the manual (timed) mode, the dryer will run until the preset time has been reached. The Cycle Drying
Time is programmable from 0 to 127 minutes for ALL pre-programs and from 0 to 99 minutes for ALL Manually
Loaded Cycles.
CYCLE COOL DOWN TIME (COOL---tinE)
For ALL preprogrammed and Manually Loaded Cycles in the manual mode the operator will enter the desired
Cycle Cool Down Time which will be activated when the drying time has expired. The time is programmable
from 0 to 31 minutes for manual pre-programs and 0 to 99 minutes for Manually Loaded Cycles.
For preprogrammed in the automatic mode the operator will enter the maximum cool down time programmable
from 0 to 14 minutes in two-minute increments.
REVERSING STATUS (rEv or nrEu)
When programming a preprogrammed cycle or entering a Manually Loaded Cycle in the select reverse mode, the
choice is available to begin a reversing cycle (rEv) or a non-reversing cycle (nrEv).
17
SECTION V
FLOW CHARTS
This section explains the programming through the use of flow charts. A flow chart is nothing more than a
diagram of the programming process.
FILL
ENTER / START
Represents the microprocessor L.E.D. (light emitting diode) display.
For example, if the flow chart shows the symbol “FILL,” the computer L.E.D. display will read the same.
Represents the key on the label that is to be pressed. For example, if
the flow chart shows “ENTER/START,” you would press that key on
the label.
Represents the program path.
The following is an index for the flow charts:
Program
Flow Chart
Page
Preprogrammed Cycle
A
19
Example of a Preprogrammed Cycle
B
21
Program Location 1
C
23
Program Location 2
D
24
Program Location 3
E
26
Program Location 4
F
27
Manually Entered Automatic Cycle
G
28
Manually Entered Manual Cycle
H
29
18
Pre-Programmed Cycle Programs
Flow Chart A
FILL
(Program Code)
(Enter Program Code)
ENTER / START
0
0
0
ProG
A-F
Cylce A - F
AUtO
(Automatic Cycle)
0
MAnU
(Manual Cycle)
ENTER / START
Grd
0
nGrd
(Anti-Wrinkle Off)
(Anti-Wrinkle Active)
ENTER / START
dry
tEnP
(Cycle Drying Temperature)
F XXX
dry
(Automatic Cycle
Dryness Level)
Automatic Mode
ENTER / START
dry
tinE
LEvL
XX
Manual Mode
Continued
on next
page.
19
XX
(Manual Cycle
Drying Time)
Flow Chart A
(continued)
cont. from
previous page.
Automatic Mode
ENTER / START
COOL
XX
tinE
ENTER / START
(Cycle Cool Down Time)
Manual Mode
COOL
Cycle Cool Down
Temperature
tEnP
F XXX
ENTER / START
(Non-Reversing Dryer)
(Reversing Dryer)
(Reversing)
rEv
0
nrEv
(Non-Reversing)
ENTER / START
CLEAR / STOP
FILL
20
ProG
Example of a Pre-Programmed Cycle
Flow Chart B
Program a Cycle with the Following Parameters:
1. Enter cycle under program A.
2. Set a manual cycle.
3. Set Anti-Wrinkle active.
4. Set the drying temperature at 190ºF.
5. Set the cycle drying time at 30 minutes.
6. Set the cycle cool down time at 3 minutes.
7. Set the dryer in the reversing mode.
FILL
(Program Code)
(Enter Program Code)
ENTER / START
0
0
0
ProG
A
CY A
AUtO
0
MAnU
ENTER / START
(Select Guard Active)
Grd
0
ENTER / START
Continued
on next
page.
21
nGrd
(Select Manual Mode)
cont. from
previous page.
drY
(Cycle Drying Temperature)
F 190
tEnP
ENTER / START
drY
30
tinE
ENTER / START
COOL
(Cycle Drying Time)
(Enter Keys 3 - 0)
tinE
(Cycle Cool Down Time)
03
ENTER / START
(Select Reversing)
0
rEv
(Enter Keys 0 - 3)
nrEv
ENTER / START
ProG
CLEAR / STOP
FILL
The cycle has now been entered and stored into the computer under key A.
By pressing key A when the computer readout display “FILL” will begin this
drying cycle.
22
Program Location 1
Flow Chart C
FILL
(Program Code)
(Enter Program Code)
ENTER / START
0
0
0
ProG
2
(Display ºFahrenheit)
ºFAr
0
ºCEL
(Display ºCelsius)
(Non-Reversing)
ENTER / START
Reversing
(Always Reverse)
SrEv
0
ArEv
(Select Reverse)
(Tumbler Dwell Time)
StoP
tinE
XX
SPin
ENTER / START
(Tumbler Spin Time)
XX
ENTER / START
tinE
ProG
CLEAR / STOP
23
FILL
Program Location 2
Flow Chart D
FILL
(Program Code)
(Enter Program Code)
ENTER / START
0
0
0
ProG
5
(Display Flash Active)
FLS
0
nFLS
(Display Flash Off)
ENTER / START
(Always Display
Temperature)
tEnP
0
tinE
(Always
Display Off)
ENTER / START
COOL
tEnP
F XXX
ENTER / START
Continued
on next
page.
24
(Cool Down Temperature)
Continued
from
previous
page.
COOL
(Cool Down Time)
tinE
XX
ENTER / START
(Display Flash
Active)
CYCL
(Cycle Display Time)
tinE
XX
ENTER / START
tEnP
(Temperature Display Time)
tinE
XX
ENTER / START
ProG
CLEAR / STOP
FILL
25
(Display Flash Off)
Program Location 3
Flow Chart E
FILL
(Program Code)
(Enter Program Code)
ENTER / START
0
0
0
ProG
8
(Anti-Wrinkle Active)
Grd
0
nGrd
(Anti-Wrinkle Off)
nbUZ
(Signal Tone Off)
ENTER / START
(Signal Tone Active)
bUZ
0
(Maximum Active Guard Time)
tinE
nGrd
ENTER / START
XXX
(Guard on Time)
ENTER / START
FILL
G on
CLEAR/STOP
tinE
XX
ProG
ENTER/START
26
Program Location 4
Flow Chart F
FILL
(Program Code)
(Enter Program Code)
ENTER / START
0
0
ProG
0
GdLY
tinE
(Guard Delay Time)
XXXX
ENTER / START
bUZ
tinE
(Signal Tone Time)
XX
ENTER / START
ProG
CLEAR / STOP
FILL
27
0
Manually Entered Automatic Cycle
Flow Chart G
FILL
Auto
2
F XXX
(Enter Drying Temperature)
ENTER / START
d XXX
(Enter number of Dryness Level)
ENTER / START
(Enter Reverse Mode or Non-Reverse Mode)
(Select Reverse Mode)
No
(Will Begin a
Non-Reversing Cycle)
Sr
0
Yes
ENTER / START
Cycle
Will
Begin
28
(Will Begin a
Reversing Cycle)
Manually Entered Manual Cycle
Flow Chart H
FILL
Manu
5
Ld XXX
(Enter Cycle Drying Time)
ENTER / START
LCXXX
(Enter Cycle Cool Down Time)
ENTER / START
F XXX
ENTER / START
(Enter Cycle Drying Temperature)
(Enter Reverse Mode or Non-Reverse Mode)
(Select Reverse
Mode)
No
(Will Begin a
Non-Reversing Cycle)
Sr
0
Yes
ENTER / START
Cycle
Will
Begin
29
(Will Begin a
Reversing Cycle)
SECTION VI
FACTORY PRESET PARAMETERS (PROGRAMS)
PHASE 3 OPL PARAMETERS
(Preset by Factory for Reversing Dryers)
Cycle A:
Automatic mode, Anti-Wrinkle active, dry temperature 190º F (88º C), dryness level 09, cool
down time 6 minutes, cool down temperature 100º F (38º C), reverse, spin time 90 seconds,
stop time 5 seconds.
Cycle b:
Automatic mode, Anti-Wrinkle active, dry temperature 190º F (88º C), dryness level 08, cool
down time 5 minutes, cool down temperature 100º F (38º C), reverse, spin time 90 seconds,
stop time 5 seconds.
Cycle C:
Automatic mode, Anti-Wrinkle active, dry temperature 160º F (71º C), dryness level 09, cool
down time 4 minutes, cool down temperature 100º F (38º C), reverse, spin time 90 seconds,
stop time 5 seconds.
Cycle d:
Manual mode, Anti-Wrinkle active, dry temperature 190º F (88º C), dry time 40 minutes, cool
down time 6 minutes, no reverse.
Cycle E:
Manual mode, Anti-Wrinkle active, dry temperature 180º F (82º C), dry time 30 minutes, cool
down time 4 minutes, no reverse.
Cycle F:
Manual mode, Anti-Wrinkle active, dry temperature 170º F (77º C), dry time 10 minutes, cool
down time 2 minutes, no reverse.
SYSTEM PARAMETERS
Program System 1:
Temperature conversion status set in Fahrenheit, reverse, stop time 5 seconds, spin time
90 seconds.
Program System 2:
No Flash, display time, cool down temperature 100º F (38º C), cool down time 6 minutes,
cycle display time 15 seconds, temperature display time 1 second.
Program System 3:
Anti-Wrinkle active, buzzer (tone) active, maximum Anti-Wrinkle time 10 minutes,
Anti-Wrinkle on time 20 minutes.
Program System 4:
Anti-Wrinkle delay time 90 seconds, buz time 7 seconds.
30
PHASE 3 OPL PARAMETERS
(Preset by Factory for Non-Reversing Dryers)
Cycle A:
Automatic mode, Anti-Wrinkle active, dry temperature 190º F (88º C), dryness level 09, cool
down time 6 minutes, cool down temperature 100º F (38º C).
Cycle b:
Automatic mode, Anti-Wrinkle active, dry temperature 190º F (88º C), dryness level 08, cool
down time 5 minutes, cool down temperature 100º F (38º C).
Cycle C:
Automatic mode, Anti-Wrinkle active, dry temperature 160º F (71º C), dryness level 09, cool
down time 4 minutes, cool down temperature 100º F (38º C).
Cycle d:
Manual mode, Anti-Wrinkle active, dry temperature 190º F (88º C), dry time 40 minutes, cool
down time 6 minutes.
Cycle E:
Manual mode, Anti-Wrinkle active, dry temperature 180º F (82º C), dry time 30 minutes, cool
down time 4 minutes.
Cycle F:
Manual mode, Anti-Wrinkle active, dry temperature 170º F (77º C), dry time 10 minutes, cool
down time 2 minutes.
SYSTEM PARAMETERS
Program System 1:
Temperature conversion status set in Fahrenheit.
Program System 2:
No Flash, display time, cool down temperature 100º F (38º C), cool down time 6 minutes,
cycle display time 15 seconds, temperature display time one-second.
Program System 3:
Anti-Wrinkle active, buzzer (tone) active, maximum Anti-Wrinkle time 10 minutes,
Anti-Wrinkle on time 20 minutes.
Program System 4:
Anti-Wrinkle delay time 90 seconds, buz time 7 seconds.
31
Phase 3 OPL Programming Limits
SYSTEM PARAMETERS
Stop Time: 4 - 19 seconds in one-second increments.
Spin Time: 30 - 93 seconds in one-second increments.
Auto Cool Temperature: 70º F to 100º F in 10º F increments or 21º C to 38º C in 5º C increments.
Auto Cool Time: 0 - 15 minutes in one-minute increments.
Cycle Display Time: 1 - 15 seconds in one-second increments.
Temperature Display Time: 1 - 15 seconds in one-second increments.
Guard On Time: 10 - 63 seconds in one-second increments.
Guard Delay Time: 15 - 4095 seconds in one-second increments.
Maximum Guard Time: 1 - 27 minutes in one-minute increments.
Buz Time: 1 - 15 seconds in one-second increments.
PREPROGRAMMED CYCLES
Dry Temperature: 110º F to 200º F (44º C to 94º C) in one-degree increments.
Dry Time (manual): 0 - 127 minutes in one-minute increments.
Cool Temperature (auto): 70º F to 100º F in 10º F increments or 21º C to 38º C in 5º C increments.
Cool Time (manual): 0 - 31 minutes in one-minute increments.
Cool Time (auto): 0 - 14 minutes in one-minute increments.
Stop Time: 4 - 19 seconds in one-second increments.
Spin Time: 30 - 93 seconds in one-second increments.
Dryness Level: 1 - 127 peaks in one-peak increments.
MANUALLY LOADED CYCLES
Dry Temperature (auto): 110º F to 200º F (44º C to 94º C) in one-degree increments.
Dryness Level (auto): 0 - 255 peaks in one-peak increments.
Dry Time (manual): 0 - 99 minutes in one-minute increments.
Cool Time (manual): 0 - 99 minutes in one-minute increments.
Dry Temperature (manual): 110º F to 200º F (44º C to 94º C) in one-degree increments.
32
ADC 450146
1- 07/17/97-250 2- 11/03/97-250 3- 11/04/99-100
4* 11/11/99-25
5- 12/02/99-25
6- 08/21/00-20
7- 09/26/00-75