1
Application Note:
A Procedure for Measuring Extracted Chloropll a Free from
the Errors Associated with Chloropyll b and Pheopigments
(Without Acidification - Using 13 mm Test Tubes)
INSTRUMENT SET-UP:
Model 10-AU Digital Fluorometer equipped with:
1. 13 mm cuvette holder; 2. Optical Filter Kit PN 10-040 or 10-040R, which includes:
PN 10-113 (436 nm) Excitation Filter; PN 10-115 (680 nm) Emission Filter;
PN 10-032 (1ND) Reference Filter; the PN 10-089 Blue Lamp (F4T4.5B2 equivalent).
SUMMARY OF THE METHOD
Conventional fluorescence methods for measuring chlorophyll a require samples to be measured twice; once before
acidification and once afterwards. Under the most extreme ratio of chlorophyll a/chlorophyll b likely to occur in nature
(1:1 molar), conventional acidification techniques result in approximately a 60% underestimate of true chlorophyll a.
1
Under these conditions, the new method described in these pages yields only a 10% overestimate of true
chlorophyll a. In addition, it requires a single fluorescence determination and is sensitive enough for estimates of
euphotic zone chlorophyll a in all marine and freshwater ecosystems. Filtration of less than 200 mL of water provides
adequate sensitivity even in the most oligotrophic environments.
The method requires:
1. Sample preparation.
2. Setting the basic operating level of your fluorometer (this only needs to be done once, prior to running samples
for the FIRST time).
3. Calibration of the Fluorometer.
4. Reading samples.
SAMPLE PREPARATION
Detailed instructions for extracting chlorophyll a and measuring with the Turner Designs analog fluorometer can be
found in United States Environmental Protection Agency (EPA) Method 445.0 "In Vitro Determination of Chlorophyll
a and Pheophytin a in Marine and Freshwater Phytoplankton by Fluorescence." A copy is enclosed for your
convenience. Method 445.0 sets forth the conventional fluorescence procedure, requiring two readings for each
sample--before and after acidification. (Method 445.0 can be found in the EPA standard methods book, Methods for
the Determination of Chemical Substances in Marine and Estuarine Environmental Samples.)
PLEASE NOTE that the procedure described in these instructions is without acidification. The Model 10-AU must
be configured with special optical filters and lamp which read chlorophyll a in the presence of chlorophyll b and
pheopigments. These optical filters and lamp should be installed according to instructions in your Model 10-AU
User's Manual ("Filter and Light Source Replacement" appendix).
USING THIS METHOD, you must NOT acidify your samples as set forth in EPA Method 445.0, section 11.2.2;
and you do not need to perform any calculations as required by section 12.1 of Method 445.0.
www.turnerdesigns.com
998-9000
Revision A
Page 1 of 6
Application Note:
A Procedure for Measuring Extracted Chloropll a Free from
the Errors Associated with Chloropyll b and Pheopigments
(Without Acidification - Using 13 mm Test Tubes)
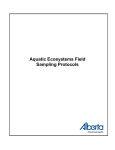
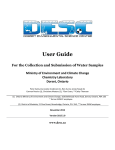
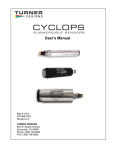
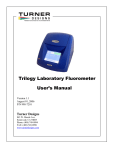
SETTING THE BASIC OPERATING LEVEL
The basic operating level of your fluorometer is set on
screen 3.2 using the Sensitivity Adjustment Knob.
Fluorescence readout: XXXX.XXX*
PM signal output: XXXX.XXX
Your Model 10-AU User's Manual contains detailed
instructions for setting the basic operating level (Appendix
5B of the Model 10-AU-000 Laboratory Fluorometer User's
Manual, and Appendix 6B of the Model 10-AU-005 Field
Fluorometer User's Manual). Once the basic operating
Cal std val: XXX.XX Blank: XX.XXX
FS: XX% of XXXX.XXX (PPB) at HIGH
Span level%: 48
<ENT> to next screen
#3.2
level (sensitivity) is set in this way, you should not have
to adjust it unless you want to drastically increase or
decrease sensitivity, or unless you change the lamp or filters.
Take care not to spill any liquids inside the fluorometer's sample chamber. If you do have a spill, turn off the
fluorometer immediately and consult the Sample System appendix of your user's manual. Wipe up splashes
on the instrument's exterior promptly.
Through experience, we have found the following operating level to be appropriate for extracted chlorophyll.
Have on hand one of the following: 50, or 75, or 100 g/liter (parts per billion) standard of chlorophyll a in 90%
acetone.
1. Turn on the fluorometer and allow to warm up for 10 minutes.
2. Using the keypad, access screen 2.0, Calibration. Press <6> once and then <9> five times to reset calibration
defaults.
3. From screen 2.0, press <4>, then <2> to access screen 2.42. Set the concentration range to HIGH.
4. Access screen 3.2, Diagnostic. Loosen (do not remove) the Sensitivity Knob Lock (hex screw to the left of the
keypad; see Figure 1 in the user's manual) with the 5/32" Allen wrench (stored behind and to the lower right of
the keypad).
5. Fill a clean 13 mm test tube with your standard. Dry the outside of the tube with a lab wipe and insert it in the
opening to the sample compartment. Replace the light cap.
6. On screen 3.2, look at the third line from the bottom: FS: XX% of XXX (g/l) at HIGH. Turn the Sensitivity Knob
slowly, pausing between adjustments for the reading to stabilize, until the FS % reads:
If you are using 50 ppb standard:
FS: 30-50% of 900.000 at HIGH
If you are using 75 ppb standard:
FS: 50-70% of 900.000 at HIGH
If you are using 100 ppb standard:
FS: 70-90% of 900.000 at HIGH
Turning the Sensitivity Knob clockwise increases the FS %; turning it counter-clockwise decreases FS %.
7. When desired FS % is reached, use the Allen wrench to tighten the Sensitivity Knob Lock. (IMPORTANT!)
8. Remove the standard from the fluorometer and set aside.
9. Before running samples, calibrate your fluorometer (see next section).
www.turnerdesigns.com
998-9000
Revision A
Page 2 of 6
Application Note:
A Procedure for Measuring Extracted Chloropll a Free from
the Errors Associated with Chloropyll b and Pheopigments
(Without Acidification - Using 13 mm Test Tubes)
CALIBRATION
Once the basic operating level is set, all you need to do is calibrate the instrument with the following procedure. The
calibration should remain stable for some time (at least two weeks), and unless you change your blank or standard
or want to change from reading very high levels to very low levels (or vice versa), you do not have to calibrate every
time you read a new batch of samples. (You will, of course, need to recalibrate if you reset the basic operating level,
or change the lamp or filters.)
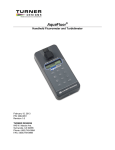
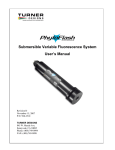
Table 1 shows a recommended range and concentration
of standard to use for reading various concentrations of
sample. These are recommendations and not absolute
concentrations; find what works for you. Please note,
however, that the standard must be within the linear range
for accurate readings (according to the EPA Method
445.0, using the 13 mm cuvettes, chlorophyll a is linear to
250 g/L).
TABLE 1. Recommended Standard Concentration
and Fluorometer Range
Concentration
to be Read
Range
Standard Fluorometer
Concentration2
Conc.
0 - 3.75 g/l
2.1 - 3.75 g/l
LOW
0 - 37.5 g/l
21 - 37.5 g/l
MED
Resolution on samples of low concentration will be better
0 - 100 g/l
75 - 100 g/l
HIGH
if you calibrate with a standard not too much more
0 - 2503 g/l
200 g/l
HIGH
concentrated than the samples. For example, if you want
to read samples less than 3 g/l, you will get better
resolution calibrating with a 3-10 g/l standard on the
LOW or MEDIUM range than with a 75 g/l standard on the HIGH range. You will note, however, that you will
probably still obtain good results reading low samples, even if you have calibrated with a high standard. (The
fluorometer is designed to give good range-to-range correlation.)
To calibrate:
Have ready a blank of 90% acetone and your standard of known concentration of pure chlorophyll a in 90% acetone.
1. Turn on the fluorometer and allow it to warm up for 10 minutes.
2. To begin calibration, from the Main Menu, press <2> to access screen 2.0, Calibration.
3. Set the concentration range control to MAN. From screen 2.0, press <4> to bring up screen 2.4, then <3> to
bring up screen 2.43 (set conc. range control), and press <ENT> to toggle.
4. Refer to Table 1 for the concentration range (LOW, MED, HIGH). To change to the desired concentration range,
from screen 2.4, press <2> to bring up screen 2.42 (change concentration range), and press <ENT> to toggle.
Return to screen 2.0.
5. From screen 2.0, press <2> to access screen 2.2 (standard solution concentration). Enter the actual
concentration for your standard. I.e., 3, 25, 75, etc. See Table 1. (This number must be less than 1000.)
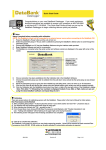
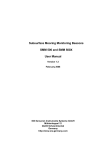
6. To Run Blank, press <1> to access screen 2.1. Make sure #2 on screen 2.1 reads YES. Then from screen 2.1,
press <1> to call up screen 2.11.
If you wish to abort the blank run and revert to
the former calibration settings, press <ESC>
before pressing <0>. This will retain the
current settings for Span and blank.
Because temperature affects fluorescence, do not
allow the blank to remain in the instrument any
longer than necessary for a stable reading.
Use UP or DOWN arrow to set Blank %
to less than 200%!
Blank%:
TC: 8 (SEC) Range: MED
Span: 48%
Press <0> after reading is stable!
#2.11
www.turnerdesigns.com
998-9000
Revision A
Page 3 of 6
Application Note:
A Procedure for Measuring Extracted Chloropll a Free from
the Errors Associated with Chloropyll b and Pheopigments
(Without Acidification - Using 13 mm Test Tubes)
Fill a clean 13 mm test tube with the blank of 90% acetone. Put the blank in the sample chamber and
replace the light cap. After the Blank % reading is stable ("TC" on screen 2.11 cycles from 1 to 8 sec)
and assuming the Blank % is less than 200%, press <0>. When "FINISHED" appears, press <ESC>.
If Blank % is not less than 200%, reduce the Span% (fine tuning of sensitivity) by pressing the down
arrow until the Blank % is less than 200%. Then press <0>. When "FINISHED" appears, press <ESC>.
Remove the blank. Set cuvette aside.
7.
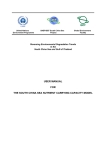
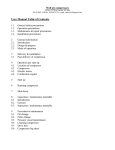
Run Standard solution. On screen 2.0, press <3> to bring up screen 2.3.
If you wish to abort the standard run and revert to the former calibration settings, then press
<ESC> before pressing <*>. This will retain the current settings for the Span and standard.
FS is the maximum concentration or relative
fluorescence you will be able to read on a particular
range, and it is not necessary or likely that FS match
the value of the standard.
For example, if you are calibrating on the MED range
with a 25 g/l standard, you would want to adjust the
Span % until the FS for the MED range is
approximately 30 (meaning you will be able to read
samples up to 30 g/l on the MED range).
Read help <?> before running Standard!
Use UP or DOWN arrow to adjust Table
RANGE: High Medium Low
FS (PPB):
TC: 8 (SEC) Range: MED
Press <*> after reading is stable!
Span: 48%
#2.3
Because temperature affects fluorescence, do not allow the standard to remain in the instrument any
longer than necessary for a stable reading.
Fill a clean 13 mm test tube with your pure chlorophyll a standard (See Table 1). Put the standard in the sample
chamber and replace the light cap. Adjust the Span % using the UP and DOWN arrows until the FS
readings for each range are satisfactory. Pressing the UP arrow increases Span % (sensitivity), but decreases
FS. Pressing the DOWN arrow decreases Span %, but increases FS. Wait until readings are stable ("TC" on
screen cycles from 1 to 8 sec), then press <*>. When "FINISHED" appears, press <ESC>.
If the LOW range reads OVER, with the Span % close to 0, it means the standard concentration is too
high for the LOW range. Press <ESC>, change to the MED range on screen 2.42, and return to step 6,
Calibration. Similarly, if the MED range reads OVER, with the Span close to 0%, it means the standard
concentration is too high for the MED range: press <ESC>, change to the HIGH range on screen 2.42,
and repeat steps 6-8, Calibration.
Refer to Section 2G, subsection 2d of the user's manual for an explanation of minus (-) and BLK>FS.
Remove the standard. Set cuvette aside.
8. Press <HOME> to return to the HOME screen, and you are ready to begin reading samples (see next
section).
READING SAMPLES
Refer to your user's manual, Section 3C, Routine Operation, for additional details.
After calibration is complete, you may begin reading your extracted samples on the HOME screen.
www.turnerdesigns.com
998-9000
Revision A
Page 4 of 6
Application Note:
A Procedure for Measuring Extracted Chloropll a Free from
the Errors Associated with Chloropyll b and Pheopigments
(Without Acidification - Using 13 mm Test Tubes)
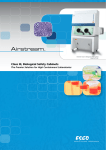
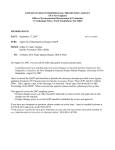
For your convenience, the Model 10-AU has a "Discrete Sample
Averaging" capability, where the instrument averages a reading
over a preset period, allowing you to read samples after they
CONC: MED (MAN)
XXX (PPB)
have been in the instrument for the same amount of time. This
Time
Const:
2
(SEC)
removes the guesswork from reading the digital display and
minimizes error due to temperature changes. Defaults for the
______________________________________
Model 10-AU are 15 seconds pre-delay for the signal to
stabilize, and an averaging period of 10 seconds. (To change
0
499
999
these periods, access screen 1.63. See appendix on Optional
Parameters in your user's manual) To use Discrete Sample
<?> for help
4:42:05 PM 1/25/93
Averaging, after putting in your sample, from the HOME screen,
press <*> and the instrument will countdown a delay period,
average the reading, and then display "DONE" in the upper right
hand corner of the screen. The averaged reading will be displayed for 10 seconds. Log the reading.
Procedure for running samples:
1. It is suggested that you read samples in the manual mode (MAN, set on screen 2.43). For the best
resolution, read your sample on the lowest range in which you can get an on-scale reading. (You can
see what the full scale values are for each range under the current calibration by pressing the LEFT
arrow while on the HOME screen.)
2. Fill a clean cuvette with a sample, wipe the outside of the cuvette dry with a lab wipe, and place in the
instrument. Replace the light cap.
3. Wait about 15 seconds for the reading to stabilize, and log the reading. (Remember: Because of
temperature effects, for greatest accuracy, read all samples after they have been in the fluorometer for
approximately the same length of time.)
If the display reads "OVER," and you are in the LOW range, go to screen 2.42 and change to the MED range. If
OVER in the MED range, go to screen 2.42 and change to the HIGH range. If you read OVER on the HIGH
range, it means the sample is too concentrated to be read at the current calibration (and probably over the linear
range anyway). In this case, dilute the sample by 25% (1 part sample to 3 parts blank water), and read it.
Multiply the reading by 4 to get the actual concentration.
4. Remove the cuvette and put in the next sample.
5. Repeat steps 2 - 3 until all samples are read.
These readings are the actual concentration of extracted chlorophyll a in the cuvette. To arrive at the
environmental chlorophyll a, for each sample you must correct for the volume of water filtered and the volume of
90% acetone used in the extraction.
6. Turn off the fluorometer.
NOTE: It won't hurt the fluorometer to leave it on all day. If you are going to be reading samples off-and-on over the
course of a few days, it is better to leave the fluorometer on.
www.turnerdesigns.com
998-9000
Revision A
Page 5 of 6
Application Note:
A Procedure for Measuring Extracted Chloropll a Free from
the Errors Associated with Chloropyll b and Pheopigments
(Without Acidification - Using 13 mm Test Tubes)
NOTES
www.turnerdesigns.com
998-9000
Revision A
Page 6 of 6