1
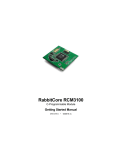
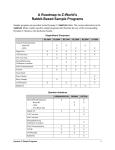
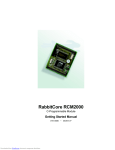
RabbitCore RCM2200
C-Programmable Module with Ethernet
Getting Started Manual
019–0096
• 040505–F
RabbitCore RCM2200 Getting Started Manual
Part Number 019-0096 • 040505–F • Printed in U.S.A.
©2001–2004 Z-World Inc. • All rights reserved.
Z-World reserves the right to make changes and
improvements to its products without providing notice.
Trademarks
Rabbit and Rabbit 2000 are registered trademarks of Rabbit Semiconductor.
RabbitCore is a trademark of Rabbit Semiconductor.
Dynamic C is a registered trademark of Z-World Inc.
Z-World, Inc.
Rabbit Semiconductor
2900 Spafford Street
Davis, California 95616-6800
USA
2932 Spafford Street
Davis, California 95616-6800
USA
Telephone: (530) 757-3737
Fax: (530) 757-3792
Telephone: (530) 757-8400
Fax: (530) 757-8402
www.zworld.com
www.rabbitsemiconductor.com
RabbitCore RCM2200
TABLE OF CONTENTS
Chapter 1. Introduction & Overview
1
1.1 RCM2200 Description .................................................................................................... 1
1.1.1 Physical & Electrical Specifications ........................................................................................... 2
1.2 Development Software .................................................................................................... 3
1.3 How to Use This Manual ................................................................................................. 3
1.3.1 Additional Product Information .................................................................................................. 3
1.3.2 Additional Reference Information .............................................................................................. 3
1.3.3 Using Online Documentation ...................................................................................................... 4
Chapter 2. Hardware Setup
5
2.1 Development Kit Contents ............................................................................................... 5
2.2 Prototyping Board .......................................................................................................... 6
2.2.1 Prototyping Board Features ......................................................................................................... 7
2.2.2 Prototyping Board Expansion ..................................................................................................... 8
2.3 Development Hardware Connections ................................................................................. 9
2.3.1 Attach Module to Prototyping Board .......................................................................................... 9
2.3.2 Connect Programming Cable .................................................................................................... 10
2.3.3 Connect Ethernet Network Cable .............................................................................................. 11
2.3.4 Connect Power .......................................................................................................................... 12
2.4 Where Do I Go From Here? ........................................................................................... 13
2.4.1 Technical Support ..................................................................................................................... 13
Chapter 3. Software Installation & Overview
15
3.1 An Overview of Dynamic C ........................................................................................... 15
3.1.1 Hardware Requirements ............................................................................................................ 16
3.2 Installing Dynamic C .................................................................................................... 17
3.2.1 Program & Documentation File Location ................................................................................. 17
3.2.2 Installation Type ........................................................................................................................ 18
3.2.3 Select COM Port ....................................................................................................................... 19
3.2.4 Desktop Icons ............................................................................................................................ 19
3.3 Starting Dynamic C ...................................................................................................... 20
3.3.1 Communication Error Messages ............................................................................................... 20
3.4 Sample Programs ......................................................................................................... 21
Getting Started Manual
Chapter 4. Using the TCP/IP Features
23
4.1 TCP/IP Connections ......................................................................................................23
4.2 Running TCP/IP Sample Programs ...................................................................................24
4.3 IP Addresses Explained ..................................................................................................26
4.4 How IP Addresses are Used ............................................................................................27
4.5 Dynamically Assigned Internet Addresses .........................................................................28
4.6 Placing Your Device on the Internet .................................................................................29
4.7 How to Set IP Addresses in the Sample Programs................................................................30
4.8 How to Set Up your Computer’s IP Address for Direct Connect .............................................31
4.9 Run the PINGME.C Sample Programs ..............................................................................32
4.10 Running More Sample Programs With Direct Connect .......................................................32
4.11 Where Do I Go From Here? ..........................................................................................33
Notice to Users
35
Index
37
Schematics
39
RabbitCore RCM2200
1. INTRODUCTION & OVERVIEW
The RCM2200 is an advanced module that incorporates the powerful Rabbit 2000® microprocessor, flash memory, static RAM,
digital I/O ports, and a 10Base-T Ethernet port, all on a PCB just
half the size of a business card.
1.1 RCM2200 Description
The RCM2200 is a small-footprint module designed for use on a motherboard that supplies power and interface to real-world I/O devices. Its two 26-pin connection headers provide 26 parallel user I/O lines, shared with three serial ports, along with data, address and
control lines. A fourth serial port and three additional I/O lines are available on the programming header.
A fully-enabled slave port permits glueless master-slave interface with another Rabbitbased system. The slave port may also be used with non-Rabbit systems, although additional logic may be required.
The RCM2200 is equipped with a 10Base-T Ethernet port, 256K flash memory and 128K
static RAM.
There are three production models in the RCM2200 series. If the standard models do not
serve your needs, other variations can be specified and ordered in production quantities.
Contact your Z-World or Rabbit Semiconductor sales representative for details.
Table 1 provides a summary of all the models in the RCM2200 family.
Table 1. RCM2200 Versions
Feature
Microprocessor
RCM2200
RCM2210
RCM2250
Rabbit 2000 running at 22.1 MHz
Flash Memory
256K
256K
512K
Static RAM
128K
128K
512K
Yes
No
Yes
RJ-45 Ethernet Connector,
Filter Capacitors, and LEDs
Serial Ports
Getting Started
4, high-speed, CMOS-compatible;
2 configurable as clocked ports;
1 clocked port dedicated to programming port use.
1
In addition, a variant of the RCM2200 is available. The RCM2300 omits the Ethernet connectivity but offers a much smaller footprint, one-half the size of the RCM2200.
Another RabbitCore module can be used to reprogram an RCM2200. This reprogramming
(and debugging) can be done via the Internet using Z-World’s RabbitLink network programming gateway or with Ethernet-equipped RabbitCore RCM2100 and RCM2200
models using Dynamic C’s DeviceMate features. The RCM2200 is particularly suitable
for use as an inexpensive hardware platform for Dynamic C’s DeviceMate features.
1.1.1 Physical & Electrical Specifications
Table 2 lists the basic specifications for the RCM2200.
Table 2. RCM2200 Specifications
Specification
Data
Power Supply
4.75 – 5.25 V DC (134 mA at 22.1 MHz clock speed)
Size
2.3” x 1.6” x 0.86” (59 mm × 41 mm × 22 mm)
Environmental
–40°C to 70°C, 5–95% humidity, noncondensing
NOTE: For complete product specifications, see Appendix A in the RabbitCore
RCM2200 User’s Manual.
The RCM2200 modules have two 26-pin headers to which cables can be connected, or
which can be plugged into matching sockets on a production device. The pinouts for these
connectors are shown in Figure 1 below.
J4
GND
PC0
PC2
TPOUTLNK
PD4
/IORD
PE0
TPINPE4
ACT
A3
A1
J5
VCC
PC1
PC3
TPOUT+
PD3
PD5
/IOWR
PE1
TPIN+
PE5
PE7
A2
A0
PA0
PA2
PA4
PA6
/RES
PB2
PB4
PB7
D6
D4
D2
D0
VCC
PA1
PA3
PA5
PA7
PB0
PB3
PB5
D7
D5
D3
D1
VBAT
GND
Note: These pinouts are as seen on
the Bottom Side of the module.
Figure 1. RCM2200 Connector Pinout
2
RabbitCore RCM2200
1.2 Development Software
The RCM2200 module uses the Dynamic C development environment for rapid creation
and debugging of runtime applications. Dynamic C provides a complete development
environment with integrated editor, compiler and source-level debugger. It interfaces
directly with the target system, eliminating the need for complex and unreliable in-circuit
emulators.
Dynamic C must be installed on a Windows workstation with at least one free serial
(COM) port for communication with the target system. See Chapter 3., “Software Installation & Overview.” for complete information on installing Dynamic C.
NOTE: The RCM2200 module requires Dynamic C v7.04 or later for development. A
compatible version is included on the Development Kit CD-ROM.
1.3 How to Use This Manual
This Getting Started manual is intended to give users a quick but solid start with the
RCM2200 module. It does not contain detailed information on the module hardware capabilities, the Dynamic C development environment, or the TCP/IP software support for the
integrated Ethernet port. Most users will want more detailed information on some or all of
these topics in order to put the RCM2200 module to effective use.
1.3.1 Additional Product Information
Detailed information about the RCM2200 will be found in the RabbitCore RCM2200
User’s Manual, provided on the accompanying CD-ROM in both HTML and Adobe PDF
format.
Some advanced users may choose to skip the rest of this introductory manual and proceed
directly with the detailed hardware and software information in the User’s manual.
TIP: We recommend that anyone not thoroughly familiar with Z-World controllers at
least read through the rest of this manual to gain the necessary familiarity to make use
of the more advanced information.
1.3.2 Additional Reference Information
In addition to the product-specific information contained in the RabbitCore RCM2200
User’s Manual, several higher-level reference manuals are provided in HTML and PDF
form on the accompanying CD-ROM. Advanced users will find these references valuable
in developing systems based on the RCM2200 module:
• Dynamic C User’s Manual
• An Introduction to TCP/IP
• Dynamic C TCP/IP User’s Manual
• Rabbit 2000 Microprocessor User’s Manual
Getting Started
3
1.3.3 Using Online Documentation
We provide the bulk of our user and reference documentation in two electronic formats,
HTML and Adobe PDF. We do this for several reasons.
We believe that providing all users with our complete library of product and reference
manuals is a useful convenience. However, printed manuals are expensive to print, stock
and ship. Rather than include and charge for manuals that every user may not want, or provide only product-specific manuals, we choose to provide our complete documentation
and reference library in electronic form with every development kit and with our Dynamic
C development environment.
NOTE: The most current version of Adobe Acrobat Reader can always be downloaded
from Adobe’s web site at http://www.adobe.com. We recommend that you use
version 4.0 or later.
Providing this documentation in electronic form saves an enormous amount of paper by
not printing copies of manuals that users don’t need.
Finding Online Documents
The online documentation is installed along with Dynamic C, and an icon for the documentation menu is placed on the workstation’s desktop. Double-click this icon to reach the
menu. If the icon is missing, create a new desktop icon that points to default.htm in the
docs folder, found in the Dynamic C installation folder.
The latest versions of all documents are always available for free, unregistered download
from our web sites as well.
Printing Electronic Manuals
We recognize that many users prefer printed manuals for some uses. Users can easily print
all or parts of those manuals provided in electronic form. The following guidelines may be
helpful:
• Print from the Adobe PDF versions of the files, not the HTML versions.
• If your printer supports duplex printing, print pages double-sided.
• If you do not have a suitable printer or do not want to print the manual yourself, most
retail copy shops (e.g. Kinkos, AlphaGraphics, etc.) will print the manual from the PDF
file and bind it for a reasonable charge—about what we would have to charge for a
printed and bound manual.
4
RabbitCore RCM2200
2. HARDWARE SETUP
This chapter describes the RCM2200 hardware in more detail, and
explains how to set up and use the accompanying Prototyping Board.
NOTE: This chapter (and this manual) assume that you have the RCM2200 Development
Kit. If you purchased an RCM2200 module by itself, you will have to adapt the information in this chapter and elsewhere to your test and development setup.
2.1 Development Kit Contents
The RCM2200 Development Kit contains the following items:
• RCM2200 module with Ethernet port, 256K flash memory, and 128K SRAM.
• RCM2200 Prototyping Board.
• Wall transformer power supply, 12 V DC, 500 mA. (Included only with Development
Kits sold for the North American market. Overseas users will have to substitute a
power supply compatible with local mains power.)
• 10-pin header to DE9 programming cable with integrated level-matching circuitry.
• Dynamic C CD-ROM, with complete product documentation on disk.
• This Getting Started manual.
• Rabbit 2000 Processor Easy Reference poster.
• Registration card.
Getting Started
5
2.2 Prototyping Board
The Prototyping Board included in the Development Kit makes it easy to connect an
RCM2200 module to a power supply and a PC workstation for development. It also provides some basic I/O peripherals (switches and LEDs), as well as a prototyping area for
more advanced hardware development.
For the most basic level of evaluation and development, the Prototyping Board can be
used without modification.
As you progress to more sophisticated experimentation and hardware development, modifications and additions can be made to the board without modifying or damaging the
RCM2200 module itself.
The Prototyping Board is shown below in Figure 2, with its main features identified.
RCM2200/RCM2300
User
Reset
RCM2200/RCM2300
Slave Module
Power
Switch Switches
Master Module
Voltage
Connectors
Input
Connectors
Regulator
Power
User
LED
LEDs
Through-Hole
Prototyping Area
Master Module
Extension Headers
Slave Module
Extension Headers
Battery
CAUTION
RS-232
Signal
Header
Battery
SMT Prototyping
Area
Vcc and GND
Buses
Figure 2. RCM2200/RCM2300 Prototyping Board
6
RabbitCore RCM2200
2.2.1 Prototyping Board Features
• Power Connection—A 3-pin header is provided for connection to the power supply.
Note that it is symmetrical, with both outer pins connected to ground and the center pin
connected to the raw V+ input. The cable of the wall transformer provided with the
North American version of the development kit ends in a connector that is correctly
connected in either orientation.
Users providing their own power supply should ensure that it delivers 8–24 V DC at not
less than 500 mA. The voltage regulator will get warm while in use. (Lower supply
voltages will reduce thermal dissipation from the device.)
• Regulated Power Supply—The raw DC voltage provided at the POWER IN jack is
routed to a 5 V linear voltage regulator, which provides stable power to the RCM2200
module and the Prototyping Board. A Shottky diode protects the power supply against
damage from reversed raw power connections.
• Power LED—The power LED lights whenever power is connected to the Prototyping
Board.
• Reset Switch—A momentary-contact, normally open switch is connected directly to
the RCM2200’s /RES pin. Pressing the switch forces a hardware reset of the system.
• I/O Switches and LEDs—Two momentary-contact, normally open switches are connected to the PB2 and PB3 pins of the master RCM2200 module and may be read as
inputs by sample applications.
Two LEDs are connected to the PE1 and PE7 pins of the master module, and may be
driven as output indicators by sample applications.
The LEDs and switches are connected through JP1, which has traces shorting adjacent
pads together. These traces may be cut to disconnect the LEDs, and an 8-pin header soldered into JP1 to permit their selective reconnection with jumpers. See Figure 3 for
details.
• Expansion Areas—The Prototyping Board is provided with several unpopulated areas
for expansion of I/O and interfacing capabilities. See the next section for details.
• Prototyping Area—A generous prototyping area has been provided for the installation
of through-hole components. Vcc (5 V DC) and Ground buses run around the edge of
this area. An area for surface-mount devices is provided to the right of the through-hole
area. (Note that there are SMT device pads on both top and bottom of the Prototyping
Board.) Each SMT pad is connected to a hole designed to accept a 30 AWG solid wire.
• Slave Module Connectors—A second set of connectors is pre-wired to permit installation of a second, slave RCM2200 or RCM2300 module. This capability is reserved
for future use, although the schematics in this manual contain all of the details an experienced developer will need to implement a master-slave system.
Getting Started
7
2.2.2 Prototyping Board Expansion
The Prototyping Board comes with several unpopulated areas, which may be filled with
components to suit the user’s development needs. After you have experimented with the
sample programs in Section 3.4, you may wish to expand the board’s capabilities for further experimentation and development. Refer to the Prototyping Board schematic (090–
0122) for details as necessary.
• Module Extension Headers—The complete pin sets of both the Master and Slave
RabbitCore modules are duplicated at these two sets of headers. Developers can solder
wires directly into the appropriate holes, or, for more flexible development, 26-pin
header strips can be soldered into place. See Figure 1 for the header pinouts.
• RS-232—Two 2-wire or one 4-wire RS-232 serial port can be added to the Prototyping
Board by installing a driver IC and four capacitors. The Maxim MAX232CPE driver
chip or a similar device is recommended for the U2. Refer to the Prototyping Board
schematic for additional details.
A 10-pin 0.1-inch spacing header strip can be installed at J6 to permit connection of a
ribbon cable leading to a standard DE-9 serial connector.
All RS-232 port components mount to the underside of the Prototyping Board, between
the Master module connectors.
NOTE: The RS-232 chip, capacitors and header strip are available from electronics distributors such as Digi-Key.
• Prototyping Board Component Header—Four I/O pins from the module are hardwired to the Prototyping Board LEDs and switches.
To disconnect these devices and permit
the pins to be used for other purposes,
cut the traces between the pin rows of
JP1. Use a knife or similar tool to cut or
break the traces crossing JP1 in the area
between the silk-screened arrows, as
indicated in Figure 3.
Use jumpers across the positions on JP1
if you need to reconnect any of the
devices later on.
8
JP1
DS2 DS3 S2
S3
Cut
Cut
PE1 PE7 PB2 PB3
Figure 3. Prototyping Board Header JP1
(located on BOTTOM SIDE of board)
RabbitCore RCM2200
2.3 Development Hardware Connections
There are four steps to connecting the Prototyping Board for use with Dynamic C and the
sample programs:
1. Attach the RCM2200 module to the Prototyping Board.
2. Connect the programming cable between the RCM2200 module and the workstation PC.
3. Connect the module’s Ethernet port to a PC’s Ethernet port, or to an Ethernet network.
4. Connect the power supply to the Prototyping Board.
2.3.1 Attach Module to Prototyping Board
EGND
ACT
DS2
JP5
C1
RCM2200
LNK
JP1
C30
JP2
U8 U7
JP6
C7
GND
C29 GND
Turn the RCM2200 module so that the Ethernet connector end of the module extends off
the Prototyping Board, as shown in Figure 4 below. Align the module headers J4 and J5
into sockets J1 and J2 on the Prototyping Board.
Y2 C2
U3
DS1
R18
Y3
R16
R19
Q4
Q3
C13
R20
C12
R17
Q2
R15
U1
BT1
C8
R9
R11
R13
Q5
R21 R22
R37
Y1 C4
R1 C17
R2
J1
C14
C25
R8
R36
D2
R7
U6
C3
U2
R38
C27
C28
RT1
D3
D1
R41
J2
JP3
JP4
R39
Battery
CAUTION
Line up the
mounting holes
Figure 4. Installing the RCM2200 on the Prototyping Board
Getting Started
9
Although you can install a single module into either the MASTER or the SLAVE position
on the Prototyping Board, all the Prototyping Board features (switches, LEDs, serial port
drivers, etc.) are connected to the MASTER position. We recommend you install a single
module in the MASTER position.
NOTE: It is important that you line up the pins on headers J4 and J5 of the RCM2200
exactly with the corresponding pins of headers J1 and J2 on the Prototyping Board. The
header pins may become bent or damaged if the pin alignment is offset, and the module
will not work. Permanent electrical damage to the module may also result if a misaligned module is powered up.
Press the module’s pins firmly into the Prototyping Board headers.
2.3.2 Connect Programming Cable
The programming cable connects the RCM2200 module to the PC running Dynamic C to
download programs and to monitor the RCM2200 for debugging.
Connect the 10-pin connector of
the programming cable labeled
PROG to header J1 on the
RCM2200 module as shown in
Figure 5. Be sure to orient the
marked (usually red) edge of the
cable towards pin 1 of the connector. (Do not use the DIAG connector, which is used for a normal
serial connection.)
Connect the other end of the programming cable to a COM port on
your PC. Make a note of the port to
which you connect the cable, as
Dynamic C needs to have this
parameter configured when it is
installed.
Figure 5. Connect Programming Cable
to RCM2200
NOTE: COM 1 is the default
port used by Dynamic C.
10
RabbitCore RCM2200
2.3.3 Connect Ethernet Network Cable
Programming and development can be done with the RCM2200 without connecting the Ethernet
port to a network. However, if you will be running the sample programs that use the Ethernet capability or will be doing Ethernet-enabled development, you should connect the RCM2200 module’s
Ethernet port at this time.
There are four options for connecting the RCM2200 to a network for development and
runtime purposes. The first two options permit total freedom of action in selecting network addresses and use of the “network,” as no action can interfere with other users. We
recommend one of these options for initial development.
• No LAN — The simplest alternative for desktop development. Connect the
RCM2200’s Ethernet port directly to the PC’s network interface card using an RJ-45
crossover cable. A crossover cable is a special cable that flips some connections
between the two connectors and permits direct connection of two client systems. A
standard RJ-45 network cable will not work for this purpose.
• Micro-LAN — Another simple alternative for desktop development. Use a small
Ethernet 10Base-T hub and connect both the PC’s network interface card and the
RCM2200’s Ethernet port to it, using standard network cables.
The following options require more care in address selection and testing actions, as conflicts with other users, servers and systems can occur:
• LAN — Connect the RCM2200’s Ethernet port to an existing LAN, preferably one to
which the development PC is already connected. You will need to obtain IP addressing
information from your network administrator.
• WAN — The RCM2200 is capable of direct connection to the Internet and other Wide
Area Networks, but exceptional care should be used with IP address settings and all
network-related programming and development. We recommend that development and
debugging be done on a local network before connecting a RabbitCore system to the
Internet.
TIP: Checking and debugging the initial setup on a micro-LAN is recommended before
connecting the system to a LAN or WAN.
Getting Started
11
2.3.4 Connect Power
When all other connections have been made, you can connect power to the RCM2200 Prototyping Board.
Hook the connector from the wall transformer to header J5 on the Prototyping Board as
shown in Figure 6 below. The connector may be attached either way as long as it is not
offset to one side.
AC Adapter
C1
EGND
ACT
DS2
JP5
LNK
JP1
C30
JP2
U8 U7
JP6
C7
GND
C29 GND
RCM2200
Y2 C2
U3
DS1
R18
R16
Y3
Q4
Q3
C13
R20
R19
Q2
C12
R17
R15
U1
BT1
C8
R9
R11
R13
Q5
R21 R22
R37
Y1 C4
R1 C17
R2
J1
PROG
C14
C25
R8
R36
D2
R7
U6
C3
U2
R38
C27
C28
D3
RT1
D1
R39
J2
JP3
JP4
R41
Prototyping
Reset Board
Switch
DIAG
Figure 6. Power Supply Connections
Plug in the wall transformer. The power LED on the Prototyping Board should light up.
The RCM2200 and the Prototyping Board are now ready to be used.
NOTE: A RESET button is provided on the Prototyping Board to allow hardware reset
without disconnecting power.
To power down the Prototyping Board, unplug the power connector from J5. You should
disconnect power before making any circuit adjustments in the prototyping area, changing
any connections to the board, or removing the RabbitCore module from the board.
12
RabbitCore RCM2200
2.4 Where Do I Go From Here?
We recommend that you proceed to the next chapter and install Dynamic C (if you do not
already have it installed), then run the first sample program to verify that the RCM2200
module and the Prototyping Board are set up and functioning correctly.
If everything appears to be working, we recommend the following sequence of action:
1. Run all of the sample programs described in Section 3.4 to get a basic familiarity with
Dynamic C and the RCM2200 module’s capabilities.
2. For further development, refer to the RabbitCore RCM2200 User’s Manual for details
of the module’s hardware and software components.
A documentation icon should have been installed on your workstation’s desktop; click
on it to reach the documentation menu. You can create a new desktop icon that points to
default.htm in the docs folder in the Dynamic C installation folder.
3. For advanced development topics, refer to the Dynamic C User’s Manual and the
Dynamic C TCP/IP User’s Manual, also in the online documentation set.
2.4.1 Technical Support
NOTE: If you purchased your RCM2200 through a distributor or through a Z-World or
Rabbit Semiconductor partner, contact the distributor or Z-World partner first for technical support.
If there are any problems at this point:
• Check the Z-World/Rabbit Semiconductor Technical Bulletin Board at
www.zworld.com/support/bb/.
• Use the Technical Support e-mail form at www.zworld.com/support/support_submit.html.
Getting Started
13
14
RabbitCore RCM2200
3. SOFTWARE INSTALLATION & OVERVIEW
To develop and debug programs for the RCM2200 (and for all
other Z-World and Rabbit Semiconductor hardware), you must
install and use Dynamic C. This chapter takes you through the
installation of Dynamic C, and then provides a tour of its major
features with respect to the RCM2200 module.
3.1 An Overview of Dynamic C
Dynamic C integrates the following development functions into one program:
• Editing
• Compiling
• Linking
• Loading
• In-Circuit Debugging
In fact, compiling, linking and loading are one function. Dynamic C does not use an InCircuit Emulator; programs being developed are downloaded to and executed from the
“target” system via an enhanced serial-port connection. Program development and debugging take place seamlessly across this connection, greatly speeding system development.
Other features of Dynamic C include:
• Dynamic C has an easy-to-use built-in text editor. Programs can be executed and
debugged interactively at the source-code or machine-code level. Pull-down menus and
keyboard shortcuts for most commands make Dynamic C easy to use.
• Dynamic C also supports assembly language programming. It is not necessary to leave
C or the development system to write assembly language code. C and assembly language may be mixed together.
• Debugging under Dynamic C includes the ability to use printf commands, watch
expressions, breakpoints and other advanced debugging features. Watch expressions
can be used to compute C expressions involving the target’s program variables or functions. Watch expressions can be evaluated while stopped at a breakpoint or while the
target is running its program.
Getting Started
15
• Dynamic C provides extensions to the C language (such as shared and protected variables, costatements and cofunctions) that support real-world embedded system development. Interrupt service routines may be written in C. Dynamic C supports
cooperative and preemptive multi-tasking.
• Dynamic C comes with many function libraries, all in source code. These libraries support real-time programming, machine level I/O, and provide standard string and math
functions.
• Dynamic C compiles directly to memory. Functions and libraries are compiled and
linked and downloaded on-the-fly. On a fast PC, Dynamic C can load 30,000 bytes of
code in 5 seconds at a baud rate of 115,200 bps.
3.1
Hardware Requirements
To install and run Dynamic C, your system must be running one of the following operating
systems:
• Windows 95
• Windows 98
• Windows NT
• Windows Me
• Windows 2000
3.1.1 Hardware Requirements
The PC on which you install Dynamic C for development of RCM2200-based systems
should have the following hardware:
• A Pentium or later microprocessor
• 32 MB of RAM
• At least 50 MB of free hard drive space
• At least one free COM (serial) port for communication with the target systems
• A 10Base-T Ethernet network interface port
(optional if you will not be using the RCM2200’s Ethernet port)
• A CD-ROM drive (for software installation)
16
RabbitCore RCM2200
3.2 Installing Dynamic C
Insert the Dynamic C CD-ROM in the drive on your PC. If autorun is enabled, the CD
installation will begin automatically.
If autorun is disabled or the installation otherwise does not start, use the Windows
Start | Run menu or Windows Disk Explorer to launch SETUP.EXE from the root folder
of the CD-ROM.
The installation program will guide you through the installation process. Most steps of the
process are self-explanatory and not covered in this section. Selected steps that may be
confusing to some users are outlined below. (Some of the installation utility screens may
vary slightly from those shown.)
3.2.1 Program & Documentation File Location
Dynamic C’s application, library and documentation files can be installed in any convenient location on your workstation’s hard drives.
The default location, as shown in the example above, is in a folder named for the version
of Dynamic C, placed in the root folder of the C: drive. If this location is not suitable, enter
a different root path before clicking Next >. Files are placed in the specified folder, so do
not set this location to a drive’s root directory.
Getting Started
17
3.2.2 Installation Type
Dynamic C has two components that can be installed together or separately. One component is Dynamic C itself, with the development environment, support files and libraries.
The other component is the documentation library in HTML and PDF formats, which may
be left uninstalled to save hard drive space or installed elsewhere (on a separate or network drive, for example).
The installation type is selected in the installation menu shown above. The options are:
• Typical Installation — Both Dynamic C and the documentation library will be
installed in the specified folder (default).
• Compact Installation — Only Dynamic C will be installed.
• Custom Installation — You will be allowed to choose which components are
installed. This choice is useful to install or reinstall just the documentation.
18
RabbitCore RCM2200
3.2.3 Select COM Port
Dynamic C uses a COM (serial) port to communicate with the target development system.
The installation allows you to choose the COM port that will be used.
The default selection, as shown in the example above, is COM1. You may select any available port for Dynamic C’s use. If you are not certain which port is available, select COM1.
This selection can be changed later within Dynamic C.
NOTE: The installation utility does not check the selected COM port in any way. Specifying a port in use by another device (mouse, modem, etc.) may cause temporary problems when Dynamic C is started.
3.2.4 Desktop Icons
Once your installation is complete, you will have up to three icons on your PC desktop, as
shown below.
One icon is for Dynamic C, one opens the documentation menu, and the third is for the
Rabbit Field Utility, a tool used to download precompiled software to a target system.
Getting Started
19
3.3 Starting Dynamic C
Once the RCM2200 module is set up and connected as described in Chapter 2 and
Dynamic C has been installed, start Dynamic C by double-clicking on the Dynamic C
icon. Dynamic C should start, then look for the target system on the COM port you specified during installation (by default, COM1). Once detected, Dynamic C should go through
a sequence of steps to cold-boot the module and compile the BIOS.
If you receive the message beginning "BIOS successfully compiled and
loaded", you are ready to continue with the sample programs.
3.3.1 Communication Error Messages
If you receive the message "No Rabbit Processor Detected", the programming
cable may be connected to a different COM port, a connection may be faulty, or the target
system may not be powered up. First, check to see that the power LED on the prototyping
board is lit. If it is, check both ends of the programming cable to ensure that it is firmly
plugged into the PC and the RCM2200’s programming port. If you are using the Prototyping Board, ensure that the module is firmly and correctly installed in its connectors.
If there are no faults with the hardware, select a different COM port within Dynamic C.
From the Options menu, select Project Options, then select Communications. The
dialog shown should appear.
Select another COM port from the list, then click OK. Press <Ctrl-Y> to force Dynamic C to recompile the BIOS. If Dynamic C still reports it is unable to locate the target system, repeat the above
steps until you locate the active COM port.
If Dynamic C appears to compile the BIOS successfully, but you then receive a communication error message, it is possible that your PC cannot handle the 115,200 bps baud rate.
Try changing the baud rate to 57,600 bps as follows.
• Locate the Serial Options dialog in the Dynamic C Options > Project Options >
Communications menu. Change the baud rate to 57,600 bps.
20
RabbitCore RCM2200
3.4 Sample Programs
To help familiarize you with the RCM2200 modules, Dynamic C includes several sample
programs. Loading, executing and studying these programs will give you a solid hands-on
overview of the RabbitCore’s capabilities, as well as a quick start with Dynamic C as an
application development tool.
NOTE: The sample programs assume that you have at least an elementary grasp of ANSI
C. If you do not, see the introductory pages of the Dynamic C User’s Manual for a suggested reading list.
Of the many sample programs included with Dynamic C, several are specific to the
RCM2200 module. These programs will be found in the Samples\RCM2200 folder.
We suggest that you examine the following five of these sample programs in order to get a
complete tour of the capabilities of the RCM2200 modules. They form a “learning arc”
from basic I/O control to advanced TCP/IP issues, including Web serving:
• FlashLED.c
• ToggleLED.c
• FlashLEDs.c
• EXTSRAM.c
• PUTS.c
• MASTER.c
• SLAVE.C
Each of these programs is fully commented within the source code. Refer to these comments for the details of how each program works. TCP/IP sample programs are discussed
in Chapter 4, “Using the TCP/IP Features.”
Once you have loaded and executed these five programs and have an understanding of
how Dynamic C and the RCM2200 modules interact, you can move on and try the other
sample programs, or begin building your own.
Getting Started
21
22
RabbitCore RCM2200
4. USING THE TCP/IP FEATURES
4.1 TCP/IP Connections
Before proceeding you will need to have the following items.
• If you don’t have Ethernet access, you will need at least a 10Base-T Ethernet card
(available from your favorite computer supplier) installed in a PC.
• Two RJ-45 straight through Ethernet cables and a hub, or an RJ-45 crossover Ethernet
cable.
The Ethernet cables and Ethernet hub are available from Z-World in a TCP/IP tool kit.
More information is available at www.zworld.com.
1. Connect the AC adapter and the programming cable as shown in Chapter 2, “Hardware
Setup,”
2. Ethernet Connections
If you do not have access to an Ethernet network, use a crossover Ethernet cable to connect the RCM2200 board to a PC with at least a 10Base-T Ethernet card.
If you have Ethernet access, use a straight Ethernet cable to establish an Ethernet connection to the RCM2200 from an Ethernet hub.
The PC running Dynamic C through the serial port on the RCM2200 does not need to
be the PC with the Ethernet card.
3. Apply Power
Plug in the AC adapter. The RCM2200 is now ready to be used.
Getting Started
23
4.2 Running TCP/IP Sample Programs
We have provided a number of sample programs demonstrating various uses of TCP/IP for
networking embedded systems. These programs require that the user connect his PC and
the RCM2200 board together on the same network. This network can be a local private
network (preferred for initial experimentation and debugging), or a connection via the
Internet.
RCM2200
Board
User’s PC
Ethernet
crossover
cable
Direct Connection
(Network of 2 computers)
RCM2200
Board
Ethernet
cables
To additional
network
Hub
elements
Direct Connection Using a Hub
Obtaining IP addresses to interact over an existing, operating, network can involve a number of complications, and must usually be done with cooperation from your ISP and/or
network systems administrator (if your company has one). For this reason, it is suggested
that the user begin instead by using a direct connection between a PC and the RCM2200
board using an Ethernet crossover cable or a simple arrangement with a hub. (A crossover
cable should not be confused with regular straight through cables.) The hub and a wide
variety of cables can also be purchased from a local computer store.
In order to set up this direct connection, the user will have to use a PC without networking,
or disconnect a PC from the corporate network, or install a second Ethernet adapter and set
up a separate private network attached to the second Ethernet adapter. Disconnecting your
PC from the corporate network may be easy or nearly impossible, depending on how it is
set up. Mobile PCs, such as laptops, are designed to be connected and disconnected, and
will present the least problem. If your PC boots from the network or is dependent on the
network for some or all of its disks, then it probably should not be disconnected. If a second Ethernet adapter is used, be aware that Windows TCP/IP will send messages to one
adapter or the other, depending on the IP address and the binding order in Microsoft products. Thus you should have different ranges of IP addresses on your private network from
those used on the corporate network. If both networks service the same IP address, then
Windows may send a packet intended for your private network to the corporate network.
A similar situation will take place if you use a dial-up line to send a packet to the Internet.
Windows may try to send it via the local Ethernet network if it is also valid for that network.
24
RabbitCore RCM2200
The following IP addresses are set aside for local networks and are not allowed on the
Internet: 10.0.0.0 to 10.255.255.255, 172.16.0.0 to 172.31.255.255, and 192.168.0.0 to
192.168.255.255.
The RCM2200 board uses a 10Base-T type of Ethernet connection, which is the most
common scheme. The RJ-45 connectors are similar to U.S. style telephone connectors, are
except larger and have 8 contacts.
An alternative to the direct connection using a crossover cable is a direct connection using
a hub. The hub relays packets received on any port to all of the ports on the hub. Hubs are
low in cost and are readily available. The RCM2200 board uses 10 Mbps Ethernet, so the
hub or Ethernet adapter must be either a 10 Mbps unit or a 10/100 unit that adapts to either
10 or 100 Mbps.
In a corporate setting where the Internet is brought in via a high-speed line, there are typically machines between the outside Internet and the internal network. These machines
include a combination of proxy servers and firewalls that filter and multiplex Internet traffic. In the configuration below, the RCM2200 board could be given a fixed address so any
of the computers on the local network would be able to contact it. It may be possible to
configure the firewall or proxy server to allow hosts on the Internet to directly contact the
controller, but it would probably be easier to place the controller directly on the external
network outside of the firewall. This avoids some of the configuration complications by
sacrificing some security.
Hub(s)
T1 in
Adapter
Ethernet
Firewall
Proxy
Server
Network
Ethernet
Typical Corporate Network
RCM2200
Board
If your system administrator can give you an Ethernet cable along with its IP address, the
netmask and the gateway address, then you may be able to run the sample programs without having to setup a direct connection between your computer and the RCM2200 board.
You will also need the IP address of the nameserver, the name or IP address of your mail
server, and your domain name for some of the sample programs.
Getting Started
25
4.3 IP Addresses Explained
IP (Internet Protocol) addresses are expressed as 4 decimal numbers separated by periods,
for example:
216.103.126.155
10.1.1.6
Each decimal number must be between 0 and 255. The total IP address is a 32-bit number
consisting of the 4 bytes expressed as shown above. A local network uses a group of adjacent IP addresses. There are always 2N IP addresses in a local network. The netmask (also
called subnet mask) determines how many IP addresses belong to the local network. The
netmask is also a 32-bit address expressed in the same form as the IP address. An example
netmask is:
255.255.255.0
This netmask has 8 zero bits in the least significant portion, and this means that 28
addresses are a part of the local network. Applied to the IP address above
(216.103.126.155), this netmask would indicate that the following IP addresses belong to
the local network:
216.103.126.0
216.103.126.1
216.103.126.2
etc.
216.103.126.254
216.103.126.255
The lowest and highest address are reserved for special purposes. The lowest address
(216.102.126.0) is used to identify the local network. The highest address
(216.102.126.255) is used as a broadcast address. Usually one other address is used for the
address of the gateway out of the network. This leaves 256 - 3 = 253 available IP
addresses for the example given.
26
RabbitCore RCM2200
4.4 How IP Addresses are Used
The actual hardware connection via an Ethernet uses Ethernet adapter addresses (also
called MAC addresses.) These are 48-bit addresses and are unique for every Ethernet
adapter manufactured. In order to send a packet to another computer, given the IP address
of the other computer, it is first determined if the packet needs to be sent directly to the
other computer or to the gateway. In either case, there is an IP address on the local network to which the packet must be sent. A table is maintained to allow the protocol driver
to determine the MAC address corresponding to a particular IP address. If the table is
empty, the MAC address is determined by sending an Ethernet broadcast packet to all
devices on the local network asking the device with the desired IP address to answer with
its MAC address. In this way, the table entry can be filled in. If no device answers, then
the device is nonexistent or inoperative, and the packet cannot be sent.
IP addresses are arbitrary and can be allocated as desired provided that they don’t conflict
with other IP addresses. However, if they are to be used with the Internet, then they must
be numbers that are assigned to your connection by proper authorities, generally by delegation via your service provider.
Getting Started
27
4.5 Dynamically Assigned Internet Addresses
In many instances, there are no fixed IP addresses. This is the case when, for example, you
are assigned an IP address dynamically by your dial-up Internet service provider (ISP) or
when you have a device that provides your IP addresses using the Dynamic Host Configuration Protocol (DHCP). The RCM2200 can use such IP addresses to send and receive
packets on the Internet, but you must take into account that this IP address may only be
valid for the duration of the call or for a period of time, and could be a private IP address
that is not directly accessible to others on the Internet. These private address can be used
to perform some Internet tasks such as sending e-mail or browsing the Web, but usually
cannot be used to participate in conversations that originate elsewhere on the Internet. If
you want to find out this dynamically assigned IP address, under Windows 98 you can run
the winipcfg program while you are connected and look at the interface used to connect
to the Internet.
Many networks use private IP addresses that are assigned using DHCP. When your computer comes up, and periodically after that, it requests its networking information from a
DHCP server. The DHCP server may try to give you the same address each time, but a
fixed IP address is usually not guaranteed.
If you are not concerned about accessing the RCM2200 from the Internet, you can place
the RCM2200 on the internal network using a private address assigned either statically or
through DHCP.
28
RabbitCore RCM2200
4.6 Placing Your Device on the Internet
In many corporate settings, users are isolated from the Internet by a firewall and/or a
proxy server. These devices attempt to secure the company from unauthorized network
traffic, and usually work by disallowing traffic that did not originate from inside the network. If you want users on the Internet to communicate with your RCM2200, you have
several options. You can either place the RCM2200 directly on the Internet with a real
Internet address or place it behind the firewall. If you place the RCM2200 behind the firewall, you need to configure the firewall to translate and forward packets from the Internet
to the RCM2200.
Getting Started
29
4.7 How to Set IP Addresses in the Sample Programs
We have provided a number of sample programs demonstrating various uses of TCP/IP for
networking embedded systems. These programs require that you connect your PC and the
Coyote together on the same network. This network can be a local private network (preferred for initial experimentation and debugging), or a connection via the Internet.
With the introduction of Dynamic C 7.30 we have taken steps to make it easier to run
many of our sample programs. You will see a TCPCONFIG macro. This macro tells
Dynamic C to select your configuration from a list of default configurations. You will
have three choices when you encounter a sample program with the TCPCONFIG macro.
1. You can replace the TCPCONFIG macro with individual MY_IP_ADDRESS,
MY_NETMASK, MY_GATEWAY, and MY_NAMESERVER macros in each program.
2. You can leave TCPCONFIG at the usual default of 1, which will set the IP configurations
to 10.10.6.100, the netmask to 255.255.255.0, and the nameserver and gateway
to 10.10.6.1. If you would like to change the default values, for example, to use an IP
address of 10.1.1.2 for the Coyote board, and 10.1.1.1 for your PC, you can edit
the values in the section that directly follows the “General Configuration” comment in
the TCP_CONFIG.LIB library. You will find this library in the LIB\TCPIP directory.
3. You can create a CUSTOM_CONFIG.LIB library and use a TCPCONFIG value greater
than 100. Instructions for doing this are at the beginning of the TCP_CONFIG.LIB
library in the LIB\TCPIP directory.
There are some other “standard” configurations for TCPCONFIG that let you select different features such as DHCP. Their values are documented at the top of the
TCP_CONFIG.LIB library in the LIB\TCPIP directory. More information is available in
the Dynamic C TCP/IP User’s Manual.
IP Addresses Before Dynamic C 7.30
Most of the sample programs use macros to define the IP address assigned to the board and
the IP address of the gateway, if there is a gateway. Instead of the TCPCONFIG macro, you
will see a MY_IP_ADDRESS macro and other macros.
#define
#define
#define
#define
MY_IP_ADDRESS "10.10.6.170"
MY_NETMASK "255.255.255.0"
MY_GATEWAY "10.10.6.1"
MY_NAMESERVER "10.10.6.1"
In order to do a direct connection, the following IP addresses can be used for the Coyote:
#define MY_IP_ADDRESS "10.1.1.2"
#define MY_NETMASK "255.255.255.0"
// #define MY_GATEWAY "10.10.6.1"
// #define MY_NAMESERVER "10.10.6.1"
In this case, the gateway and nameserver are not used, and are commented out. The IP
address of the board is defined to be 10.1.1.2. The IP address of your PC can be defined
as 10.1.1.1.
30
RabbitCore RCM2200
4.8 How to Set Up your Computer’s IP Address for Direct Connect
When your computer is connected directly to the RCM2200 board via an Ethernet connection, you need to assign an IP address to your computer. To assign the PC the address
10.10.6.101 with the netmask 255.255.255.0, do the following.
Click on Start > Settings > Control Panel to bring up the Control Panel, and then double-click the Network icon. Depending on which version of Windows you are using, look
for the TCP/IP Protocol/Network > Dial-Up Connections/Network line or tab. Doubleclick on this line or select Properties or Local Area Connection > Properties to bring
up the TCP/IP properties dialog box. You can edit the IP address and the subnet mask
directly. (Disable “obtain an IP address automatically.”) You may want to write down the
existing values in case you have to restore them later. It is not necessary to edit the gateway address since the gateway is not used with direct connect.
RCM2200
Board
IP 10.10.6.101
Netmask
255.255.255.0
User’s PC
Ethernet
crossover
cable
Direct Connection PC to RCM2200 Board
Getting Started
31
4.9 Run the PINGME.C Sample Programs
Connect the crossover cable from your computer’s Ethernet port to the RCM2200 board’s
RJ-45 Ethernet connector. Open this sample program from the SAMPLES\TCPIP\ICMP
folder, compile the program, and start it running under Dynamic C. When the program
starts running, the green LNK light on the RCM2200 board should be on to indicate an
Ethernet connection is made. (Note: If the LNK light does not light, you may not have a
crossover cable, or if you are using a hub perhaps the power is off on the hub.)
The next step is to ping the board from your PC. This can be done by bringing up the MSDOS window and running the pingme program:
ping 10.10.6.100
or by Start > Run
and typing the entry
ping 10.10.6.100
Notice that the red ACT light flashes on the RCM2200 board while the ping is taking
place, and indicates the transfer of data. The ping routine will ping the board four times
and write a summary message on the screen describing the operation.
4.10 Running More Sample Programs With Direct Connect
The sample programs discussed here are in the Dynamic C SAMPLES\RCM2200\ folder.
• CONSOLE.C—Demonstrates the features of ZCONSOLE.LIB command-oriented console library. This program is also run in conjunction with SERDCLIENT.C or SPCLIENT.C.
• ETHCORE1.C—Creates two “devices” (lights) and two “buttons” in the Web browser to
toggle them. Users can change the status of the lights. If the RCM2200 is plugged into
the MASTER slot on the Prototyping Board, the lights on the Prototyping Board will
track the ones in the Web browser. As long as you have not modified the TCPCONFIG 1
macro in the sample program, enter the following server address in your Web browser
to bring up the Web page served by the sample program.
http://10.10.6.100
Otherwise use the TCP/IP settings you entered in the TCP_CONFIG.LIB library.
• MYECHO.C—Operates RCM2200 as a basic server. When a client connects, echoes
back any data sent by the client.
• SERDCLIENT.C—Demonstrates the ability of a Rabbit-based target board to update
files on the Web server of the RCM2200 board it is connected to via Serial Port D. This
program is run in conjunction with CONSOLE.C.
• SPCLIENT.C—Demonstrates the ability of a Rabbit-based target board to update files
on the Web server of the RCM2200 board it is connected to via the slave port. This program is run in conjunction with CONSOLE.C.
32
RabbitCore RCM2200
4.11 Where Do I Go From Here?
NOTE: If you purchased your RCM2200 through a distributor or through a Z-World or
Rabbit Semiconductor partner, contact the distributor or Z-World partner first for technical support.
If there are any problems at this point:
• Check the Z-World/Rabbit Semiconductor Technical Bulletin Board at
www.zworld.com/support/bb/.
• Use the Technical Support e-mail form at www.zworld.com/support/support_submit.html.
If the sample programs ran fine, you are now ready to go on.
Additional sample programs are described in the Dynamic C TCP/IP User’s Manual.
Please refer to the Dynamic C TCP/IP User’s Manual to develop your own applications.
An Introduction to TCP/IP provides background information on TCP/IP, and is available
on the CD and on Z-World’s Web site.
Getting Started
33
34
RabbitCore RCM2200
NOTICE TO USERS
Z-WORLD PRODUCTS ARE NOT AUTHORIZED FOR USE AS CRITICAL COMPONENTS IN LIFESUPPORT DEVICES OR SYSTEMS UNLESS A SPECIFIC WRITTEN AGREEMENT REGARDING
SUCH INTENDED USE IS ENTERED INTO BETWEEN THE CUSTOMER AND Z-WORLD PRIOR
TO USE. Life-support devices or systems are devices or systems intended for surgical implantation into the
body or to sustain life, and whose failure to perform, when properly used in accordance with instructions for
use provided in the labeling and user’s manual, can be reasonably expected to result in significant injury.
No complex software or hardware system is perfect. Bugs are always present in a system of any size. In
order to prevent danger to life or property, it is the responsibility of the system designer to incorporate
redundant protective mechanisms appropriate to the risk involved.
All Z-World products are 100 percent functionally tested. Additional testing may include visual quality control inspections or mechanical defects analyzer inspections. Specifications are based on characterization of
tested sample units rather than testing over temperature and voltage of each unit. Z-World products may
qualify components to operate within a range of parameters that is different from the manufacturer’s recommended range. This strategy is believed to be more economical and effective. Additional testing or burn-in
of an individual unit is available by special arrangement.
Getting Started
35
36
RabbitCore RCM2200
INDEX
A
F
R
additional information
online documentation .......... 4
references ............................ 3
features
Prototyping Board ........... 6, 7
RCM2200 ............................ 1
C
H
C language ...................... 15, 16
hardware connections ............. 9
Ethernet ............................. 11
install RCM2200 on Prototyping Board ........................ 9
power supply ..................... 12
programming cable ........... 10
hardware reset ....................... 12
RCM2200
mounting on Prototyping
Board .............................. 9
reset ....................................... 12
running TCP/IP sample programs ............................ 24
D
Development Kit ..................... 5
Dynamic C .................. 3, 15, 16
assembly language ............ 15
debugger ............................ 15
debugging .......................... 15
desktop icons ..................... 19
editor ................................. 15
features .............................. 15
handling communication error
messages ....................... 20
hardware requirements ...... 16
installing ................ 17, 18, 19
interrupt service routines .. 16
sample programs ............... 21
starting .............................. 20
watch expressions ............. 15
E
Ethernet cables ................ 11, 23
Ethernet connections . 11, 23, 25
10Base-T ........................... 25
10Base-T Ethernet card .... 23
additional resources .......... 33
Ethernet cables .................. 25
Ethernet hub ...................... 23
IP addresses ................. 24, 26
steps .................................. 23
Getting Started
I
IP addresses .................... 26, 31
how to set .......................... 30
how to set PC IP address ... 31
J
JP1
Prototyping Board ............... 8
M
models
factory versions ................... 1
P
pinout
RCM2200 ............................ 2
power supply
connections ....................... 12
programming cable
RCM2200 connections ..... 10
Prototyping Board ................... 6
expansion area ..................... 8
features ............................ 6, 7
mounting RCM2200 ........... 9
optional header JP1 ............. 8
S
sample programs ................... 21
EXTSRAM.C .................... 21
FLASHLED.C .................. 21
FLASHLEDS.C ................ 21
how to set IP address ........ 30
MASTER.C ...................... 21
PUTS.C ............................. 21
SLAVE.C .......................... 21
TCP/IP .............................. 24
CONSOLE.C ................ 32
ETHCORE1.C .............. 32
MYECHO.C .................. 32
PINGME.C .................... 32
running TCP/IP sample programs .......................... 24
SERDCLIENT.C .......... 32
SPCLIENT.C ................ 32
TOGGLELED.C ............... 21
software
sample programs ............... 21
specifications
physical and electrical ......... 2
T
technical support ................... 13
37
38
RabbitCore RCM2200
SCHEMATICS
090-0120 RCM2200 Schematic
www.rabbitsemiconductor.com/documentation/schemat/090-0120.pdf
090-0122 RCM2200 Prototyping Board Schematic
www.rabbitsemiconductor.com/documentation/schemat/090-0122.pdf
090-0128 Programming Cable Schematic
www.rabbitsemiconductor.com/documentation/schemat/090-0128.pdf
The schematics included with the printed manual were the latest revisions available at the
time the manual was last revised. The online versions of the manual contain links to the
latest revised schematic on the Web site. You may also use the URL information provided
above to access the latest schematics directly.
Getting Started
39