1
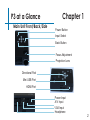
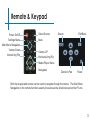
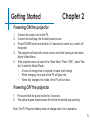
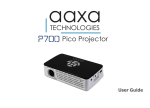
aaxa
TECHNOLOGIES
P3 Pico Projector
User Guide
Caution!
WARNING: Please use this product as instructed. Misuse may cause
injury or death.
*Do not operate the Projector in direct sunlight
or near heat sources such as heaters, fires,
and stoves as this may cause a fire
hazard.
*Do not place inflammable materials beside
the projector as this may cause a fire hazard.
*Do not operate the projector close to sources
of steam or oil such as a humidifier as this may
cause electric shock.
*Do not operate the projector near water such
as by the sink or bathtub as this may cause
electric shock.
*Do not block or restrict airflow from ventilation holes as this may cause the Projector to
overheat.
*Do not drop the projector or allow heavy impacts or
shock as this
*Do not dispose of improperly - This projector has a
built-in lithium ion battery and must be send to a certified recycling center
Caution for Battery Use
•
Do not pierce or puncture the battery with
sharp objects
•
Do not heat the product or expose it to high
temperature.
•
Do not wet it or place it in any liquid
Caution for Earphone (Earplug) Use
•
Prolonged use at high volume may impair
your hearing.
•
High volume during walking or driving may
cause distractions and result in injury or
death
Table of Contents
2 Chapter 1: P3 at a glance
2 Main Unit Front/Back
3 Remote & Keypad
4 Accessories
5 Chapter 2: Getting Started
5 Powering On / OFF
6 Focus Adjustment / Throw
Distance
7 External Inputs /Input Sources
8 Connecting to a Computer
11 Connecting to Composite Video
13 Connecting to Speaker or
Headphones
14
Connecting to a USB drive
15 Chapter 3: Menu Screens
15
Main menu
16
File Menu System
18
Video Player Menu
19
Photo Viewer Menu
20
Music Player Menu
22 Chapter 4: Technical Details
22
Troubleshooting
24
Specifications
1
P3 at a Glance
Main Unit Front/Back/Side
Chapter 1
Power Button
Input Select
Back Button
Focus Adjustment
Projection Lens
Directional Pad
Mini USB Port
HDMI Port
Power Input
A/V Input
VGA Input
Headphone
2
Remote & Keypad
Power On/Off
Settings Menu
Main Menu Navigation
Volume Down
Vertical Img Flip
Select Source
Source
Exit/Back
Mute
Volume UP
Horizontal Img Flip
Media Player Menu
Navigation
Direction Pad
Power
Both the keypad and remote can be used to navigate through the menus. The Main Menu
Navigation on the remote functions exactly the same as the directional pad on the P3 unit.
3
Accessories
A/V Cable
Tripod
Power Adapter
Remote
Mini USB to
USB Adapter
VGA Cable
*Under various circumstances, the actual accessories may be different from
those shown in the pictures above.
4
Getting Started
Chapter 2
Powering ON the projector
1. Connect the power cord to the P3.
2. Connect the wall plug into the wall power source.
3. Press POWER button and hold for 2-3 seconds to switch on or switch off
the power.
4. The projector will boot with a boot screen and finish booting to the media
player’s Main Menu.
5. If the projector does not boot to the “Main Menu” Press “SRC”, select “Media” to start the Media Player
• 4 hours of charge time is required to reach a full charge.
• When charging, the inside of the P3 will glow red.
• When fully charged, the inside of the P3 will turn blue.
Powering OFF the projector
1. Press and hold the power button for 3 seconds.
2. The optical engine should power off and the fan should stop spinning.
Note: The P3 Projector battery does not charge when it is in operation.
5
Focus Adjusment / Throw Distance
Focus Adjustment
1. Spin the focus wheel left of right until the image becomes
clear.
2. The recommended focus distance for this projector is 12” to
infinity.
Throw Distance Chart
Distance inch (“)
12
18
24
30
36
74
84
96
Diagonal Inch (“)
6.4
9.6
12.8
16
19
39.6
45
51.3
DIA
GO
NA
LS
CR
EE
NS
IZE
16:9 Aspect Ratio
Throw Ratio 1.87
*minimum throw distance: 10 inches
6
External Inputs/Outputs
The P3 can connect to a wide variety of multi-media devices. You can use the HDMI, VGA, Or
Composite A/V cables to connect to external devices such as iPod®, iPad® iPhone®, mobile
phones, notebook/PC, game console or more.
*accessory cables may be required
Composite Cable
USB Stick
Headphone/speaker
Laptop VGA or HDMI
Desktop VGA or HDMI
7
Connecting to a Computer via VGA
There are two ways to connect a computer to your P3. You can connect with the VGA
adapter or the HDMI adapter. Whichever connection you computer has will work.
Connecting via VGA Connection
Step 1:
Connect the large end of the
to your computer’s
VGA Cord
Step 2:
to your P3’s
Connect the small end of the
Step 3:
VGA Adapter
VGA Cord
VGA Adapter
Press the SRC button and select PC-RGB
8
Connecting to a Computer via HDMI
There are two ways to connect a computer to your P3. You can connect with the VGA
adapter or the HDMI adapter. Whichever connection you computer has will work.
Connecting via HDMI Connection
Step 1:
Connect the one end of the
to your computer’s
HDMICord
Step 2:
to your P3’s
Connect the small end of the
Step 3:
HDMI Adapter
HDMI Cord
HDMI Adapter
Press the SRC button and select HDMI
9
Connecting to a Computer Cont.
Step 4:
Enabling VGA or HDMI output on your Computer – To enable VGA or HDMI on your
computer most computers require “turning on” the video output feature. Each computer
is different. Please consult your owner’s manual for instructions to enable VGA or HDMI
output. Below are standard instructions for a Windows XP computer – not all systems
are the same.
Step 5:
Press function & “F5” to instruct
the computer to enable multiple
displays.
You can also press Windows+P to
toggle through display settings.
*NOTE: different operating systems may differ
Step 6:
1.Right click on computer desktop and select “Properties”
2.Display Properties window
will pop up
3.Click on the “Settings” Tab
4.If a secondary monitor is
grayed out, click on it and
check “Extend my Windows
Desktop onto this monitor”
5.If the image is blurry or the
text is not legible, adjust
the screen resolution. We
recommend 1024x768.
10
Connecting to Composite Video
Step 1:
Connect one end of the
to your P3’s
Composite Cord
A/V Adapter
Step 2:
Connect opposite end of
to your devices
Composite Cord
Composite Cord
11
Connecting to Composite Video Cont.
Step 3:
Step 4:
Press the SRC
Button on the p3
Choose A/V
Step 5:
Turn on your multimedia device.
Connectivity with multimedia devices
The P3 can connect to many media devices including: iPod, iPhone, iPad, VHS
players, DVD players, smart phones, cameras, video game consoles and other
peripherals with ease.
*Apps on smart phones may require video out capabilities to be displayed with
the P3.
*addition accessory cables may be required
12
Connecting Speakers/Headphones
Step 1:
Connect your speaker
to your P3’s
or headphones
3.5 mm cord
Speaker Adapter
Step 2:
Ensure the power and volume on your
speaker or headphones is turned on
Step 3:
Place headphones/earphones in/over ears
Caution for Earphone (Earplug) Use
•
Prolonged use at high volume may impair
your hearing.
13
USB OTG(On-the-Go)
How to insert your USB Drive
•
Slide your USB Drive into USB adapter.
•
Gently slide the drive until it cannot go in any further.
•
Gently slide the mini-USB adapter into
the P3 until it cannot go in any further.
How to access your USB Drive
•
Once your USB Drive has been
inserted, you can navigate through the
main menu to select what you want to
view under each sub menu.(Videos,
Photo, Music)
*Review the Specification
section of this manual to read
about the supported file
formats.
14
Chapter 3
Menu Screens
Main Menu
The P3 features a built in PMP (Portable Media Player) function.
This function allows the projector to play videos, pictures, music files, and text. To access
the main menu simply turn on the projector.
Photo
•
•
•
Music
Movie
Text
Scroll Left/Right by pressing the
buttons on the projector or the left, right
buttons on the remote.
To select a submenu, highlight the desired submenu and press the “OK” button
located in the middle of the keypad or remote.
To go back to the previous page while in a submenu, press the
button on
either the projector or remote.
15
File Menu System
The P3 will show all folders and files you have on your USB Drive.
Use the directional buttons to navigate to different folders or files.
Opening a file:
• Choose Movie, Music, Photo,
or Text
• Select device file is stored on
• Select file from list
Return: Brings you
back to the main
menu
Up Folder: Brings
you back to the
previous folder
16
File Menu System
Previewing Files:
Highlighting files on the P3 file viewing system will bring up a preview
menu. You can preview videos, music and photo’s this way.
Navigating around the P3 is similar
to any computer. The files will
show up in a folder system for you
to browse. Find the file you wish
to view and press the
button
located on the P3.
17
Video Player Menu
Playing Videos
-To play/pause a video, press the ok
button in the middle of the keypad or
remote control
-To rewind, press and hold the left arrow button
-To fast-forward, press and hold the right arrow
button
-To jump forward to the next video, press the right
arrow button
-To jump back to a prior video, press the left arrow button
-To adjust the volume, press the up arrow button. To decrease the volume press
the down arrow button.
Note: If the video is large, please allow the projector a moment to process the
file. If after a few minutes the projector does not play a video, it means the file is
not compatible.
*Review Specification section of this manual for supported video formats.
18
Photo Menu
Viewing Pictures
The P3 Pico Projector allows you to view pictures individually or in a slideshow.
To view individual photos, select the file you want to
view in the file menu for the particular storage device
on which the image file is stored. You can press the
left and right arrow buttons on the directional pad or
remote to flip through the pictures you have in the present
folder.
Viewing Pictures in a Slideshow
To view your pictures in a slideshow, select a file and press the “OK” button
located on the projector.
Rotating images
To rotate images from landscape to portrait, press the up or down arrow keys on
the projector.
*Review Specification section of this manual for supported picture formats.
19
Music Player Menu
Pause
Rewind
FastFoward
Previous File
Next file
Stop
Repeat
Mute
Opening a file:
• Choose “Open File” option
• Select device file is stored on
• Select file from list
20
Music Player Menu
Listening to music
-To play/pause a song, press the ok
button in the middle of the keypad or
remote control
-To rewind, press and hold the left arrow button
-To fast-forward, press and hold the right arrow button
-To jump forward to the next video, press the right arrow button
-To jump back to a prior video, press the left arrow button
-To adjust the volume, press the vol+ ( on the remote) to increase and vol- ( on
the remote) to decrease the volume.
*Review Specification section of this manual for supported video formats.
21
Chapter 4
Technical Details
Troubleshooting
IMAGE IS BLURRED
Possible Causes
Solution
The Projector is not in focus
Adjust the focus with the focus adjustment dial
until the image comes into focus
The Projector is offset from plane / angle of
operation
Move the projector so that it is both 180 degrees
and on an evern plane with the screen.
No Sync, No Signal
1. Be sure to setup the computer to enable a video signal output. On some
laptops this is done by pressing and holding Function F5 key. If using
the P3 as an external monitor on Windows based systems, this can be
done by selecting “extend my desktop to this monitor”. Depending on
the video driver different resolutions may need to be selected for proper
output.
22
Technical Details
Troubleshooting
THE PROJECTOR DOES NOT TURN ON
Possible Causes
Solution
There is no power
Check to ensure the power outlet or battery
source is good. check the power adapter to
ensure a proper connection with the wall outlet
as well as the proejctor. Confirm that the unit is
charged and has enough power
The power button was not held long enough
To power on the projector, the power button
needs to be depressed for a full 3 seconds. Try
holding the power button until the optical engine
turns on
NO PICTURE / FILE NOT SUPPORTED
Possible Causes
Solution
The video source is not properly connected or
selected
Check the video source signal to ensure that it
is properly connected. Select the current input
source by choosing the input desired from the
main menu
Incorrect file extension / Video is encoded with
incorrect codec
Please refer to “Specifications” page to see which
file types and codex are supported. Verify that
the file was encoded properly.
23
Specifications
Brightness
Native Resolution
Contrast Ratio
Projection Lens:
Image Size:
Lamp:
Video in:
Audio Output:
USB:
Dimensions
Weight
Supported File Formats
50 Lumens
1024x600(WSVGA)
500:1
Manual Focus
10~80 inches
15,000 hour RGB Triple LEDs
Composite A/V
VGA(mini-VGA)
HDMI
1.0 W stereo speakers
3.5 mm audio jack
USB OTG (On-the-Go)
(Memory Sticks)
USB Data Transfer
4.6”x 2.6”x1.2”
0.5 lbs
MPEG1,MPEG2,RMVB,MOV,M
JPEG,VC1, DivX, JPEG, BMP,
PNG, TXT
24
Please direct all customer service inquiries to:
AAXA Technologies, Inc.
103A East Alton
Santa Ana, CA 92707
(714) 957-1999
[email protected]