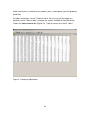
1
CPM Version 2.0
User’s Manual
Consumption Projection Model
Version 2.0
User’s Manual
Norine E. Dobiesz1 and James R. Bence1
1Department of Fisheries and Wildlife
13 Natural Resources Building
Michigan State University
East Lansing, MI 48824-1222
United States Geological Survey
This work was funded through the Great Lakes Fishery Commission and the
Michigan Department of Natural Resources
February 29, 2004
i
Table of Contents
THE CONSUMPTION MODEL....................................................................................... 1
INTRODUCTION ............................................................................................................. 1
PROJECTION MODEL HIGHLIGHTS .................................................................................. 2
MODEL CALCULATIONS ................................................................................................. 5
MODEL ASSUMPTIONS .................................................................................................. 7
INSTALLING THE CPM ................................................................................................10
INSTALLING THE CPM FROM A CD...............................................................................10
INSTALLING THE CPM FROM THE W EB SITE .................................................................10
INSTALLING THE CPM FROM THE FTP SITE ..................................................................11
OBTAINING THE CPM USER’S MANUAL .........................................................................11
PROBLEMS DURING INSTALLATION ...........................................................................11
AFTER INSTALLING THE CPM .......................................................................................12
PROBLEMS RUNNING THE CPM ...............................................................................12
INSTALLING OTHER SOFTWARE INCLUDED W ITH THE CPM ............................................12
UNINSTALLING THE CPM..............................................................................................13
THE CPM PROGRAM...................................................................................................14
PROGRAM FUNCTIONS .................................................................................................14
USER INPUT ................................................................................................................15
DATABASES USED BY CPM ..........................................................................................16
OUTPUT ......................................................................................................................17
CPM MENUS ...............................................................................................................20
CPM TOOLBARS .........................................................................................................24
THE HELP FACILITY......................................................................................................25
CPM VERSION INFORMATION .......................................................................................25
USING THE CPM ..........................................................................................................26
CREATING AND RUNNING A NEW PROJECTION ...............................................................26
CHANGING A PREVIOUSLY CREATED SCENARIO ............................................................29
OUTPUT FROM A PROJECTION .....................................................................................32
ii
REMOVING SCENARIOS ................................................................................................37
PREY BIOMASS ............................................................................................................37
EXPORTING DATA ........................................................................................................38
CAPTURING GRAPHICAL OUTPUT ...................................................................................38
SETTING YOUR CPM PREFERENCES .......................................................................40
CPM OPTIONS ............................................................................................................40
CHANGING PLOT ATTRIBUTES ......................................................................................40
SELECTING AUTOPLOT GRAPHS ....................................................................................42
CONTROL THE OUTPUT FORMAT....................................................................................43
SET THE APPEARANCE OF THE CPM WINDOW ...............................................................44
DEFINE HOW THE CPM MODEL PERFORMS CALCULATIONS .............................................47
IMPORTING DATA INTO THE CPM .............................................................................49
OVERVIEW OF THE IMPORT PROCESS ...........................................................................49
IMPORTING FORMATTED REPORT FILES ........................................................................49
REPORT FILE GUIDELINES............................................................................................51
IMPORTING A FORMATTED TEXT FILE .............................................................................56
IMPORTING A CONTROL TABLE ......................................................................................59
HANDLING ERRORS ...................................................................................................60
ERROR MESSAGES.......................................................................................................60
DEBUG MODE ..............................................................................................................69
LITERATURE CITED ....................................................................................................70
iii
List of Tables
Table 1. Predator populations and their attributes as represented in the CPM program 4
Table 2. Directories and files that are placed on your computer during the installation of
the CPM. ................................................................................................................12
Table 3. List of tables and record formats in a Predator database. Not all of these
tables are in every predator database. Types of tables include standard (S) tables
found in every predator database, tables unique (U) to specific populations, and
tables generally only created during ADModel Builder use (A). ..............................18
Table 4. List of tables and record formats in a Scenario database. Some tables contain
model assumptions (A) that may be changed by the user while other tables are
calculated (C) during a projection. ..........................................................................19
Table 5. Toolbar icons and their corresponding menu function. ....................................25
Table 6. Formatted text section separators. Only the first five letters of each command
are required. All letters in a command must be capitalized and each command must
be preceded by an “*”. (See example Figure 23). ..................................................57
iv
List of Figures
Figure 1. Lake Huron statistical districts are grouped into six lake regions by the CPM: 3
Figure 2. Lake whitefish management areas included in CPM V2.0 .............................. 3
Figure 3. The CPM design............................................................................................15
Figure 4. The CPM toolbar. ..........................................................................................24
Figure 5. The FILE NEW Screen ..................................................................................27
Figure 6. The CPM Scenario screen.............................................................................28
Figure 7. The Scenario Comparison screen. ................................................................29
Figure 8. Autoplot graph produced from a scenario projection. .....................................33
Figure 9. Example of tabular data.................................................................................34
Figure 10. Selecting data ranges to be viewed. ............................................................35
Figure 11. Changing the plot attributes. ........................................................................36
Figure 12. Setting the scenario year and age ranges....................................................36
Figure 13. The EDIT | OPTIONS screen. .....................................................................37
Figure 14. The Captura window....................................................................................39
Figure 15. Plot attributes tab on the Program Options screen.......................................42
Figure 16. Autoplot tab on the Program Options screen. .............................................43
Figure 17. Output tab on the Program Options screen.................................................45
Figure 18. Appearance tab on the Program Options screen. ........................................46
Figure 19. Calculations tab on the Program Options screen. ........................................48
Figure 20. The Import ADModel Report screen. ...........................................................50
Figure 21. The Predator screen. ...................................................................................51
Figure 22. The import text file screen. ..........................................................................56
Figure 23. Sample of a formatted text file. ...................................................................58
v
THE CONSUMPTION MODEL
This chapter describes the highlights of the Consumption Projection
Model and the basic system requirements to run it.
Introduction
The Consumption Projection Model (CPM) is a computer program that implements a
consumption projection model based on stock assessment and bioenergetics data. This
section describes the projection model and its assumptions. For details on the CPM
computer program, see “The CPM Program” section.
The “No Name” model (Bence, unpublished data), the predecessor to the CPM, assesses
the overall consumption of prey fish by predators in the main basin of Lake Huron using a
series of eight linked spreadsheets. The main spreadsheet links to all other spreadsheets,
provides central parameter values, and collects data common to all subpopulations. The
other seven spreadsheets represent specific predator subpopulations. While the “No Name”
model can be amended with new data and additional calculations, correctly updating the
series of spreadsheets is cumbersome. To project consumption under different
management scenarios requires many changes to one or more spreadsheets. Furthermore,
comparing predator consumption under different management actions requires copies of the
entire suite of spreadsheets for each management scenario. Such major updating of
spreadsheets can introduce errors common to spreadsheet manipulation (e.g., copying cells
or losing cell formulas).
The Consumption Projection Model (CPM V2.0) computer program is a replacement for the
“No Name” model and uses the same underlying data while simplifying the process of
projecting consumption under multiple management scenarios. The CPM employs a userfriendly interface that allows users to quickly and easily obtain and compare projections of
consumption resulting from various management actions. While the CPM interface is an
improvement over the “No Name” model spreadsheet format, there are limitations. For
1
instance, the CPM program processes each subpopulation in turn such that subpopulations
do not interact. Future development could address such limitations.
The CPM was written in Microsoft® Visual Basic® and utilizes Windows® objects: windows,
menus, prompts, progress bars. Data are stored in Microsoft® Access databases. An
integrated “help” facility provides information about the CPM either through a table of
contents or through keyword searches. The program is compatible with Microsoft®
Windows® 95, 98, 2000, NT, and XP versions and is distributed on CD or via an FTP site
(See “Installing the CPM”).
Projection Model Highlights
The CPM assesses overall consumption of prey fish by predators in the main basin (the
entire lake excluding bays) of Lake Huron. The CPM groups the main basin statistical
districts into four lake regions (Figure 1) plus Georgian Bay and the North Channel. The
model includes these predator subpopulations across these regions:
Main basin
Saginaw Bay
Georgian Bay
North Channel
burbot
walleye
lake trout in GB-1
lake trout in NC-1
chinook salmon
lake trout in GB-2
lake trout in NC-2
lake trout (northern region)
lake trout in GB-3
lake trout in NC-3
lake trout (central region)
lake trout in GB-4
chinook salmon
lake trout (southern region)
x
chinook salmon
walleye (southern region)
whitefish (5 populations) 1
longnose sucker 2
white sucker 2
1
Whitefish populations cover WFH-01, WFH-02, WFH-03, WFH-04, WFH-05 and do not
include appropriate diet and GCE data.
2 Databases are incomplete for these species
The CPM uses estimates of age-specific population abundance and mortality rates together
with information on weight-at-age to estimate gross production and consumption. Stock
assessment models (Bence and Dobiesz 2000) provided these data for the period 1968
2
LAKE REGIONS
Northern main basin is
MH-1 and northern
portion of OH-1
Central main basin is
MH-2 and southern
portion of OH-1 and all of
OH-2
Southern main basin is
MH-3, MH-4, MH-5,
excluding Saginaw Bay
Saginaw Bay
Georgian Bay (GB-1, GB2, GB-3, GB-4)
North Channel (NC-1,
NC-2, NC-3)
Figure 1. Lake Huron statistical districts are grouped into six lake regions by the CPM:
Figure 2. Lake whitefish management areas included in CPM V2.0 include WFH-01,
WFH-02, WFH-03, WFH-04, WFH-05.
3
through 1998, although actual timeframes vary by predator (Table 1). Assumptions about
recruitment, mortality rates, and weight-at-age (Dobiesz 2003, Appendix B) are used to
project future year- and age-specific gross production.
Production estimates are divided by age-specific gross conversion efficiency
(GCE)estimates to compute year- and age-specific consumption. GCE estimates for each
predator population are based on bioenergetics models using Lake Huron specific data on
fish growth, diet, energy density, and water temperature (Dobiesz 2003, Appendix C).
Table 1. Predator populations and their attributes as represented in the CPM program
ID
BUR
CHGB
CHNC
CHS
LATC
LATN
LATS
LGB1
LGB2
LGB3
LGB4
LNC1
LNC2
LNC3
LNSU
WAEB
WAES
WFH1
WFH2
WFH3
WFH4
WFH5
WHSU
Subpopulation
Name
Burbot-Main basin
Chinook salmon-Georgian Bay
Chinook salmon-North Channel
Chinook salmon-Main basin
Lake trout-Main basin, central
Lake trout-Main basin, north
Lake trout-Main basin, south
Lake trout-Georgian Bay1
Lake trout-Georgian Bay2
Lake trout-Georgian Bay3
Lake trout-Georgian Bay4
Lake trout-North Channel1
Lake trout-North Channel2
Lake trout-North Channel3
Longnose sucker-Main basin
Walleye-Saginaw Bay
Walleye-Main basin, south
Whitefish-WFH01
Whitefish-WFH02
Whitefish-WFH03
Whitefish-WFH04
Whitefish-WFH05
White sucker-Main basin
Year
Range
1983 - 1998
1985 - 2001
1985 - 2001
1968 - 1998
1984 - 1998
1977 - 1998
1984 - 1998
1992 - 2001
1988 - 2001
1981 * 2001
1986 - 2001
1992 - 2001
1992 - 2001
1981 - 2001
0
1981 - 2003
1983 - 1998
1976 - 2001
1980 - 2001
1991 - 2001
1981 - 2001
1981 - 2001
0
4
Age
Range
1-15
1-6
1-6
0-5
1-15
1-15
1-15
1-15
1-15
1-15
1-15
1-15
1-15
1-15
0
2-12
2-12
3-10
4-10
4-10
3-10
3-9
0
Sea
lamprey
induced
Y
N
N
N
Y
Y
Y
Y
Y
Y
Y
Y
Y
Y
N
N
N
Y
Y
Y
Y
Y
N
Model Calculations
Abundance
Population abundance (Na,y) of lake trout, walleye, and burbot is calculated using annual
steps and species-specific year (y) and age (a) ranges. Total mortality (Za,y) is partitioned
into components for background natural mortality (Ma,y), sea lamprey-induced mortality
(La,y), and fishing mortality (Fa,y). For walleye, La,y is assumed to be zero.
N a +1, y +1 = N a , y e
− Z ay
Z a , y = M a + La , y + Fa , y
The population model for chinook salmon uses two time periods within a year consisting of
the first seven months, then a “pulse” of harvest (h) and maturation (m), followed by the
remainder of the year. Ph,a,y and Pm,a,y are the proportions of fish that die due to fishing or
maturation.
*
N a , y ,i = N a , y ,i e
−
7
M
12
*
N a , y ,i +1 = N a , y ,i e
−
5
M
12
(1 − Ph ,a , y ) (1 − Pm ,a , y )
Gross production
Gross production each year is estimated as the sum of yield, biomass of fish that die from
other causes, and changes in standing stock biomass. Biomass (Ba,y) of age-a fish in year
y is the product of numbers-at-age (Na,y) and weight-at-age (Wa,y). For burbot, walleye,
and lake trout, gross production (Pa,y) is calculated on an annual basis with the
instantaneous growth rate estimated by Ga,.. The instantaneous growth rate cannot be
estimated for the last age from the weight-at-age data; therefore, Ga,y is assumed to be
zero for the last age group.
Pa , y = ( Ba +1, y +1 − Ba , y ) + Ba , y * Z a , y * [1 / G a , y − Z a , y )] * [exp(Ga , y − Z a , y ) − 1]
Ga , y = Ln (Wa +1, y +1 / Wa , y )
5
Ga , y , i =
Ln(Wa , y ,i +1 / Wa , y ,i )
ti
Gross production of chinook salmon is calculated for two intervals – pre-harvest and postmaturation. Total annual gross production (Pa,y) is
Pa , y = ∆a , y − Ra, y +
Da, y,i
i
where ∆a,y is standing stock biomass, Da,y,i is production lost to natural mortality,
Da , y ,i = Ba , y ,i * Z a , y * [1 / Ga , y ,i − Z a , y )] * [exp(Ga , y ,i − Z a , y ) * t i − 1]
and Ra,y is the pulse removals of fish (in biomass) due to fishing and maturation between
the two periods of natural mortality.
Removals and deaths occur as discrete events at the end of the ith period and before the
subsequent period. For removals, Sa is age-specific recreational selectivity and fy is yearspecific fishing intensity. For deaths during a given period, ti is the proportion of a year
represented by the interval i. The CPM assumes t is 7/12 and 5/12 for the pre-harvest and
post-maturation intervals respectively. Instantaneous growth rate is given by Ga,y,i .
When the ith interval is the last interval in the year, Wa,y,i+1 = Wa+1,y+1,i .
Instantaneous growth rate for the last age of the post-maturation interval (age 5+) is
assumed to be zero.
Consumption
For a given predator subpopulation, age- and year-specific gross production (Pa,y) is
divided by age-specific GCE (Ea) and summed over all ages to obtain annual total
consumption (Cy). Consumption on a prey species basis (Cj) is computed by multiplying
annual total consumption by estimates of the proportion (by weight) that each prey species
(j) contributes to the diet ( j).
Pa , y
Cy =
Ea
C j = Cy × ∂ j
a
6
Model Assumptions
The CPM employs various assumptions about future trends in each predator subpopulation.
You may change these assumptions when you create a new scenario (See “Using the
CPM”). The CPM makes the following assumptions:
Diet composition
The proportion of each prey type in an age-specific predator diet is held constant during
the projection period. Prey types are alewife, bloater, other, sculpin, smelt, and
stickleback.
Fishing mortality
All fishing mortality sources are assumed constant during the projection period. For
southern and Saginaw Bay walleye, and burbot, a single source of fishing mortality is set
to the value of the most recent available year of data. For Chinook salmon and all three
lake trout subpopulations, commercial and recreational fishing mortality are used and set
to the most recent available year of data.
GCE
Age-specific GCE is constant during the projection period for all predators. GCE values
were estimated from bioenergetics models (Dobiesz 2003, Appendix C).
Hooking mortality
Used only in conjunction with size regulation data. The default is 0.15 if size regulations
are being used; otherwise, hooking mortality is set to 0.
Immigrants
The Saginaw Bay walleye population is assumed to have a constant number of
immigrants during the projection period. Immigrants are defined as individuals that
move into the area to feed but are NOT included in the population model. Therefore,
their numbers affect consumption but not abundance. In the CPM program, you may
add an immigrant table for other populations as needed.
Length-at-age
Used only in conjunction with size regulations, currently defined for northern and central
lake trout populations. Length-at-age is assumed constant during the projection period.
7
Maturation proportion
Used only for chinook salmon. Set to the most recent available data in the assessment
model (Bence & Dobiesz 2000).
Month of occurrence for mortality sources
Used only in the main basin chinook salmon population where the default value is 7,
indicating that the pulse of harvest and maturation occurs in the seventh month of the
year. Value must be between 1 and 12.
Movement matrix
The only movement matrix currently implemented is for the lake trout populations. The
same matrix must be used for the entire projection period. The movement matrix only
works in conjunction with the stocking table.
Natural mortality rates
For all predators, natural mortality is constant during the projection period. The value
used is the natural mortality experienced in the last year of the assessment models.
Excludes sea lamprey-induced mortality.
Natural recruitment
Natural recruitment, for all subpopulations EXCEPT lake trout, is held constant during
the projection period. Lake trout are assumed to have no natural recruitment.
Post stocking survival
Used only in the southern lake trout subpopulation where the default value is 0.74.
Relative Effort
Provides a multiplier that may be used to change the mortality rate of a given mortality
source. For projections, relative effort for all mortality sources is set to 1. The user may
change this value to reflect changes in mortality for a specific scenario.
Sea lamprey-induced mortality
This mortality source is only implemented in the burbot and all lake trout subpopulations.
During the projection period, sea lamprey-induced mortality rates derived from the
assessment models (Bence and Dobiesz 2000) are adjusted by a scaling factor to reflect
reduction of sea lamprey abundance due to sea lamprey control measures in the St
8
Marys River (Schleen et al. In Press). If this mortality source is not defined for a
particular subpopulation, you may add it in your particular scenario.
Size regulations
For lake trout populations in the northern and central regions, the size limits in the
recreational fishery set at 20” in 2001, 22” in 2003, 24” from 2005 to the end of the
projection period.
Stocking
For all lake trout subpopulations in the main basin, one stocking table by lake region is
used. This table is used in conjunction with a movement matrix to update annual
recruitment data. For all other species, a constant stocking value is used during the
projection period.
Survival to first age
Currently only set in the Saginaw Bay walleye subpopulation where the default value is
0.20636. Describes survival to the first age in the assessment data. This is age 2 for
Saginaw Bay walleye.
Weight-at-age
During the projection period weight-at-age is assumed constant. Weight-at-age at
annulus is used for all subpopulations except chinook salmon. The chinook salmon
population is defined by two weight-at-age periods, annulus and pulse.
9
INSTALLING THE CPM
This chapter describes the process of installing and removing the
Consumption Projection Model from your computer. Possible
problems you may encounter during these processes and their
solutions are also described.
!
$
"
%
%&
' $
#
$
"
Installing The CPM From A CD
Locate the Setup.exe file on the CD. Launch this program by double-clicking the icon.
Read each window as it is presented, make any changes to the install directories, and press
the Next button. By default, the CPM is installed in the Program Files directory. The
Setup.exe file will automatically install the program and associated databases on your
computer.
Installing The CPM From The Web Site
You can download the CPM installation software from a web site or via FTP (See “Installing
The CPM From The FTP Site” below). To use the web site, point your browser to
http://glpd.fw.msu.edu/. Click on the "DOWNLOAD" entry on the menu at top of screen.
Click "GLPD directory listing", then “CPM V2.0”. You will see a listing of all files associated
with the CPM software. Click the “READ_ME.txt” entry for information about the files in this
directory.
To install the CPM, download all of files in the directory “Auto_Install” to a temporary area on
your hard drive. Locate the Setup.exe file in this temporary directory. Launch this program
by double-clicking the icon. Read each window as it is presented, make any changes to the
install directories, and press the Next button. By default, the CPM is installed in the
Program Files directory. The Setup.exe file will automatically install the program and
associated databases on your computer.
10
Installing The CPM From The FTP Site
Using whatever FTP program you prefer, connect to the FTP server glpd.fw.msu.edu. This
is an anonymous FTP server. The CPM files are located in the pub directory under
CPM_V2.0. Download all of files in the directory “Auto_Install” to a temporary area on your
hard drive. Locate the Setup.exe file in this temporary directory. Launch this program by
double-clicking the icon. Read each window as it is presented, make any changes to the
install directories, and press the Next button. By default, the CPM is installed in the
Program Files directory. The Setup.exe file will automatically install the program and
associated databases on your computer. See the “READ_ME.txt” file for more information
on the files in this directory.
Obtaining the CPM User’s Manual
A pdf version of the CPM User’s Manual is available for download at the web and FTP
locations. The file name is “CPM_V2.0_Manual.pdf”.
Problems During Installation
The software to install the CPM on your computer has been tested with several version of
Microsoft® Windows®. However, errors may still arise due to differences between Windows
versions or conflicts with other software installed on your computer. Some possible errors
you may experience during the installation of the CPM are:
1. If a message appears indicating that a module being installed is an older version
than the one on your computer, click the No button. This will leave the newer version
on your computer.
2. If a message appears indicating that a module could not be registered on your
computer, click the Ignore button.
11
After Installing The CPM
After you have finished installing the CPM on your computer, the following directories and
files will be in the directory you selected:
Table 2. Directories and files that are placed on your computer during the installation of the
CPM.
Type
Name
Purpose or content
Directory Comparisons
Holds the Comparison databases
Control
Contains files and databases used by the CPM to
run the model
Export
Default directory for storage of exported data
Import
Default directory of import files
Predators
Holds the Predator databases
Scenarios
Holds the Scenario databases
File
CPM.exe
Executable version of the CPM. Double-clicking its
icon will start the CPM.
CPM.ini
Contains your preference settings for the CPM.
Default values are set during the install process.
Changes you make to the preferences using the Edit
| Options menu are stored in this file.
Read Me.txt
General information about installing the CPM
Uninstall.txt
General information about uninstalling the CPM
Problems Running The CPM
If your computer operates under a Windows version prior to Windows NT, you may not have
the appropriate Visual Basic files on your computer. The symptoms of this condition will
appear when you try to run the CPM. A number of different error messages may occur but
they all will indicate a particular component, DLL, or module is missing on your computer. If
this situation arises, install the Visual Basic Runtime files as indicated below.
Installing Other Software Included With The CPM
Install the screen capture program
This software will install the screen capture program called “Captura”. The print facilities in
the CPM are very limited. Using a screen capture program provides an easy way to save
images of graphs produced by the CPM. Captura can be used to capture the entire screen
12
or a selected portion of a particular window. Double-click on the icon labeled
InstallCapture.exe to start the installation of Captura on your computer. Follow the
instructions on each screen.
Install Visual Basic Run Time Files
This software will install the Microsoft® Visual Basic® Version 6.0 runtime files on your
computer. Newer versions of Microsoft® Windows® should have these files already
installed. However, when running the CPM for the first time, if you encounter any error
messages that indicate a missing DLL, the problem may be solved by installing the runtime
files. Launch the installer by double-clicking VBrun60.exe and follow instructions on each
screen.
Uninstalling the CPM
To uninstall the CPM, use the Start menu Settings | Control Panel | Add/Remove
Programs option. If you have made ANY changes (e.g., creating new scenarios, etc.) while
using the CPM, you may receive messages such as
Unable to remove directory
AND
Some components could not be removed
while uninstalling the program. These represent files and directories that were not removed
during the uninstall process and must be manually deleted to completely remove them from
your computer. Items that will not be removed when you uninstall the CPM include
1.
2.
3.
4.
Scenarios created
New import or report files copied into the Import directory
Changes made directly to predator databases
Comparisons of scenarios
If you are uninstalling the CPM prior to installing a new version, it is recommended that you
rename the old directory prior to installing a new version of the CPM if you want to save
previously created scenarios. However, scenarios created with previous versions of the
CPM may not be compatible with the new version.
13
THE CPM PROGRAM
This section describes the Consumption Projection Model and its
Windows user interface including the menus and toolbars. Event
logging and the Help facility are also described.
Program Functions
The CPM is implemented as a computer program that allows you to define a management
action or a change in a population trend, and then estimate predator consumption. A
management action may be a change to stocking plans or an anticipated change in mortality
due to a change in fishing regulations. Population trends include changes to weight-at-age
or diet composition.
Using the CPM program, you create a management scenario and run the projection model
to estimate consumption by the selected predators. A “scenario” is a set of data that define
a particular management activity or change in a population trend for one or more predator
populations. A management scenario can be created for any combination of the seven
predator populations.
The CPM employs various assumptions about future trends in each predator subpopulation.
These assumptions take the form of tables in a scenario database, which are created when
you start a new scenario. Data for each year and/or age are loaded into a new scenario.
Tables with assumptions of future trends that can be changed by you are shown in each
“tab” on the scenario screen. When these data have been set to represent the desired
management scenario, a menu option calculated consumption and produces several
standard graphs including estimated consumption by year, instantaneous growth by year,
gross production by year, and consumption of prey species. Other data tables and graphs
can also be displayed.
The CPM uses several types of inputs and creates multiple output formats (Figure 3).
Inputs into the CPM consist of databases supplied with the CPM computer program and
user modifications to model assumptions. Output from a projection can be displayed as a
table or a graph. Other database tables that are not the result of a projection can also be
displayed.
14
Figure 3. The CPM design
User Input
You will provide input into the CPM primarily through the keyboard. The model contains the
data needed to project consumption but you may need to modify these data to reflect a
particular management scenario. Model assumptions (Dobiesz 2003, Appendix B) are
contained in the form of year- and/or age-specific data tables. Data that may be changed by
you are:
Numbers stocked
Natural recruitment
Mortality by source
Relative effort by source
Sea lamprey adjustment factor
Size regulations
Weight-at-age
Length-at-age
Diet proportion by prey type
Gross conversion efficiency
Immigrants
Movement matrix
Stocking matrix
Hooking mortality
Post stocking survival
Month pulse mortality occurs
Survival to first age
15
Databases Used by CPM
The CPM utilizes four distinct types of databases: Predator, Scenario, Comparison, and
Control. The Predator and Control databases are included with the CPM and are copied to
your computer during installation. You create Scenario and Comparison databases as you
use the CPM.
A Predator database contains historical (1968 to 1998, varies with population) information
for an individual predator population (Table 3). Predator databases for all predator
subpopulations are included with the CPM program. These are located in the “Predators”
subdirectory where each database is named with the predator population ID (Table 1) and
the suffix “.mdb”. For example, the Predator database for main basin chinook salmon is
named “Chs.mdb”. Predator databases can be updated through the Microsoft® Access
interface or through an Import facility in CPM. The Import facility accepts ADModel Builder
formatted report files or specific formatted text files (see section IMPORTING DATA INTO
THE CPM). The ADModel Builder format resulted from earlier work on a projection program
for the 1836 Treaty model process (Bence and Ebener 2002) and is maintained in CPM to
allow for future updates in this format.
The projected output of each scenario is contained in a Scenario database. Both historical
and projected data are stored for each predator population in a Scenario database (Table
4). The user assigns the name of a Scenario database when the scenario is created.
A Comparison database contains totals for specific scenarios that will be compared. Only
one Comparison database is used by CPM, which it names Comparison.mdb and saves in
the Comparison directory. The Comparison database is overwritten each time you request
a comparison of multiple scenarios. However, using the File | Save As menu you may
save this database under a different name. You CANNOT reopen your comparison
database in the CPM but you can access the data tables through Microsoft® Access.
The Control database contains information used in the program to control its operation as
well as tables whose data is used to modify specific predator populations (e.g., sea
lamprey-induced mortality factor applied to lake trout populations). The Control database
cannot be modified through the CPM except for imports of new movement matrices.
However, if changes are required to a table in the Control database, it can be updated
manually through Microsoft® Access. Any changes to the Control database will affect all
future scenario projections but will not affect previously run scenarios.
16
Output
Any Scenario or Comparison database table can be viewed in tabular or graphical format.
Data may also be exported to several file formats (See “Using the CPM”). Currently, the
CPM has no print capability. The data can include a specific age and/or year range, or may
be summed over ages and/or years. Global preferences that affect all output being viewed
can be set by changing your preferences using the Edit | Options menu (See “Advanced
Features”).
The CPM also provides an automatic plotting feature called AutoPlot. Pre-defined plots
are automatically generated and displayed after each projection run. These plots include:
Total consumption
Comparison to prey biomass
Prey proportion consumed
Consumption by prey type
Abundance of residents
Biomass of residents
Instantaneous growth
Gross production
You control which plots are generated at the end of each projection by selecting the plots
on the AutoPlot tab in the Edit | Options menu (See “Advanced Features”).
17
Table 3. List of tables and record formats in a Predator database. Not all of these tables
are in every predator database. Types of tables include standard (S) tables found in every
predator database, tables unique (U) to specific populations, and tables generally only
created during ADModel Builder use (A).
Table
type
S
S
A
S
S
S
A
A
A
S
S
S
S
U
S
S
A
A
A
A
A
A
A
A
U
S
A
U
A
A
A
A
S
S
A
A
A
Table name
Abundance
Biomass
Biomass_Harvested
Consumption
Consumption_By_PreyType
Diet_Composition
Effective_Sample_Size
Eggs
Eggs_per_Female_for_Projections
GCE
Gross_Production
Instantaneous_Growth
Instantaneous_Mortality
Length_at_Age
Natural_Mortality_for_Projections
Numbers_Harvested
ObsPrd_Effort
ObsPrd_Numbers_Harvested
ObsPrd_Proportion_Harvested
ObsPrd_Survey_CPE
ObsPrd_Survey_Proportions
ObsPrd_Total_Biomass_Harvested
Proportion_Females_for_Projections
Proportion_MatFemales_for_Projections
Recruitment
SeaLamprey_Factor
Selectivity_for_Projections
Size_Limits
SSB
StdRes_Effort
StdRes_Harvest
StdRes_Proportions
Total_Biomass
Weight_at_Age
WtAge_Harvest_for_Projections
WtAge_Population_for_Projections
WtAge_SpFemales_for_Projections
18
Fields
Year
X
X
X
X
X
X
X
X
X
X
X
X
X
X
X
X
X
X
X
X
X
X
X
X
X
X
X
X
Age
X
X
X
X
X
X
X
X
X
X
X
X
X
X
X
X
X
X
X
X
X
X
X
X
Source
X
X
X
X
X
X
X
X
X
X
X
X
X
X
X
X
X
X
X
X
X
.
Table 4. List of tables and record formats in a Scenario database. Some tables contain
model assumptions (A) that may be changed by the user while other tables are calculated
(C) during a projection.
Table name
Abundance
Biomass
Biomass_Harvested
Consumption
Consumption_By_PreyType
Diet_Composition
GCE
Gross_Production
Immigrants
Instantaneous_Growth
Instantaneous_Mortality
Length_at_Age
Movement_Matrix
Natural_Mortality_for_Projections
Numbers_Harvested
Prey_Biomass
Pulse_Mortality
Recruitment
Relative_Effort
SeaLamprey_Factor
Size_Limit_Factor
Size_Limits
Stocking
Stocking_Matrix
Weight_at_Age
Table
types
C
C
C
C
C
A
A
C
A
C
A
A
A
A
C
A
A
A
A
A
A
A
A
A
19
Fields
Year
X
X
X
X
X
X
X
X
X
X
X
X
X
X
X
X
X
X
X
X
X
X
X
Age
X
X
X
X
X
X
X
X
X
X
X
X
X
X
X
Source
X
X
X
X
X
X
X
X
X
X
X
X
X
X
X
X
X
X
CPM Menus
There are eight menus in the CPM: File, Edit, View, Scenario, Predators, Tools, Windows,
Help. Each menu contains specific program functions described below,
File Menu
The File menu is used to perform basic operations such as opening or closing a scenario, or
exiting the program. The options in this menu and their functions are:
New
Create a new scenario
Open
Open an existing scenario so changes can be made
and/or a projection can be run
Close
Close a scenario so another one may be opened
Save
Save changes to the currently opened scenario
Save As
Save changes to the currently opened scenario using
a different scenario file name
Export Spreadsheet
Export the current data table as a spreadsheet
Export Text
Export the current data table as text
Change Printer
Change the destination printer
Page Setup
Alter the page setup to be used for print operations
Print Preview
<currently not available>
Print
Print a data table or graph
Exit
Shutdown the CPM program
20
Edit Menu
The Edit menu is used to make changes to data tables or to set options that change the
operation of CPM. The options in this menu and their functions are:
Copy
Copy the highlighted table cells so they can be pasted
into another location
Paste
Paste data from another location into the highlighted cells
Clear All
Clear the contents of the highlighted table cells
Select All
Highlight all table cells
Options
Change several basic program settings in CPM.
View Menu
The View menu provides operations for displaying data. Data resulting from projection runs,
predator databases, or scenario comparisons can be viewed in tabular or graphical format.
This menu also provides options to change the graphical format. The options in this menu
and their functions are:
Data
Display a data table
Plot
Plot data from a table
Plot Scale
Change the scale of the current plot
Plot Type
Change the type of plot currently displayed
Plot Line Markers
Shows line markers on line graph if checked.
Plot Legend
Change the location of the legend in the current plot
Plot Color
Change the color of the current plot
Plot Range
Change the range of data that is contained in any
subsequently created plots
AutoPlot
Display the automatic plots
Show Prey Biomass
Display a table of the prey biomass
21
Scenario Menu
The Scenario menu provides operations that can be performed on the currently opened
scenario. The options in this menu and their functions are:
Project Consumption Run a projection for the current scenario
Add Predator
Add a predator to the current scenario.
Delete Predator
Delete the currently selected predator from the scenario
Applied Mortality
Display mortality sources for the current predator. Any
associated “factors” can be applied to the mortality value
to show the actual value being used in the projection.
Total instantaneous mortality can also be displayed.
Scenario Information Display information about the current scenario. Each
predator is included in the scenario is listed.
Compare Scenarios
Compare the results of multiple scenarios
Delete Scenario
Delete a specific selected scenario from your computer
Tools Menu
The Tools menu provides auxiliary operations such as viewing the event log or repairing
databases. The options in this menu and their functions are:
List Table Status
Lists tables currently selected predator population
Repair Database
Repairs Predator, Scenario, or Control databases
Database Properties
Lists properties of any database including tables, record
structure, and queries
View Log
View contents of the program log
View Backup Log
View contents of the backup program log
Review Tables
List of tables contained in the database
Calculator
Starts a calculator program. You may need to use
Edit | Options menu to identify the location of your
computer’s calculator program.
Display array
Available in Debug mode only. Displays the contents of
one of the internal arrays
22
Windows Menu
The Windows menu lets the user rearrange the layout of the screen when multiple windows
are displayed. This menu also allows you to bring a particular window to the “top”. Note, the
main scenario window that is created when you open a scenario is fixed, and thus
operations that rearrange the windows will not affect the scenario window. The options in
this menu and their functions are:
Tile Horizontal
Arrange open windows in a horizontal pattern
Tile Vertical
Arrange open windows in a vertical pattern
Cascade
Arrange open windows in a cascade pattern
Close All Data/Plots
Closes all windows except the main scenario window.
Useful if you have requested multiple data tables or
plots and want to quickly remove them.
<name>
The name of each opened window is displayed at the
end of this menu. Click the window name to bring it to
the front of all other windows.
Help Menu
Information about the CPM and how it operates can be obtained through the options in the
Help menu.
Contents
Index
Help on Help
About
Display the help table of contents
Display a searchable index of help topics
Display help on using the Microsoft help system
Basic information about CPM
Predators Menu
The Predators menu provides operations associated with the predator databases; however,
this menu is only displayed if the “allow access to predator databases” option (under the
Edit | Options menu) is turned on. Under normal operations this option is turned off.
Access to these databases is not generally needed since the pertinent historical data is
copied into each scenario database. Further, changes to predator databases will not be
reflected in previously created scenarios and, if mixed with new scenario databases, may
lead to confusing or misleading results. For most users, changing the Predator databases is
not recommended. The options in this menu and their functions are:
23
View predator database
Open a Predator database for viewing
View movement matrix
View a particular movement matrix in the
Control database
View stocking matrix
View a particular stocking matrix in the
Control database
Import ADModel report
Import data into a Predator database from a
formatted ADModel Builder report file
Import formatted text
Import data into a Predator database from a
formatted text file
Import control table
Import data into the Control database from a
formatted text file
Build remaining tables
Build tables that are needed in the predator
Database but not created by the import process.
This option may also be invoked in a text file
using the*CALCULATE label.
CPM Toolbars
The CPM program also has a toolbar for easy access to commonly used menu functions
(Figure 4). The default option is for the toolbar to be displayed. However, the toolbar may
be removed by clicking the Show Toolbar option on the Appearance tab from the Edit |
Options menu.
Figure 4. The CPM toolbar.
Clicking on a toolbar icon invokes the same operations as clicking on the corresponding
menu option (see “CPM Menus” section above). Only the most commonly used menu
options are provided on the toolbar (Table 5). Toolbar icons that have a down-arrow ( ) to
the right have additional menu selections. For example, clicking on the down-arrow
associated with the Plot Types toolbar icon (
) will display a drop-down list of plot types
you may choose from.
24
Table 5. Toolbar icons and their corresponding menu function.
Icon
Equivalent menu option
Icon
Equivalent menu option
File | New
View | Autoplot
File | Open
View | Plot
File | Save
View | Plot Scale
File | Import
View | Plot Type
File | Export Spreadsheet
Tools | Calculator
File | Print
Scenario | Project
Consumption
Scenario | Compare
Scenarios
Help | Contents
[not functional]
File | Print Preview [not
functional]
Predator | View Predator
Database
View | Data
The Help Facility
The CPM has a standard Windows Help facility, which can be accessed through the Help
menu. Information about the projection model or instructions on using the CPM can be
located either through the Table of Contents or by performing a subject search through the
index.
CPM Version Information
Information about the current version of the CPM can be displayed using the Help | About
menu. This displays a screen containing the current version and revision numbers, a list of
program changes to this version and/or fixes to previous errors, and a contact name and
phone number.
25
USING THE CPM
This section demonstrates the process of creating a scenario
and running a projection. Using the AutoPlot feature and the
Export facility to view projection results is also discussed.
Creating and Running a New Projection
Creating and running a new a projection requires several steps. You must identify which
predator populations will be included in the projection and then make the appropriate
changes to the model assumptions. The steps you should follow are:
1.
2.
3.
4.
5.
6.
Create a new scenario
Modify predator attributes
Run projection
View output
Repeat for other scenarios
Compare scenario results
STEP 1. Create a new scenario
Click the File | New menu to begin building a new scenario (Figure 5). You must enter a
name for the new scenario, select the number of projected years, and identify which
predator populations will be included. You may also include some notes about this
particular scenario. Click OK to proceed to the scenario screen (Figure 5).
STEP 2. Modify predator attributes
The default projection values (i.e. model assumptions) for each predator population
are copied into a new Scenario database. Model assumptions (Table 6) about each
subpopulation take the form of parameters or tables in the Scenario database. You modify
these as needed to reflect the scenario you wish to project (also, see Model Assumptions in
the The CPM Model section). Each predator is shown separately. The currently displayed
predator is listed in the Predator drop-down list and if a map is available, its lake region will
be displayed (Figure 6). Make any changes necessary to reflect your scenario. To adjust
26
Figure 5. The FILE NEW Screen
model assumptions to match your scenario, click the corresponding tab on the Scenario
screen and update the parameter or table. For example, to increase the number of wild
recruits during the projection period, click the Wild Recruitment tab and change the number
of recruits in each projection year (Figure 6).
To change to another predator, click the down-arrow in the Predator drop-down list (Figure
6). Highlight the predator you wish to update. The data listed in each tab section will reflect
the new predator. Click on the tabs to change this predator’s attributes.
STEP 3. Run projection
When you have completed modifications to the predator attributes, you are ready to run a
projection. Click on the Project Consumption option in the Scenario menu. Depending on
the predators chosen, the projection timeframe, and your computer speed, this process may
take a minute or more to complete. A status bar will display the progress of the projection.
27
Figure 6. The CPM Scenario screen. This screen allows you to change the model
assumptions for every predator subpopulation that you selected when creating the
scenario.
STEP 4. View output
When the projection is completed the AutoPlot function will display all selected plots. You
can modify which plots are shown by selecting the Edit | Options menu and clicking on the
AutoPlot tab. Other plots or data tables may be viewed by using the View menu.
STEP 5. Repeat for other scenarios
Repeat steps 1 through 4 for every scenario you wish to project.
28
STEP 6. Compare scenario results
After you have created several scenarios, their projections can be compared using the
Compare Scenarios option in the Scenarios menu or by clicking the
toolbar icon. This
function only compares totals for each scenario. Individual predator populations cannot be
compared using this option. To compare scenarios, select the desired scenarios from the
list (Figure 7) by dragging the mouse over the scenario names. Hold the CTRL key down to
select non-consecutive scenarios.
Figure 7. The Scenario Comparison screen.
Changing A Previously Created Scenario
To make changes to a scenario you previously created, use the File | Open menu to open
the scenario. This process loads the selected Scenario database and displays the Scenario
screen (Figure 6). Use the predator list to select a particular subpopulation, then use the
tabs to select the items to be modified. You may also add
or delete predator populations from the currently opened scenario using the Scenario |
Add Predator or Scenario | Delete Predator menus.
REMEMBER: After making any changes to a scenario, you must rerun the
projection by selecting the Scenario | Project Consumption menu or
clicking the
toolbar icon.
29
The CPM will remind you when you must rerun a projection. After a projection is completed
running, a
symbol will appear at the top of the scenario screen. As you modify the
model assumptions or add/delete predators, this symbol changes to
indicating that a
projection must be rerun. The CPM does not erase the previous projection output until you
rerun the projection. Therefore, you can view the previous projection results until you rerun
the projection.
30
Table 6. Predator attributes that can be changed on the Scenario screen (see Figure 6).
Scenario screen tab
Diet
Categories
Ages
Fishing mortality,
Natural mortality,
Sea lamprey-induced
mortality
GCE
Hooking mortality
Years &
ages
Ages
Single factor
Immigrants
Years
Length at age
Ages
Maturation proportion
Month pulse mortality
occurs
Movement matrix
Single factor
Natural recruitment
Post stocking survival
Relative effort
Sea lamprey factor
Size regulations
Years
Single factor
Years
Years
Years
Stocking
Stocking matrix
Years
Survival to first age
Single factor
Weight at age
Ages
Restrictions/limitations
Must use specified prey types.
Proportions for an age class must sum to
1. Only defined for alewife, bloater, other,
sculpin, smelt, and stickleback.
Sources of mortality vary by
subpopulation. New sources may be
added or existing ones removed, however,
these apply only to the projection period.
Used with size limits; currently defined for
northern lake trout only
Predators that consume prey but are not
represented in population; currently
defined for Saginaw Bay walleye only
Used in conjunction with size limits;
currently defined for northern lake trout
only
For predators with a pulse mortality source
For predators with a pulse mortality source
Used with stocking matrix to define
recruitment; currently defined for lake trout
only
Set to 1 for all sources; user must override
See Appendix B for year-specific values
Currently defined for northern lake trout
only
Used with movement matrix to define
recruitment; currently defined for lake trout
only
For populations where numbers do not
start with first age; currently defined for
walleye only
31
Output From A Projection
AutoPlots
The AutoPlot function of the CPM automatically generates and displays a set of predefined
graphs after each projection run. These plots include:
•
•
•
•
•
•
•
•
Total consumption
Comparison to prey biomass
Prey proportion consumed
Consumption by prey type
Abundance of residents
Biomass of residents
Instantaneous growth
Gross production
You control which plots are generated at the end of each projection by selecting the plots
on the AutoPlot tab in the Edit | Options menu (See “Advanced Features”).
When a projection is completed, AutoPlot displays the selected graphs in the order they
are listed above (Figure 8). To view all the graphs in an AutoPlot window, click on the
NEXT>> button, which displays the next graph in the series. Similarly, clicking the
<<PREV button will display the previous graph in the sequence. If you have elected to omit
some graphs from the sequence (use Edit | Options menu), AutoPlot will skip these when
you click the NEXT>> or <<PREV buttons. AutoPlot graphs behave the same way as
standard graphs in the CPM. For example, you can export their contents or change the
plot type.
Once you have run a projection, you can access the AutoPlot graphs at anytime through
the View | AutoPlot menu or by clicking the
toolbar icon.
Data tables and plots
The AutoPlot function displays a limited number of graphs but you may view any table in a
Scenario or Comparison database using the View menu. If you select Data, the results will
be shown in a tabular format (Figure 9). If you select Plot, the results will be graphed. The
scenario must be “opened” to view its contents. You must select the predator population
and the table you wish to view (Figure 10). By default, the year and age range is set to the
maximum ranges available in the selected table. If the table you select has more than one
32
source (Table 4), you may also select a particular source within the table to view. If you do
not select a source, all sources will be listed.
Figure 8. Autoplot graph produced from a scenario projection.
Changing the format of the currently displayed data
For a particular table, the user can limit the year and/or age range that is displayed or
plotted (Figure 10). This window is opened using the View | Data or View | Plot menus.
When you select a table you wish to view or plot, the available year and/or age ranges will
be displayed. You may enter a new range directly in the year or age boxes or click the
“down arrows” next to each box to get a list of valid entries. If you enter a range that is
outside of the available data, you will get an error message.
Data may also be summed over years or ages (Figure 10) by clicking in the sum box next
to years and ages. The type of data table or plot you are viewing determines the format of
the output obtained using the sum function. For example, in a table that contains years
and ages, summing over ages will produce data by year containing the total of all ages
33
found in each year; in a table that only contains years, summing over years will produce a
grand total.
For tables containing a “source” (Tables 3 and 4), the user may limit the output to a
particular source. When a table is selected, the sources available for that table will be
listed in the select a source box (Figure 10). Types of sources are listed in Table 7.
Figure 9. Example of tabular data.
34
Figure 10. Selecting data ranges to be viewed.
Table 7. Types of “sources” contained in database tables.
For data tables containing
Mortality, harvest, effort,
proportions
Diet or consumption
Survey data used in
ADModel Builder runs
Recruitment data
Weight-at-age
Type of source is
A particular type of mortality (e.g., recreational
fishing mortality, natural mortality, etc.)
A prey species (e.g., alewife, bloater, etc.)
The name(s) of fishery survey(s)
A lake region where recruitment occurred or the
words “wild recruitment”
One or two sources may be included as “weight
at annulus” and “weight at pulse”
Changing the format of all displayed data
The user may change the output format for all displayed items in two ways. First, by
selecting how populations are summed and second by setting year and age ranges. To
select a summation option, use the Edit | Options menu the Plot Attribute tab (Figure 11).
When the “Sum consumption by species” option is chosen (checked), data are summed
35
over all predator subpopulations composed of a particular species. If this option is not
checked, then the totals data is presented by each subpopulation.
To set year and age ranges of displayed data, use the View | Plot Range menu (Figure 12)
to set the minimum and maximum values for each of these items.
Figure 11. Changing the plot attributes.
Figure 12. Setting the scenario year and age ranges.
36
Removing Scenarios
Each projected scenario requires several megabytes of space on your hard drive,
depending on the number of predator populations you chose. At some point you may wish
to remove scenarios that you no longer need. You can delete a scenario from the CPM by
using the SCENARIO | DELETE SCENARIO menu. The CPM will list the scenarios found
in the Scenarios subdirectory. Select the scenario to be deleted and click “Yes” to delete
the associated Scenario database. If you selected the wrong scenario, click “No” to keep
the scenario. You may also delete Scenario databases directly from the Scenarios
subdirectory using Windows Explorer.
Prey Biomass
The CPM contains data (1974 -1999) on the combined alewife and rainbow smelt biomass
obtained from the US Geological Survey fall prey assessments and estimates of swept area
biomass. To provide a comparison of prey availability to projected forage demand, the CPM
projects prey biomass by averaging a specified number of years. The default number of
years to average is five. You may change this assumption by setting a new value using the
Calculations tab on the EDIT | OPTIONS screen (Figure 13).
Figure 13. The EDIT | OPTIONS screen. Clicking the Calculations tab
will bring it forward. Change the prey biomass averaging by clicking the
down-arrow.
37
Exporting Data
An “Export” facility allows any data underlying tables or graphs to be saved in a
spreadsheet or text file. Multiple file types can be output including Microsoft Excel, Quattro
Pro, and Lotus 123 spreadsheets; DBASE IV database tables; and tab-,
space-, and comma-delimited text files.
To export data from the CPM to a file:
1. Select Data or Plot from the View menu and choose the table and associated
display options you desire.
2. Export to a spreadsheet format by choosing the File | Export Spreadsheet menu or
to a text format using the File | Export Text menu.
3. Select the file destination and the file name, then click SAVE. By default, an
exported file will be saved in the Export subdirectory within the CPM folder you
designated during installation.
The first line of text or the first row in a spreadsheet that is exported will contain the field
names.
Capturing graphical output
Currently, the CPM program does not have print capability. However, you may export data
from any displayed table or graph, including Autoplots. You can also obtain “pictures” of
graphs using a screen capture program. If you do not have such a program, the CPM
program comes with a “freeware” screen capture program, named Captura, that you can
install on your computer (see Installing Other Software Included On The CD in the
“Installing the CPM”).
To use Captura to save a picture of a particular graph, first use the View menu and the
Plot or Autoplot selections to display the graph. Start the Captura program; an entry for it
will be placed in your Start Menu after you install the program. To save only the graph and
not the surrounding window, click the “Capture a section of the screen” button (Figure 14).
The Captura window will disappear and the mouse pointer will become a crosshairs.
Position the crosshairs at one corner of the plot to be saved. Hold down the “right” mouse
button and drag the crosshairs over the plot, working across the diagonal until a thin black
line surrounds the plot. Release the mouse button and Captura will provide you with a
38
window to name the file. You must include the “.jpg” extension if you wish to view the
graph in most software packages. The “jpg” format is the only format provided through
Captura. If your pictures require a different format, use another screen capture program or
convert the format using another software program such as PaintShop Pro.
Figure 14. The Captura window.
39
SETTING YOUR CPM PREFERENCES
This chapter describes several advanced functions in the CPM
program that allow you to customize the way the model runs.
CPM Options
Several basic operations and program defaults can be changed through the Edit |
Options menu. The Options screen lets you set the format for the plots and Autoplots,
define output ranges, set the screen appearance, and modify model calculations. To set an
option, click the appropriate tab, make your selections, and click the OK button. To “undo”
all changes you just made, click the “Cancel” button. You must click “Cancel” BEFORE you
close this window. To return all settings to their default values, click the “Defaults” button.
Tabs on this screen are organized by option and contain different features as follows:
Plot Attributes
Changes the type and style of plot (Figure 15)
Autoplot
Select and Unselect plots generated with Autoplot (Figure 16)
Output
Controls the format of output files (Figure 17)
Appearance
Set the appearance of the CPM program interface (Figure 18)
Calculations
Define how the CPM program performs calculations (Figure 19)
Changing Plot Attributes
Sum consumption by species
The default option will display individual predator populations on standard graphs. Checking
this option sums the plot item by species rather than population. Include the origin in all
graphs: This option cannot be changed in this version.
40
Include the origin in all graphs
This option is currently not available. The default is to include the origin in every graph
shown.
Prompt for plot range before showing consumption plots
All plots use the default range. Check this option to be prompted to change the range for
plots before they are shown on the screen.
Use maximum plot range for all VIEWs
This option is checked by default and causes all plots to use the maximum range of years
and ages for the current predator populations selected.
Maximum comparisons
Denotes the maximum number of comparisons that can be simultaneously displayed. The
default is 5. Note: setting this value too high may cause the plots to become overcrowded
with legend data, particularly if scenario names are long.
Background color for displayed graphs
The default background color for graphs is black. The color may be changed to white by
clicking the button. Color on individual graphs can be changed by selecting from the color
palette in the View | Plot Color menu. This change is temporary and influences only the
current plots while changing the color through the Edit | Options menu sets the background
color for all plot.
41
Figure 15. Plot attributes tab on the Program Options screen.
Selecting Autoplot graphs
This tab lists the plots that the CPM will automatically generate after each projection is run.
A plot that is “checked” will be displayed. To omit a plot from the Autoplot operation, click
the checkbox to unselect it. During installation of CPM all plots are “checked”. Clicking the
Defaults button on the Options screen will also select all plots. The Autoplots available are
•
•
•
•
•
•
•
•
Total consumption
Comparison to prey biomass
Prey proportion consumed
Consumption by prey type
Abundance of resident predators
Predator biomass of residents
Instantaneous growth
Gross production
42
Figure 16. Autoplot tab on the Program Options screen.
Control the output format
Produce log event
This option is normally checked to allow CPM to log the major events performed by the
user. It is especially helpful when using the Import function as it logs critical import
information that can be used to determine possible errors in the import file. Also, in Debug
mode, the log records critical information that can be used to determine program
malfunctions.
Export headers with data
This option allows the user to include column headers with exported data. The default is
set to include headers with every export file. If this option is turned off, the user must
remember which column contains which data item.
43
Display biomass in metric tons
This option is not available in the current version of CPM. Biomass can be displayed in
kilograms only.
Graph print color
This option sets the background color of printed plots. The default is “white”.
First year in new scenario
This option is used to set the first year included in all newly created scenarios. The default
it set to 1984 to accommodate predator databases whose earliest data start in this year. If
a subset of predators are being used their databases may start in an earlier period.
Changing this value to that year will allow the scenario to include those years. Note:
changing this option will note affect scenarios that have been previously created.
Set the appearance of the CPM window
Show toolbar
The toolbar contains icons for the most often used menu items. Clicking an icon is
equivalent to clicking the menu option. When “checked” the toolbar will appear on the
screen. Unchecking this option will remove the toolbar.
Show progress bar during long processes
The progress bar is used to indicate the status of a long running process such as a
projection. This window will normally appear unless this option is unchecked.
Before projection starts, prompt with possible errors
There are several errors and warnings that are primarily caused by incorrect or missing
data in a newly defined scenario. Running a projection starts by examining the scenario
data for these errors. Normally, a window is displayed indicating the possible errors and
giving the user a chance to abort the projection is needed. However, some warnings may
be acceptable and the user can elect to proceed with the projection. Unchecking this option
will cause the projection to run with or without errors. NOTE: if you choose not to view the
44
error window the projection may be run with “unacceptable” errors and produce
unpredictable results.
Figure 17. Output tab on the Program Options screen.
Omit startup prompt
This prompt only appears when CPM is started. It prompts the user to create a new
scenario or open an existing scenario. By default, this screen appears on each startup of
CPM. Unchecking this option will suppress this screen. This would be desirable only for an
experienced user or when using CPM to process predator databases.
Allow access to predator databases
The primary function of CPM is to projection consumption of prey by predators. However,
predator databases can be maintained and accessed for data tables and plots. Also, this
function provides the ability to import ADModel Builder report files and view the results
using CPMs data table and plot operations. For standard operations this function is turned
off (unchecked). Turning it on does not affect the projection functions of CPM.
45
Maximum number of open windows
The maximum number of windows that can are simultaneously available is 15. If more
windows are opened, CPM will close the oldest window. This option can be set lower to
reduce the amount of memory used by CPM. Setting this option higher is acceptable but
will cause the Window menu to overflow to a second menu where it can list all available
windows. It is recommended that a window is closed when its contents are not longer
needed.
Figure 18. Appearance tab on the Program Options screen.
46
Define how the CPM model performs calculations
Maximum number of projection years
The maximum number of years that can be projected is 50. A new maximum can be set by
entering the value in the box. This option only affects the possible projected years that can
be selected when creating a new scenario.
Projection year interval
The standard interval between projected years that can be selected when creating a new
scenario is 5. A new interval can be set by entering the value in the box. This option only
affects the possible projected years that can be selected when creating a new scenario.
Project prey biomass by averaging x years
To compare consumption to prey biomass, the projected prey biomass is calculated by
averaging the last 5 years. A different number of years can be included in this average by
selecting the value in the drop down box.
Precision for sums (#0.00)
The movement matrix and the diet composition tables contain data that should sum to one.
However, due to rounding errors the value may not sum to one. This option is a mask used
to determine the number of decimals checked for a proper sum. The default is #0.00
denoting that the values should sum to one out to 2 decimal places. If additional precision
is desired, add zeros to the end of the mask string. Note: a warning will be generated if the
movement matrix or the diet composition does not sum to one at the precision set on this
screen.
External calculator
Since several of the projection tables may require mathematical manipulation before the
data can be entered, a shortcut to the user’s selected calculator program can be set. Click
the Browse button and locate your chosen calculator program. By setting this option, the
calculator can easily be accessed by clicking the toolbar calculator icon.
47
Figure 19. Calculations tab on the Program Options screen.
48
IMPORTING DATA INTO THE CPM
This chapter describes how to use the Import feature to update CPM
databases.
Overview of the Import Process
The Import process provides a method of updating a Predator database without using
Microsoft Access. There are two separate import processes. First, you can import a
formatted report file. This process replaces an entire Predator database. Second, you can
import a formatted text file. This process is primarily used to update individual tables but
may also be used to replace an entire Predator database. Each of these processes is
described in this section.
Importing Formatted Report Files
A “report” file is a formatted file that is typically output from an ADModel Builder stock
assessment model. Since these models contain most of the data needed to populate a
Predator database, their output can be used to create a database. These are essentially
text files that use the file extension “.rep”. Therefore, if you follow the Report File Guidelines
section below and use the “.rep” file extension, you can also create one of these with a text
editor.
To import a report file, click the Predators | Import ADModel Report menu. The report file
import screen will be displayed (Figure 20). Select a Predator database to be replaced in
the Select the Predator drop-down list. You may only import data for a predator
subpopulation that is included in this list. Then either enter the entire path name that points
to the report file (e.g., C:\Program Files\CPM\Import\walleye.rep) or click the Browse button
to get a list of all files on your computer. From this screen you can navigate to locate the
report file you wish to import. After you select the report file, its ID line (i.e., the first line in
the file that denotes what the file includes) will be displayed in the Enter a comment box.
You may edit this comment to include additional data if desired. Finally, click the OK button
to begin the import; click the CANCEL button if you decide not to import the data. While the
import process is running, you will see a progress bar indicating the table that is being
imported. When the import process if completed, the Predator screen will be displayed
(Figure 21).
49
Figure 20. The Import ADModel Report screen.
If this predator subpopulation has a sea lamprey-induced mortality source, it must be
identified as such using the Set sea lamprey mortality source button. Since you may
name mortality sources in any way you choose, the CPM does not know which mortality
source is the correct one. Click the button and select the mortality source that represents
the sea lamprey-induced mortality.
If this predator subpopulation is associated with a movement matrix, you must identify which
movement matrix to use. Click the Set movement matrix ID button and select a movement
matrix from the list.
50
Figure 21. The Predator screen.
Report File Guidelines.
Output from ADModel Builder is used as input for CPM. Input must follow a specific
sequential order and format.
Numeric Data
• Numeric values occupying the same line must be separated by a space.
• Each new set of numeric data must begin on a new line.
• Matrices are input by rows, one line per row with spaces between columns.
• Missing values are represented by –1. Designate a missing vector or matrix by
filling it with –1s.
Text Data
• Text data are used for providing report file information and data labels. Each
occurrence of text data must begin on a new line and be preceded by an “*”.
• Labels used to identify sources of mortality or survey data should be no longer
51
•
•
than 50 characters. Labels exceeding this length will be truncated.
Labels should be unique with a given report file. Duplicate labels will be marked
as an error during the import process.
Upper and lower case letters are allowed.
Section Separators
• Section separators are required text data that must appear in specific locations in
the report file. These are shown in Table 1
• Required text labels start with an “*” and use capital letters.
Comments
• Comments may be included throughout the file by preceding each with the “#”
character. Any line beginning with a “#” will be ignored by the projection model.
• Blank lines may be placed within the report file and will be ignored by the
projection model.
52
Report File Format.
Standard text file format with file extension “dat”, “rep”, or “txt”.
Report data
Data description
*Text ID
Description and date preceded by “*”
First year Last year First age Last age
4 integers, separated by spaces
Numbers by age and year
Matrix with a row for each year
Total mortality sources and number of fishing
2 integers separated by a space
mortality sources
st
*Label for 1 mortality rate
Alphabetic label preceded by
an *; list fishing mortality sources first
Repeat for each
1 mortality rates
Matrix with a row for each year
source
Total instantaneous mortality rate
Matrix with a row for each year
st
Repeat for each
Numbers killed by source
Matrix with a row for each year
source in same
order as labels
Total numbers killed
Matrix with a row for each year
Biomass at start of each year
Vector (first year, last year)
Time of spawning
Value between 0 – 1 indicating time of
year for spawning
Spawning biomass each year
Vector (first year, last year)
Eggs produced each year
Vector (first year, last year)
*OBSVSPRED
Required text
Repeat for each
Observed numbers harvested by year
Vector by year
fishing
source in same
Predicted numbers harvested by year
Vector by year
order as labels
Repeat for each
Observed harvested biomass
Vector by year
fishing
source in same
Predicted harvested biomass
Vector by year
order as labels
First age Last age
2 integers separated by a space;
Repeat for
corresponds to proportion data
each fishing source
in
Observed proportion of harvest
Matrix of age and years
53
same order
Predicted proportion of harvest
Matrix of age and years
as labels
Observed effort
Vector by years
Repeat for
each fishing
Predicted effort
Vector by years
source in same
order as labels
Number of surveys
Integer; 0 indicates no survey data will
be input
st
Alphabetic label preceded by *
Repeat for
Observed CPE
Vector of ln(CPE)
each survey
Predicted CPE
Vector of ln(CPE)
First age Last age
2 integers separated by a space;
Omit this section if
corresponds to proportion data
no surveys are
Observed proportion
Matrix of age and years
available
Predicted proportion
Matrix of age and years
*PROJECTIONS
Required text
*Label for 1 survey
Repeat for
st
Selectivity for 1 fishery
Vector by age
each fishing source
(in order)
Catchability (q) for each fishery
Row of q-values; one for each fishery;
same order as fishing labels
Repeat for
Natural mortality
Vector by age
each natural
source (in order)
Weight-at-age for harvest
Vector by age
Weight-at-age for population (at start of year)
Vector by age
Weight-at-age for spawning females
Vector by age
Eggs per females by age
Vector by age
Proportion females by age
Vector by age
Proportion mature females by age
Vector by age
*RESIDUALS
Required text
Standard deviation for harvest by source
Row of numbers; one for each source;
same order as fishing source labels
Standard deviation for effort
Row of numbers; one for each source;
same order as fishing source labels
Omit this entry if no
54
Standard deviation for surveys
Row of numbers; one for each source;
surveys available
same order as survey labels
Maximum effective sample size by source
Row of numbers; one for each source;
same order as fishery labels followed
by surveys in order
Actual number of fish by year
Vector by year; each vector must start
Repeat for each
on a new line
fishery followed by
each survey
Standardized residuals for harvest numbers for
Vector by year
st
Repeat for each
fishery
1 fishery
Standardized residuals for age-composition for
Matrix of age and years Vector by year
st
Repeat for each
fishery
1 fishery
st
Standardized residuals for effort for 1 fishery
Vector by year
Repeat for each
fishery
Repeat for each
Standardized residuals for survey CPE for 1
st
Vector by year
survey.
Omit if no surveys
survey
available
Standardized residuals for age-composition for
Matrix of age and years
st
Repeat for each
survey.
1 survey
Omit if no surveys
available
*ENDREPORT
Required text
55
Importing a formatted text file
Formatted text files provide a way to update individual tables in a Predator database. It
also provides the only method to update certain tables such as the diet composition. A
formatted text file must follow the same guidelines as a report file (See “Report File
Guidelines” in previous section). The difference between a report file and a formatted text
file is the “Section Separators”. Each section separator identifies the data that follows it or
an action to be taken. Valid section separators are shown in Table 6. An example of a
formatted text file is shown in Figure 23.
To import a text file, click the Predators | Import formatted text menu. The text file import
screen will be displayed (Figure 22). Select a Predator database to be replaced in the
Select the Predator drop-down list. You may only import data for a predator subpopulation
that is included in this list. Then either enter the entire path name that points to the text file
(e.g., C:\Program Files\CPM\Import\filename.txt) or click the Browse button to get a list of all
files on your computer. From this screen you can navigate to locate the report file you wish
to import. Finally, click the OK button to begin the import; click the CANCEL button if you
decide not to import the data. While the import process is running, you will see a progress
bar indicating the table that is being imported. When the import process if completed, the
Predator screen will be displayed (Figure 21).
Figure 22. The import text file screen.
56
Table 6. Formatted text section separators. Only the first five letters of each command are
required. All letters in a command must be capitalized and each command must be
preceded by an “*”. (See example Figure 23).
CALCULATE
IMMIGRANTS
WILDRECRUITMENT
STOCKING
STKMOVEMENT
MOVEMENT
POSTSTOCKINGSURVIVAL
GROSSCONVERSION
DIETCOMPOSTION
WEIGHT-AT-AGE
LENGTH-AT-AGE
SIZELIMITS
PROJECTION
PULSEMORTALITY
SURVIVAL-TO-AGE1
HOOKING
CVLENGTH
VBLEN
ENDREPORT
Immediately invoke the projection routines. Place this command
immediately before the ENDREPORT command.
Lists number of immigrants by year. An immigrant is a fish that
consumes prey in a particular lake region but is not included in
estimates of population size. Immigrant consumption is added to
total population consumption but their abundance is not.
Lists the number of wild recruits by year.
Lists the number of fish stocked by year. Only applies to
populations that do not use a movement matrix.
Lists number of fish stocked by year and location. Builds a
stocking table in the “Control” database, which applies to all
predator populations associated with a movement table.
Builds a movement matrix. A movement matrix is applied to a
predator population by assigning a movement matrix ID in
Predator database, via the Predator screen.
Defines post stocking survival for a particular predator population.
List of gross conversion efficiency by year (rows) and ages
(columns).
Diet composition by year (rows) and prey type (columns) in the
following order: Alewife, Bloater, Smelt, Sculpin, Stickleback,
Other.
1=annulus only 2= annulus followed by pulse weight-at-age
Then lists weight-at-age by year (rows) and age(cols); Biomass
is recalculated following the import of this data.
Lists length-at-age in millimeters
This is a compound entry. First line after the command must be
the fishing mortality source name (as in Predator database).
Second line contains first and last year the size limit is effective,
with a space between years. Following lines contain size limit in
millimeters for each age.
Run a projection.
This is a compound entry. First line after the command is the
number of pulse sources. Second line is the month the pulse
occurs in and must be same for all sources. Third line is name of
pulse source preceded by an “*”. Then table of year and age
specific mortality.
Survival to age 1 listed on line following the command.
Hooking mortality listed on line following the command.
CV of length-at-age listed on line following the command.
vonBertalanffy parameters for calculating length-at-age. List the
following items on separate lines immediately following the
command: L-inf , K, t0 . This data applied to all projected years.
Marks end of data input. All data after this command is ignored.
57
*Consumption data for central lake trout
#First and last years and ages in data
1996 1998 3 6
#
*GROSSCONVERSION
#years in rows, ages in cols
0.141349
0.116348
0.102864
0.0997455
0.141349
0.116348
0.102864
0.0997455
0.141349
0.116348
0.102864
0.0997455
#
*DIETCOMPOSTION
#prey names
Alewife,Bloater,Smelt,Sculpin,Stickleback,Other
#diet comp 1 row for each age, col for prey
0.5231 0.0000 0.4628 0.0089 0.0039 0.0013
0.6028 0.0000 0.3941 0.0011 0.0009 0.0010
0.8472 0.0063 0.1456 0.0000 0.0000 0.0010
#
*WEIGHTATAGE
# type of age data; 1=annulus only
1
#actual weight data; years in rows, ages in cols
0.41485
1.10652
1.69586
2.22796
0.49578
1.09769
1.74074
2.27795
0.04535
0.17333
0.6625 0.90405
#
*HOOKINGMORTALITY
0.15
#
*LENGTHATAGE
#Length at age from first to last age (constant over years)
#ONLY USED FOR PROJECTIONS
157.1562019 275.6290626 375.0222834 458.4085737
#
*CALCULATE
*ENDREPORT
Figure 23. Sample of a formatted text file. Note, more examples of import files are
contained in the CPM subdirectory Import.
58
Importing a control table
Control database tables may also be updated using a formatted text file. This text file must
conform to the report file guidelines (See “Report File Guidelines” in previous section) and
use the appropriate section separators (Table 6).
To import a Control database table, click the Predators | Import control table menu. A
standard Windows directory window will be displayed. Enter the entire text file path name
(e.g., C:\Program Files\CPM\Import\filename.txt) or navigate through the directories to
locate your file and double click it. Click the CANCEL button if you decide not to import the
data. While the import process is running, you will see a progress bar indicating the table
that is being imported. Note, this process does not affect any of the Predator databases.
59
HANDLING ERRORS
This section describes what to do when you encounter errors in the
CPM.
Error messages
The CPM issues four types of messages. “Log Only” messages are sent to the event log
but not displayed on the screen. They are used to clarify events that occurred in association
with other errors or to log program problems that are not severe enough to halt the CPM.
“Warning” messages are displayed on the screen and require your attention. They typically
occur when data is entered incorrectly or a process could not be performed. The CPM
keeps running even if warnings are encountered. “Error” messages are problems
encountered which prohibit the CPM from completing a request. They are shown on the
screen and often require you to stop the CPM and fix an error before continuing. “Program
Errors” are severe logic problems encountered by the CPM. All Program Errors halt the
CPM. They cannot be fixed by user intervention and require a programmer’s assistance.
Below is a list of all the numbered messages. There are numerous messages used to log
events that are not numbered and therefore not shown here. Non-numbered messages are
informational only. All messages are written to the event log as they occur. Message
numbers appear in square brackets, “[ ]”, at the end of the message. Items below shown
between “<>” indicate variable data that changes depending on the particular problem that
was encountered.
Log only
Predator <predator name> not found in predator list. Get_Predator_Attr process failed.
[0103]
Get_Information process failed. Item <item> not found in database. [0321]
Save_database procedure: Copy of <source> to <destination> failed. [0331]
Compact_database procedure: Copy of <database> to <temporary database> failed. [0332]
Invalid table name <table name> passed to Get_Table_Attr process. [0301]
60
IMPORT ERROR: Last line of report file was not *ENDREPORT. Probable IMPORT
problem. Last line: <text> [0799]
A critical program file is missing. The program cannot continue with it. Check the LOG for
details. [0902]
File <file name> not found. This file must be present for the program to continue. Check the
LOG for details [0903].
End of import data reached before all tables were completed. Insufficient data provided.
Check the LOG for details. [0904]
One or more required tables are missing. Probable error occurred during creation of
predator database or calculations were not done for the predator. [1304]
Warnings
Your screen resolution of <width> x <height> is outside the optimum range for this program.
Some windows may not be displayed correctly. It is recommended that you change you
screen resolution to 800 x 600 or 1024 x 768. [0010]
Paste area is not the same size as the copy area. [0011]
The backup log does not exist.[0020]
Cannot locate the calculator application. Please check the location specified in
Options|Calculations. [0021]
The calculator could not be accessed. Please check the location specified in
Options|Calculations. [0022]
The event log does not exist. [0025]
No prey-related data was found. Make sure to load diet and GCE data for this predator.
[0101]
61
Database <database> is already opened by another application. The database cannot be
used by CPM until the other application is closed. [0303]
The following errors were encountered in <database> [0330]
Cannot create and/or open the export file <file name> [0402]
Cannot close the export file <file name>. File may be incomplete. [0403]
Import file <file name> does not exist. [0701]
Possible cause: manually entering an invalid path and/or file name. Use directory
open dialog box to navigate windows to reach desired directory or correct the entered
file name.
Found weight-at-age indicator of <number>. Weight-at-age must be specified as '
1'for
annulus only or '
2'for annulus followed by pulse weight-at-age. [0710]
Instantaneous fishing mortality has already been defined for this predator. CPM does not
support both instantaneous fishing and pulse mortality sources. Please refer to the
documentation. [0711]
CPM requires exactly two pulse mortality proportions. Please make the appropriate changes
to the import file before proceeding. [0712]
Errors occurred during the import process. The predator database may not be correct.
Check the Log to help identify problems in the import file. [0723]
Possible cause: given at end of import process if any warnings or errors occurred that
may have adversely affected the import process or the creation of the data being
imported.
Overflow encountered. Please select new parameters. [0906]
62
A table was not found in the database table name: <table name>. Reload the predator
database or create a new scenario. [0908]
Execution of an SQL sequence has failed. Error number: <number> <description>. [0909]
Logging error. Error number <number> has occurred. <description>. Program may not be
able to continue execution. [0901]
Input file error. Error number <number> has occurred. <description>. Program may not be
able to continue execution. [0905]
No autoPlots have been specified. To request one or more autoPlots use the Edit|Options
menu. [1101]
Scenario <scenario name> was NOT successfully built due to errors. [1301]
Predator <predator name> not found in predator list. Get_Predator_ID process failed.
[1305]
Error occurred while loading cursors. The table magnify option is being disabled. [1503]
Invalid range of years specified. [1501]
Invalid range of ages specified. [1502]
Scenario name is too long. Only 35 characters are allowed. Name will be truncated. [2401]
The character '
<character>'is not allowed in scenario names. [2403]
You have selected <number> scenarios to be compared. The current maximum allowed is
<number>. Only the first <number> scenarios will be shown. Note: You may change the
maximum number of comparisons through Edit|Options. [2501]
63
All scenarios have errors. NO comparison can be completed. [2599]
One or more scenarios were missing a projection table. [2590]. These scenarios will not be
presented in the comparison. Do you want to continue?
Activating this option will allow you to import new data into the predator databases.
CAUTION: Any changes made to the predator databases will not be reflected in previously
created scenarios. [2601]
No predators have been selected. Please choose at least one predator from the list. [3001]
Only <number> years can be plotted on this graph. Please select a smaller range of years
or click the sum option to sum over the years. [3006]
Only <number> ages can be plotted on this graph. Please select a smaller range of ages or
click the sum option to sum over the ages. [3007]
The <mortality source> already exists. Enter a new source name before clicking the Add
button. [3201]
There is only one <mortality type> mortality source currently defined. You cannot delete all
of the <mortality type> mortality sources. [3202]
You have not selected a sea lamprey mortality source. Please select one from the mortality
source list. [3210]
Value of <text> in variable <variable name> is not a valid number. [3211]
Possible cause: when entering data into a field that needs numerics, a non-number
was entered
Pulse month must be a value between 1 and 12. [3212]
Pulse month must be a numeric value between 1 and 12. [3213]
Proportion specified may be invalid. Please specify the proportion of increase in decimal
format. [3214]
64
Errors
Diet composition for '
<predator name>'is missing. [0102]
Mortality source ‘<mortality source>'does not match any sources in the scenario database.
Probably program error. [0106]
Error encountered in database table <table name>. Operation cannot continue. [0110]
Possible cause: database is corrupted or table contains invalid data that the model
must have to continue
Problem detected in control database table <table name>. Program will terminate. [0199]
Possible cause: need valid control databases so program stops
Immigrant data in predator database starts in year <year>. Current request is attempting to
project back to <year>. This conflict cannot be resolved. Estimation process is being
halted. [0201]
Possible cause: Immigrant data was incorrectly entered. Make sure that immigrants
exist for the timeframe needed
Immigrant data could not be found for the specified predator but the Information table
indicated that data did exist. Estimation process has halted. [0202]
Creation of temporary database failed. Copy operation failed. VB Error: <description> for
<database> [0304]
Save database operation failed: VB Error: <description> [0305]
<Operation> operation failed: VB Error: <description> [0306]
CreateDB has failed: VB error # <number> Source: <text> Desc: <description> [0307]
65
Temporary work area could not be erased: VB error # <number> Source: <text> Desc:
<description> [0308]
Creation of COMPARISON database has failed: VB error # <number> Source: <text> Desc:
<description> [0309]
Creation of COMPARISON table has failed: VB error # <number> Source: <text> Desc:
<description> [0310]
Database error occurred during import. VB Error: <description> [0311]
Possible cause: During creation of predator database from an import process a
database error occurred. Retry the operation.
Error encountered during export spreadsheet operation # <number> VB Error: <description>
[0401]
First age of proportion data is less than first age for this report file. Report file first age is
<number> while '
<mortality source>'proportion first age is <number> [0702]
Last age of proportion data exceeds last age for this report file. Report file last age is
<number> while '
<mortality source>'proportion last age is <number>. [0703]
Invalid IMPORT label '
<text>'
. Processing of import has ended. [0719]
<Text> label missing -- IMPORT aborted! [0722]
Possible cause: an import command label was missing in the current import file.
A table cannot be created since it already exists (table name: <table name>). Possible
database or program error encountered. [0907]
First age of survey proportion data is less than first age for this report file. Report file first
age is <number> '
<survey label>'proportion first age is <number> [0704]
66
Last age of survey proportion data exceeds last age for this report file. Report file last age is
<number> while '
<survey label>'proportion last age is <number>. [0705]
Missing lake trout stocking table. Make sure the table has been imported into the control
database. [1302]
Pgm Errors
Find_Mortality_Label subroutine encountered mortality type '
<mortality type>’ but cannot
handle this type. [0105]
Possible cause: Invalid mortality type found. Only “instantaneous” and “pulse”
mortality are valid but another was found.
Matching z-value (<number>) not found in ZIndex control table. [0290]
Delete record failed for information item <text> [0320]
Error: unknown table type in READ_TABLE. [0720]
Cannot create .ini file to store program options [0801]
Cannot update .ini file with new <directory> value. [0802]
Cannot update .ini file with new <directory> value. [0013]
Predator search function <integer> is invalid. Get_Predator_Ptr process failed. [1306]
Program error in <SQL_Calc_Con>: Trying to update <table> with an undefined calculation.
[1401]
Entered frmList with invalid operation: <number> [2201]
67
cmdOK: Error--invalid operSelected value of <number> [2402]
frmOpen error - operselected= <number> [2505]
INI File Error occurred. Section: <text> Keyword: <text> Data: <text>. Cannot update .ini file
with these options. [2602]
Error loading <form name>. Invalid operation: <number>. [3002]
Independent variable specified as '
<text>'cannot be processed by this program. [3003]
No preformed SQL for '
4YY'table <table name> [3004]
Table Attr <text> does not have pre-formed SQL query. [3005]
The following error most likely occurred because a mistake was made in entering the region
information in the predators table in Control.mdb. Stocking source is invalid. Data error in
<predator database> database. [3290]
frmScenario Refresh_Tab has received an invalid tab value of <number>. [3291]
ERROR: trying to set constant values for undefined table with tab# <number>. [3292]
ERROR: trying to calculate linear function for undefined table with tab# <number>. [3293]
frmScenario Update_Table routine encountered an invalid tab request <number>. [3294]
frmScenario Update_Table routine encountered an invalid tab request <number>. [3295]
Error loading <form name>. Invalid operation requested -- <number>. [3401]
Invalid operation <number> occured in frmView. [3501]
68
Debug mode
The CPM employs an event log to track the major activities you request. It also has the
ability to expand the number of recorded events to include important details that may aid in
programming debugging. You can activate this function using a command line code
DEBUG. Note, this will greatly increase the size of the event log but will capture the
specifics of the SQL commands issued to the databases being used.
69
Literature Cited
Bence J. R. and N. E. Dobiesz. 2000. Estimating forage fish consumption by predators in
Lake Huron. Great Lakes Fishery Commission Project Completion Report. Available
for download at http://www.glfc.org/research/cap.htm .
Bence, J. R. and Ebener, M. P. (eds). 2002. Summary status of lake trout and lake whitefish
populations in 1836 treaty-ceded waters of Lakes Superior, Huron and Michigan in
2000, with recommended yield and effort levels for 2001. Technical Fisheries
Committee, 1836 Treaty-Ceded Waters of Lakes Superior, Huron and Michigan.
Dobiesz, N.E. 2003. An Evaluation Of The Role Of Top Piscivores In The Fish Community
Of The Main Basin Of Lake Huron. Ph.D. Dissertation for Michigan State University.
Modeling Subcommittee, Technical Fisheries Committee. 2002. Summary Status of Lake
Trout and Lake Whitefish Populations in the 1836 Treaty-Ceded Waters of Lakes
Superior, Huron and Michigan in 2000, with recommended yield and effort levels for
2001. Technical Fisheries Committee, 1836 Treaty-Ceded Waters of Lakes
Superior, Huron and Michigan.
Schleen, Larry P., Christie, Gavin C., Heinrich, John W., Bergstedt, Roger A., Young, Robert
J., Morse, Terry J., Lavis, Dennis S., Bills, Terry D., Johnson, James E., Ebener,
Mark P. in press. Development and implementation of an integrated program for
control of sea lampreys in the St. Marys River. Journal of Great Lakes Research,
SLIS II Special Issue.
70