1
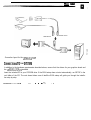
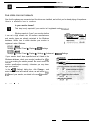
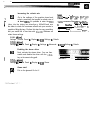
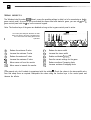
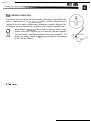
THE
GLASSES FOR TRUE DEPTH OF VISION
You’ve already made your purchase decision, so it’s too late now-you’re already convinced that you bought the
right product. It doesn’t matter who convinced you, they were right!
We can only attempt to describe the ELSA 30 R/%!ATUR experience on paper. Instead, we’d like to concentrate on giving you effective guidelines to help you install and set up the glasses correctly as quickly as possible.
Everything else can be found in the online help. The hardware installation is straightforward. You should devote
a bit of attention to setting the software up correctly, however.
0
II
In some individuals, flash effects may trigger epileptic seizures or sensory disturbances. Please consuit yourph ysician before using the 30 REVELA TOR in the event that you’ve experienced similar problems in the past. Should you experience queasiness, involuntary muscle contractions or cramps
while using the glasses, take them off immediately.
ESSENTIAL
HARDWARE AND
SOFWVARE
An ELSA ERAZOR 11, an ELSA ERAZOR Ill, an ELSA VICTORY II or an ELSA WIMVER II.
A monitor capable of a refresh rate of at least 120 Hz.
Any 30 game that uses Direct3D and delivers valid Z data-nearly all current games are suitable.
DirectX 6.0 or higher!
CONNECTIONS
TO THE COMPUTER
A connection adapter for the ELSA 30 REVELATORglasses and monitor is included, as well as a CD containing
the ELSA 30 REVEMTORsoftware. For the infrared version, connect the plug of the transmitter module to the
socket on the adapter; plug the cable version directly into the adapter.
.
,a
Infrared version
t
Connection layout for the 30 REVELA TOR
CONNECTIONS To
THE
SYSTEM
In addition to the hardware requirements described above, ensure that the drivers for your graphics board and
the 30 REVELATORare installed.
Insert the included CD in your CD-ROM drive. If the ELSA setup does not start automatically, run SETUP in the
root folder of the CD. The rest almost takes care of itself-the ELSA setup will guide you through the installation step by step.
.
,.r.‘.*~...;;.‘.-,;;
,::*, . ..1.-.e...._ :- ,I.
-:I::
.
.
.
.
_..
I
,
.
-
. . .._-..
_.
,_
_--.- -__
FOUR
STEPS FOR FAST RESULTS
Now that the glasses are connected and the drivers are installed, we bet that you’re already dying of impatience.
Here-in a nutshell-is how to continue:
Is your monitor known?
This step is only required if your monitor isn’t registered under Windows1
0
Windows needs to “know” your monitor before
it can set a high refresh rate. All common manufacturers
and monitor types are already contained in the Windows
database. Here’s how to check whether your monitor is
registered under Windows:
b4Walui.
.] &LSA.ELSAECOMO
Rcfl& Rate:
Settings b Control Panel F Display F I- Settings
WINg8: iqy&-j
Settings b Control Panel F Display F Settings F Advanced... F m Settings
If your monitor hasn’t been specified and isn’t listed in the
Windows database, check your monitor handbook for information on making the entries yourself. Be sure to enter the
monitor specifications correctly, otherwise you may damage your monitor!
In the ’ ImJ Settings’ dialog box, click Change..., and
enter the horizontal and vertical values, as well as the diagonal size of your monitor, as stated in the mon itor manua I.
..~
_...
-
..
*.i c&&4 i-tlamdactuc~.
:sL&n
-.
.iLSA ECOMO ZlH97
2-i
Qange...
1
-
-
Increasing the refresh rate
Go to the settings of the graphics board and
select a resolution that permits a refresh rate of
at least 120Hz. It’s possible to enter the resolution into the dialog box directly-e.g. 800x600-and use
the slider to check the maximum refresh rate your monitor is
capable of displaying. Perform this step for every resolution
that you would like to use later with Direct3D. Windows will
retain these settings.
Li3
I
i
r
%souon
__
-3X0qAi-C
32768 coloo High Calm
.~
A
L1
_
VifbYdU&
/pirx]6a3
::w.----.--.-I----.-.--- --- -...--.. -._-._ -.____.___,,_. . __ . ,_ ___I __,_, .
Qetds...
Hz
R&sh Rats
H
Next, activate the stereo driver. You can then
enable and disable the driver with the I-’ hotkey on the numeric keypad.
WINSx: :@@ji
Settings F Control Panel F Display F m Stereo
A :.
0
:
I
Game start!
Put on the glasses! Go for it!
1
‘vJE%DDC
lOOH
..-k 1120 I+:
Ha. Scan Rate
1octkH2
F-----------
WIN95: a=+
Settings ,-Control Panel F Display F EEJi Settings F Details
-. “. _ .~ _._._. I
WlN98: .a+$
Settings F Control Panel F Display F Settings F Advanced... F IKEI Settings b Details
Enabling the stereo driver
ViitUdRerolution:
[“;:31ixF
Eir,,:
S EEING
CORRECTLY
The Windows help file under ’ (Gj Stereo’ covers the possible settings in detail, so let’s concentrate on the ingame control panel. As soon as you’ve activated the stereo effect and started a game, you can call up the ingame control panel with the * key on the numeric keypad.
Note: The function keys of the game are disabled as long as the in-game control panel is active.
The control panel histogram illustrates the distribution of Z values in the scene. The relative position of the monitor arid viewing plane are also
symbolized.
:
-
0Fl
0F2
0F3
'0
F4
:0
F5
!(F61
Reduce the minimum Z value
Increase the minimum Z value
Reduce the maximum Z value
Increase the maximum Z value
Move scene out from the monitor
Move scene in towards the monitor
0F7
0F8
0F9
HO
0
0Fll
F12
0
.I
2
FI/F2- ZFROHT
F3/F4- ZBACK
.3
.‘I
.5
F5/Fb-HOWPUS
FWFB- DEPTH
.b
.1
.9
F9 -DYWM
FiL’Fi2-IkZ
.9
i.
Reduce the stereo width
Increase the stereo width
Enable and disable Dyna-ZTM
Save the current settings for the game
Reduce nonlinear Z-mapping factor
Increase nonlinear Z-mapping factor
,As a general rule, don’t hesitate to experiment with the settings.1 Check the values in the stereo-width calculator and adapt them as required. Manipulate the values using the function keys in the control panel and
‘observe the effects.
FOR CORDLESS USERS ONLY:
Just above the nose pads of the infrared model, you’ll find a cover plate for the
battery compartment of the 3DREVElATUR. Two CR2032 batteries will be
required if you ever need to replace them. Remember: be sure to dispose of the
old batteries correctly. Batteries do not belong in your regular household trash.
0
II
. . r.‘-.;.:-....
“.-T--~-- . . . . :... .
When taking the 30 REVElA TOR off briefly or setting it aside for longer
periods of time, don ‘t forget to fold up at least the right-hand earpiece.
The on/off switch of the glasses is linked to the hinge mechanism. The
glasses are ready to receive in their open state and are thus drawing
pa wer from the batteries.
. . . .
DoC - Declaration of Comformity
REVELATOR IR
ELSA AG
Tastqd To Comply
With FCC Standards
FOR HOME OR OFFICE USE
Compliance Information Statement
(Declaration of Conformity Procedure)
-.
Responsible Party:
ELSA Inc.
Address:
2231 Calle De Luna
Santa Clara, CA 95054
USA
Phone:
t l-408-91 9-9100
Type of Equipment
Graphics Roard
Model Name:
REVELATOR IR
This device complies with Part 15 of the FCC rules.
Operation is subject to the following two conditions:
(1) this device may not cause harmful interference, and
(2) this device must accept any interference received, including interference that may
cause undesired operation.
See user manual instructions if interference to radio reception is suspected.
On behalf of the manufacturer / importer
this declaration is submitted by
Aachen, April 14* 1999
$2 2%-f
Peter Wieninger
VP Engineering
ELSA AG, Germany