1
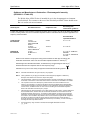
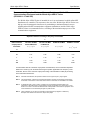
AED10 Menu Welch Allyn AED10 Trainer User's Manual Software Revision 01.01.xx Declaration of Conformity 2 Introducing the Welch Allyn AED10 Trainer 3 Overview ................................................................................................... 3 Special Features ....................................................................................... 3 Getting to Know the Welch Allyn AED10 Trainer 4 User Interface............................................................................................ 4 Operating the Trainer 5 Trainer Mode............................................................................................. 6 Menu Mode ............................................................................................... 6 Volume................................................................................................ 6 Contrast .............................................................................................. 7 Scenario ............................................................................................. 7 CPR Timer .......................................................................................... 8 Language............................................................................................ 9 More.................................................................................................... 9 Restore Defaults............................................................................... 10 Maintenance ..................................................................................... 10 Scenarios ................................................................................................ 10 Changing the Batteries 11 Remote Control (option) 12 Appendix: Specifications © Welch Allyn, 2004 Welch Allyn AED10 Trainer Operating Instructions Declaration of Conformity Manufacturer: Medical Research Laboratories, Inc., A Welch Allyn Company 1000 Asbury Drive Buffalo Grove, IL 60089 USA Phone: (847) 520-0300 Fax: (847) 520-0303 European Office Welch Allyn Ireland Navan Business Park Dublin Road, Navan, Co. Meath Republic of Ireland Phone: 011-353-466-7775 FAX: 011-353-462-7128 declares that the CE-marked product Product Name: AED 10 Trainer Accessories: As listed in User’s Manual Device Type: Accessory to Medical Device complies with: Council Directive 93/42/EEC (Medical Device Directive) of 14 June 1993 Annex II class I (rule 1) Safety: IEC 60601-1 / EN 60601-1 IEC 60601-1-2 / EN 60601-1-2 Internally Powered Date Joel Orlinsky Director of Q. A. and Regulatory Affairs 2 © Welch Allyn, 2004 991026 - Rev. B Operating Instructions Welch Allyn AED10 Trainer Introducing the Welch Allyn AED10 Trainer Overview The Welch Allyn AED10 Trainer is a training tool for preparing emergency responders to use the Welch Allyn AED10 to treat a victim of sudden cardiac arrest. The Trainer provides realistic simulation of the Welch Allyn AED10 without actually charging or discharging electrical energy. Voice prompts, simulated energy delivery, pauses for CPR, training pads, and the functional system status indicator all accurately mimic the operation of the Welch Allyn AED10 and provide a realistic demonstration. Ten different scenarios are available. Multiple language selections are available. Hand held IR remote control allows instructors to customize training sessions. The Welch Allyn AED10 Trainer is intended for indoor use. The Welch Allyn AED10 Trainer is not intended to teach basic life-saving skills. Trainees should have completed an appropriate training class for knowledge in assessing the patient, CPR (cardiopulmonary resuscitation), and correct medical protocols. Note: Training Pads should be used only with a “plastic skin” type mannequin. Do not use on foam-based mannequins. Caution Trainer Pads are for demonstration purposes only and are not for clinical use. Special Features 991026 - Rev. B Voice prompts identical to those in the Welch Allyn AED10. Text prompts identical to those in the Welch Allyn AED10. Remote control for instructor use. © Welch Allyn, 2004 3 Welch Allyn AED10 Trainer Operating Instructions Getting to Know the Welch Allyn AED10 Trainer User Interface 3. Connect cable from defibrillator pads 7. Remote Control IR window and Command Status LED 4. System status indicator 1. ON/OFF button 5. Battery level icon 6. Menu Buttons 2. Shock button 1. Green ON/OFF button. Turns the unit on and off. 2. Red Shock button. Flashes to prompt a simulated shock, is pressed to deliver a simulated shock. 3. ECG Pad Connector. Connect cable from pads to the Trainer here. 4. LCD Status Indicator. Displays if the unit is ready for operation. A black diamond signifies the Trainer is ready for operation. A red circle with a line through it signifies a need to, replace the batteries, or service the unit. A flashing indicator or fading black diamond signifies low battery power; replace the batteries soon. 5. Battery Level Icon. Displays the current battery level. The Trainer will display text and voice prompts when the battery needs to be changed. 6. Menu buttons. Used to control volume, contrast, scenario, CPR timer, and language. 7. Remote Control Window. The Remote Control window allows light pulses from the Remote Control to be received. There is a Command Status LED located next to the Remote Control window which illuminates when a command is received. 4 © Welch Allyn, 2004 991026 - Rev. B Operating Instructions Welch Allyn AED10 Trainer Operating the Trainer Trainer Mode Trainer mode is the primary mode of operation and is accessed by pressing the green ON/OFF button. In this mode, the Menu buttons are inoperative and all menus are inactive. The ON/OFF button and the Shock button are the only user responsive buttons in this mode. While in Trainer mode the unit displays elapsed time, battery level, number of shocks delivered to the patient, text prompts, and various status messages on the LCD display. Elapsed Time Battery Level Patient Shock Counter AED Text Status Elapsed Time: While in Trainer mode the elapsed time is displayed in the upper left hand corner of the screen in the following format: HH:MM:SS. The Elapsed Time stops incrementing if the Trainer is paused during a scenario and continues after the scenario is resumed. Battery Level: While in Trainer mode the Trainer graphically displays the battery level in the upper middle portion of the screen. The battery level indicator displays 10 distinct battery levels and is updated every second. The word “LOW” appears under the battery level symbol if the average battery voltage falls below operating levels. Patient Shock Counter: While in Trainer mode the unit displays the number of shocks delivered in the upper right hand corner of the screen AED Text: While in Trainer mode this region of the display shows text prompts to the user. Status: The lower right hand corner of the screen displays the simulated amount of delivered energy. 991026 - Rev. B © Welch Allyn, 2004 5 Welch Allyn AED10 Trainer Operating Instructions Menu Mode Menu mode allows the user to access and set various system parameters. Menu mode is enabled by holding down the lower menu button while turning on the Trainer. Once the Trainer has been powered up into Menu mode, the following menu appears on the screen: Menu Title Soft Key Label 1 Main Menu Next Volume Contrast Scenario CPR Timer Menu Buttons Enter Menu Selections Language More Soft Key Label 2 Display Border Volume Pressing the Enter button while the Volume menu item is highlighted causes the Volume menu to be displayed, allowing the user to select a level between 1 and 3. As sound volume values are selected using the Next button, a beep is heard at the selected volume. The Save menu item saves the currently selected value and then returns to the Main Menu. The Cancel menu item restores the volume value that was present prior to entering the Volume menu and returns to the Main Menu. Main Menu Volume Volume Contrast Scenario Next 1-3 Enter Save Cancel Enter Enter Go to Main Menu Go to Main Menu CPR Timer Language More 6 © Welch Allyn, 2004 991026 - Rev. B Operating Instructions Welch Allyn AED10 Trainer Contrast Pressing the Enter button while the Contrast menu item is highlighted displays the Contrast menu, allowing the user to select a contrast value between 0 and 5. As contrast values are selected using the Next button, the display contrast changes immediately to the selected value. The Save menu item saves the currently selected value and returns to the Main Menu. The Cancel menu item restores the contrast value present prior to entering the Contrast menu and returns to the Main Menu. Main Menu Contrast Volume 0-4 Contrast Enter Save Enter Scenario Next Cancel Go to Main Menu Enter Go to Main Menu CPR Timer Language More Scenario Pressing the Enter button while the Scenario menu item is highlighted displays the Scenario menu, allowing the user to select different scenarios (see “Scenarios” section for more details). Pressing the Next button causes a sequential display of possible Scenario numbers, and pressing the Enter button causes the current scenario number to be selected and the Save menu item to be highlighted. Pressing the Enter button while the Save menu item is highlighted stores the currently selected Scenario number and returns to the Main Menu. The Cancel menu item restores the scenario value present prior to entering the Scenario menu and returns to the Main Menu. Main Menu Scenario Volume See Note1 Contrast Save Enter Scenario Cancel Enter Enter Next Main Menu Main Menu CPR TImer Language More 991026 - Rev. B Note 1: The list of scenarios is scrolled through with the Next button © Welch Allyn, 2004 7 Welch Allyn AED10 Trainer Operating Instructions The scenarios are numbered sequentially in the same order as for the remote control. Scenario Description 1 AHA Scenario 1 2 AHA Scenario 2 3 AHA Scenario 3 4 AHA Scenario 4 5 AHA Scenario 5 6 AHA Scenario 6 7 AHA Scenario 7 8 AHA Scenario 8 9 Ventricular Fibrillation with one shock conversion 10 Ventricular Fibrillation with one shock conversion followed by refibrillation 11 Shockable Rhythm 12 Non-shockable Rhythm CPR Timer Pressing the Enter button while the CPR menu item is highlighted displays the CPR menu, allowing the user to select a CPR time of 15, 30, 45, 60, 75, or 90 seconds. The Save menu item saves the currently selected value and returns to the Main Menu. The Cancel menu item restores the CPR time present prior to entering the CPR menu and returns to the Main Menu. Main Menu CPR Timer Volume 15/30/45/60/75/90 Contrast Save Scenario CPR Timer Language Cancel Enter Enter Enter Go to Save Menu Item Go to Main Menu Go to Main Menu Enter More 8 © Welch Allyn, 2004 991026 - Rev. B Operating Instructions Welch Allyn AED10 Trainer Language Pressing the Enter button while the Language menu item is highlighted causes the Language menu to be displayed. The current Language is displayed, and pressing the Next button scrolls through the list of available languages. Each language selection is displayed in its own language as the list is traversed, and pressing the Enter button while the Save menu item is highlighted stores the currently selected language as the new language parameter. All text is subsequently displayed in the new language. Pressing the Enter button while the Cancel menu item is highlighted displays the Main Menu. Next Main Menu Language Volume See Note 1 Contrast Save Scenario Cancel Enter Go to Save Menu Item Enter Go to Main Menu or Reboot Enter Go to Main Menu CPR Timer Language More Enter Note: The Next button will scroll through the language list. Each language is displayed in its own language. More Pressing the Enter button while the More menu item is highlighted causes the More Menu to be displayed. Main Menu More Menu Volume Restore Defaults Contrast Maintenance Scenario Back Enter Return to Main Menu CPR Timer Language Enter More 991026 - Rev. B © Welch Allyn, 2004 9 Welch Allyn AED10 Trainer Operating Instructions Restore Defaults Pressing the Enter button while the Restore Default menu item is highlighted displays the restore defaults menu. Pressing the Next button scrolls down, highlighting the next menu item. If the Enter button is pressed while the Yes menu item is highlighted, all of the configuration parameters are forced to their default value except for the language. If the Enter button is pressed while the Cancel menu item is highlighted the More Menu is displayed. More Menu Restore Defaults Maintenance Restore Defaults Enter Yes Cancel Enter Enter Reboot Go to More Menu Back Maintenance Pressing the Enter button while the Maintenance menu item is highlighted displays the Maintenance Menu. This menu is for factory use only. More Menu Maintenance Restore Defaults System Test Maintenance Back Enter Service Debug External Diag Back Enter Go to More Menu Scenarios The Welch Allyn AED10 Trainer provides training scenarios that follow the American Heart Association (AHA) recommended AED training scenarios. These scenarios are pre-configured and give an AED Instructor a standard means of training and testing proficiency in AED use. Scenarios 1 to 10 may be selected with the Menu Mode Scenario menu or with the Remote Control. Scenarios 1 to 8 conform to the AHA recommended training scenarios. Scenario 9 is the same as AHA scenario 2 except with a one shock conversion. Scenario 10 is the same as AHA scenario 7 except with a one shock conversion followed by refibrillation. See the following table of Training Scenarios. The Scenario menu may also be used to select a continuous Shockable rhythm (11) or a continuous Non-shockable rhythm (12). 10 © Welch Allyn, 2004 991026 - Rev. B Operating Instructions Welch Allyn AED10 Trainer Scenario Description Event 1 Event 2 Event 3 Event 4 Event 5 Event 6 1 Ventricular Fibrillation with four shock conversion Shockable Rhythm 3 Shocks CPR Shockable Rhythm 1 Shock Non-shockable Rhythm 2 Ventricular Fibrillation with two shock conversion Shockable Rhythm 2 Shocks Non-shockable Rhythm CPR Non-shockable Rhythm CPR 3 Ventricular Fibrillation with two shock conversion Shockable Rhythm 2 Shocks Non-shockable Rhythm CPR Non-shockable Rhythm CPR Non-shockable Rhythm Non-shockable Rhythm CPR Non-shockable Rhythm CPR Non-shockable Rhythm CPR Ventricular Fibrillation with four shock conversion Shockable Rhythm 3 Shocks CPR Shockable Rhythm 1 Shock Non-shockable Rhythm Non-shockable Rhythm Non-shockable Rhythm CPR Non-shockable Rhythm CPR Non-shockable Rhythm CPR Shockable Rhythm 2 Shocks Non-shockable Rhythm Shockable Rhythm 1 Shock Non-shockable Rhythm Defibrillator Pads followed by two shock conversion Pad Fault Shockable Rhythm 2 Shocks Non-shockable Rhythm CPR Non-shockable Rhythm 9 Ventricular Fibrillation with one shock conversion Shockable Rhythm 1 Shock Non-shockable Rhythm CPR Non-shockable Rhythm CPR 10 Ventricular Fibrillation with one shock conversion followed by refibrillation Shockable Rhythm 1 Shock Non-shockable Rhythm Shockable Rhythm 1 Shock Non-shockable Rhythm 11 Continuous Ventricular Fibrillation Shockable Rhythm 3 Shocks CPR Shockable Rhythm 3 Shocks CPR CPR Non-shockable Rhythm CPR Non-shockable Rhythm CPR 4 5 6 7 Ventricular Fibrillation with two shock conversion followed by refibrillation Troubleshooting Skills 8 12 Continuous Non-shockable Non-shockable Rhythm Rhythm Changing the Batteries 1. Remove the four screws on the back panel. 2. Remove the panel. 3. Replace all batteries at the same time with 6 C-cell alkaline batteries. The status indicator will be flashing after battery replacement until the unit is powered on. 4. Replace the back panel and insert the four screws. 991026 - Rev. B © Welch Allyn, 2004 11 Welch Allyn AED10 Trainer Operating Instructions Remote Control (option) The hand held remote control for the AED10 Trainer provides the Instructor with significant control over the configuration of the Trainer. The remote control communicates with the Trainer via an IR window located next to the pad's connector. A status indicator LED is located next to the IR window, and it will flash to indicate that a command has been received. The status indicator LED will flash continuously when a scenario has been paused. Refer to the diagram and descriptions listed below. AHA 1 AHA 2 AHA 3 AHA 4 1 2 3 4 AHA 5 AHA 6 AHA 7 AHA 8 5 6 7 8 9 10 Shockable Shock 1 3 5 12 No-Shock Non-shockable Lead Fault Motion Low Battery Status Pause Allows the Instructor to select AHA Scenario number one as the default scenario (see table 2 for scenario descriptions). Trainer will automatically turn off after the selection has been made. Allows the Instructor to select AHA Scenario number three as the default scenario. The Trainer will automatically turn off after the selection has been made. Allows the Instructor to select AHA Scenario number five as the default scenario. The Trainer will automatically turn off after the selection has been made. © Welch Allyn, 2004 2 4 6 Allows the Instructor to select AHA Scenario number two as the default scenario. The Trainer will automatically turn off after the selection has been made. Allows the Instructor to select AHA Scenario number four as the default scenario. The Trainer will automatically turn off after the selection has been made. Allows the Instructor to select AHA Scenario number six as the default scenario. The Trainer will automatically turn off after the selection has been made. 991026 - Rev. B Operating Instructions 7 9 Welch Allyn AED10 Trainer Allows the Instructor to select AHA Scenario number seven as the default scenario. The Trainer will automatically turn off after the selection has been made. Allows the Instructor to select Ventricular Fibrillation with one shock conversion. The Trainer will automatically turn off after the selection has been made. 8 10 Allows the Instructor to select AHA Scenario number eight as the default scenario. The Trainer will automatically turn off after the selection has been made. Allows the Instructor to select Ventricular Fibrillation with one shock conversion followed by refibrillation. The Trainer will automatically turn off after the selection has been made. Allows Instructor to interrupt any scenario with a continuous shockable rhythm. The current default scenario is not changed. Allows the Instructor to interrupt any scenario with a continuous non-shockable rhythm. The current default scenario is not changed. Allows the Instructor to interrupt any scenario with a lead fault condition. To resume the scenario, press the button again. Allows the Instructor to interrupt any scenario with a “Motion” condition on the next rhythm analysis. Allows the Instructor to interrupt any scenario with a Low Battery condition. To resume the scenario, press the button again. Allows the Instructor to simulate a Warning (flashing icon) system status. To resume the scenario, press the button again. Allows the Instructor to pause during any scenario. To resume the scenario, press the button again. Note: While the Trainer is paused, all other buttons are inactive until the pause button has been pressed again. 991026 - Rev. B © Welch Allyn, 2004 13 Welch Allyn AED10 Trainer 14 Operating Instructions © Welch Allyn, 2004 991026 - Rev. B Appendix: Specifications Physical Specifications Batteries: 6 C-cell alkaline batteries Battery life: approximately 40 hours Number of training scenarios: Ten Storage temperature (without batteries): -22° to 158°F (-30° to 70°C) Operating temperature: 32° to 122°F (0° to 50°C) Weight without batteries: 1.5 lbs Weight with batteries: 2.5 lbs Dimensions: 8 1/4" x 6 7/8" x 2 3/4" (210 x 175 x 70 mm) Electromagnetic Compatibility Category Radiated Emissions Standard EN55011 Level CISPR11 B ESD EN61000-4-2 8KV air 6KV contact Radiated Susceptibility EN61000-4-3 10 V/m (20 V/m EN 60601-2-4) Guidance and Manufacturer’s Declaration-Electromagnetic Emissions (IEC 60601-1-2 Table 201) The Welch Allyn AED10 Trainer is intended for use in the electromagnetic environment specified below. The customer or the user of the Welch Allyn AED10 Trainer should assure that it is used in such an environment. Emissions test Compliance RF emissions CISPR 11 Group 1 RF emissions CSPR 11 Class B Harmonic Emission IEC 6100-3-2 Not applicable Voltage fluctuations/ flicker emissions IEC 61000-3-3 Not applicable Electromagnetic environment - guidance The Welch Allyn AED10 Trainer uses RF energy only for its internal function. Therefore, its RF emissions are very low and are not likely to cause any interference in nearby electronic equipment. Medical Electrical Equipment needs special precautions regarding EMC and needs to be installed and put into service according to EMC information provided in this document. 990020 – Rev. F © Welch Allyn, 2004 A-1 Welch Allyn AED10 Trainer Specifications Guidance and Manufacturer’s Declaration – Electromagnetic Immunity (IEC 60601-1-2 Table 202) The Welch Allyn AED10 Trainer is intended for use in the electromagnetic environment specified below. The customer or the user of the Welch Allyn AED10 Trainer should assure that it is used in such an environment. Immunity Test IEC 60601 test level Compliance level Electrostatic discharge (ESD) IEC 61000-4-2 ± 6 kV contact ± 8 kV air ± 6 kV contact ± 8 kV air Electrical fast transient / burst IEC 61000-4-4 ± 2 kV for power supply lines ± 1 kV for input/ output lines Not applicable ± 1 kV differential mode +/- 2 kV common mode Not applicable <5% UT (>95% dip in UT) for 0.5 cycle 40% UT (60% dip in UT) for 5 cycles 70% UT (30% dip in UT) for 25 cycles <5% UT (>95%dip in UT) for 5 sec Not applicable 3 A/m Not applicable Surge IEC 61000-4-5 Voltage dips, short interruptions and voltage variations on power supply input lines. IEC 61000-4-11 Power frequency (50/60 Hz) magnetic field IEC 61000-4-8 Electromagnetic environment - guidance Floors should be wood, concrete or ceramic tile. If floors are covered with synthetic material, the relative humidity should be at least 30%. Not applicable Not applicable Not applicable Not applicable Not applicable Power frequency magnetic fields should be at levels characteristic of a typical location in a typical commercial or hospital environment Note: UT is the a.c. mains voltage prior to application of the test level. A-2 © Welch Allyn, 2004 990020 – Rev. F Specifications Welch Allyn AED10 Trainer Guidance and Manufacturer’s Declaration – Electromagnetic Immunity (IEC 60601-1-2 Table 203) The Welch Allyn AED10 Trainer is intended for use in the electromagnetic environment specified below. The customer or the user of the Welch Allyn AED10 Trainer should assure that it is used in such an environment. Immunity test IEC 60601 test level Compliance level Electromagnetic environment - guidance Portable and mobile RF communications equipment should be used no closer to any part of the Welch Allyn AED10 Trainer, including cables, than the recommended separation distance calculated from the equation applicable to the frequency of the transmitter. Conducted RF IEC 61000-4-6 3 Vrms 150 kHz to 80 MHz outside ISM a bands 10 Vrms 150 kHz to 80 a MHz in ISM bands 10 V/m 80 MHz to 2.5 GHz Radiated RF IEC 61000-4-3 3 Vrms Recommended separation distance d = 1.17*√P 10 Vrms d = 1.20*√P 10 V/m d = 1.20*√P 80 MHz to 800 MHz d = 2.30*√P 800 MHz to 2.5 GHz Where P is the maximum output power rating of the transmitter in watts (W) according to the transmitter manufacturer and d is the recommended separation distance in meters (m).b Field strengths from fixed RF transmitters, as determined by an electromagnetic site survey,c should be less than the compliance level in each frequency range.d Interference may occur in the vicinity of equipment marked with the following symbol: Note 1: At 80 MHz and 800 MHz, the higher frequency range applies. Note 2: These guidelines may not apply in all situations. Electromagnetic propagation is affected by absorption and reflection from structures, objects and people. a. The ISM (industrial, scientific and medical) bands between 150 KHz and 80 MHz are 6.765 MHz to 6.795 MHz; 13.553 MHz to 13.567 MHz; 26.957 MHz to 27.283 MHz; and 40.66 MHz to 40.70 MHz. b. The compliance levels in the ISM frequency bands between 150 kHz and 80 MHz and in the frequency range 80 MHz to 2.5 GHz are intended to decrease the likelihood that mobile/portable communications equipment could cause interference if it is inadvertently brought into patient areas. For this reason, an additional factor of 10/3 is used in calculating the recommended separation distance for transmitters in these frequency ranges. c. Field strengths from fixed transmitters, such as base stations for radio (cellular / cordless) telephones and land mobile radios, amateur radio, AM and FM radio broadcast and TV broadcast cannot be predicted theoretically with accuracy. To assess the electromagnetic environment due to fixed RF transmitters, an electromagnetic site survey should be considered. If the measured field strength in the location in which the Welch Allyn AED10 Trainer is used exceeds the applicable RF compliance level above, the Welch Allyn AED10 Trainer should be observed to verify normal operation. If abnormal performance is observed, additional measures may be necessary, such as reorienting or relocating the Welch Allyn AED10 Trainer. d. Over the frequency range 150 kHz to 80 MHz, field strengths should be less than [V 1 ] V/m. 990020 – Rev. F © Welch Allyn, 2004 A-3 Welch Allyn AED10 Trainer Specifications Recommended Separation Distances Between Portable and Mobile RF Communications Equipment and the Welch Allyn AED10 Trainer (IEC 60601-1-2 Table 205) The Welch Allyn AED10 Trainer is intended for use in an environment in which radiated RF disturbances are controlled. The customer or the user of the Welch Allyn AED10 Trainer can help prevent electromagnetic interference by maintaining a minimum distance between portable and mobile RF communications equipment (transmitters) and the Welch Allyn AED10 Trainer as recommended below, according to the maximum output power of the communications equipment. Separation distance according to frequency of transmitter m 150 kHz to 80 MHz outside ISM bands 150 kHz to 80 MHz in ISM bands 80 MHz to 800 MHz 800MHz to 2.5 GHz d = [3.5/3]∗√P d = [12/10]∗√P d = [12/10]∗√P d = [23/10]∗√P 0.01 0.17 0.12 0.12 0.23 0.1 0.37 0.38 0.38 0.73 1 1.17 1.20 1.20 2.3 10 3.69 3.79 3.79 7.27 100 11.70 12.00 12.00 23.00 Rated maximum output power of transmitter W For transmitters rated at a maximum output power not listed above, the recommended separation distance d in meters (m) can be determined using the equation applicable to the frequency of the transmitter, where P is the maximum output power rating of the transmitter in watts (W) according to the transmitter manufacturer. A-4 Note 1: At 80 MHz and 800 MHz, the separation distance for the higher frequency range applies. Note 2: The ISM (industrial, scientific and medical) bands between 150 kHz and 80 MHz are 6.765 MHz to 6.795 MHz; 13.553 MHz to 13.567 MHz; 26.957 MHz to 27.283 MHz; and 40.66 MHz to 40.70 MHz. Note 3: An additional factor of 10/3 is used in calculating the recommended separation distance for transmitters in the ISM frequency bands between 150 kHz and 80 MHz and in the frequency range 80 MHz to 2.5 GHz to decrease the likelihood that mobile/portable communications equipment could cause interference if it is inadvertently brought into patient areas. Note 4: These guidelines may not apply in all situations. Electromagnetic propagation is affected by absorption and reflection from structures, objects and people. © Welch Allyn, 2004 990020 – Rev. F