1
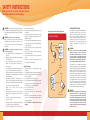
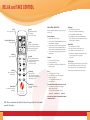
Use and Care Manual
Length
Width
Height
Weight
Upholstery
Warranty
78 inches
25 inches
21 inches
160 pounds
Faux leather
2 Years, Limited
Accommodates up to 350lbs
Therasage Rx 8000 Massage Bed
Congratulations on your purchase of the
Therasage Rx 8000 Massage Bed!
The Therasage Rx 8000 Massage Bed is designed to target
your back’s pressure points along the spine with a precise,
relaxing massage. For years, therapists and physicians have
recommended the combination of heat and massage to ease
chronic back pain, speed recovery from injuries, improve
rest, concentration, and promote a general sense of wellbeing.
Our massage bed employs patented Far-Infrared heat strips
that line the inside of the bed. The Far-Infrared heat emitted
from these strips will penetrate up to 3 inches into your
muscles creating uniform warmth that can be felt for up to
one hour after use.
The bed uses customized jade rollers to deliver a thorough
head-to-toe massage. The jade absorbs the Far-Infrared heat
delivering a penetrating contact-heat to the parts of your
body being massaged. Our massage bed also comes with
a heated hand-held projector that can be used to target
specific areas of pain or discomfort.
1
For more information and questions about Therasage Corporation inquire by
e-mail; please include your mailing address and phone number.
Choose one of three preset 30 minute massage programs of
Therasage Corporation
209 E Palmetto Park Road
Boca Raton, FL 33432
Tel: 888-416-4441
E-mail: [email protected]
rollers to traverse over the 67 inch track to provide you
Relaxation, Rejuvenation or Shiatsu and allow the 9 jade
with a full body treatment. If you feel the massage is too
vigorous, place the softening pad on top of the bed and
enjoy a less intense massage session.
2
SAFETY INSTRUCTIONS
Read all instructions before using this product.
Save these instructions after reading.
WARNING: Do not put hands or fingers near the massage
mechanism or rollers while this product is running. Touching
the mechanism can result in injury from the rollers squeezing
together.
•
•
DANGER: To reduce the risk of electrical shock
Always unplug this product from the electrical outlet
immediately after using and before cleaning. Do not
reach for this product if it has fallen into water. Unplug
immediately.
WARNING: To reduce the risk of burns, fire, electric
shock or injury to persons
• This product should never be left unattended when
plugged in.
• Unplug from outlet when not in use, and before putting
on or taking off parts.
• Do not operate under blanket or pillow. Excessive
heating can occur and cause fire, electric shock, or
injury to persons.
• Close supervision is necessary when this product is used
by, on, or near children, invalids, or disabled persons.
• Use this product only for its intended use as described in
this manual. Do not use attachments not recommended
by the manufacturer.
• Never operate this product if it has damaged cord or
plug, if it is not working properly, if it has been dropped
or damaged, or dropped into water. Return this product
to service center for examination and repair.
• Always keep the power cord away from
heated surfaces.
• Never operate this product with the air openings
blocked. Keep the air openings free of lint, hair, and
the like.
• Never drop or insert any object into any opening.
• Do not use outdoors.
• Do not operate where aerosol (spray) products are being
used or where oxygen is being administered.
• To disconnect, turn all controls to the OFF position,
3
•
•
•
•
•
then remove plug from outlet.
Do not massage abdomen when pain is present or if you
are pregnant.
Do not massage any area of the body that is swollen,
inflamed, or covered with skin eruptions. Do not use on
unexplained calf pain.
Do not use this product when standing on a damp floor,
or when any part of the body is in contact with pluming
or any similar ground.
Always connect this product to a properly grounded
electrical outlet.
This product is designed to operate on standard 120
Volt 60 Hz house current.
Do not use this product if noise above normal sound
is heard.
This product is designed for personal in-home use.
Commercial use will void warranty.
GROUNDING INSTRUCTIONS
For all grounded cord-connected products:
Grounding Methods
Grounded Outlet
WARNING:
•
•
•
•
•
•
•
•
Comfortable clothing is recommended while using
this product.
This product was meant to be used in a relaxed position.
Never force any body part into the backrest area while
the rollers are moving.
Do not allow children to use this product.
If you feel any abnormal discomfort during the operation
of this product, turn off the power immediately and do
not use this product. Consult your physician.
Do not sit on the controller.
Do not pull on the AC cord.
Always confirm that there are no obstacles behind
this product.
When using this product after it has been in storage,
check to see that the product is operating properly prior
to sitting in the product.
DO NOT ATTEMPT TO REPAIR THIS PRODUCT
YOURSELF.
Improper connection of the equipment-grounding
conductor can result in a risk of electric shock.
Check with a qualified electrician or serviceman
if you are in doubt as to whether this product is
properly grounded. Do not modify the plug provided
with the product - if it will not fit the outlet, have a
proper outlet installed by a qualified electrician.
(A)
Grounded Pin
Safety Precautions
•
This product must be grounded. If it should malfunction
or breakdown, grounding provides a path of least
resistance for electrical current to reduce the risk of
electric shock. This product is equipped with a cord
having an equipment-grounding conductor and a
grounding plug. The plug must be plugged into an
appropriate outlet that is properly installed and
grounded in accordance with all local codes and
ordinances.
Grounded
Outlet Box
Adapter
Metal Screw
(B)
(C)
This product is for use on a normal 120-volt circuit and
has a grounding plug that looks like the plug illustrated
in sketch (A). A temporary adapter that looks like the
adapter used in sketches (B) and (C) may be used to
connect this plug to a 2-pole receptacle as shown in
sketch (B), if a properly grounded plug is not available.
The temporary adapter should be used only until a
properly grounded outlet (sketch A) can be installed
by a qualified electrician. The green colored, rigid ear
tab or the like extending from the adapter must be
connected to a permanent ground such as a properly
grounded outlet box cover. Whenever the adapter is
used, it must be held in place by a metal screw.
WARNING:
Tab for
Grounding Screw
This product is equipped with a thermal resetting
protection device. This is an added safety feature
to protect you and this product from overheating. If
the product should suddenly stop and will not start,
turn the main power switch, located on the back
of the product, off and do not operate the product
for at least 30 minutes. Failure to turn the product
off may result in the product starting unexpectedly
when the device cools.
4
LET’S GET STARTED
Your new Therasage Rx 8000 Massage Bed requires some simple assembly
before use. Follow these 10 easy steps to assemble your new bed.
Before we begin, unpack your box and make sure
you have all of the following items.
1
With the bed sideways, use 2 long screws (L) and
nuts (N) to secure the side frame (B) to the bed (I).
(I)
List of Parts
(F)
(J)
(G)
(E)
(A) Arched frames (4)
(B) Side rails (2)
(D)
(C) Connecting bars (2)
(H)
(D) Handheld control holder (1)
(E) Sand weight (1)
(I)
(B)
(F) Handheld Control
(G) Front heat unit
(C)
(B)
(H) Runner (1)
(I) Bed (1)
(J) Comfort pad
(A)
(L)
(M)
(N)
5
(K) Furniture caps (16)
(K)
(L) Long screws (12)
(M)Short screws (4)
2
Connect the arched frames (A) together.
(A)
(N) Nuts (16)
Power cord (Not Shown)
6
3
Use the long screws (L) and nuts (N) to secure the
frame (A) and side frame (B) to the bed (I).
5
Use the short screws (M) to secure the frame (A)
with the connecting bar (C).
(I)
(B)
4
(I)
(C)
(A)
Turn the bed to the other side and repeat steps 2
thru 4.
6
Attach the handheld control holder (D) to the frame
(A) and secure with bolt (N).
(N)
(D)
(I)
(A)
7
(A)
8
7
Plug the handheld control (F), front heat projector
(G) and the power cord to the control box.
9
(F)
(E)
(G)
8
Place the runner (H) by using the Velcro strips at
each end.
The sand weight (E) is to be used over your legs
to add pressure against the rollers. The comfort
pad (J) is used to give additional padding for your
lower back or tailbone.
10
(J)
Cover all screw holes with furniture caps (K).
(H)
(K)
9
YOU ARE NOW READY TO RELAX.
10
RELAX and TAKE CONTROL
On/Off
Smooth
Press to turn unit on or off
Full uninterrupted total body
smooth massage.
Press to Pause or Resume.
FRONT
HEAT
Front Heat (Hand Projector)
Press to adjust Heat
UP
DOWN
BACK
HEAT
MODE
SMOOTH
SHIATSU
Shiatsu
Performs 16 graduated incremental
acupressure movements, unblocking 67
Meridian Points along your back.
Press to Pause or Resume.
REVITALIZE
Back Heat
Press to adjust Heat
��������
����������
������
�������
�
���������
Vibration
Press to add vibration or
turn vibration off
Revitalize
Make sure that the Main Power Switch located on the head of
the bed is “On”
1.
2.
3.
4.
Massage Programs
1. Press the hand control “On” button
2. Select one of the individual 30-minute Massages: Smooth,
Shiatsu, Revitalize, or QS/Massage.
3. To switch from one selection to another, simply press the
new desired button. The bed will automatically switch to
the new choice wihtout interrupting the massage timer.
4. To pause or resume any program, just press the selected
Massage button.
Total body graduated incremental
massage movements stimulating and
awakening your full body.
Press to Pause or Resume.
Vibration
QS/Massage
Heat
����������
���������
������������
��
����
Press for Quick Start
(demo of all the above programs).
Press after choosing a program to choose
a body massage location.
Manual Mode
Press and hold to direct rollers
towards head
QS/Massage
1. Press the hand control “On” button
2. Select any desired massage.
3. Press (Vibration) to add vibration or turn vibration off to
any massage option.
�
��
Manual Mode
HAND CONTROL INSTRUCTIONS:
Press and hold to direct rollers
towards feet
Press the hand control “On” button
Select one of the individual 30 minute Massages
The bed will default to “Full Body” massage
Press “QS/Massage” to direct your personalized Massage
Bed to concentrate on any desired general location on your
body: Total, Upper, or Lower Body.
Manual Mode
1.
2.
3.
4.
Press the hand control “On” button
Press “Up” to move the rollers from feet to head
Press “Down” to move rollers from head to foot
Use this button to manually move the Massage Bed rollers
to a desired specific location on your body, or
for spot relief.
End of Session
Upon completing your personal massage session, press the hand
control “On/Off” button to turn the bed off. The rollers will
return to the foot of the bed. To shut down the main power,
turn off the power rocker switch near the head of the bed.
1. Press the hand control “On” button
2. Press “Front Heat” to achieve desired temperature
(default is “Low” setting)
• This will regulate the temperature of the
hand held projector
NOTE: NEVER APPLY FRONT HEAT SOURCE DIRECTLY TO SKIN
3. Press “Back Heat” to achieve desired temperature
(default is “Medium” setting)
• This will regulate the temperature of the bed
Low (115°F)
Medium (135°F)
High(145°F)
NOTE: HEAT ONLY FUNCTION CAN BE INITIATED BY PRESSING
ANY HEAT BUTTON ONCE.
NOTE: There is an automatic auto shut-off developed for your safety if the bed remains
paused for 15-minutes.
11
12
MAINTENANCE AND
TROUBLESHOOTING
WARRANTY
INFORMATION
Other than regular cleaning, the Therasage Rx 8000 Massage Bed requires no maintenance.
Apply general cautions for electrical home appliances:
• Keep the product clean and free of dust
• Unplug the unit and allow it to cool before cleaning.
• Clean only with a soft, slightly damp sponge.
• Never allow water or any other liquids to come into contact with the unit.
• Never use abrasive cleaners, brushes, gasoline, kerosene, or paint thinner to clean.
TROUBLESHOOTING
PROBLEMS
The bed turns on but the remote control does not
respond.
My front heat projector does not work at all.
The bed begins to work and
suddenly stops.
SOLUTIONS
1. Turn the bed power switch off
2. Unplug the power cord from the wall.
3. Disconnect the remote control and the front heat
projector cords from the bed.
4. Reconnect the remote control and front heat
projector cords into the bed, making sure they go all
the way in.
5. Plug the power cord to the wall.
6. Turn the power switch on and test the bed to see if
the problem has been resolved.
One or more of the front heat projector lights are off
You need to replace the light bulbs:
1. Unscrew the 6 bolts on the back of the front heat
projector
2. Replace the blown out light bulbs with 5W-12V
bulbs.
We recommend the Sylvania 5007 (R5W), which is easy
to find at any local auto parts store.
There is no power at all when I turn the switch on
Unplug the cord from the wall and plug it back in. If
there is still no power you need to replace the fuse:
1. Unplug the Power Cord from the wall and the bed.
2. Using the tip of a screwdriver, remove the fuse box
located below the bed’s female power plug.
3. Replace the blown fuse with a 250V fuse; your bed
comes with a spare fuse clipped on the fuse box or
you can easily buy on in your local hardware store.
TWO YEAR LIMITED WARRANTY
The Therasage Rx 8000 Massage Bed comes with a limited parts and
labor warranty for a period of two years from the date of original
purchase, except as noted below.
• The warranty does not cover damage caused by misuse or abuse,
accident, or any unauthorized alteration of the product.
• The decision to repair a product is made exclusively by
TherasageCorporation afterr eceiptofthedefectiveproduct.Allwarranty
claims must be accompanied by a copy of the original sales
receipt.
• This warranty is the complete and exclusive agreement between
you and Therasage Corporation. It supersedes all other written or oral
communications related to this product.
DISCLAIMER: Therasage Corporation and it’s affiliates do not provide
medical advice, education, or treatment. Far-infrared heat may not
be right for you and the information herein should not be relied
upon in making decisions about your health. Always consult your
physician for medical advice.
If the problem(s) persist after following all of the action steps, please contact your store for further
testing and repairing.
13
14