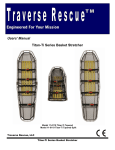
1
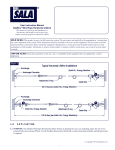
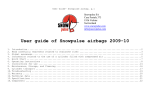
Disclaimer This manual contains general instructions for the use, operation and care of this product. The instructions are not all-inclusive. Safe and proper use of this product is solely at the discrestion of the user. Safety information is included as a service to the user. All other measures taken by the user should be within and under consideration of applicable regulations. It is recommended that training on the proper use of this product be provided before using this product in an actual situation. Retain this manual for future reference. Include it with the product in the event of transfer to new users. Additional free copies are available upon request from Customer Care. Proprietary Notice The information disclosed in this manual is the property of Traverse Rescue, LLC Mississauga, Ontario, Canada. Traverse Rescue, LLC. reserves all patent rights, proprietary design rights, manufacturing rights, reproduction use rights, and sales use rights thereto, and to any article disclosed therein except to the extent those rights are expressly granted to others or where not applicable to vendor proprietary parts. 1.Safety Information 1.1 Warnings The following are warnings in this manual: Untrained operators can cause injury or be injured. Permit only trained personnel to operate this stretcher. Improper use of the stretcher can cause injury. use the stretcher only for the purpose described in this manual An unrestrained or improperly restrained patient can suffer injuries. Always secure the patient in the stretcher with a restraint system suitable to the situation Improper operation can cause injury. Operate the stretcher only as described in this manual © Copyright Traverse Rescue, LLC . All Rights Reserved Traverse Rescue, LLC. 755 The Queensway East, Unit 8 Mississauga, Ontario Canada L4Y 4C5 An un-attended patient can be injured. Stay with the patient at all times Toll Free (US and Canada):..................... 1-866-998-7866 Improper maintenance can cause injury and damage. Maintain stretcher only as described in this manual Telephone (Worldwide): ...............................905-279-7866 Fax (NA and Worldwide):.............................905-615-1367 Web Site:www.traverserescue.com Traverse Rescue, LLC manufactures its products under a strict Quality Assurance Program. We also recognize and comply to any applicable standards that apply to each product. The CE symbol on Traverse Rescue products signifies they have been self certified in accordance with the Medical Devices Directive 93/42/EEC concerning Class 1 Medical Devices Helpers can cause injury or be injured. Maintain control of the stretcher and direct all helpers Improper parts and service can cause injury. Use only Traverse-approved parts and service on the stretcher Modifying the stretcher can cause injury and damage. use the stretcher only as-sold by Traverse. Attaching improper or inapprpriate items to the stretcher can cause injury. Use only TraverseApproved items on the stretcher 1.2 Important Boxes like the one below emphasize important information. 3.About The Stretcher 3.1 General Specifications Durathene® Netting...-65°F/-54°C to +200°F/+93°C Restraint Webbing Tensile Strength.......................975 lbs. / 442 kg Restraint Buckles Minimum Tensile Load.........4000 lbs. / 1814 kg Buckles meet ANSI Z359.1 and CSA Z259.1 1.3 Bloodborne Disease Notice OSHA (Occupational Safety and Health Administration) requires employers to protect workers from workplace exposure to bloodborne diseases such as HIV-1 and hepatitus. To reduce the risk of exposure when using the stretcher, follow disinfecting and cleaning instructions in this manual. 1.4 Safety Labels Lables place important information from the Users’ Manual on the stretchers. Read and follow label instructions. Replace worn or damages labels immediately. New labels are available from Traverse. The Load-Limit label shown is affixed to the stretcher. 2. Operator Skills and Training 2.1 Skills Operators using the stretcher need: A working knowlege of emergency patient-handling procedures. The ability to assist the patient A complete understanding of the procedures described in this manual 2.2 Training Trainees need to: Follow a training program designed or approved by their training officer read this manual. For additional free users’ manuals, contact Traverse Customer Care. Practice with the stretcher before using it in regular service be tested on their understanding of the stretcher record their training information Traverse reserves the right to change specifications with out notice. Length 82.5” 210 cm Width - Non Split 24.5” 62 cm Depth 7.25” 18 cm Weight 28.5 lbs. 13 kg. Rated Load Limit 900 lbs. 4 kN 4.Restraints 4.1 About the Restraints A total of four restraints are included with your purchase of this stretcher. These restraints are to suppliment what you will typically use to tie-in a patient in a high-angle situation. We have made them to a suitable strength in order to compliment your own system of tubular webbing, cord or the like. These restraints are only for securing the patient into the stretcher, and are not to be used for lifting or for any other purpose. 4.2 Fastening and Tightening The top edge of the Durathene® netting is shaped with coves to provide points where restraints can easily be fastened to the lower-rail of the stretcher (fig. 6). the Restraints The strap with the three-bar buckle is constructed with a looped end that attaches to the stretcher, and a free end that that is used to tighten the restraint (figure 1). 1 Pass the three-bar buckle and webbing upward through the opening in the two-bar buckle ( fig. 2). Make sure to pull the free end of the webbing completely through the opening 2 Pull slightly on the free end of the webbing to firmly seat the three-bar buckle on top of the two-bar buckle (fig. 3). Tighten the restraint by pulling on the free end of the webbing. 3 Select attachment points that are appropriate for effective securing of the patient, as well as for working together with your own fastening system. Attach the supplied restraints as folows: 1. Unfasten the buckle to seperate the restraint straps. 2. Starting outside the stretcher, pass the looped end of the strap inward between the stretcher rail and the netting at a chosen attachment point. 3. Thread the buckle through the restraint loop (Fig. 8) and pull until the loop is tight around the stretcher rail. 4. Attach the remaining strap to the opposite side of the stretcher following steps 2 and 3. 4.3 Loosening and unfasten ing the Restraints 5. Using the Stretcher 5.1 Before Placing the Stretcher in Service To loosen a restraint, pull the breakaway tab toward the buckle (fig. 4). Continue pulling until the restraint is as loose as desired. To unfasten the restraint, first loosen as in step number 1, then angle the three-bar buckle and pass it downward through the opening in the two-bar buckle (fig. 5). 4.4 Attaching the Restraints Webbing, Free End Three-Bar Buckle Webbing, Looped End Three-Bar Buckle Personnel who will work with this stretcher need to read this manual. If using the supplied restraints, attach them as instructed in Attaching the Restraints. Confirm that the stretcher, restraints and mesh netting are in good condition. Follow instructions in Inspecting the Stretcher in this manual. Two-Bar Buckle 5.2 General Guidelines for Use Webbing, Free-End Webbing, Looped End Two-Bar Buckle Break-Away Pull-Tab Figure 1, Components Three-Bar Buckle Two-Bar Buckle Webbing Free-End Using the stretcher requires a minimum of two trained operators. In most situations, operators will want or need additional help. For information Break-Away about placement and direction of Pull-Tab helpers, see Carrying the Stretcher in this manual. Follow standard emergency patientFigure 2, Fastening the Buckle handling procedures when using the stretcher. Stay with the patient at all times. Always use the patient restraints provided, Break-Away Pull-Tab Figure 3, Seating the Buckles Figure 4, Loosening Restraint Figure 5, Unfastening Buckle Figure 6, Restraint Cove Figure 7, Passing Looped End Through Cove Figure 8, Threading Buckle as well as a supplimentary restraining system as per your training and team protocols, and the situation. Personnel using the stretcher in high-angle environments are responsible for learning the the proper techniques involved, and for selecting the equipment and procedures best ssuited to the rescue situation. 5.3 Carrying the Stretcher Carrying the stretcher requires a minimum of two operators. Additional personnel will be helpful or even needed in most situations. Use an even number of personnel and position them to keep the stretcher as even as possible. Using Additional Help Operators should maintain control of the stretcher and direct any helpers. 5.4 Sliding the Stretcher Slide the stretcher on its runners over smooth surfaces. Avoid rock, stumps, branches or other hazards that could penetrate the netting, or cause discomfort or injury to the patient. 5.5 Transporting the Stretcher on a Cot Use the cot restraints to secure the stretcher to the cot. 5.6 Using High-Angle Rescue Procedures High angle and rope-access rescue can involve any combination of ropes, winches, pulleys, litter bridles, belay devices any many other specialized items and devices too numerous to mention. Proper and safe use of these tools requires professional instruction and training. When using high-angle or rope-access equipment with the stretcher, ensure the equipment has an adequate load-rating, and that it is at least as great as that of the stretcher. During a high-angle rescue, the stretcher may be oriented vertically, horizontally or in other positions. Secure the patient in the stretcher so that he/she does not slip in any direction, or be able to accidentally come out of the stretcher. Tie-In Points The Gazelle Stretcher has several Tie-In points where carabiners or other hardware devices may be attached to the upper rail. We recommend you fasten the carabiner as close to the Cross-Member as possible and always at a point where the device has little room to move laterally along the top tube. Ensure proper balance, and always refer to your local protocols and training. 6. Maintaining The Stretcher 6.1 Maintenance Schedule The stretcher requires regular maintenance. Set up and follow a maintenance schedule, such as provided by the form below. This form represents minimum maintenance, and you can modify your own program based on your needs. When using maintenance products, follow the manufacturers’ directions and read the manufacturers’ material safety data sheets. 6.2 Disinfecting and Cleaning the Restraints 1. 2. 3. 4. 5. 6. Remove restraints from stretcher. Buckle restraints before cleaning. This helps prevent damage to buckles or washing machine. Place buckled restraints inside a mesh bag (not supplied) and place in an industrial washing machine. Launder restraints in warm water, using a disinfectant soap and gentle agitation. Do not use bleach. Remove restraints from mesh bag and hang to dry. Do not put restraints into dryer. Attach clean, dry restraints to stretcher as instructed in Section 4. 6.3 Disinfecting and Cleaning the Stretcher Wipe or spray all surfaces of stretcher and netting with disinfectant. Follow disinfectant manufacturers’ directions. Each Month As Needed Each Use Disinfecting (See 6.3) • Cleaning (See 6.3) • Inspecting (See 6.4) • • Traverse recommends inspecting the stretcher for obvious damage as you disinfect it. Hand clean the stretcher and netting with a mild detergent in warm water. Rinse well, and dry with a towel. 6.4 Inspecting the Stretcher Have your stations/services’ maintenance personnel check the following: All components should be present Stretcher frame (top and lower rails, runners, ribs) should be free of dents, cracks or un-intentional bends Durathene® netting should be free of breaks and tears, and should be securely fastened to the lower rail. Yellow back support should be securely fastened into place Restraint webbing should be in good condition with no cuts or frays Restraint buckles should be free of visible damage, and should operate properly. Weld joints should be free of cracks or any other sign of breakage Warning labels should be clear and legible for all users to see and read. If inspection shows damage or excessive wear, remove the stretcher from service until appropriate repairs are completed (see Repair, Parts and Service, Section 7). 6.5 Storing the Stretcher Store the stretcher in a dry area. Make sure the stretcher is clean and dry before placing it into storage. 7. Accessories and Related Products Traverse offers a full line of accessories that are approved for use with the Titan Series stretchers. Always follow the instructions packaged with accessories. Keep the instructions with this manual. Be aware of any special considerations (loading heights, door heights, etc.) Part Number Description 15-0108 Hard-Eye Litter Bridle 15-0109 Soft-Eye Litter Bridle 11-0110 Mule Litter Wheel 04-0180 Traverse Restraint Strap 17-0101 Millennia Backboard 17-0100 Universal Head Immobilizer 17-0105 Quick-Connect Restraint Straps 17-0110 Fastrap Restraint System Related Products Part Number Description 16-0100 540°™ Rescue Belay-Large 16-0200 540°™ Rescue Belay-Small 11-0118SL Titan-Ti Titanium Stretcher with Strātload 11-0119SL Titan-Ti Titanium Stretcher Split Apart with Strātload 42-000-XXX UT2000 Series Backcountry Stretcher 19-0100 Traverse Rescue Stretcher 8. Limited Warranty Traverse Rescue, LLC (Traverse) Limited Warranty All Traverse Rescue, LLC products are warranted for a period of one year after the date of invoice, to the original purchaser. This warranty is provided against any material or workmanship flaws or defects. In the event of such a flaw or defect during this warranty period, please contact Traverse immediately. Traverse Rescue agrees to repair or replace (at our choice) the defective product. Our Limited Warranty does not cover damage due to abuse, misuse, lack of care, improper use or accidents. It also does not cover damage due to attempted repair by the purchaser that was not authorized by Traverse Rescue, LLC. No other warranties exist or are implied by Traverse. This limited warranty excludes, and Traverse shall not be held liable for any punitive, incidental, special or exemplary damages arising out of the breach of the warranty on sales by Traverse Rescue, LLC or otherwise, or through the performance or nonperformance of any third-party part, products, service or system. This limited warranty does not limit in any way, nor alter in any way, other manufacturer’s warranties on products that are sold by Traverse Rescue, LLC. 9. Traverse Customer Care Customer Care and product support are important aspects of each Traverse product. Telephone: …………………..........................905 279 7866 For assistance with this, or any other Traverse Rescue product, please contact Traverse Customer Care. Fax : .............................................................905 615 1367 Please have the serial number of your Traverse stretcher available when calling Traverse Customer Care, and include this number with any written communications Traverse Rescue, LLC. 755 Queensway East, Unit 8 Mississauga, Ontario Canada L4Y 4C5 Toll Free (Canada & US): .........................1 866 998 7866 Email: [email protected] Web site: www.traverserescue.com Training Schedule Date Name Training Method Maintenance Record Date Maintenance Performed By