1
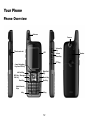
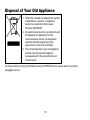
ZTE-J G610
GoTa Digital Trunking Phone
User Manual
1
Copyright © 2012 ZTE Corporation
All rights reserved.
No part of this publication may be excerpted, reproduced, translated or utilized in any form or by any
means, electronic or mechanical, including photocopying and microfilm, without the prior written
permission of ZTE Corporation.
The manual is published by ZTE Corporation. We reserve the right to make modifications on print
errors or update specifications without prior notice. The information on the package is only for your
reference. Images are for you reference only. Please check the product model before purchasing.
Version No.: R1.0
Manual No.: 079584503817
Edition Time: 20120413
2
Contents
Safety Information .............................................................................................. 7
General Care .................................................................................................................................. 7
General Guidelines ......................................................................................................................... 7
Road Safety .................................................................................................................................... 8
Hospital Safety................................................................................................................................ 8
Emergency Service......................................................................................................................... 8
Third Party Equipment .................................................................................................................... 8
Vehicles Equipped with an Airbag................................................................................................... 9
Aircraft Safety ................................................................................................................................. 9
Radio Frequency (RF) Energy........................................................................................................ 9
FCC Compliance .......................................................................................................................... 10
Disposing of Your Phone ...............................................................................................................11
Limitation of Liability ......................................................................................................................11
Your Phone ........................................................................................................ 12
Phone Overview ........................................................................................................................... 12
Keys and Functions ...................................................................................................................... 13
Getting Started .................................................................................................. 15
Installing Battery and (U)SIM Card ............................................................................................... 15
Inserting Memory Card ................................................................................................................. 17
Charging Your Phone.................................................................................................................... 18
Security Settings ........................................................................................................................... 18
Handset Code .................................................................................................................................. 19
PIN Code.......................................................................................................................................... 19
PUK Code ........................................................................................................................................ 19
Restoring Factory Settings ............................................................................................................... 20
Clear User Data................................................................................................................................ 20
Basic................................................................................................................... 21
Switching On/Off ........................................................................................................................... 21
Indicators and Icons...................................................................................................................... 21
3
Keypad Lock..................................................................................................................................22
Making a Normal Voice Call ..........................................................................................................23
PTT Calls............................................................................................................24
Make PTT Calls .............................................................................................................................24
Dial Directly ...................................................................................................................................... 24
Dial via Contacts .............................................................................................................................. 24
Dial via Call History .......................................................................................................................... 24
Dial via PTT Speed Group................................................................................................................ 25
Receive PTT Calls.........................................................................................................................25
End / Exit PTT Calls ......................................................................................................................25
Functions during PTT Calls ...........................................................................................................25
PTT Watching Function .................................................................................................................25
Set PTT Watching Function.............................................................................................................. 26
Set PTT Watching List...................................................................................................................... 26
Broadcast Call ...............................................................................................................................26
Operation Method ............................................................................................................................ 26
PTT Emergency Calls ...................................................................................................................26
Text Input ...........................................................................................................28
Contacts .............................................................................................................29
Adding Contact ..............................................................................................................................29
PTT System Group........................................................................................................................29
PTT IM...........................................................................................................................................29
Creating PTT IM............................................................................................................................... 29
Adding PTT IM Member ................................................................................................................... 30
Searching Contact.........................................................................................................................30
Adding group .................................................................................................................................31
Setting Speed Dial.........................................................................................................................31
Viewing Speed Dial .......................................................................................................................... 31
Making a Speed Dial ........................................................................................................................ 31
Other Options ................................................................................................................................32
Message .............................................................................................................33
4
Sending SMS................................................................................................................................ 33
Message Settings ......................................................................................................................... 33
Call History ........................................................................................................ 34
Multimedia ......................................................................................................... 35
Camera ......................................................................................................................................... 35
Setting Camera mode....................................................................................................................... 35
Taking a Photo.................................................................................................................................. 35
Viewing Photos................................................................................................................................. 35
Music Player ................................................................................................................................. 36
Setting Music Play Mode .................................................................................................................. 36
Managing Play List ........................................................................................................................... 36
Playing a Music ................................................................................................................................ 36
Voice Recorder ............................................................................................................................. 37
Recording ......................................................................................................................................... 37
Playing a sound file .......................................................................................................................... 37
EBook................................................................................................................. 38
File Manager ...................................................................................................... 39
Other Facilities .................................................................................................. 40
Alarm ............................................................................................................................................ 40
Calendar ....................................................................................................................................... 40
Reader .......................................................................................................................................... 41
Calculator...................................................................................................................................... 41
Unit Converter............................................................................................................................... 41
Stopwatch ..................................................................................................................................... 42
Notepad ........................................................................................................................................ 42
JAVA ............................................................................................................................................. 42
Settings .............................................................................................................. 43
Profile............................................................................................................................................ 43
Display Settings ............................................................................................................................ 43
Phone Settings ............................................................................................................................. 43
Call Settings.................................................................................................................................. 44
5
Connect Settings ...........................................................................................................................45
Time and Date Settings .................................................................................................................45
PTT Settings ......................................................................................................46
GPS.....................................................................................................................48
Troubleshooting and FAQs ..............................................................................49
Technical Parameters .......................................................................................51
Declaration of RoHS Compliance....................................................................52
Disposal of Your Old Appliance.......................................................................53
EC DECLARATION OF CONFORMITY.............................................................54
6
Safety Information
General Care
● If you want to clean your phone, please use clean fabric that is a bit wet or anti-static. Do not use
harsh chemical cleaning solvents or strong detergents to clean it. Turn off your phone before you
clean it.
● As your mobile phone can produce electromagnetic field, do not place it near magnetic items such
as computer disks.
● Using the phone near electrical appliances such as TV, telephone, radio and personal computer
can cause interference, which affects the function of the phone.
● Do not expose your mobile phone to direct sunlight or store it in hot areas. High temperatures can
shorten the life of electronic devices.
● Prevent liquid from leaking into your phone.
● Do not drop, knock or harshly treat your phone. Rough handling can break internal circuit boards.
● Do not charge the mobile phone without battery.
● Do not short-circuit the battery, as this can cause excessive heat and fire.
● Do not store battery in hot areas or dispose of it in a fire to avoid explosion.
● Store the phone out of the reach of little children. The phone may cause injury if used as a toy.
● Be aware of the usage limitation when using a mobile phone at places such as oil warehouses or
chemical factories, where there are explosive gases or explosive products being processed,
because even if your phone is in standby mode, it still transmits radio frequency (RF) energy.
Therefore, power off your phone if required.
General Guidelines
● If your mobile phone is lost or stolen, please report to your service provider or agencies of banning
the use of your lost phone, which will protect you from economic losses resulted from
7
unauthorized use. You need to provide the phone’s ESN/MEID number labeled. You can see
ESN/MEID number after removing the battery. Please keep ESN/MEID number for future use.
● To protect your mobile phone from illegal use, please take the security measures as follows:
fSet PIN code of the UIM card.
fTake it with you as you can.
Road Safety
Pay attention to traffic safety. Do not use your mobile phone while driving. Park before making or
answering a call.
Hospital Safety
● Some electronic devices are susceptible to electromagnetic interference sent by mobile phone if
inadequately shielded, such as electronic system of vehicles. Please consult the manufacturer of
the device before using the phone if necessary.
● Operating of mobile phone may interfere with medical devices like hearing aid and pacemaker.
Please always keep the mobile phone more than 20 centimeters away from such medical devices
when the phone is powered on. Do not carry the mobile phone in the breast pocket. Power the
mobile phone off if necessary. Consult a physician or the manufacturer of the medical device
before using the phone.
Emergency Service
On occasion of emergent calling, keep your phone in status of power on and in area of service. On
the condition of standby, press the key to enter emergency phone number, and then press Send key
to make a phone call.
Third Party Equipment
● Please use original accessories or accessories that are authorized by the manufacturer. Using any
8
unauthorized accessories may affect your mobile phone’s performance, and violate related
national regulations about telecom terminals, or even endanger your body.
● Do not connect the phone with other unauthorized peripheral equipments.
● Do not attempt to disassemble the mobile phone and battery by yourself. Non-expert handling of
the devices may damage them.
Vehicles Equipped with an Airbag
● Before making or answering a call, you should pay attention to the local laws about using wireless
mobile phones and take them into account in practical use.
● Safety airbag, brake, speed control system and oil eject system shouldn’t be affected by wireless
transmitting. If you do meet problems above, please contact your automobile provider.
● Please power off your mobile phone when refueling your automobile, and so do the place where
duplex wireless equipments are banned. Don’t put your phone together with flammable or
explosive items, as inner spark may cause fire.
Aircraft Safety
● Follow the restrictions in aircraft. Wireless devices can cause interference in aircraft.
● Please power off your mobile phone before taking on till landing. In order to protect airplane’s
communication system from interference, it is never allowed to use mobile phone when it is in
flight. Using mobile phone before the plane taking off should get aircrew’s permission according to
safety regulations.
Radio Frequency (RF) Energy
The exposure guidelines for mobile devices employ a unit of measurement known as the Specific
Absorption Rate (SAR). The SAR limit stated in the international guidelines is 2.0 watts/kilogram
(W/kg) averaged over ten grams of tissue. Tests for SAR are conducted using standard operating
positions with the device transmitting at its highest certified power level in all tested frequency bands.
9
The actual SAR level of an operating device can be well below the maximum value because the
device is designed to use only the power required to reach the network. That amount changes
depending on a number of factors such as how close you are to a network base station.
The highest SAR value when tested according to international testing procedures recommended by
International Guidelines for Exposure to Radio Waves (ICNIRP) for use is 1.020 W/kg.
SAR values may vary depending on national reporting and testing requirements and the network
band. Use of device accessories and enhancements may result in different SAR values.
Notes:
The SAR limit of 2W/kg averaged over ten grams of tissue is the permitted level of RF energy for the
general population. The standards and guidelines include a substantial safety margin designed to
assure the safety of the public, regardless of age and health and to account for any variations in
measurements.
FCC Compliance
● This device complies with part 15 of the FCC rules. Operation is subject to the condition that this
device does not cause harmful interference.
● This device has been tested and found to comply with the limits for a Class B digital device,
pursuant to Part 15 of the FCC Rules. These limits are designed to provide reasonable protection
against harmful interference in a residential installation. This equipment generates uses and can
radiate radio frequency energy and, if not installed and used in accordance with the instructions,
may cause harmful interference to radio communications. However, there is no guarantee that
interference will not occur in a particular installation. If this equipment does cause harmful
interference to radio or television reception, which can be determined by turning the equipment off
and on, the user is encouraged to try to correct the interference by one or more of the following
measures:
● Reorient or relocate the receiving antenna.
● Increase the separation between the equipment and receiver.
● Connect the equipment into an outlet on a circuit different from that to which the receiver is
10
connected.
Consult the dealer or an experienced radio/TV technician for help.
● Changes or modifications not expressly approved by the party responsible for compliance could
void the user‘s authority to operate the equipment.
● The antenna(s) used for this transmitter must not be co-located or operating in conjunction with
any other antenna or transmitter.
●
Disposing of Your Phone
● Never use any charger or battery damaged or worn out.
● Return the wear-out battery to the provider or put it in the appointed recycle place. Do not put it in
familial rubbish.
Notes:
If the battery is broken, keep away from content. If it taints your skin, wash your skin with abundant
fresh water and ask doctor help if necessary.
Limitation of Liability
ZTE shall not be liable for any loss of profits or indirect, special, incidental or consequential damages
resulting from or arising out of or in connection with using this product, whether or not ZTE had been
advised, knew or should have known the possibility of such damages.
11
Your Phone
Phone Overview
Antenna
Camera
T-flash card slot
Volume Up
Key
LCD
PTT Key
4-way Navigation
Keys and OK Key
Left Soft Key
GPS Key / Emergency
Call Key
Send Key
Right Soft
Key
Music Key
End Key
Alpha Numeric
Keys
* Key
Volume
Down Key
# Key
12
Speaker
Keys and Functions
Left Soft Key
● In standby mode, press it to access to the main menu interface.
● Perform the function indicated in the bottom left corner of the screen.
Right Soft Key
● In standby mode, press it to access to Contacts interface.
● Perform the function indicated in the bottom right corner of the screen.
GPS Key
● In standby mode, press it to access to GPS.
/Emergency call
● In standby mode, press and hold it to make Emergency Call.
key
Music Key
In standby mode, press it to access to Music Player.
Send Key
● Dial or receive calls.
● Shortcut to All Calls in standby mode.
End Key
● Used to power on and off.
● End or reject calls.
● Back to standby mode.
4-way
● Used to move the highlight or cursor.
Navigation Keys
(Up / Down / Left ● In standby mode, press the Left / Right Key to access to shortcut menu,
/ Right Key)
please refer to Phone Settings for detail.
OK Key
● Used to confirm or select.
● Press it to access to main menu in standby mode.
13
Alpha Numeric
Keys
●
●
●
●
Used to enter numbers or letters.
Used to make speed dial.
Used to select menu items quickly.
In standby mode, hold 0 Key to enter +.
* Key
●
●
●
●
Used to enter *.
Press it twice consecutively to enter P, three times to enter T.
Used to open symbol list in text entering mode.
Hold to lock the keypad in standby mode.
# Key
● Used to enter #.
● Used to switch text entering modes.
● In standby mode, hold to activate/deactivate vibration mode.
Volume Up Key
Turn up the volume in standby mode.
Volume Down
Key
Turn down the volume in standby mode.
PTT Key
● Hold it to make a PTT call and release it to listen to others or back to idle
status.
● When PTT function is off, press and hold it to activate camera.
14
Getting Started
Installing Battery and (U)SIM Card
The charger and other accessories should be disconnected from your phone before you insert or
remove the battery or UIM card.
Notes:
● The phone automatically switches off if the battery voltage is too low.
● When not using the battery for a long period, remove it from the phone and store it in a cool dry
place.
1. Press and hold End Key to turn off the phone.
2. Push the battery cover down with your thumbs until it disengages from the device, and then
remove it.
Note:
When the battery is inside, put finger on the finger grip, and then lift up the battery to remove the
battery.
15
3. Insert the UIM card into the card holder, with the metal contacts facing downward and the cut
corner in the right direction. Make sure it is pushed all the way to the end as shown below.
4. Insert the battery carefully with the contacts located against the metal springs.
5. Push the battery until it clicks into position.
6. Place the cover onto the back of your phone.
16
Caution:
Do not force the cover down by pressing on it. This will damage the cover.
Inserting Memory Card
The memory card gives your handset a very large memory capacity. This allows you to save
multimedia data, including images, photos, MP3 audio files, and ring tones. You can also use this
memory card to store any other files.
Tips:
Your phone can support a memory card with capacity up to 4GB.
1. Open the T-flash card slot at the right of the phone;
2. Insert the card until it clicks to the right position;
3. Close the card slot.
Caution:
Only use ZTE approved memory cards for this device. Any use of unapproved memory cards may
cause loss of data or damage to your phone.
17
Charging Your Phone
Your phone is powered by a rechargeable battery. The battery is not fully charged when first
unpacked, but there may be enough power to power your phone on. You should use it up completely
before charging the battery for the first time. Charge the battery with the procedure indicated below.
1. Connect the phone and AC adapter with the data cable.
2. Insert the AC adapter into an electrical outlet.
When the battery icon flicker, the phone is charging; when the battery icon become static, the
phone is fully charged
3. Disconnect the AC adapter with an electrical outlet when charge finished.
4. Disconnect the phone with the data cable.
Notes:
● Make sure that the adapter is inserted into the correct position. Do not force the connector into the
port.
● The battery will be fully charged for about 3 hours.
● Use the charger provided by the original provider. Using unapproved charger may cause danger
and violate the authorization and warranty rules of the phone.
● If the phone is over-used in shortage of battery or not used for a long time, the screen may not
display the charge indicator until it is continuously charged for 10 to 40 minutes.
● For maximum battery performance, it is recommended that you completely charge the battery
before using the phone for the first time. A new battery’s full performance is achieved only after
three complete charge and discharge cycles.
● Once the charging is complete, remove the charger from both the power outlet and the phone.
● To charge the battery, you can use the provided charger or the USB data cable.
● Charging is only possible within a temperature range of -5℃ to +45℃.
Security Settings
18
Handset Code
Phone password can protect your phone efficiently and avoid illegal usage. If phone password
protection is activated, you should input the correct password at phone start-up.
● For a new bought phone, the protection function is not activated and the default password is 0000.
● In standby mode, select Menu > Settings > Security Settings > Use Phone Code to activate or
deactivate password protection.
● In standby mode, select Menu > Settings > Security Settings > Change Phone Code to change
phone password. It is suggested to change the password according to your requirement.
Note:
Please remember the password you set, otherwise your handset can not be used normally, need to
contact ZTE after-sales service center.
PIN Code
PIN code is the personal identification code of UIM card, used to avoid illegal usage for your UIM card.
Once PIN code is started, the correct PIN code should be input at phone start-up, otherwise the
phone can only execute emergency call.
● For a new bought card, the default code is supplied by the service provider.
● In standby mode, select Menu > Settings > Security Settings > Use PIN Code to activate or
deactivate PIN code.
● In standby mode, select Menu > Settings > Security Settings > Change PIN Code to change
PIN code.
Note:
If you change PIN code, please remember it clearly.
PUK Code
After inputting wrong PIN code continuously for three times, the phone will lock the UIM card and
prompt you to input PUK code to unlock.
19
Notes:
● PUK code is the specified unlock code for UIM card, when UIM card is locked, input the correct
PUK code and then input the new set PIN code, UIM card can then be used normally.
● PUK code may be supplied with the new bought card, the detail can refer to the service provider.
● PUK code is supplied with the new bought card, please keep it safely.
● PUK code can only be input continuously for 10 times. If you input wrong PUK code for 10 times,
UIM card will be locked indefinitely.
Restoring Factory Settings
Restoring factory settings can recover all the items in Settings menu to the default values.
1. In standby mode, select Left soft key [Menu] > Settings > Security Settings > Restore Factory
Settings.
2. Input the phone password, and then press Left soft key [OK].
3. Press Left soft key [Yes] to restore factory settings.
Note:
Restoring the phone does not influence PIN code. Or press Right soft key [No] to cancel restore.
Clear User Data
Clearing user data can recover all the items in Data Folder to default values.
1. In standby mode, select Left soft key [Menu] > Settings > Security Settings > Clear User Data.
2. Input the phone password, and then press Left soft key [OK].
3. Press Left soft key [Yes] to restore the default values.
Note:
Restoring the phone does not influence PIN code. Or press Right soft key [No] to cancel restore.
20
Basic
Switching On/Off
Note:
Do not power on your phone if wireless phone use is unapproved, or when it may cause interference
or danger.
1. Press and hold the End Key to turn on the phone.
Tips:
● When being asked, enter your PIN (Personal Identification Number) code or handset code and
press the OK Key to confirm.
● The PIN code is the password provided by your network service provider. You need this password
to use the UIM card.
● When the entered PIN code or handset code is accepted, the phone will automatically search for
the designated network. After a few seconds, your phone will show the standby mode.
2. To power off the phone, press and hold the End Key from the standby mode.
Indicators and Icons
Signal strength
Roam
New short message
Message box full
Vibrate
Vibrate + ring tone
21
Alarm
Silent
Calling
Earphone
Battery capacity
T-flash card
PTT group call
PTT private call
Watching function activated
Idle
Speaking
Listening
PTT speed dial
GPS
PTT call attribute
Keypad Lock
Use the keypad lock to prevent the keys from being accidentally pressed.
1. In standby mode, select Left soft key [Menu] > Settings > Phone Settings > Auto Keypad
Lock and then select On to activate, or select Off to deactivate.
2. To unlock the keypad, press the Right soft key [Unlock] first and then press * Key.
Tips:
● When the keypad is locked, Unlock is displayed at lower right of the screen.
22
● If the call is coming when the keypad is locked, you can press the Send Key to answer. After
ending or rejecting the call, the keypad will be locked automatically.
● When the keypad lock is on, calls may be possible to the official emergency number programmed
into your device.
Making a Normal Voice Call
1. If required, press and hold the 0 key for the international prefix “+”.
2. Enter the number, and press the Send key to make a call.
3. Press the End Key to end the call.
23
PTT Calls
Make PTT Calls
You could make PTT calls by the following means:
● Dial directly
● Dial via Contacts
● Dial via Call History
● Dial via PTT Speed Group
Note:
Only PTT private calls can be dialed via Call History.
Dial Directly
1. Enter the desired PTT number in standby mode for private calls; if you want to make PTT group
calls, press the # Key and then enter the desired group number in standby mode;
2. Hold the PTT Key to start dialing, and speak after hearing a beep sound;
3. Release the PTT Key to listen to the other party or back to the idle status.
Dial via Contacts
1.
2.
3.
4.
In standby mode, select Left soft key [Menu] > Contacts;
Select your desired contact, PTT system group, or PTT IM by pressing the Up / Down Keys;
Hold the PTT Key to start dialing, and speak after hearing a beep sound;
Release the PTT Key to listen to the other party or back to the idle status.
Dial via Call History
1. In standby mode, press the Send Key to access to All Calls interface;
2. Press the Up / Down Keys to select your desired contact or phone number;
24
3. Hold the PTT Key to start dialing, and speak after hearing a beep sound;
4. Release the PTT Key to listen to the other party or back to the idle status.
Dial via PTT Speed Group
1. In standby mode, press the Up / Down Keys to select your desired PTT speed group;
2. Hold the PTT Key to make the PTT speed dial, and speak after hearing a beep sound; release the
PTT Key to listen to the other party or back to the idle status.
Receive PTT Calls
When receiving PTT calls, you firstly hear a short beep sound, and then hear the other party speaks
without any operation. After the party finishes speaking, hold the PTT Key and speak after hearing a
beep sound. Release the PTT Key to listen to the other party or back to the idle status.
End / Exit PTT Calls
● In private calls, press the End Key or select End Call to end a call.
● In group calls, press the End Key to exit from a group call.
● The group caller or leader can select End Call to end a group call.
Note:
Contact your network service provider for detailed PTT call authorities.
Functions during PTT Calls
● Press the Volume Up / Down Keys or Left / Right keys to adjust the volume.
● Press the OK Key to switch the voice output device between speaker and earpiece.
PTT Watching Function
This function enables your phone receive the group calls which are set in the current watching list.
25
You can set up to 3 groups as watching groups.
Set PTT Watching Function
1. In standby mode, select Left soft key [Menu] > PTT Settings > Watching Function;
2. Select On or Off to activate or deactivate PTT watching function.
Set PTT Watching List
1. In standby mode, select Left soft key [Menu] > Contacts > PTT System Group;
2. Press the Up / Down Keys to select a group and then select Watch to add the group into the
watching list.
Note:
The current speed dial group is as watching group by default.
Broadcast Call
Broadcast Call is an unilateral call. It broadcasts the call to the group members and the group
members can receive the call but not allow answering the call.
Operation Method
1. Enter “ ## ”, in standby mode;
2. Enter the group number of the call;
3. Hold PTT key to start the broadcast call and talk after hearing a beep sound
PTT Emergency Calls
With the highest priority, emergency calls could be made through the Emergency Call key.
You can make the emergency call by the following way:
● In standby mode, hold the Emergency Call key to send the emergency call which has been
preset in the PTT Settings (Please refer to section “PTT Settings” for details ).
26
Note:
Please consult the network operator for the PTT emergency call authority.
27
Text Input
Your phone offers text input modes: Multitap mode (abc/Abc/ABC), Numbers mode (123), eHiText
mode (eng). Text mode includes uppercase and lowercase modes.
When you are in a field that allows characters to be entered, you will notice the text input mode
indicator in the upper right corner of the display.
You can key in letters, digits, characters and symbols when writing text or editing contact record
information, following the common instruction in the table hereinafter.
Operation
Method
Input Letters
Multitap mode —“abc/Abc/ABC”, press corresponding letter key
till the letter appears.
Input Words
eHiText mode — “eng”, press any key once to key in any word.
Input Digits
Numbers mode — “123”, press digit key once.
Input Symbols
Symbols mode — Press the * key to enter the symbols mode
and press corresponding digit key.
Or press 1 key till the symbol (common symbols) appears except
for numbers mode.
Input Space
Press 0 key, except for being in numbers mode.
Erase Character
Press the Right soft key.
Move cursor
Press the Navigation keys.
Change input mode
Press the # key to select another text mode.
28
Contacts
Adding Contact
You can store contacts with a variety of phone and fax numbers.
The phone can store up to 1000 items. The capacity of a phone book in your UIM card depends on
the type of UIM card provided by your service provider. The saved location can be identified by the
icon before the contacts.
1. Select Left soft key [Menu] > Contacts > Add Name.
2. Select save location.
3. Enter the information of contact.
4. Press Left soft key [Save] to save the new contact.
PTT System Group
Note:
PTT system group is updated by system automatically.
1. In standby mode, select Left soft key [Menu] > Contacts > PTT System Group;
2. Select your desired system group by pressing the Up / Down Keys;
3. Hold the PTT Key to start dialing, and speak after hearing a beep sound; Release the PTT Key to
listen to the other party or back to the idle status.
PTT IM
Creating PTT IM
1. Select Left soft key [Menu] > Contacts > PTT IM.
2. You can make the following operation.
29
● When the PTT IM list is blank, press the OK key to access to new IM interface.
● When the PTT IM list is not blank, select Left soft key [Option] > New IM to access to new IM
interface.
3. Enter the IM name.
4. Press the Left soft key to save the PTT IM.
Adding PTT IM Member
1.
2.
3.
4.
●
●
●
5.
Select Left soft key [Menu] > Contacts > PTT IM.
Press the Up / Down key to select the PTT IM.
Press the OK key to access the PTT IM member list interface.
Select Left soft key [Option] > Add IM Member, you can add member through the following
ways.
All List: press the Up / Down key to select contact, and then press OK key to confirm.
PTT IM: press the Up / Down key to select PTT IM, and then press OK key to confirm.
New Edit: enter the phone number.
Press Left soft key [OK] to add the members to the PTT IM.
Searching Contact
1. Select Left soft key [Menu] > Contacts > All List.
2. Input the name you want to find.
3. Press the Up key or Down key to scroll through the corresponding name(s) and record(s) in the
list. Scroll to the name you want, and press the OK key to view the details.
30
Note:
All the names will be list by the letter of the name. If no contact could be found or not exist in the list,
“No Items” will be displayed.
Adding group
Assign group for the contacts saved in phone.
1. Select Left soft key [Menu] > Contacts > All List.
2. Select the desired contact.
3. Select Left soft key [Option] > Edit.
4. Press the Up key or Down key to select Groups.
5. Press the Left key or Right key to select desired group.
6. Press the Left soft key [Save] to save the settings.
Setting Speed Dial
1.
2.
3.
4.
5.
Select Left soft key [Menu] > Contacts > All List.
Select the contact record, press the OK key to view details.
Scroll to the number and choose Set Speed Dial Number in Option.
Select a Not Set slot in list and press the OK/Left soft key.
Press the Right soft key to return to previous menu.
Viewing Speed Dial
1. Select Left soft key [Menu] > Contacts > Speed Dials.
2. View contact record in Speed Dial List.
Making a Speed Dial
Hold the Speed Dial Number digit key to make a speed dial in the standby mode.
31
Other Options
1. Select Left soft key [Menu] > Contacts > All List.
2. Press the Left soft key [Option] to enter the submenu list, and you can do following operations:
Options
Function
Edit
Edit the contact information.
Add Name
Add new contact.
Send Message
Send message to the contact’s default number.
Call
Dial the contact’s default number.
Multiple Select
Select multiple contacts
Delete
Delete current selected contact.
Send Name Card
Send information of this contact via SMS.
Copy to Phone
Copy contact in UIM card to the phone.
Copy to UIM
Copy contact on the phone to UIM card.
Move to Phone
Move contact in UIM card to the phone.
Move to UIM
Move contact on the phone to UIM card.
Delete All
Delete all contacts.
32
Message
SMS (Short Messaging Service) allow you to send text messages and manage the messages that
you sent and received.
Sending SMS
1. Select Left soft key [Menu] > Messages > New Message.
2. Enter the recipient(s) party’s number. (Or select Left soft key [Option] > Contacts to choose the
recipient(s).)
3. Press the Down key to the text field.
4. Edit the message.
5. Press the OK key to send your message.
Message Settings
1. Select Left soft key [Menu] > Messages > Message Settings.
2. Select General Settings to make auto delete, auto save, signature settings.
3. Select SMS Settings to make SMS settings, such as delivery, priority, validity, save location, call
back settings, etc.
33
Call History
In standby mode, select Left soft key [Menu] > Call History to check the call logs and call duration.
34
Multimedia
Camera
There is an integrated digital camera in your phone, and this function enables you to take a still
picture.
Setting Camera mode
1.
2.
●
●
●
●
●
●
●
●
●
●
Select Left soft key [Menu] > Multimedia > Camera.
Press the Left soft key [Option] > Settings for more options.
Resolution: Set the size of your photo.
Quality: Set the quality standard of your photo.
Effect: Set the effect of your photo.
White Balance: Set the balance of your photo.
Night Mode: Set night mode or not.
Frame: Choose frame style for the photo.
Shutter Sound: Select the sound when the shutter is pressed.
Store Location: You can select memory card or phone for photos to store.
Multishot: Set the times for the multishot.
Self-shot Time: Set the self-timer.
Taking a Photo
1. Select Left soft key [Menu] > Multimedia > Camera.
2. Aim the camera lens at the place/object.
3. Press the OK key to take a photo.
Viewing Photos
35
1. Select Left soft key [Menu] > Multimedia > Camera > Option > View.
2. Select your desired photo and press the OK key to view. Press the OK key for full-screen display.
Music Player
When you have some audio files stored in your phone, you can create a playlist to play your audio
files in the preferred order.
Setting Music Play Mode
1. In standby mode, press Left soft key [Menu] to enter main menu.
2. Select Multimedia > Music Player > Option >Play Mode to set play mode as Random, Order or
Single.
Managing Play List
1. Select Left soft key [Menu] > Multimedia > Music Player > Option > Current List > Option >
Add.
2. Select an audio file folder in phone or memory card.
3. Press the OK key to mark the audio files, press the Left soft key [OK] to save the audio files to
the playlist.
4. Select Save List, input the list name.
5. Press the Left soft key [OK] to add new play list.
Playing a Music
You can use the following methods to play a sound file.
● Open File Manager to play a sound file.
1. In standby mode, select Left soft key [Menu] > File Manager > Music.
2. Select your desired audio file, press the OK key to play an audio file.
● Select Menu > Multimedia > Music Player to play a sound file.
36
1. In standby mode, select Left soft key [Menu] > Multimedia > Music Player to activate media
player.
2. Select Left soft key [Option] > Current List.
3. Press the Up key and Down key to select the audio file you would like to play.
4. Press the OK key to play.
Voice Recorder
This function allows you to record a voice memo, and you can also set the voice memo as ringtone.
Recording
1. Select Left soft key [Menu] > Multimedia > Voice Recorder.
2. Press the OK key to start recording your voice memo.
3. Press the Left soft key/OK key [Pause] to pause, press the Left soft key/OK key [Continue] to
resume recording, and press the Right soft key [Stop] to stop recording and save the memo into
Record List directory automatically.
4. Select Option to check memo or make settings, etc.
Playing a sound file
1.
2.
3.
4.
Select Left soft key [Menu] > Multimedia > Voice Recorder.
Press the Left soft key [Option], and then select Record List.
Press the Up / Down keys to select the memo you would like to play.
Press the OK key to play the sound file.
37
EBook
You can read Ebooks in File Manager.
Note:
You can copy texts to memory card as Ebooks.
38
File Manager
File Manager is a storage area for photos, audios, etc.
In standby mode, select Left soft key [Menu]> File Manager to enter the file manager.
Accessing the memory card
1. Select Left soft key [Menu] > File Manager to open file manager.
2. Select Card to view the files on memory card. By pressing the Left soft key [Option], you can
create new folder, or delete the file.
39
Other Facilities
Alarm
You can set the alarm to ring if required.
● In standby mode, select Left soft key [Menu] > Magic Box > Alarm.
● Select No Set to add a new alarm, and press the Left soft key [Save] to save it.
● Select Edit to view the alarm settings.
● Select snooze mode, such as snooze type, time and tone, etc.
● Select Snooze Setting to set the alarm duration.
● Select Disable All Alarms to disable all alarms.
Note:
If you turn the alarm on, the icon will be displayed in standby mode.
Calendar
You can conveniently access and modify your agenda:
1. In standby mode, select Left soft key [Menu] > Magic Box > Calendar to enter Calendar
interface.
2. Press the Navigation keys to move to different date.
3. Select Left soft key [Options] > New Task to add the subject, start time, end time, remind, or
remind interval. Press the Left soft key to save it.
4. Press the Left soft key [Options] to display more options.
● View By day: View the schedule lists of the current day.
● View All Tasks: View all schedule lists.
● Go To Today: Go to the calendar window indicating today.
40
● Go To Date: Input the date, your phone go to the calendar window indicating the date you input.
● Delete Before Date: Input the date, your phone deletes all the schedule lists earlier than the date.
● Delete All Tasks: Delete all schedule lists.
Reader
You mobile phone supports TXT files. Select Left soft key [Menu] > Magic Box > Reader to read the
e-books saved in T-flash card. Select Option and you can view the recently-read books and labels.
Calculator
The phone provides simple calculating functions, such as addition, subtraction, multiplication and
division.
● In standby mode, select Left soft key [Menu] > Magic Box > Calculator.
● Press key “0~9” to enter numbers.
● Press the* key to enter the decimal point.
● Press the Up key, Down key, Left key, or Right key to choose +, –, ×, /.
● Press the Right soft key [Delete] to clear the last digit you input.
● Press the OK key to view the result.
Unit Converter
1. In standby mode, select Left soft key [Menu] > Magic Box > Unit Converter.
2. Choose any unit to convert.
3. Press the Up key or Down key to switch between original unit ‘from” and equals unit ‘to”. Press
the Left key or Right key to select the original unit which is “from” and equals “to”.
4. Enter numbers with the original unit to get the corresponding result.
41
Stopwatch
You can measure time and take split times or lap times, for example, in different sports.
1. In standby mode, select Left soft key [Menu] > Magic Box > Stopwatch.
2. Select Normal timing, Lap timing, Split timing, press the Left soft key [Start] to start timing.
3. Press the Left soft key [Split/Lap] to complete a period of time/lap.
4. Press the Left soft key [Continue] to continue timing.
5. Press the Right soft key [Reset] to reset.
Notepad
1. In standby mode, select Left soft key [Menu] > Magic Box > Notepad to enter Notepad
interface.
2. Press the Left soft key [Option] to edit, select, delete the note or create a new note.
JAVA
Your handset can connect network and download JAVA program.
42
Settings
Profile
Your handset supplies several predefined user profiles, and you can choose a certain profile
according to your surroundings.
You can also edit the appropriate profile depending on the current condition.
Display Settings
In standby mode, select Left soft key [Menu] > Settings > Display Settings:
● Select Screen Settings
● Select Wallpaper Settings, use the picture saved in Phone or Memory card as wallpaper,
displayed in standby mode.
● Select Backlight Time to adjust backlight duration.
● Select Brightness to adjust the screen brightness.
● Select Idle Display Content to select idle mode.
● Select Theme Settings to select theme style.
● Select Banner to input the idle greet words.
● Select Roaming Reminder to activate or deactivate reminder for roaming network.
● Select Keypad Light Settings to select keypad light mode.
Phone Settings
1. In standby mode, select Left soft key [Menu] > Settings > Phone Settings.
2. Select options.
● Select Language to select the language available.
43
●
●
●
●
●
Select Shortcut to set the Left/Right key shortcut functions.
Select Auto Keypad Lock to set phone keypad auto lock time or disable keypad auto lock.
Select Power Save to activate or deactivate power-saving mode.
Select Auto Power On/Off to set the time of powering on/off the handset automatically.
Select Version Info. To view the preset PRL (Preferred Roaming List) version, software and
hardware version of the phone.
● Select Version Update to upgrade version. This operation should need insert T-card first, and the
upgrade software file has been stored in the T-card. It has requirements about the name and
storage location of upgrade software file, the upgrade file must be named image.bin and stored in
image folder of root directory of T-card. You can update version by following the pop-up alert on
the screen.
Call Settings
1. In standby mode, select Left soft key [Menu] > Settings > Call Settings.
2. Select your desired item to make setting:
● Call Settings: set whether to activate call forwarding, call waiting and connection reminder.
● Call Forwarding: this function enables you to forward your incoming calls to an appointed phone
number. Contact your network service provider to activate the function. There are 4 kinds of call
forwarding: All, Busy, No Answer, and Default. You can activate or deactivate one kind of call
forwarding and set the forward number.
● Call Waiting: .If you activate the function, there will be an alert to inform you of a new incoming
call when you are making a call. You can receive the second call while keeping the first call
connected. Contact your network service provider for details.
● Connection Reminder: set whether to activate or deactivate the function.
● Answer Settings: set whether to activate or deactivate Any Key Answer or Headset Auto
Answer.
● Call Information Reminder: set whether to activate or deactivate minute reminder or missed
44
calls reminder.
● IP Dial: set IP number, and select Option to edit, delete IP number, or set the IP number as
default.
● Black List: view the black list, or select Option to add numbers, contacts or recent contacts
to black list; delete numbers in black list.
● International Dial: set the international dial mode as Automatic or Manual.
Note:
The functions need network support. For details, please contact your service provider.
Connect Settings
1.
2.
3.
4.
5.
In standby mode, select Left soft key [Menu] > Settings > Connect Settings.
Select USB Disk Mode to set the memory card of the phone as a disk.
Select JAVA to view access point and select proxy server.
Select Roaming List to set roaming ways.
Select Network Select to set the available network.
Time and Date Settings
In standby mode, select Left soft key [Menu] > Settings > Time & Date Settings.
● Select Time Format to select display format of time in standby mode.
● Select Date Format to select display mode of date in standby mode.
45
PTT Settings
1.
2.
●
●
●
In standby mode, select Left soft key [Menu] > PTT Settings.
Select your desired item to make setting:
PTT Function: select On or Off to activate or deactivate PTT function.
Watching Function: select On or Off to activate or deactivate PTT watching function.
Emergency Call: set the emergency call type and the number. The type can be set as Normal
Call, DAS, Private Call and Group Call.
● PTT IM: set the PTT IM call answer way. You can set it as Answer or Auto Connect.
● SupplementSvc: set the PTT supplement service.
● Call Attribute: set PTT call attribute as Normal or Pre-emptive.
● DynaManagement: manage the PTT group.
● Add Member: add member to PTT group.
● Delete Member: delete member from PTT group.
● Set Priority: set group member PTT call priority.
● Set Talk Time: set group member maximum talk time.
● Supplement Svc Set: set the supplement functions.
● Private Call Forward: activate, deactivate or query PTT private call forward function, and set
call forward number.
● Duty Number: set duty number and status. When the status is set as On Duty, you can receive
the duty number PTT call, when the status is set as Off Duty, you would not receive the duty
number PTT call.
● PTT CNIR: set PTT number identification restriction function. After activating this function, PTT
number will not be identified during the PTT call.
● Call Alert Busy: activate, deactivate or query call alert busy function. After activating this
function, You could receive the other incoming call prompt when you are making the call.
46
● Key Set: set the key function.
● End Key in PTT Call: set the function of End Key during the PTT call.
● Auto Keypad Lock: activate or deactivate the auto keypad lock, set the waiting time and
whether to lock the PTT key when the keypad is locked.
● Standby and performance Setting: set the standby mode and performance of the phone.
47
GPS
The mobile phone supports GPS. GPS can provide locating function.
1. In standby mode, select Left soft key [Menu] > GPS.
2. Select GPS Setting, and then select On to activate GPS function.
3. Select GPS Information to start locating.
After locating successfully, the current location information will display on the screen.
4. Select Message Center Num to set the message center number.
The message center number is used to receive the location information automatically, it is provided
by the network operator.
5. Select Format Setting to set the information display mode.
Note:
Please consult the service provider for the message center number.
48
Troubleshooting and FAQs
If your phone appears following phenomenon in the process of application, please read following
relative information at first. If the problems still cannot be solved, please contact with the distributor or
service provider.
Problem
Possible Cause
Solution
The area covered with weak
Move to the area covered with strong
signal, such as basement, and the signal.
area near high-rise buildings.
Weak signal
Echo or noise
Fail to use some
functions
The network is busy. For example, Avoid using mobile phone during rush
you may fail to make calls during
hours.
rush hours because of busy
network.
You are too far away from station.
Contact your network service provider for
station location.
Poor network trunk.
Press the End Key and dial again.
Poor telephone line.
Press the End Key and dial again.
Your network service provider
Contact your network service provider.
does not support such functions,
or you have not applied to activate
the functions.
The battery or charger is
damaged.
Charging failure
Contact your local dealer.
The temperature is lower than 0 °C Avoid charging battery at too low or
or higher than 45 °C.
high temperature.
The battery is not connected well
with charger.
49
Connect again, and make sure the
cables are connected correctly.
Problem
Short standby
time
Powering on
failure
UIM card failure
Possible Cause
Solution
Standby time depends on the
setting by network service
provider, and varies from provider
to provider.
Power off the mobile phone.
Battery power is run out.
Replace the battery.
Network connection failure
Move to the area with network, or
power off the mobile phone.
The battery power is run out.
Charge the battery.
UIM card is failed or damaged.
Return the UIM card to network
service provider to test.
UIM card is not inserted correctly.
Insert the UIM card correctly.
The metal contacts of UIM card
are dirty.
Clean the metal contacts with soft and
dry cloth.
Invalid UIM card
Contact your network service provider.
Out of network service area
Network
connection failure
Weak signal
PIN code is
locked.
Contact your network service provider
for network service area.
Move to an open area; if you are in a
room, move to the area near windows.
Input incorrect PIN code three
times consecutively.
Input PUK code to unlock the PIN code,
or contact your network service provider.
Fail to add contact The contact memory capacity is all Delete unnecessary contact
information
used.
information.
50
Technical Parameters
Phone specifications are shown in the following table.
Model
ZTE-J G610
Dimensions (H * W * T)
117 mm * 51 mm * 16 mm
Weight
About 120 g (including standard battery)
Battery capacity
1300 mAh
LCD
TFT, 262 K color
Camera
1.3 mega pixels
Charging duration
About 3 hours
51
Declaration of RoHS Compliance
To minimize the environmental impacts and take more responsibilities to the earth we live on, this
document shall serve as a formal declaration that the ZTE-J G610 manufactured by ZTE
CORPORATION is in compliance with the Directive 2002/95/EC of the European Parliament - RoHS
(Restriction of Hazardous Substances) with respect to the following substances:
1. Lead (Pb)
2. Mercury (Hg)
3. Cadmium (Cd)
4. Hexavalent Chromium (Cr (VI))
5. Polybrominated biphenyls (PBBs)
6. Polybrominated diphenyl ethers (PBDEs)
52
Disposal of Your Old Appliance
1. When this crossed-out wheeled bin symbol
is attached to a product, it means the
product is covered by the European
Directive 2002/96/EC.
2. All electrical and electronic products should
be disposed of separately from the
municipal waste stream via designated
collection facilities appointed by the
government or the local authorities.
3. The correct disposal of your old appliance
will help prevent potential negative
consequences for the environment and
human health.
For this product’s recycling information based on WEEE directive, please send an e-mail to
[email protected]
53
EC DECLARATION OF CONFORMITY
It is hereby declared that following designated product:
Product Type: GoTa Digital Trunking Phone
Model No: ZTE-J G610
Complies with the essential protection requirements of the Radio and Telecommunication Terminal
Equipment Directive (EC Directive 1999/05/EC) and the Electromagnetic Compatibility
Directive(2004/108/EC).
This declaration applies to all specimens manufactured identical to the samples submitted for
testing/evaluation.
Assessment of compliance of the product with the requirements relating to the Radio and
Telecommunication Terminal Equipment Directive (EC Directive 1999/05/EC) was performed by
American TCB (Notified Body No.1588), based on the following standards:
Safety
EN60950–1:2006
EMC
EN 301 489-1 V1.8.1; EN 301 489-7 V1.3.1;
EN 301 489-17 V1.3.2; EN 301 489-19 V1.2.1;
EN 301 489-24 V1.4.1;
EN 55013:2001+A2:2006; EN 55020:2007;
Radio
EN 301 511 V9.0.2; EN 301 908-1 V3.2.1;
EN 301 908-2 V3.2.1; EN 300 328 V1.7.1;
ETS 300 487+A1:1997
54
EN 50360:2001; EN 62209-1:2006;
IEC 62209-2:2010; EN 50332-1:2000;
EN 50332-2:2003
Health
This declaration is the responsibility of the manufacturer:
ZTE Corporation
ZTE Plaza, Keji Road South, Hi-Tech, Industrial Park,
Nanshan District, Shenzhen, Guangdong, 518057, P.R.China
Authorised person signing for the company:
Xu Feng
Quality Director Of ZTE Corporation
Name in block letters & position in the company
th
Shenzhen, 28 February 2012
Place & date
Legally valid signature
55