1
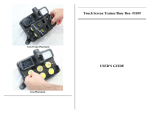
User’s Manual – ATI Powermodule
THANK YOU for purchasing an ATI Powermodule T5 High-Output Fluorescent Fixture. Please carefully read
the following User’s Manual in its entirety to become acquainted with the features of your new light. For
optimal performance please install and operate the fixture in accordance with this manual.
Parts
The fixture comes with a number of items. Please take a minute to inspect the contents of the package. If
any parts are missing or damaged, please contact your dealer immediately.
You will receive the following items:
1 – Base Unit
1 – Acrylic Shield
1 – Hanging Kit (Includes 2 cables, 2 cable retainers (look like a mini top-hat) and 2 cable retainer adapters.)
1 – Universal AC-DC Power Supply
Safety
Please take great care when installing and using this light fixture. This is an electrical device and as with any
electrical device used in or around an aquarium caution needs to be exercised. Failure to do so may result in
electrocution, fire, serious bodily injury or even death. Please follow these guidelines/instructions carefully as
failure to do so may void the warranty and could cause serious safety hazards.
*** Safety Warnings ***
1.
2.
3.
4.
5.
6.
7.
8.
9.
10.
11.
12.
13.
Do NOT operate the fixture in a wet location.
Do NOT touch the bulbs or sockets while the fixture is on.
Do NOT operate the fixture if it has been damaged or if it has been malfunctioning.
Do NOT hang or grab the fixture by any of the electrical cords.
Do NOT re-wire, re-configure or modify the fixture in any way.
Do NOT use the fixture without the acrylic shield.
Do NOT hang the fixture by the power-cords or lamp cords.
Do NOT use any bulb if the exterior is damaged in any way.
Do NOT use with generators.
Unplug the fixture before replacing bulbs or doing any other work on the fixture.
Make sure the fixture is hung securely before operating.
Let the bulbs cool completely before touching.
Keep away from children.
Installation
1. Remove the acrylic shield.
2. Slide both ends of each bulb into the socket pair and rotate the bulb 90 degrees into alignment in the
socket. Gently push each end of the bulb down until it “snaps” in place in the bottom of each socket.
Each bulb should be oriented so that the stamp/label on the bulb is over the hole in the fixture.
3. Remove the protective film from the acrylic shield and slide it back into the fixture.
4. Attach hanging kit to ceiling or wall mount
a. Attach the cable retainers (female threaded) to ceiling with a wood screw for installation into
ceiling studs or toggle bolt/drywall anchor for installation into drywall. (Screw or toggle bolt
not included. Thread Size: 6.0mm x 1.0; a 8-32” toggle bolt will usually also work.)
b. Thread cable through cable retainer adapter (male threaded).
c. Screw cable retainer adapter into cable adapter.
5. Slide loose end of each cable through the “cable gripper” attached to the fixture.
6. Attach AC-DC Power Supply to black junction box. (7.5 or 9.0 Volts recommended.)
7. Plug in the two power-cords and AC-DC power supply and allow a few seconds for it to fire. If the
bulbs do not fire, unplug the power-cords and verify that each bulb is installed correctly.
1
*** Please Note ***
1. The fixture is heavy and care needs to be taken to insure that the fixture is suspended correctly
above the tank. We recommend suspending the fixture from ceiling/wall studs or any other material
that can adequately support the weight of the fixture. Any damage to the fixture that is the result of
improper installation will not be covered by the warranty.
2. Do NOT operate the fixture without the acrylic shield. The reflectors are coated with silver and
without the shield in place the reflectors will deteriorate quickly. Damage to the reflectors or fixture
that results from a failure to use the acrylic shield will not be covered by the warranty.
3. To avoid the possibility of the electrical plug or receptacle getting wet a “drip loop” should be created
for each power-cord. The “drip loop” is the portion of the power-cord that is below the electrical
receptacle or connection to an extension cord which helps prevent water from traveling along the
power-cord and coming into contact with the electrical plug or receptacle.
Active Cooling System
If the “Active Cooling System” isn’t working as well as it should performance and lamp life will suffer and the
ballasts could get too hot and fail over time. Here are few things to check/keep in mind.
1. Air blows into the fixture from the top, so for adequate air flow it’s important to have at least a few
inches of space between the top of the fixture and the ceiling, canopy, etc. Adequate space is also
needed on the side of the fixture opposite the lamp-cord to allow the hot air to exit the fixture.
2. Make sure the holes cut into the fixture housing below the lamp cord side of the fixture are not
blocked by the reflectors and that the metal endplate with the cut-outs is on the side opposite the
lamp-cord. This is important because air blows into the fixture from the top, along the internal
channel where the ballasts and wire are housed, through the holes cut in the fixture housing, along
the bulb channel and then out the side of the fixture opposite the lamp-cord.
3. For installations inside a canopy or other enclosure it’s important to cool the entire canopy or
enclosure in addition to using the Active Cooling System on the fixture.
4. Clean the fans. Dust, debris and salt creep are typically part of any installation and the fans will get
probably dirty. On a regular basis, please remove each fan and clean it.
Acclimation Period
It typically takes several days to several weeks for corals to adjust to a change in the intensity of the lights. In
many cases the Powermodule will produce more light than the previous set of lights used on a tank. If this is
the case we recommend implementing one or more of the following procedures to properly acclimate corals
to the increase in light.
1. Reduce the length of the photo period (the time the lights are on) and then gradually build it back up
over a period of several weeks.
2. Start with the fixture higher up off the tank and gradually lower it down over a period of several
weeks.
3. Screen or shade the tank and gradually remove the screens over a period of several weeks.
4. Start by running just one set of bulbs and gradually add the second set of bulbs over a period of
several weeks.
*** Please Note ***
A similar procedure should be followed upon re-lamping as new bulbs typically have significantly higher
output than old bulbs.
2
Maintenance
1. Wipe down each reflector with a soft polishing cloth at least once a month to remove any moisture
build-up and/or salt spray. This will help maintain there reflective quality and help reduce the chance
of deterioration/rusting.
2. Check the inside of the fixture for any signs of moisture damage or salt creep. Sometimes a “dry”
location is not as dry as you think it is.
3. Inspect end-caps for any signs of electrical arching or moisture damage.
4. Clean the outside of the fixture and the acrylic shield with a soft cloth or sponge.
*** Warnings ***
1. Do NOT use any chemicals or detergents on the silver-coated reflectors.
2. Do NOT use any harsh chemicals or detergents on any part of the fixture.
3. Turn off and unplug the fixture prior to performing maintenance.
3
Tips & Trouble-Shooting
1. The fixture is plugged in/turned on, but nothing happens
Make sure the fixture is plugged in properly and check that the electrical breaker or GFI outlet is not tripped.
Next check to make sure all bulbs are seated correctly in the bottom of the socket as just one incorrectly
installed bulb can prevent 2 or more of the bulbs from firing.
2. The fans do not turn on
The fans are polarized and will not turn on if the plug/tip on the end of the power supply is not oriented
correctly. If the fan or fans do not turn on immediately, pull the plug/tip off the end of the power supply
and rotate the plug/tip 180 degrees and try again. If the fan or fans still do not turn on gently pry up the “ATI”
fan guard on the top of the fixture with a flat blade as the fan guard can get pushed down during transit and
prevent the fan or fans from spinning freely.
3. The fixture trips the GFI outlet
The ballasts used to power the bulbs are electronic and by nature they have a tendency to trip GFI outlets
especially those with a low trigger points (less than 1.0 milliamps). The ballasts are UL Certified and feature
a built-in protection circuit that will turn the ballast off in case of electrical arching or lamp failure. This circuit
makes the use of a GFI unnecessary. If you would still like to use a GFI make sure the trigger point is greater
than 1.0 milliamp.
4. One or more of the bulb flashes on and then immediately goes out
In most cases this is caused by an incorrectly installed or defective bulb. First check to make sure all bulbs
are seated correctly in the bottom of each socket as just one incorrectly installed bulb can prevent 2 or more
of the lamps from firing.
All T5 bulbs are tested before they leave our facility, but unfortunately this doesn’t guarantee that all of them
will arrive in working condition as they occasionally can get banged around pretty bad during shipping. That
being said testing them definitely minimizes the possibility of receiving a bad bulb. The fixture is wired in
such a manner to create two independent sets of bulbs. If one of the sets of bulbs works and the other
doesn’t try swapping the bulbs one at a time between the working and non-working group to determine which
bulb is defective. By the process of elimination one should be able to determine if a bulb is defective.
5. The light fixture trips the circuit breaker/fuse
Most residential circuits can only handle an electrical load of 15 amps each. This is a number that can easily
be surpassed in an aquarium set-up. Please make sure you are not overloading the circuit with too many
lights, aquarium equipment or other appliances. If you require more electrical items to be run off the same
circuit, please contact a licensed electrician.
Still need more help?
Please contact your dealer first for support. If all else fails don’t be afraid to contact us. We are here to help!
We can be reached toll-free at 866-295-9230 or [email protected].
4
ATI Limited Warranty
ATI warrants this product against defects in material and workmanship under normal use for 1 year from the
date of original purchase. During this warranty period ATI will, at the company’s discretion, repair or replace
the defective product or any of it’s components without additional charge for parts and labor. This warranty
may be enforced by the original purchaser only and is not transferable. All subsequent purchasers acquire
the product “as is” without the benefit of the limited warranty.
Inbound shipping is to be paid by the customer including insurance costs and other related expenses. If
repairs are covered by the Limited Warranty, ATI will pay all return shipping charges to any destination within
the United States. All return shipments will be sent via Ground service. Expedited shipping is at the
customer’s expense.
Please keep all the original packaging in case the product needs to be returned or shipped again. Using the
original packaging will help minimize the chance of product damage during transit.
Exclusions
Damage resulting from failure to maintain or use the product in accordance with the manufacturer’s
instructions, damage resulting from accident, abuse, alteration, misapplication, misuse, modification or
neglect or damage resulting from repair or attempted repair by anyone other than ATI or its authorized US
affiliate ReefGeek, Inc. is not covered by this warranty.
Exclusion of Certain Damages/Losses
ATI nor any of its authorized dealers are responsible for any incidental and consequential damage including
but not limited to commercial loss, incidental expenses or inconvenience.
Limitation of Implied Warranties
There are no warranties which extend beyond the face of the ATI Limited Warranty. ATI disclaims all other
warranties, express or implied, regarding this product, including any implied warranties of merchantability or
fitness for a particular purpose. Some states do not allow the exclusion of the implied warranties.
Other Legal Rights
This Limited Warranty gives you specific legal rights. You may also have other rights which vary from state to
state.
Return Authorization (RA)
Please do not return product for warranty service without prior authorization and issuance of a Return
Authorization. To obtain a Return Authorization in the United States please call ReefGeek, Inc toll-free at
866-295-9230. A receipt documenting proof of purchase including the date of purchase must be presented
prior to obtaining a Return Authorization.
5