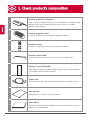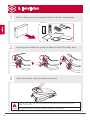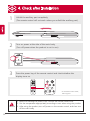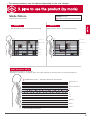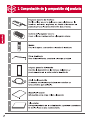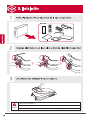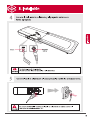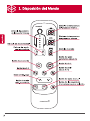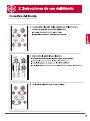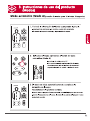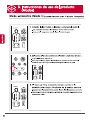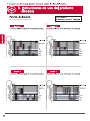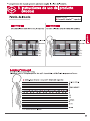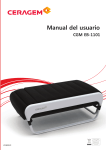
1
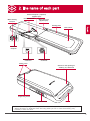
Manual del usuario
CGM ECB-1201
Important safety issues
This appliance is not intended for use by persons (including children) with reduced physical,
sensory or mental capabilities, or lack of experience and knowledge, unless they have been
given supervision or instruction concerning use of the appliance by a person responsible for
their safety. Children should be supervised to ensure that they do not play with the appliance.
The information below stands to protect the safety of the user and to prevent any
property damage. All users must read the manual and use the product appropriately.
The important safety issues are divided into “Danger”, “Warning” and “Caution” and their
meanings are as follows. This picture is a symbol used to warn in case of dangerous
situations or dangerous control methods.
Danger
Warning
Caution
In case of violating the instructions, there is an emergent possibility of serious
damage or even death.
In case of violating the instructions, there is some possibility of serious injury
or death.
In case of violating the instructions, there is possibility of minor injury or
property damage.
Danger
Please follow the instructions carefully in order to reduce potential electric shocks.
1. While using this product, do not use pins or other metals.
2. Do not use the product when there is humidity or water.
3. The external projector must be used with the external projector cover so that there is no
direct contact between the product and skin. (There is risk of receiving a burn.)
4. To prevent damage to the eye (eyeball), do not place the external projector directly on the eye.
5. In case of thunder, lightning or an earthquake, please stop using the product and unplug it.
(There is risk of receiving an electric shock or a burn.)
6. Do not pull the cord to unplug or touch the power plug with wet hands.
(There is risk of receiving an electric shock or a burn.)
7. Apart from the mode for massaging the abdomen or the manual mode, do not use the
product laying face down.
(If the product is used lying down, do not use near the rib cage and only on the abdomen.)
1
Important safety issues
Warning
In order to prevent injuries from burns, fires and electric shocks, one must connect
to a socket that has a ground connection. Be certain of how to connect to the
socket before using the product.
1. Only use the product if it is in mechanically complete condition.
If damaged products are used, there is a possibility of injury or burns)
2. If you have finished using the product or will not use it for a long time, unplug the product.
3. Apart from the external projector cover provided by our company, do not place other products
or substances on top that may cause fires (such as fiber products, blankets and etc.)
(Overheating can cause fires and electric shocks.)
4. In case of use by a disabled person or children, guardians must be present.
*Warning! Keep children away from where this product has been installed.
*Warning! Make sure that children do not jump on the thermal massage bed.
5. Do not use the product if they are in the conditions mentioned below. Call the customer
center and request inspection or after-service.
- If the product has been dropped or is damaged
- If the product is wet
- If the cord or the power button is damaged. (There is a risk of an electric shock or a fire.)
6. Keep the power cord away from electric heating appliances or heaters.
7. This product has only been designed for indoor use. Do not use it outdoors.
8. Do not use the product where there are foreign substances in the air or places that handle oxygen.
9. Do not use or apply skin care, cosmetic or medical products on your skin before and during
the usage of this product.
10. Be cautious of heated surfaces. (Can cause severe burns)
11. Do not use the external projector on parts of the body that have low levels of sensitivity or
parts that have reduced blood flow.
(The heat remaining from the product may be dangerous to children or those who are in bad health.)
12. Please do not sleep on the equipment.
13. Do not randomly disassemble, repair or remodel the product. Call the customer center when
in need of a repair.
(There is a risk of electrick shock, fire, injury, and burns.)
14. To avoid the risk of injury:
- Pregnant women, people who have malignancies, high fever, osteoporosis, people in
poor physical health, people in poor physical shape or undergoing any medical treatment,
and people suffering back, neck, shoulder or hip pain should consult their doctor before
using the product.
- If you have a pacemaker, defibrillator, other artificial implants or other medical devices,
consult with your doctor prior to use.
- If you have sensitive reactions or allergy to heat, you should also consult your doctor
before using the product.
- Do not use on bare skin; always wear clothing.
- Do not use if you have had any major surgeries, including back and/or hip surgeries.
- Consult your doctor prior to use if you have any external wound(s) or infection(s) on
the skin where the product will come into direct contact with your skin.
2
Important safety issues
- Immediately stop using the unit if you start to feel sick or uncomfortable, or if the
massage seems too painful.
- As of now, there is no evidence to suggest that this product interferes with or influences
medications. Those taking any prescribed medications should consult their doctor before
using this product.
- Do not go to sleep while using the unit.
- Do not use the unit after drinking alcohol.
- Do not allow children or pets to play on or around the unit, especially during operation.
Caution
1. When using the internal projector, do not twist your body and use it with a straight posture.
2. When the product is set to high temperatures, there is a risk of burns, so set the projector’s
temperature at an optimal level. (Depending on the physical constitution or thickness of skin,
use the product at optimal temperature.)
3. Those with sensitive skin must use the product at lower temperatures. (There is a risk of burns)
4. Children, those who cannot control the temperature by themselves, and those who have weak
sensory skin must be cautious of using the product for an extended period even if it is set at a low
temperature because there is risk of receiving a burn. (Warning! Please use while wearing clothing.)
5. If there are any abnormal symptoms while using the product, you must consult a doctor
before using it again.
6. Do not bend the power cord or the outer wiring by force. (There is a risk of electric shocks and fires.)
7. Do not place flammable objects (candles, cigarettes and alcohol), objects with water in them,
heavy objects or sharp objects on top of the product. (They can cause electric shocks and damage.)
8. When climbing on or off the product, be cautious of the risk of falling.
9. Use according to the instruction manual and keep to the duration and methods instructed in the manual.
(Use 1~2 times a day and do not use other products unless supplied by the manufacturer.)
10. Do not use the external projector(s) for more than 2~3 minutes on one part of the body.
(The projector must be moved to another part of the body after 2~3 minutes.)
11. Do not apply shock to the product.
12. Do not throw the rmote control and swing or swirl the connecting cable.
(It can cause the injury and equipment failure.)
13. When you move or store the product, take care not to throw down it.
(It can cause the injury and equipment failure.)
14. Do not jump on the product.
(It can cause the injury and equipment failure.)
15. The appliance has a heated surface.
Persons insensitive to heat must be careful when using the appliance.
※ Important information on symptoms
Sometimes when a certain product is used for the first time, healing reactions may occur. In alternative
medicine, such healing reactions can be considered to be a part of the process of improving one’s condition.
If your reaction(s) or pain persists, reduce the time and/or temperature at which you are using the product.
If your reaction(s) or pain worsens, stop the use of the massager immediately and seek medical advice.
3
Ground connection method
This product must be connected to a ground connection.
The ground connection reduces resistance against electric currents in case there are any
defects or breakdowns which may lead to electric shocks and damage. On the product,
there are conductors and electric terminals where the power cord is located. The power
cord has been installed to comply with regional laws; therefore it must be connected to
where there is a socket.
Danger
Check the connection of the product.
(Inappropriate connection may lead to electric shock and damage.)
If you suspect that the product’s power cord and connection point
has a problem, request investigation from an electrician or service
personnel. This product is for 100-240V~ and the power terminal is
installed as can be seen in the picture on the right. Connect the
power cord to a socket that looks like the one shown in the picture.
This product does not use an adaptor.
Notice to users
This device complies with Part 15 of the FCC Rules. Operation is subject to the following
two conditions: (1) this device may not cause harmful interference, and (2) this device
must accept any interference received, including interference that may cause undesired
operation.
NOTE: This equipment has been tested and found to comply with the limit for a Class B
digital device, pursuant to Part 15 of the FCC Rules. These limits are designed to provide
reasonable protection against harmful interference in a residential installation. This equipment generates, uses and can radiate radio frequency energy and, if not installed and
used in accordance with the instructions, may cause harmful interference to radio communications. However, there is no guarantee that interference will not occur in a particular
installation, which can be determined by turning the equipment off and on, the user is
encouraged to try to correct the interference by one or more of the following measures:
- Reorient or relocate the receiving antenna.
- Increase the separation between the equipment and receiver.
- Connect the equipment into an outlet on a circuit different from
that to which the receiver is connected.
Caution
4
- Changes or modifications not expressly approved by the party responsible
for compliance could void the user's authority to operate the equipment.
Contents
>> Important Safety Issues
01
- Danger
- Warning
- Caution
Ⅰ. Introduction of the product
07
1. Product’s characteristics
2. The name of each part
Ⅱ. Installation and preparation
11
1. Check product’s composition
2. Check before product installation
3. Installation
4. Check after installation
Ⅲ. Using the product
17
1. Remote control layout
2. How to use the remote control
3. How to use the product (by mode)
4. How to move the product
Ⅳ. Management and matters that require attention
31
1. Self inspection
2. Management techniques and storage methods
3. Check before A/S request
4. Remote control error messages
5. Product specifications
6. Product warranty
5
MEMO
6
Ⅰ. Introduction
of the product
1. Product’s characteristics
2. The name of each part
7
1. Product’s characteristics
1. Aesthetically Pleasing, Easy-To-Use Exterior Design
The aesthetically pleasing, easy-to-use exterior design matches well with any
home interior article. The folding design of the supporting mat requires
minimum space and ensures convenience for the user.
2. Body sensing function
The new body sensing function automatically measures the length of the spine
of the user, offering optimal, customized compressive stimulation.
3. Easy-To-Move Casters Installed
When the product is not in use, you can easily move and store it by using the
casters installed underneath.
4. Diverse Stimulation Programs
The different stimulation programs created based on the concept of alternative
medicine allow users to select programs that b needs.
5. Slim, Easy-To-Use Remote Control
The slim and light remote control has function keys in the form of icons for
more convenient product operation and simpler manipulation. Moreover, with
its acceptable-type design for the main body, the risk of loss is minimized.
6. External Projectors (3-Sphere) Provided
External projectors that can be used while this massaging equipment is
operated are provided as basic components; users may use the external
projectors for the abdomen, shoulders, arms, legs, and other body parts.
8
2. The name of each part
External Projector (3-Sphere)
(Applied part)
Main Heating
Element
Remote control
Main body mat
(Applied part)
Auxiliary Part
Outer Fabric
Internal
Projector
Remote Control
Connector
External Projector
Connector
Safety Latch
Sensor for the opening of
auxiliary part detection
Supporting Frame
Remote Control
Handle
*Sensor for the opening of auxiliary part detection : It detects that the auxiliary part is open.
When the sensor is separated from the body (when you lift or close the auxiliary part),
however, it does not work.
9
MEMO
10
Ⅱ. Installation
and preparation
1. Check product’s composition
2. Check before product installation
3. Installation
4. Check after installation
11
1. Check product’s composition
1
External projectors (3-Sphere)
Easy to use on body parts such as the abdomen, shoulders, arms,
legs and etc. Can be used with the main product or shared
between two people.
2
External projector cover
It can be used while covering the external projector.
3
12
1
2
Remote control
Simple to operate and check the product’s status.
4
Remote control cable
To use the remote control, connect it to the main body.
5
Remote control back label
Describes the remote control button layout, and can be attached
to the back of the remote control.
6
Power cord
Connects with the main body and plugs into an outlet for use.
7
User manual
Information on how to use the product.
8
Outer fabric
Protects the product from pollution and prevents burns. Easy to
wash as it is detachable.
2. Check before product installation
1. Install where the ground is flat to avoid the risk of damaging the product.
2. Try and avoid installation where there is a lot of humidity or dust.
(To avoid risking electric shocks or fire.)
3. Install according to the designated order.
4. When installing, check that the rated voltage is 100-240V~
(To avoid circuit damage or fire.)
5. Do not drop the product or apply any force to it.
(This could cause malfunctioning.)
6. Do not use damaged power cords, plugs or old sockets.
7. You must connect to a socket with a connection terminal.
(To avoid risking electric shocks.)
13
3. Installation
1
Take out the product and components from the box. Components
Accessaries
부속품
1
2
2
Lay the product where the ground is flat and unlock the safety latch.
3
Open the product using the supporting frame.
Take care not to insert any part of your body into the product when opening the product.
(There is risk of injury.)
Caution
14
The supporting frame cannot open somewhat smoothly for safety reasons.
3. Installation
4
Connect the outer fabric, remote control, and external projector properly.
External
Projector
Remote
Control
Warning
5
Do not touch the connector pin.
(Can cause bodily harm or mechanical failure.)
Connect the power cord onto the main body and plug into a socket.
Caution
If the power cord is connected when the power switch is ”On”, it can cause mechanical failure.
15
4. Check after Installation
1
Unfold the auxiliary part completely.
(The remote control will not work unless you unfold the auxiliary part.)
2
Turn on power at the side of the main body.
(Turn off power when the product is not in use.)
3
Press the power key of the remote control and check whether the
display turns on.
1
1
2
2
*For the remote control’s screen,
refer to page 19.
Caution
16
1. Before connecting the power cord, connect the remote control first.
2. Set the temperature appropriately according to user when using the product.
3. After using the product, turn off power on the remote control, and then turn
off the main body.
Ⅲ. Using the
Product
1. Remote control layout
2. How to use the remote control
3. How to use the product by mode
4. How to move the product
17
1. Remote control layout
Internal projector’s
temperature symbol
Internal projector
position symbol
External projector’s
temperature symbol
Manual mode symbol
Semi-automatic
mode symbol
Mode Symbol
Automatic mode
button (Mode A)
Power button
Mode 2 button
Mode button
(Mode 3~9)
Mode 1 button
Up/Down button
Semi-automatic
mode button
18
1
2
Manual mode button
Internal/External projectors
button for selection
2. How to use the remote control
Turning on the Remote Control
1. Check the condition of the product connections and press
the power key of the remote control.
- Start the remote control after opening the auxiliary part.
1
2
- Press the remote control for 2~3 seconds to turn it off.
2. Check the display on the remote control.
- External projectors appear only when they are connected.
- The current temperature is displayed, and the standby state is shown.
- Refer to pages 21~26 for the mode selection.
- Refer to page 20 for details on how to adjust the temperature.
3. Select the mode to be used.
1
2
19
2. How to use the remote control
Adjusting the Temperature
The temperature of the internal projector and external projector can be adjusted when the mode is
in use.
1. Check the current temperature.
- If you press the Internal/External projectors button for selection, the setting
temperature display for the projector will flash, and a buzzer sound will be emitted.
(The temperature is in standby state.)
2. Press the temperature key and set the temperature to
the desired level using the Up/Down button.
- The temperature can be adjusted by 1℃.
- If you do not press the button for 5 seconds in temperature standby state, the
2
1
temperature is converted into the current level when the temperature setting is
completed.
2
Pressing once (Internal projector temperature selected)
1
Pressing repeatedly (External projector temperature selected)
3. Check the changed temperature set point on the remote control
display.
- If you do not press the setting button after setting the temperature by pressing the
internal/external projectors’ temperature, the temperature is converted into the current
level after the temperature display blinks for about 5 seconds.
Internal projector External projector
30℃~65℃
20
30℃~60℃
3. How to use the product (by mode)
Automatic Mode (Mode A) (Mode Duration : Approx. 36 minutes 30 seconds)
1. Turn on the remote control power and check the display.
- External projectors appear only when they are connected.
- The current temperature is displayed, and the standby state is shown.
2. Select the mode by pressing the automatic mode button
(Mode A).
- The mode display will show “A”
1
2
- To change the mode, press the desired mode button
once more in 5-second standby state after pressing the
mode button.
3. The mode begins automatically, and body sensing
starts.
Lie in the correct posture.
- When you move the internal projector, the moving projector display appears.
- During body recognition, internal projector position symbols will flash in order.
21
3. How to use the product (by mode)
Automatic Mode (Mode 1)(Mode Duration:
Approx. 36 minutes 30 seconds)
1. Turn on the remote control power and check the display.
- External projectors appear only when they are connected.
- The current temperature is displayed, and the standby state is shown.
2. Select the mode by pressing the automatic mode 1 button.
- The mode display will show “1.”
- To change the mode, press the desired mode button once more in 5-second
standby state after pressing the mode button.
1
2
3. The mode begins automatically, and body sensing
starts. Lie in the correct posture.
- When you move the internal projector, the moving projector display appears.
- During body recognition, internal projector position symbols will flash in order.
22
3. How to use the product (by mode)
Automatic Mode (Mode 2) (Mode Duration: Approx. 18 minutes)
1. Turn on the remote control power and check the display.
- External projectors appear only when they are connected.
- The current temperature is displayed, and the standby state is shown.
2. Select the mode by pressing the automatic mode 2 button.
- The mode display will show “2.”
- To change the mode, press the desired mode button once more in 5-second standby
state after pressing the mode button.
1
2
3. The mode begins automatically, and body sensing
starts. Lie in the correct posture.
- When you move the internal projector, the moving projector display appears.
- During body recognition, internal projector position symbols will flash in order.
23
3. How to use the product (by mode)
Modes 3~9 (Mode Duration:
Approx. 36 minutes 30 seconds)
1. Turn on the remote control power and check the display.
- External projectors appear only when they are connected.
- The current temperature is displayed, and the standby state is shown.
2. Select the mode by pressing the mode
button (Modes 3~9).
- The mode display will show the mode number.
- To change the mode, press the desired mode button once more in 5-second standby
state after pressing the mode button.
1
2
Pressing repetition
(Modes 3~9 Sequential selection)
3. The mode begins automatically, and body sensing
starts. Lie in the correct posture.
- When you move the internal projector, the moving projector display appears.
- During body recognition, internal projector position symbols will flash in order.
24
3. How to use the product (by mode)
Semi-Automatic Mode (Mode Duration:
Approx. 18 minutes)
1. Turn on the remote control power and check the display.
- External projectors appear only when they are connected.
- The current temperature is displayed, and the standby state is shown.
2. Press the semi-automatic button and move the internal
projectors to the desired position.
- If you press the semi-automatic mode button, the semi2
1
automatic mode display will flash, and a buzzer sound will
be emitted.
- To change the mode, press the desired mode button once
more in 5-second standby state after pressing the mode
2
button.
1
3. The mode will automatically begin centered on the
designated position. Assume a proper body posture.
- Up and Down motion will begin centered on the selected point.
- When you move the internal projector, the moving projector display appears.
25
3. How to use the product (by mode)
Manual Mode
(Mode Duration: Approx. 60 minutes)
1. Turn on the remote control power and check the display.
- External projectors appear only when they are connected.
- The current temperature is displayed, and the standby state is shown.
2. Press the manual mode button and move the internal
projectors to the desired position.
- If you press the manual mode button, the manual mode
display will flash, and a buzzer sound will be emitted.
- To change the mode, press the desired mode button; the
mode will then be changed immediately.
2
1
3. Thermal stimulation begins from the designated
position. Assume a proper body posture.
- When you move the internal projector, the moving projector display appears.
- The projector moves after a certain time (5 minutes) to prevent freeze burn.
26
* The massage patterns may be adjusted depending on the user's height.
3. How to use the product (by mode)
Mode Pattern
Scanning
Thermal acupressure (88 seconds)
Mode A
Mode 1
(Mode Duration: Approx. 36 minutes 30 seconds)
(Mode Duration: Approx. 36 minutes 30 seconds)
Thermal acupressure (100 seconds)
10 seconds
Standby
Cervical spine 1
3
5
7
Thoracic vertebrae 2
10 seconds
Standby
Cervical spine 1
3
5
7
Thoracic vertebrae 2
4
4
6
6
8
8
10
10
60 seconds Standby
(Abdomen switch)
12
2 minutes Standby
(Abdomen switch)
4
4
Sacral 1
Sacral 1
Sacral 3
Sacral 3
Mode 2
Mode 3
(Mode Duration: Approx. 18 minutes)
10 seconds
Standby
12
Lumbar 2
Lumbar 2
(Mode Duration: Approx. 36 minutes 30 seconds)
Cervical spine 1
3
5
7
Thoracic vertebrae 2
10 seconds
Standby
4
Cervical spine 1
3
5
7
Thoracic vertebrae 2
4
6
6
8
8
10
10
12
12
Lumbar 2
4
Lumbar 2
4
Sacral 1
Sacral 1
Sacral 3
Sacral 3
27
* The massage patterns may be adjusted depending on the user's height.
3. How to use the product (by mode)
Mode Pattern
Scanning
Thermal acupressure (88 seconds)
Mode 4
Mode 5
(Mode Duration: Approx. 36 minutes 30 seconds)
10 seconds
Standby
Cervical spine 1
3
5
7
Thoracic vertebrae 2
4
Cervical spine 1
3
5
7
Thoracic vertebrae 2
4
6
8
8
10
10
12
12
Lumbar 2
4
Lumbar 2
4
Sacral 1
Sacral 1
Sacral 3
Sacral 3
Mode 6
28
10 seconds
Standby
6
Mode 7
(Mode Duration: Approx. 36 minutes 30 seconds)
10 seconds
Standby
(Mode Duration: Approx. 36 minutes 30 seconds)
Cervical spine 1
3
5
7
Thoracic vertebrae 2
(Mode Duration: Approx. 36 minutes 30 seconds)
10 seconds
Standby
Cervical spine 1
3
5
7
Thoracic vertebrae 2
4
4
6
6
8
8
10
10
12
12
Lumbar 2
Lumbar 2
4
4
Sacral 1
Sacral 1
Sacral 3
Sacral 3
* The massage patterns may be adjusted depending on the user's height.
3. How to use the product (by mode)
Mode Pattern
Scanning
Thermal acupressure (88 seconds)
Mode 8
Mode 9
(Mode Duration: Approx. 36 minutes 30 seconds)
10 seconds
Standby
Cervical spine 1
3
5
7
Thoracic vertebrae 2
(Mode Duration: Approx. 36 minutes 30 seconds)
10 seconds
Standby
Cervical spine 1
3
5
7
Thoracic vertebrae 2
4
4
6
6
8
8
10
10
12
12
Lumbar 2
Lumbar 2
4
4
Sacral 1
Sacral 1
Sacral 3
Sacral 3
Semi-Automatic Mode
(Mode Duration: Approx. 18 minutes)
Massaging is repeated on a specified region. This region depends on the final position of the internal projectors.
Up&Down(3 Times) + Thermal acupressure (60 seconds)
Cervical spine 1
3
5
7
Thoracic vertebrae 2
4
6
8
10
12
Lumbar 2
4
Sacral 1
※
Users may adjust the position.
Sacral 3
29
4. How to move the product
1
Caution
2
Caution
30
Close the product using the supporting frame and lock the safety latch.
Take care not to insert any part of your body into the product when closing
the product. (There is risk of injury.)
Hold the handle and move the product using the casters.
When you move or store the product, take care not to slam it down.
(There is risk of injury and equipment failure.)
Ⅳ. Management and matters
that require attention
1. Self inspection
2. Management techniques and storage methods
3. Check before A/S request
4. Remote control error messages
5. Product specifications
6. Product warranty
31
1. Self inspection
Inspection Points Before Use
1. Is the power cord connected to the socket?
2. Did you check whether the main body’s power button is “ON”?
3. Is the remote control temperature displayed when the remote control
power is “ON”?
4. Did you check whether the projector’s temperature has been set to the
appropriate level?
5. Is there anything strange on the exterior?
6. Did you check whether there is no damage to the external projector cover?
Inspection Points After Use
1. Did you check whether all displays have been turned “OFF” when the
remote control power is “OFF”?
2. Did you check whether the main body’s power button is “OFF”?
3. Is the power cord disconnected from the socket?
32
2.
Management techniques and storage methods
1. Leather is an oil based product. Therefore it is crucial that it is not exposed to organic
solvents such as acetone, ballpoint pen ink, gasoline, thinners, sweat, mousse, spray,
and etc.
2. Where there is direct contact with the head or skin, wipe with a dry cloth.
3. If there is contact with cosmetic products or volatile emulsions and is left for a long
time, the surface may peel off so wipe with a dry cloth as soon as possible.
4. When washing the outer cloth, use a neutral detergent and wash alone by hand.
5. If there is contact with hot objects or heat, the leather will curl up so please use
caution.
6. Avoid direct sunlight or humid places.
(They can expose the product to bleaching or aging.)
7. Store at room temperature.
33
3. Check before A/S request
Does the remote control not turn on?
Q: Is the power switch at the bottom of the product turned on?
A: Turn on the power switch.
Q: Is the power cord properly connected?
A: Reconnect the power cord.
Q: Is the remote control properly connected?
A: Reconnect the remote control.
Q : Is the auxiliary part spread out completely?
A : Start the remote control after spreading out the auxiliary part.
Do the external projectors not work?
Q: Are the external projectors properly connected?
A: Reconnect the external projectors.
Is the product malfunctioning?
Q : Can you move the internal projectors using the Up/Down key?
A : The internal projectors can be moved using the Up/Down key only in semi-automatic
mode and manual mode.
Q : Does the internal projector move to your head while using the product?
A : If you lift the auxiliary part while using the product, the remote control power turns off.
The internal projector moves to your head automatically.
Please use after turning power on again.
Are error messages displayed on the remote control?
Q : Does the remote control screen display E1, E2, E, C, or LE?
A : After checking the error messages, contact the Customer Support Center.
Never dismantle the product arbitrarily.
34
4. Remote control error messages
In case of error during operation, the following messages appear on the remote
control display:
Symbol
Meaning
E1
When the internal projector’s temperature is over 75℃, the “E1” error
appears on the temperature display of the internal projector, and all
operations of the product stop.
E2
When the external projector’s temperature is over 70℃, the “E2” error
appears on the temperature display of the external projector, and all
operations of the product stop.
E
If the motor is overloaded, and certain abnormal current is detected,
the “E” error appears on the automatic mode display, and all
operations of the product stop.
C
If normal communication between the remote control and the main
body is impossible, the “C” error appears on the automatic mode
display, and all operations of the product stop.
LE
It appears when the limit switch is faulty and all operations of the
product stop.
Caution
After checking the error messages, contact the Customer Support Center.
35
5. Product specifications
Name of Model
Name of Product
Rated Voltage
Power Consumption
Recommended
Height for Body
Sensing
CGM ECB-1201
Automatic Thermal Massager
100-240V~, 50/60Hz
80W
120cm~186cm
Measurement
When spread out : 2080mm x 600mm x 120mm(±5mm)
When folded : 1170mm x 600mm x 175mm(±5mm)
Weight
(excluding
components)
26kg(±2㎏)
Manufacturer
CERAGEM CO., LTD
* This appliance should not be used purpose of medical treatment.
* To improve quality, design and product specifications may be changed without notice.
36
6. Product warranty
37
MEMO
V~ : AC (alternating current) voltage source
ㅣ
: On (power: connectino to the mains)
O
: Off (power: disconnection from the mains)
: Load Way Mark
: Handle with Care(Wet)
: Handle with Care(Open)
: Handle with Care(Fragile)
: Attention, consult Accompanying documents
38
MEMO
39
MEMO
40
Ruedas para traslado
Tenga cuidado de no insertar ninguna parte de su cuerpo en el producto al abrirlo.
(Existe el riesgo de lesiones.)
Precaución
La caja de soporte no puede abrirse sin ningún tipo de complicaciones por razones de seguridad.
Utilizar tras haber abierto el soporte de la parte posterior y formar un angulo de 90ºcon la camilla.
60
: Gráfico de masaje tras el estímulo de calor
* El rodillo estímula con calor la zona antes de aplicar la función
de masaje correspondiente(Gráfico superior) y luego se traslada
a la siguiente zona a trabajar.
(Excepto Modo1, Modo2 y semiautomático)
60
60
1. El cuero es un producto oleoso. Por lo tanto, resulta esencial que no se exponga a
solventes orgánicos como la acetona, tinta de lapiceras, gasolina, diluyentes,
sudoración, mousse, spray, etc.
2. Limpie con un paño seco los lugares en donde haya contacto directo con la cabeza
o la piel.
3. Si se produce el contacto directo con productos cosméticos o emulsiones volátiles y
la exposición es prolongada, la superficie puede descamarse; por lo tanto, limpie el
producto con un paño seco lo antes posible.
4. Al lavar el paño exterior, utilice un detergente neutro y lávelo a mano, por separado.
5. Tenga cuidado ya que el cuero puede deformarse si se produce el contacto con
objetos calientes o el calor.
6. Evite la luz directa del sol o los lugares húmedos.
(Pueden decolorar el producto o avejentarlo.)
7. Almacene a temperatura ambiente.
8. No almacenar la camilla en posición vertical sin apoyo.
(Para evitar riesgos de caídas, daños y averías)
MEMO
39
MEMO
40
Oficina central
/ Fábrica
177-14 Osaekdang-ri, Seonggeo-eup, Seobuk-gu
Cheonan-si, Chungcheongnam-do, Korea
TEL : (82)41-523-2550
FAX : (82)41-523-2560
Página de inicio
http://www.ceragem.net