1
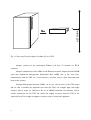
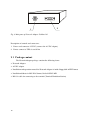
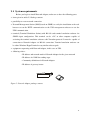
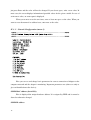
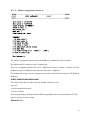
Network Adapter
Installation and operation manual
MNSMP-03D
Contents
I. OUTLINE………………………………………………………………………………………… 6
I.1.What is NetMan?………………………………………………………………………………. 6
I.2.What is SNMP?………………………………………………………………….……………..6
I.3.What is Network Adapter?…..………………………………………………………………. 7
I.4. Package content……………………………………………………………………………….. 10
I.5. System requirements………………………………………………………………………….11
I.6. Specifications………………………………………………………………………………….. 13
II. INSTALLATION AND CONFIGURATION………………………………… 15
II.1. Connecting the equipment…………………………………………………………………15
II.1.1 Adapter configuration………………………………………………………….…… 15
II.1.2 Hardware set-up……………………………………………………………………... 16
II.1.3 Software set-up………………………………………………………………….……. 16
II.2. Main configuration menu of Network Adapter……………………………….………. 17
II.3. Description of options……………………………………………………………………… 17
II.3.1 Network configuration……………………………………………………………… 18
II.3.2 Trap Receivers……………………………………………………………………….. 20
II.3.3 Set SNMP communities……………………………………………………………..21
II.3.4 Additional setup screen…………………………………………………………….. 21
II.3.5 Set UPS protocol…………………………………………………………………….. 22
II.3.6 Modem configuration……………………………………………………………….. 23
II.3.7 Save configuration…………………………………………………………………... 24
II.3.8 Restore configuration……………………………………………………………….24
II.3.9 Service menu……………….…………………………………………………………. 24
II.3.10 Exit………………………………………………………………………………………
24
II.4. Upgrading the NetMan firmware………………………………………………………... 25
II.5. Testing and verifying the installation…………………………………………………… 25
III. SUPPLEMENTS…………………………………………………….……………………... 28
III.1. Using various NMS………………………………………………………………………... 28
III.2. Glossary of technical terms………………………………………………………………. 32
2
Thank you for purchasing the product by our company.
To reach the maximum utilization of our product in operation, we advise you to read
this manual thoroughly, prior to this product installation and operation.
Specifications and technical data in this manual are as up-to-date as possible. With
regards to perpetual improvement of our products, the producer reserves the right to changes
without prior notice, and takes no responsibility for casual aberrations not included or
presented here.
4
I. OUTLINE
I. 1. What is NetMan ?
This device is a network interface between the UPS and the LAN, is able to communicate in
severals way:
•
TCP/IP UDP to be used in combination with our management software that is available for
all the common operating systems present on the market.
•
HTTP to monitor the UPS status directly from a normal web browser without any added
software
•
Telnet to configure the NetMan throw the network
•
NetMan is able also to manage a modem. This is used to call the service center, that
immediately report the UPS failure.
I. 2. What is SNMP ?
With nowadays market environment using computer networks which become larger
and more complex, it is important to protect precious and confidential information and data.
Your computer systems connected to an uninterruptible power supply prevents from any data
loss in case of electricity outage. And what you need is a reliable equipment for monitoring and
control over each UPS within your computer system.
To monitor critical or operational states there is a standard network protocol for
network management - Simple Network Management Protocol (SNMP). This protocol is a
particle of IP protocols set even when there are solutions based on other network protocols
(IPX, etc.).
A PC or workstation supported by your UPS may perform the critical function that
cannot be cancelled by the provided network station monitoring. Or, your UPS may support
peripheral accessories and not the PC or workstation that has the ability, with suitable
software, to monitor the UPS directly via a serial interface network solution for monitoring
and control of the UPS.
5
Management Information Base ( MIB )
MIB (Management Information Base) is a virtual structure used for communication
between a NMS and SNMP Agent. MIB consists of OIDs (Object Identifiers) that label the
variables which can be controlled and monitored by a NMS (Network Management Station).
6
I. 3. What is Network Adapter?
The Network Adapter enables the network management of UPS units or other
equipment. Adapter is supplied with basic accessories that can be completed according to
individual customer's needs and requirements. In Figure 1 you see the Network Adapter
(NetMan101 version), in Figure 2 there is an example of connection between Network
Adapter NetMan 102 and UPS; this device is an expansion card for your UPS to insert directly
into UPS slot (for Ups models supporting that), but functionality is exactly the same of
NetMan101: in this manual everything explained about NetMan101 is the same for
NetMan102.
1
2
3
Fig. 1 Network Adapter NetMan 101
Description of controls and connectors :
1. UTP Ethernet LAN
2. Signaling LED’s for network activity
3. Terminal connect to configure adapter
1
NetMan 102
2
3
Rear side
of UPS
Fig.2 Network adapter NetMan 102
7
NETWORK
Fig. 3 Connecting Network Adapter NetMan 101 to an UPS
Adapter connects to the twisted-pair Ethernet (10 base T) network via RJ-45
connector.
Adapter communicates with a NMS via the Ethernet network. Adapter includes SNMP
agent that implements Management Information Base (MIB) and, at the same time,
communicates with the UPS via a serial interface, and thus creates a data interconnection
between the systems.
Network Management Stations (NMS) can receive critical states of the UPS (traps)
and are able to monitor the important data about the UPS, for example input and output
voltages, battery status, etc. Moreover, the set of SNMP commands can remotely activate
various instructions for the UPS and control the supply of power from the UPS to the
connected load. For example it supports a remote restart of connected equipment.
8
NMS
File
Server
UPS
Device 1
SNMP Adapter
BootP
Server
Terminal
Emulation
Station
TFTP
Server
Fig. 3 Connecting Network Adapter to the network.
Network adapter was designed after a careful consideration of needs of wide range of
network environments. As a result it offers network management with several supports :
* Universality and flexibility
* Network Interface Card (NIC) slot provides the Network Adapter, via a
manufacture-configured interface, to Ethernet.
User-configured parameters are stored in the Network Adapter´s nonvolatile memory.
Configuration can be updated via RS-232 port via a terminal.
Some proceeds in this Manual utilize specific parts of the Network Adapter. Before
you start working under these proceeds, make familiar with the Adapter's specific parts. In
Figure 4 you see the Adapter and its main parts.
9
1
2
Fig. 4 Main parts of Network Adapter NetMan 101
Description of controls and connectors :
1. Power cord connector 12V DC (connect the AC/DC adapter)
2. Port to connect to UPS via serial line
I. 3 Package content
The Network Adapter package contains the following items :
• Network Adapter
• AC/DC adapter
• Installation and operation manual for Network Adapter is inside floppy disk in PDF format
• Installation diskette in MS- DOS format, labeled SNMP MIB
• RS-232 cable for connecting to the terminal (Terminal Emulation Station)
10
I. 4 System requirements
Before you begin to install Network Adapter, make sure to have the following parts:
• items given in article I.3 Package content
• possibility to create network connection
• Network Management Station (NMS) based on SNMP, to verify the installation or the web
browser to test the HTTP communication or the UPS management software to test the
UDP communication.
• terminal (Terminal Emulation Station) with RS-232 and terminal emulation software for
SNMP Agent configuration. This terminal can be a PC or other computer capable of
activating the terminal emulation software with X-modem protocol. It must be capable of
connection to Network Adapter via RS-232 connection. Terminal emulation software can
be either Windows HyperTerminal or any similar software pack.
• equipment cooperating with Network Adapter, in this case an UPS.
• following values :
- IP address and network mask of Network Adapter for the given network
- IP address of a NMS for sending traps
- Community definitions for Network Adapter
- IP address of gateway/router
Figure 5. Network Adapter package content.
11
Additional installation requirements
To install the adapter to Ethernet (10BaseT) network you need a UTP or STP cable
with RJ 45 plugs.
Specifications and Recommendations for 10BASE-T Ethernet Cabling
•
RJ-45 cabling is also known as Twisted Pair Ethernet (TPE) or Unshielded Twisted
Pair (UTP) 10BASE-T.
•
The cable must comply with the IEEE 802.3 10Base-T standards 2-pair, Category 3 or
higher, UTP cable.
•
The cable between the adapter and the hub must be no more than 100 meters (328 feet)
and no less than 2.5 meters (8 feet).
•
IMPORTANT: Pins 1 and 2 must be a pair, and pins 3 and 6 must be a pair.
Straight-through cable for 10BASE-T cabling
Function
TX+
TXRX+
RX-
Pin # to Pin #
1 <--------> 1
2 <--------> 2
3 <--------> 3
6 <--------> 6
When everything necessary for installation is ready and you are familiar with the main
adapter parts, you can configure your adapter for your computer system.
12
I. 5 Specifications
Electrical characteristics
Input: Nominal input voltage :
direct connection :
12V DC
Maximum input current :
0,3 A
Output :
1x
RS 232 TERMINAL and MODEM
1x
RS 232 UPS CONNECTION
1 x ETHERNET 10BaseT
Interference down to the limit R02 according to technologic standard STN 34 2860
Dimensions and weight
Dimensions : width
77 mm
height
28 mm
depth
158 mm
Weight :
300 g
Covering :
IP20
Environmental conditions
Operational temperature :
+ 5o C to + 40o C
Storing temperature :
- 5o C to + 50o C
Relative operational humidity :
max. 80%
Relative storing humidity :
max. 90%
Environment dustiness : The volume of dust particles in the air should not exceed 0,75 kg/m3
13
Network adapter
− connectable to any network architecture
− equipment can be connected via RS-232
− equipment can be any product supported by Network Adapter
− configurable from terminal and Telnet (after the first terminal configuration).
SNMP Agent
− offers SNMP protocol for connection to a NMS
− communicates with the NMS via UDP/IP protocol
− enables the NMS to control MIB OID`s
− signals critical states of connected equipment (traps) to the NMS.
Terminal Emulation Station (TES)
− a PC or workstation with RS-232 interface, and terminal emulation software for Network
Adapter configuration
−
the system can either be a PC-compatible computer or any computer software with Xmodem protocol, and which can be connected to Network Adapter via RS-232.
−
terminal emulation software can be, for example, Windows HyperTerminal or any similar
terminal emulating the software pack
− enables configuration and testing of Network Adapter
− enables the firmware upgrade for the adapter (using the X-modem protocol)
−
enables direct communication with connected equipment
NIC Driver
− provides software connection to specific NIC
−
enables to configure NIC
−
enables to receive data via NIC
−
enables to send data via NIC
− provides (Packet Driver) services for Network Adapter
Network Interface Subsystem
− provides HTTP services for Network Adapter
− provides UDP/IP services for Network Adapter
− provides TELNET service for Network Adapter
− provides TFTP client service to upgrade the adapter firmware.
14
II. INSTALLATION AND CONFIGURATION
II. 1. Connecting the equipment
II. 1. 1. Adapter configuration
Adapter must be configured before it is used. Adapter contains own configuration
software and it can be configured locally only.
Adapter configuration
Adapter contains a configuration software that can be accessed by connecting the
Adapter to computer with running emulation software (TES). When configuration is complete,
disconnect the Adapter from the terminal and install it to your network.
To use the built-in software for Network Adapter configuration you need a terminal
with RS-232 serial port, or a PC with terminal emulation software for example Windows
Terminal. Set the serial link to 9600 baud, No parity, 8 data bits, 1 stop bit, no control flow.
NOTE : Configuration software is always activated with this setting, even you change the
adapter`s serial configuration.
Connecting the adapter to terminal and starting the configuration software :
1. Connect the serial cable to the Network Adapter`s configuration port and
to the serial port on terminal
2. Connect power supply for Network Adapter
3. Wait for about 10 seconds, then press Enter and the main configuration menu is displayed
If the main configuration menu is not displayed, interrupt power supply to Network
Adapter and repeat steps 2 and 3. If the main configuration menu is still not displayed, check
the following conditions :
• check the communication settings on the terminal you are using. It must be set to 9600
baud, No parity, 8 data bits, 1 stop bit, no control flow.
• if the serial link configuration is correct, check the cables and plugs
• repeat steps 2 and 3. If the main configuration menu is not displayed even after these steps,
please, contact the factory or your distributor for help.
15
II. 1. 2. Hardware set-up
The figure below shows the simpliest hardware configuration of Network Adapter.
NMS
WEB
UPS
Device 1
SNMP Adapter
TELNET
UDP
Terminal
Emulation
Station
TFTP
Network Interface Card (NIC) configuration.
Connecting the Network Adapter NETMAN 101
1. Use the UPS cable to connect the Network Adapter to the UPS via RS-232 interface.
2. Connect the Network Adapter to the power supply and the power-supply to the mains or
into an UPS.
Connecting the Network Adapter NETMAN 102
1. Turn off the UPS.
2. Remove the slot box cover and insert the NetMan 102.
3. Close the slot box with the cover and turn on the UPS.
II. 1. 3. Software set-up
Network Management Station (NMS) Configuration
Each NMS has its own user interface. In this part you find general instructions how to
configure a NMS for connecting to Network Adapter. For details, see the User Manual to the
NMS. The configuration instructions for some types of NMSs is in Supplement III.2
Adding the Network Adapter to the NMS configuration
16
Inform the NMS of the presence of Network Adapter by entering the Network
Adapter`s IP address in NMS configuration.
Recompiling the MIB on the NMS station
Create a SNMP control of MIB on the NMS station. This operation will place MIB to
the NMS of MIB database from the floppy included.
Activation of critical states (traps) on NMS
Make sure to have activated critical states (traps) on the NMS.
II. 2. Main configuration menu of Network Adapter
When a terminal is connected to the Adapter`s configuration port and the Adapter is
switched on, several reports are displayed (after having inserted default password: password):
When the terminal is connect to SNMP adapter, and after you press ENTER, the menu of
options is displayed enabling the user to see the adapter`s configuration and watch its actual
state.
II. 3. Description of options
General rules of work with the software :
This menu communicates with you in the English language only. The menu options are
selected by writing the corresponding number and pressing ENTER. You can make correction
of the entered values by pressing Backspace. If you agree with the actual value of a variable,
17
just press Enter and the value will not be changed. If you do not agree, write a new value. In
most cases, the screen displays information of possible values for the given variable. In case of
an incorrect value, an error report is displayed.
When you want to erase the text issue, enter at least one space as the value. When you
want to erase the numeral or address issue, enter zero as the value.
II. 3. 1. Network Configuration (menu 1)
Here you can see and change basic parameters for correct connection of Adapter to the
computer network and the adapter’s monitoring. Important parameters are (others are only to
give an identification to the device):
SNMP MAC address (Serial NO)
Here is displayed the unique hardware address. It is assigned by IEEE and it cannot be
altered or otherwise changed.
SNMP IP address
18
Write the IP address assigned to the Adapter. To change the IP address, use the format
aaa.bbb.ccc.ddd, where aaa, bbb, ccc and ddd are numbers from 0 to 255. If you write a
number outside this interval, the software reconverts the number to a value from the interval 0
to 255. If you do not know the IP address, call your system administrator.
Mask IP address (network mask - Netmask)
Write a network mask for the adapter. To change the network mask (Netmask)
address, use the format aaa.bbb.ccc.ddd, where aaa, bbb, ccc and ddd are numbers from the
interval 0 to 255. If you write a number outside the interval, the software reconverts the
number to a value from the interval 0 to 255. If your local network is divided into subnetworks, make sure to have the value set (for example, 255.255.0.0).
Router IP address (gateway)
Define the gateway address. The gateway is a predefined termination for all packets not
addressed to the local network. Use the format aaa.bbb.ccc.ddd, where aaa, bbb, ccc and ddd
are numbers from the interval 0 to 255. If you write a number outside the interval 0 to 255, the
software reconverts the number to a value from the interval. If the gateway is not used, enter
zero value (0).
SysContact, SysName, SysLocation
These 3 strings define the names for the Contact and name of the administrator and the
location. Are used only in the NMS program.
UDP port
The UDP port can be changed if another device on the network use the same.
19
II. 3. 2. Trap receivers (menu 2)
These are the snmp managers to which you want Device will send traps (NMS and Teleguard).
It is possible specify what community must be use to send the traps.
Trap community
This command changes the name of community used by some SNMP manager to
receive the traps. Write up to 16 alphanumeric characters to specify the trap-community.
20
II. 3. 3. Set SNMP communities (menu 3)
Get community
This command changes the name of community used by SNMP manager to perform
GET operations. Write up to 16 alphanumeric characters to specify the get-community.
Set community
This command changes the name of community used by SNMP manager to perform
SET operations. Write up to 16 alphanumeric characters to specify the set-community.
II. 3. 4. Additional Setup Screen.(menu 4)
21
To set a different password from the default, the password will be asked for confirm.
It is also possible start the Web server to send HTTP pages to a browser with "HTTP
connection", enable the Telnet with "Telnet connection", ATTENTION! The Telnet
connection has a timeout of 1 minute.
Can be configured a modem on the Terminal serial port see the part no. 3.6. with "MODEM
connection".
It is possible moreover to create a virtual UPS; this function, enabled with "UPS Direct mode"
permits to connect on the Terminal serial port another NetMan or a computer to manage the
UPS.
Finally it is possible set-up a password for the UDP communication with the software, so the
management of the UPS can be secure and inaccessible from non authorized computer.
To set a different password from the default, the password will be asked for confirm.
II. 3. 5. Set UPS Protocols (menu 5)
In this menu, select the type and communication parameters of the monitored UPS.
You will find all data you need to insert here correct entries on the UPS label: look for PRTK.
code. The UPSname is the UPS model name, UPS address and NetMan address is not used.
The UPS serial number is used for the Modem communication with the Teleguard service
program. This number is written on the UPS data label.
22
II. 3. 6. Modem configuration (menu 6)
The modem configuration menu enable the NetMan to communicate with a modem.
The modem will be connected to the Terminal port.
There are 2 telephone numbers that can be called in the sequence: number 1- number 2, for the
numbers of repeat configured and waiting the delay time configured.
The modem init string is used to configure the modem, the default init string for US Robotics
modem is:
ATE0V1&H0&R1&I0&D0S0=0&W
The alarm level define for what alarm the NetMan will start to call:
0 no call
2 call for internal fault alarm
3 call for all alarm.
The accept incoming call flag enable/disable the possibility that an external modem call . This
may be used for security reasons.
IMPORTANT! :
23
the modem must be configured before connected to the NetMan with a terminal emulation
software for example Windows HyperTerminal with the string
ATE0V1&H0&R1&I0&D0S0=0&W0
after connect to the NetMan and reboot the NetMan.
II. 3. 7. Save Configuration (menu 7)
To save the configuration.
II. 3. 8. Restore Configuration (menu 8)
To restore default saved configuration.
II. 3. 9. Service menu (menu 9)
On this menu you can access only after you have inserted the login password.
Set Hosts 1-7
It is possible define up to 7 hosts or subnetworks that will be enabled for the network
communication with the NetMan. This communication comprises all the NetMan supported
protocols even the ping.
To specify a subnetwork it is used the *.
Reset Netman
24
It is used to reset the NetMan.
Upgrade firmware
With this command it is possible make the firmware upgrade in two different ways:
if you are connected via serial port it will be possible make the upgrade using the Xmodem
protocol,
if you are connected via Telnet the firmware will be upgraded making a download from a
TFTP server specified at the point A of this menu.
NetMan will find the file named netman10x.bin on the server, if this file exists the firmware
upgrade will be done with the new firmware.
It is also possible make the upgrade from a computer with the TFTP server executing the
command UPDATE included on the floppy disk in bundle.
The command has the follow sintax:
update <netman address> <firmware file.bin> <TFTP server>
At the end of the upgrade the NetMan will reboot automatically after about 10 seconds.
Set TFTP server
It is used to configure the server TFTP from it will be possible download the new firmware.
This address has full access to the NetMan like the host addreses on the access list.
II. 3. 10. Exit
To exit from the configuration program press q. For reconfiguration, insert again the password
to start the configuration program.
25
II.4. Upgrading NetMan firmware
Before upgrading the firmware, make sure that you have everything listed in paragraph 1.5 as
well as the firmware file (BIN file) that can be downloaded from our site www.upstechnet.com.
II. 4. 1. Upgrading via serial port
Connect the TERMINAL port of NetMan to the serial port on the PC using the supplied
CB378 cable. Activate the Terminal Emulation software with X-Modem protocol
(HyperTerminal), configuring it as described in paragraph II.1.
Then perform the following operations:
1. Power NetMan using the special power supply provided.
2. Access the main menu and select menu 9.
3. Press “9” to start the upgrade.
4. Wait until the message “Press D download software…” appears, as shown in figure 8.
26
Figure 8: Connection to upgrade Firmware: start
In this case, the connection has been assigned the name “NetMan”.
5. Press “D” within 10s to start the download.
6. Select “Send File…” on the “Transfer” menu, as shown in figure 9 below.
27
Figure 9: Connection to upgrade the Firmware: selecting “Send File”
28
7. Upload the Firmware upgrade file, selecting the X-modem protocol on the pull-down
menu as shown in figure 10.
Figure 10: Connection to upgrade the Firmware: transferring the file
8. Lastly, click on the “Send” button and wait for the file to be transferred.
9. Should an error occur during the transfer, disconnect the board and repeat the
operation.
Access menu 4, Additional Setup Screen, to check that the firmware version has been
upgraded.
II. 4. 2. Upgrading via TFTP
The upgrade requires a TFTP server to which the firmware image will be copied.
There are two ways to upgrade the firmware:
1) by running the UPDATE command from the provided floppy disk.
The command has the following syntax:
update <netman address> <firmware file.bin> <TFTP server>
When the upgrade is complete, NetMan will automatically start up again after about 10
seconds.
2) by forcing the upgrade from menu 9 on NetMan. NetMan searches for the file called
netman10x.bin on the TFTP server. If the file exists, the flash memory will be upgraded with
the new firmware.
When the upgrade is complete, NetMan will automatically start up again after about 10
seconds.
29
II. 5 Testing and verifying the installation
HTTP
Open the browser and write the NetMan IP address on the location you must see the UPS
status.
UDP
Start the upsview giving the NetMan IP address, you must see the UPS status with all the
values not in the form "???"
SNMP
Verification of the basic physical address of Network Adapter:
From the NMS, perform Ping on the IP address assigned to Network Adapter.
SNMP Get :
From the NMS, perform SNMP Get from MIB OID controller.
SNMP Set :
From the NMS, perform SNMP Set on MIB OID controller.
SNMP Trap:
From Network Adapter, emulate Trap to the NMS. One of the ways how to do it is to
simulate a drop-out.
30
III. SUPPLEMENTS
III. 1. Using various NMS
Network Adapter is a device that can work in many types of networks and can be
controlled by various NMSs.
Shown here is the description of how to configure some of the most used NMSs for
Network Adapter. We hereby do not attempt to present an exhausting description or propose
to prefer specific NMS to other NMS. As well, this is not intended to be a comparison of the
given NMS.
We suppose that the user has a basic knowledge of NMS as such. With respect to the
fact that SNMP is a world-wide standard, other NMS can also be used without any problems.
The MIB diskette is in DOS format.
Novell NetWare Services Manager 1.0 (NSM)
Control of adapter`s host address (ping) :
From the main NMS menu select Fault and then Test Connectivity. In Test Connectivity
Dialog Box, Insert, enter the IP address into IP Address Box and press Test. If the adapter
responds, Status Box reports the result, otherwise it indicates that the response from IP address
has not been received.
Installation of MIB controller on the NMS :
Copy the MIB from the diskette to the directory / nms / snmpmibs / current. From main
NMS menu, select Tools and then SNMP Alarm Integrator. From Dialog Box go to subdirectory / nms / snmpmibs / current and complete all MIB. This enables the NMS to receive
critical states (traps) sent by Network Adapter.
Connecting the Network Adapter Object to Management Map :
The NMS will search Network Adapter and in the meantime will connect it to its
Management Map.
Reading the OID controllers :
31
To see and read the controller data stored in MIB OID, you need to set MIB Profiles.
These profiles enable to adjust various OID configurations you might want to see due to their
relationship.
From the main NMS menu, select Tools and then SNMP MIB Browser. In Dialog Box
create new profiles and record them under names. Here you can define how often the Network
Adapter will select the given profile, to which SNMP Community it will be applied, and which
OID or OID groups will be selected. You also have to give an IP address to the Network
Adapter. By pressing OK you start the process.
Setting the OID controllers
See article “Reading the OID controllers“ to learn how to set profile browsing. If you
wish to change the value of OID, stop the selection process by clicking on the red icon. Select
the OID to be changed, press ENTER, write a new value, close the Dialog Box and click on
the Hand icon to enter the new value to Network Adapter. Click on the green icon to restart
the selection process.
For detailed information about NSM see NetWare Services Manager User`s Guide and
NetWare Management Map User`s Guide.
Novell NMS or Novell ManageWise
Checking the host address (ping) of the adapter :
From main NMS menu, select Fault and then Test Connectivity. In Test Connectivity
Dialog Box, insert IP address to IP Address Box and press Test. If the adapter responds, Status
Box reports the result. Otherwise, Status Box indicates that the response from IP address has
not been received.
Installing MIB controller on the NMS :
Copy the MIB from diskette to directory / nms / snmpmibs / current.
From main NMS menu select Tools and then SNMP MIB Compiler. Compile MIB in this
directory to NMS. This enables the NMS to receive critical states sent by Network Adapter.
32
Connecting the Network Adapter Object to Management Map :
NMS will search Network Adapter and, in the meantime, will connect it to its Management
Map.
Reading the OID controllers :
From main NMS menu, select Tools and then SNMP MIB Browser. In Dialog Box create new
profiles and record them under names. Here you can define how often the Network Adapter
will select the given profile, to which SNMP Community it will be applied, and which OID or
OID groups will be selected. You also have to give an IP address to the Network Adapter. By
pressing OK you start the process.
HP Open View Network Node Manager 3.0 (NNM)
Installing the MIB controller on the NMS :
Copy the MIB from diskette to directory / usr / OV / snmp_mibs. In NNM select the option
menu Options : / load / unload MIB`s : SNMP..., then select Load, select MIB and press
Close.
Connecting the Network Adapter Object to Management Map
Select submap and then select Edit : Add Object. Select a suitable type from the group of
objects. With the middle button on the mouse move the generally used symbol subclass of the
controller to submap and then write the name for the object in Selection and Label fields from
dialog box Add Object.
Reading the OID controllers :
From the menu, select Monitor : MIB Values : Browse MIB : SNMP. Then see the information
on Network Adapter or on controllers by moving to MIB.
Setting the OID controllers
From the menu, select Monitor : MIB values : Browse MIB : SNMP. Select the variable MIB
to be changed and click on it. Write a new value and click on Set Click on Start Query to
display the changes. For more detailed information on NNM see HP Open View Network
Manager User`s Guide.
33
SunConnect SunNet Manager 2.0 (SNM)
Installing the MIB controllers on the NMS :
Copy the MIB to a directory specified by key-word na.snmp.schemas in directory / usr / snm /
snm / conf. Usually, it is / usr / snm / agents.
Perform mib2schema on MIB. This will create corresponding files xxx.mib.oid,
xxx.mib.schema and xxx.mib.traps.
In the box of SNM control panel select File/Load. Click on xxx.mib.schema and click on Load.
Activate the new shell box. Go to directory / usv / snm / agents and perform build_oid. Finally,
open xxx.mib.traps to the file specified by the key-word na.snmp-trap.default in directory / usr
/ snm / snm.conf. Usually, it is / var / adm / snm / snmp.traps. Now, SNM will understand
error reports from Network Adapter.
Connecting the Network Adapter Object to Management Map :
There are three ways how to connect it :
connect it to submap, where there is an associate controller for Network Adapter
connect it to subview from an associate controller and it will take the state of a
controller
connect it to cloud or to an independent browsing from the controller. It is the place
where all controllers can be resident.
Write submap in which the controller will be placed. With the right button on the mouse select
Edit / Create / Component / lanbox. This will add a controller and Properties dialog box is
displayed. Write the name of Network Adapter so as it is in / etc / hosts or in the name of the
server.
Write SNMP RdCommunity
Write SNMP WrCommunity
Select the requested MIB. Choose a color for it. Finally, before you can use the above created
glyph, you must create an managed device view. Select relevant submap and with the first
mouse button select Edit / Create / view / subnet. Key in the view name. Now copy and paste
the glyph into the managed device view.
34
Reading the OID controllers
Select the controller glyph with the right button on the mouse and select Quick Dum /xxx-MIB
and then one of the MIB groups. A box will be displayed, showing the frame display of the
group.
Setting the OID controllers :
Select the controller glyph with the right button on the mouse. Now, select Set Request / xxxMIB /<OID name>.
Application Set Tool will be displayed. Click on Get button to enter the actual values. Select a
new value by clicking on New Value and then by clicking on the Set button. To browse the
changed values, click again on the Get button. For more detailed information about SNM, see
SunNet Manager User`s Guide.
III. 2. Glossary of technical terms
In this glossary are found the technical terms concerning the NETMAN 101/102
Network Adapter and brief definitions of these terms.
Agent - an SNMP application in network elements (hosts). These protocol applications are
responsible for conducting the network controlling functions required by the network manager
from the NMS.
Boot P Server - (Boot Protocol) - host language providing services for Boot Protocol. This
enables the hosts, that do not know their IP address, to learn the address form the net.
Ethernet - a local computer network technology created by Xerox Corporation.
Flash EPROM - (Erasable Programmable read-only Memory) - a memory chip in which the
stored data can be changed by program and the data remain stored even after electricity
outage.
Gateway - a computer connected to several nets and directory packets between them. The
packets can be of various higher-level protocols.
IP - Internet Protocol - a standard TCP/IP protocol defining an IP datagram as a unit of
information passing through the network.
IP address - a 32-bit address given to TCP/IP network users. It is assigned for connecting the
host to the network. IP address consists of a net part and a host part.
35
MIB - Management Information Base - a database (setting the variables)
supported by
Network Adapter
NMS - Network Management Station - a station which monitors SNMP equipment.
NIC - Network Interface Card - a hardware interface for connection to the network
OID - Object Identifier - variables defined in MIB
RS-232 - data transfer specification for serial connection between the equipment and the
computer.
Router - controls the network operation between various networks or their segments,
according to the target IP address. The protocols of higher levels must be the same, network
environments can differ.
SNMP - Simple Network Management Protocol - a standard protocol used to monitor the
devices, gateways and networks.
TCP/IP - Transmission Control Protocol / Internet Protocol - a name for combined TCP and
IP protocols
TES - Terminal Emulation Station - a computer with a software emulating a simple terminal.
UDP/IP - User Datagram Protocol/Internet Protocol - a standard TCP/IP protocol. Enables
data transmission between applications run by various users. UDP uses IP to deliver data
UPS - Uninterruptible Power Supply
36