1
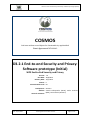
D3.2.1 End-to-end Security and Privacy: Software prototype (Initial)
COSMOS
Cultivate resilient smart Objects for Sustainable city applicatiOnS
Grant Agreement Nº 609043
D3.2.1 End-to-end Security and Privacy:
Software prototype (Initial)
WP3 End-to-End Security and Privacy
Version:
Due Date:
Delivery Date:
Nature:
Dissemination Level:
1.0
30/6/2014
19/7/2014
P
PU
Lead partner: Siemens
Authors: Vassilis Psaltopoulos (NTUA), Paula Ta-Shma
Internal reviewers: (IBM), Leonard Pitu (Siemens)
Date: 17/07/2014
Grant Agreement number: 609043
Page 1 of 25
D3.2.1 End-to-end Security and Privacy: Software prototype (Initial)
www.iot-cosmos.eu
The research leading to these results has received funding from the
European Community's Seventh Framework Programme under grant
agreement n° 609043
Version Control:
Version
Date
Author
Author’s Organization
Changes
0.1
Leonard Pitu
Siemens
Internal draft
0.2
Vassilis
Psaltopoulos
NTUA
Privacy #1
0.3
Leonard Pitu
Siemens
Hardware
Security
0.4
Vassilis
Psaltopoulos
NTUA
Privacy #2
0.5
Leonard Pitu
Siemens
Ready for review
0.6
Achilleas Marinakis
NTUA
Review
1.0
Leonard Pitu
Siemens
addressed comments;
final version
Coded
Annexes:
Nº
Date: 17/07/2014
File Name
Title
Grant Agreement number: 609043
Page 2 of 25
D3.2.1 End-to-end Security and Privacy: Software prototype (Initial)
Table of Contents
1
2
Introduction .......................................................................................................................... 4
1.1
About this deliverable ................................................................................................... 4
1.2
Document structure ...................................................................................................... 4
Hardware Coded Security ..................................................................................................... 5
2.1
2.1.1.
Functional description ........................................................................................... 5
2.1.2.
Fitting into overall COSMOS solution .................................................................... 5
2.1.3.
Technical specifications ....................................................................................... 14
2.2
3
Implementation............................................................................................................. 5
Delivery and usage ...................................................................................................... 15
2.2.1.
Package information ........................................................................................... 15
2.2.2.
Installation instructions ....................................................................................... 15
2.2.3.
User Manual ........................................................................................................ 16
2.2.4.
Licensing information .......................................................................................... 16
2.2.5.
Download ............................................................................................................ 16
Privacy ................................................................................................................................. 17
3.1
Implementation........................................................................................................... 17
3.1.1.
Functional description ......................................................................................... 17
3.1.2.
Fitting into overall COSMOS solution .................................................................. 19
3.1.3.
Technical specifications ....................................................................................... 21
3.2
Delivery and usage ...................................................................................................... 21
3.2.1.
Package information ........................................................................................... 21
3.2.2.
Installation instructions ....................................................................................... 21
3.2.3.
User Manual ........................................................................................................ 22
3.2.4.
Licensing information .......................................................................................... 23
3.2.5.
Download ............................................................................................................ 23
4
Cloud Storage Security ........................................................................................................ 24
5
Conclusions ......................................................................................................................... 25
Date: 17/07/2014
Grant Agreement number: 609043
Page 3 of 25
D3.2.1 End-to-end Security and Privacy: Software prototype (Initial)
1 Introduction
1.1
About this deliverable
The present deliverable describes the first modules of the COSMOS platform demonstrator. It
provides technical details with respect to the implemented modules, their usage and the
requirements needed.
1.2
Document structure
The document is structured as according to work package 3 structure. Each task has a
dedicated section which details the results of the activities performed. The present document
covers the individual activities which are going to converge into a unified demonstrator over
the course of the next month.
Date: 17/07/2014
Grant Agreement number: 609043
Page 4 of 25
D3.2.1 End-to-end Security and Privacy: Software prototype (Initial)
2 Hardware Coded Security
2.1
Implementation
2.1.1. Functional description
The Hardware Coded Security component of COSMOS provides the necessary link between the
physical world and the actual COSMOS platform. The hardware security board implements the
necessary security mechanisms to support the functionality described in D3.1.1 End-to-End
Security and Privacy.
The hardware security board provides security primitives, implemented in hardware, for the
software applications. Therefore the hardware coded security components help build up the
chain of trust, based on high performance cryptographic applications.
The security components in place allow for seamless operation and are not an optional
component, selectable by the user, but are by-default enabled for each communication
between the hardware security board and the COSMOS platform.
The main advantages of the hardware coded security components are the high speed and
reliability as compared to software implementations. Also the structure and architectural
model in place have been developed to enable on the fly cryptographic operation without user
interaction. This is provided by a mixture of hardware and software design.
The delivered prototype is the first step in enabling the seamless enrollment and
authentication of hardware based security components in the COSMOS platform. Currently it
provides hardware components which integrate seamlessly with an ARM CPU sub-system and
with a modern Linux based operating system. The provided components implement the
cryptographic accelerator and the basic Linux drivers for the hardware security board.
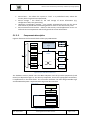
2.1.2. Fitting into overall COSMOS solution
As depicted in Figure 1 the COSMOS platform receives data from VEs. These VE’s can be of
three types (as presented in D3.1.1 – End-to-End Security and Privacy):
Highly secured,
Low secured,
Unsecured.
The presented activities are focusing on a hardware embedded solution which provides the
platform for the highly secure VEs – the Hardware Security Board. The Hardware Security
Board consists of a physical hardware device which provides the link between sensors (data
generators) and the COSMOS environment/platform. The Hardware Security Board can be
either attached to one sensor or can be a hub for an entire collection of sensors (e.g.
temperature, pressure, humidity, surveillance cameras, etc.).
Date: 17/07/2014
Grant Agreement number: 609043
Page 5 of 25
D3.2.1 End-to-end Security and Privacy: Software prototype (Initial)
Figure 1. COSMOS high level view
2.1.2.1.
Technical description
The hardware coded security components are implemented inside the Xilinx Zynq platform
FPGA.
2.1.2.2.
Prototype architecture
The Hardware Coded Security diagram is presented below:
3. HW Coded Security
Memory
Interface
CPU
Secure
Storage
Cloud
Ethernet
Interface
Crypto/Hash
SPI / I2C / …
Interface
HW Security Path
HW Secure Board
Figure 2: Hardware Coded Security
For the system to be secure, the following items are needed:
Date: 17/07/2014
Grant Agreement number: 609043
Page 6 of 25
Sensors Interface
System Bus
D3.2.1 End-to-end Security and Privacy: Software prototype (Initial)
Secure boot – this allows the system to “start” in a pre-defined state, where the
security level is high and uncompromised;
Secure storage – this allows for the safe storage of secret information (e.g.
configuration data, encryption keys);
Hardware cryptographic modules – runs partially autonomously and uses the secret
information to provide the basic building blocks in order to raise the security level.
Secure execution environment – allows for the security critical applications to run in a
safe and secure compartment which safe-guards the critical information.
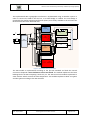
2.1.2.3.
Components description
Figure 3 illustrates the functional blocks of the Zynq-7000 AP SoC.
CRU
I/O Peripherals
FPGA Programmable
Logic
I/O
MUX
Config
AXI
2 x USB
2 x GigE
2 x SD
GPIO
2 x UART
2 x I2C
2 x CAN
2 x SPI
AXI
Interconnect
Matrix
AXI
ARM
Core1
AXI
DDR2/3/
LPDDR2
CTRL
AXI
ARM
Core2
Memory I/F
QSPI CTRL
SRAM
AXI
Zynq-7000 AP SoC
Figure 3: Zynq-7000 AP SoC Overview
The hardware security board uses the ARM subsystem and the provided peripherals (hard
macros) as depicted in Figure 3. The security component, that is the cryptographic accelerator,
is implemented in the FPGA fabric. The connection between the FPGA Programmable Logic
and the ARM subsystem is implemented using an AXI bus interface.
Zynq zc702
ARM Subsystem
AXI
Bridge
APB
AES_TOP
APB INTF
APB
aes_module
Figure 4: AES Module Instantiation
Date: 17/07/2014
Grant Agreement number: 609043
Page 7 of 25
D3.2.1 End-to-end Security and Privacy: Software prototype (Initial)
The implemented AES cryptographic accelerator is implemented using an APB bus system. In
order to connect the APB to the AXI bus, a so-called bridge is needed. The used bridge is
provided by the platform FPGA manufacturer (Xilinx) and is freely available in the toll-chain the
demonstrator board was delivered with.
state_reg_i
clk_i
rstn_i
load_i
dat_i
se_i
State
Register
dec
state_reg_o
A
dec_i
subbytes_i
sbsel_i
clk_i
rstn_i
Q
sb_o[31:0]
0
MC
mc_o[31:0]
1
AK
ar_o[31:0]
2
SB
aes_clk
clk_i
aes_enable
aes_reset
psel_i
penable_i
paddr_i
pwrite_i
pwdata_i[31:0]
prdata_o[31:0]
pready_o
S-BOX
encrypt
cmbi[31:0]
aes_encrypt
APB
INTERFACE
dec
rstn_i
dec_i
start_i
load_i
kload_i
read_i
AES
Control
aes_start
load
kload
cmb_i
dat[31:0]
aes_read
se_o
fsel_o
ready_o
sbsel_o
kshift_o
rn0_o
ksel_o
rcon_updt_o
dec_ctrl_o
dat_o
dec_i
cmbo[31:0]
data_i
cmbi[31:0]
data_i
aes_ready
dat_o
clk_i
rstn_i
kload_i
kshift_i
rnd0_i
dat_i
round_key_i
round_key_i
key_reg0_o
key_reg2_o
key_reg3_o
Key
Register
0
3
clk_i
rstn_i
dec_ctrl_i
rcon_updt_i
kshift_i
key_reg0_i[31:0]
key_reg2_i[31:0]
key_reg3_i[31:0]
start_i
rn0_i
ksel_i
round_key_o[31:0]
Key
Scheduler
Figure 5. AES Module Internal Structure
The AES module is implemented according to the fips-197 standard and hard the internal
structure as depicted in Error! Reference source not found.. The module implements the basic
building blocks the AES computing rounds rely on. The AES Control sub-module implements a
state machine which controls the AES computation. The module implements both encryption
and decryption according to the AES standard.
Date: 17/07/2014
Grant Agreement number: 609043
Page 8 of 25
D3.2.1 End-to-end Security and Privacy: Software prototype (Initial)
0
10
260
...
clk_i
rsnt_i
kload_i
load_i
start_i
ready_o
read_i
K0
dat_i
K1
K2
K3
D0
D1
D2
D3
D0
dat_o
D1
D2
D3
* dat_i and dat_o are 32 bits wide
** an encryption or decryption(without key expansion) takes 240clk
Figure 6: AES Timing Diagram
The timing diagram of the AES cryptographic accelerator is depicted in Figure 6. As the diagram
shows the data and key are loaded over a 32bit bus and therefore need 4 clock cycles to load.
2.1.2.4.
AES Functionality Description
Certain steps must be followed in order to encrypt/decrypt data correctly with the AES module
described in this chapter (see Figure 7). After the chip Power On, the software has to enable
the AES module – set bit [1] (aes_enable) of the AES_CTRL register. This bit gates the module’s
input clock. After the clock enable, a software reset must be provided by writing bit [0]
(aes_reset) of the same control register. In this phase, the AES is initialized and enters the IDLE
state, waiting for an encryption/decryption operation.
In case of an encryption, AES_CTRL bit [3] (aes_encrypt) must be set, and then 128 bits of data
have to be first loaded into the LOAD_DATA1…4 registers followed by writing 128 bits of key
into the LOAD_KEY1…4 registers. The encryption operation starts when bit [4] (aes_start) of
AES_CTRL is set. This register bit is automatically cleared by hardware. Having the encryption
started, the SW must poll bit [5] of AES_CTRL register (aes_ready) in order to detect the
operation end. This bit is set by hardware and automatically cleared (by hardware) when 128
bits of result are read out from READ_DATA1…4 registers.
In case of a decryption, AES_CTRL bit [3] (aes_encrypt) must be cleared, and then 128 bits of
data have to be first loaded into the LOAD_DATA1…4 registers followed by writing 128 bits of
key into the LOAD_KEY1…4 registers if the decryption keys are not the same with the
encryption keys. The decryption operation starts when bit [4] (aes_start) of AES_CTRL is set.
This register bit is automatically cleared by hardware. Having the decryption started, the SW
must poll bit [5] of AES_CTRL register (aes_ready) in order to detect the operation end. This bit
is set by hardware and automatically cleared (by hardware) when 128 bits of result are read
out from READ_DATA1…4 registers.
Date: 17/07/2014
Grant Agreement number: 609043
Page 9 of 25
D3.2.1 End-to-end Security and Privacy: Software prototype (Initial)
Power On
Write bit[1] from
AES_CTRL register
Enable
Module
Write bit[0] from
AES_CTRL register
Reset
Module
IDLE
Write
LOAD_DATA[cnt]
registers
Yes
No
aes_encrypt?
Load Data
[cnt]
Yes
No
same keys?
No
cnt = 4?
Write
LOAD_KEY[cnt]
registers
Load Keys
[cnt]
Write bit[4] from
AES_CTRL register
Yes
No
cnt = 4?
START
No
Read bit[5] from
AES_CTRL register
aes_ready?
Yes
Read Data
[cnt]
Wait
Yes
Read
READ_DATA[cnt]
registers
cnt = 4?
No
Figure 7: AES Module Functionality Chart
Date: 17/07/2014
Grant Agreement number: 609043
Page 10 of 25
D3.2.1 End-to-end Security and Privacy: Software prototype (Initial)
2.1.2.5.
AES Address Space
The AES address space has been designed to allow further improvements. The data and
control registers are directly addressable, by the CPU, using the implemented APB bus.
Start-Address
End-Address
0h
Module/Memory-Name
90h
Module
AES
Register/Memory
Read
Write
Address
LOAD_DATA1
w
0h
LOAD_DATA2
w
4h
LOAD_DATA3
w
8h
LOAD_DATA4
w
Ch
LOAD_KEY1
w
10h
LOAD_KEY2
w
14h
LOAD_KEY3
w
18h
LOAD_KEY4
w
1Ch
READ_DATA1
w
20h
READ_DATA2
w
24h
READ_DATA3
w
28h
READ_DATA4
w
2Ch
(w)
90h
/AES
AES_CTRL
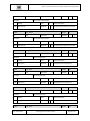
2.1.2.6.
(r)(h)
AES Register Description
In order to address the AES peripheral using software, the following register map has been
implemented.
Register:
LOAD_DATA1
Bits:
31dt0
Description:
Bit
Reset value:
Identifier
Reset
LOAD_DATA2
Bits:
31dt0
Description:
Attributes:
w
Function / Description
w Load register for the data to be encrypted
Address:
Reset value:
0h
4h
Attributes:
w
Load the data to be encrypted.
Identifier
Reset
31dt0 LOAD_DATA2
Date: 17/07/2014
Attr.
00000000h
Register:
Register:
0h
0h
Load the data to be encrypted.
31dt0 LOAD_DATA1
Bit
Address:
00000000h
Attr.
Function / Description
w Load register for the data to be encrypted
LOAD_DATA3
Address:
Grant Agreement number: 609043
8h
Page 11 of 25
D3.2.1 End-to-end Security and Privacy: Software prototype (Initial)
Bits:
31dt0
Description:
Bit
Reset value:
Identifier
Reset
LOAD_DATA4
Bits:
31dt0
Description:
Identifier
LOAD_KEY1
Bits:
31dt0
Description:
Reset value:
0h
Attr.
00000000h
Ch
Attributes:
w
Function / Description
w Load register for the data to be encrypted
Address:
Reset value:
Reset
31dt0 LOAD_KEY1
0h
Attr.
00000000h
Register:
LOAD_KEY2
Bits:
31dt0
Description:
10h
Attributes:
w
Function / Description
w Load register for the encryption key
Address:
Reset value:
0h
14h
Attributes:
w
Load the encryption key.
Identifier
Reset
31dt0 LOAD_KEY2
Attr.
00000000h
Register:
LOAD_KEY3
Bits:
31dt0
Description:
Function / Description
w Load register for the encryption key
Address:
Reset value:
0h
18h
Attributes:
w
Load the encryption key.
Identifier
Reset
31dt0 LOAD_KEY3
Date: 17/07/2014
w Load register for the data to be encrypted
Load the encryption key.
Identifier
Register:
Function / Description
Address:
Reset
Register:
Bit
w
Load the data to be encrypted.
31dt0 LOAD_DATA4
Bit
Attr.
00000000h
Register:
Bit
Attributes:
Load the data to be encrypted.
31dt0 LOAD_DATA3
Bit
0h
00000000h
Attr.
Function / Description
w Load register for the encryption key
LOAD_KEY4
Address:
Grant Agreement number: 609043
1Ch
Page 12 of 25
D3.2.1 End-to-end Security and Privacy: Software prototype (Initial)
Bits:
31dt0
Description:
Bit
Reset value:
Identifier
Reset
READ_DATA1
Bits:
31dt0
Description:
Identifier
0h
31dt0
Description:
Attr.
00000000h
Bits:
20h
Attributes:
w
Function / Description
w Read register for the decrypted data.
Address:
Reset value:
0h
24h
Attributes:
w
Read decrypted data
Identifier
Reset
31dt0 READ_DATA2
READ_DATA3
Bits:
31dt0
Description:
Attr.
00000000h
Register:
Function / Description
w Read register for the decrypted data.
Address:
Reset value:
0h
28h
Attributes:
w
Read decrypted data
Identifier
Reset
31dt0 READ_DATA3
READ_DATA4
Bits:
31dt0
Description:
Attr.
00000000h
Register:
Function / Description
w Read register for the decrypted data.
Address:
Reset value:
0h
2Ch
Attributes:
w
Read decrypted data
Identifier
Reset
31dt0 READ_DATA4
Date: 17/07/2014
Address:
Reset
READ_DATA2
Register:
Function / Description
Read decrypted data
Register:
Bit
w
w Load register for the encryption key
Reset value:
31dt0 READ_DATA1
Bit
Attr.
00000000h
Register:
Bit
Attributes:
Load the encryption key.
31dt0 LOAD_KEY4
Bit
0h
00000000h
Attr.
Function / Description
w Read register for the decrypted data.
AES_CTRL
Address:
Grant Agreement number: 609043
90h
Page 13 of 25
D3.2.1 End-to-end Security and Privacy: Software prototype (Initial)
Bits:
31dt0
Description:
Bit
Reset value:
0h
Attributes:
(r)(h)
(w)
AES Control register
Identifier
Reset
AES_RESET
0h
Attr.
Function / Description
AES module Reset bit
0
r
w
'0' - Reset is asserted
AES module Enable
1
AES_ENABLE
0h
r
w
'1' - AES module enabled
2
reserved
0h
3
AES_ENCRYPT
0h
r
Select
between
encryption/decryption
w operation '1' - encryption
'0' - decryption
AES operation start (pulse, always read '0')
4
AES_START
0h
w '1' - start the encryption/decryption opeartion
'0' - idle/operation in progress
5
AES_READY
0h
31dt6 reserved
rh
AES operation ready, set by HW, reset by
SW when reading from address 0x2X
0000000h
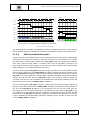
2.1.3. Technical specifications
The AES module is coded entirely in the Verilog hardware description language. The rest of the
HW subsystem is instantiated from the XILINX standard libraries which require no other
licenses.
The software components are written in C/C++. The main component is the Linux driver which
enabled user-level (level 5) access to the cryptographic accelerators inside the FPGA fabric. The
driver is developed in ANSI C. The test application as well as all other software components is
developed in C++. There are no other software components in use except for the Linux
operating system stock libraries. The custom libraries which are used to access Xilinx’s own
proprietary hardware components inside the Zynq Platform FPGA device are freely available
and usable from directly the tool-chain IDE.
Tools used:
Xilinx ISE 14.6;
GCC;
Linux 3.6 based operating system (ARM branch).
Date: 17/07/2014
Grant Agreement number: 609043
Page 14 of 25
D3.2.1 End-to-end Security and Privacy: Software prototype (Initial)
2.2 Delivery and usage
2.2.1. Package information
An SD card image is provided with the following structure:
/boot.bin – contains also the bitstream file with the hardware set-up and the custom
hardware AES cryptographic accelerator;
/image.ub – is the bootloader;
/AES/test vectors – contains the test vectors according to fips-197;
/AES/aes_app_drv.elf – contains the application using the custom AES hardware;
/AES/aes_driver_amp.ko – contains the custom AES driver;
/AES/load_aes_driver_amp.sh – is the script used to load the driver.
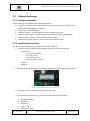
2.2.2. Installation instructions
In order to start the application, the following steps are necessary:
1. Copy the content of AES Linux App Image Folder on the root of the SD card:
- AES directory:
- test_vectors directory
- aes_app_drv.elf
- aes_driver_amp.ko
- load_aes_driver_amp.sh
- boot.bin
- image.ub
2. Set board for booting from SD card, using the SW16 switch from the Zynq ZC702 board.
Figure 8. Zynq ZC702 boot switch configuration
3. Place SD card in the MMC slot and power ON the board.
4. Start a terminal application (e.g. PuTTY) with the following serial settings:
baudrate: 115200;
data bits: 8;
stop bits: 1;
parity: none;
flow control: none.
Date: 17/07/2014
Grant Agreement number: 609043
Page 15 of 25
D3.2.1 End-to-end Security and Privacy: Software prototype (Initial)
5. After board initialization, the DS16 and DS17 LEDs are blinking to indicate the system’s
activity.
6. In order to boot from SD card, enter the following commands:
- fatload mmc 0:1
- bootm
7. Linux is booting up; login with user = root, password = root.
8. Mount the SD card using the following commands:
- cd /
- mkdir sdcard
- mount dev/mmcblk0p1 sdcard/
9. Load the kernel driver using the following commands:
- cd sdcard/AES/
- ls
- source ./load_aes_driver_amp.sh
10. Run application using the following command:
- ./aes_app_drv.elf
2.2.3. User Manual
Once the steps above have been executed the cryptographic module can be accessed from the
user level. This enables the usage of cryptographic primitives from the application level, such
as OpenSSL.
The provided components enable a standard Linux usage model for the custom hardware
cryptographic components. This mechanism will be further extended in order to enable the
COSMOS platform to fully use the capabilities of the provided hardware platform (as stated in
D3.1.1 – encryption, authentication and privacy).
2.2.4. Licensing information
The provided files are as-is and are provided to the COSMOS consortium partners for
demonstration purposes. Redistribution and/or modification of the files are prohibited without
notifying Siemens SRL.
All used components are available under the same license as the Xilinx ISE tool chain.
2.2.5. Download
The bitstream file and compiled software images will be available in the COSMOS SVN
repository.
Date: 17/07/2014
Grant Agreement number: 609043
Page 16 of 25
D3.2.1 End-to-end Security and Privacy: Software prototype (Initial)
3 Privacy
3.1
Implementation
3.1.1. Functional description
Privelets is an essential part of the COSMOS chain. Virtual Entities are able to contact with
each other as much as with the external platform also exposing and trading information
connected to the VE’s user and his environment. It is easily understood that this behaviour
leaves the user exposed and vulnerable to any use of his information sharing. In this way of
information exchange there is high possibility that the user shares information that violate his
privacy in an unwanted way.
Our goal is to ensure that the user shares information that he wants only and leaves out all
other that he considers as private and believes that may affect his privacy.
The design and implementation of Privelets follow an iterative approach. As a first step,
messages about to be exported from a VE are analyzed and specific fields are filtered based on
users’ input.
In this section we will try to provide a diagram of the Privelets and how the work.
Firstly we will have to make some assumptions about the incoming and outgoing information
regarding the Privelets. In order to keep Privelets generic and in order to avoid making a
specific Privelet according to each device we consider the incoming and outgoing information
from and to each device to follow a specific pattern. Data will be exchanged though JSON files.
The format that each JSON file should have in order to be processed by a Privelet must follow
this way without duplicates:
[
{"tag":"some_tag","information":"some_information"},
.
.
.
{"tag":"some_tag","information":"some_information"}
]
A Privelet has a certain space in each VE, where it can store a configuration file, in order to
load it on each start up. This configuration file, can be updated, edited or even deleted, during
the VE’s operation. This configuration file contains only the private tags, the tags that a VE
doesn’t want to share to the public. By now, in the source code already developed, the
specified path where this configuration file can be found is C:\\jsonFile.json.
As said before, the template is also specific. So the configuration file is presented in this way
again without duplicates:
[
{"tag":"some_tag"},
.
.
.
{"tag":"some_tag"}
Date: 17/07/2014
Grant Agreement number: 609043
Page 17 of 25
D3.2.1 End-to-end Security and Privacy: Software prototype (Initial)
]
By this time, the filtering procedure is human oriented, so the user parameterizes what to
share and what to keep private.
Every incoming and outgoing file transfer a.k.a data exchange is made with JSON files as
already said. JSON files are transferred through RESTful services.
As far as RESTful services are concerned there are (until now) four basic services running.
insertData: When choosing this @POST service, we have to load a JSON file, containing the
tags and information to be exchanged. This is what the VE is exporting and has to be filtered.
So this service takes each piece of information coming out from the VE and enters them into
the Privelet for further filtering.
getPublicJasonFileTags: When calling this @GET service, the VE responds to us, giving out the
filtered information. So the response contains a JSON file with all the public tags after the
filtering procedure. All the private tags are kept inside the VE and get discarded just the after
the moment the next @POST insertData service is called. This service is called by another VE,
or by the main platform that requests to gather information.
retrieveExistingConfigurationFile: This service has to do with the stored configuration file we
mentioned before on the root directory of each device. It’s a @GET service. With this call, we
can see, in any time, the state of the configuration file that is read by the source code and by
which the filtering procedure is taking place. This service is called by the user in order to check
the status of the VE’s file. The response of this service, gives us a JSON file with the tags
considered as private only.
updateExistingConfigurationFile: This service also has to do with the stored configuration file.
A @POST service, through which the user can alter the configuration file by adding a JSON file
to the payload of the service’s call. The user has to enter only the private tags on this file, the
tags that he wants to keep safe and not share with the other VEs or the platform. The changes
take place just after the next “insertData” service is called, in the next interval. Changes do not
affect the already running information to be shared.
By the time the VE starts operating, the source code starts scanning the root registry for a
configuration file that describes the private values. If the configuration file contains no value,
the VE shares everything with the rest of the world. The filtered information sharing procedure
starts by the time a configuration file has at least one value in it.
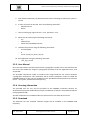
There is also a UI for the managing of the configurations. If the device has a screen, the user
can make changes regarding the configurations through a user interface. To build the UI, we
used Java Server Faces and the PrimeFaces extension.
Date: 17/07/2014
Grant Agreement number: 609043
Page 18 of 25
D3.2.1 End-to-end Security and Privacy: Software prototype (Initial)
Figure 9. Privelets
The user can see the tags existing that moment in the VE, and can alter the privacy level by
selecting one or multiple and pressing the update button. By the time the submit button is
pressed, every change is written down to the configuration file. The refresh button is used if
and when the next “insertData” service is called in order to view the new values to be
exchanged. The view button is of no general use. It just shows on a pop up window the tag
name and the information provided through this tag.
3.1.2. Fitting into overall COSMOS solution
A VE, which participates on COSMOS platform, generates information that sends on other VEs
and COSMOS. Information generated is stored in a JSON file. The JSON file stores all the
information on separated tags in a specific pattern. With the use of an existing preloaded
configuration file, or by some user input that can configure the privacy level of some tags, a
privelet (as expected) lets all the public tags to be exchanged and it keeps safe or discards all
the private ones by generating a new JSON file which looks like the one received by the VE
before the filtering process, but without the private tags.
In other words, data generated from the device must pass through that filter and then be
exported to another VE or our COSMOS platform. That’s a Privelet’s action. We assume that
the VE generates data with a certain interval update and wants to share it through our
platform or between other VEs. It generates a JSON file where all those data pass through this
mechanism called privelet. Each tag of the JSON file generated contains information and the
user is called to configure the privelet by setting privacy level values to the data exchanged
and thus a configuration file is stored in the privelet. After that any data exchanged from the
VE, will have the same configuration regarding the privacy level of each tag in order to decide
what data to send to the platform and what to keep. The privelet will not change each tag’s
privacy level unless the user calls it again and re-configures it. After this configuration the data
exchanged will be filtered and exported with the Privelet’s configuration.
By now, we consider that a Privelet is embedded on the VE and relates with other VEs or the
COSMOS platform. So it’s a standalone component that (by now) acts as a filter and we choose
to embed it on the VE. So, a Privelet, is related with the VE, and any other component that will
ask the VE for information exchange.
Date: 17/07/2014
Grant Agreement number: 609043
Page 19 of 25
D3.2.1 End-to-end Security and Privacy: Software prototype (Initial)
Figure 10. COSMOS high level view
3.1.2.1.
Technical description
The Privelets component is developed on Eclipse Java EE IDE for Web Developers, version:
Kepler Service Release 2. We used Tomcat v7.0 Server to handle all the request and responses
from and to the source code. We made use of Jersey Restful web services, and Java Server
Faces. Finally, the project is being built with Maven.
3.1.2.2.
Prototype architecture
A draft diagram of how a Privelet works is shown below. By now as we can see the mechanism
is fully user driven.
Figure 11. Prototype architecture
Date: 17/07/2014
Grant Agreement number: 609043
Page 20 of 25
D3.2.1 End-to-end Security and Privacy: Software prototype (Initial)
3.1.3. Technical specifications
The Privelets component is coded entirely in the Java programming language, with the use of
Apache Tomcat v7.0 Server. We used Eclipse in Windows 7 environment. We used HTML GET
and POST methods for communication purposes. Apart from the Java’s JDK 1.7 and the JRE’s 7
existing stock libraries, we made use of external existing libraries to develop functions and
operations that are open source and freely available online.
3.2 Delivery and usage
3.2.1. Package information
The source code is structured in two individual packages. The first is called
“com.cosmos.rest.jersey” which is responsible for the main operations and services offered
and the second one is called “persistence” with main target to keep temporary storage and
use of it on the main services.
The first package contains three Java classes.
JsonData (Definition of the Json data to be filtered and exchanged)
JsonDataConfiguration (Definition of the data that have to do with the configuration
file)
Privelets (The main class with most of the services offered)
The second package contains five Java classes.
ConfigurationJsonObject (temporary storage and mapping of configuration data)
JSFcontrollerBean (A bean responsible for the projection of data to the UI)
JsonDataTable (Creation of a data table to be projected)
PublicJsonObjectsToExport (class that categorizes the public data to be exported)
StoredJsonObjects (Data temporary stored to be filtered and edited)
3.2.2. Installation instructions
Firstly we have to generate a Json file on the root directory of our device “C:\\” and call it
“jsonFile.json”. So the final path will look like “C:\\jsonFile.json” This will be our configuration
file. We can pre-complete some tags on it considered as private, or we can leave it empty.
What we really care about is that this file exists. After, we need to take the source code’s
package and import is on Eclipse or Netbeans. As soon as the project is built with maven, we
let Maven find the libraries and build the project. As soon as the project is built, we just need
to run it as a java application and switch to the REST client and the JSF component (UI
webpage).
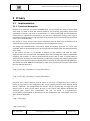
In order to test our source code, and as soon as it’s a standalone component by now and not
embedded in any other structure, we had to download and install Google Chrome browser and
in order to take advantage of its add-on called “Advanced REST Client”. Through this
application/add-on, we were able to communicate with our application running on the server
Date: 17/07/2014
Grant Agreement number: 609043
Page 21 of 25
D3.2.1 End-to-end Security and Privacy: Software prototype (Initial)
and exchange messages. This add-on fully supports JSON files so it was exactly what we
needed.
Figure 12. Privelet add-on
3.2.3. User Manual
In order for the prototype to be usable, as said before, we need the Google Chrome’s add on
called advanced REST client. In this way we can simulate the VE’s behavior.
Assuming we have a configuration file on the root directory by the time we will run the
application, the source code will scan for it and load (if any) the private tags to be kept. After
that, we can do some testing by performing some @POST insertData services with groups of
tags on the call’s payload and right after some @GET getPublicJasonFileTags services. In this
way, we will see what the VE is sending out to the other VEs or the platform. The insertData
service, is the data generated by the VE to be exported before the filtering procedure, while
the getPublicJasonFileTags service, is the call on the VE (by another VE) to share information.
Afterwards we can check about the existing configuration file by calling the @GET service
called retrieveExistingConfigurationFile. This will give us every tag stored on the configuration
file. In other words, every private tag that will not be exchanged with the platform.
We can update the existing configuration file, and add or remove tags considered as private by
calling the @POST service, updateExistingConfigurationFile and giving in the payload a Json
file, as described in the previous parts.
We can see (while the code is running) on the link http://localhost:8080/JAXRSCOSMOS/faces/home.xhtml, the UI of that has to do with the instance of the data to be
exchanged, from there we can alter the configuration file with some specific moves described
above, and see the next instance (after an insertData service use) by clicking refresh.
Date: 17/07/2014
Grant Agreement number: 609043
Page 22 of 25
D3.2.1 End-to-end Security and Privacy: Software prototype (Initial)
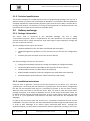
3.2.4. Licensing information
For
the
component
license,
we
chose
Apache
License
(http://www.apache.org/licenses/LICENSE-2.0.html) and Common Development
Distribution
License
(CDDL)
(http://glassfish.java.net/nonav/public/CDDL+GPL.html).
plus
v2.0
And
GPL
The reason for this choice is that
they are the most neutral license models that can be combined with proprietary and/or other
restrictive open source licenses (e.g. GPL-like models).
3.2.5. Download
The source code will be available in the COSMOS SVN repository.
Date: 17/07/2014
Grant Agreement number: 609043
Page 23 of 25
D3.2.1 End-to-end Security and Privacy: Software prototype (Initial)
4 Cloud Storage Security
The Cloud Storage Security components are described in D4.2.1 Information and Data Lifecycle
Management: Software Prototype (Initial), as stated in the DoW. Please refer to section 7 –
Cloud Storage Security and Privacy of the deliverable for technical details.
Date: 17/07/2014
Grant Agreement number: 609043
Page 24 of 25
D3.2.1 End-to-end Security and Privacy: Software prototype (Initial)
5 Conclusions
This document describes the prototypes for the End-to-End Security and Privacy workpackage. Each individual component implemented independently during the past year will be
integrated over the course of year 2 and 3 of the COSMOS project into a common
demonstrator.
Date: 17/07/2014
Grant Agreement number: 609043
Page 25 of 25