1
iPECS Attendant MG
User Manual
Please read this manual carefully before
operating your set. Retain it for future reference.
iPECS Attendant MG
User Manual
Issue 1.0
Revision History
Issue
1.0
Date
May, 2013
Change of Contents
Initial Release
iPECS Attendant MG
User Manual
Issue 1.0
Table of Contents
1
IPECS_MG INSTALLATION ........................................................................................................ 3
1.1
1.2
2
IPECS_MG LOGIN .......................................................................................................................... 5
2.1
2.2
2.3
3
RECOMMENDED SPECIFICATIONS ........................................................................ 3
PROGRAM INSTALLATION ................................................................................ 4
BASIC SETTING OF THE PROGRAM ..................................................................... 5
USER AUTHENTICATION .................................................................................. 6
PROGRAM START ......................................................................................... 6
IPECS_MG PROGRAM MENU ..................................................................................................... 8
3.1
FILE MENU ................................................................................................. 8
3.1.1
Import Phone Book ............................................................................... 8
3.1.2
Export Phone Book ............................................................................... 8
3.2
TOOLS ....................................................................................................... 9
3.2.1
Phone Book......................................................................................... 9
3.2.2
Account ............................................................................................ 10
3.2.3
Call Log ............................................................................................ 11
3.2.4
Change Station Name ......................................................................... 12
3.2.5
Message setting in absentia.................................................................. 13
3.2.6
Paging .............................................................................................. 14
3.2.7
Date/Time ......................................................................................... 15
3.2.8
SMS................................................................................................. 16
3.2.9
Attendant – Change COS ..................................................................... 17
3.2.10
Attendant – Temporary COS ................................................................. 17
3.2.11
Attendant – Attendant Cancel................................................................ 18
3.2.12
Prepaid Call....................................................................................... 18
3.2.13
Conference Room Setting .................................................................... 19
3.3
SETTING MENU .......................................................................................... 20
3.3.1
Wake Up Setting ................................................................................ 20
3.3.2
Mail Sending...................................................................................... 21
3.3.3
Group Setting .................................................................................... 21
3.3.4
Flex Button Setting.............................................................................. 22
3.3.5
23
3.3.6
Speed Dial ........................................................................................ 23
3.3.7
Code Setting ..................................................................................... 23
3.3.8
System Greeting................................................................................. 25
3.3.9
Intercom Busy One-Digit ...................................................................... 26
3.3.10
ICM BOX Music Type .......................................................................... 27
3.3.11
Custom Setting [Environment Setting]..................................................... 28
4
IPECS_MG MAIN TOOLBAR...................................................................................................... 29
1
iPECS Attendant MG
User Manual
4.1
4.2
4.3
5
STATION CALLING AND ANSWER...................................................................... 36
CALL TRANSFER ......................................................................................... 36
CONFERENCE ............................................................................................ 36
MUTE ...................................................................................................... 37
HOLD/CONNECT ......................................................................................... 37
CALL PICK UP............................................................................................ 37
PMS [MAIN WINDOW] ................................................................................................................. 39
7.1
8
LOGOUT ................................................................................................... 31
WAIT/HOLD W INDOW ................................................................................... 31
MONITORING W INDOW (STATION INFO.) ............................................................ 32
MONITORING W INDOW (CO LINE INFO.) ............................................................. 33
PHONE BOOK SEARCH WINDOW ..................................................................... 34
DIAL PAD W INDOW ...................................................................................... 34
ALARM DISPLAY LED ................................................................................... 35
IPECS-MG FUNCTION ................................................................................................................ 36
6.1
6.2
6.3
6.4
6.5
6.6
7
STATUS ................................................................................................... 29
CALL FORWARD ......................................................................................... 29
CALL PARK ............................................................................................... 30
IPECS_MG MAIN WINDOW ........................................................................................................ 31
5.1
5.2
5.3
5.4
5.5
5.6
5.7
6
Issue 1.0
MONITORING W INDOW ................................................................................. 39
PMS FUNCTION ............................................................................................................................ 40
8.1
DB SYNCHRONIZATION ................................................................................. 40
8.2
CONFIGURATION ......................................................................................... 40
8.2.1
Hotel Information ................................................................................ 40
8.2.2
Group ............................................................................................... 40
8.2.3
Guest Search..................................................................................... 41
8.2.4
Setting .............................................................................................. 41
8.3
GUEST INFORMATION SETTING ....................................................................... 42
8.3.1
Check In ........................................................................................... 42
8.3.2
Check Out ......................................................................................... 43
8.3.3
Room Status Change .......................................................................... 44
8.3.4
Room Change.................................................................................... 45
8.3.5
COS................................................................................................. 46
8.3.6
Message ........................................................................................... 46
8.3.7
DND................................................................................................. 46
8.3.8
Wake Up ........................................................................................... 47
2
iPECS Attendant MG
User Manual
Issue 1.0
1 iPECS_MG Installation
1.1 Recommended specifications
Description
iPECS Attendant installation will be done easily through the installation wizard. Therefore the installer is requested to
consider just few conditions describred below.
Installation PC Environment is recommended like below.
1) Hardware:
Minimum Specification : CPU 1GHz, Main Memory 1GB, HDD 100GB
2)
Operating System:
Windows XP with Service pack2 and later, Windows Vista, Windows 7
3) Window Resolution:
1280 x 1024 Window Resolution is considered
3
iPECS Attendant MG
User Manual
Issue 1.0
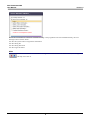
1.2 Program Installation
Description
The initial program installation shall take the following steps.
Procedure
4) Select the iPECS_Setup.exe file and then operate it.
5) Install the program according to the procedure.
6) Install additional programs such as WinPcap 4.1.1 and FireBird 2.1, which are necessary for operating the iPECS
Attendant.
7) Once installation procedure is completed, operate the program by selecting the icon (iPECS-Attendant) on the
wallpaper.
Notice
1) In case WinPCap program cannot be installed, communication with IP-PBX cannot be done.
2) In case “FireBird 2.1” is not installed, Local or Remote DB of the program cannot be operated normally.
Note
4
iPECS Attendant MG
User Manual
Issue 1.0
2 iPECS_MG Login
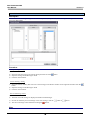
2.1 Basic Setting of the Program
Description
Set the basic information to connect to the PBX.
Window
Procedure
1) Start → All programs → iPECS-Attendant.
2) By clicking the "Setting" button, Connect to Custom Setting by clicking the "Setting" button.
3) Select System type, input the system IP, select connection mode and input the Attendant ID & password in sequence
in the System Connection tap. After all required information is set, click the "Apply" button.
4) Check the Database directory in the Database Setting tap and then click the "Test" button to check if connection is
done properly. After that, click the "Apply" button
Notice
1) iPECS-Attendant for MG cannot be operated unless iPECS-MG in the System Type (System Information) is not
selected.
2) System IP is the PBX IP information. In case wrong information is inputted, connection with the PBX cannot be
done normally.
Note
1) Attendant ID/Password are ID/Password of Attendant Station which should be previously configured at 'IP-Phone
Registration Table' in System Admin. Program. (Refer to iPECS-MG Administration & Maintenance Manual)
2) Station Number for Attendant should be the member of Attendant Group. (Attendant Group Assignment in System
Admin. Program)
3) Automatic connection (Sign me in automatically) cannot be operated in case the system is logged out.
5
iPECS Attendant MG
User Manual
Issue 1.0
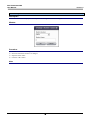
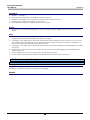
2.2 User Authentication
Description
When operating the program, set the basic environment for user authentication and communication with the PBX.
Procedure
1)
Input ID and Password in the login window.
2)
When login, select the option which will be used next time, by choosing the check box next to the option.
3)
By clicking the “Login” button, proceed the authentication to have access to the program.
Notice
1) The first login ID (Account) will be automatically deleted in case of registering new ID (Account) after operating
the attendant. Once new ID (Account) is registered, login with “admin / 1111” cannot be done, so DO NOT
FORGET the newly registered ID (Account).
2) If the registered new account is deleted due to an operator's fault, the account - ‘admin/1111’ will be automatically
created.
3) When login with “admin/1111”, some functions will be limited to be used, on the other hand, when login with user
ID & Password, there will not be any restrction for the user to use the functions.
Note
1)
If ticking the box next to “Sign me in automatically”, automatic login will be done whenever login.
2)
After program setting up, the initial login ID and Password are “admin’,’1111”.
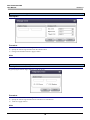
2.3 Program Start
Description
After login, apply the system information into the iPECS-MG to operate.
Window
In case ID & password of the user are wrong, the error message as above will be shown.
db fail: Wrong ID.
db fail: Wrong Password.
db fail: Connection with DB cannot be done normally.
6
iPECS Attendant MG
User Manual
Issue 1.0
In case the environment of connection with PBX is wrong or the program has not been installed normally, the error
message as above will be shown.
ucti fail: The system cannot recognize the information.
ucti fail: Wrong ID.
ucti fail: Wrong Password.
ucti fail: Login has failed.
Note
In case the information of connection with the PBX is wrong or the communication with PBX is cut off, the red light of
left lamp will come on.
7
iPECS Attendant MG
User Manual
Issue 1.0
3 iPECS_MG Program Menu
3.1 File Menu
3.1.1 Import Phone Book
Description
This is about Synchronizing user information which is used at the iPECS-MG after importing it from the other programs
or files.
Procedure
1) "Menu" → "File" → "Import Phone Book".
2) Select one of types that need to be synchronized.
3) Select the file in the file import window.
Notice
1) The program relevant to the selected import type must be already installed in the PC.
2) "Import Phone Book" menu is functional only when Server type which is in the Database Setting is "Local". In other
words, in case Server type is "Remote", "Import Phone Book" menu is not functional.
3) In case of "Import", the phone book that has been saved before will be cleared and the phone book that is currently
imported will be replaced.
4) If "Import" & Export" are in progress, they cannot be stopped.
3.1.2 Export Phone Book
Description
This is about creating user information which is used at the iPECS-MG as making it suitable for various types of other
programs & files.
Procedure
1) "Menu" → "File" → "Export Phone Book".
2) Select one type that needs to be created.
3) Input the file name in the file export window and then save it.
Notice
1) The format of the created file can be applied to the relevant program.
2) "Export Phone Book" menu is functional only when Server type which is in the Database Setting is "Local". In other
words, in case Server type is "Remote", "Export Phone Book" menu is not functional.
8
iPECS Attendant MG
User Manual
Issue 1.0
3.2 Tools
3.2.1 Phone Book
Description
This is about registering/adding & modifying/changing & deleting subscriber information that is used at the iPECS-MG.
Window
Procedure
1) "Menu" → "Tools" → "Phone Book".
2) In case of new subscriber information registration/addition, click the "Add" button.
3) In the Phone Book window [subscriber registration-Add button], input the station number, the name and department,
and then click the "Save" button.
4) If it is necessary to change the information of the registered subscriber, click the "Modify" button after selecting the
relevant subscriber/information or double click the relevant subscriber/information.
5) In the Phone Book window [Modification/Change], modify/change the information and then click the "Save" button.
6) If it is necessary to delete the information of the registered group, select the relevant group and then click the
"Delete" button.
Notice
Depending on Phone Level in the Phone Book window [subscriber registration-Add button], the display order of holding
calls will be determined.
Note
1) The information that has been registered in the Phone Book will be displayed in the all subscriber information display
part of the program.
2) Up to 30,000 phone numbers are recommended to be registered/added. Registration/Addition of over 30,000 phone
numbers might result in search speed down.
9
iPECS Attendant MG
User Manual
Issue 1.0
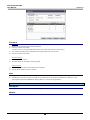
3.2.2 Account
Description
This is about registering/adding & modifying/changing & deleting the information of iPECS-MG operator information.
Window
Procedure
1) "Menu" → "Tools" → "Account".
2) In case of new operator information registration/addition, click the "Add" button.
3) In the Account Info. window, input the relevant information such as User ID, Password, Name, Department, Perm
(Permission), Attendant ID and Password, and then click the "Save" button.
4) If it is necessary to change the information of the registered operator, select the relevant operator and then click the
"Modify" button.
5) In the Account Info. Window [Modification], change the information and then click the "Save" button.
6) If it is necessary to delete the information of the registered operator, select the relevant operator and then click the
"Delete" button.
Notice
1) If Attendant ID and Password in Attendant Info. are wrong, communication with the PBX cannot be done.
2) Bear in mind that operator information is provisioning with all information registered by the operator, so when the
operator is deleted, any setting or any information such as program environment setting registered by the operator
will be deleted.
3) General user/operator is not allowed to change & delete "admin" account.
10
iPECS Attendant MG
User Manual
Issue 1.0
4) If all operator information is deleted, “admin” and “1111” (user/operator information) will be automatically created.
Note
1) "Monitoring Group" and "Program Environment (window configuration)" includes the information registered by
operators
2) Operator information (“admin” and “1111” that are used for the first login) will be automatically deleted in case a
new operator is created.
3) Depending on user/operator permission, accessible menus are determined and in case of "admin", there is a
restriction to access the menu & main window.
4) Recommended number of operator information registration is 50.
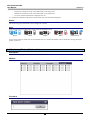
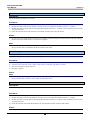
3.2.3 Call Log
Description
This is about searching for the history of incoming calls and outgoing calls through the iPECS-MG.
Window
Procedure
1) "Menu" → "Tools" → "Call Log".
2) Select the search period and search condition, and then click the "Search" button.
3) In case of search for all information without any condition, click the "All Log" button.
Note
11
iPECS Attendant MG
User Manual
Issue 1.0
3.2.4 Change Station Name
Description
The name of STN that is displayed in the telephone can be registered/added or changed.
Window
Procedure
1)
2)
3)
4)
"Menu" → "Tools" → "Change Station Name".
Select the station that needs to be changed.
Input the station name.
Click the "OK" button.
Note
12
iPECS Attendant MG
User Manual
Issue 1.0
3.2.5 Message setting in absentia
Description
iPECS-MG is able to send Preselected message or Customized message to the other stations. The station subscriber is
able to leave a message at the LCD of the other station's telephone. Depending on type or feature of Preselected message,
additional time and date can be set.
Procedure
1)
2)
3)
4)
"Menu" → "Tools" → "Preselected Message".
Set the station range in the station input blank and then click the "Read" button.
Select the massage as you wish.
Click the "Apply" or "OK" button.
Note
If selecting the "Remove Message" and click the "Apply" button, the message in absentia, which has been set will be
cleared.
13
iPECS Attendant MG
User Manual
Issue 1.0
3.2.6 Paging
Description
iPECS-MG can do "Paging" to the station. Paging section will be determined on the basis of paging section defined by
PBX.
Window
Procedure
1) "Menu" → "Tools" → "Paging".
2) Select the appropriate paging range in the paging selection window.
3) Click the "OK" button.
Notice
1) In order to do paging, the operator's telephone must be permitted to do paging.
2) iPECS-MG only supports one type of speaker mode for paging.
Note
14
iPECS Attendant MG
User Manual
Issue 1.0
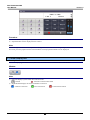
3.2.7 Date/Time
Description
Date and time that are displayed in the dial pad can be set or changed.
Window
Procedure
1) "Menu" → "Tools" → "Date/Time".
2) Change date and time and then click the "OK" button.
Note
15
iPECS Attendant MG
User Manual
Issue 1.0
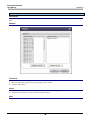
3.2.8 SMS
Description
This function is for sending messages to the station telephones (Group/Private) and checking the messages that have been
sent to the iPECS-MG.
Procedure
Group Message Setting
1) "Tools" → "SMS".
2) Select the relevant group in the Current Group and then click the
3) Input the message in the Message to Send.
4) Click the "Send" button.
button.
Private Message Setting
1) Select the station number (that will receive the message) in the Station window on the right side and then click the
button.
2) Input the message in the Message to Send
3) Click the "Send" button.
Received Message Check
1) "Tools" → "SMS".
2) The latest received message is displayed in the Received Message".
3) In order to check the previous message or the next message, click the
4) The current message will be deleted if clicking the
button.
Note
16
button or
button.
iPECS Attendant MG
User Manual
Issue 1.0
3.2.9 Attendant – Change COS
Description
By specifying the station range for COS change, Day COS & Night COS & Timed COS can be set.
Procedure
1) "Tools" → "Attendant" → "Change COS".
2) Specify the station range and then click the "Read" button.
3) Change COS and then click the "Apply" button.
Note
3.2.10 Attendant – Temporary COS
Description
By specifying the station range, temporary COS can be set.
Procedure
1) "Tools" → "Attendant" → "Change COS".
2) Specify the station range and then select COS Down or COS Restore.
3) Click the "Apply" button.
Note
17
iPECS Attendant MG
User Manual
Issue 1.0
3.2.11 Attendant – Attendant Cancel
Description
By specifying the station range, the function on the station numbers can be cancelled.
Procedure
1) "Tools" → "Attendant" → "Attendant Cancel".
2) Specify the range of the station numbers whose functions are going to be cancelled and then click the "Apply" button.
Note
3.2.12 Prepaid Call
Description
Prepaid amount can be registered by specifying the prepaid station range.
Procedure
1) "Tools" → "Prepaid Call".
2) Input the relevant station range and then click the "Read" button.
3) Input the amount and then click the "Apply" button.
Note
18
iPECS Attendant MG
User Manual
Issue 1.0
3.2.13 Conference Room Setting
Description
This is for setting "Activate" or "Deactivate" of each conference room by selecting the conference room that has been
registered in the system.
Procedure
1) "Tools" → "Conference Room".
2) Move the mouse pointer on the conference room number whose status needs to be changed and then click the right
button of the mouse to select "Activate" or "Deactivate".
3) The password of the conference room can be inputted in case of "Activate".
Note
19
iPECS Attendant MG
User Manual
Issue 1.0
3.3 Setting Menu
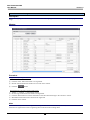
3.3.1 Wake Up Setting
Description
Maximum number of Wake Up is 5 to be registered by specifying the station range.
Procedure
1) "Setting" → "Wake Up Setting".
2) Specify the station range so that Wake Ups can be registered.
3) Tick the box on the left side of the Wake Up Information window in order to activate Wake Up Type and Wake Up
Time.
4) Select one of Wake Up types and input the Wake Up time, and then click the "Save" button.
5) If it is necessary to delete any information relevant to Wake Up, click the "Clear All" button.
Note
20
iPECS Attendant MG
User Manual
Issue 1.0
3.3.2 Mail Sending
Description
If it is necessary to send a mail, activate Microsoft Outlook if it has been already installed.
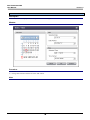
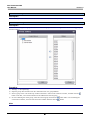
3.3.3 Group Setting
Description
Stations can be managed as a group as subscribers wish. The group information is registered as the monitoring group of
the main window.
Procedure
1) "Setting" → "Group Setting".
2) Input the group name and then click the "Add" button for new group addition.
3) Select a group in the "Current Group" window and select a station in the "Stations" window, and then click the
button. After that, a new station number will be added at the selected group.
4) In case of deleting the whole group, select the relevant group and click the
certain station number, select the relevant station number and then click the
Note
21
button and in case of deleting the
button.
iPECS Attendant MG
User Manual
Issue 1.0
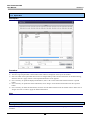
3.3.4 Flex Button Setting
Description
This is for assigning the relevant functions to Flex button that is going to be used at the station by specifying the station
range.
Window
Procedure
Registration by using the Dial Pad
1) Click the "PGM" button.
2) Click the "Flex" button that needs to be registered.
3) Dial the station number that needs to be set at the "Flex" button.
4) Click the
button.
Registration by using Flex button setting menu
1) "Menu" → "Setting" → "Flex button setting".
2) Set the range of the station that needs to be registered.
3) Click the "Read" button to see the information of the Flex button belongs to the relevant to station.
4) Maximum 48 Flex buttons are allowed to be registered.
5) Click the "Save" button.
Note
1 Flex button is only allowed to be registered if using "PGM" button in the Dial Pad, however, several Flex buttons are
allowed to be registered at a time if registering them in the Flex button setting menu.
22
iPECS Attendant MG
User Manual
Issue 1.0
3.3.5
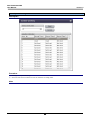
3.3.6 Speed Dial
Description
This is for registering/changing/deleting the Speed Dial that is used in the system.
Procedure
1) "Setting" → "Speed Dial".
2) The first range of Speed Dial is from 2000 to 2099 and this is displayed on the top of the window.
3) Select the index of the Speed Dial that needs to be changed and input the relevant information in the Detail Setting,
and then click the "Apply" button so that inputted information can be applied.
4) If it is necessary to upload all displayed information, select "All" on the bottom left and then click the "Upload"
button.
5) If it is necessary to upload the certain information, select "Single" on the bottom left and then click the "Upload"
button.
6) If it is necessary to delete the information, select the relevant index and then click the "Delete" button. Select one of
"Single" and "All" in order to apply the deleted information.
Note
3.3.7
Code Setting
Description
This is for setting CO Access Code/International Code/Country Code/Area Code that are going to be used in the iPECSAttendant.
23
iPECS Attendant MG
User Manual
Issue 1.0
Window
Procedure
1) "Setting" → "Code Setting".
2) Input CO Access Code/International Code/Country Code/Area Code.
3) Click the "OK" button.
Note
24
iPECS Attendant MG
User Manual
Issue 1.0
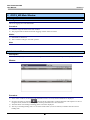
3.3.8 System Greeting
Description
This is for checking the recording status of greetings (by slots) that have been registered in the system.
Procedure
1) "Setting" → "System Greeting".
2) Select the relevant slot number in order to check the recording status.
Note
25
iPECS Attendant MG
User Manual
Issue 1.0
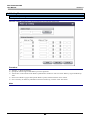
3.3.9 Intercom Busy One-Digit
Description
This is for checking & changing the information of Intercom Busy One-Digits that are used in the system.
Window
Procedure
1) "Setting" → "Intercom Busy One-Digit".
2) Select "Able" or "Disable" in the Step Call which means select one of options to confirm if the step call is going to be
used.
3) Select the relevant services from Digit 1 to Digit #.
4) Click the "OK" button.
Note
26
iPECS Attendant MG
User Manual
Issue 1.0
3.3.10 ICM BOX Music Type
Description
This is for selecting or changing ICM BOX music type.
Window
Procedure
1) "Setting" → " ICM BOX Music Type".
2) Select the type of ICM BOX music.
3) Click the "OK" button.
Note
1) ICM BOX Music Type
- No BGM (Not Applicable)
- Internal Music (Internal Music)
- External Music (External Music)
- VMIB BGM 1 (VMIB BGM - BackGroundMusic 1)
- VMIB BGM 2 (VMIB BGM - BackGroundMusic 2)
- VMIB BGM 3 (VMIB BGM - BackGroundMusic 3)
- VMIB BGM 4 (VMIB BGM 4) (This is only applicable for MG 300 system)
- SLT MOH 1 (SLT MOH - MusicOnHolding1)
- SLT MOH 2 (SLT MOH - MusicOnHolding 2)
- SLT MOH 3 (SLT MOH - MusicOnHolding 3)
- SLT MOH 4 (SLT MOH - MusicOnHolding 4)
- SLT MOH 5 (SLT MOH - MusicOnHolding 5)
27
iPECS Attendant MG
User Manual
Issue 1.0
3.3.11 Custom Setting [Environment Setting]
Description
This is for custom setting for program operation.
Procedure
1)
"Menu" → "Setting" → "Custom Setting".
2)
In the "System Connection", system information such as "PBX Type", "System IP", "Connection Mode",
"Connection ID" and "Password" can be set.
3)
"In the "Audio Setting", incoming ring file, internal ring file and enternal ring file can be set.
4)
In the "Windoize of monitoring group display icon can be set by Station Type & the position of window at the
time when the program is operated can be set by Window Position & Program language (Language Select) can be
set by Language Select.
5)
In the "Communication Setting", the history of communication with the PBX can be saved as either "Detail" or
"Summary".
6)
In the "Database Setting", DB operation mode can be set. In case of "Remote" as the server, IP address of the
relevant PC and “DB\iPECS_DB.DFB” file located in Attendant installation folder in the relevant PC must be
accurately set for DB connection. In case of "Local" as the Server, “DB\iPECS_DB.DFB”file located in Attendant
installation folder of the relevant PC must be accurately set.
Notice
1)
"Window Position" varies with operators.
2)
WAV file & MP 3 file are only allowed to be selected in the Audio Setting.
3)
Bear in mind that if "checking View system mode and link test" in Communication, program speed will be down
and the size of log file will be bigger.
4)
After "Database Setting", connection test by using the "Test" button is strongly recommended.
Note
Any change on Language Selection will be applied once the program is restarted.
28
iPECS Attendant MG
User Manual
Issue 1.0
4 iPECS_MG Main Toolbar
4.1 Status
Description
This is for specifying the status of the iPECS-Attendant.
Procedure
1) Click the "Status" button in the main toolbar.
2) Specify the status of the iPECS-Attendant.
Note
1) Status
- Day
- Night
- Timed
- Day + Auto Ring
- Night + Auto Ring
- Timed + Auto Ring
4.2 Call Forward
Description
This is for forwarding the call that comes into the iPECS-Attendant to the other station number.
Window
Procedure
1) Click the "Forward" button in the main toolbar.
2) Select one of forward types.
3) Input the forward number.
Note
29
iPECS Attendant MG
User Manual
Issue 1.0
1) Forward Type
- Unconditional
- Busy
- No Answer
- Busy or No Answer
4.3 Call Park
Description
The call that is on the phone with the iPECS-Attendant becomes holding (call park).
Procedure
1) Click the "Call Park" button in the main toolbar.
2) The call that is on the phone will be added in the holding call (call park) information tap.
3) In case of recalling the call on holding (call park), double click the relevant number for recall.
30
iPECS Attendant MG
User Manual
Issue 1.0
5 iPECS_MG Main Window
5.1 Logout
Description
This is for logging out of the iPECS-MG.
Procedure
1) Click the "Logout" button in the main window.
2) The program will be shut down and the Logging window will be activated.
Notice
1) iPECS-MG is shut down.
2) This is useful to change to the other operator.
Note
5.2 Wait/Hold Window
Description
This is about displaying the information of incoming calls to the iPECS-MG and holding calls during the phone call.
Window
Procedure
1) In the "Wait" window, the incoming call information such as Co Line, Station and Recall is displayed.
2) In case a call come in, click the
button or hit the “Space Bar” on the keyboard for call response. In case of
using the mouse, double click the displayed incoming information for call connection.
3) The information of a holding call during phone call will be displayed.
4) The way of recalling holding calls is to click the "ICM" button (in case of stations) or double click the relevant
holding calls.
31
iPECS Attendant MG
User Manual
Issue 1.0
Note
1) Depending on the Phone Level in the Phone Book window, the display order of holding calls will be displayed in
consecutive order.
2) In case several holding calls have come in, the call that has firstly come in (displayed on the top in the Wait Window)
can be firstly received by double clicking the call. In other words, holding calls are received in consecutive order (by
double clicking the calls).
3) The ” Camp on” information does not display wait window.
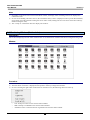
5.3 Monitoring Window (Station Info.)
Description
This is about displaying real-time status of Station Info. or the information of Station that has been assigned to the group.
Window
Procedure
1) In case of Station, call can be connected by double clicking the icon on the "IDLE" status.
2) The information of stations is displayed with operators' names by Change Station Name.
3) In case of clicking the right button of the mouse on the station icon, the following menu will come up.
-
Call: Attempt to connect to the relevant station number.
SMS: Attempt to send SMS to the relevant station number.
Attendant Cancel: Cancel the function registered in the relevant station number.
32
iPECS Attendant MG
User Manual
Issue 1.0
- Large Icon: Change the icons in the Station Info. to the large icons.
- Small Icon: Change the icons in the Station Info. to the small icons.
- List View: Station information is displayed as a list.
4) If click the left button of the mouse on the station icon, DN list will be displayed.
Notice
The monitoring group information can be changed in real time.
Note
Status Icon (There are no other status icons except for the below icons)
BUSY
IDLE
CFWD
DND
PRESELECT
In case of the station in which auto call forward has been set, call forward number can be checked by moving the mouse
pointer on the icon.
5.4 Monitoring Window (Co Line Info.)
Description
This is about displaying real-time status of Co Line Information.
Window
Procedure
1) In case of Co Line, call can be connected by double clicking the icon on the "IDLE" status.
33
iPECS Attendant MG
User Manual
Issue 1.0
2) In case of clicking the right button of the mouse on the "IDLE" status,
Co Line port can be activated or deactivated.
3) In case of clicking the right button of the mouse on "BUSY" status,
Co Line port can be forcibly shut down (Drop Coline)
Note
Status Icon
Deactivate
IDLE
BUSY
5.5 Phone Book Search Window
Description
This is for searching for the information of the subscribers who have been registered in the Phone Book.
Procedure
1) For search, it is required to input the necessary information among station number, name, company, department and
mobile phone number.
2) Various functions such as "Call", "Mobile No", "SMS" and "E-Mail" can be functional if clicking the right button of
the mouse on the searched information.
Note
Information in the Phone Book can be registered/changed/deleted. ("Menu" → "Tools" → "Phone Book").
5.6 Dial Pad Window
Description
In this Dial Pad window, "connection", "answer", "holding", "conference", "redial" and "Mute" can be done and this
window displays subscribers' numbers, date and time.
Window
34
iPECS Attendant MG
User Manual
Issue 1.0
Procedure
1) Dial the number by hitting the keyboard or the mouse in case of connection for Co Line & Station.
2) Inputted number will be displayed in the window.
Note
Unlimited digits are allowed to be inputted for dialing, however, in case of exceeding 57 digits, those of numbers which
have been previously inputted will be cleared and the currently inputted numbers will be displayed.
5.7 Alarm Display LED
Description
This is for displaying the status of alarm, DB connection and connection between iPECS-MG & PBX.
Window
Note
1) Left LED displays system alarm & connection status.
: Normal
: Alarm & Connection has failed
2) Right DB LED displays the status of Database connection.
: Remote Connection
: Local Connection
35
: Connection has failed
iPECS Attendant MG
User Manual
Issue 1.0
6 iPECS-MG Function
6.1 Station Calling and Answer
Description
This function is that an iPECS_MG operator answers the calling from a station subscriber or does calling a station
subscriber.
Procedure
Answer
1) When an incoming call come in, it will be displayed in the Wait window
2) Click the
in the Dial Pad window or double click the station number in the Wait window.
Station Calling
1) Dial the station number or click the station icon in the Group Info. window
Note
6.2 Call Transfer
Description
This function is that the iPECS-MG operator transfers various types of incoming/outgoing calls. Call transferring depends
on the status of the subscribers and when call transferring fails, the subscriber needing to be transferred becomes
"Holding", and if clicking the
maintained.
button, the phone call with the subscriber needing to be transferred will be
Procedure
1) Click the "Transfer" button during the phone call with the Co Line subscriber and then dial the station number.
2) The Co Line subscriber will hear "holding tone" and the station subscriber will receive "call signal".
3) As making response, the phone call with the station subscriber will be made (Co Line subscriber will be on
"holding").
4) If clicking the
will be made.
button, the iPECS-MG operator will be cut off and then the phone call between subscribers
Note
6.3 Conference
Description
The iPECS-MG operator is allowed to attend the conference call.
Procedure
1) The iPECS-MG operator dials the station number (A) to make a phone call
2) Once the phone call with the station number (A) is made, click the "CONF" button and then dial the station number
(B). At this time, (A) will hear "holding tone".
36
iPECS Attendant MG
User Manual
Issue 1.0
3) As soon as the phone call with (B) is made, click the "CONF" button twice consecutively.
4) As hearing "alarm", the conference call for the operator, (A) and (B) will be made.
Note
In case of the conference call for more than 3 people, repeat 2) in the above procedure.
6.4 Mute
Description
During the phone call with a subscriber, the iPECS-MG operator activates the "Mute" function so that the subscriber
cannot hear the iPECS-MG operator's voice.
Procedure
1) During the phone call, click the "Mute" button in the Dial Pad window.
2) The subscriber will not hear the iPECS-MG operator's voice.
3) Click the "Mute" button for deactivation.
Note
6.5 Hold/Connect
Description
This function is that the iPECS-MG operator makes a station/Co line subscriber (A) who is on the phone with the
attendant operator "holding" and the iPECS-MG operator releases (A) from "holding" to make response. In addition, the
iPECS-MG operator connects the other subscriber who is on the phone with the iPECS-MG operator to subscribers on
"holding".
Procedure
Hold
1) Click the
button during the phone call between the iPECS-MG operator and a subscriber.
2) The subscriber will hear "holding tone" and the relevant subscriber's information will be displayed in the
"Wait/Hold" window. And the number of call count will increase.
Holding Answer
1) iPECS-MG operator needs to click the
button or double click the subscriber's information displayed in the
Hold window.
2) Phone call with the subscriber on holding will be made.
Note
6.6 Call Pick Up
Description
By using the "Call Pick Up", the iPECS-MG operator is able to pick up calls that come in to the other stations. This
function is applicable for station, Co line and recall.
37
iPECS Attendant MG
User Manual
Issue 1.0
Procedure
1) Among "Flex" buttons, blue light of the button that receives the incoming calls will be flickering.
2) Click the relevant button.
3) At the end of the call, click the "ESC" or
button.
Note
38
iPECS Attendant MG
User Manual
Issue 1.0
7 PMS [Main Window]
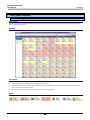
7.1 Monitoring Window
Description
The PMS information (PMS information of station number) that has been registered at iPECS-MG is displayed in real
time for user's convenience.
Window
Procedure
1) The status of check in & out can be checked in real time by lighting & lights-out of the blue lamp.
2) The status of rooms is displayed in real time by color & icon.
3) Various functions such as check in & out/wake up/message/DND/room status are functional if clicking the right
button of the mouse on the window.
4) Station numbers can be managed more effectively by creating groups.
Note
1) Color and icon are variable depending on the status of station numbers.
39
iPECS Attendant MG
User Manual
Issue 1.0
8 PMS Function
8.1 DB Synchronization
Description
The information in PBX is synchronized with the information in the PMS program.
Procedure
1) "File" → "DB Sync".
2) The process of DB synchronization is displayed and when it gets completed, the window will be automatically closed
to be initialized.
Notice
1) In case of closing the window while DB synchronization is in progress, PMS window will be closed.
8.2 Configuration
8.2.1 Hotel Information
Description
Hotel information such as "address", "phone number", "FAX number", "HomePage", tax number" and "main currency"
can be registered. The information that has been registered will be displayed in the receipt.
Procedure
1) "Config" → "Hotel Information".
2) Input the relevant information.
3) Click the "OK" button.
Note
1) The information that has been saved will be displayed in the receipt when check out.
2) RemoteDB to use the hotel if you will be sharing information on all PMS
8.2.2 Group
Description
PMS information of station numbers can be managed more effectively in the monitoring window by creating groups.
Window
40
iPECS Attendant MG
User Manual
Issue 1.0
Procedure
1)
2)
3)
4)
5)
Group Creation
"Setting" → "Group".
Input a new group name.
Click the "Add" button to create the group.
Select the number that needs to be included in the group and then click the [<<] button.
Check the station information of the group registered in the current window and then click the "OK" button.
1)
2)
3)
4)
5)
Group Deletion
"Setting" → "Group".
Select a group that needs to be deleted.
Click the right button of the mouse.
Click the "Delete" button.
Right after the message comes up, click the "YES" button.
1)
2)
3)
4)
Group Name Change
Select a group.
Click the right button of the mouse.
Click the "Name Change" button.
Input a new name and then click the "Enter" button.
Notice
1) Group information is applied in the ATD program as well. If group information in the PMS program is changed,
monitoring group information of the ATD program will be changed at the same time.
8.2.3 Guest Search
Description
This is for searching for the information of guests who are staying and who have stayed in the past.
Procedure
1) "Setting" → "Guest Search".
2) Select one of search types. If it is necessary to search for guests who are staying, select "Current Guest" and if it is
necessary to search for guests who have stayed in the past, select "Past Guest".
3) In case of "Current Guest", input the guest's name to search but if nothing is inputted, all guests who are staying will
be searched (Guest name is the only search condition).
4) In case of "Past Guest", input one of search conditions such as receipt number, guest name. The relevant information
by search conditions will be displayed.
5) In case of double clicking searched information by "Current Guest", the window for information change of the guest
who is being checked in will be displayed.
6) In case of double clicking searched information by "Past Guest", the historical information of the relevant guest (call
charge history/sales history/room charge history) will be displayed.
Notice
1) For displaying changed information, search for the information by "Current Guest" and change the information in the
window, and then search for the information again.
8.2.4 Setting
Description
This is for setting the necessary information to operate the PMS program.
41
iPECS Attendant MG
User Manual
Issue 1.0
Procedure
1)
2)
3)
4)
5)
"Setting" → "Setting".
Room level that is displayed in the PMS main window can be set.
Items that are displayed in the receipt that is printed out when check out can be set.
Language that is applied in the PMS program can be set.
Once information change is completed, click the "Save" button.
Notice
1) Room level is not synchronized with PBX. In case of operating a number of PMS programs, all levels must be set
equally.
Note
1) "Top Logo Image" is the image that will be printed on the left side of hotel information in the receipt. If it is not set,
nothing will be printed. Recommended size is width 12 x height 5.
2) "Top Image" is the image that will be printed on the bottom of hotel information in the receipt. If it is not set, it will
be excluded and the next information will be displayed. When printing, if the height is more than 5 centimeter, the
height will be reduced and reduced image might be printed.
3) "Left Image" is the image that will be printed on the left side of the receipt lengthways. Recommended size is width 3
x height 54.
4) "Right Image" is the image that will be printed on the right side of the receipt lengthways. Recommended size is
width 3 x height 54.
5) "Printer Dialogue View" is for selecting a printer when printing the receipt.
6) Set the contents of the PMS for being used in RemoteDB using information will not be shared.
8.3 Guest Information Setting
8.3.1 Check In
Description
This is for allocating rooms to guests to change room status and to register guest information. In addition to this, the
information of guests who have been checked in can be changed.
Window
42
iPECS Attendant MG
User Manual
Issue 1.0
Procedure
1) Select a room number whose status is check out.
2) Click the "Check In" button.
3) Check in is also functional by double clicking the room or clicking the right button of the mouse after selecting the
room, and then click the "Check In".
4) Check in window will be activated.
5) Input the relevant information.
6) Click the "OK" button.
Notice
1) Check in is only applicable for one room. More than 2 rooms cannot be checked in at the same time.
2) In case of selecting a room that has been already checked in, the window for information change will be displayed.
Note
In case of group, station call between guests in the same group can be functional by designating the group number.
8.3.2 Check Out
Description
Guests are checked out and receipts are issued. From the Check Out window, detailed information (like room charge) is
displayed and the receipt can be printed.
Window
43
iPECS Attendant MG
User Manual
Issue 1.0
Procedure
Check Out
1) Select a station number that has been checked in.
2) Click the "Check Out" button.
(Another way is to click the right button of the mouse and then click the "Check Out").
3) The window including Guest Information & Charge Details will be activated.
4) Click the "Check Out" button.
Receipt Printing
1) Click the "Printer" button.
2) The information in the window will be printed.
Charge Details
1) Click the "Details" button at the bottom of the window.
2) Charge details window will be activated.
Note
1) Images that will be included in the receipt can be set by "Config" → "PMS Config".
2) If multiple Front-desks are used for check-out, the Database server should be configured as “Remote” in the
“SettingCustom SettingDatabase SettingServer” to share the charged data.
8.3.3 Room Status Change
Description
The information of room status (cleaning & repairing) can be set.
Window
44
iPECS Attendant MG
User Manual
Issue 1.0
Procedure
1) "Customer Info. Setting" → "Room Status".
2) Room status can be set by double clicking the group that has been designated or selecting the group, and then click
the (>>) button so that a number of rooms can be set at the same time.
3) Check the selected station and select the relevant room status, and then click the "OK" button.
Notice
1) In case of error occurring during room status change for a number of rooms, the process of this function will stop.
Settings that have been done before the error occurs will be applied.
Note
1) In case of room status change for a room, select a room in the PMS main window and click the right button of the
mouse, and then select "Status" under the "Room Status" menu.
8.3.4 Room Change
Description
This is for changing a room in which a guest is staying to the other room.
Procedure
1) Select a room number in which a guest has been checked in.
2) Click the "Room Change" button or click the right button of the mouse and then select "Room Change".
3) Select a room in which a guest is going to move.
4) Room change will be in progress and check the result message.
Notice
1) The status of the room in which a guest is going to move must be "check out".
2) Any information such as DND, Message and Room Level cannot be changed, which means those information should
be newly set.
45
iPECS Attendant MG
User Manual
Issue 1.0
8.3.5 COS
Description
This is for setting the authority for call use.
Procedure
1) "Customer Info. Setting" → "COS".
2) Double click/Select the relevant number in the station list on the right side and then click the (<<) button.
3) Double click/Select a group that has been designated and then click the (>>) button so that a number of rooms can be
set at the same time.
4) Check the selected station and select the COS number, and then click the "OK" button.
Notice
1) In case of error occurring during COS change for a number of rooms, the process of this function will stop. Settings
that have been done before the error occurs will be applied
Note
1) In case of room status change for a room, select a room in the PMS main window and click the right button of the
mouse, and then select COS number under the "Room COS" menu.
8.3.6 Message
Description
This is for setting & cancelling the message warning for station users.
Procedure
1) "Room Setting" → "Message".
2) Program in the upper left corner, "Select room to leave a message," the phrase is written.
3) Select the message to register the room.
4) Message to register.
Notice
Note
1) In case of room status change for a room, select a room in the PMS main window and click the right button of the
mouse, and then select "YES" or "NO" under the "Message" menu.
8.3.7 DND
Description
This is for setting & cancelling DND function.
Procedure
1) "Customer Info. Setting" → "DND".
2) Double click/Select the relevant number in the station list on the right side and then click the (<<) button.
3) Double click/Select a group that has been designated and then click the (>>) button so that a number of rooms can be
set at the same time.
4) Check the selected station and decide whether to operate DND, and then click the "OK" button.
Notice
46
iPECS Attendant MG
User Manual
Issue 1.0
1) In case of error occurring during DND setting for a number of rooms, the process of this function will stop. Settings
that have been done before the error occurs will be applied.
Note
1) In case of room status change for a room, select a room in the PMS main window and click the right button of the
mouse, and then select "YES" or "NO" under the "DND" menu.
8.3.8 Wake Up
Description
This is for setting wake up with ringing the bell at the designated time.
Procedure
1) "Customer Info. Setting" → "Wake Up".
2) Double click/Select the relevant number in the station list on the right side and then click the (<<) button.
3) Double click/Select a group that has been designated and then click the (>>) button so that a number of rooms can be
set at the same time.
4) Check the selected station and set wake up time at the bottom, and then click the "OK" button or "Apply" button.
5) In case it is necessary to check the existing information of the selected room, click the "Read" button.
Notice
1) When using the "Reading" function, if a number of rooms are selected, the information of the first room will be
displayed.
47
The contents of this document are subject to revision without
notice due to continued progress in methodology, design and
manufacturing. Ericsson-LG shall have no liability for any error
or damage of any kind resulting from the use of this document.
Posted In Korea
www.ericssonlg.com
© Ericsson-LG Co., Ltd. 2013