1
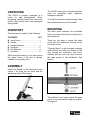
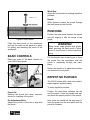
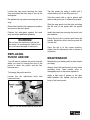
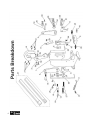
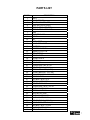
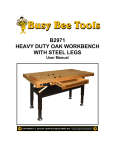
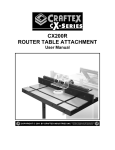
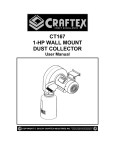
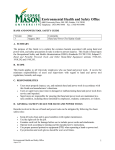
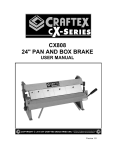
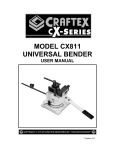
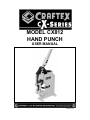
MODEL CX812 HAND PUNCH USER MANUAL Version 1.0 CX812 SPECIFICATIONS MODEL CX812 – HAND PUNCH As part of the new line of Craftex CX-Series Metalworking Tools, we are proud to offer the CX812 Hand Punch. By following the instructions and procedures laid out in this user manual, you will receive years of excellent service and satisfaction. The CX812 is a professional tool and like all tools, proper care and safety procedures should be adhered to. Thickness Dia. of Punch 0.5-1.5mm 1.5-2.5mm 2.5-3.5mm 3.5-5.0mm Aluminum 2.5-20mm 3.0-20mm 5.0-20mm 8.0-20mm Copper A3 carbon steel 3.0-30mm 5.0-20mm 6.0-20mm 8.0-20mm 6.0-30mm 8.0-18mm 10-17mm ______ * Country of Origin ................... China * Weight ................................... 84 Kg * Warranty................................ 3 Year 2 UNPACKING The CX812 is properly packaged in a carton for safe transportation. When unpacking, carefully inspect the carton and ensure that nothing has been damaged during transit. The hand punch consists of the following: A. B. C. D. E. F. To install the extension handle simply, slide the handle extension over the handle. MOUNTING INVENTORY CONTENTS The CX812 comes with a handle extension used for operations when additional leverage is required. QTY Hand Punch ...................................... 1 Handle............................................... 1 Handle Extension ............................. 1 Hex Bolts........................................... 2 Flat Washers ..................................... 4 Hex Nuts ........................................... 2 While doing the inventory if you can not find any parts, check if the part is already installed on the hand punch. The hand punch features four pre-drilled holes on its base which allow mounting it to the workbench. There are two ways to mount the hand punch onto the workbench; through mount and direct mount. "Through Mount" is the strongest mounting option where the holes are drilled all the way through the workbench. Hex bolts, washers and hex nuts are used to secure the hand punch to the workbench. See figure-2. ASSEMBLY Attach the handle to the hand punch and secure it by using the hex bolts and flat washers provided. See figure-1. Figure-2 Through mount Figure-1 Attaching the handle "Direct Mount" is to simply secure the hand punch to the workbench using lag screws. See figure-3. 3 Work Stop Aligns the work-piece for making repetitive punches. Handle When lowered, pushes the punch through the work-piece and into the die. PUNCHING Figure-3 Direct mount Place the hand punch on the workbench and use the holes on the base as a guide for drilling and attaching the punch to the workbench. BASIC CONTROLS Below are some of the basic controls on your CX812 hand punch. Position the work-piece between the punch and die, aligning it with the center of the punch. WARNING! Always wear safety glasses and gloves when operating the hand punch. Failure to do so could result in serious personal injury. Pull the handle down towards you to force the punch into the work-piece until the punch is completely through the workpiece. Return the handle to its uppermost position and remove the work-piece. REPETITIVE PUNCHES The CX812 comes with a work stop used to make repetitive punches easily. Figure-4 Basic controls To make repetitive punches: Punch Pin Secures the punch and when removed, allows for changing of the punch. Position the work-piece between the die and the punch. Lower the handle half way and check the proper position of the punch. Die Adjustment Bolts Adjusts the position of the die to align with the punch Now, lower the handle all the way down to force the punch into the work-piece until the punch is complete. 4 Loosen the cap screw securing the work stop and adjust the work stop to line up the work-piece. Re-tighten the cap screw securing the work stop. Tap the punch pin using a mallet until it moves freely, but do not fully remove it. Hold the punch with a rag or gloves and remove the punch pin to release the punch. Return the handle to the uppermost position and remove the work-piece. Slide the new punch into the hole and align the flat side of the punch with the punch pin. Position the work-piece against the work stop and make additional punches. Insert the punch pin securing the punch into the machine. WARNING! Place the new die in position and lower the handle. Adjust the die so that the punch fits into the die. Do not force the machine to do the job for which it is not designed. Failure to do so could result damage to the punch. REPLACING PUNCH AND DIE You will want to replace the punch and die when you need to change the size of the punch or when the punch and die has become worn. To change the punch and die: Loosen the die adjustment bolts and remove the die. Once the die is in the correct position, tighten the die adjustment bolts to secure it in position. MAINTENANCE Maintaining your hand punch is quite simple and easy. Always check the hand punch for any loose mounting bolts, loose handle, worn or damaged punch or die before operation. Apply a light coat of grease to the gear teeth between the handle and the main body of the hand punch. Figure-5 Die adjustment bolts & punch pin 5 6 PARTS LIST PART # 1 2 3 4 5 6 7 8 9 10 11 12 13 14 15 16 17 18 19 20 21 22 23 24 25 26 27 28 29 30 31 32 33 34 35 36 37 38 39 40 DESCRIPTION BODY HANDLE BASE JOINTING PLATE LEFT JOINTING PLATE RIGHT PRESSURE PLATE LEFT PRESSURE PLATE RIGHT RAM ROCKER BLOCK TABLE DIE WORK STOP HANDLE BRACKET PIVOT PIN PORTED PIVOT PIN HANDLE PIVOT PIN ZERK FITTING GEAR COVER SPRING PLATE PUNCH PUNCH PIN FLANGE BOLT M5-.8 X 10 HEX BOLT M10-1.5 X 20 SPRING BRACKET (INNER) SPRING BRACKET (OUTER) FLANGE BOLT M8-1.25 X 25 TORSION ROD HEX BOLT M16-2 X 70 SPECIAL SET SCREW HEX BOLT M6-1 X 8 FLANGE BOLT M10-1.5 X 20 FLAT WASHER 16MM SPECIAL NUT M16 SPECIAL NUT M20 FLAT WASHER 20MM FLAT WASHER 20MM HEX BOLT M12-1.75 X 60 HANDLE 2PC SET V2.11.02 HEX BOLT M12-1.75 x 55 FLAT WASHER 12MM HEX NUT M12-1.75 7 WARRANTY CRAFTEX 3 YEARS LIMITED WARRANTY Craftex warrants every product to be free from defects in materials and agrees to correct such defects where applicable. This warranty covers three years for parts and 90 days for labour (unless specified otherwise), to the original purchaser from the date of purchase but does not apply to malfunctions arising directly or indirectly from misuse, abuse, improper installation or assembly, negligence, accidents, repairs or alterations or lack of maintenance. Proof of purchase is necessary. All warranty claims are subject to inspection of such products or part thereof and Craftex reserves the right to inspect any returned item before a refund or replacement may be issued. This warranty shall not apply to consumable products such as blades, bits, belts, cutters, chisels, punches etceteras. Craftex shall in no event be liable for injuries, accidental or otherwise, death to persons or damage to property or for incidental contingent, special or consequential damages arising from the use of our products. RETURNS, REPAIRS AND REPLACEMENTS To return, repair, or replace a Craftex product, you must visit the appropriate Busy Bee Tools showroom or call 1800-461-BUSY. Craftex is a brand of equipment that is exclusive to Busy Bee Tools. For replacement parts directly from Busy Bee Tools, for this machine, please call 1-800-461-BUSY (2879), and have your credit card and part number handy. 8 All returned merchandise will be subject to a minimum charge of 15% for re-stocking and handling with the following qualifications. Returns must be pre-authorized by us in writing. We do not accept collect shipments. Items returned for warranty purposes must be insured and shipped pre-paid to the nearest warehouse Returns must be accompanied with a copy of your original invoice as proof of purchase. Returns must be in an un-used condition and shipped in their original packaging a letter explaining your reason for the return. Incurred shipping and handling charges are not refundable. Busy Bee will repair or replace the item at our discretion and subject to our inspection. Repaired or replaced items will be returned to you pre-paid by our choice of carriers. Busy Bee reserves the right to refuse reimbursement or repairs or replacement if a third party without our prior authorization has carried out repairs to the item. Repairs made by Busy Bee are warranted for 30 days on parts and labour. Any unforeseen repair charges will be reported to you for acceptance prior to making the repairs. The Busy Bee Parts & Service Departments are fully equipped to do repairs on all products purchased from us with the exception of some products that require the return to their authorized repair depots. A Busy Bee representative will provide you with the necessary information to have this done. For faster service it is advisable to contact the nearest Busy Bee location for parts availability prior to bringing your product in for repairs.