1
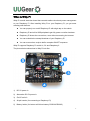
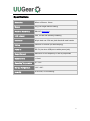
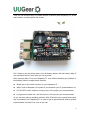
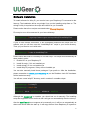
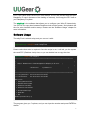
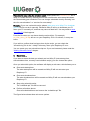
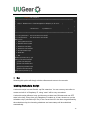
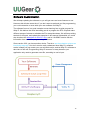
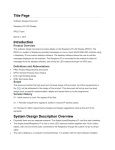
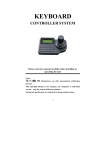
Witty Pi Realtime Clock and Power Management for Raspberry Pi User Manual Copyright © 2015 UUGear s.r.o. All rights reserved. Table of Content What is Witty Pi .................................................................................................... 1 Package Content ................................................................................................. 2 Specifications ....................................................................................................... 3 Mounting Witty Pi ................................................................................................. 4 Software Installation............................................................................................. 6 Software Usage ................................................................................................... 7 Making Schedule Script ..................................................................................... 12 Hardware Configuration ..................................................................................... 15 Software Customization ..................................................................................... 16 Reset Your Witty Pi ............................................................................................ 17 Copyright © 2015 UUGear s.r.o. All rights reserved. What is Witty Pi Witty Pi is small extension board that can add realtime clock and power management to your Raspberry Pi. After installing Witty Pi on your Raspberry Pi, you get some amazing new features: You can properly turn on/off Raspberry Pi with single tap on the switch. Raspberry Pi and all its USB peripherals get fully power cut after shutdown. Raspberry Pi knows the correct time, even without accessing the Internet. You can schedule the startup/shutdown of your Raspberry Pi. You can even write a script to define complex ON/OFF sequence. Witty Pi supports Raspberry Pi model A+, B+ and Raspberry 2. The picture below shows how is Witty Pi look like: 1) DC 5V power in 2) Alternative DC 5V power in 3) On/off switch 4) 40-pin header (for connecting to Raspberry Pi) 5) Battery holder (for button cell lithium battery CR2032/CR2025) 1 Package Content Each Witty Pi package contains: Witty Pi board x 1 CR2032 battery x 1 M2.5 x 11mm Copper Standoff x 4 M2.5 screws x 8 2 Specifications Dimension: 65mm x 56mm x 19mm Weight 23g (net weight without battery) Realtime Clock Chip DS1337 (datasheet) LED Indicator One, for halt and stand by breathing Connector 40-pin dual row 2.54 mm pitch female & male header Battery CR2032 or CR2025 (for time keeping) Power In DC 5V (via micro USB port or white power jack) Output Current Maximum 2A for Raspberry Pi and its peripherals Static Current < 10mA Operating Temperature 0℃~50℃ Storage Temperature -20℃~60℃ Humidity 0~80%RH, no condensing 3 Mounting Witty Pi You can simply plug Witty Pi on your Raspberry Pi’s 40-pin header, and it can work just like that. However if you wish, you can use the copper standoffs and screws in the package to tightly mount Witty Pi on your Raspberry Pi. First you can mount the 4 copper standoffs on your Raspberry Pi, using the screws. Your Raspberry Pi should looks like this after mounting the 4 standoffs: 4 Then you can connect Witty Pi’s female header (at bottom) with Raspberry Pi’s 40-pin male header, and then tighten the screws. Don’t forget to put the button battery into the battery holder, with the battery Witty Pi can remember the time even after you cut its power. After mounting Witty Pi on your Raspberry Pi, even without installing any software, it immediately starts to support these features: Single tap on the switch to power on your Raspberry Pi. Witty Pi will cut Raspberry Pi’s power if you shutdown your Pi (sudo shutdown -h). Pull off GPIO-4 with software or wiring can cut Pi’s power (not recommended) Long press the switch for a few seconds to cut Pi’s power (not recommended) As you can see, without installing software, Witty Pi doesn’t have a gentle and proper way to shutdown your Raspberry Pi. In order to get all good features working, please install software for Witty Pi as soon as you can. 5 Software Installation To install software for Witty Pi, you need to have your Raspberry Pi connected to the Internet. The installation will be very simple if you run the installing script from us. The wiringPi utility is required so the script will install it for you if needed. Please notice that all our scripts are tested under Wheezy Raspbian. First step is to run this command in your home directory: pi@raspberrypi ~ $ wget http://www.uugear.com/repo/WittyPi/installWittyPi.sh If your Pi has internet connection, it will immediately download the script from our website, and you will then see the “installWittyPi.sh” script in your home directory. Then you just need to run it with sudo: pi@raspberrypi ~ $ sudo sh installWittyPi.sh Please notice that sudo is necessary to run this script. This script will automatically do these tasks in order: 1. Enable I2C on your Raspberry Pi 2. Install i2c-tools, if it is not installed yet 3. Install wiringPi, if it is not installed yet 4. Install Witty Pi programs, if they are not installed yet You can also manually install these packages if you prefer to. After the installation, please remember to reboot your Raspberry Pi, so the Realtime clock I2C hardware will be loaded correctly. You will see a new “wittyPi” directory, and it contains 3 runnable scripts: pi@raspberrypi ~ $ cd wittyPi pi@raspberrypi ~ /wittyPi $ ls daemon.sh init.sh syncTime.sh utilities.sh wittyPi.sh Although the daemon.sh is runnable, you should not run it manually. The installing script has registered it into /etc/init.d and it will get run automatically after the start up. Also the syncTime.sh is not suppose to be manually run, it will be run automatically at about one minute after the start up. It will copy the time from Raspberry Pi system to 6 RTC if you have never set the RTC time before. If RTC has correct time and your Raspberry Pi hasn’t (because of the lacking of Internet), it will copy the RTC time to your Raspberry Pi system. The wittyPi.sh is the software that allows you to configure your Witty Pi interactively. You can use it to copy time between Realtime clock and the system, and schedule the time for auto shutdown and/or startup. Please see the “Software Usage” chapter for more information. Software Usage The wittyPi.sh is a bash script, and you can run it with: pi@raspberrypi ~/wittyPi $ sudo ./wittyPi.sh Please notice that sudo is required. Once the script is run, it will tell you the system time and RTC (Realtime clock) time, so you can decide how to copy the time. pi@raspberrypi ~/wittyPi $ sudo ./wittyPi.sh ================================================================================ | | | Witty Pi - Realtime Clock + Power Management for Raspberry A+, B+ and 2 | | | | < Version 2.02 > by UUGear s.r.o. | | | ================================================================================ >>> Your system time is: Sun 01 Nov 2015 16:51:29 CET >>> Your RTC time is: Sun 01 Nov 2015 16:51:29 CET Now you can: 1. Write system time to RTC 2. Write RTC time to system 3. Set time for auto startup 4. Set time for auto shutdown 5. Choose schedule script 6. Reset data... 7. Exit What do you want to do? (1~7) The program gives you 7 options, and you can input the number and press ENTER to decide. 7 1. Write system time to RTC This option will copy the time from your Raspberry Pi system to the Realtime clock on Witty Pi. This option should be used when you find the system time is correct (may get synchronized from Internet) and RTC time is not. 2. Write RTC time to system This option will copy the time from the Realtime clock on Witty Pi to your Raspberry Pi system. This option should be used when you find the RTC time is correct while the system time is not. 3. Set time for auto startup This option allows you to specify when your Raspberry Pi should auto startup. Please notice the input format should be “DD HH:MM:SS”, DD means the day in the month, HH is the hour, MM is the minute and SS is the second. All these should be 2 digits and 24 hours system is used. Since version 1.50, you can also use “??” as wildcard while inputting the time. This gives you the possibility to make a repeatable schedule. Please see the table below: Here are some examples: 15 07:30:00 means 7:30 in the morning, on 15th in this month. ?? 23:30:00 means 23:30:00 at night everyday (daily schedule) ?? ??:15:00 means the 15th minute every hour (hourly schedule) ?? ??:??:05 means the 5th second every minute (minutely schedule) Please be informed that not all patterns with wildcards are supported. According to the hardware limitation, only a few combinations are supported. The rule is, in short: wildcards have to show up from let to right, and no any number appears between two wildcards. So “?? ??:??:12” is OK and “?? 15:??:25” is not supported. 8 If you input an unsupported pattern, Witty Pi will try to change it to the closest one that could be supported. You will see the message on the console. 4. Set time for auto shutdown This option allows you to specify when your Raspberry Pi should auto shutdown. Please notice the input format should be “DD HH:MM”, it is basically the same with the previous option but without the second in the end. It is a hardware limitation and only day, hour and minute could be specified for auto shutdown. Here are some examples: 15 21:45 means 9:45 at night, on 15th in this month. Similar with the auto startup schedule, you can use “??” as wildcard as well, and the rules to use wildcards are the same. ?? 23:30 means 23:30 at night everyday (daily schedule) ?? ??:15 means the 15th minute every hour (hourly schedule) 5. Choose Schedule Script This cool feature is available since version 2.00, and it brings so many new possibilities to use Witty Pi. The RTC chip on Witty Pi only has two alarms, and we use one for auto startup and the other for auto shutdown. Manually setting the auto shutdown and startup alarm might be enough for the major of cases, but sometimes you may want a more complex schedule. For example, you want your Raspberry Pi to wake up on 7:00 AM -> shutdown on 7:30 AM -> wake up again on 9:00 PM -> shutdown again on 9:30 PM. The process repeats everyday, as shown in the state chart below. 9 Obviously you could not achieve this by just setting the auto startup/shutdown time, because there will be two auto-startups and two auto-shutdown everyday, and you can only set them once. The solution is to use the schedule script, which is designed for scenarios like this. A schedule script (.wpi file) defines a loop, with all states and their durations inside. By automatically running the script after booting, Witty Pi will automatically schedule the next shutdown and startup for you. Once you select the “Choose schedule script” option, it will list all schedule scripts in the “schedules” directory. You can choose one, and then Witty Pi will take care of the rest. pi@raspberrypi ~/wittyPi $ sudo ./wittyPi.sh ================================================================================ | | | Witty Pi - Realtime Clock + Power Management for Raspberry A+, B+ and 2 | | | | < Version 2.02 > by UUGear s.r.o. | | | ================================================================================ >>> Your system time is: Sun 01 Nov 2015 16:51:29 CET >>> Your RTC time is: Sun 01 Nov 2015 16:51:29 CET Now you can: 1. Write system time to RTC 2. Write RTC time to system 3. Set time for auto startup 4. Set time for auto shutdown 5. Choose schedule script 6. Reset data... 7. Exit What do you want to do? (1~7) 5 I can see 5 schedule scripts in the "schedules" directory: [1] 7:00_on_7:30_off_21:00_on_21:30_off.wpi [2] on_10m_every_2h.wpi [3] on_1h_every_2d.wpi [4] on_30m_everyday_but_weekend.wpi [5] on_5m_every_20m.wpi Which schedule script do you want to use? (1~5) The first schedule script (7:00_on_7:30_off_21:00_on_21:30_off.wpi) can make a schedule for the example above with state chart. 10 If you want to stop using the schedule script, please delete the “schedule.wpi” file in Witty Pi’s install directory. Deleting this file will not affect the auto-startup/shutdown time that already gets scheduled. You can change scheduled time by choosing “set time for auto-shutdown” or “set time for auto-startup”. Remarks: if you use a schedule script, please make sure to let Witty Pi to shutdown your Pi, and do not do it manually. Otherwise Witty Pi will try to shutdown your Pi when your Pi is actually off, and that may cause a dead lock. You may need to reset your Witty Pi if that happens. From the file name you can know what the script will do. For example, on_10m_every_2h.wpi will turn on your Raspberry Pi for 10 minutes, in every two hours. If you wish to confirm what has been done by the script, you can check the “schedule.log” file in the “~/wittyPi” directory, when your Raspberry Pi is on. You can create your own schedule script too. If you are interested, please read the “Making Schedule Script” chapter. 6. Reset Data… If you want to erase the data you already set into Witty Pi (auto-startup time, auto-shutdown time, currently used schedule script), you can choose this option. Once you select this option, the software will display a sub menu, which allows you to: Clear auto startup time: The auto-startup time will be erased and Witty Pi will not auto-start your Raspberry Pi. Clear auto shutdown time: The auto-shutdown time will be erased and Witty Pi will not auto-shutdown your Raspberry Pi. Stop using schedule script: The “schedule.wpi” file will be removed. Perform all actions above: Clear all scheduled times and remove the “schedule.wpi” file. The figure below shows these sub menu options. 11 pi@raspberrypi ~/wittyPi $ sudo ./wittyPi.sh ================================================================================ | | | Witty Pi - Realtime Clock + Power Management for Raspberry A+, B+ and 2 | | | | < Version 2.02 > by UUGear s.r.o. | | | ================================================================================ >>> Your system time is: Sun 01 Nov 2015 16:51:29 CET >>> Your RTC time is: Sun 01 Nov 2015 16:51:29 CET Now you can: 1. Write system time to RTC 2. Write RTC time to system 3. Set time for auto startup 4. Set time for auto shutdown 5. Choose schedule script 6. Reset data... 7. Exit What do you want to do? (1~7) 6 Here you can reset some data: [1] Clear auto startup time [2] Clear auto shutdown time [3] Stop using schedule script [4] Perform all actions above Which action to perform? (1~4) 7. Exit Selecting this option will simply exit the software and return to the console. Making Schedule Script A schedule script is a text file with .wpi file extension. You can use any text editor to create and edit it. In Raspberry Pi, using “nano” will be very convenient. A schedule script defines a loop, and there are at least one ON state and one OFF state in the loop. Every time your Raspberry Pi wakes up, it has a chance to run the schedule script (“schedule.wpi” file). If the current time is in the time range defined by the schedule script, the incoming shutdown and next startup will be scheduled automatically. 12 Below is a very simple schedule script and it will keep your Raspberry Pi on for 5 minutes in every 20 minutes. # Turn on Raspberry Pi for 5 minutes, in every 20 minutes BEGIN 2015-08-01 00:00:00 END 2025-07-31 23:59:59 ON M5 # keep ON state for 5 minutes OFF M15 # keep OFF state for 15 minutes Like many other scripting language, Witty Pi schedule script also uses “#” to make single line comment. The first two lines define the time range for executing the script. Please make sure to use the correct time format (YYYY-mm-DD HH:MM:SS). You can use one or more white characters (space or tab) between BEGIN/END and the time string. The rest of the script defines the states in the loop. It could be “ON” or “OFF”, and you should define at least one “ON” and one “OFF” states in the loop. Usually the ON and OFF states are used in pair. You should also specify the duration of each state. You can do so by putting one or more parameters after ON/OFF, separated by space or tab. Each parameter starts 13 with a capital letter and follows by a number, where the capital letter is the unit of time: D = Days (D2 means 2 days) H=Hours (H3 means 3 hours) M=Minutes (M15 means 15 minutes) S=Seconds (S30 means 30 seconds) For example, if you wish to define an ON state for one and a half hour, you can write: ON H1 M30 When the script engine executes this line, it will actually schedule a shutdown at the end of the ON state. If you wish to define an OFF state for two days, you can write: OFF D2 When this line gets executed, an incoming startup will be scheduled at the end of the OFF state. There are some schedule scripts in the “schedules” directory, and they all have comments inside to explain themselves. You can take them as example to learn how to create the Witty Pi schedule script. Advanced Usage: Although the schedule script can be chosen by wittyPi.sh, you can use it without the help from wittyPi.sh. Just copy the schedule script file to “~/wittyPi/schedule.wpi” and then run “sudo ./runScript.sh” in the “~/wittyPi” directory, the script will start to work. This allows you to use schedule script as an interface to integrate other tools with Witty Pi together. For example, you can create your own tool to visually create a schedule script, or remotely generate the schedule script via a web interface. 14 Hardware Configuration There are three colorful jumpers on the board, and they allow you to make some customization on your Witty Pi. The red jumper can decide weather you Raspberry Pi get powered immediately if you connect the 5V power supply to Witty Pi. By default, this jumper is set to “Default Off”, so you have to click the switch once to power on your Raspberry Pi. The yellow jumper allows you to specify which GPIO pin is used to drive the LED indicator. GPIO-17 is used by default, and you can change it to any GPIO pin you want. Just put the jumper cap on the right side and wire the left pin of the jumper to the target GPIO pin. The green jumper is to configure which GPIO pin will be used to shutdown your Raspberry Pi. GPIO-4 is used by default. Please notice that, not every GPIO pin could be used for this purpose. The GPIO pin should have initial high voltage level after the booting, otherwise your Raspberry Pi will get shutdown immediately. The way to configure this jumper is the same with the yellow one. 15 Software Customization We will keep updating the software so you will get more and more features to use. However this will take some time, if you don’t want to wait and you like programming, you could customize or even write your own software for Witty Pi. The software from us is a good example to start learning how to write program for Witty Pi. We believe the most interesting part is to program the RTC chip and make different setups of alarms to schedule the Pi’s startup/shutdown. We will keep writing tutorials for this part, and update the examples in this manual. Meanwhile you could also checkout the datasheet for DS1337 chip, and its “ALARMS” section has the information that needed for programming the alarms. Since version 2.00, you have another choice. That is to use the schedule script as an interfacing language. You don’t need to really understand how Witty Pi’s software works; instead you just create your own schedule script, and let Witty Pi’s software to take care of the rest. Programming Witty Pi becomes so easy because your application only need to generate a text file, according to user’s input. 16 Reset Your Witty Pi There are some scenarios that could make your Witty Pi enter a “dead lock” status, which prevent you from starting up your Raspberry Pi (even pressing the button would not help). These scenarios are: Witty Pi tries to shutdown your Raspberry Pi when your Pi is actually off. Witty Pi tries to startup your Raspberry Pi when your Pi is still on. Witty Pi tries to startup your Raspberry Pi while no power supply is connected. To avoid the dead lock, please make sure not to set the auto shutdown time to a moment that your Raspberry Pi is off. Otherwise when the shutdown alarm gets activated, it works like holding the button and never releases it, which will prevent you to power on your Raspberry Pi. If you are using a schedule script, please let Witty Pi to turn off your Raspberry Pi according to the schedule, otherwise it will meet the first scenario that causes the dead lock. Please also not to set the auto startup time very close to the auto shutdown time. Otherwise Witty Pi may try to start the Pi while the Pi is not fully shutdown yet. This will weaken the signal for next startup. If you are expecting an auto startup, please make sure your Witty Pi has power supply connected. If you meet the dead lock, no worry you can solve it very easily. Just remove the battery on Witty Pi, and unplug the power supply. Then you wait for 1 minute so the RTC chip forgets the alarm state, later you will be able to power it on again. 17