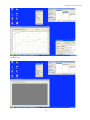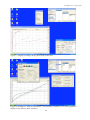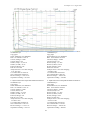
1
John Chubb Instrumentation Ltd
Unit 30, Lansdown Industrial Estate, Gloucester Road,
Cheltenham, GL51 8PL, UK. Tel: +44 (0)1242 573347
Fax: +44 (0)1242 251388 email: [email protected]
________________________________________________________________________________________
User Manual for JCI-Graph
UM JCI-Graph v2.2.4 September 2009
Contents:
1.
Introduction
2.
Installation
3.
Operation off-line for data stored to a memory card
3.1 Start-up
3.2 File
3.3 Extraction of files
3.4 Select
3.5 Graphical display
3.6 Summary table .csv file
4.
Operation online with control and display of charge decay observations
4.1 Start-up
4.2 Serial link up
4.3 Start run
4.4 Graphical display
4.5 Stop run
5.
Analysis of results
6.
Transfer to other Windows programs
References
Annex 1: ‘Readme’ file for JCI-Graph v2.0
for Windows 95, 98, 2000 and XP
Annex 2: Column headings in summary table created by JCI-Graph
Annex 3: Analysis of long corona charge decay times
Figures 1 - 8
Example of graph and text presentation
Example of summary table presentation
Registered in England No 5798844. VAT GB 392 007 172
Registered Office: Unit 30, Lansdown Industrial Estate, Gloucester Road, Cheltenham, GL51 8PL, UK.
JCI-Graph v2-2-4 August 2009
User Manual for JCI-Graph
Windows based software for graphical display of charge decay
observations made using JCI 155 instruments. On-line operation and
display of operation of JCI 155v5 instruments is also available.
1. Introduction:
JCI-Graph v2.2.2 is Windows based software for the display of graphs, numerical results and
test details of corona charge decay and capacitance loading studies made using JCI 155v5
Charge Decay Test Units. Software operation is directly compatible with Windows
95/98/2000/XP.
Special features of JCI-Graph are:
- ability to present up to 4 selected graphs together
- opportunity to scale graphs and select the area and features viewed
- opportunity to copy graphs to other Windows applications, such as wordprocessing, for
incorporation into documents along with text details of numerical results and test
conditions.
- opportunity to evaluate the ‘capacitance loading’ experienced by charge at the test surface
[1,2,3] when charge decay observations are made by JCI 155v5 Charge Decay Test Units
in conjunction with JCI 176 measurements of charge transfer to the test surface.
- opportunity to display variation of the rate of charge decay (in terms of the local decay
time constant) during the progress of charge decay and from this to predict decay times to
1/e and 10% for very slow charge decays
- opportunity to start analysis of decay curves from peak voltage or from a set time after the
end of corona charging
- creation of Spreadsheet loadable file (.csv) at file extraction giving a summary of all
numerical values of test conditions and measurements. This provides an easy way to
compare the performance of various samples.
- opportunity to create a Spreadsheet loadable file (.csv) of charge decay observations,
calculated local decay time constants and all the data recorded of test conditions.
- opportunity to display variations of local charge decay time constants on linear or quasilogarithmic axes
- opportunity to extract observations from the memory card mounted in a JCI 155v5
instrument via a serial communications link (or via a USB port using an adaptor)
- opportunity to start and stop tests with JCI 155v5 instruments via a serial communications
link. This enables the charge decay observation to be observed remotely in quasi-real
time. This is particularly useful when studies are conducted in a controlled environment
chamber where access to instrument controls and visibility of the display may be limited.
- opportunity for on-line as well as off-line operation with JCI 155v5 instruments.
- opportunity to display charge decay observations recorded by operation of JCI 155v4
instruments in conjunction with software DECAY18.
- opportunity to display charge decay observations made using Picoscope or Picolog
software (www.picotech.com) to store observations made using a JCI 140 Static Monitor
in .txt file format.
Charge decay time measurements within JCI-Graph use the same proprietary ‘stutter timing’
method as is used in JCI 155v5 instruments. This method of time measurement very effectively
overcomes the influence of noise when working with very low level signals and with very slow
charge decay rates. In this approach, as the signal falls below the target level of voltage the
timing clock is stopped and is then restarted as it rises back above. Thus as a noisy signal
1
JCI-Graph v2-2-4 August 2009
gradually falls through a target voltage level the clock may stop and start many times until the
signal level no longer rises up to the level at which it can restart the clock. Modelling studies
have shown this to be an excellent way to find the time at which noisy signals cross set voltage
levels. Operation of this stutter timing approach can be seen on charge decay graphs by location
of the intersection of end of timing voltage level indication and time markers lines within the
range of fluctuation of noisy signals. (This same stutter timing approach is applied in JCI-Graph
to analysis of observations made with JCI 155v4 and older instruments using DECAY18
software and with Picoscope or Picolog data recordings).
2. Installation
Installation of JCI-Graph software follows usual Windows operating practice and will usually
start automatically after loading the software disc as a floppy to drive a: or on a CD to the CD
drive. If loading does not start automatically it may be initiated via the usual Windows route
using the ‘Start’ key and the ‘Run’ key. Basic operational features are described in the ‘Readme’
file on the installation disc. This file is also listed in Annex 1.
3. Operation off-line for JCI 155v5 test data stored to a memory card
3.1 Start-up
JCI-Graph is started by double clicking the JCI-Graph icon or going via the ‘Start’ button to
‘Programs’ and then clicking on the relevant ‘JCI-Graph.exe’ in the list of programs.
The opening display is shown in Figure 1. The working area can be entered by clicking the
left mouse button, or waiting a few seconds, and the screen then shows a bare graph area with a
toolbar above. This toolbar (shown in background of Figure 2) provides 5 direct options: File,
Display, Serial link, Parameters and Help. The ‘Help’ facility gives background information
about JCI-Graph (including version number) and access to descriptions of all the main
operational features of the software, and in a fuller form than is presented in this User Manual.
3.2 File
The ‘File’ select option in the toolbar provides three options: ‘Select for display’, ‘Extract
from ATA card’ and ‘Exit’.
‘Extract’ is used to transfer the data of tests stored on the memory card from JCI155v5
operation and from this to make files for individual runs (.jc5 files). These are automatically
stored within folders related to the serial number of the instrument and the date.
‘Select for display’ is used to select files for display that have already been extracted from
data held on PCMCIA or CompactFlash memory cards, or for getting new data over an RS232
serial communications link (see section 4). For results that have been already been stored to a
memory card, by operation of a JCI 155v5 instrument, the initial action is to ‘Extract from ATA
card’.
3.3 ‘Extraction’ of files
Data from operation of JCI 155v5 instruments is stored to the memory card resident in the
instrument. Data is stored on the memory card as binary data within a large single file that can
hold results for a large number of test runs. This data can be read directly at the instrument by
the integral microprocessor, and this gives the opportunity to review any earlier runs on the
instrument display in the same way for as just completed runs. It is not in a form that can be
directly inspected or read by normally available software.
Data held on the memory card can be read into a PC via a PCMCIA card slot (available in
many laptop of Notebook computers) or using a card reader plugged into a USB port. Such card
readers are moderately priced and readily available from photographic shops. The same reader
may be used with any computer equipped with a USB port. (Note that Sandisk ‘Imagemate’
software may not be Windows 2000 compatible).
2
JCI-Graph v2-2-4 August 2009
Data transfer is started by clicking the ‘Extract from ATA card’ button within the File menu.
The screen display at this point is as illustrated in Figure 2.
To proceed there needs to be identification of two features
1) Identification of the ‘source’ via its drive letter. This may be known or will be
revealed by a Windows pop-up menu (which can be discarded).
2) Identification of the destination folder for the extracted files.
For the first time of use a ‘destination’ directory needs to be created via the ‘Change’ button
– and this can also be used if it is appropriate to create a new destination directory at any time for
example to store different groups of results. (A name such as ‘JCI-Graph data’ is easily
recognisable as a general folder). At subsequent extraction of files the destination directory last
used is offered as the default. The destination folder is a general folder. The act of ‘Extraction’
creates and puts the extracted files into appropriate instrument and date folders within this
general folder.
The first action of extraction is to transfer the data file from the source card. Progress is
shown on a bargraph display. Advice is then offered to make a ‘back-up’ copy of the extracted
data. Opportunity is provided, following this, to select the data to be extracted in terms of
instrument serial number, date and start run number.
Results from individual test runs are now stored at the selected location as individual files
(with the extension .jc5) by ‘run number’ within directories (folders) for each day of operation
and within directories (folders) identified by each instrument serial number. Results from
individual runs are hence uniquely stored, even if one memory card has been used on several
instruments.
Note: The .dat file held on the memory card and the .jc5 files created at Extraction are not
directly useable. Opportunity is provided when individual graphs of JCI 155v5 data are displayed
to create a .csv file that includes all the data describing that test run, and this is then directly
loadable into a Spreadsheet for numerical analysis and/or graphical display.
A ‘summary.csv’ file is generated at the time of file extraction that includes details of all the
main test conditions and results. This is placed into the same directory (folder) as the data files.
This summary file can be directly loaded into a Spreadsheet such as Excel.
The date and time values stored in the data files are derived from the calendar clock in the
JCI 155v5 instrument. Operation of this clock is maintained by a long life battery. The
instrument serial number is incorporated into the microprocessor software data that is set up at
time of manufacture and so cannot be changed. These features ensure uniqueness of data file
information.
The above ‘Extraction from an ATA card’ can also take place from the memory card, albeit
rather slowly, while the card is still in an instrument. This achieved via an RS232 serial
communications link, as described in Section 4.2.
3.4 ‘Select’
Clicking on the ‘Select for display’ option provides 4 choices:
‘JCI 155v5 files’
‘JCI 155v5 via serial link’
‘JCI 155v4 files’
‘Pico files’
Select ‘JCI 155 v5 files’ to access existing v5 files already extracted or ‘JCI 155v5 via
serial link’ for direct on line operation of JCI 155v5 instruments. Selection of ‘JCI 155v4 files’
or ‘Pico files’ (in .txt format) provides direct access to these files, but does not create any JCI
155v5 equivalent files. The nest of directories shown will reflect the folder from which data was
3
JCI-Graph v2-2-4 August 2009
last selected and displayed. Alternative dates, instruments and general folders may be selected by
clicking the appropriate higher folder levels and then moving down to the location required.
From the folder of the serial number of the instrument used the date on which the tests were
made can be selected. This will show a listing of the files available. Individual files may be
selected and displayed in any order by double clicking the mouse pointer. Up to four files may
be displayed at a time for display. The screen display is illustrated in Figure 3.
With ‘Pico files’ there can be two channels of data recorded, channel A and channel B.
Opportunity is provided to display either or both these channels by selecting the .txtA or .txtB
version of the source file.
3.5 Graphical display
As each file is selected for graphical display, by double clicking it in its menu list, a graph
will be shown of the variation of surface voltage versus time for the full range of these
parameters measured. This is illustrated in Figure 3. Surface voltage values relate to the left
hand vertical axis of the graph and the horizontal axis is time. The maximum values for the axes
will be adjusted automatically to accommodate the maximum values of all the graphs being
displayed. Portions of the graphs may be selectively displayed by clicking the left-hand mouse
button on the top left hand corner of the area, moving to the bottom right hand corner and the
releasing the button. The area being selected is greyed to show its extent. This expansion may be
pursued sequentially and may be applied from the origin or over any part of the area displayed.
The full view may be restored via the ‘Display’ menu item.
One or more graphs may be removed from the display after inspection or use by clicking the
file identity in the list of ‘Displayed files’ and clicking the ‘Hide’ button below. Graphs may be
included from other directories.
The graphs presented include a display of the values of local charge decay time constants
during the progress of each charge decay. These graphs are a set of short horizontal straight
lines giving the average local time constant over the corresponding short periods of each decay
curve. They relate to the right hand ‘time constant’ axis.
The identity of the active files selected is shown at the bottom of the graph display. Clicking
on one of these brings up an alphanumeric summary of run test conditions (‘File parameters’)
and numerical values of measurement results. This is shown in Figure 3. With Picoscope and
Picolog sourced data the ‘Run settings’ area will be blank.
The ‘File parameter’ display panel provides opportunity to enter an alphanumeric
‘Description’ for that particular test run. When this description is added it will also appear in the
text information that may be printed out to accompany graphs and is entered into the .csv ‘results
summary’ file. The ‘description’ last used is stored and is made directly available for acceptance
or editing for subsequent test runs. Acceptance can be by clicking the accept key or hitting
Return. Details from other sources can of course also be copied into the ‘Description’ box using
<CTRL> C to copy the details to the clipboard and then <CTRL> V to paste to the desired
location.
This ‘File parameters’ panel also provides opportunity to make the whole set of data
describing the test to be made available as a .csv file by clicking the ‘Make CSV’ button in the
File parameters box.
The ‘zero’ voltage of graphs may be adjusted in the ‘File parameters’ window to take account
of any offset thought to be present. The default ‘zero shift’ voltage is zero.
With observations recorded into .txt files using Picoscope or Picolog software then JCI-Graph
finds the last highest peak voltage and puts this at time zero. The graph shows the variation of
surface voltage for the 1s preceding the peak and it assumes for analysis that the pre-event
surface voltage was close to zero. It may well be found that this surface voltage reading before
the start of the event of interest has a zero offset. This can be compensated in the File parameters
window before clicking ‘Apply’. Voltage values displayed are interpreted as surface voltages as
4
JCI-Graph v2-2-4 August 2009
observed by a JCI 140 at 100mm on the 2kV FSD range – i.e. 1V of surface potential gives 1mV
signal output.
The graphical presentation may be modified via the ‘Parameters’ key on the toolbar and then
either the Analysis or Display options. The ‘Analysis’ option provides the option to measure
decay times to a chosen end % of the initial peak voltage in addition to the 1/e value built into all
analyses. Charge decay measurements may be set to start either at the peak of the initial voltage
or a selected time after the end of the corona period. Experimental comparison between charge
decay and capacitance loading results based on corona charging and tribocharging show [4] that
a time of about 100ms after the end of corona charging is the most appropriate time to start
analysis. This is because it takes at least this time for surfaces to separate in manual charging
actions and for surface charges to provide and influence nearby.
The form of the decay curve is conveniently shown via the display of local decay time
constant values. Values are shown relative to the right hand axis on the graphical display. The
percentage change of surface voltage over which the local decay time constant values are
calculated can be set via the ‘Parameters’ key in the main display and then via ‘Analysis
parameters’. The axis used for the display display of values may be set via the ‘Parameters’ key
and the ‘Display parameters’.
When the program starts the source data is subject to no suppression of single data point
spikes. The option is provided to provide suppression of single or multiple spikes to overcome
the influence of minor glitches that may arise in the data stream. The ‘Display parameters’
option provides opportunity to change colour and thickness of the graphical lines and whether
graticule and analysis lines are shown for both the ‘time’ and ‘surface voltage’ axes. These are
implemented when the ‘Apply’ button is clicked.
3.6 Summary table .csv file
As JCI 155v5 data files are extracted a .csv file is automatically created that summarises all
the important features of the test conditions and results for each individual test. (No summary
file is created when handling data from DECAY18 or Pico files). This .csv file may be opened
into a Spreadsheet (such as Excel) where it may be rearranged, if desired, to be suitable for
transfer into a document or a test report. An example summary file, in Excel format, is
appended. An explanation of the column headings in the summary table is listed in Annex 2.
Where changes are made to the sample ‘Description’ or the % value for the second end point
of timing these changes are shown in subsequent presentations of the .csv file.
Where JCI 155v5 studies are made in conjunction with charge measurements using a JCI 176
Charge Measuring Sample Support [1,2,3] the observations of ‘induction’ and ‘conduction’
charge components are stored to the memory card along with the charge decay observations.
These values are ‘extracted’ and the values are included within the .csv file. Preparation of the
results summary file also includes calculation of the total charge received by the sample using
the induction charge signal as modified by an appropriate factor before adding to the conduction
charge signal. The default factor used is 2.2. A calculation is also made of the ‘capacitance
loading’ experienced by charge on the test surface [1,2,3]. The factors used in these calculations
can be edited on the Spreadsheet and then copied through the appropriate columns of numbers.
4. Operation online with control and display of charge decay observations
4.1 Start-up
JCI-Graph is started by double clicking the JCI-Graph icon or going via the ‘Start’ button to
‘Programs’ and then clicking on the relevant ‘JCI-Graph.exe’ in the list of programs.
The opening display is shown in Figure 1. This can be ended by clicking the left mouse
button, or waiting a few seconds, and the screen then shows a bare graph area with a toolbar
above. This toolbar provides 5 direct options: File, Display, Serial link, Parameters and Help.
The ‘Help’ facility gives background information about JCI-Graph (including version number)
5
JCI-Graph v2-2-4 August 2009
and access to descriptions of all the main operational features of the software, and in a fuller
form than is presented in this User Manual.
Clicking on the ‘Select’ option provides (as shown in Figure 4) 3 options for the ‘Source’ of
data to display on the ‘Select for display’ box:
‘JCI 155v5 files’
‘JCI 155v5 via serial link’
‘JCI 155v4 files’
‘Pico files’
Select ‘JCI 155 v5 via serial link’ for on-line operation.
Check that the serial link cable is in place from the serial port (COM1) on the computer to the
right hand 8w mini DIN connector on the JCI 155v5. Many new computers, notably Laptop
computers, are not provided with RS232 serial data ports. On-line operation of JCI-Graph can be
achieved on such computers by using a USB to serial adapter – e.g. Belkin Serial Adapter
F5U103. This adapter is plugged into a USB port and connected to the JCI 155v5 with the 9w D
type to 8w mini DIN cable supplied by JCI.
During serial link operation data is both stored to the memory card to directly into files on the
linked computer. However, it is necessary for a memory card to be present in the JCI 155v5 for
communications to be established.
Note: Do not try to use any serial extension cable to the cable provided as this may cause problems
from transposition of functions between pin positions. If an extension cable must be used a ribbon cable is
suggested to ensure no transpositions.
4.2 Serial link up
When ‘JCI 155v5 via serial link’ is clicked as the ‘Source’ a ‘Destination’ menu appears as
shown in Figure 4. This allows selection of the drive and the folder to which data will be stored
– or creation of a new folder. The folder previously used is remembered – but an alternative may
be selected as desired.
Note: It is suggested it will prove useful to use separate folders to hold data files rather than in with
the source .exe program.
4.3 Start Run
Check that the JCI 155v5 instrument is serial linked and switched on, has suitable test
conditions selected on the instrument and has a sample ready in position. If the JCI 155v5 is
being operated by a mains supply then its operation will be switched on by the ‘Start run’
request.
When ready, click the ‘Start run’ key at the bottom left hand corner of the ‘Select for display’
box. The box over the graph display advises on the status of the serial communications link and
the progress of preparations for a test run. This condition is illustrated in Figure 5. When the run
has started a bargraph appears advising on how long it will be before the graphical display
appears. This indication is desirable because it is not possible for the JCI 155v5 instrument to
start transferring run data until after completion of the initial fast data recording phase that lasts 2
seconds.
The data transferred during a run is stored in .jc5 files in just the same way as when data is
extracted from a memory card.
A test run may be stopped by clicking the ‘Stop run’ button if this is not greyed out or via the
‘Serial link’ menu option. The progress of a test run may be paused or stopped according to
values set in the ‘Transfer parameters’ menu within the ‘Parameters’ menu.
6
JCI-Graph v2-2-4 August 2009
4.4 Serial link file extraction
Files may be extracted from a memory card while still in an instrument. This is selected by
clicking the ‘Serial link’ as the Source as opposed to ‘Drive’. It is worth noting that this is a
much slower route for data transfer, but may be appropriate for a few files and in particular
situations.
4.5 Graphical display
The graphical display shows the progress of decay of surface voltage and the calculated
values of local decay time constant values. As the display reaches the right hand edge of the
display the time axis expands by a factor of two, so one has a stationary display of decay
progress for visual inspection. As for the display of previously recorded data up to 4 graphs may
be shown together and parts of the display may be selected for detailed inspection. Where part of
the display is selected this remains stationary while data continues to accumulate in the
background. Text details of test conditions and results available so far can be accessed by
clicking the run number below the graph to show the ‘File parameters’ display. This will include
measurements of the quantity of charge transferred and the calculated value of the ‘capacitance
loading’.
The graphical display can be handled in just the same way as for graphs obtained from stored
data, and as described in Sections 3.4 and 3.5 above.
4.6 Stop run
A test run may be stopped by clicking the ‘Stop run’ button at the lower left hand side of the
‘Select for display’ menu box if this is not greyed out or via the ‘Serial link’ menu option. This
will stop operation of the JCI 155v5 with storage of all results to the memory card and to the
selected folder.
5. Analysis of results
The main outcome from operation of JCI-Graph is the graphs of the charge decay curves and
the numerical values for the decay times to 1/e, to a selected % and for the capacitance loading.
Also included is the display of how the rate of decay varies during the progress of decay.
Experience from manual tribocharging studies [4] indicates that it takes about 100ms after
the end of charging for the rubbing surfaces to separate and for the surface voltage to reach a
peak value. In the light of this it is appropriate to use a similar time after the end of corona
charging for selecting the initial voltage on which analysis of decay curves is based. The form of
decay curves before this time may well still be of interest but is not directly relevant to using
corona studies to predict the performance of materials in practice [5,6].
The graphical display may be adjusted in various ways to best show features of interest.
Options are provided via the ‘analysis’ menu section for starting decay time analysis at the initial
peak of surface voltage or at a set time after the end of corona charging. The inherent mechanical
time in the JCI 155v5 for the observed surface voltage to reach a peak is about 20ms. If the delay
is set to something less than this (say 10ms) then decay time measurements are made from the
peak initial voltage. Decay time analysis always includes measurement of the decay time to 1/e
of the chosen initial voltage. The ‘analysis section enables a second % end point level to be
selected – and a value of 10% is set as the default.
It has been noted that the variation of local decay time constants provides a good way to
compare decay curves between materials for different test conditions with different initial
voltages and different charge polarities. The ‘local decay time constant’ reflects the rate of decay
per unit of surface voltage at that time. It is derived as the time constant for the best fit
exponential curve for each of a number of small segments of the decay curve – i.e. as if each of
these segments was an exponential. It has been observed in a number of studies that local decay
time constant values increase appreciably during the progress of charge decay [7]. With long
decay time materials it is generally observed that after a short initial settling down period the
7
JCI-Graph v2-2-4 August 2009
local decay time constant increases linearly with time [4]. Where this is true it provides
opportunity to predict the time to achieve certain end points from studies over modest test
periods for materials with inconveniently long decay times. An approach for this prediction is
outlined in Annex 3 [8].
The percentage change of surface voltage over which the local decay time constant values are
calculated can be set via the ‘Parameters’ key in the main display and then via ‘Analysis
parameters’. A small % step will give more detail in the form of the variation but a greater
susceptibility to noise. The numerical values of calculated local decay time constants (and
displayed on the graphs) can be accessed in the .csv file that can be created by clicking the
‘Make .csv’ key in the ‘File parameters’ box. The axis for graphical display of local time
constant values (right hand axis) may be selected to be quasi-logarithmic or linear via the
‘Parameters’ and ‘Display parameters’ menu boxes from the main graph. This is illustrated in
Figure 8.
6. Transfer to other Windows programs:
The graphs and text boxes of numerical decay details can be copied individually to Windows
programs - such as wordprocessing programs. This is implemented via the ‘Display’ and ‘Copy
to document’ buttons.
If graphs are to be used at an appreciably larger or smaller scale than displayed by JCI-Graph
it is best to change the display from full screen to a tile display and then adjust the size of the
graph (by dragging a corner) to be close to the required application size. This ensures that the
thickness of lines and scale divisions will be appropriate to the application size used.
To copy a display to, for example, a wordprocessing document:
- open the document or target area of the document
- in JCI-Graph click ‘Display’ and then ‘Copy to document’.
- go to the target area in the target document and click ‘Paste’ in the edit menu. This will
transfer a copy of the graph.
- return to JCI-Graph and click the ‘OK’ in the Graph instruction box.
- return to the document and click ‘Paste’ to paste in the text information. This will transfer
and display all the text information for each of the graphs displayed.
- return to JCI-Graph and click the OK button in the Text instruction box.
Adjustments for size and layout may then be made to match the application by dragging and
scaling. Text information may be edited after copying – but not the content of the graph.
Up to 4 graphs may be displayed together on a single graph. A convenient presentation in a
report is to have the graph and all the associated text details on a single A4 sheet. Depending on
margins this can be achieved by setting a target page to be double column, 5mm gutter with 10
point printing and then a) copying the graph (possibly at a slightly reduced size) to the top of the
page, followed by b) copying the text information. This is illustrated in the example appended.
References:
[1] J. N. Chubb “New approaches for testing materials” J. Electrostatics 54 March 2002 p233.
Proceedings ESA Annual meeting, Brock University, Niagara Falls, June 18-21, 2000
(This paper is available on the JCI Website at http://www.jci.co.uk/Papers/ESA-MaterialTesting.pdf)
[2] J. N. Chubb “Measurement of tribo and corona charging features of materials for assessment of risks
from static electricity” IEEE Trans. Ind. Appl. 36 (6) Nov/Dec 2000 p1515-1522. Presented at IEEE-IAS
Meeting, Phoenix, Arizona, Oct 1999
(This paper and copies of the overhead transparencies used are available on the JCI Website at http://www.jci.co.uk)
[3] “Method to test the electrostatic suitability of materials” Document considered by British Standards
GEL101 to progress towards becoming a British Standard, July 2004 (Available on JCI Website via:
www.jci.co.uk/List.html)
8
JCI-Graph v2-2-4 August 2009
[4] J. N. Chubb “Experimental comparison of the electrostatic performance of materials with
tribocharging and with corona charging” (Available on JCI Website via: www.jci.co.uk/List.html)
[5] “Method for testing the electrostatic suitability of materials” Draft prepared for British Standards
GEL101 committee. (On JCI Website at: http://www.jci.co.uk/cache/JCITestMethod.pdf)
[6] J N Chubb "A Standard proposed for assessing the electrostatic suitability of materials"
J. Electrostatics 65 2007 p607-610
[7] J N Chubb "Instrumentation and standards for testing static control materials" IEEE Trans Ind
Appl 26 (6) Nov/Dec 1990 p1182
[8] J N Chubb “Charge decay time prediction” Paper submitted to J Electrostatics July 2009
9
JCI-Graph v2-2-4 August 2009
Annex 1:
‘Readme’ file for JCI-Graph version 2.0
for Windows 95, 98, 2000 & XP
Copyright (c) 2001 John Chubb Instrumentation
Thank you for choosing JCI-Graph. This Readme file holds important information on using the
software.
CONTENTS
1. Description of this version of JCI-Graph
2. Installing JCI-Graph
3. Getting started with JCI-Graph
4. On-line Help System for JCI-Graph
5. Contacting John Chubb Instrumentation
-------------------1. Description of this version of JCI-Graph
JCI-Graph enables charge decay observations recorded from
the operation of a JCI 155 instrument to be processed and
graphed. Version 1.0 deals with data from JCI 155
instruments up to Version 4. Data can be read from disc
files (eg floppy disc or hard disc). Version 2.0 deals with
data both from JCI 155v4 and JCI 155v5 instruments.
-------------------2. Installing JCI-Graph
Insert the JCI-Graph installation disc into your computer
and run "setup". This can be done by clicking on the
"Start" button, then "Run". On the Run window, click
"Browse". On the Browse window, ensure "look in" refers
to the drive containing the installation disc and then
select "setup.exe". Back on the Run window, click "OK"
to run "setup.exe".
The installation process should not take long. You will
be asked to accept the licensing agreement and to enter
identification. You can also select installation
locations, although it is anticipated that most will
accept the normal locations indicated as default.
--------------------
10
JCI-Graph v2-2-4 August 2009
3. Getting started with JCI-Graph
After installation, JCI-Graph can be run by clicking on
the "Start" button, then "Programs", then "JCI-Graph".
A welcome screen is displayed for a short period: this
can be removed by clicking the left mouse button.
In the main display form, files can be selected for
display by clicking on the "select" option after either
(a) clicking on "File" in the menu bar at the top of the
window or (b) clicking the right mouse button.
A range of subsidiary forms can be used to control the
operation of JCI-Graph. Up to four files can be
displayed at a time. The display can be adjusted, for
example to focus on a small part of the current graphs
User analysis can be performed to check specific decay
characteristics. The current display can be copied for
insertion into a word-processor document.
Details on using JCI-Graph are available in the On-line
Help System (see below).
-------------------4. On-line Help System for JCI-Graph
The On-line Help System can be obtained as follows :In the main display form, click on "Help" in the menu bar
at the top of the window, which causes a drop-down menu
to appear. Move the mouse pointer into this help menu
and click on the "Help Topics" option.
The On-line Help System starts by indicating its
contents. The system is divided into screens of
information which are linked to each other. Where
further information is available for a particular topic,
the topic is displayed as a "link" in a distinctive
colour (eg green, although this depends on your system)
If you want to view information on that topic, move the
mouse pointer onto the link and click the left mouse
button. In this way, you can follow through information
on a series of related topics. If you want to review one
of the previous screens of information, click on the
"back" button at the top of the help window.
The On-line Help System provides further information on
how to use help.
-------------------11
JCI-Graph v2-2-4 August 2009
5. Contacting John Chubb Instrumentation
We would welcome your comments on this software.
If you have any problems using this software,
please check :(a) information given in this Readme file and
(b) guidance given in the On-line Help System.
If you cannot resolve your problem, please make a note of
the circumstances (in particular, any error message).
John Chubb Instrumentation can be contacted as follows :Telephone:
Fax:
Email:
Web:
+44 (0)1242 573347
+44 (0)1242 251388
[email protected]
http://www.jci.co.uk
12
JCI-Graph v2-2-4 August 2009
Annex 2: Column headings in summary table created by JCI-Graph
Run
Description
Time
Vc
tc(s)
Vstart
t pk to 1/e
t pk to %
%
Q(nC)
CL
T(C)
RH(%)
Serial
Date
CondQ(nC)
IndQ(nC)
Pre(V)
V peak
t delay (s)
The number allocated in sequence for this JCI 155v5 instrument
A description of the material tested – can be entered in JCI-Graph
Time of test run: hours, minutes, seconds (from instrument clock)
Corona voltage (volts)
Duration of corona (s)
The initial surface voltage (volts) at which analysis starts
Time to 1/e of initial peak voltage (s) – if this level reached
Time to selected % of initial peak voltage (s) – if this level reached
Selected % of initial peak voltage
Quantity of corona charge transferred (nC)
Capacitance loading
Temperature measured within JCI 155v5
Relative humidity measured within JCI 155v5
Serial number of JCI 155v5 instrument
Date of testing
Quantity of ‘conduction’ charge measured by JCI 176 – if connected
Quantity of ‘induction’ charge measured by JCI 176 – if connected
Surface voltage on sample surface before start of test run
The initial peak voltage
The time delay between the end of charging and the start of decay time analysis
Note: If JCI 176 is not connected then no charge is measured and Q(nC), CL, CondQ(nC) and
IndQ(nC) are all zero. If the quantity of charge received by the JCI 176 is larger than
measurement capability it is shown as ########
13
JCI-Graph v2-2-4 August 2009
Annex 3: ANALYSIS OF LONG CORONA CHARGE DECAY TIMES
1. Introduction
Assessment of the electrostatic suitability of materials by observation of charge decay is most
directly made in terms of the decay time to 1/e or to 10% of the initial peak surface voltage
achieved at the end of the charging action [6]. For materials with decay times up to 1000s or so
this is fine but for many materials, notably pharmaceutical powders and electrostatic paint
powders, decay times may be up towards a million seconds. It is not usually convenient to
pursue observations over such times. The present analysis is concerned with the opportunity to
predict decay times to chosen end points from observations over a more limited timescale.
It is observed in most corona charge decay studies that the rate of charge decay slows up
during the progress of charge decay [2]. Figure 1 shows an example. What has been clear from
studies on a wide variety of materials over many years is that after an initial settling down period
the local decay time constant increases linearly with time. This is an empirical result - and no
theoretical backing is offered at this time. On the basis of this behaviour it was recognized it is
possible to predict decay times to 1/e or to 10% from observations that only extended far enough
to provide a period of good quality linear variation of local decay time constant [8].
2. Theoretical analysis 1
Where the local decay time constant τ comes to increase linearly with time, t, the time
constant τ will increase from an initial time constant τ0 (at the intercept on the t=0 axis) as:
τ = τ0 + t * dτ/dt
The governing equation can be written in terms of the surface voltage Φ as:
d ln (" )
1
=!
(# 0 + kt )
dt
…(1)
where k = dτ/dt and τ0 is the initial value of the time constant. This approaches the standard
exponential decay equation as k tends to 0.
Equation (1) has the solution (readily verified by taking logs and differentiating):
"
1
=
" 0 (1 + kt ! 0 )1 k
…(2)
As k tends to zero, equation (2) tends, as it should, to the standard exponential form for
constant τ0.
Rearranging equation (2) gives:
- / * &- .
t = ++ 0 (( $++ 0
, k ) %$, .
k
#
*
(( ' 1!
!"
)
…(3)
Where Φ0/Φ = e (2.718) for decay to 1/e and 10 for decay to 10% (note the ratio is initial
voltage over final). Numerical values for these decay times are to be obtained from best straight
lines fits to experimental data to give τ0 and k.
3. Comparison of theory to experimental observations
1
Analysis provided by Harold Walmsley, Shell Technology Centre Thornton, PO Box1, Chester, CH1 3SH.
14
JCI-Graph v2-2-4 August 2009
As was noted above (and is illustrated in Figure 1) that the linear increase in local decay time
constant only starts after an initial settling down period. Analysis must hence be restricted to the
time after this and the time of this point added on to the calculated decay times to give the total
predicted time to 1/e and/or to 10%.
A number of charge decay records have been analysed where there is opportunity to compare
predictions with actual decay time measurements. The results show that decay times can be
predicted with some confidence even though the accuracy is not high. An example of straight
line fitting is shown in Figure 2 with the results of three predictions shown in Table 1.
The accuracy of prediction is likely to be dominated by the accuracy of fitting of the straight
line to the variation of local decay time constant after the initial settling down period. Accuracy
could be estimated from analysis of the fitting errors and will improve as the period of fitting
increases. In conducting practical studies this might be used as a way to decide how long it is
necessary to proceed with individual charge decay tests.
4. Conclusion
An approach has been described that provides a way to predict charge decay times to 1/e
and/or 10% from periods of testing that are appreciably shorter than these times. This is of
considerable value in the testing of materials where charge decay times may be up in the range
104 to 106 seconds.
Table 1: Comparison of predictions and actual decay times for JCI 155v5
Date
Test
1/e
1/e
10%
10%
predict
actual
predict
actual
26/03/08 39504
874
913
26/03/08 39505
762
755
27/05/08 39615
778
795
15
JCI-Graph v2-2-4 August 2009
Figure A3.1: Variation of local decay time constant with time and best straight line fit
16
JCI-Graph v2-2-4 August 2009
Figure 1: Opening display
Figure 2: Ready to extract data from memory card in drive d: to folder ‘JCI-Graph Data’ in c:
17
JCI-Graph v2-2-4 August 2009
Figure 3: Display showing ‘Select for display’ of JCI 155v5 files with source options
Figure 4: Display showing graphs for two selected files with File Parameter information.The
graphs show both the decay of surface voltage (left hand axis) and the variation of local decay
time constant during the progress of each decay (right hand time axis)
18
JCI-Graph v2-2-4 August 2009
Figure 5: Display showing selection of JCI 155v5 instrument via serial link and connection
ready to run
Figure 6: Display showing serial connection status after clicking ‘Start run’
19
JCI-Graph v2-2-4 August 2009
Figure 7: Display of charge decay curve from on-line test
Figure 8: Settings of ‘Analysis parameters’ and ‘Display parameters’ for linear graphical
display of local decay time constants
20
JCI-Graph v2-2-4 August 2009
1 : MyDocuments\JCI-Graph Data\04092193\2004-1014\00000269.jc5
Copy paper
Serial: 04092193, run: 00000269
Date: 14.10.2004 at 14:35:31
Corona (Voltage): -3000
Corona (Time): 0.01
Surface (Temp. °C): 22.78
Surface (% R.H.): 58.56
Pretest (Voltage): 0.45
Peak at 13.06 volts
Analysis start 0.1 secs after charging
at 11.253 volts
1/e reached after 0.19785 sec
10% reached after 0.6998 sec
Received charge = 1.05673 nC
Capacitance loading = 34.7462
3 : MyDocuments\JCI-Graph Data\04092193\2004-1014\00000273.jc5
Copy paper
Serial: 04092193, run: 00000273
Date: 14.10.2004 at 14:39:22
Corona (Voltage): -10000
Corona (Time): 0.01
Surface (Temp. °C): 22.8
Surface (% R.H.): 58.38
Pretest (Voltage): 0.89
Peak at 83.99 volts
Analysis start 0.1 secs after charging
at 29.406 volts
1/e reached after 0.25254 sec
10% reached after 1.0895 sec
Received charge = 150.218 nC
Capacitance loading = 768.006
2 : MyDocuments\JCI-Graph Data\04092193\2004-1014\00000272.jc5
Copy paper
Serial: 04092193, run: 00000272
Date: 14.10.2004 at 14:37:15
Corona (Voltage): -3000
Corona (Time): 0.01
Surface (Temp. °C): 22.8
Surface (% R.H.): 58.35
Pretest (Voltage): 0.81
Peak at 13.273 volts
Analysis start 0.1 secs after charging
at 9.9037 volts
1/e reached after 0.28965 sec
10% reached after 1.1227 sec
Received charge = 1.14171 nC
Capacitance loading = 36.9372
4 : MyDocuments\JCI-Graph Data\04092193\2004-1014\00000274.jc5
Copy paper
Serial: 04092193, run: 00000274
Date: 14.10.2004 at 14:40:06
Corona (Voltage): -10000
Corona (Time): 0.01
Surface (Temp. °C): 22.8
Surface (% R.H.): 58.08
Pretest (Voltage): 0.45
Peak at 79.846 volts
Analysis start 0.1 secs after charging
at 29.578 volts
1/e reached after 0.25645 sec
10% reached after 1.1324 sec
Received charge = 149.583 nC
Capacitance loading = 804.457
21
JCI-Graph v2-2-4 August 2009
Summary of decay observations made by a JCI155v5
instrument
Factors used in charge and capacitance loading formulae
Induction charge factor
2.2
Voltage sensitivity
factor
0.73
Capacitance loading
1.7
factor
Formula
for Q(nC)
Formula
for CL
#######
#DIV/0!
C:\Documents and Settings\John Chubb\My Documents\JCI-Graph Data\04092193\200410-14
Run
269
272
273
274
Description
Copy paper
Copy paper
Copy paper
Copy paper
Time
14:35:31
14:37:15
14:39:22
14:40:06
Vc
-3000
-3000
-10000
-10000
tc(s)
0.01
0.01
0.01
0.01
V
start
11.3
9.9
29.4
29.6
t to
1/e
0.198
0.290
0.253
0.256
t to
%
0.700
1.123
1.089
1.132
%
10
10
10
10
Q(nC)
1.1
1.1
150.2
149.6
CL
34.7
36.9
768.0
804.5
(See Annex 2 for explanation of column headings)
22
T(C)
22.8
22.8
22.8
22.8
RH
(%)
58.6
58.4
58.4
58.1
Serial
4092193
4092193
4092193
4092193
Date
14.10.2004
14.10.2004
14.10.2004
14.10.2004
CondQ
(nC)
1.057
1.139
150.128
149.495
IndQ
(nC)
0.001
0.041
0.040
Pre
(V)
0.45
0.81
0.89
0.45
Vpk
13.1
13.3
84.0
79.8
t delay
(s)
0.1
0.1
0.1
0.1