1
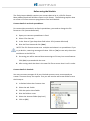
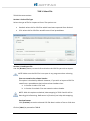
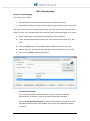
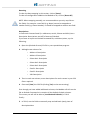
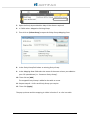
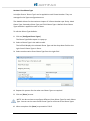
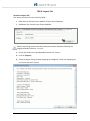
Artifax Entity Import Module Manual V.3.24.0044 for Event V.3.21 or later 1 Artifax Event Artifax Entity Import Module Manual Contents: DESCRIPTION: PAGE: About the Entity Import Module 3 Installing the Module 4 Before using the Module 5 Opening the Entity Import Module 7 TAB 1: Select File 8 TAB 2: Data Mapping 9 TAB 3: Custom Forms 12 TAB 4: Select Types and Groups 14 TAB 5: Options 17 Address Options 18 Saving & Loading Configuration 20 TAB 6: Import File 20 Imported Entities in Event 22 Duplicate Checker 23 Importing Multiple Contacts of the same Organisation 25 SUPPORT 26 Author: SBlend 2 About the Artifax Entity Import Module: The Artifax Entity Import Module allows Users of Event to transfer all Entity details in a CSV spreadsheet to the Event database, saving hours of manual data entry! This means any contact details you have stored in Microsoft Outlook or in an Excel spreadsheet can easily be uploaded to Event as new Entities. You will be able to import: A Persons First Name, Last Name and Title A Person’s Company and their Position in that Company (NOTE: A person’s Company will also be added to Event as a new separate Entity) 2 Addresses (with descriptions) 3 Phone Numbers (with descriptions) 2 Email Addresses (with descriptions) 1 URL (and description) New Countries into Country Configuration (as part of an Address) Additional data from Outlook or even data unique to your contact’s record can be imported to a Custom Form in Event. People or Organisations are imported as members of an Entity Group. You can create a new Entity Group or import the new Entities to an existing Group or Groups in Event. 3 Installing the Module: The Module is delivered as two files: 1. Open Artifax Event. 2. Double-click on the Setup file to start. a. The installer opens with the ‘Welcome’ page. Click on [Next]. b. Choose the location in which to install the Module. The default address is: C:\Program Files\Artifax\Entity Import Module\ To choose an alternative location click on [Browse]. NOTE: Click on [Disk Cost] to check whether you have enough disk space to accommodate the Module. c. Now select whether you want the Module to be available to: Everyone: Module will be available to all Users of this computer or Just me: Module will only be available to the User who installed. d. Click on [Next]. e. In the ‘Confirm Installation’ page, click on [Next] to run. f. When the ‘Installation Complete’ page shows. click on [Close]. The second file prepares the database in Artifax Event for the import: 3. Double-click on the Artifax Entity Import Module file. a. Click on [Finish] to run the setup. b. When the ‘Installation Complete’ page shows. click on [Close]. 4 Before using the Module: The Entity Import Module requires your contact data to be in a CSV file format. Many address books will allow an export in this format. The following explains how to create a CSV from common programmes Excel and Outlook: Contact details in an Excel spreadsheet: For contact data recorded in an Excel spreadsheet, you need to change the file format to: CSV (comma delimited) 1. Open your contacts spreadsheet in Excel 2. Select: File> Save As 3. In the Save as Type drop-down field select: CSV (comma delimited) 4. Give the file a Name and click [Save]. NOTE: The CSV format cannot save multiple worksheets in a spreadsheet. If you try to do this, a warning message will show. Click on [Yes] to save only the active worksheet as the CSV file. 5. On saving you will be warned that converting to CSV may lose some features. Click [Yes] to proceed with the save. 6. After saving check the data in the new CSV file to ensure that it is all in order. Contact details in Outlook: You may not want to export all of your Outlook contacts so we recommend you create a ‘Contact Group’ for exports. First you will need to add a new folder to save the Group to: 1. In Outlook select the Contacts view 2. Select the tab: Folder 3. Click the option: New Folder 4. Give the folder a name 5. Select the Account folder (top level) 6. Click on [Ok] 5 Then create your Contact Group: 1. In Outlook select the Contacts view and the Home tab 2. Click the option: New Contact Group 3. Give your Contact Group a Name 4. Then click the option: Add Members 5. In the Select Members pop-up: a. Select a contact to add b. Click the [Members] button c. Repeat steps ‘a’ and ‘b’ to add all your required contacts. Then [Ok]. 6. Click on Save and Close 7. The Group is added to the default ‘Suggested Contacts’ folder. Select this folder in the left pane and then search for your new Group. 8. Right-click on the Group and select Move. Then select the new export folder. Exporting the folder from Outlook to a CSV file is done in Advanced Options: 1. In Outlook select the File tab 2. In the left pane select: Options 3. In the Options pop-up, select Advanced in the left pane. 4. Under the ‘Export’ heading click the [Export] button. 5. In the Export pop-up: a. Select Export to a file and click [Next] b. Select Comma Separated Values (windows) and click [Next] c. Give your file a name d. Click [Browse] to select a save point. e. Click [Next] f. Then select the new folder you created as the folder to export from. g. Click [Next] and then [Finish] to create the CSV export file. Based on Outlook version 2010. See the Microsoft Outlook help notes for more information. 6 IMPORTANT! Before you start the Module, make sure that you have backed up your current Event database! Opening the Entity Import Module: To open the Module go to the Directory in which you installed it. The default location is: C:\Program Files\Artifax\Entity Import Module\ In this folder there is an application file named: EntityImportModule NOTE: The Module MUST be run by a SQL User who has DB ownership of the Event database! Please check with your System Administrator. As the SQL Database Owner, click on the file to open the Module. On opening the Module you’ll be presented with 6 tabs: Select File Data Mapping Custom Form Mapping Select Types and Groups Options and Import File 7 TAB 1: Select File TAB #1 has two sections: Section 1: Select File Type Select the type of file for import to Event. The options are: Outlook: select this for CSV files which have been exported from Outlook. CSV: select this for CSV files saved from an Excel spreadsheet. Section 2: Load Input File Use the [Browse] button, to search for and select the CSV file you wish to import. NOTE: Make sure the CSV file is not open in any programs when selecting. First row contains the column header: This option is checked by default. However, if you wish to import a CSV file saved from a spreadsheet that had no column headers then: a. In Section 1 select ‘CSV’ and b. In Section 2 uncheck First row contains column header NOTE: With this option unchecked, data mapping in TABS 2 and 3 will be done by grid referencing. References in [Preview] can help with mapping. Preview button: Click [Preview] to see the selected CSV file data in either a Text or Grid view. Click on [Next] to proceed to TAB #2 8 TAB 2: Data Mapping Section 3: Data Mapping This section has 2 fields: Artifax Data field lists all the details in Event related to an Entity Outlook/CSV field lists all the column headers (or grid references) in your CSV Use these fields to map or match like data from your CSV to the most relevant Entity detail in Event. This method allows you to define exactly where data goes to in Event: 1. Select a data type in the Artifax Data field (e.g. Entity Position) 2. In the Outlook/CSV Data field select the most relevant data match (e.g. Job Title). 3. Click the [Add] button. The mapped data is added to the table as a row. 4. Repeat steps 1-3 and map all required data in Event to data in your CSV file. 5. Then click on [Next] to proceed to TAB 3. Load Outlook Defaults If you have selected the Outlook option in Section 1 AND an Outlook formatted file in Section 2, then this button will become available. Click on [Load Outlook Defaults] to automatically map the Artifax Data to its equivalent Outlook Data. Once loaded, you can still map additional details manually. 9 Resetting To clear the data mapping in this section, click on [Reset]. To clear all configuration added to the Module so far, click on [Reset All]. NOTE: When mapping manually, we recommend that you only map like-tolike fields. For example: a text field (e.g. Name) cannot be mapped to a number field (e.g. Phone Number). It should be mapped to another text field. Descriptions: In Event each Contact Detail (i.e. addresses, emails, Phones and URLs) has a Description. Descriptions are NOT a feature of Outlook. If you want to import an Outlook formatted file, with descriptions, try the following: 1. Open the (Outlook format) CSV file in your spreadsheet program 2. Add eight new columns for: - Address 1 Description - Address 2 Description - Phone No 1 Description - Phone No 2 Description - Phone No 3 Description - Email 1 Description - Email 2 Description - URL Description 3. Then in each new column, enter descriptions for each contact in your CSV file as required. 4. Close and [Save] the CSV file (clicking [Yes] to the save warning). Even though you have added additional columns, the Module will still see the file as Outlook formatted as it contains all the default Outlook columns. This means you will still be able to [Load Outlook Defaults] in TAB 2. Finally… 5. In TAB 2, use the fields to manually map and add each (new) piece of description data. 10 Removing Rows: Rows can be removed one at a time. To remove a row: 1. Right-click on the row to remove. 2. Select the [Remove] option. Editing Rows: To overwrite or edit a row’s mapped data: 1. Select the row you wish to edit in the table. The Artifax Data and Outlook/CSV Data fields will automatically become populated with the mapping in that row. 2. Using the two fields, edit the mapping as required. 3. Click on [Add]. A warning asks you if you wish to overwrite the existing mapping. 4. Click on [Yes] to confirm and overwrite. 11 TAB 3: Custom Forms Section 4: Custom Form Mapping This section has 2 fields: Artifax Data field lists all field names in the Custom Form for Entities in Event Outlook/CSV field lists all the column headers (or grid references) in your CSV Use these fields to map or match like data from your CSV to the most relevant Entity Custom Form field in Event. This method allows you to define exactly where data goes to in your Entity Custom Forms: Entity Custom Forms in the Module: In Event, Entity Custom Forms are applied to 2 different places: Entity Customer: the Custom Form for a Person or Organisation Entity Entity Contact Link: the Form used where a Person Entity is linked as a Contact for an Organisation Entity. If you expand the Artifax Data field in TAB 3 you will see that each Custom Form field caption is listed 3 times. Each instance is followed by a suffix (in brackets). This suffix indicates what type of Custom Form and for what type of Entity your CSV data will map to once imported. The table below illustrates which areas each suffix refers to: Suffix Description Where data goes in Entity Custom Forms The Entity Customer Custom Form for the (Organisation) Organisation The Entity Customer Custom Form for the (Contact) Person The Entity Contact Link Form which links the (Link) contact to the Organisation 12 To map Custom Form Data: 1. Select a Custom Form field in the Artifax Data field (e.g. Memo) 2. In the Outlook/CSV Data field select the most relevant data match (e.g. Notes). 3. Click the [Add] button. The mapped data is added to the table as a row. 4. Repeat steps 1-3 until you mapped all the required Entity Custom Form fields in Event to data in your CSV file. 5. Then click on [Next] to proceed to TAB 4. NOTE: When you make a selection in the Artifax Data field, a message shows indicating the type of field you have selected (e.g. string, numeric etc.). This message is a guide for data selection you make in the Outlook/CSV Data field, as you can only map like-to-like fields. For example: a string field (e.g. Name) cannot be mapped to a number field (e.g. Phone No). It has to be mapped to another string field. Removing or Editing Mapped Custom Form Rows Removing or editing rows in TAB 3 uses the same process as in TAB 2. Please see page 11 for steps on how to Remove or Edit mapped rows. 13 TAB 4: Select Types & Groups TAB 4 has two sections: Section 5: Set Entity Group Entities must be imported as members of an Entity Group, whether new or existing. In this section, select whether to: Create a New Entity Group or Map to an Existing Entity Group Create a New Entity Group: Select Create New Group to import all contacts as members of one new Entity Group. You can use the automatically generated name in the Entity Group field, (this is created from the current date and time) or enter an alternate Group Name. Mapped to an Existing Group: This option lets you import contacts as members of existing Entity Groups. To do this you must create extra columns in the CSV file for each existing Entity Group. Then, for each contact, enter a ‘1’ in that column if they’re a Group member and a ‘0’ if not. 1. In Event add an Entity Group (e.g. ‘Customers’). 2. Then open your CSV file in your spreadsheet program. 3. Add a new column and label it with the name of new Entity Group (e.g. ‘Customer Entity Group’). 4. For each row or contact in that column enter either : “1” if they are a member of that Group “0” if they are NOT a member of that Group FOR EXAMPLE: Below the User has 2 existing Entity Groups in Event: Customer and Staff. The User wants the Entity (for import) to be added to the Staff Group but not the Customer Group, so they enter a “1” in the Staff column and a “0” in the Customer column: 14 5. Open the Entity Import Module. Map all the data as required. 6. In TAB 4 select: Mapped to Existing Group 7. Then click on [Select Group] to open the Entity Group Mapping form: 8. In the Entity Group field select an existing Entity Group 9. In the Mapping Data field select the name of the extra column you added to your CSV spreadsheet (i.e. ‘Customer Entity Group’). 10. Then click on [Add]. The mapped Entity Group is added to the table as a row. 11. Repeat steps 8 - 10 for each Entity Group you require. 12. Then click [Apply]. The pop-up closes and the mapping is visible in Section 5 as a list in a table. 15 Section 6: Set Phone Type In Artifax Event a ‘Phone Type’ can be applied to each Phone Number. They are managed in the Types configuration area. The Module allows for the maximum import of 3 Phone Numbers per Entity: Main Phone Type, Secondary Phone Type and Third Phone Type. A default Event Phone Type selection is applied to each of these. To edit the Phone Type defaults: 1. Click on [Configure Phone Types]. The Phone Type Editor opens in a pop-up. 2. Select a Phone Type in the table to edit. The left field displays the selected Phone Type and the drop-down field on the right lists all Phone Types in Event. 3. Select an alternative Event Phone Type from the right field 4. Repeat this process for the other two Phone Types as required. 5. Click on [Close] to save. NOTE: You do not have to configure different Event Phone Types for each Phone Type. You can set the same Event Phone Type for all three of the Phone Types. 6. When complete click [Next] to proceed to TAB 5. 16 TAB 5: Options Section 7: Configure Export Options This section (and tab) are new to this version of the Entity Import Module. It includes the read only options: Do not allow duplicate Organisations Use all addresses (primary and secondary) to check for duplicates Do not overwrite existing data for duplicate Entity These options are all checked by default and CANNOT be edited. The editable options available are: Always add new Country name to database In Artifax Event, countries are added to the database by the Administrator (Options > Setup > Countries). When you import new contacts, they may contain addresses with countries that do not exist in your Event database. To add any new countries when you import, check this option. If unchecked, addresses with countries not in the database will get added with a blank country selection. Do not allow duplicate Person When the Module imports a Person contact, it checks the First Name + Last Name + Postcode entry for duplicates. 17 Check this option to prevent the Module creating new Entity’s with the same First Name + Last Name + Postcode. However, your CSV file may include contacts with the same name, but different details. For example: your contacts list may have many common names like ‘Dave Smith’, but each instance of ‘Dave Smith’ is unique. If this is the case, leave the Do not allow duplicate Person option unchecked. Address Options When you import a Person Entity with company details, then their company will get added to Event as a separate Entity. Three fields are supplied so you can define which of the Person Entity’s addresses are added to the new Organisation (if any) and in which order: Add Address to Organisation This option becomes active when you map the Entity Details on TAB 2. Check this option to add your mapped Person’s address (or addresses) to new Organisations. Uncheck this option to prevent a Person’s address(es) being applied to new Organisations. NOTE: When this option is unchecked the Module can no longer ascertain whether there are duplicates of an Organisation. See p 23 on Organisation Duplicates. Organisation Address/ Only add selected Address… In TAB 2 of the Module, you have the option to map the data for 2 addresses: Main (Primary) Address Secondary Address These fields only become active if box Add address to Organisation is checked and both the Main and Secondary Addresses have been mapped in TAB 2. The Organisation Address field adjusts to list the address(es) that you have mapped in TAB 2. 18 For example: If you map both Addresses in TAB 2, then they are both listed in this field for selection and the checkbox option Only add selected Address… becomes active. if you only map the Secondary address in TAB 2, then this field can only display: Secondary. The checkbox Only add selected Address… will become inactive (as the option no longer applies). So when both Addresses are mapped, the fields: Organisation Address and Only add selected Address function together with any of the following combinations: Organisation Address Selection Main Main & Secondary mapped Secondary Only add selected Address Checkbox Once imported, the Organisation has… Only Main address added Both addresses added (Main 1st) Only Secondary address added Both addresses added (Secondary 1st) But when just one Address is mapped (i.e. Main or Secondary), the fields: Organisation Address and Only add selected Address become read only with the following selection (and results): Organisation Address Only add selected Address Once imported, the Organisation has… Main only Main Only Main address added Secondary only Secondary Only Secondary address added 19 Saving & Loading Configuration NEW to this version of the Entity Import Module is the option to save all Module settings in any tab at any time. All details including File Selection, Mapping and Options Configuration can be saved. The configuration is saved to an XML file on your computer. You can save as many configuration variables to as many XML files as you require. Make sure you give the files titles that sum up their settings so they can be easily defined at a later date. To Save Configuration: 1. Enter your required Module configuration 2. Click on [Save Configuration] A Save Configuration File window opens 3. Browse to your preferred save location 4. Enter a Name for the XML file 5. Click on [Save] A message confirms that the file is saved to the specified location. You can overwrite a saved XML file at any time with updates to the configuration. Simply select the existing file as the save point rather than entering the name of a new one. To Load Configuration: At a later stage you may want to re-load previously saved settings: 1. Open the Entity Import Module 2. Click on [Load Configuration] A Load Configuration File window opens 3. Browse to the location of your saved XML file 4. Select the required XML file 5. Click on [Open] The Module tabs will all be populated with the settings saved to the XML file. Reset All Click on the (NEW) [Reset All] button at any time to clear all data and settings in all sections of the Module. 20 TAB 6: Import File Section 8: Import File The Import section has two read only fields: Data Source: the SQL server address of your Event database Database: the name of your Event database Before importing, please read the information about Duplicate Checking on page23 and Best Practise… on p.25. 1. Check the Data Source and Database details are correct. 2. Click on [Import] 3. A pop-up opens listing all data mapping as configured. Check the mapping list to ensure that all is correct. 21 4. If the mapping is correct click on [Ok]. 5. You will get a final reminder message to back-up your Event database before importing. If you have backed-up click [Yes] to continue. 6. When the import is complete you will get a message to confirm. Click [Ok]. Imported Entities in Event When the import is complete check the Entity List in Artifax Event: 1. Log into Event 2. From the Diary page select: Lists > Entity Lists 3. Run an Entity Search Your imported contacts should be listed here as new Entities (under Last Name, First Name) 22 Duplicate Checker The Module runs duplicate checks when importing a Person contact who has details of an Organisation attached. The checker looks for matching: Organisation Name + Postcode (Main and/or Secondary Postcode) If it finds an existing Organisation with matching Name AND Postcode then a new Organisation Entity will NOT be created. Only the Person contact will be added to Artifax Event and will be linked to the existing Organisation. If no existing Organisation with a matching Name AND Postcode is found then the Person and their associated Organisation will be added to Artifax Event as new, individual Entities. The two will be linked as Contacts. Duplicate Organisations Depending on how the Contacts data is recorded in your CSV file, the duplicate checker may create duplicate versions of an Organisation. A duplicate Organisation Entity is usually created when multiple contacts of the same Organisation are imported – but have alternate (non-matching) postcodes in their addresses. The following rules, should help you understand the potential scenarios: If there are 2 entities of ‘Organisation A’, both with blank postcodes - then the Organisation will be added once: The duplicate checker found a Name + Postcode match (No Duplication) If there are 2 entities of ‘Organisation B’, both with postcode ‘ABC’ – then their Organisation will be added once: The duplicate checker found a Name + Postcode match (No Duplication) If there are 2 entities of 'Organisation C’, where one has a postcode and the other does not - the Organisation is added twice: Only a Name match was found by the checker (Organisation Duplicated). A null or blank postcode is considered to be different to an actual postcode. If there are 2 entities of ‘Organisation D’ where both have a blank primary postcode but differing secondary postcodes – the Organisation is added twice: Only a Name match was found (Organisation Duplicated). Where mapped, the duplicate checker looks at secondary as well as primary postcodes. 23 If there are 2 entities of 'Organisation E', where both have the same postcode but differing address details (i.e. street, city, county etc.) - then the Organisation is added once: The duplicate checker found a Name + Postcode match (No Duplication). It does not run a check on any other address details. If there are 2 entities with the same postcode but belonging to different Organisations – then an Entity is added for each Organisation: The duplicate checker found a Postcode match only. NOTE: When checking postcodes, the duplicate checker does not ignore spaces in a postcode. So the postcodes: SW1 1AA and SW11AA will be seen as two different postcodes. It is advised to delete all spaces in postcodes prior to import. The above scenarios are expected functionality in the Entity Import Module. If you want to avoid the duplication we advise that you see p.25 on The Best Practise for Importing Multiple Contacts of the same Organisation. Alternately you can import your CSV contacts as normal and then manually administer your Entity List in Event to ensure that all Organisations are added and linked their Contacts as required. Add Address to Organisation Option In the 5th TAB named Options there is a checkbox: Add Address to Organisation. When this option is unchecked, no addresses from the Person Entity will be added to the new Organisation Entity. Because the Organisation has no addresses, the Module can no longer check for duplicates of an Organisation via Name + Postcode. In this instance you may get duplicate Organisations added as new Entities in Event. If you have multiple contacts of the same Organisation, we recommend importing WITH the option Add Address to Organisation checked. 24 Best Practise for Importing Multiple Contacts of the same Organisation When importing Organisations with multiple Contacts we recommend the following import process: 1. Split your CSV file into 2 new CSV files: One listing Organisations only and a second listing Person contacts only. 2. Import the Organisation CSV file first: Make sure you map both addresses in TAB 2 Check option: Add address to Organisation in TAB 5 3. Then import the CSV file with Person Contacts only. Make sure you map both addresses in TAB 2 Check option: Add address to Organisation in TAB 5 Running the import this way allows for the addition of new addresses (from new contacts) to an existing Organisation Entity. This process is preferred to a single import which creates a new Organisation Entity for each new address. 25 Support Please refer to the Artifax Event User Manual for further information regarding Artifax Event functionality. For further assistance with any Artifax product, please contact Artifax Software Ltd at: UK Support Office: EMAIL: [email protected] NATIONAL CALL RATE NUMBER: +44 (0)1372 587 587 TWITTER: ArtifaxSoftware WEB: www.artifax.net See the Contacts page on our website for more global contact details: http://www.artifax.net/index.php/company/contact-us 26