1
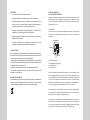
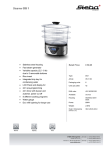
USER MANUAL
Two Tier Steamer
Model: 16145
Helpline No: 015394 88100
Lakeland
Alexandra Buildings, Windermere, Cumbria LA23 1BQ
Tel: 015394 88100 Web: www.lakeland.co.uk
INTRODUCTION
Thank you for choosing this two-tier steamer from My Kitchen, a hard-working range of
everyday cooks’ essentials by Lakeland. Please take a few moments to read these
instructions before using the steamer for the first time, and keep them in a safe place
for future reference.
FEATURES
1.
Lid with steam vents
2. Rice bowl
3. Top tier
4. Bottom tier
5. Drip tray (with flavour screen)
6. Steam Diffuser
7.
Power Unit with water tank
8. LED digital display
9. on/off button with water
level indicator
10. Pre-set cooking program butons
11. Timer control dial
4. Place the steamer on a level, sturdy and dry surface away from heat and direct
sunlight. Do not place it on or near a hot gas or electric burner, or in or near a
heated oven.
5. Do not let the power cord hang over the edge of the worktop or table, where a child
could grab it. Keep the power cord away from sharp edges and hot surfaces, such
as stovetops.
6. To protect against electric shock, do not immerse the steamer, power cord or plug
in water or any other liquid. Never allow the cord or plug to get wet. Do not touch
with wet hands.
7. Never switch the steamer on unless the water is above the minimum level. Herbs,
seasonings, etc. should not be added to the water.
8. CAUTION: steam is extremely hot and can burn. Keep your hands and face well
away from the lid’s steam vents during cooking. When lifting the lid during or
after use, tilt it away from you to prevent the risk of scalding.
9. Place the steamer well away from anything that may be damaged by hot steam.
Do not position it directly beneath wall cabinets.
10. The steamer will get very hot during use and should be handled with great care.
To prevent burns, never touch the hot surfaces and always wear oven gloves when
handling the lid, tiers and trays.
11. Never lift the lid whilst the water is boiling.
12. Never attempt to move the steamer during use or when it contains hot water.
13. Always switch off and unplug the steamer when not in use and before cleaning.
Let it cool completely before cleaning.
Operating Voltage: 240V- 50Hz
Power: 900W
14. Using parts not supplied by the manufacturer should be avoided as this may lead
to electric shock, fire or injury.
IMPORTANT SAFEGUARDS
When using this food steamer, please follow these basic safety precautions.
15. The steamer is not intended for use by children or infirm people, unless they have
been adequately supervised by a responsible person to ensure they can use it
safely. Children should be supervised to ensure they do not play with the steamer.
The steamer must not be left unattended during use.
1.
Please read all instructions before using.
2. Make sure your electricity supply matches the voltage shown on the appliance.
3. This steamer is for household use only. It is not suitable for commercial use,
or for use outdoors. It must be used only for its intended purpose.
16. Do not use the steamer if the power cord or plug shows any signs of damage, or if
the appliance is dropped, damaged or working incorrectly. Call the helpline on
015394 88100 to arrange a repair by an authorised repairer, or a replacement.
Never try to repair the steamer yourself as this may cause electric shock.
BEFORE USING FOR THE FIRST TIME
Carefully unpack the food steamer and remove any packaging.
Wipe the power unit with a dry cloth and clean the water tank with a soft, damp cloth.
The power unit should never be immersed in water or any other liquid.
The lid, tiers, rice bowl and steam diffuser can be cleaned in warm, soapy water. Rinse
then dry thoroughly.
A NOTE ON COOKING RICE
The steamer comes with a special bowl for cooking rice. For white, long-grained rice or
brown rice, add 150g rice and 300ml boiling water to the bowl. Cook for 42 minutes.
PLEASE NOTE: this cooking time is approximate and may vary according to personal
preference and the type of rice chosen.
INTRODUCING YOUR FOOD STEAMER
This full-size steamer has been designed to make cooking as healthy and simple as
possible. There are 5 pre-set programmes for eggs/meat, fish/vegetables, chicken, rice
and mixed food, offering precision cooking at the touch of a button.
Cooking times can also be set manually, if you prefer, using the 99 minute timer.
A helpful keep warm mode will keep food warm for up to 20 minutes once cooking is
complete. See BOIL-DRY PROTECTION.
The digital display shows at a glance which programme has been selected and how
much cooking time is left.
The water tank lets you see if it needs topping up – this can be done at any time during
cooking. See REFILLING THE WATER TANK.
A NOTE ON COOKING EGGS
The bottom tier of the steamer has egg holders integrated into the base. Place the eggs
into the tier as per the picture below. PLEASE NOTE: this cooking time is approximate
and may vary according to personal preference and the size of egg chosen.
Steaming Time (based on large egg)
For versatility, the food steamer can be used with 1 or 2 tiers. The mixed foods
programme is ideal if you are cooking several different types of food that require
different cooking times, e.g. a meal of fish, potatoes and broccoli. Start with the food
that takes the longest to cook and place it in the bottom tier. As the cooking time
counts down add the next tier of food and always placing the lid on the uppermost tier.
PLEASE NOTE: for food safety, meat or poultry should be placed in the lowest tier.
When adding extra tiers during steaming, please take great care as hot steam will
escape when the lid is lifted. Always wear oven gloves and tilt the lid away from you to
prevent burns.
CAUTION: KEEP YOUR HANDS AND FACE WELL AWAY FROM THE LID’S STEAM VENTS
AT ALL TIMES DURING COOKING, TO PREVENT BURNS FROM HOT STEAM.
Soft boiled egg
10 minutes
Medium boiled Egg
15 minutes
Hard boiled egg
17 minutes
SETTING UP YOUR FOOD STEAMER
1. Making sure the steamer is switched off and unplugged, pour plain, cold water
directly into the water tank, paying attention to the MIN and MAX levels on the
water gauge. The tank will hold up to 1.1 litres.
5. When the cooking time is up, two beeps will sound and the steamer will
automatically go into keep warm mode for 20 minutes. When the keep warm mode
is completed the steamer will beep five times. After one final minute the steamer
will beep two further times and then turn off.
PLEASE NOTE: the tank should not be filled under a running tap as the power cord
or plug may get splashed. No herbs, stock, wine or seasonings should be added
directly to the water as they may damage the appliance.
6. When you are ready to serve the food, press the on/off button twice and unplug the
steamer. Wearing oven gloves, lift off the lid, tilting it away from your face to
prevent scalds from hot steam. Carefully remove the tiers, taking great care not to
spill any hot cooking juices that may have collected on the trays.
2. If using herbs, spices or other dry seasonings, wet the flavour screen with cold
water to prevent them falling through the screen. Place a small amount (1/2 to 3
teaspoons) of herbs or spices onto the flavour screen to add flavour to food during
steaming. Place the drip tray over the water tank. It is not necessary to wet the
flavour screen if steaming without adding herbs or spices.
3. Place the bottom tier on the drip tray. Add food to the tier.
4. Depending on how many types of food you are cooking, stack with the top tier.
5. Place the lid onto the top tier.
7. Let the drip tray and water tank cool down completely before cleaning. See CARE
AND CLEANING.
REFILLING THE WATER TANK
The water tank holds 1.1 litres, which gives approximately 1 hours’ steaming. Please
keep a close eye on the water gauge during cooking or when the steamer is in keepwarm mode to ensure it does not drop below the MIN level. For ease the tank can be
topped up at any time during use, as shown below.
6. Plug the steamer into the mains socket and turn on the socket. The on/off button
will illuminate.
COOKING USING THE PRE-SET PROGRAMME
There are 5 pre-set programmes; indicated by the following symbols.
eggs/meat
15 minutes
1.
fish/vegetable
20 minutes
chicken
30 minutes
rice
42 minutes
mixed foods
60 minutes
When the unit is plugged in the on/off button will illuminate. Press the required preset cooking programme button, the pre-set programme will then illuminate and
start flashing.
2. To adjust the pre-set time, e.g. for crunchier or softer vegetables, simply turn the
control dial clockwise to increase or anticlockwise to decrease. Each turn will
change the cooking time by one minute.
3. Steaming will begin within 30 seconds.
4. To cancel the steaming process, or select a different cooking programme, press the
on/off button to return the steamer to standby mode.
BOIL-DRY PROTECTION
For your safety, this food steamer automatically stops cooking if the water tank boils
dry. The buzzer will sound continuously and the refill symbol will be flashing
REFILL
Refill water above the MIN level and the buzzer will stop and the
Reset the cooking programme to recommence steaming.
REFILL
will stop flashing.
If the tank remains empty for several minutes the steamer will automatically shut off.
If this happens allow the steamer to cool completely before turning the steamer on
again.
HELPFUL HINTS
• Choose the freshest, best quality produce available.
•
Avoid overfilling the tiers, as this will prevent the steam circulating freely.
•
The digital programmes offer pre-set cooking times for particular foods but you
may like to increase or decrease the time according to the quantity and type of
food and your personal tastes, e.g. softer/crunchier vegetables.
•
We always recommend using a kitchen thermometer to check that food is
thoroughly cooked, especially meat, fish, seafood and poultry.
•
Raw meat and poultry should always be placed in the lowest tier to prevent juices
dripping onto other foodstuffs.
•
To stop the cooking ahead of time, simply press the on/off button, or put the
steamer into keep warm mode by pressing the keep warm button.
ELECTRICAL CONNECTIONS
THIS APPLIANCE MUST BE EARTHED
This appliance is fitted with a fused three-pin plug to BS1363 which is suitable for use in all homes
fitted with sockets to current specifications. If the fitted plug is not suitable for your socket
outlets, it should be cut off and carefully disposed of. To avoid an electric shock, do not insert the
discarded plug into a socket.
Fitting a new plug
If for any reason you need to fit a new plug, the flexible mains lead must be connected as shown
here. The wires in the mains lead fitted to this appliance are coloured in accordance with the
following code:
Earth(green/yellow)
Neutral(blue)
CARE AND CLEANING
Before cleaning the food steamer, always switch it off, unplug it and let everything cool
down completely. Lift off the drip tray and pour away any liquid. Clean the lid, tiers and
drip tray in warm, soapy water. Rinse, and then dry thoroughly.
Carefully tip away any liquid remaining in the water tank. Wipe the power unit with a
dry cloth and clean the water tank with a soft, damp cloth. The power unit should never
be immersed in water or any other liquid.
Avoid abrasive cleaners and metal scourers as they will damage the product.
Once everything is clean and dry, stack the tiers inside each other and place on the
power unit for compact storage.
RECYCLING YOUR ELECTRICALS
Along with many other high street retailers, Lakeland has joined a scheme whereby
customers can take their unwanted electricals to recycling points set up around the
country. Visit www.recycle-more.co.uk to find your nearest recycling point.
13amp FUSE
E
L
13amp fuse
N
Live(brown)
Connect BLUE to Neutral (N)
Connect GREEN & YELLOW to Earth (E)
Connect BROWN to Live (L)
13 amp fuse to be used
If the colours of the wires in the mains lead of this appliance do not correspond with the coloured
markings identifying the terminals in your plug, proceed as follows. The wire which is coloured
green and yellow MUST be connected to the terminal which is marked with the letter E (Earth) or
coloured green. The wire which is coloured blue MUST be connected to the terminal which is
marked with the letter N (Neutral) or coloured black. The wire which is coloured brown MUST be
connected to the terminal which is marked with the letter L (Live) or coloured red.
Before refitting the plug cover, check that there are no cut or stray strands of wire inside the plug.
Use a 13 amp BS1362 fuse. Only BSI or ASTA approved fuses should be used. If you are at all unsure
which plug or fuse to use, always refer to a qualified electrician.
Note: after replacing or changing a fuse on a moulded plug which has a fuse cover, the cover must
be refitted to the plug; the appliance must not be used without a fuse cover. If lost, replacement
fuse covers can be obtained from an electrical shop. This appliance complies with the following
EEC Directives: 73/23 EEC (Low Voltage Directive) and 89/336 EEC (EMC Directive).
0002