1
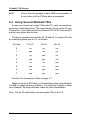
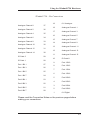
Windmill 750 Manual Windmill Software Limited Manual Code: WM.750-1.3 Issue Date: November 2015 Information in this document is subject to change without notice. Windmill Software Limited 2015 PO Box 58 North District Office Manchester M8 8QR UK Telephone: +44 (0)161 833 2782 E-mail: [email protected] http://www.windmill.co.uk http://www.windmillsoft.com/ Table of Contents Table of Contents 1 2 Introduction 1.1 1.1 Printing 1.1 Using the Windmill 750 Hardware 2.1 2.1 Introduction 2.1 2.2 Plugging the Windmill 750 into the Computer 2.1 2.3 The Windmill 750’s Lights 2.1 2.4 Using Several Windmill 750s 2.2 2.5 Analogue Input Connection Notes 2.5.1 Single-Ended Inputs 2.5.2 Input Voltage Range 2.5.3 Maximum Input Voltage 2.5.4 Unconnected Inputs 2.5.5 Pin Numbers 2.3 2.3 2.3 2.3 2.4 2.4 2.6 Digital Input and Output Connection Notes 2.6.1 Input Voltages 2.6.2 Contact Closures 2.6.3 Output Drive 2.6.4 Pin Numbers 2.5 2.5 2.5 2.5 2.5 2.7 Counter Connection Notes 2.7.1 Input Voltages 2.7.2 Count Inputs 2.7.3 Pin Numbers 2.6 2.6 2.6 2.6 2.8 Specifications 2.8.1 Analogue Inputs 2.8.2 Digital Inputs and Outputs 2.8.3 Counters 2.8 2.8 2.8 2.8 I Windmill 750 Manual 3 4 Installing and Configuring Windmill Software 3.1 3.1 Introduction 3.1 3.2 What is Windmill Software? 3.1 3.3 Installing Windmill Software 3.3.1 Upgrading From Earlier Versions of Windmill 3.3.2 Running Several Copies of Windmill 3.1 3.2 3.2 3.4 Configuring Your System 3.4.1 Adding New Hardware 3.4.2 Changing Hardware Settings 3.4.3 Windmill 750 Devices 3.4.4 Setting the Working Directory 3.4.5 The ConfIML Main Window 3.4.6 Saving the Settings 3.4.7 ConfIML Summary Window 3.4.8 The Software Signal Generator 3.4.9 The IML Device Icon 3.3 3.4 3.4 3.4 3.5 3.5 3.5 3.6 3.7 3.7 Using Windmill Software with the 750 4.1 4.1 Introduction 4.1 4.2 Options in SetupIML 4.2.1 Analogue Inputs 4.2.2 Digital Ports 4.2.3 Grouping I/O Lines into Multi-Bit Channels 4.2.4 Event Counters 4.1 4.1 4.2 4.3 4.4 4.3 The Rest of the Windmill Software Suite II 4.5 Introduction Introduction Thank you for purchasing the Windmill 750 package. This Manual tells you: • About the 750 unit and how to connect your signals (Chapter 2) • How to install the Windmill software (Chapter 3) • How to use Windmill software with the 750 unit (Chapter 4) To use the 750 package you need a PC with a USB port. It should be running Windows 98SE, Windows 2000 or later. 1.1 Printing This manual has been designed to be printed on A5 size paper. When printing to A4 paper, if your printer permits, you can print 2 pages of the Manual onto one A4 sheet in landscape orientation. Printing 1.1 Windmill 750 Manual 1.2Introduction Using the Windmill 750 Hardware Using the Windmill 750 Hardware 2.1 Introduction The Windmill 750 lets you monitor 16 analogue voltage inputs, 16 digital inputs & outputs and 8 counters. This chapter tells you how to connect your signals to the 750. After making your connections, see Chapter 3 for details of installing the software. 2.2 Plugging the Windmill 750 into the Computer Plugging the 750 into your PC could not be easier: just use the USB cable provided. You don’t have to switch off your computer or even restart Windows. The Windmill 750 is powered from the PC: you don’t need an extra power supply box. 2.3 The Windmill 750’s Lights The 750 has a green light labelled ENUM and a red light labelled BUSY. Neither of these comes on until you have installed the Windmill software. ENUM Introduction ENUM stands for Enumerated. This is lit when the 750 has been powered on by the USB plug and play controller. It is a good indication that the Windmill USB driver software has been correctly loaded. 2.1 Windmill 750 Manual BUSY This is lit for the duration of each USB communication. It is not active until the 750 has been enumerated. 2.4 Using Several Windmill 750s As you can connect up to eight 750s to the PC, each one must have some way of identifying itself. This is provided by 3 pins on the 37-way D connector. (If you have just the one Windmill 750, its ID Code will be 0 and you can ignore this section.) The pins in question are numbers 10, 28 and 29. You set an ID code by connecting these pins to 0 V, as follows. ID Code Pin 10 Pin 28 Pin 29 0 no no no 1 yes no no 2 no yes no 3 yes yes no 4 no no yes 5 yes no yes 6 no yes yes 7 yes yes yes See the Pin Connections Table on page 2.7. Make a note of the ID Codes: you’ll need them when using Windmill ConfIML to install the driver software. You may find it helpful to label your Windmill 750 plugs with their codes for quick identification. Note: Set the ID code before connecting the 750s to the PC. 2.2 Using the Windmill 750 Hardware 2.5 Analogue Input Connection Notes The Windmill 750 provides 16 single-ended analogue inputs. It uses a 12-bit fast converter. The software automatically causes 8 conversions to be taken and averaged to reduce noise. 2.5.1 Single-Ended Inputs With single-ended inputs you measure the difference between the input signal and the 750 ground which is connected to mains earth via the computer. Differences in Earth Levels The earth is not a constant 0 V: it is at different levels at different locations. The further apart the locations, the greater the likelihood of earth variation. Make a connection between two earths and the difference in levels can drive large currents, know as earth loops. It’s best practice, therefore, to keep your signal sources as close to the Windmill 750 as possible. Noise Errors Single-ended inputs are sensitive to noise errors. Noise (unwanted signal contamination) is added when signal wires act as aerials, picking up environmental activity. Again, it helps to keep your signal wires short. 2.5.2 Input Voltage Range The 750 operates correctly with input voltages in the range ±10.240 V. 2.5.3 Maximum Input Voltage The input multiplexers are protected against dc voltages of 33 V above the power supply. This means +48 V if the computer is switched on, +33 V if it is switched off. If the over-voltage is transient then protection extends as far as +300 V. When a voltage above the power supply is applied to the unit its protection mechanism comes into action, and this draws some current from the signal source. This effect can be a problem when the computer is switched off as it now draws current 2.3 Windmill 750 Manual from any signal. This current is limited by 4K7 resistors. Extra series resistors can be added to reduce this fault current. 2.5.4 Unconnected Inputs You can leave unused inputs unconnected, but if you attempt to read from these unconnected inputs do not expect to get 0 V. They could be any value. If another connected channel has recently been read, the unconnected input will return a similar value. This is not crosstalk. It occurs because the input capacitance of the amplifier is charged to the voltage of the previous channel and has little incentive to change when connected to an open circuit. 2.5.5 Pin Numbers Make your connections to the 37-way D connector as detailed in the table on page 2.7. 2.4 Using the Windmill 750 Hardware 2.6 Digital Input and Output Connection Notes The Windmill 750 provides digital input to the computer and output control by the computer. Its 16 general purpose input and output lines are arranged in 2 groups or ports. Each port can be either input or output (set using the Windmill SetupIML program). All ports power-up as inputs. The ports are referred to as Port 0 and Port 1. Port 1 also functions as 8 event counters, detailed in the next section. 2.6.1 Input Voltages All inputs are high impedance CMOS type. They are TTL and 5 V CMOS compatible. Input Voltages should be within the range 0 to 5 V. 2.6.2 Contact Closures You can interface to contact closures using a resistor to tie the input to either 5 or 0 V. The contact then switches the line to either 0 or 5 V. 2.6.3 Output Drive The outputs are TTL and 5 V CMOS compatible. They can drive 15 LSTTL loads. 2.6.4 Pin Numbers Make the I/O connections to the digital 37-way connector. See the Pin Connections Table on page 2.7. Digital Input and Output Connection Notes 2.5 Windmill 750 Manual 2.7 Counter Connection Notes The Windmill 750 provides eight 16-bit totalise (event) counters, which can each count up to 65535. These are located on Port 1 of the digital I/O connector. If you are using counters, set Port 1 as an input only, using the Windmill SetupIML software. The 750 monitors the state of the 8 input lines once every millisecond and maintains a count for each of them. It does this whether or not you intend to use the lines as counters. You can still read Port 1 as a normal digital input, even if you are also using it to count. 2.7.1 Input Voltages All inputs are high impedance CMOS type. They are TTL and 5 V CMOS compatible. Input Voltages should be within the range 0 to 5 V. 2.7.2 Count Inputs A valid count is declared if the input is low for 2 milliseconds then high for two milliseconds. This gives a theoretical maximum count speed of 250 Hz. 2.7.3 Pin Numbers Make the counter connections to Port 1 of the Digital Connector. The counter pin numbers are on page 2.7. 2.6 Using the Windmill 750 Hardware Windmill 750 - Pin Connections Analogue Channel 0 37 Analogue Channel 2 36 Analogue Channel 4 35 Analogue Channel 6 34 Analogue Channel 8 33 Analogue Channel 10 32 Analogue Channel 12 31 Analogue Channel 14 30 ID Code 2 29 ID Code 1 28 Port 1 Bit 1 27 Port 1 Bit 3 26 Port 1 Bit 5 25 Port 1 Bit 7 24 Port 0 Bit 1 23 Port 0 Bit 3 22 Port 0 Bit 5 21 Port 0 Bit 7 20 19 0 V Analogue 18 Analogue Channel 1 17 Analogue Channel 3 16 Analogue Channel 5 15 Analogue Channel 7 14 Analogue Channel 9 13 Analogue Channel 11 12 Analogue Channel 13 11 Analogue Channel 15 10 ID Code 0 9 Port 1 Bit 0 8 Port 1 Bit 2 7 Port 1 Bit 4 6 Port 1 Bit 6 5 Port 0 Bit 0 4 Port 0 Bit 2 3 Port 0 Bit 4 2 Port 0 Bit 6 1 0 V Digital Please read the Connection Notes on the previous pages before making your connections. 2.7 Windmill 750 Manual 2.8 Specifications Maximum number of 750s 8 Maximum length of cable 5 m per cable Maximum distance from PC can be increased by use of USB hubs 2.8.1 Analogue Inputs Number of inputs Maximum safe input voltage Computer on Computer off Transient Range Maximum linearity error Input impedance Resolution 16 ±48 V ±33 V ±300 V ±10.240 V 1 LSB 100 MΩ 12 bits 2.8.2 Digital Inputs and Outputs Maximum number of inputs Maximum number of outputs Power-up state Maximum speed Voltage Inputs Compatibility Range Voltage Outputs Compatibility Drive 16 16 all inputs 160 channels per second TTL and 5 V CMOS 0 to 5 V TTL and 5 V CMOS 15 LSTTL loads 2.8.3 Counters Maximum number of counters Resolution Type of counters Maximum count speed Compatibility Input voltage range 2.8 8 16 bits Event (totalise) 160 counts per second TTL and 5 V CMOS 0 to 5 V Installing and Configuring Windmill Software Installing and Configuring Windmill Software 3.1 Introduction This chapter explains how to install and configure the Windmill measurement and control software. There are two steps. 1. Install the software onto the hard disk. 2. Tell the software about the hardware you have. For installation you will need a personal computer with a USB port that is running Windows 98SE, Windows 2000 or later. 3.2 What is Windmill Software? Windmill is a ready-to-run suite of applications for data acquisition and control. You can be up and running in very little time as no programming is required. The standard suite includes data logging, charting and output control applications. You can also transfer data directly into third-party applications like Microsoft Excel or Access. Other Windmill modules are available—see our Internet catalogue for details at www.windmillsoft.com. 3.3 Installing Windmill Software 1. Connect the 750 data acquisition unit to your computer, as detailed in Chapter 2. 2. Install the Windmill software: Insert the CD. The Installation software should run automatically. If not select Run from the Start menu and type d:setup (where d: is your CD drive). 3.1 Windmill 750 Manual 3. At the end of in stal la tion the Con fig u ra tion program—ConfIML—starts. This asks you for details of your data acquisition hardware and the default working directory. See Section 3.4 for details. 3.3.1 Upgrading From Earlier Versions of Windmill You can run Windmill alongside earlier versions of the software. Once you are happy that you no longer need a previous copy of Windmill simply run its “Uninstall” program to delete it. 3.3.2 Running Several Copies of Windmill Unless you have bought a multiple licence, you are only permitted to run one copy of the software at any one time. Please contact your supplier if you require a multiple licence. 3.3.3 Installing Under Windows 7, 8 and Later If you are using Windows 8 or 10, and you encounter problems with your USB devices, see http://www.windmill.co.uk/usb-device-windows8.html For Windows 7 see http://www.windmill.co.uk/install-hardware-windows7.html 3.2Installing and Configuring Windmill Software Installing and Configuring Windmill Software 3.4 Configuring Your System The Windmill Configuration program, ConfIML, records the details of your data acquisition hardware. It will run at the end of the installation process, and you should run it again from Windows whenever your acquisition hardware changes—for example when you install additional units. ConfIML Window The first thing you need to do is press the Add button to include your Windmill 750 unit. Configuring Your System 3.3 Windmill 750 Manual Configuring Your System 3.4.1 Adding New Hardware The Add IML Hardware dialogue lists the acquisition and control devices for which you have installed drivers. Select the Windmill 750 Unit and press the Add button. This will take you to the Hardware Settings dialogue (Section 3.4.2). 3.4.2 Changing Hardware Settings ConfIML needs to know some information about your 750 unit. The Default button will reset all the answers to Windmill’s default settings. The ConfIML Settings Screen Which Type of Card do you have? Choose the 750. ID Code of the 750 Unit? As you can connect several 750s to your PC, you need to tell ConfIML which one you are currently configuring. Do this by selecting the correct ID Code. If you have only one 750 its ID Code is 0. (There should be as many ID codes as there are 750 units connected, and each code should be different. If not, change the codes on individual units as detailed in Chapter 2, Using the 750 Hardware.) 3.4.3 Windmill 750 Devices After making your choices and pressing OK, your 750 is shown as 3 hardware devices: 750 analogue inputs, 750 digital ports and 750 event counters. 3.4Installing and Configuring Windmill Software Installing and Configuring Windmill Software 3.4.4 Setting the Working Directory When you use Windmill you will create two types of files, those which hold data and those which hold the Windmill programs’ settings. You can specify a default folder in which to store these files— known as the Working Directory. Initially the working directory is set to wherever you installed Windmill. To change this, press the Directory button. Choose a new directory (folder) and press Save. Windmill will create two sub-directories under this choice, called setup and data. All the Windmill settings will be stored in “setup” and all the data you collect stored in “data”. 3.4.6 Saving the Settings Save your settings and they will be used every time you run Windmill. You don’t need to run ConfIML again, unless you make changes to your data acquisition hardware (adding extra 750 units for example). After closing ConfIML start the SetupIML program and choose how you wish to use the hardware. Refer to the next chapter or to SetupIML’s Help file for details. 3.4.8 The Software Signal Generator In addition to data acquisition and control hardware, ConfIML lists the Software Signal Generator. This is a special driver which simulates a device with seven channels, each channel producing a different signal. No special hardware is required—the data values are produced by calculation. The Software Signal Generator lets you experiment and practise with Windmill, without being concerned about the hardware To install the signal generator you first need to add it to the list of devices. In the ConfIML Summary window press the Add button (Section 3.4.1). Select Software Signal Generator and again press the Add button. You’re taken to the Hardware Settings dialogue (Section 3.4.2) where you can choose options for five of the channels. Configuring Your System 3.5 Windmill 750 Manual Press the Help button in this dialogue for more information on the signal generator. 3.4.9 The IML Device Icon Whenever you run a Windmill program one or more IML Device icons will appear. Different icons identify different hardware drivers, software signal generators and so on. The Windmill applications can’t run without these, so don’t close them whilst using Windmill. 3.6Installing and Configuring Windmill Software Using Windmill Software with the 750 Using Windmill Software with the 750 4.1 Introduction This chapter explains which settings in the Windmill SetupIML program apply to the 750. Make sure your 750 is plugged into the computer’s USB port before starting the Windmill software. 4.2 Options in SetupIML SetupIML is the Windmill program that lets you save libraries of setup files, each holding details about how you want to use individual channels. A Windmill 750 is shown as 3 devices in SetupIML: Analogue Inputs, Digital Inputs and Event Counters. Choose one from SetupIML’s Device menu. Now double-click a channel to configure it. Full details of using SetupIML are in its Help file. 4.2.1 Analogue Inputs The input channels are numbered 0 to 15. Using SetupIML you can configure each channel as follows: • enable or disable • re-name • give a new units name, scale factor and offset • set alarm levels Introduction 4.1 Windmill 750 Manual 4.2.2 Digital Ports The Windmill 750 unit provides two digital ports, each with 8 lines. You can use each port for input or output. You can explicitly control the choice, or it can be deduced automatically by the software. All ports start as inputs, but if any data is sent to a port by a Windmill program it immediately switches to output mode. Output lines can also be con trolled by the alarm detection features of the input channels. This will cause the whole port to switch to output mode. You can also use port 1 for event counting—in which case you must set it as an input. The channels are numbered as follows: 0100 Line 0 of port 0 0101 Line 1 of port 0 0102 Line 2 of port 0 .. ... 0107 Line 7 of port 0 0108 Direction control signal for port 0 0109 not used 0110 Line 0 of port 1 0111 Line 1 of port 1 ... ... 0117 Line 7 of port 1 0118 Direction control signal for port 1 Renaming Channels and Digital States In SetupIML you can replace the channel numbers with meaningful names. By default, each channel is linked to a single line and the two digital states are called ON and OFF. You can also change these names to more suitable ones, for example FAST and SLOW or OPEN and SHUT. 4.2 Using Windmill Software with the 750 4.2.3 Grouping I/O Lines into Multi-Bit Channels SetupIML lets you group the lines within each port into multi-bit channels, which are displayed or controlled as single values transferred via the first channel in the group. Multi-bit values can be chosen as binary, decimal or hexadecimal, e.g. Binary Decimal Hexadecimal 11 3 3 1010 10 A 10001 17 11 11111111 255 FF Channels 0108, 0118 are the direction control signals for ports 0 and 1. When set to 0, the whole port is used for input; when 1, the port is used for output. These channels can be viewed and also altered, but they are normally disabled and must be explicitly enabled from SetupIML before use. As noted above, direction control can usually be sensed automatically by the software. Options in SetupIML 4.3 Windmill 750 Manual 4.2.4 Event Counters The Windmill 750 unit provides eight 16-bit event counters. The default names are 0200, 0201, 0202, etc. Each counter starts at zero and counts pulses on the corresponding input lines, to a maximum of 65535. They can be reset to zero at any time by sending “0” to the channel using the AnalogOut, Graphics or Test-Seq programs. No other values can be sent to the counters. You can use SetupIML to: • change the names • enable or disable each channel • choose one of two operating modes—accumulating count or resetting count • apply a scale factor or offset to the count Accumulating Count Simply keeps counting until explicitly reset. Resetting Count Starts again from zero after each reading. This shows the number of pulses since the last reading, but it can only be used where a single program is reading the counter. If several different programs were accessing the counter simultaneously, they would all be resetting it at different times, so the results would be unpredictable. Scale Factor and Offset SetupIML lets you apply a scale factor and offset to the count. For example, if the pulses came from a flow meter which produced one pulse for each 50 millilitres, then a scale factor of 0.05 would give a reading in litres. 4.4Using Windmill Software with the 750 Using Windmill Software with the 750 4.3 The Rest of the Windmill Software Suite The Windmill suite of software that comes with the 750, comprises: ConfIML; SetupIML; the display and control panels—AnalogOut, DigitalOut & DDE Panel; Logger and Chart. The display and control panels let you send data to, or display data from, any number of analogue and digital channels. Logger logs data to disk from up to 100 channels whilst Chart displays moving charts of data from up to 8 channels. For more channels, or different logging and charting speeds, simply run more instances of Logger and Chart. Full details of all these programs are given in their on-line Help files. Alternatively you can buy the Windmill Manual from our Internet catalogue at http://www.windmillsoft.com/. Should you need more sophisticated analysis or presentation, you can share data with other Windows applications using dynamic data exchange (DDE). For example, you can process data as it’s collected using Microsoft Excel. See the DDE Panel Help file for more details. We regularly update our Help files, according to questions our customer ask. To download the latest updates visit http://www.windmill.co.uk/help.html There are many other optional programs in the Windmill range. Graphics lets you design and create your own Windmill displays— process mimics, wiring diagrams, bar charts, annunicator panels…whatever you wish. Test-Seq interprets a file of commands, and controls a test-rig accordingly. Replay replays a data file graphically. To be informed when new Windmill products are launched, be given data acquisition hints and tips, and read articles on measurement and control; subscribe to our free newsletter Monitor (ISSN 1472-0221) at http:///www.windmill.co.uk/newsletter.html. The Rest of the Windmill 5 Software Suite 4.5