1
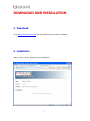
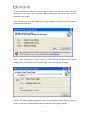
TAIFOOK POWER BULLION USER MANUAL TAIFOOK BULLION LIMITED Table of Content COMPANY PROFILE ............................................................................................... 4 INTRODUCTION .................................................................................................... 5 DOWNLOAD AND INSTALLATION ........................................................................... 6 1. Download .............................................................................................. 6 2. Installation ............................................................................................. 6 LOGIN ................................................................................................................... 8 QUOTATION .......................................................................................................... 9 1. 2. Rate Monitor ......................................................................................... 9 Choose Mode ........................................................................................ 10 2.1. Default (Click & Confirm) ............................................................... 11 2.2. One Click ....................................................................................... 11 2.3. Double Click .................................................................................. 11 ORDER .................................................................................................................12 1. Order Input ........................................................................................... 12 2. Auto Quote ........................................................................................... 13 3. Manual Quote ....................................................................................... 14 4. Amend Order ........................................................................................ 15 5. Delete Order ......................................................................................... 16 6. Conditional Order ................................................................................. 16 7. Enhanced Order .................................................................................... 17 8. Order Book ........................................................................................... 20 9. Order Book History ............................................................................... 21 TRADE .................................................................................................................23 1. Trade Book ............................................................................................ 23 2. Trade Book History ................................................................................ 24 3. Open Position ....................................................................................... 27 3.1. Close a Position with Market Order ............................................... 27 3.2. Close a Position with Stop Order.................................................... 29 3.3. Close a Position with Limit Order ................................................... 30 4. Close Position ....................................................................................... 31 ACCOUNT SUMMARY ...........................................................................................32 1. General ................................................................................................. 33 2. Account Balance.................................................................................... 33 OTHERS................................................................................................................34 1. Customizing User Interface .................................................................... 34 1.1. Change Language .......................................................................... 34 2 2. 3. 1.2. General Change ............................................................................. 34 Tab Group ............................................................................................. 35 F iltering ................................................................................................ 36 3 COMPANY PROFILE Taifook Securities Group Limited (“Taifook” or “the Group”; HKSE Stock Code: 665), as a subsidiary of Hai Tong (HK) Financial Holdings Limited (“Hai Tong (HK)”), receives strong shareholder support. Hai Tong (HK) is a company incorporated in Hong Kong and wholly owned by Haitong Securities Company Limited (“Haitong”). Listed on Shanghai Stock Exchange (SSE Stock Code: 600837.SH), Haitong is one of the leading securities companies in Mainland China, providing comprehensive financial services for over 3 million clients with its branches and sales offices spread across 67 cities. Established in 1973, Taifook has been listed on the Hong Kong Stock Exchange since August 1996. Taifook is well known for providing total quality corporate finance, asset management and brokerage services to global and local institutional and corporate clients as well as individual investors, with the aim of becoming a global player in the financial services industry, and a leader in the Greater China region. Taifook has the largest retail client base and the most extensive distribution network with 12 branches in Hong Kong and Macau. In Mainland China, the Group has 2 representative offices in Beijing and Shanghai and 6 investment consultancy centres in major cities including Beijing, Shanghai, Guangzhou, Shenzhen, Hangzhou and Xiamen. Looking forward, the Group will strive to establish more presence in strategic locations in Mainland China. Over the years, the comprehensive and quality financial services delivered by Taifook have been widely recognized by the industry. As early as 1999, the Group was the first financial institution in Hong Kong and China to acquire ISO 9002 Quality Management System Certification; in 2004, the Group obtained BS 7799 Information Security Management System Certification. The accreditations were upgraded to ISO 9001:2008 Certification in 2009 and ISO 27001:2005 Certification in mid-2006 respectively. Furthermore, since 2000 Taifook has been named the “Best Equity House in Hong Kong” by numerous international, mainland and local institutions, including FinanceAsia, Asiamoney, Euromoney, Capital Magazine, Sing Tao Daily and QQ.COM. In addition, Taifook has been awarded “Hong Kong Top Brand Mark Scheme Registered Service Provider” by the Hong Kong Brand Development Council and the Chinese Manufacturers’ Association of Hong Kong. 4 INTRODUCTION Thank you for using Power Bullion Platform. Please spare a few moments to read through this help manual to better familiarize with our Power Bullion Platform. Provided by Taifook Bullion Limited, our bullion trading service includes Loco-London Gold and Loco-London Silver. Moreover, investors can profit from price volatility and interest differentials through trading, arbitraging and hedging with the use of our bullion price quotation. On the Power Bullion Platform, The size of transaction for gold is at the multiple of 100 ounces and the size of transaction for silver is at the multiple of 5,000 ounces. Our professional consultants operate 24 hours a day to serve enquiry purposes in terms of bullion market enquiries and real-time price quotation. Our knowledge and expertise enable sophisticated analysis on latest market movements and assist to take position once market opportunity appears. Should you have any questions about the platform, please feel free to contact us. 5 DOWNLOAD AND INSTALLATION 1. Download Go to http://www.taifook.com and download the Power Bullion software. 2. Installation Step 1: Press <Install> button to start installation. 6 *If you received the following screen shot, it means you need to install the .NET Framework 2.0 SP2 on your machine. (Please download and install from the link provided in the page). Step 2: You may receive the following warning dialogue. Just click <Install> button to continue the installation. Step 3: After clicking the <Install> button, a downloading dialogue will be shown automatically. Installation will be started right after finishing downloading. Step 4: The Power Bullion application will start immediately and a login dialogue is shown. A shortcut of Power Bullion will be created in the Program Menu. 7 LOGIN Read the Risk Disclosure Statement. Enter the User Name and Password. Click <OK> to login. 8 QUOTATION 1. Rate Monitor Rate Monitor is used for price quotation. Toolbar Rate Rate Monitor Open Rate Monitor, instrument LLG and LLS can be chosen. Price of each instrument will be shown. 9 2. Choose Mode Choose Mode can facilitate your order placing action. Toolbar Rate Choose Mode Three order placing modes can be selected including, Default (Click and Confirm), One Click, and Double Click. 10 2.1. Default (Click & Confirm) Click <Buy> or <Sell> in Rate Monitor to enter the order ticket. After entering the relevant details, order will be sent after clicking <Confirm>. 2.2. One Click Single-click on <Buy> / <Sell> in Rate Monitor will place an order with pre-filled amount. 2.3. Double Click Double-click on <Buy> / <Sell> in Rate Monitor will place an order with pre-filled amount. 11 ORDER 1. Order Input Order Input can be used to create a new order. 12 2. Auto Quote Toolbar Rate Rate Monitor Enter instrument and number of lots to be bought (sold) on the order ticket and Click <Buy>(<Sell>) to place a new buy (sell) order. In the order ticket, choose <Order type> / <Price> / <Expiry Mode> and <Related Order> (if applicable). Press <Confirm> to send the order. 13 3. Manual Quote Manual Quote is required when order quantity is larger than the auto quote limit. Toolbar Order Order Input In the order ticket, choose <Market Order> under “Order Type”. If the order quantity is larger than the system parameter, a button <Quote> will be shown. Press <Quote> to ask for price from dealer. Press <Confirm> to send the order after dealer sending back a price. 14 4. Amend Order Toolbar Order Order Book Press next to a particular order in Order Book to start order amendment. After finishing, press <Confirm> to amend the order. 15 5. Delete Order Toolbar Order Order Book Press next to a particular order in Order Book to start order deletion. After checking the details, press <Delete> to delete the order. 6. Conditional Order Toolbar Order Order Input Choose <Limit>/<Stop> under “Order Type”. Enter <Instrument>, <Buy/Sell>, <Quantity>, <Price>, and <Expiry Mode>. Press <Confirm> to send the order. 16 7. Enhanced Order Toolbar Order Order Input Choose <Limit> / <Stop> under “Order Type”. You can choose <If-then>/ <OCO> under “Enhanced Order”. 17 If-then order is a conditional order, which means the latter order would be executed only if the previous one is executed. 18 OCO order means “One Cancel the Other” which means there are 2 orders placed, and either one order would be cancelled if one of them is executed. Choose in the “Enhanced Order”, enter the relevant details such as price and lot. Press <Confirm> to send the order. 19 8. Order Book Order Book is used for viewing current order records. Viewing / Amending / Cancelling orders is also made in the Order Book. Order Amendment and Order Deletion are introduced in <<Order – 4. Amend Order>> and <<Order – 5. Delete Order>> respectively. Toolbar Order Order Book Click on the <Order No.> of a particular order, corresponding order details will be shown. 20 9. Order Book History Order Book History is used for viewing historical order records. Toolbar Order Order Book History Enter searching criteria, Press <Search>. 21 Results will be shown. Click on the <Order No.> of a particular order, corresponding order detail will be shown. 22 TRADE 1. Trade Book Trade Book is used for viewing current trade records. Toolbar Trade Trade Book To review transaction information on the table, Click on the <Trade No.> of a particular trade, corresponding trade details will be shown. 23 The information shown includes <Trade Date> <Execution Date & Time> <Account ID> <Instrument> <Buy/Sell> < Lot> & <Price> etc. 2. Trade Book History Trade Book History is used for viewing historical trade records. Toolbar Trade Trade History 24 Enter searching criteria, Press <Search>. 25 Results will be shown. Click on the <Trade No.> of a particular trade, corresponding order details will be shown. The information shown includes <Trade Date> <Execution Date & Time> <Account ID> <Instrument> <Buy/Sell> < Lot> & <Price> etc. 26 3. Open Position Open Position is used for viewing position details and for closing positions by placing limit / stop / market order. Toolbar Trade Open Position 3.1. Close a Position with Market Order Press the cell of a particular position under the column “Close”. 27 Check the details <Trade No>, <Lot> and <Price>.Press <Confirm> to close the position. You can choose multiple positions for batch closeout or change the amount of closeout lots. 28 3.2. Close a Position with Stop Order Press the cell of a particular position under the column “Stop”. Check the details and press <Confirm> to place a stop order for closing position. 29 3.3. Close a Position with Limit Order Press the cell of a particular position under the column “Limit”. Check the details and press <Confirm> to place a limit order for closing the position. 30 4. Close Position Close Position is used for viewing closeout details. Toolbar Trade Close Position Click on the Expansion Button will be shown. of a particular order, corresponding closeout detail 31 ACCOUNT SUMMARY Account Summary is used for viewing client profile and account balance. Toolbar Trade Account Summary 32 1. General Personal Information can be viewed in General 2. Account Balance Account Balance can be viewed in Available Balance. 33 OTHERS 1. Customizing User Interface 1.1. Change Language Toolbar Tool Option Press <Language>, choose <English>, <Traditional Chinese> or <Simplified Chinese>. Press <OK> after selection. 1.2. General Change Toolbar Tool Option Press <General> and select the <Font Size>, to change the font size <Color Scheme> 34 to change the theme color, and <Page Size> to change to number of entry shown per page. Press <OK> after selection. 2. Tab Group Move mouse to the tabs in tab group, and right-click to choose Horizontal/Vertical Tab Group arrangement. 35 For example, press <New Vertical Tab Group> and the chosen tab will be moved to the right-hand side of the original tab group. Another way is simply drag the tab and move it to create a new tab group. 3. F iltering You can filter the content by pressing at the top of the table. Parameter will be shown for quick filtering. Besides, you can set specific criterion for filtering. For example, you may choose <Less than> in under Lot, and enter a rate, say 2, orders with lot size less than 2 will be sorted out. To clear the filtering criteria, press on the top right corner of the table. 36 37 End 38