1
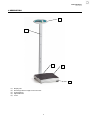
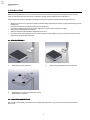
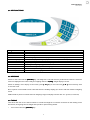
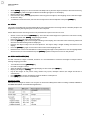
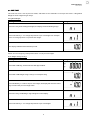
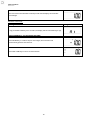
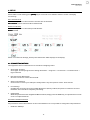
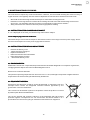
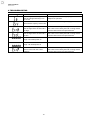
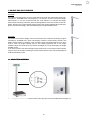
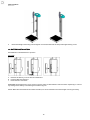
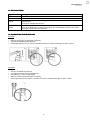
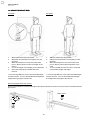
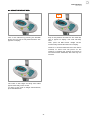
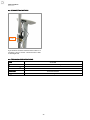
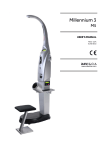
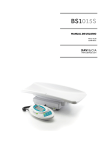
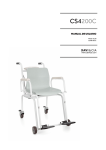
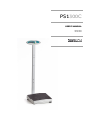
PS1300C
USER’S MANUAL
MA17-02/C
09/11/2011
www.davicia.com
USER’S MANUAL
MA17-02/C
INDEX
Page
3
1. DESCRIPTION
2. INSTALLATION
2.1. Scale assembly
2.2. Location and setting
2.3. Startup
4
4
4
5
3. OPERATION
3.1. LCD symbol description
3.2. Key functions
3.3. Weighing
3.4. Taring
3.5. Hold
3.6. Body Mass Index (BMI)
3.7. Pre-Tare
6
6
7
7
7
8
8
9
4. SETUP
4.1. Connecting with PC
4.2. Print function
11
11
12
5. MAINTENANCE AND CLEANING
5.1. Instructions for charge and connect
5.2. Instructions for replacing batteries
5.3. Environmental
5.4. Equipment disposal
13
13
13
13
13
6. TROUBLESHOOTING
14
7. HEIGHT ROD ACCESSORIES
7.1. Height rod assembly
7.2. Battery installation
7.3. Key functions
7.4. Calibrating the height rod
7.5. Using the height rod
7.6. Technical Specifications
15
15
16
17
17
18
19
8. AUTOMATIC HEIGHT ROD ACCESSORIES
8.1. Height rod assembly
8.2. Using the height rod
8.3. Connecting with PC
8.4. Technical Specifications
20
20
21
22
22
9. TECHNICAL SPECIFICATIONS
23
10. WARRANTY CERTIFICATE
24
11. CE DECLARATION OF CONFORMITY
25
2
USER’S MANUAL
MA17-02/C
1. DESCRIPTION
1
2
5
3
4
(1)
(2)
(3)
(4)
(5)
Display unit
Mounting holes for height rod accessories
Scale platform
Adjustable feet
Level
3
USER’S MANUAL
MA17-02/C
2. INSTALLATION
Before putting the device into use, please read with care the information given in the Operating Instructions.
They contain important instructions for installation, proper use and maintenance of the device.
The manufacturer shall not be liable for damages arising out of failure to heed the following instructions:
o
o
o
o
o
o
When using electrical components under increased safety requirements, always comply with the appropriate
regulations.
Improper installation will render the warranty null and void.
Ensure the voltage marked on the power supply unit, matches your main power supply.
This device is designed for use indoors.
Observe the permissible ambient temperatures for use.
The device meets the requirements for electromagnetic compatibility. Do not exceed the maximum values
specified in the applicable standards.
2.1.
2.1. SCALE ASSEMBLY
1.
Assembling column with base
3.
Tightening four screws at the bottom of base.
Assembling is complete.
2.
Connecting wire between column and base
2.2.
2.2. LOCATION AND SETTING
We strongly recommend you use this device on flat and hard surface. Any soft surface, like carpet will cause
inaccuracy.
4
USER’S MANUAL
MA17-02/C
2.3.
2.3. STARTUP
o
o
o
Connect the equipment to the power supply using the AC adaptor.
Press the ON/OFF button in the indicator.
Wait until “0” appears on display.
5
USER’S MANUAL
MA17-02/C
3. OPERATION
Before reading detailed instructions on how to use all the weighing functions that are built into your scale, please
read the following important guidelines:
o
o
Always be sure that the display shows `Zero` before use, if it does not then please press the ZERO key.
The equipment is designed to detect when a stable weight is achieved, your reading should be taken at this
point.
3.1.
3.1. LCD SYMBOL DESCRIPTION
PRE-TARE Indication
HOLD Indication
NET WEIGHT Indication
3
WEIGHT Indication
Stable symbol
kg
Minor weight
Zero symbol
Low Battery
Display
Display
[→ 0 ←]
LOW
BMI
HOLD
PRE-TARE
NET
WEIGHT
Description
Zero symbol: If the scale does not show exactly zero value although the scale pan is
unloaded, press the [→0
0←]] key. After a short waiting time, the scale will be zeroed again.
Stable symbol: If the display shows the stabilization display [ο], the scale is in the stable
condition. When the scale is in the unstable condition, the stabilization display [ο]
disappears.
Minor weight: Weight under zero.
Low Battery: Battery need to change or replace.
Calculated value of the body mass index (BMI).
Hold function / saving function is active.
Initially set tare value is active.
The net weight is displayed.
The present weight value is displayed.
6
USER’S MANUAL
MA17-02/C
3.2.
3.2. KEY FUNCTIONS
Designation
ON/OFF-switch
PRINT button
BMI button
HOLD button
ZERO setting key
M1-5 button
PRE-TARE button
TARE button
CLEAR button
ENTER-key
Numeric keys
Function
Turn ON/OFF the scale
Data transmission via interface(Print-out the results)
Determine Body Mass Index
To hold weighing result on the display / determine stable weighing value
To reset the display to 0.0kg display / Zero the scale (±2% of full capacity)
To store 5 pre-tare values
Setup target weight for tare before weighing
Tare weight during weighing process
To clear the wrong entry while entering digits
To confirm the performing functions
Numerical value Entering digits
3.3.
3.3. WEIGHING
Switch on the scale with the [ON/OFF] key. The diagnostic scale self-check is performed and then the software
version is displayed. The scale is ready for weighing when the “0,00
0,00 kg”
kg weight display is shown.
NOTE: If “0,00 kg” won’t display on the screen, press [→0←] key to zero the scale, [→0←] can be used any time
to zero the scale.
Place a person in the middle of the scale. Wait until the stability display (ο) is shown and then read the weighing
result.
DIRECTION: If a person is heavier than the weighing range, the display will show the “Err” symbol (= overload).
3.4.
3.4. TARING
Tare allows the user to zero the instrument to cancel the weight of a container/ clothes from the reading of the
instrument, thus giving the true weight of the product/ person being tested.
o
Turn on the scale using [ON/OFF] key.
7
USER’S MANUAL
MA17-02/C
o
o
o
o
o
When“0,00
0,00 kg”
kg displays on the screen and scale beeps twice, place the object (clothes) to be tared on the tray.
Press [TARE] key after the weight stabilizes and stable sign appears on the display.
Display will return to “0,00
0,00 kg”
kg
Place the item/ baby to be weighed (without removing the tare object). The weighing result is the Net weight
of the item / baby.
To delete the saved tare value, remove the tare object from the tread platform and press [TARE] key.
3.5.
3.5. HOLD
The scale is provided with the integrated hold function (determination of average value). It enables people to be
weighed accurately although they are not still on the scale plate.
NOTE: Determination of average value is not possible when a person moves too much.
o
o
o
o
o
o
Switch on the scale with the [ON/OFF] key. The scale self-check diagnostic is performed. The scale is ready
for weighing when the “0,00
0,00 kg”
kg weight display is shown.
Place a person in the centre of the scale plate.
Press the [HOLD] key. When the triangle is flashing on the display, the scale takes some measuring values and
then the calculated average value is displayed.
Remove the object/ baby from the scale platform. The object/ baby’s weight reading will remain on the
display.
Press the [HOLD] key again to return the scale to the normal weighing mode.
HOLD function can be activated before or after putting the weight on the platform. In case of weighing babies
that move a lot, it is recommended to press [HOLD] key before the person moves on the platform.
3.6.
3.6. BODY MASS INDEX (BMI)
For BMI calculation, height is needed, therefore it is recommended to measure the height of subject before
starting weighing procedure.
o
o
o
o
o
o
o
Turn ON the scale using [ON/OFF] key.
Proceed to weigh as normal.
After the weight is stable and stable sign displays on the screen press [BMI] key.
Display will change to “0,00
0,00 kg”.
kg
Key-in the height of the person using numeric keys (0~9). Example: 186cm (the height should be in
centimeters).
Press [ENTER] to confirm, the Display will show the B.M.I. of the person.
Press [BMI] again to return to normal mode.
Categories of BMI
Classification of weight for adults over 18 years on the basis of Body Mass Index according to WHO, 2000 EK IV
and WHO 2004 (WHO - World Health Organization).
8
USER’S MANUAL
MA17-02/C
3.7.
3.7. PREPRE-TARE
The scale can store 5 sets of pre-tare values, and there are two methods to store pre-tare value – Using Dead
Weight or Enter weight using 0~9 keys:
Using Dead Weight
Description
Example
Press M1-5 key after loading the weight; the display will show blinking m sign.
Press numeral key 1 ~ 5 to assign the position to pre-tare weight. For example:
Press 1 to assign position-1 to preset tare weight.
The display will blink and makea beep sound.
NOTE: You can assign any other position (from 1~5) to pre-tare weight.
Enter Weight Using 0-9 Keys
Description
Example
Press PRE-TARE key, and the extreme left digit will blink.
Enter PRE-TARE weight using 0~9 keys. For example: 10kg
Press ENTER key to confirm the pre-tare weight; the display will show the minus
sign on left of the pre-tare weight value.
Press M1-5 key; the blinking m sign will appear on the display.
Press numeral key 1 ~ 5 to assign the position to pre-tare weight.
9
USER’S MANUAL
MA17-02/C
The instrument will make flash and beep sound and will display the saved PreTare Weight.
Recall Pre-Tare Value:
Description
Example
Example
Long press PRE-TARE key for 3 seconds; the display will show the blinking m sign.
Press numeral key 1 ~ 5 to choose prepre-tare value
Press ENTER key to confirm the pre-tare weight; the instrument will
automatically perform tare function.
Press PRE-TARE key to return to Normal Mode.
10
USER’S MANUAL
MA17-02/C
4. SETUP
Switch ON the scale and long press [ZERO] key for 3 seconds. First “SETUP” and then “A.OFF” will display
successively.
Auto-off time setup
This enables operator to select the auto turn OFF time of the device.
Auto off time: 120 sec/180 sec/240 sec/300 sec/Off
Buzzer on/off setup
This enables operator to select beep sound ON/OFF.
Buzzer: On/Off
NOTE: To confirm the settings, please press HOLD when “END” displays on the display.
4.1.
4.1. CONNECTING
CONNECTING WITH PC
The equipment can be connected to PC to transfer the weighing results.
1.
Start Hyper Terminal
Start Hyper Terminal program from clicking: Start Menu → Programs → Accessories → Communication →
Hyper Terminal.
2.
New Connection Description
Give new connection a name then click OK.
3.
Select Your COM Port
Click Connect to select your COM port. Usually there’s only one option for select. Then click OK.
4.
Port Settings
Click Bits per second to set up rate at 9600, Data bits at 8, Parity at None, Stop bits at 1 and Flow control at
Hardware. Then click OK to complete your setting.
5.
Output Data
When the patient has been weighed and BMI calculated, simply press the PRINT key to output data from scale
to PC or an Optional Printer.
Parameters of RS232 interface
Set parameters of the scale interface on the connected device. It is not possible to change the scale parameters.
o
Baud rate: 9600 bps
11
USER’S MANUAL
MA17-02/C
o
o
o
o
o
Parity check: None
Data length: 8 bits
Stop bit: 1 bit
Handshake: RTS/CTS
Data code: ASCII.
4.2.
4.2. PRINT FUNCTION
The Weighing, BMI and Height results can be printed-out for records using RS232 interface cable (included in
accessory kit), which is connected with the round plug at the back terminal.
After weighing and calculating BMI simply press PRINT key to print out the results.
The format presented below is the standard format of results print-out and cannot be changed.
12
USER’S MANUAL
MA17-02/C
5. MAINTENANCE AND CLEANING
The scale does not require any routine maintenance. However, we recommend checking the scale’s accuracy at
regular intervals. The regularity of these checks is dependent on the level of use and the state of the scale.
o
o
o
We would recommend using alcohol based wipes or similar when cleaning the scale.
Please do not use large amounts of water when cleaning the scale as this will cause damage to the scale’s
electronics, you should also refrain from using corrosive liquids or high pressure washers.
Always disconnect the scale from the main power supply before cleaning.
5.1.
5.1. INSTRUCTIONS FOR CHARGE AND CONNECT
If “Lo” is displayed on the LCD, you should charge scale with AC adaptor.
Locate adaptor plug at the rear of indicator.
CAUTION: Always connect the AC adaptor to the indicator before connecting to the main power supply. Please
disconnect the adaptor from main power supply before indicator.
5.2.
5.2. INSTRUCTIONS FOR REPLACING BATTERIES
o
o
o
o
o
1.
Remove the battery cover
Take the battery housing out
Replace new batteries
Make sure batteries are well installed
Reinstall the battery housing
Reinstall the battery cover
5.3.
5.3. ENVIRONMENTAL
All batteries contain toxic compounds; disposal of batteries should be delegated to a competent organization,
complying with the deposit of Poisonous Waste Regulation 1972.
Please do not incinerate batteries.
The optimum operating temperature for the scale is 5ºC to +35ºC; although it will operate at higher and lower
temperatures the scale’s battery life will adversely be affected.
5.4
5.4. EQUIPMENT DISPOSAL
All electrical and electronic products should be disposed of separately from the
municipal waste stream via designated collection facilities appointed by the
government or the local authorities.
This crossed-out wheeled bin symbol on the product means the product is covered
by the European Directive 2002/96/EC.
The correct disposal and separate collection of the equipment will help prevent
potential negative consequences for the environment and human health. It is a
precondition for reuse and recycling of used electrical and electronic equipment.
13
USER’S MANUAL
MA17-02/C
6. TROUBLESHOOTING
Error Message
Reason
Low Battery: This warning shows
that the voltage of battery is too
low to use
Overload: The total load exceeds
the maximum capacity of the scale
Action
Please replace a new battery or plug the AC
adaptor for operation
Counting error (too high): Indicates
that the signal from the load cell is
too high
Counting error (too low): Indicates
that the signal from the load cell is
too low
Zero count over calibration zero
range +10% while power on
This error is normally caused by a serious fault on
the scales such as faulty load cell or wiring. Please
contact the local service representative.
This error is normally caused by a serious fault on
the scales such as faulty load cell or wiring. Please
contact the local service representative.
Please recalibrate the instrument
Zero count under calibration zero
range -10% while power on
Please recalibrate the instrument
EEPROM Error: Indicates that
there is a fault with the scale’s
software
This error is normally caused by a serious fault on
the scales such as faulty load cell or wiring. Please
contact the local service representative.
14
Please reduce the loading and try again
USER’S MANUAL
MA17-02/C
7. HEIGHT ROD ACCESSORIES
AC1200D
AC1200D is a digital height rod to be mounted on the scale with measuring range from
120~200cm. AC1200D have LCD display for convenient, accurate and quick height
measurement. It can be connected with the scale indicator to transfer the height
measurements directly, therefore while calculating BMI the users don’t need to enter the
height. Simply step on the weighing platform and as the weight stabilizes adjust the head
piece to measure the height, the scale will display the height and BMI results.
AC1200M
AC1200M is a mechanical height rod to be mounted on the scale with measuring range of
120~200cm, AC1200M don’t have LCD display, instead it automatically transfers the
height measurement to weighing scale, therefore while calculating BMI the user don’t
need to enter the height. Simply step on the weighing platform and as the weight
stabilizes adjust the head piece to measure the height, the scale will display the height
and BMI results.
It can also be used as mechanical height measurement rod. For mechanical measurement
range starts from 60~200cm making it an ideal measurement rod for measuring height of
children and adults as well.
7.1.
7.1. HEIGHT ROD ASSEMBLY
1.
Fixing the bracket on the column of the scale using the screws provided with the height rod.
15
USER’S MANUAL
MA17-02/C
2.
Extend the height measuring rod and tighten it in the bracket with the help of the appertaining screw.
7.2.
7.2. BATTERY INSTALLATION
AC1200M don’t need batteries to operate
AC1200D
a.
b.
c.
Remove the battery cover at the rear of indicator.
Install 2-AAA size batteries.
Put the batter cover back.
WARNING: If the height rod is not in use for long time, take out the batteries and store them separately, in case of
any leakage from battery would damage the measuring rod.
NOTE: When the new batteries have been installed, it is recommended to reset the height rod using reset key.
16
USER’S MANUAL
MA17-02/C
7.3. KEY FUNCTIONS
Keys
ON/OFF
UNIT
HOLD
RESET
Description
Press to switch on and off.
To select the measurement unit between cm and inch.
To enable value store function during measuring. Current height value of user will be stored
and displayed.
Press again to disable the function.
RESET key is for user to calibrate false reading. Slide right feet piece to the left at length of
35cm. Press RESET key to calibrate the height rod. LCD will display 35.0cm which means
the height rod has been well calibrated.
7.4.
7.4. CALIBRATING THE HEIGHT ROD
AC1200D
o
o
o
Slide the measuring rod downward completely
Turn ON AC1200D using ON/OFF key
If the height display is not on ‘120cm’, press Reset button to calibrate the height. It will be ‘120cm’
AC1200M
o
o
o
o
o
Connect AC1200M with indicator
Turn ON the scale by pressing ON/OFF key
Press BMI key to check current height
Slide the measuring rod downward completely
If the height display is not ‘120cm’, press Reset button to calibrate the height. It will be ‘120cm’
17
USER’S MANUAL
MA17-02/C
7.5.
7.5. USING THE HEIGHT ROD
AC1200D
AC1200M
1.
2.
1.
2.
3.
4.
5.
Slide up the measuring rod upward.
Slide down the head piece until slightly touches
the head.
When the head piece touches the head of the
person, display will show the exact height of the
person.
To lock the height on the display, press HOLD key.
Press HOLD key again to disable the Hold
function.
***Connecting USB wire to the scale will enable height
transfer function. You can calculate BMI with height and
weight taken by height rod and scale.
3.
4.
Slide the measuring rod upward.
Slide down the head piece until slightly touches
the head.
When the head piece touches the head of the
person, display will transfer height data to the
scale.
You can use BMI functions of scale to recall and
calculate BMI, weight and height.
***Connecting USB wire to the scale will enable height
transfer function. You can calculate BMI with height
and weight taken by height rod and scale.
Measuring height lower than 120 cm
Please use AC1200M as a mechanical height rod and press buckle as shown in the picture below and slide the head
piece down.
Under 120cm
18
USER’S MANUAL
MA17-02/C
7.7.
7.7. TECHNICAL SPECIFICATIONS
SPECIFICATIONS
Model
AC1200D
Type
Keys
Measurement range
AC1200M
Scale mounted digital height rod
Hold, Reset, Unit
Reset Button
120~200cm (Digital measuring range)
120~200cm
60~200cm (Mechanical measuring range)
Graduations
1mm
Dimensions
40x30x1780mm
Weight
Weight
Power Supply
0.85kg
2 * AAA-size batteries
Temperature range
+10ºC up to +40ºC
19
USER’S MANUAL
MA17-02/C
8. AUTOMATIC HEIGHT ROD ACCESSORIES
AC3200D
AC3200D is an automatic height rod to be mounted on the scale with measuring
range from 0~200cm. AC3200D is connected with the scale indicator to transfer the
height measurements directly, therefore while calculating BMI the users don’t need to
enter the height. Simply step on the weighing platform and as the weight stabilizes
press a button to measure the height, the scale will display the height and BMI results.
8.1.
8.1. HEIGHT ROD ASSEMBLY
1.
AC3200D is delivered with the top part
loose and folded. Do not pull from this part
as cables could get damaged.
2.
Fix the top part of the height rod using the
longest screw.
PS
COM
COM
PS
3.
Fix the height rod to the scale by screwing
the bracket to the column.
4.
20
Connect the power supply cable (PS) to the
height rod and the indicator, then to the
socket.
Plug the communications cable (COM) both
to the height rod and to the indicator.
USER’S MANUAL
MA17-02/C
8.2.
8.2. USING THE HEIGHT ROD
O
Step on the platform and wait for the stable (O)
sign to appear on display. The scale will beep
once.
Then, press the BMI button. Height will be
automatically measured and shown on display.
Turn on the indicator by pressing the ON/OFF
button. Do not step on the platform before “0.0”
appears on display.
NOTE: It is recommended that this action will be
assisted, to ensure that the person on the
platform is standing fully straight at the time of
the measurement. Otherwise, the result may not
be exact.
The result of the height and body mass index
appear alternately on the screen.
To return to the scale to weight measurement,
press the BMI button.
21
USER’S MANUAL
MA17-02/C
8.3.
8.3. CONNECTING WITH PC
COM
If you’d like to send the measurement results to a
computer, plug in the PC communications cable
to the height rod.
8.4.
8.4. TECHNICAL SPECIFICATIONS
Model
AC3200D
Type
Scale mounted automatic height rod
Measurement range
0~200cm
Graduations
1mm
Dimensions
122x530x1630mm
Weight
1.4 kg
22
USER’S MANUAL
MA17-02/C
9. TECHNICAL SPECIFICATIONS
Model:
Capacity:
LCD Display:
Max. external dimensions:
Power supply:
Key Functions:
Operation temperature:
PS1300C
300 kg x 100 g
1.0 inch LCD display with 5 and 1/2 digits
360 x 520 x 1020 mm
AC adapter 15V 300mA / Rechargeable Battery
ON/OFF,ZERO, PRINT, BMI, HOLD, PRE-TARE,TARE, CLEAR, ENTER, 0~9, M1-5
5ºC / 35ºC
23
USER’S MANUAL
MA17-02/C
10. WARRANTY CERTIFICATE
We provide a 1-year guarantee from the date of purchase. The guarantee covers manufacturing defects or
defects occurring as a result of normal use and operation.
It excludes all removable parts such as batteries, wires, power supply devices, etc. Faults falling within the
guarantee period shall be rectified free of charge upon presentation of the purchase receipt for the appliance. No
other rights can be taken into consideration.
Return shipment is at the customer's expense if the appliance is anywhere other than at the customer's
headquarters.
In the event of damage during shipment, guarantee rights will be granted only if the appliance is shipped in the
original packaging. You are therefore recommended to keep the original packaging.
Following expiry of the guarantee period, all services requested will be dealt with by our specialist technicians at
the user's expense.
24
USER’S MANUAL
MA17-02/C
11. CE DECLARATION OF CONFORMITY
CE DECLARATION OF CONFORMITY
FABRICANTE PRODUCTO:
PRODUCT MANUFACTURER:
DAVI & CIA S.L.
DIRECCIÓN:
ADDRESS
C/ Murcia, 35, Nave G
Polígono Industrial Can Calderón
E08830 Sant Boi de Llobregat
BARCELONA - ESPAÑA
DECLARAN BAJO SU RESPONSABILIDAD QUE EL PRODUCTO:
DECLARE UNDER THEIR RESPONSIBILITY THAT THE PRODUCT
Marca
Brand
DAVI & CIA
Nombre
Name
PS1300C
Tipo
Type
EQUIPO ELECTRONICO
Electronic equipment
Finalidad Prevista
Intended Use
Equipo pesapersonas.
Weighing equipment.
CUMPLE LOS REQUISITOS DE LAS DIRECTIVAS:
CONFORMS WITH THE REQUISITES OF THE DIRECTIVES
EC Directive 2004/108/EC
Directiva de Compatibilidad Electromagnética (Electromagnetic
Compatibility Directive)
EC Directive 2006/95/EC
Directiva de Baja tensión (Low Voltaje Directive).
EC Directive 93/42/EEC
Aplicable únicamente a las básculas con aprobación médica
(Applies only to scales with medical approval).
AC1200D y AC1200M cumplen con la Directiva 93/42/EEC:
Clase I (AC1200D and AC1200M are in accordance with
Directive 93/42/EEC: Class I)
FECHA: 12 de Diciembre de 2010
Nombre:
Name
Firmado:
th
DATE: 12 December 2010
J.Masana
Signed
Cargo:
Function
Gerente
DAVI & CIA
25
USER’S MANUAL
MA17-02/C
This manual and other support documents are available on the web
www.davicia.com
C/ Murcia, 35 Nave G Pol.industrial Can Calderón.
E 08830 Sant Boi de Llobregat. Barcelona. Spain
Tel. +34 93 654 32 32
Fax. +34 93 654 16 62
26
[email protected]
www.davicia.com