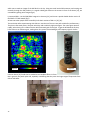
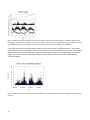
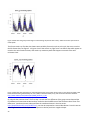
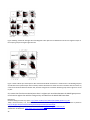
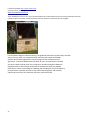
1
RADIO
ASTRONOMY
Journal of the Society of Amateur Radio Astronomers
September- October 2014
1 Ken Redcap SARA President Kathryn Hagen Editor Whitham D. Reeve Contributing Editor Christian Monstein Contributing Editor Stan Nelson Contributing Editor Lee Scheppmann Technical Editor Radio Astronomy is published bimonthly as the official journal of the Society of Amateur Radio Astronomers. Duplication of uncopyrighted material for educational purposes is permitted but credit shall be given to SARA and to the specific author. Copyrighted materials may not be copied without written permission from the copyright owner. Radio Astronomy is available for download only by SARA members from the SARA web site and may not be posted anywhere else. It is the mission of the Society of Amateur Radio Astronomers (SARA) to: Facilitate the flow of information pertinent to the field of Radio As‐
tronomy among our members; Promote members to mentor newcomers to our hobby and share the excitement of radio astronomy with other interested persons and organizations; Promote individual and multi station observing programs; Encourage programs that enhance the technical abilities of our members to monitor cosmic radio signals, as well as to share and analyze such signals; Encourage educational programs within SARA and educational outreach initiatives. Founded in 1981, the Society of Amateur Radio Astronomers, Inc. is a membership supported, non‐profit [501(c) (3)], educational and scientific corporation. Copyright © 2014 by the Society of Amateur Radio Astronomers, Inc. All rights reserved. On the Cover- Outgoing President and Vice
President Bill Lord (l) and Tom Crowley (r)
with Keynote Speaker Nobel Laureate Dr. Joe
Taylor at 2014 Green Bank Conference 2 Radio Waves
President’s Page 3 Editor’s Notes 4 News Mark Your Calendar 5 2015 SARA Western Regional Conference 7 RASDR2 Update 8 Feature Articles SIDI, the Simple Digital Interferometer‐ Marko Cebokli 9 How to Verify the SNR of a Receiver Based on the AD8307 Logarithmic Detector….‐Christian Monstein 19 Using AAVSO VLF SID Events data, the Climax Neutron Monitor records, and AAVSO sunspot group counts to look into the anti‐correlation of the sunspot cycles and cosmic ray flux‐ Rodney Howe 22 Cheap and Simple Demonstration Radio Interferometer‐ Kenneth Kornstett 28 Phase Stability, Loss Stability, and Shielding Effectiveness‐Paul Pino 37 LWA TV on the Raspberry Pi‐Whitham D. Reeve 42 Cohoe Radio Observatory, Alaska ~ Part 5, Observatory Infrastructure and Building‐Whitham D. Reeve 56 Book Review—Title: Unseen Cosmos: the universe in radio 64 Space Place partner’s article: Twinkle, twinkle, variable star 66 Membership New Members 68 SARA Membership Dues and Promotions 68 Administrative
Officers, directors, and additional SARA contacts 71 Resources Great Projects to Get Started in Radio Astronomy 72 Education Links 74 Online Resources 76 For Sale, Trade, and Wanted Sara Polo Shirts 77 For sale 77 Radio Waves President’s Page Thank you to all SARA members who attend the conferences, contribute to the Journal and support this organization. Our recent Green Bank conference was educational and enjoyable, many thanks to planners who booked two (!) Nobel laureates and members who presented papers. We hope you’ll make plans to attend these upcoming conferences: • The 2015 Western Conference will be held at Stanford University in Palo Alto, California March 20 through the 22. SARA is soliciting papers for presentation at the conference. More information is in this Journal as well as on‐line at http://www.radio‐astronomy.org/meetings. • The Eastern Conference is set for June 21 to June 24, 2015 at the National Radio Astronomy Observatory in Green Bank, West Virginia. Dr. Duncan Lorimer, Ph.D. will be our keynote speaker. He’s an astronomer at West Virginia University (astro.wvu.edu/people/dunc). More details will be made available on line at http://www.radio‐astronomy.org/meetings and in upcoming Journals. It may seem a long way off, but we need to be thinking about officers (Secretary and Treasurer) and directors (2 Directors and 2 Director‐At‐Large) nominations. If you are interested in serving as secretary, treasurer, or director please let me know. Also, take a minute to look at the responsibilities and duties of these positions at http://www.radio‐astronomy.org/pdf/operating‐procedures.pdf. The editorial staff of the Journal is working very hard to publish a quality publication for our members. They welcome articles about observations, member projects, designing equipment, software used for observing, book reviews and analyzing data. Please think about taking some time to write and tell us about what you are doing. This will enhance the Journal for all of our readers. This will be the first issue of the SARA Journal with Kathy Hagen as the editor! She has big shoes to fill as Melinda steps down as the editor. May your noise figure be low, Ken Redcap KR5ARA 3 Editor’s Notes We are always looking for basic radio astronomy articles, radio astronomy tutorials, theoretical articles, application and construction articles, news pertinent to radio astronomy, profiles and interviews with amateur and professional radio astronomers, book reviews, puzzles (including word challenges, riddles, and crossword puzzles), anecdotes, expository on “bad astronomy,” articles on radio astronomy observations, suggestions for reprint of articles from past journals, book reviews and other publications, and announcements of radio astronomy star parties, meetings, and outreach activities. If you would like to write an article for Radio Astronomy, please follow the Author’s Guide on the SARA web site: http://www.radio‐astronomy.org/publicat/RA‐JSARA_Author’s_ Guide.pdf. You can also open a template to write your article http://www.radio‐astronomy.org/publicat/RA‐JSARA_Article_Template.doc Let us know if you have questions; we are glad to assist authors with their articles and papers and will not hesitate to work with you. You may contact your editors any time via email here: editor@radio‐astronomy.org. Please consider submitting your radio astronomy observations for publication: any object, any wavelength. Strip charts, spectrograms, magnetograms, meteor scatter records, space radar records, photographs; examples of radio frequency interference (RFI) are also welcome. Guidelines for submitting observations may be found here: http://www.radio‐astronomy.org/publicat/RA‐
JSARA_Observation_Submission_Guide.pdf Tentative Radio Astronomy due dates and distribution schedule
Distribution
Issue
Articles
Radio Waves
Review
Jan – Feb
February 12
February 20
February 23
February 28
Mar – Apr
April 12
April 20
April 25
April 30
May – Jun
June 12
June 20
June 25
June 30
Jul – Aug
August 12
August 20
August 25
August 31
Sep – Oct
October 12
October 20
October 25
October 31
Nov – Dec
December 12
December 15
December 20
December 31
4 News Mark Your Calendar 2015 Annual Conference Keynote Speaker Announced Vice President Tom Hagen announced today that Duncan Lorimer from West Virginia University Department of Physics and Astronomy has agreed to be the Keynote Speaker at the 2015 Annual SARA Conference to be held June 20 to 24 at the National Radio Astronomy Observatory (NRAO) in Green Bank, WV. The following excerpt is from WVU website: I’m an astronomer interested in compact objects (black holes, neutron stars and white dwarfs) which I study using radio pulsars: rapidly spinning, highly magnetized neutron stars. Pulsars are great fun to study and have lead to a lot of exciting adventures over the years. A nice behind‐the‐scenes article describing how this work is carried out can be found here . I arrived at WVU in May 2006 from the Jodrell Bank Pulsar Group where I worked as a Royal Society Research Fellow. Before that I was at Arecibo Observatory (1998‐2001) and at the MPIfR in Bonn (1995‐1998). My research revolves around surveys for radio pulsars and what they tell us about the population of neutron stars. This work is carried out with many collaborators and uses some of the classic radio telescopes around the world. Of particular interest are young, energetic pulsars and binary systems where the orbiting companion is a white dwarf, a main sequence star, another neutron star, and (perhaps soon!) a stellar‐mass black hole. February 13‐15, 2015 Hamcation Orlando, Florida http://www.hamcation.com/ March 20‐22, 2015 SARA Western Conference at Stanford University, Palo Alto, California http://www.radio‐astronomy.org/node/177 May 15‐17, 2015 Hamvention Dayton, Ohio http://www.hamvention.org/index.php June 21‐24, 2015 SARA Annual Conference at National Radio Astronomy Observatory in Green Bank, West Virginia www.radio‐astronomy.org/meetings Do you have an event to share with SARA members? Send information to editor@radio‐astronomy.org to be included in the next issue. 5 L to R‐ Visitor, Bill Dean, Bill Lord and Jim Thiemanat 2014 Dayton Hamvention 6 2015 SARA Western Regional Conference Palo Alto, California, USA on 20 ‐ 22 March 2015 The 2015 SARA Western Regional Conference will be held at Stanford University in Palo Alto, California on Friday, Saturday and Sunday, 20 ‐ 22 March 2015. The meeting will include a visit the Kavli Institute for Particle Astrophysics and Cosmology (KIPAC). Call for papers: Papers are welcome on subjects directly related to radio astronomy including hardware, software, education and tutorials, research strategies, observations and data collection and philosophy. If you wish to present a paper please email a letter of intent, including a proposed title and abstract to the conference coordinator at westernconference@radio‐astronomy.org no later than 31 December 2014. Be sure to include your full name, affiliation, postal address, and email address, and indicate your willingness to attend the conference to present your paper. Submitters will receive an email response, typically within one week. Presentations and proceedings: In addition to presentations by SARA members, we plan to have speakers from the Stanford University faculty, and possibly KIPAC. Papers and presentations on radio astronomy hardware, software, education, research strategies, philosophy, and observing efforts and methods are welcome. Formal proceedings will be published for this conference. If presenters want to submit a paper or a copy of their presentation, we will make them available to attendees on CD. Basic schedule: Our first day will include a visit to the KIPAC facilities at Stanford Linear Accelerator Center (SLAC). The next two days' meetings will take place on the Stanford University campus and will include presentations by members and guest speakers. Getting there: Fly into San Jose or San Francisco airports and rent a car to drive to Palo Alto. Registration: Registration for the 2015 Western Regional Conference is just US$55.00. This includes breakfast and lunch on Saturday and Sunday. Payment can be made through PayPal, www.paypal.com by sending payment to treasurer@radio‐astronomy.org. Please include in comments that the payment is for the 2015 Western Regional Conference. You also can mail a check payable to SARA, 2189 Redwood Ave, Washington, IA 52353, USA. Please include an e‐mail address so a confirmation can be sent to you when we receive your payment. Hotel reservations: TBA What to wear: Our conference settings are casual. Saturday night dinner: We will make a group dinner reservation at a local restaurant for Saturday night. Additional Information: Additional details will be published online at www.radio‐astronomy.org/meetings and in the SARA journal, Radio Astronomy, as we get closer to the conference date. Please contact conference coordinator David Westman if you have any questions or if you would like to help with the conference: westernconference@radio‐astronomy.org. 7 RASDR2 Update The RASDR development team and Beta testers have been hard at work testing the new RASDRViewer 1.2 software with the RASDR2 hardware. The new RASDRViewer not only offers Continuum for detection of radio astronomy sources plus spectrum analysis for HI detection in our Galaxy and the ability to detect OH and other radio spectrum. The RASDRViewer 1.2 software has performed very well during the Beta test and is quite stable. One of the key to differentiators of RASDR is its ease of use. Just add an antenna, LNA and coax along with a Win PC and you have a working radio telescope. Paul Oxley is currently looking to add Pulsar detection to the RASDRViewer. If this can succeed with the small radio dishes amateurs use, it will herald a new era of amateur radio astronomy. The RASDR hardware is ready to go; the team is in the process of finalizing the changes to the boards in order to reduce cost without giving up any function. The team is currently finalizing the final steps in manufacturing RASDR2 and you may expect an announcement of RASDR2 availability and pricing by mid November, we are planning on having the RASDR hardware available in the second quarter of 2015 with final pricing which we expect to be under five hundred dollars ($500.00). For more information on RADR2 please take a look at: http://radio‐astronomy.org/rasdr We are planning on building a minimum of one hundred units which gives us a good price point for wholesale purchasing of the components and are asking for a one hundred dollar ($100.00) deposit Please contact the SARA Treasurer treasurer@radio‐astronomy.org for methods of paying the deposit. Many thanks to the SARA Board and members who helped make this project a success. The RASDR Team 8 Feature Articles SIDI, the Simple Digital Interferometer Marko Cebokli S57UUU [email protected] Reprinted by permission of the British Astronomical Association Radio Astronomy Group: The RAGazine Vol 2 Issue 1 Aug 2014. SIDI is my attempt at a contribution to the ERAC's ALLBIN (European Radio Astronomy Club; Amateur Linked Long Baseline Interferometer Network) project [1], whose main goal is to group several amateur radio telescopes into a VLBI (very long baseline interferometry) capable system. I started working on it around 2002. Currently in its third version (v1.2), capable of detecting radio sources down to about 1 Jy, with two 3m dishes at 1420 MHz. Here I describe the philosophy behind it, the history of its development, and some results obtained with it. 1. Introduction Before starting with the development of SIDI, I spent a lot of time thinking, trying to answer the question: what is the simplest, high‐performance, VLBI capable interferometer that I can think of? ‐ Simplicity: this refers mainly to the hardware. It was to be kept as simple as possible, mainly by putting as much processing as possible into the software. Keeping the hardware simple also makes it cheaper and accessible for self‐construction by those who like the smell of the soldering iron. ‐ High performance: it should at least match the performance of the best existing amateur analog interferometers, like those by Hans Michlmayr [2] or IRO (Indian River Observatory) [3]. ‐ VLBI capability: this is the long term goal, as set by ALLBIN. The plan with SIDI is to see how far the fancy phase locking hardware and disciplined clocks could be replaced with software in post processing. 2. Basic design choices 2.1 Choice of operating frequency Most celestial sources are stronger on lower frequencies, and VLBI synchronization also gets simpler as one goes lower in frequency. But on the other hand, the density and levels of undesired interference also increase rapidly with decreasing frequency, and the available bandwidth gets smaller. I decided to choose the well‐known 21 cm band, for several reasons: ‐ Devices like filters, LNAs (low noise amplifier), feedhorns, etc. are widely available from several sources ‐ Cheap satellite TV coax cable has low enough loss for baselines up to 50 m ‐ Cheap satellite TV line amplifiers are available ‐ There are enough bright sources in the sky, for example the VLA 1.4 GHz survey [4] lists 61 sources stronger than 10 Jy and 2206 sources stronger than one Jansky ‐ It is close to the 23cm amateur band. There are quite a few radio hams that do EME (earth‐moon‐earth) on 23 cm, and have big, fully steerable antennas for the band. Many of them are interested in radio astronomy! 9 ‐ It is close to the GPS band. Being able to receive GPS with the same hardware, with the same time base, is very desirable for VLBI experiments. ‐ In a quiet location, bandwidths up to a few tens of MHz should be possible. 2.2 Direct conversion In interferometry, the local oscillators in all of the frequency conversions must be coherent. To keep the hardware simple, it makes sense to reduce the number of oscillators to the minimum possible: one. Once upon a time, such direct conversion receivers were considered inferior, but today, a single I/Q (in phase/quadrature) down‐conversion followed by a powerful DSP (digital signal processing) engine can have excellent performance, and is the design of choice in many professional radio systems like GSM (global system for mobile), GPS, etc. 2.3 One bit A/D (analog to digital) conversion The signals at the input of radio astronomy receivers are well below the noise level, so sampling them with high precision doesn't make much sense. In fact, when a limit on the available bit‐rate is given by the digital hardware, the best strategy is to trade precision for bandwidth, and the most sensitive receiver is the one with single bit sampling and maximum bandwidth. This is also the main reason why SIDI uses none of the commercially available SDR (software defined radio) platforms, like USRP (universal software radio peripheral) or RTLSDR (TV dongles used as general purpose SDR receivers). 2.4 Open system Another important decision made early on, was to make SIDI "fully open": all of the schematics, PCB layouts and software sources should be published on the web [5], under GNU or similar licenses. People should be able to experiment with their own ideas for improvement and further development. 3. History of SIDI development 3.1 Version 1.0 The main goal of this version was to see if the "direct conversion + one bit sampling + correlation in software" idea is viable. I made a simple interferometer (SIDI v1.0, [6]) out of some modules that I had lying around (fig below), from Matjaz Vidmar's packet radio system [7]. The sampling was done with a DOS computer, over the parallel port with a simple software loop that could run at about 600k samples per second. The low‐pass filters on the IF boards were set to about 150 kHz, giving about 300 kHz of bandwidth with I/Q sampling. Figure 1 It worked on a fixed frequency in the 23 cm amateur band, the LO (local oscillator) being a simple crystal oscillator followed by frequency multiplication. This proved to be a problem, as it was impossible to evade interference by changing the frequency. Luckily, my friend Pavle Reberc (S57RA) lives in a secluded valley, with the nearest neighbor a couple of km away, behind a hill. He does EME and is also interested in radio 10 astronomy, so all the following experiments with SIDI were done at his location. There, we were able to get the first fringes from SIDI, using small antennas and simple S53MV style 0.4 dB NF low noise amplifiers [8]. By changing the baseline, we successfully measured the angular diameter of the Sun, which could be received even with small (10 cm) dipoles with reflectors. With 16 dBi short backfire antennas [9] (SBFA, diameter 48cm, Aef = 0.17m2) we were just barely able to see the big Cygnus A source, by using FFT (fast Fourier transform) on the fringes (see fig: centre peak is DC, Cygnus A is the small peak under the red arrow). Figure 2 3.2 Version 1.1 The main goal of the second version was to see if the synthesizers in the satellite TV receivers are stable enough for interferometry. I have used tuners from old "SkyStar" computer DVB (digital video broadcasting) boards. A few modifications were needed [10], like skipping the demodulator chip, replacing the reference crystals with external inputs, and changing the I2C address of one tuner. Adding a couple of TBA120 (old Siemens chip, used in analog TV sound channels) based limiting IF strips (printed circuit boards with IF filters, amplifiers, limiters), a TCXO (temperature compensated crystal oscillator), and a simple parallel port based I2C interface, gave a nice compact unit [11] (fig 3). Sampling was still done with a software loop on a DOS machine, and the filters were chosen for a 400 kHz bandwidth. At Pavle's location, we tried for some fringes from the Moon, but got an unknown satellite signal in the first try. This gave me the idea to play a little with the GPS signals [12], since these were planned to be used as a reference in the Figure 3
future. This led to the next experiment, 11 which was to make an image of the GPS birds in the sky. Using two small active GPS antennas, and moving one manually through the 256 positions in a regular 16x16 grid drawn on the tarmac in front of the house [13], we succeeded in getting some images (fig 4). I presented SIDI 1.1 at the 2006 ERAC congress in Germany [14], and it won a special double‐decker version of the ERAC's FFT‐DSP award (fig 5). At least two other people have successfully built their versions of SIDI 1.1 [15] [16]. The conclusion after experimenting with SIDI v1.1 was that sat‐TV tuners are well suitable for interferometry. They have a few weak points, like poor selectivity and a relatively high noise figure. The noise figure worsens rapidly, when their gain is reduced via the AGC (automatic gain control) pin. To get the NF below 10 dB, they have to be run at maximum gain, making them very prone to overloading by off‐frequency signals. Kimmo Figure 5
Figure 4 Lehtinen above [15] found that he needed to use bandpass filters in front of them. But in general, they work quite well, especially considering that they cover the huge range of frequencies from 950 to 2150 MHz. Figure 6
12 Now, it was time to say goodbye to software timed sampling and the parallel port, for several reasons: ‐ Software loops can only run uninterrupted on simple operating systems like DOS ‐ A software loop cannot be synchronized to an external clock, as needed for VLBI ‐ The parallel port is too slow, only sampling rates below a MHz or so are possible ‐ There is no parallel port on modern computers. After pondering about several interfacing options like FireWire and PCI, I decided to use USB, because it is widely available, has an adequate bandwidth and it looks (I hope) like it won't be obsolete very soon. In its 2.0 version, is has a theoretical maximum raw throughput of 480 Mbit/s. In practice, with moderate sized FIFOs (first in/first out high speed data buffers) on the device side, about 100 to 200 Mbit/s can be pumped through it continuously, without losing data due to OS latencies. In 2007 I made an USB interface [17], and a simple sampler [18], that could sample at up to 40 MHz on four channels (two interferometer channels with I/Q each). I upgraded and ported the software to Linux/gcc, and did the first table‐top tests with SIDI v1.2. But then, I got married, and Pavle started a start‐up, so SIDI v 1.2 got sidelined for some years. 4. Current state of SIDI development • In January 2014, I dusted off SIDI v1.2 (fig 6), and restarted work on it. Pavle has some nice 3m dishes, so I made a couple of simple "cantenna" feeds from 4kg cans of peppers and pickles, acquired in the cafeteria at my work. • In March, I visited Pavle, and we set up a baseline of around 42m E‐W, with two 3m dishes. One of them was just laid on sloping ground, and fixed with some sticks and ropes [19]. It determined the fixed declination of about ‐0.5 degrees, at which the setup then ran in drift scan mode for about a month. • The signals were fed into the house via two equally long cables, made of low loss "satellite TV" coax, the one with foil shielding and foam dielectric. The cables had about 15dB of loss, and the NAs had >35dB of gain, leaving about 20dB to cover the tuner noise. This is somewhat marginal, considering that the tuner's ≈ 3000K still contributed 30K to the system noise, about the same as the LNAs and the antenna noise. I estimated the total system noise to be around 100K. • Sampling ran at 20MHz, and the observation software averaged 16M (224) samples in real time for each correlation value recorded into the file. This gave a recorded data rate of ≈1.2Hz, creating a 3.5MB file in 24 hours. • The recorded files can be later reviewed with a special viewing and filtering program called "isci_fringe" (means "search for fringes" in Slovene), which can: o Remove impulsive noise (pulse blanker) o Filter out DC offset and image frequencies Average together several files o
o
o
o
o
13 Slow down the fringes Apply additional time averaging Show the FFT spectrum of the fringes Show a spectrogram over the whole duration of a file Show fringe amplitude and phase 5. Some results of the first observations with SIDI v1.2 • Pavle has put many of the daily recordings onhis webpage [20], where they can be downloaded. • Fig. 7 shows a section from one of the first recorded files, with only pulse blanking and DC/image filtering applied. The fringes are from a group of unresolved sources at 1720‐0058 with a total flux of about 55Jy1720‐0058 with a total flux of about 55 Jy. Figure 7 • Fig 8 shows the same data after a slowdown of 13 mHz. The slowdown is a simple frequency conversion, done by multiplication with a complex sinusoid. Now, additional averaging over 127 points can be applied, with the results shown in fig 9. Figure 8 Figure 9 14 On the second of April, an interesting side catch appeared in the recording. At first I thought it was just terrestrial QRM (manmade radio interference), but later next day, when I saw people discussing a solar burst on the SARA mailing list, I checked the timing and it was dead on! Time goes vertically from top to bottom, and fringe frequency is on the horizontal axis. The bright crescent is the quiet Sun, coming in through the sidelobes a few degrees off the main beam. The crescent shape comes from the changing fringe frequency, as the projection of the baseline is changing. The vertical string of blobs through the left part of the Sun's crescent are the sidereal sources at the fringe frequency that corresponds to meridian transit with the given baseline. The source shown in the preceding three figs. is the topmost blob with a red core. The solar burst is the bright horizontal line below the Sun crescent. To be sure it is not QRM, I checked the phase history, and it is quite smooth, fitting well with a source at the Sun's position. The wide spread over the frequencies is caused by the strong amplitude variations during the burst's duration. Figure 10
Combining files from multiple scans can improve the sensitivity. Fig 11 shows the spectrogram of an average of nine files, recorded end of March 2014. Figure11 On the fringe frequency, there is almost no place without some activity, meaning that we have increased the sensitivity to the point of reaching the confusion limit. 15 6. Plans for the future In SIDI version 1.2, both the sampling clock and the tuner synthesizer references are derived from the same oscillator, so it is already suitable for VLBI experiments. So, the very next thing planned is some experiments in this direction. The plan is to use two SIDIs with free running oscillators, and record a reference signal on one of the channels at each side. For the reference signal, I plan to use EGNOS (European Geostationary Navigation Overlay Service) [21]. This is a GPS‐like signal, but transmitted from geostationary satellites. For our application it has several advantages over normal GPS: ‐ The same satellite is visible over a very wide area ‐ Does not rise and set, can be locked on continuously ‐ Doppler correction is much smaller and simpler ‐ A directional antenna can be used, for better S/N On the hardware side, the next step will probably be to put the sampling interface into a CPLD and make a small board that can be piggybacked on some commercial USB2 breakout board. Next, I would like to replace the "tin box" tuners with single chip tuners, like MAX2112. This would ultimately allow a small production run of SIDIs to be made, because the clumsy tuner modifications wouldn't be needed any more. Pavle has the idea of making fiber optic extensions using the dual fiber optical LAN cables. That would permit connected mode operation with baselines up to a few hundred meters. The receivers and samplers would be located at the antennas. The uplink fiber would carry a reference frequency and tuner commands, and the sampled data would be multiplexed onto the downlink fiber. One Gb/s optical transceiver modules are available cheaply, and first experiments have shown that they are quite easy to interface. For the latest news about SIDI development, check at the ERAC‐VLBI Yahoo group [22]. 7. References [1] Project ALLBIN: http://www.eracnet.org/workshop/allbin.html [2] Hans Michlmayr's wavelab: http://wavelab.homestead.com/ [3] A brief history of the IRO radio interferometer: http://www.ukaranet.org.uk/projects/index.htm#doc1 [4] 1.4GHz NRAO VLA Sky Survey at vizier: http://vizier.u‐strasbg.fr/viz‐bin/VizieR?‐source=VIII/65 [5] SIDI main page: http://lea.hamradio.si/~s57uuu/astro/sidi1/index.htm [6] SIDI v1.0: http://lea.hamradio.si/~s57uuu/astro/sidi1/sidi10.htm [7] S53MV packet RTX: http://lea.hamradio.si/~s53mv/archive/p024.pdf [8] S53MV LNA: http://lea.hamradio.si/~s53mv/archive/a136.pdf [9] S53MV SBFA: http://lea.hamradio.si/~s53mv/wumca/sbfa.html [10] SAT tuner modification for SIDI: http://lea.hamradio.si/~s57uuu/astro/sidi1_1/tuner.htm [11] SIDI v1.1 description: http://lea.hamradio.si/~s57uuu/astro/sidi1_1/index.htm [12] SIDI 1.1 first fringes: http://lea.hamradio.si/~s57uuu/astro/sidi1_1/firstf/index.htm 16 [13] SIDI 1.1 radio imaging: http://lea.hamradio.si/~s57uuu/astro/sidi1_1/imaging/index.htm [14] ERAC congress 2006, An introduction to SIDI: http://lea.hamradio.si/~s57uuu/astro/sidi1_1/sidi_intro.pdf [15] Kimmo Lehtinen's SIDI presentation: http://www.helsinki.fi/~kklehtin/seminar/SIDI.pdf [16] Alex Plaha, forum posts: http://www.astronomy.ru/forum/index.php/topic,88024.0.html http://www.astroclub.kiev.ua/forum/index.php?page=100 [17] The UUUSB board: http://lea.hamradio.si/~s57uuu/uuusb/index.htm [18] SIDI v1.2 description: http://lea.hamradio.si/~s57uuu/astro/sidi1_2/index.htm [19] S57RA SIDI photo gallery: http://lea.hamradio.si/~s57ra/index.php/radio‐astronomy/galery [20] S57RA SIDI recorded data: http://lea.hamradio.si/~s57ra/index.php/radio‐astronomy/radio‐sources‐recorded‐with‐sidi [21] EGNOS wiki: http://en.wikipedia.org/wiki/Egnos [22] ERAC‐VLBI Yahoo group: https://groups.yahoo.com/neo/groups/erac‐vlbi/info 17 List of figures fig 1. SIDI v 1.0 hardware fig 2. Radio source in Cygnus, detection with SIDI v1.0. Center peak is DC, Cygnus A is the small peak to the left (red arrow) fig 3. SIDI v 1.1 hardware fig 4. SIDI v 1.0 Synthesized radio image of GPS satellites fig 5. The double‐decker DSP_FFT award fig 6. SIDI v 1.2 hardware fig 7. Raw fringes from recorded file (The declination value shown is wrong, it was about ‐1 degree.) fig 8. Fringes after a 13mHz slowdown fig 9. Fringes, after slowdown + averaging fig 10. Sun burst on 02 Apr 2014 fig 11. 24h spectrogram, 9 files averaged •
•
•
•
18 Born 1959 in Ljubljana, then Yugoslavia. Graduated 1984 from the faculty of electrical engineering, University of Ljubljana. Until 1986 worked in the antenna laboratory at the faculty, on antenna measurement automation, etc. 1986 ‐ 1993 worked at the ISKRA company, developing ESM and ELINT systems for the Yugoslav army/air force until 1991, then worked on telecom microwave links. Since 1993 with the MOD Slovenia, as an expert in radars and related systems. Leisure activities: Have a HAM license since 1979, was active mostly on 10GHz EME under the call S57UUU. SETI league regional coordinator for Slovenia since 2000. In 2006 became a fellow of the ERAC for the work on SIDI. Currently playing with radio interferometry, together with Pavel S57RA. How to Verify the SNR of a Receiver Based on the AD8307 Logarithmic Detector Christian Monstein, HB9SCT As a designer of radio astronomical receivers, I am always thinking of ways to prove that the signal‐to‐noise ratio (SNR) of a receiver fits with theory as introduced by John D. Kraus [Kraus 1986] in his radiometer equation for a total power receiver, (1) where is the system sensitivity, or smallest change in antenna temperature that can be measured, in kelvins, Tsys is the system noise temperature also in kelvins, B is bandwidth in hertz and is the integration time in seconds. Equation (1) shows that the sensitivity of a radio receiver is proportional to the system temperature Tsys and inversely proportional to the square root of the bandwidth B times the integration time . We can avoid any calibration in terms of noise temperature by rearranging equation (1), or (2) The ratio is equivalent to the radiometer SNR, therefore, (3) The system noise temperature Tsys in equation (3) can be found by a simple observation of a cold noise source such as a resistance termination at room temperature to obtain Icold and of a hot source like a semiconductor noise source, hot part of the Milky Way galaxy, the sun or any other hot broadband radio source to obtain Ihot. The smallest change in noise temperature that we can observeis equivalent to the standard deviation or root‐mean‐square (rms) value of the noise source noise, , which we can calculate from the statistics of the Ihot data. The last part of equation (3) follows from equation (2). The advantage of this approach is we do not need to know the actual noise temperature or received flux because SNR is dimensionless. In my case, for the Callisto receiver, the radiometric bandwidth is in the order of 300 KHz and the integration time is 1 ms. Therefore, the SNR should be about figures 1 through 4. = 17.3. This will be compared to actual measurements shown in Figure 1 ~ A typical light curve of a telescope movement through the position of the sun with a 5 m parabolic dish at 1152 MHz. The intensity is un‐
calibrated and expressed in digits read from Callisto’s analog‐digital converter (ADC). 19 Figure 2 ~ The same data as in figure 1 but now expressed in mV as measured by the ADC, where the ADC’s full scale range is 2500 mV (4) Figure 3 ~ The same data as in figure 2, but now expressed in dB as calculated by the specification for the AD8307 logarithmic detector (5) Figure 4 ~ Still the same data but now the plot is converted into a linear scale by (6) When we finally get the data in linear form, we can apply statistical functions to it. To get the signal itself, that is, Tsys, we need the average of the 'hot' part (Ihot) and the average of the 'cold' part (Icold). To get the rms noise of the 'hot' part we calculate the standard deviation of it, leading to σhot. In my case, based on Callisto observing the sun at 1152 MHz, I get: (7) As shown above we expect from theory an SNR of 17.3, which is 7.5% higher than the measured value but acceptable. This error can be explained by non‐ideal construction of the time constant in the integration circuit as well as imperfect knowledge of the bandpass filter’s equivalent noise bandwidth. Conclusion With a simple hot and cold measurement, the sensitivity of a nonlinear receiver can be checked with respect to theory. Equations (4) through (6) can be easily combined into one equation and applied to any observation. 20 Further information and reading: [Kraus 1986] John D. Kraus, Radio Astronomy, 2nd Ed., Powell, OH, Cygnus‐Quasar Books, 1986 More information about the instrument Callisto and the network e‐Callisto can be found here: http://e‐callisto.org/ Meet the author: Christian Monstein is a native of Switzerland and lives in Freienbach. He obtained Electronics Engineer, B.S. degree at Konstanz University, Germany. Christian is a SARA member since 1987 and is licensed as amateur radio operator, HB9SCT. He has experience designing test systems in the telecommunications industry and is proficient in several programming languages including C and C++. He presently works at ETH‐Zürich on the design of digital radio spectrometers (frequency agile and FFT) and is responsible for the hardware and software associated with the e‐CALLISTO Project. He also has participated in the European Space Agency space telescope Herschel (HIFI), European Southern Observatory project MUSE for VLT in Chile, and NANTEN2 (delivery of the radio spectrometer for the Submillimeter Observatory at Pampa la Bola, Chile). Currently he is quite involved to prepare the radio telescopes for cosmological test observations. He plays also the role of a coordinator of Seti League in Switzerland and he is representing Switzerland within Commission for Radio Astronomy Frequencies (CRAF) Email: [email protected] Cartoon by Nick D. Kim. Strange‐Matter.net. Used with permission. 21 Using AAVSO VLF SID Events data, the Climax Neutron Monitor records, and AAVSO sunspot group counts to look into the anti‐correlation of the sunspot cycles and cosmic ray flux Rodney Howe The AAVSO Solar Section has collected data from sunspot observers since 1944. All these daily data are currently located on the NOAA NGDC site under American sunspot numbers: http://www.ngdc.noaa.gov/stp/space‐
weather/solar‐data/solar‐indices/sunspot‐numbers/american/ The question being asked here is not a new one, it has been known for a long time (2013, Marius S. Potgieter) that cosmic ray counts from various observatories show an ‘anti‐correlation’ of the cosmic rays with the 11.8 year solar cycle. Data chosen here come from the Climax Neutron Monitor station in the Climax mine at Leadville, Colorado: ftp://ulysses.sr.unh.edu/NeutronMonitor/DailyAverages.1951‐.txt Climax: Version 4.8 21 December 2006, "National Science Foundation Grant ATM‐0339527” Also, there are Very Low Frequency (VLF) Sudden Ionosphere Disturbance (SID) data that has been collected by the AAVSO VLF observers since 1958. http://www.ngdc.noaa.gov/stp/space‐weather/ionospheric‐
data/sids/aavso/ In taking a look back through these AAVSO solar data, with the American relative index data it is possible to ‘de‐
convolve’ the raw Wolf numbers W = (10g + s) into group (g) and sunspot (s) counts. Once we have the group counts data we can compare those with both the SID frequency counts and the Climax Neutron Monitor flux counts. Figure 1 shows the group counts in green (bottom line), the VLF frequency counts in red and the Climax Neutron Monitor flux counts (flux / 60) in blue. These data cover 4 solar cycles from 1966 thru 2006, when the collection of Cosmic Rays from Climax were shut down. The X‐axis is in days. It’s easy to see that when the group and SID event data reach their maximum that the cosmic ray flux approaches its minimum. This is what is meant by the anti‐correlation. The question though is; does the cosmic ray counts data anti‐correlate more closely with the AAVSO group counts data or with the AAVSO SID Events data? These data streams are stacked, as in Figure 2, to show visually how each compare to the other. Note the Y axis is different for each data stream. 22 Figure 2 shows how the anti‐correlation is not quite so obvious. Which has the most influence on modulating cosmic rays reaching the Climax Neutron counters? The VLF SID Events from solar flares or the sunspot active regions counted as groups by AAVSO visual observers. It will take some statistics to determine which has the tightest anti‐correlation. If we graph cubic spline fits to these different data we can see how similar and different they are, for example the SID Events data are recording the effects of solar flares on the Earth’s ionosphere, Figure 3. And the sunspot group counts measuring white light active regions are observations made from small telescopes. These active regions may or may not cause solar flaring however; they do seem to show a more distinct maximum and minimum, Figure 4. Figure 3 shows how the daily frequency counts of VLF SID events, which seems to have a lot of variability from cycle 20 thru cycle 23. 23 Figure 4 shows how the group counts begin to scatter during the peak in solar activity. And these 4 solar cycles show bi‐
modal peaks. The Climax cosmic ray flux data also shows some variability from solar cycle to solar cycle, but not as much as the SID Events data, see Figure 5. In Figures 2 and 5 the cosmic ray ‘light curve’ has distinct dips which appear to match to the solar maximum times, and cosmic ray maximum peaks which appear to match to the solar minimum times. Figure 5 might also show that there are other phenomena than active region group counts or solar flares recorded as SID Events which are being modulated by the sun. (1998, H. Mavromichalaki, et al.), and see Neutron Monitor Database: http://www.nmdb.eu/sites/default/files/NMDB_Brochure_1.pdf So, what do the statistics show? The first step is to take the first difference of the group counts data and the first difference Climax Neutron Monitor data. And also take the difference of the SID Events data. These ‘first differences’ (one data element subtracted from the next data element in the time series: http://people.duke.edu/~rnau/411diff.htm ), can then be compared to a normal distribution. From this we can draw regression lines and do a pairwise comparison to look at positive or negative slopes. 24 Welch Two Sample t‐test data: [VLF] and [CR]
t = -0.0059, df = 6361.541, p-value = 0.9953
95 percent confidence interval:
-0.2902110 0.2884591
sample estimates:
mean of x
mean of y
0.0003175611 0.0011935059
################################
data: [group] and [CR]
t = -0.1197, df = 9354.027, p-value = 0.9047
95 percent confidence interval:
-0.04832768 0.04276506
sample estimates:
mean of x
mean of y
-0.001587806 0.001193506
From the two sample t‐test (Welch) it looks as though the VLF SID Events frequency counts are NOT as anti‐
correlated as are the sunspot group counts. Here’s another statistical test: Pearson's product‐moment correlation data: [VLF] and [CR]
t = 1.2899, df = 6296, p-value = 0.1971
95 percent confidence interval:
-0.008447781 0.040935190
sample estimates:
cor = 0.01625362
###############################
data: [group] and [CR]
t = -1.4756, df = 6296, p-value = 0.1401
95 percent confidence interval:
-0.043272259 0.006106686
sample estimates:
cor = -0.01859412
The Pearson’s correlation test also shows that the SID Events data are not as anti‐correlated (negative correlation) as the AAVSO group counts data. Figure 6 shows regression lines drawn through the pairwise scatter plots. 25 Figure 6 looking at both left and right side of the diagonal scatter plots the VLF SID data do not show as negative a slope as the sunspot group active region regression line. Figure 7 shows a blow‐up of the slopes for data tested with the Welch and Pearson’s statistical tests. The AAVSO group and VLF SID data show a positive slope and correlation, however both data sets show some anti‐correlation with the cosmic ray counts from the Climax Neutron Monitor data, with the strongest anti‐correlation between groups active regions an cosmic ray flux. So it seems that from these statistical tests there is a tighter anti‐correlation between the AAVSO group counts of solar active regions than with the flaring activity recorded from the AAVSO SID Events data. References: General reading on cosmic ray cycles: http://www.nmdb.eu/sites/default/files/NMDB_Brochure_1.pdf 1998, H. Mavromichalaki, et al., Simulated effects at neutron monitor energies: evidence for a 22‐year cosmic‐ray variation http://ruby.fgcu.edu/courses/twimberley/EnviroPol/EnviroPhilo/Simulated.pdf 2013, Marius S. Potgieter, Solar Modulation of Cosmic Rays http://arxiv.org/pdf/1306.4421.pdf AAVSO Solar SID Databases: http://www.aavso.org/sid‐database 26 R statistical package: http://www.r‐project.org/ And help from Dr. Jamie Riggs www.spannedsolutions.com These AAVSO data come from our most consistent AAVSO solar sunspot observers from all over the globe who contribute monthly sunspot counts data, and SID Events data from VLF observer’s submissions all over the globe. I have a Masters Degree in Remote Sensing / Geographical Information Systems (GIS), Colorado State University, 1997, my occupational work has been with Landsat and AVHRR Satellite data classifying agriculture crop land images for the US Department of Agriculture. I’ve been a SARA member for about 15 years, and started out recording VLF data in 1999. I now do much of the analysis for the Solar Ionospheric Detection (SID) detections for the American Association of Variable Star Observers (AAVSO) Solar Section: which is responsible for collecting and recording the Very Low Frequency (VLF) SID events caused by solar flares. http://www.aavso.org/solar‐sids SID event submissions come from VLF radio solar observers around the world. 27 Cheap and Simple Demonstration Radio Interferometer By Kenneth Kornstett Abstract A demonstration interferometer is described with both data and simulation results presented. The initial objective was an inexpensive and simple interferometer to detect interferometer fringes. Design decisions, assumptions, and mistakes are documented. 1. Introduction The title for this paper comes from the SARA Google Group where an interesting comment was found “ . . . just to get interferograms out the other end, cheap and stupid works remarkably well” [1]. Hence, the title for this paper comes from that statement, but with the word “simple” used for “stupid.” Also, mistakes to avoid are included to help other experimenters create a better system (by avoiding my mistakes). That is similar to Cliff Bates’ “A Basic Primer on Setting up an Amateur Radio Telescope” where he listed mistakes to avoid [2]. My main objective was to detect fringes at a minimum cost (cheap), but I did not expect to encounter dumb “mistakes” in the process. The topic will be examined in four steps: system description, fringe data analysis, declination calculation, and final comments. During the paper, decisions, assumptions, and “mistakes” are listed. 2. Brief system description To detect fringes, one uses an interferometer system. The simplest radio interferometer sums the output of two antennas to get interference fringes. I knew that I needed two antennas minimum to get fringes, and I had read somewhere the spacing between the antennas (interferometer baseline) should be at least 8 wavelengths. William Lonc in his book gives an interferometer spacing rule of thumb: “the more the better” [3]. However, he warned that for an extended source (like the sun) some baselines can cause the visibility function to be zero which would prevent observing fringes [4]. The block diagram of the cheap and simple interferometer described and used in this paper is shown in Figure 1. Figure 1. Cheap and Simple Interferometer Block Diagram. 28 Notice on the block diagram there are two antennas which are summed then the resultant signal is detected with a satellite finder. The digitizer converts the detected analog signal to digital data which is stored on a laptop computer file. The voltage for various blocks is supplied by the power inserter. More detail will be presented later, but let us look at some system requirements. The first design decision was the operating frequency. Since I had already made several intensity radio telescopes (Ku band, 2.4 GHz quad on a dish, and 1.4 GHz helical), it seemed obvious (cheaper) to migrate one of those systems to an interferometer system. The Ku band radio telescope seemed a possibility (design decision #1). It accepted frequencies from 12.2 to 12.7 GHz (Ku band) and down converted to 950 to 2150 GHz (1200 GHz bandwidth). The Ku band system included a dish, a Low Noise Block Down converter Feed horn (LNBF), a satellite finder, a homemade digitizer, and power inserter (to supply power to the LNBF and satellite finder). I decided to use the LNBF without the dish for three reasons. First, I had only one Ku TV satellite dish and LNBF, and I did not want to scrounge up another one or worse yet, buy one. The second reason was that I thought it would be difficult to aim the two dishes. (I have since realized that is not a problem: one uses small mirrors to focus the sun’s reflection on the proper feed horn of the LNBF for each dish.) The final reason was that without the dish, the LNBF would have a large beam width. The dish has a narrow beam width, while the LNBF probably has greater than 45 degrees beam width. The wide beam width was design decision #2. This brings up mistake #1, LNBFs had internal down conversion. Down conversion meant a local oscillator is used to convert the frequency down to a lower frequency range. If I used two LNBFs I would have to phase lock the two oscillators together to avoid losing phase information. I did not want to have to open up the LNBFs to get access to the two local oscillators (to phase lock them). I wanted to use off the shelf items when possible. At this point, I made assumption #1: perhaps if only one antenna frequency was down converted then fringes could still be obtained if the other antenna signal was not down converted. (As suspected, it worked.) For a signal source, I decided to use the sun (design decision #3). The sun’s RF signal would be stronger and make up for not using the dish (which had gain, too). This brings up mistake #2. I had forgotten that the sun has 11 year sun spot cycles and the quiet sun is not as strong, signal wise, as an active sun. In low sun spot activity, the sun’s quiet signal would be weaker. My next decision was what to use for a second antenna. The LNBF down converted the frequency to around the 1 GHz range, so I would need an antenna in that frequency range to make an interferometer. Fortunately, I had already made several working wire antennas (VHF and UHF) using welding rods. I decided to use a three element Yagi since I had built and had been using a home made three element Yagi to receive a 479 MHz (UHF) television signal; I know I could easily make a Yagi to operate at little over twice that frequency. That was design decision #4; use an easy to build three element Yagi antenna. Ideally, an antenna should be followed by a good Low Noise Amplifier (LNA). By “good,” I mean a low noise figure. The first amplifier after an antenna should have a low noise figure. Without proof, I decided that early interferometers probably did not have good LNAs (assumption #2). Thus, I decided to avoid the expense of a good LNA for the Yagi antenna. Since the LNBF produced around 30 dB gain, I decided to use inline amplifiers, which are used with satellite TV systems, because they were cheap and I had several available. I knew that inline amplifiers have a high noise figure, often oscillated, and could impact the phase. I used two inline amplifiers with about 20 dB of gain each (design decision #5). However, from William Lonc’s book, I knew that some gain differences (between each antenna leg) could be tolerated and still produce fringes [4]. I did try to keep the coax cable about the same length for both antennas to avoid introducing phase into the system. 29 It should also be noted that inline amplifiers may have different bandwidths. For example, I have two inline amplifiers types: one type has 40 to 2150 MHz while another type has 950 to 2400 MHz. System bandwidth is important because as the bandwidth decreases, so the signal power decreases, which is bad. Next the two antenna signals needed to be summed together. I used a DC pass signal summer so that the power inserter would pass voltage through the summer to the inline amplifiers and the LNBF circuit. The summer I used (Channel Vision HS‐4) has a frequency range from 5 MHz to 1 GHz. This reduced the LNBF output even more. The satellite finder operates as a band pass filter, amplifier, and detector. The bandwidth of the satellite finder was 1100 MHz (950 ‐ 2050 MHz). The system bandwidth was 50 MHz (950 to 1000 MHz) because of the summer upper frequency limit. The satellite finder has a ‐25 to ‐75 dBm input level. Since the original Ku band radio telescope had worked with the dish before (but without the summer), the RF link budget was essentially still good, especially since I was looking at a stronger RF source. (The receiver link budget considers the signal source, system gains and losses in decibels. To work, the system has to have more gain than the signal source.) The satellite finder has an audio tone which I had already disconnected (too noisy and distracting). The satellite finder analog meter was used to input to the digitizer. The power inserter supplied voltage for the satellite finder, LNBF, and inline amplifiers. It was just a bias tee with the voltage supplied with a battery. A picture of the “cheap and simple” interferometer antennas is shown in Figure 2. Notice the two inline amplifiers between the Yagi (on the left) and the summer. The LNBF is on the right. Notice that the LNBF does not have a dish, and both the Yagi and LNBF are pointed straight up. The LNBF has three feed horns and I used the center feed horn (the other two feed horns point off center). The sun at that time of year would be in view of the two antenna beam widths. Figure 2. Picture of the “Cheap and Simple” Interferometer Antennas Setup Notice that the Yagi antenna is mounted on a piece of wood with a pointed end. It was cheap as the wood was really a left over wood stake. The physical dimensions of the 1 GHz Yagi antenna are shown in Figure 3. 30 Figure 3. 1 GHz Yagi Antenna Dimensions A picture of the power inserted and satellite finder is shown in Figure 4. Figure 4. Picture of Power Inserter and Satellite Finder The homemade power inserter (bias tee) has a switch to turn on power to the coax cable center wire (for the upstream satellite finder, LNBF, and inline amplifiers). The voltage was supplied by a lawn mower 12 volt battery. (I know that the LNBF should have a minimum of 13.5 volts, but I had used it with 12 volt before. Later, I built a wall wart power supply with two reversed biased diodes to drop the voltage down to 13.5 volts.) The satellite finder is the small black box with a meter on the front. The black coax on the left side of the satellite finder comes from the signal summer, while the white coax cable supplies the power from the power inserter. The cable with the yellow connector is a RCA audio cable which connects the satellite finder meter to the digitizer. A picture of the digitizer is shown in Figure 5 and the digitizer schematic is shown in Figure 6. 31 Figure 5. Picture of Digitizer The digitizer consists of an interface circuit, an Analog to Digital Converter (ADC) chip, and a microcomputer. Notice the breadboard and 9 volt battery. The RCA cable is connected to the satellite finder meter, and the RS 232 cable transmits the digital data from the digitizer to the laptop computer. Figure 6. Digitizer Schematic The satellite finder meter was interfaced to the digitizer through an inverting operational amplifier. The gain was selected to produce five volts output when the satellite finder analog meter was at full scale. The output was fed to a buffer amplifier to avoid loading effects on the ADC chip input. Only two of the four operational amplifiers of a “cheap” LM324 were used. The ADC chip was a “cheap” 8 bit integrated circuit which had a maximum input of five volts. The microcomputer board converts the 9 volt battery voltage to five volts for the BasicStamp 2 microcomputer, the LM324 amplifiers, and the ADC chip. The LM324 only uses a single 5 volt supply. The microcomputer controls the ADC and sends the digitized data to the laptop computer. I changed the sampling time from 1 minute to 15 seconds in the microcomputer software (for the cheap and simple interferometer). The laptop stored the time the data was received (time stamped) and the interferometer data in a file. I use a six line header in that data file to store details about the data run, because system configuration often gets fuzzy over time. (I also keep a log of the configuration details such as number of amplifiers, antenna baseline, weather conditions, attenuation, if run was good or bad, and etc.). The data was 32 plotted using a spread sheet. Data processing was accomplished using 3 point smoothing. (Later, I would use averaging and simple low pass filtering in software.) By using the Ku band intensity radio telescope, I was able to build a working interferometer cheaply. The only cost to build the interferometer system was the signal summer (about $15 including shipping) plus about $32 for several short RG‐6 coax cables. I had extra surplus brazing rods that I used to build the Yagi antenna. The other parts came from my tool box. If you need a satellite finder, one can be obtained for less than $10 plus shipping, while the inline amplifiers can be purchased for as little as $5 plus shipping. With the cheap and simple system described the data obtained will be compared to simulated data. 2. Fringe data obtained compared to simulations The “first light” for this interferometer was on 10 June 2010. The interferometer data and simulation data are plotted in Figure 7. The interferometer data curve is in red, and the time was from 12:56:00 to 1:11:30. (The astute reader may notice that the laptop time may have been slightly off.) I intended to start the data run much earlier, but a wire had come loose on the digitizer. By the time, I got the problem fixed, it was almost too late. Mistake #3 was to use a breadboard rather than solder the digitizer circuit together. Another mistake was to not continue the data run longer (mistake #4). Notice that fringes are present. For comparison, on that chart, three simulations curves are shown in black for 10, 12, and 12.5 GHz (with difference lines for the simulation curves). The data sample rate was a sample every 15 seconds, and the interferometer baseline was 1.485 meters. The simulation beam width was 45 degrees. The simulation curves were created using Chris Brown’s interferometer program to create the simulation curve [6]. Figure 7. 2010 Ku LNBF and 1 GHz Yagi Interferometer Data and Simulation Data Notice on the graph that the data fringes at points “A” and “B” do not line up with the same simulations. For example, the 12 GHz simulation is over the real data peak at point A, but the 10 GHz simulation is close to the 33 peak at point B. In Figure 8, I shifted the data curve one point to the right and the 10 GHz simulation lined up more over the two points A and B. Figure 8. 10 GHz Simulation with 10 June 2010 Data Curve Shifted One Point to Right (The data is still the red curve with the solid black curve being the 10 GHz simulation curve.) Next, the declination calculation will be addressed. 3. Declination calculations My original declination calculation was bad for two reasons. First, I used too high a frequency for the wavelength value. Upon graphing the simulation plots, I used the wavelength for 10 GHz because Figure 8 showed that 10 GHz came closer to being near the two fringe peaks. Second, I had incorrectly measured the interferometer baseline. I had measured from antenna center to antenna center. I realized that error while reading G. W. Swenson Jr’s interferometer construction articles [7]. If I had thought about it, I should have realized that the baseline measurement went to opposite edges of the antennas because the way I measured it, a half of an antenna was on each side. So another mistake was in not measuring the real baseline (mistake #5). With the wavelength and the correct baseline, I measured the time between the A and B peaks (measured fringe time). The equatorial time calculation is the wavelength divided by the baseline. (The result multiplied by 57.3 converts radians to degrees. Multiplying the degrees by 4 converts degrees to minutes on the equator.) The arccosine of the equatorial time divided by the measured time is the declination angle of the radio source producing the fringes. The sun’s declination on 10 June 2010 was 23.024 degrees (from the internet), and the calculated declination for 10 GHz was 22.17 degrees (error of 3.7%). 4. Final comments Unfortunately, only one run was made for this configuration. I increased the interferometer baseline the next day, and accidently connected the power inserter battery backwards (mistake #6). (I have since corrected that problem.) 34 Obviously, using two different frequencies and down converting only one of the frequencies was a mistake (mistake #7). In my defense, it seemed logical at the time and I only wanted to obtain fringes. However, I was surprised at the small declination error when 10 GHz was used in the calculation. A final thought is that Bruce Randall in a SARA Journal article [8] listed several reasons why the interferometer in his article should not work. Therefore, “cheap” and simple (“stupid”) often works well as suggested at the beginning of this article. In summary, a cheap and simple demonstration interferometer was briefly described, fringe data from the interferometer was compared to simulation data, a declination calculation was performed, and final comments presented. Not only did the “simple” and “cheap” interferometer detect fringes, but a reasonable declination calculation was made. In addition, the goals of both “cheap” and “simple’ were obtained. In the process, the design decisions, assumptions, and mistakes were documented. I hope this article encourages other people to build an interferometer. I think it is better to build a system rather than wait and build a perfect system. I suspect perfect systems often do not get built. References [1] Marcus Leech in the SARA Google group on 9/13/08 [2]http://thehuwaldtfamily.org/jtrl/other/Basic%20Primer%20on%20Setting%20Up%20an%20Amateur%20Radi
o%20Telescope,%20Bates.pdf [3] William Lonc, Radio Astronomy Projects, Third Edition, 2006, Radio‐Sky Publishing, page 32 [4] Ibid, pages 25‐26 [5] Ibid, page 33 [6] Chris Brown, “Computer Simulation of a Meridian Transit Radio Interferometer,” SARA Journal 1997_11_12.pdf, pp 11‐15 [7] G. W. Swenson Jr, “An Amateur Radio Telescope, Sky and Telescope,” May through October issues, 1978. He has two other interesting articles: 1) “Antennas for Amateur Radio Interferometers,” Sky and Telescope, April, 1979 and 2) “An R.F. Converter for Amateur Radio Astronomy,” Sky and Telescope, November, 1979. I got copies of those articles at a local university library. [8] “408 MHz Interferometer at 2013 SARA Conference,” October 2013 SARA Journal, pages 70‐73 Kenneth Kornstett holds a Masters of Physics degree from the University of Tennessee. He has worked in various technical and engineering jobs for various companies in the US and overseas. He once taught several three day microprocessor seminars in major cities across the US in the 70s. He can be contacted via email at [email protected]. Please put “cheap and simple interferometer” in the subject line. 35 Cartoon by Nick D. Kim. Strange‐Matter.net. Used with permission. 36 Phase Stability, Loss Stability, and Shielding Effectiveness Paul Pino Reprinted, with permission, from the December 2012 issue of In Compliance Magazine, www.incompliancemag.comhttp://www.incomliancemag.com/ This article addresses phase stability, loss stability, and shielding effectiveness in cable assemblies exceeding 20 feet. Stability and shielding effectiveness behavior of long length assemblies are not well documented and lack standardized test procedures. Phase and loss repeatability is addressed within this writing as a sub‐topic of stability. This document offers basic performance information pertaining to one specific type of microwave coaxial assembly which would typically be used in a test environment where occasional coiling/uncoiling and random movement would occur. Information contained within this piece is for reference purposes only and does not constitute a performance specification for any particular microwave/RF cable assembly. TEST SUBJECT Testing was performed on a microwave/RF Test assembly, 50 feet in length, having the following specifications: Cable Type: internally ruggedized, enhanced phase stability cable 18 GHz maximum frequency Nominal cable outer diameter: 0.305 inches Stranded center conductor Minimum bend radius: 1.0 inches Crush strength: 250 lbs./ linear inch Connectors: Connector A‐side: precision 3.5 mm pin Connector B‐side: precision 3.5 mm socket Assembly Length: 50 feet, measured from connector A‐side reference plane to connector B‐side reference plane. TEST EQUIPMENT Testing was conducted using the following equipment: Vector Network Analyzer: Agilent Technologies 8510C with 8517B S‐parameter test set. Calibration Kit: Agilent Technologies 85052B 3.5 mm kit with Agilent Technologies 911E and Agilent Technologies 911D sliding loads, 3 – 26.5 GHz frequency range. Vector Network Analyzer Cables: utilized on port 2 of the network analyzer. Spectrum Analyzer: Agilent Technologies 70000 series. 37 Mode Stirred Chamber: Custom‐built by Global Partners in Shielding, Inc. Chamber dimensions: 8 feet x 8 feet x 8 feet Note: all tests were performed at ambient temperature (approximately 20 degrees Celsius) and pressure (sea level). PHASE AND LOSS STABILITY TESTING Stability testing was conducted using the following procedure as seen in Diagram 1 (left). A full 2‐port calibration of the network analyzer was performed using a stepped frequency range of 0.066 GHz to 26.5 GHz, 801 points. The cable assembly was coiled and uncoiled several times before being tested to simulate normal handling. Finally, the cable assembly was coiled with loops approximately 1 foot in diameter. The coiled cable assembly was connected to the network analyzer (3.5 mm socket to port 1, 3.5 mm pin to port 2) and s‐
parameter data was collected. This data set was labeled: “Initial Coil Data.” The cable assembly was disconnected from port 2 only, then uncoiled and laid out in a large “U” shape across the laboratory floor. The connection at port 2 was then restored and sparameter data was collected. This data set was labeled: “Uncoiled Data.” The cable assembly was disconnected from port 2 of the network analyzer and again coiled with loops approximately 1 foot in diameter. Re‐coiling was performed in the same direction as was done when the cable assembly was initially coiled. The connection at port 2 was once again restored and s‐parameter data was collected. This data set was labeled: “Return Coil Data.” The uncoiled and return coil s‐parameter data were normalized by the initial coil s‐parameter data set. Phase and loss information was extracted from the normalized s‐parameter data. By choosing the initial coil data set as a baseline, one may observe how the phase and loss characteristics of the cable assembly deviate from a known state. Any deviations are assumed to have resulted from physical manipulation of the cable assembly under test. SHIELDING EFFECTIVENESS TESTING Shielding effectiveness testing was accomplished through the use of Gore’s own mode stirred chamber. Tests were conducted from 1.0 to 18.0 GHz (1 GHz steps) in accordance with MIL‐STD‐1344A, method 3008. The noise floor of the test environment was verified before each test, as was instrument dynamic range. Efforts were made to keep the bulk of the test cable and its connectors within the working volume of the mode stirred chamber. 38 The following test procedure was employed as seen in Diagram 2 (left). The cable assembly was coiled with loops approximately 1 foot in diameter. The coiled assembly was placed atop a non‐
conductive pedestal in the middle of the mode stirred chamber. In this configuration two sets of test data were collected. One data set was collected while the cable assembly connectors were wrapped in a fine‐grade steel wool, another set collected while the cable assembly connectors were left unwrapped. Steel wool serves as a supplementary shielding material when wrapped around the cable assembly connectors; this technique is used purely for test purposes. By comparing the shielding effectiveness performance of an assembly with connectors wrapped versus unwrapped, one may more easily determine if the major contributor to RF leakage is connector or cable. As a final test, the cable assembly was hung in loose loops over a nonconductive line strung within the mode stirred chamber. Test conditions were as stated above. Data was collected for tests with and without connectors wrapped in steel wool. CONCLUSION Phase Stability and Repeatability Figure 1 illustrates the phase stability of the test assembly when going from a coiled state to an uncoiled state. It may also be noted that the behavior is essentially linear through 8 GHz. Choosing an arbitrary frequency of 10 GHz, the indicated phase change from an initially coiled state is ‐11.0 degrees. If one considers that a 10 GHz continuous wave signal will cycle through 219,546 degrees over a 50 foot cable, the 11.0 degree figure represents 0.005% of the assembly’s phase length. A high‐performance microwave cable assembly must possess excellent phase repeatability. Phase repeatability refers to an assembly’s Figure 1: Normalized phase ability to duplicate its original, or initial phase behavior when the cable response of uncoiled cable assembly
has been flexed (or disturbed) then returned to its original, unflexed (or undisturbed) state. 39 Figure 2 illustrates the phase repeatability of the cable assembly. Figure 2: Normalized phase Providing a practical response of cable assembly example will highlight when returned to coiled state the importance of repeatability. The 50 foot t est assembly is uncoiled and connected to its respective instrumentation. The necessary calibration procedures are followed and phase is noted at 10 GHz, after which the assembly is disconnected, coiled, and stored for future use. A short time later the c able assembly is Figure 3: Normalized loss of uncoiled and uncoiled cable assembly
reconnected to this same instrumentation and phase is noted. Referring to Figure 2, the user can expect to observe a change in phase of approximately 0.400 degrees at 10 GHz (20 degrees Celsius ambient temperature). Loss Stability and Repeatability Figure 3 depicts the loss stability of the test assembly when going from a coiled to an uncoiled state. At 10 GHz, a ‐0.080 dB change is indicated, which correlates to 0.54% of the test assembly’s insertion loss at this frequency. At 2 GHz, a ‐0.015 dB changes is indicated, correlating to 0.24% of the test assembly’s insertion loss at this frequency. Figure 4 illustrates the test assembly’s loss repeatability. Changes in loss from the initial Figure 4: Normalized loss of cable coiled state vary no greater assembly when returned to coiled state than 0.030 dB from 0.066 GHz through 18 GHz. The practical example provided for phase repeatability can be applied to loss repeatability as well; one may expect a change in loss of approximately ‐0.010 dB at 10 GHz (20 degrees Celsius ambient temperature). 40 Figure 5: Shielding effectiveness of cable assembly in various configurations Shielding Effectiveness Shielding Effectiveness (S.E.) was the only area where a standardized test pr ocedure was used (see Diagram 2 for details). Referring to Figure 5 the S.E. performance of the test assembly is recorded for several different configurations. In all configurations, the S.E. values of test assembly were consistently at or approaching thos e of the chamber noise floor. Performance through 18 GHz was notable, producing in excess of 100 dB of shielding effectiveness. Figure 6 Figure 6: Contrasting shielding was provided to effectiveness of cable assembly with demonstrate that data connector torqued and loosened ¼ turn
supplied in Figure 5 was merely not a measurement of the chamber ambient noise level. Figure 6 displays the con trast in S.E. behavior when one connector, at the test assembly/test lead interface, is properly torqued versus loosened by one‐quarter of a turn. Meet the author: Paul Pino received his BS degree in electrical engineering from the University of Delaware in 2000 after a long career in the automotive industry. He joined W. L. Gore & Associates, Inc. in 1999 and has worked with various groups, including Gore’s Signal Integrity Lab, the Planar Cable Team and the Fiber Optic Transceiver Team. For the past 10 years, he has worked within the Microwave Cable team. 41 LWA TV on the Raspberry Pi Abbreviations DHCP: Dynamic Host Configuration Protocol Whitham D. Reeve DVI: Digital Visual Interface GUI: Graphical User Interface 1. Introduction HDMI: High Definition Media Interface IP: Internet Protocol This article describes how to use the tiny and inexpensive Raspberry Pi LAN: Local Area Network computer with the Long Wavelength Array in New Mexico to observe LWA: Long Wavelength Array celestial radio sources in near‐real‐time (LWA1, figure 1). The RPi: Raspberry Pi application was developed by the University of New Mexico (UNM) as UNM: University of New Mexico VGA: Video Graphics Array part of LWA Education and Public Outreach. It is a good way to become familiar with the LWA, LWA TV and the Raspberry Pi, all at the same time. The LWA TV program does not allow user control, only observation, and it runs “out of the box” with no user programming whatsoever. Figure 1 ~ The Long Wavelength Array in New Mexico consists of a forest of 257 crossed‐dipole, tied‐fork antennas. Beams are formed through signal processing to observe specific celestial radio sources or areas of the sky. (Image © 2014 W. Reeve) One of the advantages of the approach described here is that no hardware construction or software programming is required – off‐the‐shelf hardware and software is all that is needed. Another advantage is that the software for the LWA TV graphical user interface (GUI) is pre‐packaged by UNM and available for free. When I started working on this project (August 2014) UNM’s software worked only with the Raspberry model B. I 42 contacted Jayce Dowell at UNM and he updated the software to run on both the model B and B+ (the B+ is the latest Raspberry Pi hardware version). Although the LWA TV software is plug‐and‐play, there is room for some customization, which I describe in section 5. I started writing this article to answer most of the questions that might arise while setting up the LWA TV application and ended up writing a reference manual. The first half provides general descriptive information and the second half contains setup details. 2. Long Wavelength Array The LWA is used to study celestial objects or areas of the radio sky in the Note: Internet links in braces { } frequency range 10 to 90 MHz {LWA}. Its primary purpose is scientific but and references in brackets [ ] are provided in section 6. education and public outreach are important parts of its government‐funded mission. One of the features of the LWA website is LWA TV {LWA TV} – a near real‐time visual representation of the data produced by the array (figure 2). Figure 2 ~ Image from LWA TV as seen on the internet. The two circles represent the sky seen by the LWA at radio frequencies, in this case, 37.80 MHz. The horizon is along the circle edges and the zenith (straight up) is in the middle of each image. Dark blue is the background and brighter areas (in order of increasing radio intensity – blue, green, yellow, red) are the Milky Way galaxy and spots are radio sources. The locations of some of the brighter celestial radio sources are labeled. The images show total intensity (left) and intensity of circularly polarized radio waves (right). (Image source: http://www.phys.unm.edu/~lwa/lwatv.html) Although LWA TV can be watched in near real‐time on any PC with internet access, observers may want to setup a dedicated monitor for LWA TV and then use the PC with their own radio telescope. For example, one could observe Jupiter or the Sun with their own radio telescope using Radio‐SkyPipe (RSP) or Radio‐Sky Spectrograph (RSS) while watching for activity on LWA TV. This allows confirmation or correlation of observations. Of course, the radio sources would need to be in common view of the LWA and the observer’s radio telescope. Another application is radio astronomy club outreach. The setup could be used at meetings, conventions and 43 conferences. It should be noted that LWA TV itself does not allow real‐time access to the actual data nor does it store any of the individual real‐time images. 3. Raspberry Pi The Raspberry Pi (abbreviated RPi throughout this article) is a small computer platform designed for educational purposes by the Raspberry Pi Foundation {RPi}. The RPi is low cost, about 35 USD (40 USD with memory card), and has HDMI video, Ethernet LAN and USB interfaces (figure 3). It is euphemistically advertised as “credit‐card size” but actually is much larger. It can be plugged into an ordinary computer monitor or TV and can use a Wi‐Fi wireless access device for LAN and internet access and wireless or wired USB keyboard and mouse. Figure 3 ~ Raspberry Pi model B and B+ hardware. The model B+ is shown in the middle with an optional clear plastic enclosure. The model B on the left is in an optional milled aluminum enclosure and is shown with a Bluetooth USB dongle. The model B on the right is in a molded clear plastic enclosure and rotated to show the opposite end. The interfaces vary slightly between the model B and B+. Enclosure dimensions are approximately 100 x 65 x 25 mm. (Image © 2014 W. Reeve) The RPi hardware usually runs an operating system derived from Linux and (as of this writing) has become available in three versions – original model A model (not generally available in North America), model B and model B+. The model B and B+ are compared (table 1). For the LWA TV application, there is no advantage of one over the other model. I have not tried the RPi model A, and I initially could not get the LWA TV software image provided by UNM to work on the RPi B+. I was successful only with the RPi B. All the information available from the Raspberry Pi Foundation for the model B+ insists that it is software compatible with the model B but I found there were problems that affected the LWA TV GUI. These were resolved in September 2014 and the software image now available from UNM works fine on both the B and B+. Table 1 ~ Comparison of Raspberry Pi Model B and B+ Hardware Description RPi B RPi B+ RAM 512 MB 512 MB Memory card SD micro‐SD Processor system BCM2835 SOC BCM2835 SOC 44 Video 1 connector Video 2 connector Audio connector USB connector Power connector GPIO connector Network connector Power Dimensions Mounting Cost Standard HDMI RCA Composite 3.5 mm 2 micro‐USB 26 pin 10/100 Ethernet 5 V, ~5 W 85 x 56 x 21 mm 2 holes 35 USD Standard HDMI 3.5 mm audio + Composite see Video 2 4 micro‐USB 40 pin 10/100 Ethernet 5 V, ~3 W 85 x 56 x 21 mm 4 holes 35 USD Hardware: The Raspberry Pi can be purchased from any number of suppliers worldwide. It is necessary to add a Secure Digital (SD) to the model B or micro‐SD memory card to the model B+ for the LWA TV software image. Sometimes the vendor supplies a card with the RPi purchase. A card with 8 GB minimum capacity is recommended but 4 GB is sufficient. Also, an HDMI monitor is needed. A VGA monitor may be used if an HDMIto‐VGA converter (figure 4) is connected between RPi and the monitor. A keyboard with or without a mouse might be handy but is not necessary. No changes are required to the RPi platform but it should be installed in an enclosure. A Secure SHell (SSH) terminal generally is used to communicate and manage RPi from another computer on the same network. This is described in more detail in section 5. Figure 4 ~ HDMI‐to‐VGA converter allows the RPi to be used with most computer monitors. The ones shown here cost about 10 USD. The RPi requires a full‐size HDMI connector seen on the left converter. An adapter will be needed If the converter has a mini‐HDMI connector as seen on the right converter. (Image © 2014 W. Reeve) The power requirements of the RPi are modest, about 5 W for the model B and 3 W for the B+ assuming no current is being drawn from the USB ports. Because these powers are more than supplied by a standard USB port on a PC it is necessary to use an external power supply or power adapter. If no USB peripherals are used, the RPi can be powered by a well‐regulated, low ripple, electrically quiet power source rated ≥ 1.0 A at 5.0 Vdc (≥ 5 W). If the RPi USB ports are to supply power to peripherals, then a 10 W or higher power source should be used. Using a poor quality power supply will lead to unreliable operation so be sure it meets these requirements. One of the most common problems users have with the RPi is inadequate power supply current. To minimize electrical noise, it is recommended that ferrite beads be installed on the power cable (figure 5). Figure 5 ~ AC wall power adapter with 5 V, 2.4 A (12 W) output purchased at BestBuy. One or more clamshell ferrite beads on the dc power lead help reduce radio frequency interference from the switchmode power supply. This image shows one bead on the right with three windings of the power lead. The Raspberry Pi uses a micro‐USB connector for power. (Image © 2014 W. Reeve) 45 Software: The RPi uses a software image that includes the operating system and applications. The RPi image developed by UNM for the LWA TV GUI is based on a Raspbian distribution. The software must be user‐installed on a memory card. Installation is not difficult but it is done in a way that is not obvious to most Windows PC users. UNM provides links to web pages with the necessary procedures (see {LWA EPO}). These procedures also are briefly listed in the Software installation part of section 5. To make this process a little simpler, I can provide a preprogrammed micro‐SD card in an SD card carrier to interested readers. See Contact information at the end of this article. With this memory card, the system truly is plug‐and‐play. When running the LWA TV GUI software, the RPi can be used only for that purpose. However, the software is written in Python and may be modified by users if they feel “adventurous”. Python is an interpreted language and, therefore, is not compiled so nothing more than a text editor is needed to write or modify an application. Notepad++ is perfect for this purpose and is free {Notepad++}, but Windows Notepad will also work. The advantage of Notepad++ is that it automatically formats and indents the code to make it easier to read and work with. The main piece of software in the LWA RV GUI is lwaTV3rpi.py, about 16.5 kB of text. Examining the code shows that it includes four command line switches, or options, which may be used to customize the GUI. The program operates normally with its default settings, and there is no compelling reason to change them except for experimental purposes. Using these options requires knowledge of the operating system and I will not discuss them further. 4. LWA TV on Raspberry Pi The setup for LWA TV is very simple (figure 6). By default the LWA TV GUI uses the wired network interface (Ethernet) built into the RPi and acquires a network (IP) address automatically using dynamic host configuration protocol (DHCP). You can change this to a static IP address and add a WiFi interface. However, to eliminate many potential problems, I recommend first running the LWA TV GUI in its default configuration to become familiar with it before making any changes. See section 5 for some changes that you might find useful. With the programmed memory card installed, make all connections before applying power to the RPi: (1) HDMI connection to your monitor or television set (be sure it is turned on); (2) Ethernet connection to your internet router; and (3) micro‐USB connection to an ac power adapter. When power is applied, the RPi system automatically starts and the display will show lines of text that scroll by rather quickly. Upon completion of the boot up process, the display will momentarily blank and then the LWA TV GUI will appear. The LWA TV GUI shows the real‐time images plus archived movies (figure 7). If the program is running but does not have a proper network connection, you will see “Error Downloading Image” and “Network Connection Error” on the display (figure 8). An archived movie may be running but the live portion of the display will be gray. The LWA TV GUI connects within a second or two after the network connection is established. I did not have to make any changes in my internet router for LWA TV, but if you have network connection problems your router and its firewall are the first place to start troubleshooting (after checking that the cable is plugged in). If everything seems to be working okay it is a good idea to update both the software and the archived movies upon first use. Log into the RPi console as discussed in the RPi console part of section 5 and execute the commands given in the Update part. 46 Figure 6 ~ Block diagram and equipment list for the RPi when setup for LWA TV. See text for description of each item. Before applying power to the RPi make all connections and turn on power to the monitor or television set. (Image © 2014 W. Reeve) When connected, LWA TV downloads a daily average of approximately 25 kB/s, 91 MB/h or 2.2 GB/d. The internet traffic is split between the real‐time images and archived movies. The LWA station processes the data and prepares images in near real‐time. The LWA TV GUI checks for and downloads a new image every 5 s. Each image includes the total radio energy received during the 5 s interval, so transient emissions lasting less than 5 s are recorded. The images are about 120 kB each so the average network traffic load is about 24 kB/s. The archived movies are downloaded in the evening and are usually around 100 MB each. Downloading uses whatever internet bandwidth is available. If your internet service has download limits and imposes penalties when exceeded, it would be wise to monitor your usage closely. If you want to reduce the internet usage overnight or other times, you can simply unplug the Ethernet cable rather than shutting down the RPi. If you use a wireless network connection, you will need to use a software method to stop network usage. The LWA TV application updates the movie archive cache at 1830 in the time zone used by the RPi. By default, the LWA TV software uses mountain daylight time (MDT) but both the time zone and movie cache update time can be changed. See Date, time and time zone in section 5 for these and a method to suspend the software at night or outside normal observation times to reduce network usage. 47 Figure 7 ~ LWA TV screen. The live image at top‐left shows one or two circles depending on the current LWA operating mode. When LWA is setup for beam pointing, only one circle may appear as shown here; otherwise, two appear. The two circles at bottom‐middle are archive movies from the previous several days. The movies cover a full day, often with gaps, and each requires about 12 minutes to run. Sometimes radio frequency interference is seen along the edges of the circles. The aerial image of the LWA at lower‐left is fixed and text on right changes depending on normal or beam‐pointing view of the live image. (Image source: http://fornax.phys.unm.edu/lwa/trac/wiki/EPO) 5. Installation and Operation Notes This section provides information that will help first‐time users. It is focused on the LWA TV application. Software installation: The brief instructions here assume the reader is using a Windows PC to install the LWA TV GUI software on the memory card: (1) Install 7‐Zip {7‐Zip}, SD Formatter {SDFmt} and Win32 Disk Imager {WDImg} on the Windows PC. When running the latter two programs, run them as Administrator; (2) Put the memory card in a card reader (see Note below) connected to the PC and use SD Formatter to format the card. In SD Formatter set the Options to Format Type = Full Erase and Format Size Adjustment = On; (3) Download the LWA TV GUI software image for the RPi from {LWASoft}. The file is compressed so decompress it with 7‐Zip to a raw image file (*.img). This will take a few minutes; (4) Write the software image to the memory card with Win32 Disk Imager using its default settings. This will take a few minutes. After the Write operation is finished, the memory card is ready to use in the RPi. Be sure RFi power is OFF and insert the card. Note: Some micro‐SD cards and card readers are incompatible, so it is best to install the micro‐SD card in a full‐size SD card carrier, insert the carrier into the reader and then format the card and load the software image. 48 Figure 8 ~ If there is a network connection problem, the live globes are gray and warnings appear. During normal operation, the Error Downloading Image message may momentarily appear but it is nothing to worry about if it happens only occasionally. (Image © 2014 W. Reeve) The RPi model B uses an ordinary push‐to‐
insert/pull‐to‐release slot connector whereas the model B+ uses a push‐to‐insert/push‐to‐release slot connector. When the RPi is powered ON, the software will load and run automatically. RPi console: In order to make changes to the RPi setup (described later in this section), it is necessary to log into the RPi console. This may be done from a Windows PC that is on the same network as the RPi. or through a wireless or wired keyboard. The RPi uses secure shell (SSH) for console communications so it is necessary to install an SSH client application such as {PuTTY} or {TeraTerm} on your PC if using the network connection. To use SSH, first determine the IP address assigned to the RPi by your internet router. Procedures vary widely and it is best to read your router user manual or search for online help. The RPi host name is “lwatvgui” (without quotes) and will be identified as such in your router’s local network status screen. An alternate, and perhaps quicker, method is to download and install on a Windows PC a network scan program as described at {RPiNet}. For PuTTY place the RPi IP address into the Host Name or IP address field and click Open (figure 9). After authentication you will see the RPi login prompt. The default username is“pi” (without quotes). After you enter the username, RPi will ask for the password. For obvious reasons I will not publish the password here, but it can be obtained by emailing the address given at the very bottom of {LWA EPO}. Updates: To update the LWA TV software and archived movie cache, send the following commands one at a time using the SSH terminal described above. Wait for each process to complete before entering the next command. It is necessary to send these commands only upon first use of the LWA TV GUI image: cd ~/LWATV/ syn update ./updateMovies.py –v Sudo rpi‐update Sudo reboot It is a good idea to routinely update the Raspbian software distribution as well. Send the following commands with an SSH terminal to update the non‐LWA TV software (these updates and upgrades can require tens of minutes if new distributions have become available after the last update): sudo apt-get update
sudo apt-get upgrade
49 Figure 9 ~ Upper‐left: Screenshot of PuTTY configuration window with the IP address for one of my setups. Upper‐
right: Upon first connection, PuTTY asks for authentication. Lower‐left: When PuTTY is connected, the window changes to a simple command line interface. After login, you can make changes to the RPi. (Images © 2014 W. Reeve)
Documentation: Online documentation for the Raspberry Pi including troubleshooting information is available at {RPiDoc} and {RPiHub}. There also are numerous forums that have information related to RPi. The only documentation that exists for the LWA TV application is this article and information at {LWA EPO}. Keyboard‐mouse: The LWA TV GUI has built‐in drivers for a USB keyboard and mouse but they are not required for normal operation. However, a keyboard is nice to have if you need to directly access the RPi or cannot access it indirectly using SSH as described above. Small wired or wireless keyboards, with or without a mouse (figure 10), are available from {Adafruit}. Figure 10 ~.Wireless keyboard and mouse uses a Bluetooth connection. The keyboard is about 285 mm long. A Bluetooth dongle is included and requires one USB port as seen on the left of the RPi model B in the image. (Image © 2014 W. Reeve) Heat: The RPi processor normally runs warm but not hot. While using LWA TV I measured about 30 °C using an infrared non‐contact thermometer pointed at the processor chip. 50 Enclosure: Many different types of enclosures are available for the model B and B+ RPi, but the enclosures for one model do not fit the other. Most enclosures are plastic and provide no shielding whatsoever. This might be of concern where the RPi is used near a radio telescope antenna or receiver. An expensive aluminum enclosure is available for the model B, and it should provide better shielding. Radio frequency interference: I took some measurements with a spectrum analyzer and a shielded magnetic loop probe and electric field probe and found several spectral spikes in the high MF and low HF ranges, about 1.5 to 8 MHz or so. These were apparent only when the probes were held against the clear plastic enclosure of the model B+. I check up to several hundred MHz but found no other indications. I did not make any measurements with the aluminum enclosure on the model B. It should be noted that conducted interference in connecting cables often is radiated because the cables act like antennas, so each installation will have different RFI characteristics and it may be necessary to install ferrite beads on all connecting cables. Video monitor: The RPi uses a standard HDMi connector for video. It may be used with a monitor or TV with an HDMI input. It also may be used with a VGA monitor by using an HDMI‐to‐VGA converter or with a DVI monitor or TV with an HDMI‐to‐DVI converter. I experimented with the HDMI and VGA interfaces on monitors and televisions but did not attempt to use DVI. For portable use, say at a convention, a small screen monitor would be handy. Many compatible types are available; for example, search “monitor” at {Adafruit} to see a variety of 5.6, 7 and 10.1 in monitors with HDMI inputs. I have not tried any monitors/TVs except those discussed below. I initially connected the RPi to the HDMI port on a Hannspree HF‐199 monitor. The HF‐199 has HDMI and VGA input connectors, and its maximum resolution is WXGA+ (1440x900 pixels, 16:10 aspect ratio). I found that the displayed image was slightly elongated horizontally when using the LWA TV GUI default settings. To change the video settings, it is necessary to edit the config.txt file in the /boot/ folder of the RPi. It is best to do a little research on the internet before making any changes. Use nano to edit the file (nano is a simple text editor built‐into the software image): sudo nano /boot/config.txt After making the desired changes and saving the file, reboot the RPi: sudo reboot I tried changing the RPi video settings to different screen resolutions and eventually found that only one HDMI mode provided a better display and that was at the monitor’s maximum resolution 1440x900 (hdmi_group=2, hdmi_mode=47). However, at this high resolution, the real‐time display and archive movies sometimes would momentarily stall or skip. I then tried an HDMI‐to‐VGA converter on the monitor’s VGA input and could not obtain a good display. With many settings I had no display at all. I spent about one full day trying different port settings on the monitor and RPi. I finally gave up and settled on using only the monitor’s HDMI port. This monitor works very well at 1440x900 pixel resolution with the VGA interface on the lab PC. I also tried our Philips 47 in LCD television set. This TV has three HDMI ports and supports several resolutions, 480p, 720p, 1080p and 1080i. I found I could obtain a nice picture using RPi settings for 720p (hdmi_group=1, hdmi_mode=4) and overscan (overscan_right=40, overscan_left=40, overscan_top=16, overscan_bottom=16) (figure 11). Although this TV supports 1080p and 1080i, I could not find any RPi overscan settings that provided a properly positioned horizontal display. Based on my experience so far, I think the video interface implementation is the RPi’s biggest shortcoming (the video implementation is separate from the LWA TV GUI). Perhaps with enough time and experimentation, I could make it work better at different resolutions. 51 Figure 11 ~ Philips 47 in LCD television set connected through one of its HDMI ports to the RPi. The RPi HDMI port was set for 720p resolution (see text). (Image © 2014 W. Reeve) As a final video test, I connected a Dynex 19 in LED‐LCD TV that I use in the lab. This is a small set designed as a kitchen counter TV with a wide range of video inputs. After using the TV menu to select the HDMI port, the screen immediately showed the correct display. I made no changes in the RPi video settings (720p) used with the 47 in TV previously described. Date, time and time zone: By default, the Raspbian distribution uses Network Time Protocol (NTP) to automatically set the RPi time when it is connected to the internet. The RPi does not have a real‐time clock or battery backup, so it must be running and connected to the internet to correctly set time and date. To confirm the date, time and time zone, enter the following at the RPi prompt on the SSH terminal: date To change the time zone, enter the following. The displayed instructions will lead you through the reconfiguration: sudo dpkg-reconfigure tzdata To confirm the scheduled download time for the daily LWA TV movie archive update, enter the following to see what is in the cron table (cron is a utility that runs automatically in the background at specified times): crontab –l You should see a number of comments with the last two lines as follows: # m h dom mon dow
command 30 18 * * * python ~pi/LWATV/updateMovies.py The last line is the scheduled event with a time of 1830 in the system time zone. It is shown in crontab with minutes before the hour. To change the scheduled time, enter the following to edit the cron table. This will 52 invoke the default editor and allow you to change the time in the table. Do not change anything on the last line except the minutes and hour: crontab –e The crontab function also can be used to temporarily stop and then restart the LWA TV application software at regular intervals to reduce network usage. For example, you could use a stop process at a specified time, say 2200 in the evening, and then a start process the next morning at 0700. The stop and start times can be set as required and are easy to change depending on observation activities. Each hour the software is suspended will reduce network usage by about 91 MB. It will be necessary to coordinate the start and stop times with the movie update time discussed above. To use the suspension feature, add the following three lines to the cron table using the cron table editor (crontab –e). The lines shown here will start the program at 0700 and stop it at 2200: DISPLAY=”:0” 0 7 * * * python ~pi/LWATV/lwatv3.rpi.py 0 22 * * * pkill –f lwatv3.rpi.py When using this feature, the RPi must be running and connected to the network. Simply delete the lines if you later change your mind about using the suspension feature. WiFi and static IP: Instructions for changing the RPi to a static IP address and adding WiFi access can be found on the internet but, like a lot of things on the internet, there is more useless than usable information. I found these procedures worked for me (these are the same links as given on the LWA TV website): {RPiWi‐Fi} and {RPiIP}. The RPi works fine with both the Ethernet and WiFi connections enabled and it is not necessary to unplug one when using the other. You will need a WiFi dongle (figure 12). I purchased one from {Adafruit}. It should be remembered that a wireless dongle derives power from the RPi USB port and this power is in addition to that required by the RPi itself. The dongle should be plugged into the USB port before power is applied to the RPi; otherwise, the RPi will reboot because of the momentary voltage drop on its power bus. This is a design deficiency in the RPi. Figure 12 ~.WiFi dongle provides wireless access and uses one USB port. I found the distance from the RPI to the wireless access point to be surprisingly good (> 3 m) in spite of its very small antenna. (Image source unknown) The following commands can be used to check the quality of the wireless connection after it has been setup: sudo iwlist wlan0 scan or sudo iwconfig Downtime: Sometimes the LWA TV does not seem to be working or the display does not properly render the archive movies or live presentation. You may see “Error Downloading Image” and “Network Connection Error” on the display for brief periods. This does not appear to be a fault with the RPi but possibly with the network connection or the UNM server and related maintenance activities. It also may occur during the transition from normal view to beam pointing view. The outages do not last long, maybe tens of minutes at most, and always self‐corrected (in other words, I just let the RPi run and never rebooted it). If you suspect your WiFi connection, confirm connectivity as described in the previous item. Backup: You will want to backup your memory card after any major changes. You will need this backup if you corrupt the program so badly that it will not boot. There are several ways to run a backup. If you are a Windows user, you can use Win32DiskImager, the same program used to Write the image to the memory card in the first place. However, to backup, you will Read the image. This method requires removing the SD card from the RPi 53 and then inserting it in a card reader connected to the Windows PC. Be sure to shutdown the RPi before removing the memory card (see next item). Shutdown the RPi: To avoid corrupting the RPi software, the system must be properly shutdown before removing power (just like a Windows PC). This may be done from a keyboard connected to the RPi by pressing CTRL‐ALT‐F1 to invoke the console directly on the display, or by using an SSH client on a PC. Log into RPi at the prompts and then enter; sudo shutdown –h now or sudo halt The display will indicate the shutdown process. All LED indicators except the red power LED on the RPi board will extinguish when the shutdown is complete. Power may then be removed. If you are at the console and change your mind before entering the shutdown commands, press CTRL‐ALT‐F7 to return to LWA TV. References and Web Links {7‐Zip} http://www.7‐zip.org/http://www.7‐zip.org/ {Adafruit} http://www.adafruit.com/http://www.adafruit.com/ {LWA} http://www.phys.unm.edu/~lwa/index.htmlhttp://www.phys.unm.edu/~lwa/index.html {LWA TV} http://www.phys.unm.edu/~lwa/lwatv.htmlhttp://www.phys.unm.edu/~lwa/lwatv.html {LWA EPO} http://fornax.phys.unm.edu/lwa/trac/wiki/EPOhttp://fornax.phys.unm.edu/lwa/trac/wiki/EPO {LWASoft} http://fornax.phys.unm.edu/lwa/trac/downloads/http://fornax.phys.unm.edu/lwa/trac/downloads
/ {Notepad++ http://notepad‐plus‐plus.org/http://notepad‐plus‐plus.org/ } http://www.putty.org/http://www.putty.org/ {PuTTY} http://www.raspberrypi.org/http://www.raspberrypi.org/ {RPi} {RPiDoc} http://www.raspberrypi.org/documentation/http://www.raspberrypi.org/documentation/ {RPiHub} http://elinux.org/RPi_Hubhttp://elinux.org/RPi_Hub {RPiNet} http://www.cpdforteachers.com/resources/finding‐the‐ip‐address‐of‐your‐raspberry‐
pihttp://www.cpdforteachers.com/resources/finding‐the‐ip‐address‐of‐your‐raspberry‐pi {RPiIP} https://www.modmypi.com/blog/tutorial‐how‐to‐give‐your‐raspberry‐pi‐a‐static‐ip‐
addresshttps://www.modmypi.com/blog/tutorial‐how‐to‐give‐your‐raspberry‐pi‐a‐static‐ip‐address
{RPiWi‐Fi) http://www.howtogeek.com/167425/how‐to‐setup‐wi‐fi‐on‐your‐raspberry‐pi‐via‐
thehttp://www.howtogeek.com/167425/how‐to‐setup‐wi‐fi‐on‐your‐raspberry‐pi‐via‐the‐
command‐line/command‐line/http://www.howtogeek.com/167425/how‐to‐setup‐wi‐fi‐on‐your‐
raspberry‐pi‐via‐the‐command‐line/ https://www.sdcard.org/downloads/formatter_4/https://www.sdcard.org/downloads/formatter_4
{SDFmt} / {TeraTerm} http://ttssh2.sourceforge.jp/index.html.enhttp://ttssh2.sourceforge.jp/index.html.en {WDImg} http://sourceforge.net/projects/win32diskimager/http://sourceforge.net/projects/win32diskimage
r/ Acknowledgement Jayce Dowell at UNM helped me immensely with this project, and I hereby extend my thanks and appreciation. The ratio of Jayce’s knowledge of the Raspberry Pi and LWA to my knowledge is very close to infinity/zero. Contact Information for Preprogrammed Memory Card 54 A preprogrammed micro‐SD memory card may be ordered by emailing: The micro‐SD card includes an SD carrier and will work in either the Raspberry Pi model B or B+. The cost is 15 USD including postage to any US destination and most other countries. About the Author: Whitham Reeve has been a director of SARA and presently is a contributing editor for the SARA journal, Radio Astronomy. He worked as an engineer and engineering firm owner/operator in the airline and telecommunications industries for more than 40 years and currently manufactures solar radio spectrometers and accessories. 55 Cohoe Radio Observatory, Alaska ~ Part 5, Observatory Infrastructure and Building Whitham D. Reeve 1. Introduction This article series describes construction of a new radio observatory in Cohoe, Alaska. The current part, Part 5, describes the construction work undertaken during summer 2014. The previous four parts in this series are 5 Part 1, Radio Frequency Interference Survey [Reeve1] 5 Part 2, Guyed Tower Foundation Construction [Reeve2] Note: References in brackets [ ] are provided in section 7. 5 Part 3, Guyed Tower Installation [Reeve3] 5 Part 4, Callisto Antenna System [Reeve4] The latest work consisted of construction of a driveway and the installation of water, sewer and electric lines, building foundation and the building itself. The building exterior is finished but the interior is not. The activities are individually described in the following sections. My original plan was to have this entire project completed by end of summer but demands for radio equipment that I manufacture took away from my time at Cohoe. However, as described in more detail in the following sections, the building is in‐place and ready for interior work and, thus, the major construction activities are done. 2. Driveway I contracted a local company to build a 100 ft driveway from the existing built‐up area to the new building location adjacent to the tower described in Parts 2 and 3. The soil at the site consists of about 6 in of peat on 2 to 3 ft of red sandy clay (top soil) and hard, compacted sand and gravel to a depth of 15 ft, the latter being very good road foundation material. For the driveway, the top soils were removed and replaced with imported sand and gravel. Starting at the built‐up area, the excavator removed the roots and top soil and placed them aside (figure 1). A dump truck then emptied a load of sand and gravel material into the excavated area. The dump truck stayed inplace while the previously excavated top soil and root masses were loaded into the empty dump (figure 2). When full the dump truck left to dispose of the material and pick up a new load of sand and gravel. Meanwhile, the new material was spread by a small tracked front‐end loader. This process was repeated for the full length of the 10 ft wide driveway (figure 3). The job required about 12 dump truck loads and, including the utilities described in the next section, 1.5 d work time. 56 Figure 1 ~ An excavator with a wide bucket removes the top soils from the hard‐pan sand and gravel mixture while the contractor’s helper looks on. (Image © 2014 W. Reeve) Figure 2 ~ Left: After dumping a load of sand and gravel backfill, the dump truck is loaded with the roots and top soils to be disposed of. Right: A small tracked front‐end loader spreads, compacts and levels the backfill in the driveway. (Images © 2014 W. Reeve) 57 Figure 3 ~ The completed driveway is 100 ft long and 10 ft wide. The tower can be seen in the back at the right. (Image © 2014 W. Reeve) 3. Utilities A water well, recreational septic system and electrical distribution were built in 2011 for one of the existing cabins and a camping trailer on the Cohoe site. The well is to be reused but I built a new, larger septic system to serve the new observatory and existing and future cabins. A new 1 in diameter HDPE water line and 2 AWG aluminum underground residential distribution (URD) electric cable were trench laid on one side of the new driveway from the new building location to an existing cabin, where the new lines are to be connected to existing. A joint trench for these lines was dug by the excavator with a narrow bucket after the driveway was completed. This method kept the structural soils from being mixed with the unusable top soils. The URD cable consists of three (triplex) conductors, each with an extremely tough cross‐linked polyethylene (XLPE) insulation designed for direct‐buried applications. The cable is identical to that used by electric utilities and carries the necessary UL listing for my application. I installed a metal junction box at an existing cabin and rerouted the existing electric distribution line in flexible conduit to it. I tapped the new electric line into the existing at this location. At the observatory end, the electric line was installed in a flexible conduit to a load center, which I installed inside. The new observatory building has no metallic paths to other grounding systems at the Cohoe site, so National Electrical Code allows the grounded circuit conductor (neutral) in the feeder and the electrical equipment to be bonded to a local earth grounding electrode system. Using a 10 lb sledge hammer (the arm‐strong method), I drove an 8 ft x 5/8 in ground rod outside and below the load center. In addition to the load center I bonded this rod to the tower ground rod about 10 ft away at the tower base. The observatory electrical system will include circuits for lighting, convenience receptacles, radio equipment, water heater and ventilation. 58 The septic system consists of a 2‐chamber septic tank and associated drain (or leach) field. Two 4 in sewage lines were laid in separate trenches from a Y‐connection, one to the new observatory building and the other to the cabin where the water and electric lines are tapped (figure 4). The septic system includes clean‐outs, vents, inspection ports and other features required by State of Alaska regulations. Figure 4 ~ Left: The 4 in sewer line is laid in a trench from the new building location. The vertical pipe in the middle of the picture is a cleanout near the new building. The tower foundation is seen at upper‐right. Right: The septic tank is almost completely buried in this picture. The two vertical black pipes are vents and inspection ports. Part of the (turquoise) line to the drain field and a monitor tube can be seen in the background. (Images © 2014 W. Reeve) 4. Foundation I looked at two alternative foundation types, one using buried Sonotube concrete forms and another using a driven metal helix post system. By now I was tired of mixing concrete so I contracted with Techno Metal Post Alaska to install helix posts. A special diesel‐powered, wheeled vehicle is used to hydraulically screw the posts into the ground (figure 5). Each post is driven until a predetermined torque limit is reached. The torque is related to the load rating of the post as determined from engineer certified load charts and tables. The post layout is simple (figure 6). The helix posts are 3.5 in diameter x 8 ft long. If a longer length is needed to achieve the desired driving torque, a 7 ft pipe section is welded to the first, with a coupling for alignment, and driving continues. This process is repeated as necessary until the needed torque is reached. Any excess lengths are simply sawed off. In my installation, because of the extremely hard ground underneath the top soils, only a few posts needed an extension of a few feet. The posts varied from 5 to 10 ft depth with compression load ratings of 13 000 to 20 000 lb. TMP Alaska used two hydraulic motor heads, one for initial driving of the ten posts and a second with a different gearing arrangement and more torque that turned slower for the final driving. Changing the motor required only a few minutes. Upon completion of the post driving operation, the posts were marked with a laser level and cut with a portable band saw. TMP Alaska’s trailer included a self‐powered arc welder, and the final operation consisted of welding U‐brackets to the top of each post for the beams (figure 7). The complete job required a total of 6 h from the time TMP Alaska arrived at Cohoe to their departure. 59 Figure 5 ~ The self‐powered post driver (called R2D) was brought to the site in an enclosed trailer hauled behind TMP Alaska’s pickup truck. The machine has local and wireless controls and uses a diesel engine with hydraulic pump. An 8 ft post with helix at the bottom can be seen hanging from the geared hydraulic motor ready for installation. The posts are galvanized steel and covered with green plastic sleeves. The sleeve eliminates frost heaving due to adfreeze of the steel posts and the ground during winter. (Image © 2014 W. Reeve) 5. Observatory Building The observatory building will house all radio and electronic equipment and living quarters. The building uses conventional 2x4 wood‐frame construction and is 24 ft long x 12 ft wide plus a 4 ft porch (figure 8). It was prebuilt to order by a company called Sterling Supply in the town of Sterling about 35 road miles away. When I ordered the building, I specified window sizes and locations and door location and with finished exterior but unfinished interior. My order also included exterior sheathing below the floor joists and foam insulation in the joist cavities. After I completed the foundation, Sterling Supply delivered the building to Cohoe on a special trailer. The trailer was maneuvered into position and the building lowered onto the foundation beams. The delivery truck and trailer were on‐site < 30 min. I was unable to be on‐site during delivery so have no pictures of the process. The main source of heat will be a small air‐tight wood stove, which will be installed when the interior is finished in summer 2015. The stove will be used only when the observatory is occupied and the inside temperature is uncomfortably low. The observatory radio equipment will be installed in a cabinet and self‐heated. 28'‐0" 60 4'‐0"
24'‐0"
Figure 6 ~ Plan view of the foundation showing the post and beam structure and building walls. Additional strength is provided by beams in the building floor structure (not shown). (Image © 2014 W. Reeve) Figure 7 ~ Left: This view looking down the driveway was taken shortly after the ten helix posts were installed. Right: The next day I installed pressure‐treated outdoor wood beams for the building to rest on. This view is looking up the driveway toward the original Cohoe cabin. The foundation was lined up with the driveway so the building could be delivered on a trailer. (Images © 2014 W. Reeve) 61 Figure 8 ~ Upper: Observatory building resting on its foundation the day after delivery. The stairs have not yet been built but all other exterior work is completed. The green metal roofing sheds snow very easily, so an ice bridge will be built between the tower and building cable entrance to protect the coaxial and rotor control cables to the tower. Lower‐left: View of the observatory building from the end of the driveway. The tower can be seen on the right. Lower‐right: Inside view of unfinished building looking toward the front. The roof is made from built‐up trusses and the cavities between floor joists are sealed and insulated. The usable interior floor space is approximately 250 ft2 and walls are 8 ft high (Images © 2014 W. Reeve) 6. Next Step The next step consists of indoor work including bathroom construction and installation of associated plumbing, electrical wiring and wall and ceiling insulation, and wall, floor and ceiling finishing. 62 7. References: [Reeve1] [Reeve2] [Reeve3] [Reeve4] Reeve, W., Radio Frequency Interference Survey at Cohoe Radio Observatory, Alaska, Radio Astronomy, Society of Amateur Radio Astronomers, September‐October 2013 Reeve, W., Cohoe Radio Observatory, Alaska ~ Part 2, Guyed Tower Foundation Construction, Radio Astronomy, Society of Amateur Radio Astronomers, November‐December 2013 Reeve, W., Cohoe Radio Observatory, Alaska ~ Part 3, Guyed Tower Installation, Radio Astronomy, Society of Amateur Radio Astronomers, January‐February 2014 Reeve, W., Cohoe Radio Observatory, Alaska ~ Part 4, Callisto Antenna System, Radio Astronomy, Society of Amateur Radio Astronomers, May‐June 2014 8. Units of Measure Conversion Many unit converters can be found online: http://www.digitaldutch.com/unitconverter/volume.htm, but for convenience conversions of the non‐metric units used in this article are shown below. Convert from To Multiply by 2
acre square kilometer (km ) 0.004 inches (in) millimeter (mm) 25.4 feet (ft) meter (m) 0.305 mile (mi) kilometer (km) 1.6 pound (lb) kilogram (kg) 0.454 63 Book Review Title: Unseen Cosmos: the universe in radio Author: Francis Graham‐Smith Publisher: Oxford University Press ISBN: 978‐0‐19‐966058‐2 Date Published: 2013, 1st edition Length: 238 pages, chapter notes and index Status: See text Availability: Hard cover, Amazon, US$34.95 Reviewers: Whitham Reeve & Stan Nelson Most readers who have been involved in radio astronomy will recognize the author’s name, Francis Graham Smith. Smith, who along with Ryle discovered Cygnus A in the 1940s, has written numerous books over the years. In Unseen Cosmos, Smith is both entertaining and explanatory, with very little mathematics. Smith shares with us historical, current, and future views of the future from his perspective as a pioneer in radio astronomy. For the beginning amateur radio astronomer this British book should give you a good grasp of the terminology and concepts in mostly laymen’s language. While the book does not discuss amateur radio astronomy specifically, it would be a valuable starting point for the amateur. Smith’s book is broken up into 11 chapters. The first chapter, Radio Noise from Space, discusses the early pioneers, Karl Jansky and Grote Reber. The next 10 chapters cover topics about the sun and planets, our galaxy, cosmic rays, radio galaxies and quasars, supernovae and pulsars, pulsar clocks and relativity, cosmology, dishes and arrays. The final chapter addresses the major new radio astronomy arrays called LOFAR, ALMA, and SKA arrays. We found figures such as 11 and 12 on pages 27 and 28 a little confusing due to the use of (a) and (b) that don’t correlate well with the two illustrations. The print is large with decent line spacing for easy reading. The book is well illustrated with black and white photos and diagrams. There are 17 color plates in the middle of the book. We both found the separation between B/W illustrations and color images a little annoying especially when the text referred to both to explain a phenomenon. It would have been nice if all illustrations were presented in order. However, publishers often bind the color images in the middle of the book separately to keep production costs down. This book is a very broad overview that mentions every aspect of professional radio astronomy (i.e., big science), but sometimes too briefly. A few explanations were so brief they were difficult to follow (but it is difficult to explain extremely complex physics in a non‐technical way). However, for the most part, the book is well written and easy to follow. One underlying theme of everything written about radio astronomy, including Unseen Cosmos, is that discoveries are enabled by new technology, not just bigger telescopes. Radio astronomy really took off after WWII, mainly because lots of state‐of‐the art radio equipment became available cheaply. But it wasn't long before new discoveries could be made only by continually advancing the state‐of‐the‐art. There is a relatively comprehensive and quite interesting discussion of the several different types of pulsars, including the discoveries made by Joe Taylor and Russel Hulse. Taylor gave a very interesting talk at the 2014 SARA summer conference on these discoveries. 64 In one section on page 71, Synchrotron Radiation, Graham‐Smith writes about Hannes Alfen’s discovery of the connection between laboratory synchrotron radiation and cosmic radio waves. This helped to solve the mystery of the origin of Karl Jansky’s discovery of radiation from the Milky Way. The book does not list references at the end of chapters or end of book. Instead, there are eight pages of notes at the end of book that often include references to original scientific journals. Unfortunately, scientific journals usually are not accessible to ordinary readers and probably would not be of any use to them anyway. It would have been nice if the author had provided a recommended reading list for readers wanting a little more depth without the opaque math and physics of a scientific journal paper. For readers wanting to expand their radio astronomy knowledge this book is definitely worth adding to your collection. 65 Space Place partner’s article: Twinkle, twinkle, variable star September, 2014 By Dr. Ethan Siegel As bright and steady as they appear, the stars in our sky won't shine forever. The steady brilliance of these sources of light is powered by a tumultuous interior, where nuclear processes fuse light elements and isotopes into heavier ones. Because the heavier nuclei up to iron (Fe), have a greater binding energies‐per‐nucleon, each reaction results in a slight reduction of the star's mass, converting it into energy via Einstein's famous equation relating changes in mass and energy output, E = mc2. Over timescales of tens of thousands of years, that energy migrates to the star's photosphere, where it's emitted out into the universe as starlight. There's only a finite amount of fuel in there, and when stars run out, the interior contracts and heats up, often enabling heavier elements to burn at even higher temperatures, and causing sun‐like stars to grow into red giants. Even though the cores of both hydrogen‐burning and helium‐burning stars have consistent, steady energy outputs, our sun's overall brightness varies by just ~0.1%, while red giants can have their brightnesses vary by factors of thousands or more over the course of a single year! In fact, the first periodic or pulsating variable star ever discovered—Mira (omicron Ceti)—behaves exactly in this way. There are many types of variable stars, including Cepheids, RR Lyrae, cataclysmic variables and more, but it's the Mira‐type variables that give us a glimpse into our Sun's likely future. In general, the cores of stars burn through their fuel in a very consistent fashion, but in the case of pulsating variable stars the outer layers of stellar atmospheres vary. Initially heating up and expanding, they overshoot equilibrium, reach a maximum size, cool, then often forming neutral molecules that behave as light‐blocking dust, with the dust then falling back to the star, ionizing and starting the whole process over again. This temporarily neutral dust absorbs the visible light from the star and re‐emits it, but as infrared radiation, which is invisible to our eyes. In the case of Mira (and many red giants), it's Titanium Monoxide (TiO) that causes it to dim so severely, from a maximum magnitude of +2 or +3 (clearly visible to the naked eye) to a minimum of +9 or +10, requiring a telescope (and an experienced observer) to find! Visible in the constellation of Cetus during the fall‐and‐winter from the Northern Hemisphere, Mira is presently at magnitude +7 and headed towards its minimum, but will reach its maximum brightness again in May of next year and every 332 days thereafter. Shockingly, Mira contains a huge, 13 light‐year‐long tail ‐‐ visible only in the UV ‐‐ that it leaves as it rockets through the interstellar medium at 130 km/sec! Look for it in your skies all winter long, and contribute your results to the AAVSO (American Association of Variable Star Observers) International Database to help study its long‐term behavior! Check out some cool images and simulated animations of Mira here: http://www.nasa.gov/mission_pages/galex/20070815/v.html Kids can learn all about Mira at NASA’s Space Place:http://spaceplace.nasa.gov/mira/en/ 66 Images credit: NASA's Galaxy Evolution Explorer (GALEX) spacecraft, of Mira and its tail in UV light (top); Margarita Karovska (Harvard‐Smithsonian CfA) / NASA's Hubble Space Telescope image of Mira, with the distortions revealing the presence of a binary companion (lower left); public domain image of Orion, the Pleiades and Mira (near maximum brightness) by Brocken Inaglory of Wikimedia Commons under CC‐BY‐SA‐3.0 (lower right). 67 Membership New Members Please welcome our new or returning SARA members who have joined since the last journal. If your name is missing or misspelled, please send an email to treasurer@radio‐astronomy.org. We will make sure it appears correctly in the next Journal issue. As of October 14, 2014: First Name Last Name City State Country Ham ID Gary Evans Sebastopol CA USA N6PAW Michael Anthony Jack J Lee Hollock Kroes Lobingier Varvaro Hampton Pulaski Houston Gillette VA WI TX WY USA USA USA USA SARA Membership Dues and Promotions Membership dues are $20.00 US per year and all dues expire in June. Student memberships are $5.00 US per year. Members joining from June to December of 2014 will renew their membership June 2015. Members joining January to June 2015 will renew June 2016. Or pay once and never worry about missing your dues again with the SARA Life Membership. SARA Life Memberships are now offered for a one‐time payment of twenty times the basic annual membership fee (currently $400 US). Journal Archives & Other CDs Promotion The entire set of The Journal of The Society of Amateur Radio Astronomers is available on CD. It goes from the beginning of 1981 to the end of 2013 (over 5000 pages of SARA history!) Or you can choose one of the following CD’s or DVD:* (Prices are US dollars and include postage.)  SARA Journals from 1981 through 2013  SARA Mentor CD, compiled by Jim Brown  SARA Navigator (IBT) CD and DVD, compiled by Jon Wallace Prices, US dollars, including postage Members Each disk $15.00 Disk + 1 year membership extension $30.00 Non‐members Each disk $25.00 Disk + 1 year membership $30.00 Non‐USA members Each disk $20.00 (airmail) Disk + 1 year members extension $35.00 *Already a member and want any or all of these CD’s or DVD’s? Buy any one for $15.00 or get any three for $35.00. SARA Store (http://www.radio‐astronomy.org/e‐store) 68 SARA offers the above CDs, DVDs, printed Proceedings and Proceedings on CD and other items at the SARA Store: http://www.radio‐astronomy.org/e‐store. Proceeds from sales go to support the student grant program. Members receive an additional 10% discount on orders over $50 US. Payments can be made by sending payment by PayPal to treasurer@radio‐astornomy.org or by mailing a check or money order to SARA, c/o Melinda Lord, 2189 Redwood Ave, Washington, IA 52353 SARA Online Discussion Group SARA members participate in the online forum at http://groups.google.com/group/sara‐list. This is an invaluable resource for any amateur radio astronomer. SARA Conferences SARA organizes multiple conferences each year. Participants give talks, share ideas, attend seminars, and get hands‐on experience. For more information, visit http://www.radio‐astronomy.org/meetings. Facebook Like SARA on Facebookhttp://www.facebook.com/pages/Society‐of‐Amateur‐Radio‐
Astronomers/128085007262843 Twitter Follow SARA on Twitter #radio astronomy1 What is Radio Astronomy? This link is for a booklet explaining the basics of radio astronomy. http://www.radio‐astronomy.org/pdf/sara‐beginner‐booklet.pdf 69 70 Administrative Officers, directors, and additional SARA contacts The Society of Amateur Radio Astronomers is an all‐volunteer organization. The best way to reach people on this page is by email with SARA in the subject line SARA Officers President: Ken Redcap, president@radio‐astronomy.org, +1 248‐630‐6810 Vice President: Tom Hagen, vicepres@radio‐astronomy.org, +1 248‐650‐8951 Secretary: Bruce Randall, secretary@radio‐astronomy.org, +1 803‐327‐3325 Treasurer: Melinda Lord, treasurer@radio‐astronomy.org, +1 319‐591‐1130 Past President: William Lord, tbd@radio‐astronomy.org, +1 319‐591‐1131 Founder & Director Emeritus: Jeffrey M. Lichtman, [email protected], +1 954‐554‐3739 Board of Directors Name Term expires Email Jim Brown 2015 [email protected] Chip Sufitchi 2015 [email protected] Carl Lyster 2016 [email protected] Stephen Tzikas 2016 [email protected] David James 2016 [email protected] Curt Kinghorn 2015 [email protected] Keith Payea 2016 [email protected] Stan Nelson 2015 [email protected] Other SARA Contacts All Officers ‐‐‐‐ officers@radio‐astronomy.org Annual Meeting Coordinator Vice President vicepres@radio‐astronomy.org All Radio Astronomy Editors ‐‐‐ editor@radio‐astronomy.org Radio Astronomy Editor Kathryn Hagen [email protected] Radio Astronomy Contributing Editor Christian Monstein [email protected] Radio Astronomy Contributing Editor Whitham D. Reeve [email protected] Radio Astronomy Contributing Editor Stan Nelson [email protected] Educational Outreach Jon Wallace education@radio‐astronomy.org Grant Committee ‐‐‐‐ grants@radio‐astronomy.org International Ambassador Librarian Membership Chair Tom Crowley membership@radio‐astronomy.org Mentor Program Jon Wallace mentor@radio‐astronomy.org Navigators Tom Crowley [email protected] Technical Queries David Westman technical@radio‐astronomy.org Webmaster Ciprian (Chip) Sufitchi webmaster@radio‐astronomy.org 71 Resources Great Projects to Get Started in Radio Astronomy Looking for a Winter Astronomy Observing Project – Think Radio By Tim Spuck – AUI STEM Education Development Officer ‐ [email protected] Are you an amateur astronomer looking for a new observing challenge, or perhaps a student looking for a unique science fair project? Or maybe you’re a K through college formal or informal educator looking for space science related projects to engage your students, or ways to integrate engineering practices into your curriculum? The largest coalition of amateur astronomy organizations in the world, the Astronomical League (AL), and the National Radio Astronomy Observatory (NRAO) have teamed up, with support from Associated Universities Inc., to begin a new astronomy “badge” program. You may have gazed at the stars, enjoyed meteors streaking across the sky, or looked at the massive planet Jupiter through a telescope, but most people don’t think about the invisible universe we miss by using our eyes alone. Unlike most AL observing programs, the new Radio Astronomy Observing Program (RAOP) encourages explorers of all ages to gaze to the cosmos and “see” the invisible radio universe. Many objects in space (e.g. the Sun, Jupiter, gas and dust in the Milky Way, etc.) emit radio waves. RAOP is designed to introduce and encourage observations in the radio part of the electromagnetic spectrum, as well as the construction of various types of radio telescopes and observing instruments. RAOP focuses on five major observing projects, including 1) Space Weather, 2) the Sun, 3) the planet Jupiter, 4) Meteors, and 5) Galactic Radio Sources. Each of the projects can be completed using various instruments that either individuals or small teams construct themselves, or existing radio telescopes at the NRAO facilities, or elsewhere. Projects range from beginner to advanced levels, and are open to amateur astronomers, K through college educators, and learners of all ages. Participants earn a bronze certificate, awarded by the Astronomical League, for completing a single observing project, a silver certificate and silver pin for completion of two projects, and those who complete four observing projects are awarded the RAOP gold certificate and pin. In addition to getting people to think about astronomy in a new “light”, the RAOP can help bring together educators and amateur astronomers to address critical needs in science, technology, engineering, and mathematics (STEM) education. The U.S. Federal STEM 5Year Strategic Plan calls for the Nation to “increase and sustain youth and public engagement in STEM by supporting a 50 percent increase in the number of U.S. youth who have an authentic STEM experience each year prior to completing high school.” In addition the Next Generation Science Standards (NGSS) call for the integration of engineering practices in science learning K through 12. Amateur astronomers are known for the excellent education and public outreach work they do, and through the Astronomical League’s 10,000+ members, and collaboration with NRAO, the new RAOP will work to address these national priorities. Begin exploring the invisible radio universe today! Check out the new Radio Astronomy Observing Program online at http://www.astroleague.org/programs/radio‐
astronomyhttp://www.astroleague.org/programs/radio‐astronomy‐observing‐programobserving‐program. 72 The Radio Jove Project monitors the storms of Jupiter, solar activity and the galactic background. The radio telescope can be purchased as a kit or you can order it assembled. They have a terrific user group you can join. http://radiojove.gsfc.nasa.gov/ The INSPIRE programuses build‐it‐yourself radio telescope kits to measure and record VLF emissions such as tweeks, whistlers, sferics, and chorus along with man‐made emissions. This is a very portable unit that can be easily transported to remote sites for observations. http://theinspireproject.org/default.asp?contentID=27 Sky Scan Awareness Project When a meteor passes through the Earth's atmosphere, it ionizes the atmosphere which improves its ability to reflect radio waves. This allows you to briefly hear a far away radio station that you normally couldn't detect. In this project, you can install an antenna, use an FM radio receiver, computer software, and learn to observe meteor showers using this very simple radio telescope. For more information about this project, please visit http://www.skyscan.ca/getting_started.htm . SARA/Stanford SuperSID Stanford Solar Center and the Society of Amateur Radio Astronomers have teamed up to produce and distribute the SuperSID (Sudden Ionospheric Disturbance) monitor. The monitor utilizes a simple pre‐amp to magnify the VLF radio signals which are then fed into a high definition sound card. This design allows the user to monitor and record multiple frequencies simultaneously. The unit uses a compact 1 meter loop antenna that can be used indoors or outside. This is an ideal project for the radio astronomer that has limited space. To request a unit, send an e‐mail to supersid_at_radio‐astronomy_dot_org
73 Education Links Space Weather Prediction Center Announces New Website On Tuesday October 14th, NOAA’s Space Weather Prediction Center will transition its new website into operational status. From this date forward www.spaceweather.gov and www.swpc.noaa.gov will link to the new website that is currently in final beta release at origin‐www.swpc.noaa.gov. SWPC’s legacy website will be available to all users for a transition period of at least 60 days. The legacy website will be located at legacy‐www.swpc.noaa.gov. Please note that if you have bookmarks or automatic links to pages on the old website, these links will no longer work. Most of the content will be available on the new site under new links and we will work with customers who bring up specific content issues to ensure that their links are re‐established on the new site. Since April 2014, NOAA’s Space Weather Prediction Center (SPWC) has sought feedback from stakeholders and customers via a survey on the beta release of the new website. We will continue to respond to feedback from stakeholders and customers regarding issues of content or behavior of the new site as we go through this transition to operational status. For questions or feedback regarding this action, please use our feedback form (http://origin‐
www.swpc.noaa.gov/content/contact‐us) or contact: Dr. Steven Hill Space Weather Prediction Center Boulder, CO 80305 303‐497‐3283 [email protected] Of particular interest to SARA members is one of the dashboards designed especially for space weather enthusiasts: http://origin‐www.swpc.noaa.gov/communities/space‐weather‐enthusiasts . Frequency Agile Solar Radio Telescope: http://www.ovsa.njit.edu/fasr/ Would you please make up your mind – Voyager spacecraft might not have reached interstellar space: http://news.agu.org/press‐release/voyager‐spacecraft‐might‐not‐
have‐reached‐interstellar‐space/ See also, So Where the Heck IS Voyager 1, Anyway?: http://time.com/3023509/where‐is‐voyager‐1/ And, finally, Is Voyager in Interstellar Space?: http://www.pddnet.com/news/2014/08/voyager‐interstellar‐ space?et_cid=4111701&et_rid=210447177&location=top Science Graphic of the Week: Jupiter’s Huge, Crazy Magnetic Field: http://www.wired.com/2014/07/science‐ graphic‐jupiter‐magnetic‐field/ Solar “superstorm” just missed Earth in 2012 (or, time to build your underground shelter and stock up on canned chili and AA batteries): http://www.cbsnews.com/news/solar‐super‐storm‐just‐missed‐earth‐in‐
2012/ Original newsreel story – dedication of the Jim Creek VLF transmitter, NLK, in 1953: U.S. Navy opens 1 megawatt transmitter in Cascade Mountains of Washington, known as 'Radio Jim Creek”: https://archive.org/details/LargestR1950. See also: http://www.navy‐radio.com/commsta/jimcreek.htm Spectrum Management for Radio Astronomy, Proceedings of the IUCAF Summer School, Green Bank, 2002: http://www.iucaf.org/sschool/procs/ 74 Radio quiet, please – protecting radio astronomy from interference: http://arxiv.org/abs/0906.2268v1 Sky & Telescope magazine, October 2014 issue: Discovering the Radio Sun, The wartime discovery of radio emissions from the Sun gave birth to the field of solar radio astronomy: http://www.skyandtelescope.com/sky‐ and‐telescope‐magazine/inside‐october‐2014‐issue/ Primers from Marki Microwave: Balun Basics: http://www.markimicrowave.com/Assets/appnotes/balun_basics_primer.pdf Mixer Basics: http://www.markimicrowave.com/Assets/appnotes/mixer_basics_primer.pdf Power Dividers and Couplers: http://www.markimicrowave.com/Assets/appnotes/microwave_power_dividers_and_couplers_primer.p
df Radio News, Radio & Television News, Radio & TV News magazines from 1919 through 1959, Electronics World magazine from 1959 through 1972, and more: http://www.americanradiohistory.com/Radio_News_Master_Page_Guide.htm dB or Not dB? Everything You Ever Wanted to Know About Decibels But Were Afraid to Ask: http://techonline.com/electrical‐engineers/education‐training/tech‐papers/4127502/dB‐or‐not‐dB‐
Everything‐ You‐Ever‐Wanted‐to‐Know‐About‐Decibels‐But‐Were‐Afraid‐to‐Ask? RF Electronics Engineering Blog (let us know what you think of this): https://jaunty‐electronics.com/blog/ 75 Online Resources British Astronomical Association – Radio Astronomy Group http://www.britastro.org/baa/ CALLISTO Receiver & e‐CALLISTO http://www.reeve.com/Solar/e‐CALLISTO/e‐
callisto.htm CALLISTO data archive: http://e‐callisto.org Deep Space Exploration Society http://dses.org/index.shtml European Radio Astronomy Club http://www.eracnet.org GNU Radio http://www.gnu.org/licenses/gpl.html Inspire Project http://theinspireproject.org NASA Radio JOVE Project http://radiojove.gsfc.nasa.gov Archive: http://radiojove.org/archive.html National Radio Astronomy Observatory http://www.nrao.edu NRAO Essential Radio Astronomy Course http://www.cv.nrao.edu/course/astr534/ERA.shtml Pisgah Astronomical Research Institute http://www.pari.edu Radio Astronomy Supplies http://www.radioastronomysupplies.com Radio Sky Publishing http://www.radiosky.com RF Associates Richard Flagg, [email protected] 1721‐I Young Street, Honolulu, HI 96826 RFSpace, Inc. http://www.rfspace.com Shirleys Bay Radio Astronomy Consortium [email protected] Simple Aurora Monitor Magnetometer http://www.reeve.com/SAMDescription.htm SETI League http://www.setileague.org SkyScan Science Awareness (Meteor Detection) http://www.skyscan.ca/getting_started.htm Stanford Solar Center http://solar‐center.stanford.edu/SID/ UK Radio Astronomy Association http://www.ukraa.com/www/ SARA Facebook page https://www.facebook.com/pages/Society‐of‐
Amateur‐Radio‐Astronomers/128085007262843 SARA Twitter feed https://twitter.com/RadioAstronomy1 SARA Web Site http://radio‐astronomy.org SARA Email Forum and Discussion Group http://groups.google.com/group/sara‐list Understanding Engineers #4 What is the difference between mechanical engineers and civil engineers? Mechanical engineers build weapons. Civil engineers build targets. 76 For Sale, Trade, and Wanted Sara Polo Shirts SARA has polo shirts with the new SARA logo embroidered. (No pocket) These are 50% cotton and 50% polyester, machine washable. Currently in Size
Color
Small Navy, Royal Blue Medium Navy, Dark Green, Royal Blue Large Maroon, Black, Navy, Royal Blue X‐Large Maroon, Black, Navy, Royal Blue XX‐Large Maroon, Black, Navy, Dark Green, Royal Blue XXX‐Large Black, Navy, Dark Green, Royal Blue stock: Price is $15 with free shipping in the USA. Additional cost for shipping outside the USA. Other colors and sizes available, contact SARA Treasurer, Melinda Lord, at treasurer@radio‐astronomy.org. There is no charge to place an ad in Radio Astronomy; but, you must be a current SARA member. Ads must be pertinent to radio astronomy and are subject to the editor’s approval and alteration for brevity. Please send your “For Sale,” “Trade,” or “Wanted” ads to editor@radio‐astronomy.org. Please include email and/or telephone contact information. Please keep your ad text to a reasonable length. Ads run for one bimonthly issue unless you request otherwise. For sale RFSpace SDR‐14, S/N KI001026, new in box, asking $975 Price negotiable, includes postage. Contact Dave Typinski, [email protected] For sale Items listed below. Send request to SARA by email to supersid@radio‐astronomy.org. For more information:http://www.radio‐astronomy.org/pdf/sid‐brochure.pdf. Description, items for sale by SARA Price (US$) SuperSID VLF receiver (assembled) $48.00 PCI soundcard, 96 kHz sample rate $40.00 Antenna wire 24 AWG (120 m) $23.00 Coaxial cable, Belden RG58U (9 m) $14.00 Shipping (United States) $10.00 Shipping (Canada, Mexico) $25.00 Shipping (all other) $40.00 For sale Description, items for sale by SARA Price (US$) New‐in‐box twist‐on male TNC Connector for RG‐58 cable, 23 available $1.00/each New Berk‐Tek twist‐on male TNC Connector for RG‐59 cable, 10 available $1.00/each New twist‐on male BNC connector 1‐Piece 50 ohm for RG‐6 cable, 21 available $1.00/each Belden RG58U Coax 25 CENTS per foot, odd lengths from 13’ to 19’ All are plus shipping. Will consider offers. Items are surplus and all proceeds go to support the SARA/Stanford SuperSID project. Contact Bill Lord (319)591‐1131 or email supersid@radio‐
astronomy.org 77