1
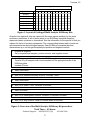
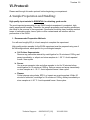
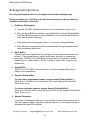
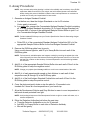
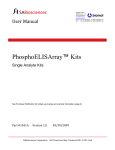
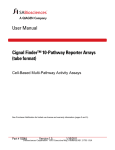
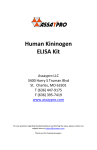
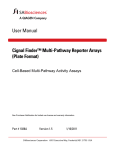
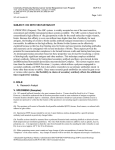
User Manual MultiAnalyte ELISArray™ Kits Multi-Protein ELISA Kits See Purchaser Notification for limited use license and warranty information (page 3). Part #1026A Version 1.4 7/27/2009 ™ Multi-Analyte ELISArray Kit Multi-Protein ELISA Kits User Manual (For Catalog Numbers Prefixed by MEH, MEM, CMEH or CMEM) Ordering and Technical Service Contact Information: Telephone: Fax: On-line Order: E-MAIL: 1-888-503-3187 (US) 301-682-9200 (outside US) 1-888-465-9859 (US) 301-682-7300 (outside US) www.SABiosciences.com [email protected] (to place an order) [email protected] (for technical support) You may place orders by fax, e-mail or from our website. Each order should include the following information: Your contact information (name, phone, email address) Product name, catalog number and quantity Purchase order number or credit card information (Visa or MasterCard) Shipping address Billing address For more information, visit us at www.SABiosciences.com SABiosciences Corporation 6951 Executive Way Frederick, MD 21703 USA CONTENTS I. Background and Introduction 4 II. Materials Provided 6 III. Additional Materials Required 6 IV. Precautions 6 V. Complementary Products 6 VI. Protocol 7 A. Sample Preparation and Handling 7 B. Reagent Preparation 8 C. Assay Procedure 9 D. Data Analysis VII. 11 Troubleshooting and Frequently Asked Questions 11 LIMITED PRODUCT WARRANTY This warranty limits our liability to replace this product in the event the product fails to perform due to any manufacturing defect. SABiosciences Corporation makes no other warranties of any kind, expressed or implied, including without limitation, warranties of merchantability or fitness for a particular purpose. SABiosciences Corporation shall not be liable for any direct, indirect, consequential or incidental damages arising out of the use, the results of use or the inability to use this product. NOTICE TO PURCHASER This product is intended for research purposes only and is not intended for drug or diagnostic purposes or for human use. Purchase of an ELISArray Kit does not grant rights to use the kit components for reproduction of any primer pair mix, to modify kit components for resale or to use the ELISArray Kit to manufacture commercial products without written approval of SABiosciences Corporation. No other license, expressed, implied or by estoppels, is granted. U.S. patents may cover the use of certain antibodies included in the ELISArray Kit. Presently, it is not clear under U.S. laws whether commercial users must obtain licenses from the owners of the rights to these U.S. patents before using the ELISArray Kit. 3 Multi‐Analyte ELISArrays™ I. Background and Introduction The Multi-Analyte ELISArray Kits are designed to simultaneously profile the level of multiple cytokines and/or chemokines using the conventional and simple sandwich-based enzyme-linked immunosorbant assay (ELISA) technique. The 96-well ELISA microplate has been coated with a panel of twelve target-specific capture antibodies, one in each eight-well strip allowing you to obtain qualitative relative profiling results from up to six samples. (Figure 1 displays the typical layout of a catalogued ELISArray Kit.) Each kit also includes the corresponding detection antibodies, Antigen Standards, and a complete set of detection reagents for a colorimetric ELISA. The ELISArray kits provide a rapid, simple and cost-effective solution for the assessment of protein expression changes for multiple protein targets in your experimental samples. We have screened commercially available antibodies to identify the capture and detection antibodies with the best sensitivity, best linearity and lowest background. All assays are optimized under uniform conditions to allow simultaneous detection with the same development or incubation time without compromising performance. Unlike other arraybased technologies, the ELISArray kits enable you to analyze multiple protein targets without the need for special equipment. The Multi-Analyte ELISArray Kit uses a standard ELISA technique. (Figure 2 displays an overview of the assay protocol.) Incubation allows the capture antibodies to bind their specific protein of interest. After washing away unbound protein, biotinylated detection antibodies added to the wells also bind the captured analyte. After washing again to remove unbound material, an avidin-horseradish peroxidase conjugate is added. The wells are again washed and a colorimetric substrate solution is added, which produces a blue color in direct proportion to the amount of protein analyte present in the initial sample. The color development is stopped by adding stop solution, and the absorbance at 450 nm is read and compared across your samples. Benefits of the MultiAnalyte ELISArray Kit: • Multi-Protein Flexibility: Detect up to twelve cytokines or chemokines at once using the same incubation and development times. • High Performance: Profile with the highest levels of sensitivity and linearity possible with screened and validated capture and detection antibodies. • Ease of Use: No special equipment is required, only the ELISA plate reader already in your lab. Technical Support: [email protected] www.SABiosciences.com 4 Version 1.4 Cytokines 1 Negative Control 2 3 4 5 6 7 8 9 10 11 12 A Sample 1 B Sample 2 C Sample 3 D Sample 4 E Sample 5 F Sample 6 G Positive Control H Figure 1: Layout of Cataloged MultiAnalyte ELISArray Kits All wells of an eight-well strip are coated with the same capture antibody for the same cytokine or chemokine. A set of twelve strips in one ELISArray microplate therefore represents twelve cytokines or chemokines. See the information for the specific kit that you ordered for the list of proteins represented. The corresponding lettered wells of each row will characterize the same biological sample. Each ELISArray microplate therefore characterizes up to six biological samples plus positive and negative controls. 1. Prepare all reagents. Set up experimental samples, positive controls, and negative control. 2. Add 50 µl assay buffer into each well of ELISArray plate. Transfer 50 µl of samples and control samples into the appropriate wells of the ELISArray plate. Incubate 2 hours. 3. Wash three times. 4. Add 100 µl Detection Antibody Solution. Incubate 1 hour. 5. Wash three times. 6. Add 100 µl Avidin – HRP. Incubate 30 minutes. 7. Wash four times. 8. Add 100 µl Development Solution. Incubate 15 minutes in the dark. 9. Add 100 µl Stop Solution. Read OD 450nm within 30 minutes. Figure 2: Overview of the MultiAnalyte ELISArray Kit procedure. Total Time ~ 4.5 hours Technical Support: 888.503.3187 (US) 301.682.9200 5 Multi‐Analyte ELISArrays™ II. Materials Provided: Component / Description Quantity BOX 1: Shipped on dry ice or blue ice packs. Store at -20 °C. One box of 12 1.5-ml tubes BOX 1A: Antigen Standards (1 g/mL) BOX 1B: Detection Antibodies One box of 12 1.5-ml tubes Avidin-HRP Conjugate 1.5-ml tube 10% BSA 15 ml bottle Donkey Serum 15 ml bottle BOX 2: Shipped at ambient temperature. Store at 4 °C. 96-well pre-coated Capture Antibody microplate One plate carrying 12 8-well strips Detection Antibody Dilution Tube Strip One strip of 12 tubes Sample Dilution Buffer Stock 60 ml bottle Assay Buffer Stock 60 ml bottle Wash Buffer (10X Concentrate) 125 ml bottle Development Solution 25 ml bottle Stop Solution 60 ml bottle Storage Conditions: Box 1 is shipped on dry ice or blue ice packs and should be stored in non-frost-free freezer at -20 °C upon receipt. Box 2 is shipped at ambient temperature and should be stored at 4 °C upon receipt. Do not use kit beyond the expiration date printed on the label. III. Additional Materials Required: 1. Standard ELISA Microplate Reader Capable of measuring 450-nm absorbance with a 570-nm correction wavelength 2. Calibrated Multi-Channel Pipettor 3. Wash Bottle 4. Microcentrifuge Tubes 5. Laboratory Timer 6. Culture Tubes IV. Precautions 1. The Development Solution is toxic if inhaled or swallowed. Avoid contact with skin. Keep container tightly closed when not in use. 2. Stop Solution is an acidic solution. Wear eye, hand, face, and clothing protection when using this material. V. Complementary Products: Single Analyte ELISArray Kits Technical Support: [email protected] www.SABiosciences.com 6 Version 1.4 VI. Protocol: Please read through this entire protocol before beginning your experiment. A. Sample Preparation and Handling: High quality input material is ESSENTIAL for obtaining good results. The most important prerequisite for any ELISA analysis experiment is consistent, highquality experimental samples. Therefore, the sample preparation and handling procedures are critical to the success of the experiment. Specimens should be clear, because residual traces of particulate matter, heme, lipids or other contaminants will interfere with the performance of the ELISA. 1. Recommended Preparation Methods: You will need roughly 650 l of each sample to complete the experiment. High quality protein samples for the ELISA experiment must be prepared using one of the following methods, each specific for your biological sample: a. Cell Culture Supernatants: Remove any particulate material by centrifugation for 10 minutes at 1000×g and assay immediately, or aliquot and store samples at ≤ - 20 °C. Avoid repeated freeze / thaw cycles. b. Serum: Use a serum separator tube and allow samples to clot for 30 minutes before centrifugation for 15 minutes at 1000×g. Remove serum and assay immediately or store samples at ≤ - 20 °C. Avoid repeated freeze / thaw cycles. c. Plasma: Collect plasma using citrate, EDTA, or heparin as an anticoagulant. Within 30 minutes of collection, centrifuge for 10 minutes at 1000×g. Assay immediately or store samples at ≤ -20 °C. Avoid repeated freeze / thaw cycles. Technical Support: 888.503.3187 (US) 301.682.9200 7 Multi‐Analyte ELISArrays™ B. Reagent Preparation: Use only polypropylene tubes for the antigen and detection antibody steps. Briefly centrifuge any 1.5-ml tube in the kit before opening it in order to collect its contents at the bottom of the tube. 1. ELISArray Kit Reagents: a. Thaw the 10% BSA and Donkey Serum at room temperature. Store on ice. b. Bring the Wash Buffer Concentrate, Assay Buffer Stock, Sample Dilution Buffer Stock and ELISArray plate to room temperature. Do not remove the ELISArray plate from its pouch at this time. c. Once finished with each reagent, return it to its proper storage conditions. d. Keep all other kit components at their recommended storage temperature until recommended by the protocol. 2. Wash Buffer Visually inspect the Wash Buffer Concentrate to ensure that all components are in solution. If any precipitates are visible, briefly shake the bottle to suspend any precipitate. Dilute 50 ml of Wash Buffer Concentrate into de-ionized or distilled water (dH2O) to a final volume of 500 ml. Transfer to wash bottle. Keep at room temperature. 3. Assay Buffer Dilute 0.6 ml of 10% BSA into a final volume of 30 ml with Assay Buffer Stock. Keep at room temperature. 4. Sample Dilution Buffer: For cell culture supernatant samples, prepare Sample Dilution Buffer 1: Dilute 2 ml of 10% BSA into a final volume of 20 ml with Sample Dilution Buffer Stock. Store on ice. For serum or plasma samples, prepare Sample Dilution Buffer 2: Dilute 6 ml of Donkey Serum into a final volume of 20 ml with Sample Dilution Buffer Stock. Store on ice. 5. Sample Preparation If you wish to characterize dilutions of your samples to insure that the results are in the linear dynamic range of the assay, perform dilutions of your samples using the appropriate Sample Dilution Buffer. Technical Support: [email protected] www.SABiosciences.com 8 Version 1.4 C. Assay Procedure: NOTE: Very accurate and precise pipetting is critical to the reliability and consistency of any ELISA experiment. Make sure that all of your single- and multi-channel pipettors are calibrated before starting this protocol. Maintain incubation times and temperatures as consistent as possible across arrays and experiments for best results. 1. Generate an Antigen Standard Cocktail: a. Just before use, thaw the Antigen Standards on ice for 20 minutes. Vortex gently to mix well. b. In a single tube, prepare the Concentrated Antigen Standard Cocktail containing all 12 of the Antigen Standards by pipeting 10 l of each Antigen Standard into the same 880 l volume of the appropriate Sample Dilution Buffer to yield 1 ml of a Concentrated Antigen Standard Cocktail. NOTE: For Mix-N-Match ELISArrays see your Product Specification Sheet for Generating Antigen Standard Cocktail c. Dilute 200 l of the concentrated Standard Antigen Cocktail into 800 l of the appropriate Sample Dilution Buffer for the final Antigen Standard Cocktail. 2. Remove the ELISArray plate from its pouch. Using a multi-channel pipettor, add 50 µl of Assay Buffer into each well of the ELISArray plate. NOTE: For best results, add all samples and reagents carefully by touching the pipette tips to the side of the wells just above the bottom and allowing the dispensed volume to run down the well wall. Do not blow out the last drop of volume dispensed to avoid introducing bubbles into the wells. 3. Add 50 l of the appropriate Sample Dilution Buffer into each well of Row A in the ELISArray plate to setup the negative control. NOTE: Change your pipette tips with every addition to avoid cross-contamination of the wells. 4. Add 50 l of each experimental sample or their dilutions to each well of their respective rows (B through G) in the ELISArray plate. 5. Add 50 l of the final Antigen Standard Cocktail into each well of Row H in the ELISArray plate to setup the positive control. 6. Cover the plate and gently shake or tap the plate for 10 seconds to mix. Incubate for 2 hours at room temperature on your bench-top. 7. Allow the Development Solution and Stop Solution to warm to room temperature in lab bench drawer protected from light. NOTE: Avoid prolonged exposure of the Development Solution to light or contact with water, air, or extreme temperature. 8. Dilute the Detection Antibodies just before the next step: a. Thaw the Detection Antibodies on ice for 30 minutes. b. Add 855 l of Assay Buffer to each tube of Detection Antibody. c. Mix well but gently. Technical Support: 888.503.3187 (US) 301.682.9200 9 Multi‐Analyte ELISArrays™ d. Transfer each detection antibody to its own empty tube of the Detection Antibody Dilution Tube Strip. e. Be sure to add the Detection Antibodies to the tubes in the same left-to-right order as the capture antibodies in columns 1 through 12. See the Product Specification Sheet for the correct orientation. 9. Washing the ELISArray Plate: a. Decant or aspirate the contents of the wells. b. Wash wells by filling each well with 1× Wash Buffer (350 µl per well). c. Gently shake or tap the plate for 10 seconds to mix and follow by decanting or aspirating the solution. d. Blot the plate upside down on absorbent paper to remove any residual buffer. e. Repeat twice for a total of three washes. 10. Using a 12-channel pipettor, transfer 100 l of the dilute Detection Antibodies from the Dilution Tube Strip to the appropriate rows of the ELISArray plate. Cover the plate and gently shake or tap the ELSArray plate for 10 seconds to mix. Incubate for 1 hour at room temperature on your bench-top. NOTE: Be sure to correctly orient your Detection Antibody Dilution Tube Strip above row A of the ELISArray plate to transfer the correct Detection Antibody to its correct wells. 11. Prepare Avidin-HRP: Just before use, thaw the Avidin-HRP Conjugate on ice for 20 minutes. Vortex gently to mix well. Add 11 l of the Avidin-HRP Conjugate to 11 ml of Assay Buffer. NOTE: Avoid prolonged exposure of the Avidin-HRP Solution to light. 12. Wash ELISA wells as in step 9. 13. Add 100 l of dilute Avidin-HRP into all wells. Cover the plate and gently shake or tap the ELSArray for 10 seconds to mix. Incubate for 30 minutes at room temperature in the dark. 14. Wash ELISA wells as in step 9, except for a total of 4 washes. 15. Just before use, transfer 12 ml of the Development Solution from its original bottle into a clean multi-channel pipettor reservoir. NOTE: Use a different clean multi-channel reservoir for each solution to be dispensed. 16. Add 100 l of the Development Solution to each well. Incubate the plate for 15 minutes at room temperature in the dark. 17. Add 100 l of Stop Solution to each well in the same order as the Development Solution was added. The color in the wells should change from blue to yellow. 18. Read absorbance at 450 nm within 30 minutes of stopping the reaction. If wavelength correction is available, subtract readings at 570 nm from the reading at 450 nm. Technical Support: [email protected] www.SABiosciences.com 10 Version 1.4 NOTE: Subtracting the A450 reading by the A570 reading corrects for any minor optical imperfections in the ELISA plate. Uncorrected A450 readings may yield artificially high signals. D. Data Analysis: 1. Processing the Raw Data a. Typical absorbance values should range from 0.00 to 2.50. Absorbance values greater than 2.50 are not within the linear range of the assay. Also, do not interpret absorbance values less then two times the negative control absorbance values for each antigen. b. For each antigen, subtract the observed absorbance by the absorbance of the negative control to obtain the corrected absorbance values. 2. Profiling Experiment a. For each antigen separately, compare the corrected absorbance values between samples to determine which cytokine or chemokine changes its protein level most or least dramatically. Be sure to account for any dilution of the samples. b. Follow up the profiling experiment with a more detailed analysis using the corresponding Single Analyte ELISArray Kit. VI. Troubleshooting and FAQs For troubleshooting or other questions, please contact a Technical Support representatives by phone at 1-888-503-3187 or 301-682-9200 or by email at [email protected]. Technical Support: 888.503.3187 (US) 301.682.9200 11 Multi‐Analyte ELISArray™ Kit User Manual Part #1026A Version 1.4 7/27/2009