1
The KPhotoAlbum Handbook
i
The KPhotoAlbum Handbook
The KPhotoAlbum Handbook
ii
Copyright © 2003-2007 Jesper K. Pedersen
Copyright © 2012 Miika Turkia
The KPhotoAlbum Handbook
iii
COLLABORATORS
TITLE :
The KPhotoAlbum Handbook
ACTION
NAME
DATE
WRITTEN BY
Jesper K. Pedersen
and Miika Turkia
2012-02-23
SIGNATURE
The KPhotoAlbum Handbook
iv
Contents
1
2
3
4
5
Introduction
1
1.1
Overview of the manual . . . . . . . . . . . . . . . . . . . . . . . . . . . . . . . . . . . . . . . . . . . . . . . .
1
1.2
Organization of images and KPhotoAlbum files . . . . . . . . . . . . . . . . . . . . . . . . . . . . . . . . . . .
1
Annotating your images
3
2.1
Categories . . . . . . . . . . . . . . . . . . . . . . . . . . . . . . . . . . . . . . . . . . . . . . . . . . . . . . .
6
2.2
Annotating one item at a time . . . . . . . . . . . . . . . . . . . . . . . . . . . . . . . . . . . . . . . . . . . . .
7
2.3
Annotating multiple items at a time . . . . . . . . . . . . . . . . . . . . . . . . . . . . . . . . . . . . . . . . . .
7
2.4
Sub-categories . . . . . . . . . . . . . . . . . . . . . . . . . . . . . . . . . . . . . . . . . . . . . . . . . . . . .
7
2.5
Changing layout of the annotation dialog . . . . . . . . . . . . . . . . . . . . . . . . . . . . . . . . . . . . . . .
9
Browsing
11
3.1
Adding Preview Images to the Browser . . . . . . . . . . . . . . . . . . . . . . . . . . . . . . . . . . . . . . . 15
3.2
General image searches . . . . . . . . . . . . . . . . . . . . . . . . . . . . . . . . . . . . . . . . . . . . . . . . 16
Thumbnail viewer
18
4.1
Deleting Images . . . . . . . . . . . . . . . . . . . . . . . . . . . . . . . . . . . . . . . . . . . . . . . . . . . . 19
4.2
Offline Mode . . . . . . . . . . . . . . . . . . . . . . . . . . . . . . . . . . . . . . . . . . . . . . . . . . . . . 19
4.3
Privacy . . . . . . . . . . . . . . . . . . . . . . . . . . . . . . . . . . . . . . . . . . . . . . . . . . . . . . . . 20
The Viewer
22
5.1
Setting Tokens from the Viewer . . . . . . . . . . . . . . . . . . . . . . . . . . . . . . . . . . . . . . . . . . . 26
5.2
Setting Categories from the Viewer . . . . . . . . . . . . . . . . . . . . . . . . . . . . . . . . . . . . . . . . . . 29
5.2.1
Exact words . . . . . . . . . . . . . . . . . . . . . . . . . . . . . . . . . . . . . . . . . . . . . . . . . . 30
5.2.2
Always start with category selection . . . . . . . . . . . . . . . . . . . . . . . . . . . . . . . . . . . . . 30
5.2.3
Assigning shortcuts . . . . . . . . . . . . . . . . . . . . . . . . . . . . . . . . . . . . . . . . . . . . . . 31
6
The Datebar
32
7
Generating HTML
35
7.1
The Content page . . . . . . . . . . . . . . . . . . . . . . . . . . . . . . . . . . . . . . . . . . . . . . . . . . . 35
7.2
The Layout page . . . . . . . . . . . . . . . . . . . . . . . . . . . . . . . . . . . . . . . . . . . . . . . . . . . 37
7.3
The Destination page . . . . . . . . . . . . . . . . . . . . . . . . . . . . . . . . . . . . . . . . . . . . . . . . . 38
The KPhotoAlbum Handbook
v
8
9
Import/Exporting
39
8.1
Export Dialog . . . . . . . . . . . . . . . . . . . . . . . . . . . . . . . . . . . . . . . . . . . . . . . . . . . . . 39
8.2
Import Dialog . . . . . . . . . . . . . . . . . . . . . . . . . . . . . . . . . . . . . . . . . . . . . . . . . . . . . 40
Plugins
10 Configuring KPhotoAlbum
41
42
10.1 General Settings . . . . . . . . . . . . . . . . . . . . . . . . . . . . . . . . . . . . . . . . . . . . . . . . . . . . 42
10.2 New Image Finder Settings . . . . . . . . . . . . . . . . . . . . . . . . . . . . . . . . . . . . . . . . . . . . . . 43
10.3 Thumbnail Viewer Settings . . . . . . . . . . . . . . . . . . . . . . . . . . . . . . . . . . . . . . . . . . . . . . 45
10.4 Viewer Settings . . . . . . . . . . . . . . . . . . . . . . . . . . . . . . . . . . . . . . . . . . . . . . . . . . . . 45
10.5 Categories . . . . . . . . . . . . . . . . . . . . . . . . . . . . . . . . . . . . . . . . . . . . . . . . . . . . . . . 46
10.6 Sub-categories . . . . . . . . . . . . . . . . . . . . . . . . . . . . . . . . . . . . . . . . . . . . . . . . . . . . . 47
11 Workflows with KPhotoAlbum
49
11.1 RAW workflow using KPhotoAlbum and Bibble5 . . . . . . . . . . . . . . . . . . . . . . . . . . . . . . . . . . 49
12 Frequently asked questions
52
13 Credits and Licenses
53
The KPhotoAlbum Handbook
vi
List of Figures
2.1
Starting KPhotoAlbum with your own images . . . . . . . . . . . . . . . . . . . . . . . . . . . . . . . . . . . .
4
2.2
Context menu for editing properties . . . . . . . . . . . . . . . . . . . . . . . . . . . . . . . . . . . . . . . . .
5
2.3
Annotating images and videos . . . . . . . . . . . . . . . . . . . . . . . . . . . . . . . . . . . . . . . . . . . .
6
2.4
Browser showing USA as a super category . . . . . . . . . . . . . . . . . . . . . . . . . . . . . . . . . . . . . .
8
2.5
Categories shown in alphabetical view of the annotation dialog . . . . . . . . . . . . . . . . . . . . . . . . . . .
9
2.6
Showing previously hidden windows. . . . . . . . . . . . . . . . . . . . . . . . . . . . . . . . . . . . . . . . . 10
3.1
Browser when images and videos have been annotated . . . . . . . . . . . . . . . . . . . . . . . . . . . . . . . 12
3.2
Browser window when People was selected. . . . . . . . . . . . . . . . . . . . . . . . . . . . . . . . . . . . . . 13
3.3
Browser limited to the scope of the person Jesper . . . . . . . . . . . . . . . . . . . . . . . . . . . . . . . . . 14
3.4
Images for each Individual Person . . . . . . . . . . . . . . . . . . . . . . . . . . . . . . . . . . . . . . . . . . 15
3.5
Category Editor . . . . . . . . . . . . . . . . . . . . . . . . . . . . . . . . . . . . . . . . . . . . . . . . . . . . 16
3.6
Search dialog . . . . . . . . . . . . . . . . . . . . . . . . . . . . . . . . . . . . . . . . . . . . . . . . . . . . . 17
4.1
Thumbnail View . . . . . . . . . . . . . . . . . . . . . . . . . . . . . . . . . . . . . . . . . . . . . . . . . . . 18
4.2
Deleting Images . . . . . . . . . . . . . . . . . . . . . . . . . . . . . . . . . . . . . . . . . . . . . . . . . . . . 19
4.3
KPhotoAlbum in Offline Mode . . . . . . . . . . . . . . . . . . . . . . . . . . . . . . . . . . . . . . . . . . . . 20
5.1
The Viewer . . . . . . . . . . . . . . . . . . . . . . . . . . . . . . . . . . . . . . . . . . . . . . . . . . . . . . 23
5.2
The viewer’s context menu . . . . . . . . . . . . . . . . . . . . . . . . . . . . . . . . . . . . . . . . . . . . . . 24
5.3
Zooming in the viewer . . . . . . . . . . . . . . . . . . . . . . . . . . . . . . . . . . . . . . . . . . . . . . . . 25
5.4
Zooming in the viewer . . . . . . . . . . . . . . . . . . . . . . . . . . . . . . . . . . . . . . . . . . . . . . . . 26
5.5
An Image with Tokens . . . . . . . . . . . . . . . . . . . . . . . . . . . . . . . . . . . . . . . . . . . . . . . . 27
5.6
Tokens seen in the Browser . . . . . . . . . . . . . . . . . . . . . . . . . . . . . . . . . . . . . . . . . . . . . . 28
5.7
Tokens seen in the Thumbnail Viewer . . . . . . . . . . . . . . . . . . . . . . . . . . . . . . . . . . . . . . . . 29
5.8
Selecting Categories in Viewer . . . . . . . . . . . . . . . . . . . . . . . . . . . . . . . . . . . . . . . . . . . . 29
5.9
Selecting Exact Words in Viewer . . . . . . . . . . . . . . . . . . . . . . . . . . . . . . . . . . . . . . . . . . . 30
6.1
The Date Bar . . . . . . . . . . . . . . . . . . . . . . . . . . . . . . . . . . . . . . . . . . . . . . . . . . . . . 32
6.2
The Date Bar Showing 10 Minutes Intervals . . . . . . . . . . . . . . . . . . . . . . . . . . . . . . . . . . . . . 33
7.1
HTML Generator Content Configuration . . . . . . . . . . . . . . . . . . . . . . . . . . . . . . . . . . . . . . . 36
The KPhotoAlbum Handbook
vii
7.2
HTML Generator Layout Configuration . . . . . . . . . . . . . . . . . . . . . . . . . . . . . . . . . . . . . . . 37
7.3
HTML Generator Destination Configuration . . . . . . . . . . . . . . . . . . . . . . . . . . . . . . . . . . . . . 38
8.1
Matching People in the Import Dialog . . . . . . . . . . . . . . . . . . . . . . . . . . . . . . . . . . . . . . . . 40
10.1 General Options . . . . . . . . . . . . . . . . . . . . . . . . . . . . . . . . . . . . . . . . . . . . . . . . . . . . 43
10.2 File Searching & Versions . . . . . . . . . . . . . . . . . . . . . . . . . . . . . . . . . . . . . . . . . . . . . . 44
10.3 Options for Thumbnail View . . . . . . . . . . . . . . . . . . . . . . . . . . . . . . . . . . . . . . . . . . . . . 45
10.4 Options for the Viewer . . . . . . . . . . . . . . . . . . . . . . . . . . . . . . . . . . . . . . . . . . . . . . . . 46
10.5 Configuring Categories . . . . . . . . . . . . . . . . . . . . . . . . . . . . . . . . . . . . . . . . . . . . . . . . 47
10.6 Configuring Member Groups . . . . . . . . . . . . . . . . . . . . . . . . . . . . . . . . . . . . . . . . . . . . . 48
11.1 Sending Images to RAW Editor . . . . . . . . . . . . . . . . . . . . . . . . . . . . . . . . . . . . . . . . . . . . 50
Abstract
This is the user manual for KPhotoAlbum — a digital image cataloguing software that supports annotation, browsing, searching
and viewing of digital images and videos. If you are not the type who likes reading documentation, but rather just want to try out
things, here are a few alternatives:
• Go to the KPhotoAlbum Homepage, and look at the quick overview, screen shoots, and introduction videos.
• Start KPhotoAlbum, and accept its offer for a demo (If this is your first time you start it), or go to Help menu and select Run
KPhotoAlbum demo. That will load KPhotoAlbum with a number of images, and let you browse around.
If you prefer to print out this document, then you may find it as on long PDF document at KDE docs. A direct link is available
at KPhotoAlbum’s Homepage. However, it might take some time for these versions to be updated.
The KPhotoAlbum Handbook
1 / 53
Chapter 1
Introduction
If you are like me you have thousands of images ever since you got your first camera, some taken with a normal camera other
with a digital camera. Through all the years you believed that until eternity you would be able to remember the story behind
every single picture, you would be able to remember the names of all the people on your images, and you would be able to
remember the exact date of every single image. I personally realized that this was not possible anymore, and especially for my
digital images - but also for my paper images - I needed a tool to help me describe my images, and to search in the pile of images.
This is exactly what KPhotoAlbum is all about.
KPhotoAlbum focuses on three key points:
• It must be easy to annotate a number of images at a time. It must for example not take more than a few mouse clicks to mark
all your images from your holiday as being from Italy, 1992. KPhotoAlbum offers two ways of describing images: one at a
time, which is useful for writing text about images, and All Simultaneously, which is useful for selecting a number of images,
and setting properties like location, people on images, and date of image.
• It must be easy to search for images. KPhotoAlbum offers to describe images with a number of properties. These includes
date, people, places, plus a keyword field the user can use for custom keywords like Album 7 or Holiday trip to Italy. With
KPhotoAlbum you can search for images in each of the categories - e.g. find all the images with Jesper on them from the
holiday in Italy. It is of course possible to create your own categories, much more on that later.
• It must be easy to browse and View the images. When viewing images, your focus often changes - one moment you are
looking at images from your holiday in 1992, and when seeing an image of a friend whom you spent that holiday with, you
focus suddenly changes, so you want to see all images of that friend.
1.1
Overview of the manual
In this manual I will take you through the steps of (1) annotating your images, (2) browsing and viewing images and (3) advanced
topics and customization.
KPhotoAlbum started out as an application for managing your images, but since then it has been extended, so it today also takes
care of your videos. In many places in this manual I will talk about images, but just as often the discussion does include videos.
1.2
Organization of images and KPhotoAlbum files
KPhotoAlbum uses all the images of a directory and all subdirectories below it, first time you start KPhotoAlbum, you will
be asked for the location of this directory. KPhotoAlbum will not modify any images, so you do not have to be afraid of
KPhotoAlbum altering your images 1 , actually if you do not trust KPhotoAlbum, feel free to make all your images write protected.
1 The
two exceptions to this rule is (1) if you ask KPhotoAlbum to delete individual images, from Edit → Delete Selected, and (2) plug-in operations.
The KPhotoAlbum Handbook
2 / 53
KPhotoAlbum will save all its information in the file index.xml in your topmost image directory. This file is a simple XML
file, so you can easily back it up using whatever tools you prefer, including normal backup utilities, copying the file to a floppy
disk, or keeping revisions using CVS. There is also a backup script (kpa-backup.sh) provided in KPhotoAlbum’s sources that
backs up not only the index.xml but also the configuration files inside user’s home directory.
KPhotoAlbum will remember where you told it your images were located, and reuse that in future use of KPhotoAlbum. Should
you ever want to load another database into KPhotoAlbum (i.e. another directory tree of images), then you may start it with the
-c option. For example: kphotoalbum -c ~/CompanyImages/index.xml.
The KPhotoAlbum Handbook
3 / 53
Chapter 2
Annotating your images
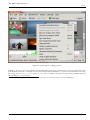
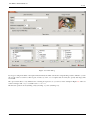
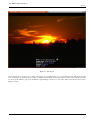
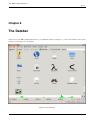
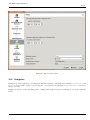
In Figure 2.1 you can see an example of the window that will greet you once you have started KPhotoAlbum with your own
images.
At the top of the screen you will find a menu and toolbar, as you know from any KDE application. Below the toolbar you see the
browser window. In browser window you can select different categories to limit the images you will be inspecting. In Chapter 3
we will get back to the browser, but for now, simply press the Show Thumbnails item, which will show you a thumbnail view of
all your images.
The KPhotoAlbum Handbook
4 / 53
Figure 2.1: Starting KPhotoAlbum with your own images
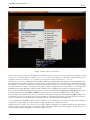
The key feature of KPhotoAlbum is that you can annotate your images. This includes who is on a given image, where it is taken,
etc. You can do this either one image at a time, or you can annotate a number of images simultaneously (For example, all these
images contain the person Jesper, and is taken in Copenhagen.)
To annotate an images, select the images in question, and go to Edit → Annotate Individual Items. Now you annotate your
selected images one after the other. If you instead choose Annotate Multiple Items at a Time, you will annotate all the selected
items as if it was one single item. In other words, with this option you mass-annotate your image - e.g. saying all these images
were shot in Copenhagen. These two options are also available from a context menu, that you get by right clicking the mouse in
the thumbnail overview or using keyboard shortcut. An example of this can be seen in Figure 2.2.
The KPhotoAlbum Handbook
5 / 53
Figure 2.2: Context menu for editing properties
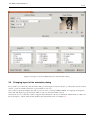
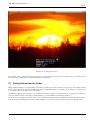
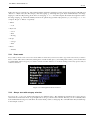
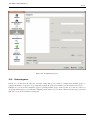
In Figure 2.3 below you can see the window for annotating images and videos. In this window you can specify the date of the
item, the label of the item 1 , a description for the item, and most important different categories for the item. In the screen shot,
these categories are People, Places, and Keywords, but as you will see in Section 10.5, these three predefined categories
may be changed to your preferences.
1 The
label is initialized to the name of the file. The label is used in the browser, and when the images are exported to HTML pages
The KPhotoAlbum Handbook
6 / 53
Figure 2.3: Annotating images and videos
All these annotations may be used for searching and browsing, as we will see in Chapter 3. On request you may see these
annotations when viewing the items in the build-in viewer.
2.1
Categories
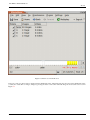
In Figure 2.3 there are three list boxes combined with line edits for specifying people, places and keywords. These widget are a
very important part of KPhotoAlbum, as you will use them over and over again, when specifying information about your images.
You can specify a property from a list box, simply by selecting it (Select say Donna to specify that Donna is on the given image.
Alternatively you may type its name in the line edit. When you start typing a name in the line edit, KPhotoAlbum will look into
the listbox, and search for the first item matching what you’ve typed so far, and fill it out. Thus typing Do might be enough to
find Donna. Once you have found the item you search for, simply press enter to select this item in the listbox. The item will
now be moved to the top of the view, so next time you need the given item it is even easier to find. There is also a "seamless"
way of annotating from Image Viewer that is described later on in Section 5.2.
The idea behind moving items to the top when they have been selected is, that when going to, say a family party, you will get
The KPhotoAlbum Handbook
7 / 53
perhaps 50 images all with the same 5-10 people. When typing in information about these 50 images you will have the 5-10
people at the top of the listbox as soon as you have typed in their name the first time.
If you prefer to have the list alphabetically sorted instead, simply press the icon for sorting under the list box.
2.2
Annotating one item at a time
When you specify properties for one image at a time, you may still of course select a number of images, and say, I want to
annotate these images. In this situation, you will find a next and previous button under the image in the topmost rightmost corner.
2.3
Annotating multiple items at a time
If you have several images with, say the same person, then it might be more convenient to select those images, and specify that
this person is on all images using the Annotate Multiple Items at a Time.
2.4
Sub-categories
Las Vegas, San Francisco, Los Angeles, and California are all located in USA. Furthermore, San Francisco and Los Angeles are
located in California.
Instead of specifying for each and every image from San Francisco, that it is in San Francisco, and in California, and in USA,
you may instead tell KPhotoAlbum that San Francisco, and Los Angeles are in California, and that California among others are
in USA. Doing so the browser (see Chapter 3) will offer you an item for USA, and an item for California in addition to all your
normal items. Selecting California, you will see all images from San Francisco, Los Angeles, etc.
In Figure 2.4 you can see a browser window, containing USA as a super category. To indicate to you that this is a group, a special
icon is used.
The KPhotoAlbum Handbook
8 / 53
Figure 2.4: Browser showing USA as a super category
In the context menu for the annotation dialog it is possible to add an item to an existing or new super or sub category. In addition
you may simply drag an item to a category to make it a sub category of that item. Notice this requires that you are currently
sorting your categories alphabetically. See Figure 2.5.
The KPhotoAlbum Handbook
9 / 53
Figure 2.5: Categories shown in alphabetical view of the annotation dialog
2.5
Changing layout of the annotation dialog
It is possible to move the items of the annotation dialog around, simply from the bar at the top of the frames, and move them
around - you can even make a frame into a top level window on its own.
Once you have found a layout that works well on your your screen, your usage of KPhotoAlbum, etc. simply press the Options...
button, that will display a pop-up menu from which you can save the current window layout.
You may also choose to hide away a frame. It appears that currently the only way to include the deleted frame is to fully reset
the layout Options... button, and from there the Reset layout item. This can be see in Figure 2.6.
The KPhotoAlbum Handbook
10 / 53
Figure 2.6: Showing previously hidden windows.
The KPhotoAlbum Handbook
11 / 53
Chapter 3
Browsing
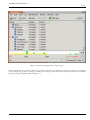
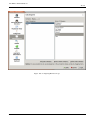
Once you have annotated your images and videos, KPhotoAlbum is ready to let you browse through your images, see Figure 3.1.
If you compare that to Figure 2.1 , you will see that there now is items available in each of the categories for People, Places,
and Keywords.
The KPhotoAlbum Handbook
12 / 53
Figure 3.1: Browser when images and videos have been annotated
In the browser window you can see the categories you typed information into when annotating your images and videos. In
addition there are items for searching based on EXIF information on images, browsing the folder structure of your hard disk, and
of course showing the actual thumbnails. Lets describe each item in turn.
Pressing the mouse on People, the browser window will change, as you can see in Figure 3.2.
The KPhotoAlbum Handbook
13 / 53
Figure 3.2: Browser window when People was selected.
The browser is now populated with the people you specified for your images and videos 1 , selecting a person will bring you back
to the original state for the browser, as we saw in Figure 3.1, this time, however, we are in the scope of the person we selected.
That means that we only shows information about images and videos containing that person. See Figure 3.3 below, which is
the result of us selecting the Person Jesper, you can see an indication of that in the bottom of the window. Please compare
Figure 3.1 with Figure 3.3, where you will see that the number of available images and videos has gone down from 25 to 12, and
the amount of items for the different categories have also changed.
1 You
may notice that the item Pets has a special icon. For details about that, see Section 10.5.
The KPhotoAlbum Handbook
14 / 53
Figure 3.3: Browser limited to the scope of the person Jesper
If we now continue selecting a new person, then we will get to the images containing both people. Continuing that way you can
narrow the set of images that you have in mind down to a few images from a set of thousands.
When you are done limiting the scope of images, you may select the View Thumbnails icon, to see exactly those images matching
your current scope.
The KPhotoAlbum Handbook
15 / 53
3.1
Adding Preview Images to the Browser
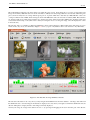
Looking at Figure 3.2 you will see that each person has the same icon in front of his name. KPhotoAlbum is actually capable of
showing a preview image for each individual person 2 as can be seen in Figure 3.4.
Figure 3.4: Images for each Individual Person
To show images along with the names, choose the tool button to the very right of the toolbar, that will bring up a popup menu,
where you can chose which view you want to use for the given category. Notice views must be configured for each category that way you may for example use an icon view for people, but a plain list view for keywords (in case you can’t come up with
good images for your keywords).
It is, however, your job to tell it which images to use for each individual person. To do so, you must open the viewer (see
Chapter 5), and from the context menu choose Show Category Editor, this will bring up the category editor which can be seen in
Figure 3.5. In the category editor you choose the image for the given person. In the viewer it is possible to zoom to part of the
image, and that way crop what part should be shown.
2 This
of course also applies to places, keywords, and other categories you have defined yourself.
The KPhotoAlbum Handbook
16 / 53
Figure 3.5: Category Editor
3.2
General image searches
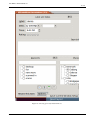
If you chose the Search item in the browser, you will get to a dialog with great resemblance to the dialog you used for setting
properties of your images. You can see this dialog in Figure 3.6 below.
The KPhotoAlbum Handbook
17 / 53
Figure 3.6: Search dialog
If you type a string in the label or description field, then that text will be searched for using substring searches. Likewise you can
also specify a date to search for, either as part of a date, say 1971, or as a complete date. You may also specify date ranges, like
1971-1980.
The options item allows a very limited form of writing an expression, as you can see in the example in Figure 3.6. Here we
search for images with Jesper, but without Anne Helene.
The allowed operations are & (meaning: and), | (meaning: or), and ! (meaning: not).
The KPhotoAlbum Handbook
18 / 53
Chapter 4
Thumbnail viewer
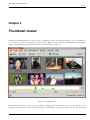
Selecting View Thumbnails in the browser, you get to a thumbnail overview of the images currently in scope (or all images if
no scope have been selected). An example of this can be seen in Figure 4.1 below. The size of the thumbnails can be configure
simply by dragging the mouse with the middle mouse button down (try it is really cool).
Figure 4.1: Thumbnail View
In the thumbnail overview you can reorder your pictures by dragging them around with the mouse. For the date bar to work
properly you should, however, aim at keeping your images sorted at all time. Sorting you images can be done by selecting all
The KPhotoAlbum Handbook
19 / 53
images, and choosing Images → Sort Selected by Date & Time. The sorting will not reorder images which has the same date and
time, so if you have say 100 images with the date 1992 (i.e. no month, no day, only year), then you may move them around, and
their individual order will stay unchanged after a sort.
Dragging an image from the viewer to the background will set the image as the background image of your desktop.
By clicking on an image you load it into the viewer, if no viewer window is present, a viewer window will be created.
If you select a number of images, and presses Ctrl-I or chooses Images → View Selected, the images will be loaded into the
existing viewer (if no viewer exists, one will be created). Alternatively you may choose Images → View (in new window) to get
the images loaded into a new viewer. If you press Ctrl-R or choose Images → Run Slide Show the selected images will be loaded
into the viewer and a slide show will start. Finally choosing Images → Run Randomized Slide Show will show a slide show of
the images selected in random order.
4.1
Deleting Images
From the thumbnail view it is also possible to delete images. To do so select the images you want to delete and press the delete
key or select Edit → Delete Selected from the menu bar. Doing so KPhotoAlbum will show you the dialog in Figure 4.2
Figure 4.2: Deleting Images
There are three ways of deleting an image in KPhotoAlbum, namely move to thrash, delete it from the disk - which means
that it will be permanently gone - or tell KPhotoAlbum not to include it. In the latter case, KPhotoAlbum will never show the
image again, but it will keep it on disk. This is useful if there for example is thumbnail images stored among your images. This
thumbnail image would contain an overview of all the other images, and would thus be useless in KPhotoAlbum, but for other
application, say a web browser, it might be needed.
4.2
Offline Mode
There is a constant battle going on between data growing, and hard disks getting bigger. If you have a large number of images,
you might find yourself in the middle of that battle, not having enough hard disk space to store all your images. In that situation
you might choose to put some of the images on CD’s. An alternative scenario might be that you are going on a business trip, and
want to bring your images with you, but do not have the 20GB disk space requires for that purpose.
The KPhotoAlbum Handbook
20 / 53
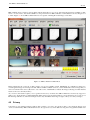
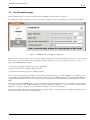
KPhotoAlbum offers a solution to that problem, namely that it allows you to use it, without having the images available on disk.
You do of course need to have them available at some point in time for KPhotoAlbum to realize that there are new images for it
to index. Figure 4.3 shows KPhotoAlbum when it is not capable of finding all needed images on the disk.
Figure 4.3: KPhotoAlbum in Offline Mode
Images which have the corner cut of (that is images 1-4) are not available on disk. Thumbnails are, available for images 5-9,
even though the images are missing from disk. Therefore KPhotoAlbum can show you the thumbnails for these images but you
cannot view them in the viewer. (We used to cut of the corner of thumbnails to indicate the image is missing from disk but that
feature seems to be currently broken.)
As you can see, this feature requires you to copy files in and out of your directories, KPhotoAlbum does not have any support for
asking you to insert the CD you labeled blah blah. Thus please forget about this feature if you are the kind of person who do not
like messing with files etc, and instead simply ensure to buy hard disks that is large enough to always store all your images.
4.3
Privacy
Some time ago my girlfriend and I brought my laptop with us on a visit to my parents in law, to show them the images from
our most recent holiday. KPhotoAlbum turned out to be a great success, and it didn’t last long before my girlfriends little sister
The KPhotoAlbum Handbook
21 / 53
seized the laptop and started browsing around on her own. Unfortunately it didn’t take her long either to get to some, let say
unfortunate, images of me from my youth, and they all had quite a bit of laugh on me. That episode inspired me to add a new
feature to KPhotoAlbum, namely privacy locking.
In the Images menu you will find a sub menu called privacy. To get some privacy, browse - while you are on your own - to the
images that you want to keep private, and select Lock Away Current Set of Images from the privacy sub menu. Alternatively you
may browse to the images you want to limit your little sister to see, and select Lock Away All Other Images.
Now you have specified what to hide away, and once you hand over your laptop to your little sister, simply choose Lock Images,
and your sister will not be able to see the locked images. When done you may unlock them again using Unlock.
It is possible to specify a password that must be entered to unlock the database. In the privacy menu, simply select Change
Password to set a password.
Don’t get fooled to believe that this will help you hide away images for good. First the images are still on the disk, second,
anyone with access to the index.xml file that KPhotoAlbum uses can read the password in clear text and optionally delete
it. This feature is only meant as a protection against someone sitting with KPhotoAlbum unintentionally getting to your private
images.
The KPhotoAlbum Handbook
22 / 53
Chapter 5
The Viewer
The reason for you to put all your images into KPhotoAlbum, and spending hours after hours describing them, is of course that
you at some point want to look at them. For that purpose KPhotoAlbum has an viewer capable of showing your images and
videos. You open the viewer from the thumbnail view as described in Chapter 4.
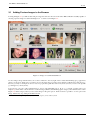
The viewer can be seen in Figure 5.1. The viewer does of course show you the image, but in addition to that it also shows you
the information you specified for each image, including, who is on the images, where and when it was takes, etc.
The KPhotoAlbum Handbook
23 / 53
Figure 5.1: The Viewer
In case the info box is located on top of part of the images you actually want to see, you can simply grab it with the mouse, and
move it elsewhere on the image. It is possible to configure what should be shown in the info box, and of course whether it should
be shown at all. All these options are available by right clicking your mouse on the viewer. The context menu can be seen in
Figure 5.2 below.
The KPhotoAlbum Handbook
24 / 53
Figure 5.2: The viewer’s context menu
Some of the words in the info box is underlines. If you click the mouse on one of these words the browser (see Chapter 3) will
go into scope of that item. Thus if you click on Anne Helene the browser will show you all images of Anne Helene, just as it
would have done if you selected People from the root of the browser, and next selected Anne Helene.
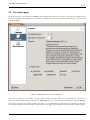
In the info box you can see a small button with the KPhotoAlbum logo. Pressing that button will get you to the thumbnail viewer.
The thumbnail view will display all images, and the image you just had in the viewer will be selected. The idea behind this is
the following: you browse to a given person, and look at the images of that person. One of the images is from say your high
school time, and now you want to see images from that period of time. Using the Jump to Context button, you are brought to the
thumbnail view showing all images, with the current one being in focus, and likely all your high school pictures around it.
In case you have loaded several images into the viewer, you can go forth and back using Page Up and Page Down. You can go
to the first and last images using Home and End. These functions are of course also available from the context menu.
If several images was loaded into the viewer, you can ask it to run them as a slide show, which means that KPhotoAlbum loads
a new image every few second. How often it loads a new image is configure by pressing the control key and respective plus (for
go faster) or minus (go slower). Starting and stopping the slide show is done simply by pressing Ctrl-S.
A very useful feature of the KPhotoAlbum viewer is it ability to go into full screen mode. In this mode, the viewer is using the
complete screen space, simply press the return key to make it go into and out of full screen mode.
Using the viewer, you may zoom in and out of your image, simply by dragging out a rectangle with the mouse. Pressing the
minus key will zoom out again. Pressing the plus key will zoom in at the center of the image. Figure 5.3 below shows how a
zoom rectangle is marked, and Figure 5.4 shows the result of the zoom.
The KPhotoAlbum Handbook
25 / 53
Pressing the period key, lets you reset zooming, so the image is shown un-zoomed. Pressing the equal sign will set the zoom
level so each pixel on the screen correspond to a pixel in the image.
Notice, for technical the only zooming operation that works when watching videos are zoom in and out (the plus and minus key).
Figure 5.3: Zooming in the viewer
The KPhotoAlbum Handbook
26 / 53
Figure 5.4: Zooming in the viewer
Choosing the rotate operations from the context menu, you may rotate the image (Does not work for videos). You can annotate
the current image, simply by choosing Annotate in the context menu.
5.1
Setting Tokens from the Viewer
When viewing the images you may find that a given image contains a person whose name you forgot to set on the images. At this
time you may cancel your viewing, and rush to the image configuration dialog to specify the person. However, you may prefer
to just tag the image and continue on viewing images.
An alternative situation is if you want to sent a number of images to a printer to get them developed on paper. To see which you
want, you start the viewer on the images, and tag them as good or bad while by inspecting see each one.
For the above two examples the viewer offers you to set tokens on the images when viewing them. Tokens are named from A to
Z, and you set a token simply by pressing its letter. In Figure 5.5 you may see an image where the tokens A, B and C are set.
The KPhotoAlbum Handbook
27 / 53
Figure 5.5: An Image with Tokens
Once you’ve set tokens on your images, they will be available for regular browsing in the browser, as can be seen in Figure 5.6.
So when you’ve marked images that needs to be edited, printed, or whatever, simply browse to the images, and annotate all
images at a time (as described in Section 2.3), use a plugin to copy the selected images to a CD, or whatever you need to do.
The KPhotoAlbum Handbook
28 / 53
Figure 5.6: Tokens seen in the Browser
Categories (and esp tokens) may be displayed in the thumbnail viewer. When Showing the categories in the thumbnail viewer,
you may also add tokens to images, simply by pressing the letter for the token when the image is selected, this can be seen in
Figure 5.7
The KPhotoAlbum Handbook
29 / 53
Figure 5.7: Tokens seen in the Thumbnail Viewer
5.2
Setting Categories from the Viewer
Category can be selected on viewer by starting to type the category name. Selection is made immediately when there is only one
matching category left.
To switch to category selection mode simply type slash (/). Possible options are shown after Assigning: text in curly brackets
and it is immediately revised once more letters are typed. When a category is selected you can keep on typing to select the item
value. Following image shows this in action and below it is explanation how this all works.
Figure 5.8: Selecting Categories in Viewer
The KPhotoAlbum Handbook
30 / 53
Follow the category setup below to better understand this explanation. Starting by typing "/k" the input selection will shift from
"Tokens" to "Keywords" (since K is unique). After that, typing "g" will assign the "good" keyword immediately to the image.
Typing "b" will show B{ad,oring} in the info box and typing "a" or "o" next will complete the match and assign the result to
the image. Typing "/p" will work similarly and show the partial category match "P{eople,laces} so you can type "e" or "l" to
complete "People" or "Places" respectively.
• Tokens
– A..Z
• Keywords
– Good
– Bad
– Boring
• People
– George
– Fred
• Places
– Internet
5.2.1
Exact words
If you want to insert a new word or have words like boa and board you need to be able to type in the exact word you want to
insert or select. This can be achieved by starting the word with double quote (") and ending with comma (,). If we would select
boa immediately when it is typed you could not select board and otherwise we would be waiting for more key presses and you
could not select boa.
Figure 5.9: Selecting Exact Words in Viewer
5.2.2
Always start with category selection
If you type two ’/’s in a row it will toggle between two different modes. The default mode described above and a category
selection mode. In the latter mode we go straight back to category selection after a match. That way you can continually select
items within different categories. It’ll still do the fastest match possible so that typing "kbo" will still match "Keywords/Boring"
in the example set above.
The KPhotoAlbum Handbook
31 / 53
5.2.3
Assigning shortcuts
If the current input is blank (e.g. you’re not in the middle of selecting anything) and you hit a function key (F1-F35), it will
assign the last matched assignment to that key. This is useful for quickly assigning frequently repeating items in your current set
of images. It remembers both the category and the category item. These shortcuts are only remembered until the viewer window
is closed.
To reset the keys you just exit the viewer and re-enter. There is no support for doing a "replacement" (e.g. once it’s assigned
there is no way to reassign it to something else until you leave the viewer).
The KPhotoAlbum Handbook
32 / 53
Chapter 6
The Datebar
At the bottom of the KPhotoAlbum main window, you will find the data bar (see Figure 6.1). As the name indicates it shows date
statistics over the images in your database.
Figure 6.1: The Date Bar
The KPhotoAlbum Handbook
33 / 53
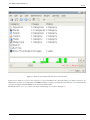
The individual bars indicates how many images are within the given period. In the figure above you may see that I have 261
images from January 2005. The bars encode two information, namely how many images that have an exact date within the given
period, and how many have an overlap with the given period. A picture which has a date that says 2005 will thus count as an
overlap for all the month of 2005, while an image from Jan 24th 2005 will count as an exact date for January 2005. Exact matches
are displayed with green, while inexact matches are displayed in yellow. Thus in December 2004 I have 86 images with exact
count, and 61 with overlap count. (I know the counts by hovering the mouse over the given range, since this displays the counts
in the status bar).
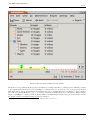
The date bar offers you a number of different granularities, where each bar displays a different time range. The range are years,
month, weeks, days, hours, and 10 minutes. Figure 6.2 shows you part of my database where each bar shows only 10 minutes.
Figure 6.2: The Date Bar Showing 10 Minutes Intervals
The date bar is interactive in two ways, first you may navigate the thumbnail view from the database - selecting a date will scroll
the thumbnail view so the first image from that date is displayed. Second, when you navigate around in the thumbnail view, the
date bar will update to display the date of the images currently displayed.
You may also drag out a range in the data bar. You do so by pressing and dragging the mouse in the ruler part of the date bar,
The KPhotoAlbum Handbook
34 / 53
i.e. on the time stamps. When you select a range, the thumbnail viewer will display only images from that range. You cancel a
selection by pressing the cancel button at the left side of the datebar.
The KPhotoAlbum Handbook
35 / 53
Chapter 7
Generating HTML
KPhotoAlbum offers two possibilities for generating HTML from your photo album. One is the implementation build into
KPhotoAlbum, the other is available as an plugin (see Chapter 9). This section will describe the build in version, which you may
find in the menubar File → Generate HTML
Before HTML pages are generated, you need to specify a bit of information, split over the three pages Content, Layout and
Destination. The following section describes each page in detail.
7.1
The Content page
In the content page you specify which information should be generated to the HTML pages.
The KPhotoAlbum Handbook
36 / 53
Figure 7.1: HTML Generator Content Configuration
First you specify the title of the overview pages, plus a description generated on these pages. If the theme you selected supports
copyright notice this can also be specified here.
Next you specify whether a KPhotoAlbum export file should be generated, and put on the overview page. See Chapter 8 for
details on export files. And if you want to have movies included in-line or as downloadable objects.
Finally you may specify which information should be generated on the HTML pages. This way you may skip generating
information which might be obvious to the reader of the pages (say these images was from the party we all attended). Notice,
KPhotoAlbum does currently not allow you to exclude certain categories from the export file, so don’t rely on this as a way of
excluding information you do not want readers of your pages to see.
The KPhotoAlbum Handbook
37 / 53
7.2
The Layout page
On the layout page you specify what your HTML pages should look like. Most of the options on this page are straight forward,
and do not need further description here. A short intro to each theme is shown when you select the theme to give some idea what
it should look like.
Figure 7.2: HTML Generator Layout Configuration
At the bottom of this page it is possible to specify several resolution for images. This way people reading your pages are not
forced to download images in large resolutions, say 1600x1200, just to see it on a monitor not offering more than say 800x600.
At any time your readers may change resolution among those you specified. That way they may browse through your images in
low resolution (and thus fast download time), and when they see an image of special interest, they may change to high resolution.
The KPhotoAlbum Handbook
38 / 53
7.3
The Destination page
On the destination page you specify several directories and URL’s specifying where your pages go.
The philosophy is that you specify a base directory for all your generations, and for each generation specify a new subdirectory.
Figure 7.3: HTML Generator Destination Configuration
First you need to specify the base directory for all your images. This directory will be remembered from session to session, and
allows you to once and for all tell where all subsequent images should go. Here you may specify a directory, or any protocol
supported by KDE. Examples includes:
• ftp://someserver/my-upload-area/images (upload using FTP)
• fish://someserver/home/foo/images (upload using ssh)
• smb://someserver/c/images (upload to a Windows share)
Once you are done generating your images, you may want to check whether they are really available to your audience. If you
specify a URL in the Base URL line edit, a web browser will be spawned once HTML pages has been generated. The URL you
specify here should match the directory you specified above. Thus the web browser will be started on the subdirectories of this
URL.
Once you have generated HTML pages, your pages may still not be in their final destination, you may still need special upload
procedures out of the control of KPhotoAlbum. For the Import feature (see Chapter 8) to work, you need to specify the final
destination of the pages. Again this does not include the subdirectory of the current generation.
The three line edits described above are all base directories and base URL’s. At these locations a new subdirectory will be created
named with the name you specify in Output Directory.
The KPhotoAlbum Handbook
39 / 53
Chapter 8
Import/Exporting
If you attend a family party, a company meeting, a conference, or any other event where other KPhotoAlbum users may be
present, you may wish to share your images with those people. You may of course choose to generate HTML pages for them to
browse, but given you already have spent time classifying all images (Who is on the images, where were they taken etc), there
are no reason for them to redo all that work.
KPhotoAlbum allows you to export a set of your images into a .kim file, which other people may import into their database, to
get your classification for these images.
Two different kind of .kim files exists, inlines or externals, referring to whether the images them self are located in the file or
at some other location. Placing the images in the file has the obvious advantage that the file is self contained, while it has the
equally obvious disadvantage of the file being rather big.
There are two places from which you may generate a .kim file, namely directly from File → Export..., or along with HTML
pages (see Chapter 7). Creating a .kim file during HTML export will create an external .kim file.
External .kim files will search for images in one of two ways. First it will try to look for the images next to the .kim file, and
if not found, it will search for them at the URL specified when the .kim file was created. Notice the later is only possible for
.kim files created during HTML export.
8.1
Export Dialog
This section will tell you about the export dialog which you get to from File → Export....
The most important part of this dialog is specifying whether the .kim file should be internal or external (see description above).
You have the following three options:
• Include in .kim file - this will be an internal file
• Manual copy next to .kim file - Here you must copy the images yourself next to the .kim file
• Automatically copy next to .kim file - here KPhotoAlbum will copy the images for you.
Between you and me, .kim files are really just zip files. Normally it is not worth bothering compressing the files because images
normally are compressed JPEG already, and the XML file itself are really tiny. If you really want to squish out the last few bytes,
you may still do so, by checking Compress Export File
The final option on the page are Limit maximum image dimension. When sending some images to some friends, you may not
want to send images in full size, as the .kim file might be huge. For this, you may specify that the maximum dimension of
images should be say maximum 800 pixels in each direction.
The KPhotoAlbum Handbook
40 / 53
8.2
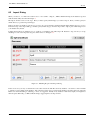
Import Dialog
When you select a .kim file from a web browser, or choose File → Import..., KPhotoAlbum will import the database exported
with the functionality described in Chapter 8.
The import wizard consist of four steps. First you must specify which images you want to import. Next you must specify in
which directory to put the imported images.
Chances are that you call the people category personen (if you are German), while I in Danish might call this category personer.
In the third step of the import dialog, you must specify which category from the import file to import, plus which categories in
your database they match.
I might call myself in my databases for me, while in your database I’m called Jesper K. Pedersen. Step four let you set up
matching for each of the imported categories. This can be see in Figure 8.1.
Figure 8.1: Matching People in the Import Dialog
In the screen shot you may see that Donna is the same in both the .kim file and in my database - the name is shown in black
to indicate a perfect match in the database. The other three names was not found in the database, though both Jesper and Anne
Helene was found matching as substring, so these are suggested. Finally in my database I didn’t have Spiff (or I might have
named it quite differently), so KPhotoAlbum simply suggest Spiff for the import name.
The KPhotoAlbum Handbook
41 / 53
Chapter 9
Plugins
KPhotoAlbum shares a plugin system with a number of other image applications, among these digiKam and Gwenview. The
plugin system is named Kipi, which is short for KDE Image Plugin Interface. See Kipi Homepage
The plugins are available from the menu bar, under the item Plugins. The plugins will and can not be described in this manual,
as the plugins are not part of KPhotoAlbum, but shipped separately. Most plugins do, however have a help page available from
the plugin itself.
Warning
As the plugins are shared between a number of applications, certain plugins might be very little tested with KPhotoAlbum, you should therefore always try out new plugins with the demo database before you try them on your own imagesa
(Don’t say I didn’t warn you!).
a You
start KPhotoAlbum with the demo setup either from the shell by executing kphotoalbum -demo, or from the Help menu.
The applications using KIPI are very different from each other, this means that some plugins are not always working the KPhotoAlbum way, but after all, this is the price for sharing the functionality between the applications.
The most important difference between KPhotoAlbum and the other applications using KIPI, is that the other applications order
the images in albums, where an album simply is a directory. KPhotoAlbum do not have this concept; nevertheless, for certain
plugins to function, KPhotoAlbum behaves towards the plugin system as if it did.
KPhotoAlbum does this by defining the current album to be the current view - that is, all the images the browser currently offers
to display.
In addition to the current album, KPhotoAlbum must also be able to give a list of all albums; KPhotoAlbum defines this list in
the following way:
• When KPhotoAlbum’s browser displays the content of a category, say people, then each item in this category will look like an
album to the plugin.
• Otherwise, the category you specify for Category for virtual albums in the options dialog, will be used; e.g. if you specify
People with this option, then KPhotoAlbum will act as if you had just chosen to display people and then invoke the plugin
which needs to know about all albums.
Some plugins might be redundant to features implemented in KPhotoAlbum, and in that case you may not want to see them at
all in the Plugin menu. For that, you may go to the options dialog, and specify which plugins should be shown at all.
The KPhotoAlbum Handbook
42 / 53
Chapter 10
Configuring KPhotoAlbum
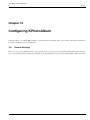
Selecting Settings → Configure KPhotoAlbum... from the menu bar will bring up the options dialog. This chapter will tell you
about the configuration option available there.
10.1
General Settings
Below you can see the configuration page for general options. Some of these options are briefly described here and you can also
access an informational menu while doing configurations by right clicking any option and selecting the What’s This? menu item.
The KPhotoAlbum Handbook
43 / 53
Figure 10.1: General Options
Use EXIF orientation information will automatically rotate images as shot. Most digital cameras embed a thumbnail on RAW
format files and quite often this thumbnail is actually of sufficient size, might be even full sized. Selecting to use this embedded
thumbnail will fasten up all image operations as decoding raw files is very time consuming but the thumbnail is many times
faster. You can also specify the minimum size for the thumbnail so that the RAW image is decoded if the thumbnail is of useless
size.
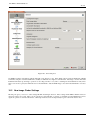
10.2
New Image Finder Settings
The left pane gives you access to other settings like File Searching & Versions. These settings define KPhotoAlbum’s behavior
when new images are found. These can be searched for automatically on start-up or manually from the Maintenance menu.
Again the options are well described in the online help menu but a few should probably be given a brief introduction here.
The KPhotoAlbum Handbook
44 / 53
Figure 10.2: File Searching & Versions
• You probably want to skip searching for some directories that are generated by different image viewers or file browsers. This
is a comma separated list and new directories can easily be added when needed.
• New versions of same files can be automatically detected to some extent. If you want to e.g. automatically stack new versions
of same image to a stack you can configure regular expression to be used to look whether the new file is a new version of an
original file. Following settings where first is the search regexp and second original file test should get you started, but might
need some tuning to suit your naming convention:
1. (_(v){0,1}([0-9]){1,2}){0,1}\.(jpg|JPG|tif|TIF|png|PNG)
2. .CR2;.NEF;.JPG;.jpg
Note that the Original file replacement text can have multiple suffixes separated by semicolon and reference to regexp match can
be used in the format of \1. Original file is being searched from the same directory as the new file. Oh, and the example regexp
will match e.g. the following files: example_v1.jpg, example_12.tif, example.PNG.
The KPhotoAlbum Handbook
45 / 53
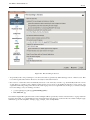
10.3
Thumbnail Viewer Settings
There isn’t much you should configure for Thumbnail Viewer. Mainly Thumbnail Size and Tooltip Size (if you plan on using the
tooltip feature that can be enabled from Settings → Show Tooltips in Thumbnail Window or Ctrl-T). You can also select to view
additional information like labels and categories with the thumbnails.
Figure 10.3: Options for Thumbnail View
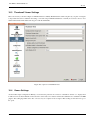
10.4
Viewer Settings
Another rather simple configuration. Mainly you can select the preferred size of Viewer or SlideShow window or to display them
in full screen mode. Basic SlideShow interval can be set here but a more feature rich Advanced SlideShow is available from KIPI
plugins. The scaling algorithm can be Best or Fastest. If your computer is fast enough for Best scaling use that otherwise go for
the speed.
The KPhotoAlbum Handbook
46 / 53
Figure 10.4: Options for the Viewer
10.5
Categories
In Chapter 2 it was described how you could specify different properties for each image, these included People, Places and
Keywords. It is possible to specify your own categories, so if you prefer you could get an Items, a Animals, or a Albums
category your self.
In Figure 10.5 below you can see the dialog used to configure which categories exists. For each category you specify a label and
an icon.
The KPhotoAlbum Handbook
47 / 53
Figure 10.5: Configuring Categories
10.6
Sub-categories
In Section 2.4 we discussed sub categories. From the settings dialog, it is possible to configure entire member groups, i.e.
configure all members of a group in one go rather than configure all groups for a member as was the situation in Section 2.4.
In Figure 10.6 you can see the configuration page for specifying member groups. At the top there is a combo box, where you
can specify which category you are currently configuring. On the left side you see a list box with the current category, and on the
right side you see a list box with the sub categories.
The KPhotoAlbum Handbook
48 / 53
Figure 10.6: Configuring Member Groups
The KPhotoAlbum Handbook
49 / 53
Chapter 11
Workflows with KPhotoAlbum
Workflow is rather important aspect in digital imaging. In this chapter we describe different workflows that fit on different needs.
There are many different factors that must be considered when developing a workflow. Hopefully these examples will provide
you with sufficient ideas of how to tune-up your own method of working with digital imaging.
11.1
RAW workflow using KPhotoAlbum and Bibble5
When shooting RAW images the files from camera must be developed to commonly recognized format like JPEG or TIFF. There
are a few options to choose from when working on Linux. For example RawTherapee and Ufraw are open-source alternatives
when Bibble5/AfterShotPro are commercial application for this purpose.
A few settings are recommended for a RAW workflow. First is to enable the using of the embedded thumbnail. This will give a
tremendous speed boost over decoding each raw file each time they are viewed (check also the minimum dimension configuration
to ensure decent quality). Second one is for the New Image Finder to automatically stack the developed versions over the RAW
file (developed image must be on same directory as the original). This requires regular expressions as described in Section 10.2.
Two helper scripts are provided in KPhotoAlbum sources to help in RAW workflow. These are open-raw.desktop and openraw.pl. The first one enables GUI applications to open the RAW files in the open-raw.pl script that tries to find the original RAW
file and open that instead of the developed image.
The KPhotoAlbum Handbook
50 / 53
Figure 11.1: Sending Images to RAW Editor
First step in actual workflow is to copy the images from camera to the computer. A simple copy on a terminal window is all that
is needed:
cp -a /media/.../101CANON/ ~/Pictures/2012/sample
Then either start KPhotoAlbum or run Maintenance → Rescan for Images and Videos. New images should be found and now is
time for initially tagging the images. As I usually photograph while traveling I first insert the place. Select Folder and browse
to the new directory. Then go to the Show Thumbnails, select all and Annotate Multiple Items at a Time or Ctrl+2. Insert the
proper place like Finland-Helsinki (see Section 2.4).
Now that the new images are easy to find I do the initial ranking and deletion. For this I go to the thumbnail view and start the
Viewer by hitting Enter. I use rating for good images, just press the appropriate number from 1 to 5. I only give 3 to 5 ratings
and hit Ctrl+Del for the bad photos to delete them. At this point I might add also People names if there happens to be a diver
in the photo. Once the first round is done I exit the Viewer by hitting Esc and select Delete file from disk to get rid off the bad
images for good.
Next I select only the images that have high enough rating using the search function. Naturally the Place has to be set if search
is started with Ctrl+F. However, if search is invoked from the Main Window the current selection is drilled down to the more
The KPhotoAlbum Handbook
51 / 53
precise match. Anyway, at this point I go through the better rated images again doing refining on the rating. E.g. if I have 5
similar photos of one Nudibranch species I generally decrease the rating of the poorer images and might increase the best one.
Comparing images can be done by selecting the ones you want to compare and starting the Viewer. Removing images from the
Viewer selection can be done with Delete. This only disables the viewing of the current image while within the Viewer, nothing
is removed or deleted. This allows comparing 2 or 3 better images next to each other moving between them with PgUp and
PgDn. I quite commonly use a tmp category to mark e.g. crabs and shrimps to be easily able to display only selected type of
images during the later phases of selection and identification.
After a reduced amount of images is left I start tagging them. I add the Latin Name of the species and Common Name. Whenever
I have these two categories completed I consider the image Done and get rid of the Untagged marking. (As the tags are copied
over to new version of images only when the new image is found and not when the top of the stack is re-tagged it is good to have
as final tagging done as possible before developing JPEGs.)
The best images are sent to external application for developing. With wanted images selected, right click on selected thumbnail
and select Invoke External Program → All Selected Images → Send Bibble5. The application selected is actually my script that
detects if there is a RAW file for the possibly already developed images available and uses that if possible. Within the external
application I do some tuning up and cropping if required and then output the developed JPEGs next to the original RAW file.
File naming is rather simple, change the extension or add underscore and running number if needed.
Now that there is plenty of new JPEGs in the image directories I let KPhotoAlbum search for new images and automatically stack
the new ones on top of the original RAW (Figure 10.2). Then a final round of selection with the developed images and adding
some descriptions if needed.
Final step is to generate static HTML pages and upload to my web server for the enjoyment of friends and colleagues. HTML
generation is described in Chapter 7.
The KPhotoAlbum Handbook
52 / 53
Chapter 12
Frequently asked questions
For a list of frequently asked questions, please see http://userbase.kde.org/KPhotoAlbum_FAQ
The KPhotoAlbum Handbook
53 / 53
Chapter 13
Credits and Licenses
This documentation is licensed under the terms of the GNU Free Documentation License.
This program is licensed under the terms of the GNU General Public License.