1
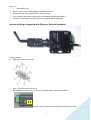
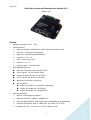
2011.01.20
Serial Port to Internet Gateway User Manual V1.1
(Model: IP-S)
Feature:
Operation voltage : DC 7V ~ 20V.
RS232 Interface
Meets or Exceeds TIA/EIA-232-F and ITU Recommendation V.28
Interface : ±12V levels compatibility.
Data rate : 1200 bps up to 921600 bps
Characters : 5, 6, 7, 8
Parity : None, Even, Odd
Stop bits : 1, 1.5, 2
Control signals : TxD, RxD, GND
RS422/RS485 Interface
Meet the requirement of the EIA/TIA-485
4-wire signals : TX+,TX-,RX+,RX-,GND
Support terminal resistor for TX and RX.
Up to connect 256 devices on the bus.
Maximum bit rate up to 115K bps.
Bus protection:
±30KV, IEC 61000-4-2, Contact/Air Discharge.
±30KV, IEC 61000-4-4, EFT(5/50ns).
±30KV, IEC 61000-4-5, Surge(8/20us).
Ethernet Interface
Built-in 1.5KV magnetic isolation.
Ethernet Interface : 10Base-T, 100Base-TX
Ethernet Speed/Duplex : Auto-negotiation 10/100Mbps, Full/Half duplex
Protocols Supported : ARP, IP, ICMP,UDP, TCP, DHCP, TFTP, HTTP.
Network Services : TCP Server, TCP Client, Web Control.
1
1
2011.01.20
Auto-MDIX : Yes
Build-in web server setting page for parameter by user.
Support all operation system, don’t need any driver.
Cross domain parameter setting utility for windows XP/VISTA/windows 7.
Support Virtual Serial Port (VSP) utility for simulate RS232 COM port.
Internet of things: Integrated with Zigbee or Bluetooth products.
Product profiles:
1. DB9 male : RS232 connector.
2.
3.
RJ45 : TCPIP Ethernet connector.
RS422/RS485 terminal resistor: Short is enabled, open is disabled (2.54mm).
Please use two jumps for to enable the terminator function.
2
2
2011.01.20
4.
RS232/RS485 mode switch.
RS232
RS422(485)
5.
RS422/RS485 4-wires connector.
VCC-GND : DC 7~20V input.
6.
DC power connector : DC 7~20V input (Φ2.0mm).
7.
8.
LED indicator : Red-Power, Orange-Ready, Green-Link.
Reset key : Reset module.
Default setting:
The module default IP address is 192.168.0.1, this module build-in a homepage for setting, so
user can change internal parameter setting by browser.
Quick start:
1. Connect RJ45 to Ethernet.
2. Select RS232 or RS422/RS485 mode.
3. Connect RS232 DB9 or RS422/RS485 4-wires bus.
4. Connect DC power input.
5. Check LED indicator.
User can use browser and entry the URL(http://192.168.0.1/setting.htm) for setting.
About the web server setting page as below:
3
3
2011.01.20
User can change any parameter, once the parameter was finished, user can press the ‘Apply’
button, and new parameter can be saved to module simultaneously the module will reboot.
The main page mainly provides two functions,
(1) Apply: to update the configuration value on the device server(s).
(2) Reset: to reset the configuration value to the factory default settings.
Notice: The ‘Firmware Update’ button doesn’t press.
Environment setting:
The module factory default IP address 192.168.0.1, so, when in use, please note that if there are
other devices that are located on the same IP address.
Setp 1: First check IP address, in window XP item ”Start”→”Run”.
4
4
2011.01.20
Entry ”ping 192.168.0.1”command, and press “OK”.
When the console window display as below:
When you see the ”Request timed out”message, said there is no device IP: 192.168.0.1 address, this
screen will then automatically shut down.
Step 2: Verify that the domain is the same as the IP address is 192.168.0.1, so the domain is in the
192.168.0.x where, if the first three digits of your computer not the same with this domain, you can
not link to this mode group. You can select ”Start” →”Run” →”My computer” →” Network
Neighborhood” →” View Network Connections”。
5
5
2011.01.20
If that is not the same domain, use a fixed IP address of the IP way to 192.168.0.x, Gateway IP:
192.168.0.254.
Step 3: Recognition and computer wiring is correct, if your computer has through the Hub is
connected to this module, then you can use the network cable to the general, if the computer is
directly connected with the module, then you must use a dedicated network handshake line before
the connection is successful.
6
6
2011.01.20
Step 4: If the domain is configured correctly success or wiring, you can use the "ping 192.168.0.1" in
the way of a successful connection recognized.
Then you can use the browser to open the setup
screen.
7
7
2011.01.20
Parameter Setting:
This module is divided into two parts parameter:
Serial Port setting
Network setting
When you set is complete, simply press the "Apply" button, if the "Enable Reboot" are ticked,
then this module will reboot, reboot time because flowers to 5 to 10 seconds, so you may see
the screen can not display the error
message.
8
8
2011.01.20
At this point you re-enter as long as the web site again and press "Enter" key, the screen will
re-appear.
Serial Port setting:
Data Baud Rate : RS232 bit rate, the range from 1200、2400、4800、9600、19200、38400、57600、
115200、921600。
Data Bit : The number of data bits transmitted, the range from 5、6、7 and 8 bits。
Data Parity : Transmission of the parity bit check method,the type are Odd、Even and None。
Stop Bit : Number of stop bits,the type are 1、1.5 and 2 bits.
Flow Control: Flow control method, the type are Xon/Xoff、Hardware and None.
Network setting:
Enable DHCP : Enable DHCP function.
IP Address : Static IP address,use IPv4 define。
Subnet Mask : Mask address,normal setting is ”255.255.255.0”。
Gateway : Gateway address,normal setting is ”xxx.xxx.xxx.254”。
DNS server : DNS address, Can point to any one DNS server, we are the factory default value is
9
9
2011.01.20
pointing to Taiwan Telecom's DNS server.
Connection Type : TCP and UDP is divided into two types, their advantages and disadvantages are as
follows:
Protocol
Advantages
disadvantages
TCP
Reliable transmission, the program
Transmission speed slower.
can be omitted and reliable
mechanism
UDP
Large transmission capacity, rapid
Unreliable, the program may need
to provide a reliable mechanism
for self.
Transmit Timer : Data packets sent between the serial interval.
Server/Client : This machine type, the default value is Server.
Listening Port : Multiple applications in the corresponding port will address, in which the range of 0
to 1023 is known to the general code used by the so-called (Well-Known Ports), for example: Port
21 is used for FTP, Port 80 is for Http used, as the dynamic port (Dynamic Ports) to users to decide
on opening up, ranging from 1024 to 65535.
Destination IP : When this module is set to Client, enter the IP address of the remote host server.
Destination Port : When this module is set to Client, enter the remote host server port address.
Enabled Reboot : Start Module reboot.
Apply : Confirm the setup is complete.
Reset : Reserved.
Firmware Upgrade : Reserved.
Test Method Description:
In Windows, the software has built-in Hyper Terminal, but less in the maintenance of the software,
so there are many problems, users are recommended to use Tera Term software to replace the
Super Terminal, this is free software, download the following address:
http://toget.pchome.com.tw/category/utility/26504.html
Or use the downloadable Google search URL.
First of all be determined in accordance with the environment set the domain PC and module are
the same, then the test board and module ready and connected with the PC's COM port and also
connected to the Ethernet network.
10
10
In
te
rn
et
2011.01.20
When the connections are completed, then the first open Tera Term from the first screen, select the
Serial port
address.
COM port after setting the parameters, in the Setup-> Serial port open parameter setting screen,
the set of the RS232 module parameters must be the same, otherwise it will not connect.
Tera Term then open a second screen, File-> New connection, select the TCPIP host
11
11
2011.01.20
address.
When TCPIP is also set to complete, Tera Term window, there were two RS232 and
TCPIP.
Transfer Mode RS232-> TCPIP
At this point you have to do RS232 screen, press a different key, in the meantime will appear on the
screen under TCPIP.
12
12
2011.01.20
If at this time the wiring RS232 and PC separately, you are still in the RS232 screen, press a different
key, this time will not you just press the TCPIP any character.
Transfer Mode TCPIP-> RS232
To transfer data through the TCPIP to RS232 picture of the screen, please enter the text in the TCPIP
screen, be sure to press the Enter key, then just enter the text can send out.
First look at the screen display settings, select Setup->
13
13
2011.01.20
Terminal.
When the Terminal setup screen appears, in the New-line-> Receive select “CR +
LF”
Two Terminal are set to do the same, after TCPIP enter a text screen, press the Enter
14
14
2011.01.20
Key.
Server mode instructions:
Use this mode is set for each Device Server-side, this time the initiative to send or read data from a
remote Client host launched through polling (Polling) way, one by one on each Device send
command, in principle, each Device must be set to a fixed IP mode, so the remote Client only way
to query one by one.
15
15
2011.01.20
Client mode instruction:
Use this mode is set for each device client-side, this time the initiative to send or read data from the
client-side initiated automatically every time client requested connection, once the connection is
successful, client will automatically send IP and MAC address, so that the remote server know
which one client has the connection is successful, the device can be configured for each variable or
fixed IP mode. Once the connection is complete, client can take the initiative to send or read data to
16
16
2011.01.20
Client
Client
Client
Client
Server
Client
Client
Client
the server.
Client
Set as follows:
Using a fixed IP or floating IP can select client mode and IP port pointing to a remote location and
server location.
17
17
2011.01.20
Client mode Demo software:
First, open the Server-side software to start listening for connections coming from the Client-side
requirements, when you press the “Receive” button, the software started listening.
When the software receives client connection requests and respond to the end of the connection, it
will show a successful connection message, and will show the client-side IP address and MAC
address.
Open Tera Term screen for COM port。
18
18
2011.01.20
At this point in the COM port screen, enter any character, all will be immediately displayed in the
software screen on the Server-side.
If server want to cancel the connection with the Client-side, please enter the capital of the 'Q' can
be.
19
19
2011.01.20
20
20