1
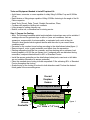
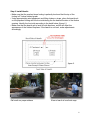
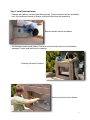
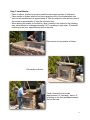
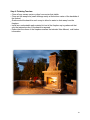
Claremont Fireplace Kit
INSTALLATION INSTRUCTIONS
!
1
Planning
• Familiarize yourself with all applicable local building codes. Only install the fireplace in
a location and in such a way as to meet all relevant codes and requirements.
• Obtain all necessary permits.
• Choosing the proper site orientation for any outdoor fire place is a critical step
minimize excess smoke or downdraft. Consider the following when selecting the fire
place location and orientation:
a. Consider the prevailing wind direction and shelter the opening from the wind
and its eddie currents.
b. Nearby structures or trees will affect the draw of the chimney. Locating the
fireplace under the canopy of a tree may adversely effect the draw of the
chimney.
c. If the fireplace is built near an enclosure or porch be sure to allow adequate
ventilation for any smoke to escape.
Make
sure
to install the fireplace an adequate distance from any combustable material
•
and/or structure, including but not limited to, buildings, decks or trees.
• Never install the fireplace in an area near combustable flooring material, such as a
wood deck.
Safety
• Prior to starting your project, contact your local utility marking service and have utilities
located in project area. Hand dig around utilities that are in or near the location of any
excavation.
• Perform all work in accordance with all local and federal OSHA requirements.
• Be sure to use appropriate personal protective equipment at all times. Hard hats must
be worn if objects could be lifted overhead, and/or if required by law.
• Never stand under or in the fall-path of any of the components as they are being
placed.
• Keep fingers and other extremities above and clear of the bottom surface of each
component when placing them.
• Only use equipment and chains that are rated to safely handle the weights of the
heaviest piece of the fireplace. Be sure to factor in the working angle of the chain or
strap when determining the total load that will be required.
• Wear appropriate fall protection if working at or above heights from which an injury
from falling could occur and/or heights that require fall protection according to local
and federal safety standards.
!
2
!
3
Tools and Equipment Needed to Install Fireplace Kit:
• A skid steer, excavator or crane capable of safely lifting 3,000lbs 6’ up and 2,300lbs
12’ up
• Rated chains or lifting straps capable of lifting 3,000lbs factoring in the angle of the lift
• Plate compactor
• Hand Tools: Shovel, Rake, Trowel, Straight Screwdriver, Pliers,
• Cordless drill capable of drilling into concrete
• Lifting straps for setting chimney cap
• Bucket, mortar tub, or wheelbarrow for mixing mortar.
Step 1. Prepare the Footing:
• Note: The following foundation detail and installation instructions may not be suitable if
existing soils are fine-grained clays or silts or if poor soil conditions, such as
expansive, compressible, frost-susceptible, or saturated soils, exist at the site. Consult a local geotechnical engineer familiar with the soils in your area if these
conditions exist.
• Excavate for the crushed stone footing according to the detail shown below(figure 1).
• Remove topsoil, roots, organic materials, and debris from the excavation.
• Existing subgrade should be firm, granular, and free-draining with a minimum load
bearing capacity of 2,000 lbs per square foot. If subgrade soils are disturbed during
excavation, compact disturbed soils to 95% of Standard Proctor.
• Install the woven geotextile per the detail shown below(note, weed mat or felt fabric
are not suitable alternatives to woven geotextile)
• Place the crushed stone footing in three compacted 4” lifts achieving 95% of Standard
Proctor throughout the footing.
• Grade the top of the footing to be level in both directions and 6” below the desired
finish grade of the surrounding area.
Precast
Fireplace
Firebox
Precast Fireplace Hearth
6"
Bury Untextured Portion
of Hearth Below Grade
12"
Crushed Stone Footing
Woven
Geotextile
!
6"
figure 1.
4'-6" Wide x 7'-0" Long
4
Step 2. Install Hearth:
• Make sure that the crushed stone footing is perfectly level and that the top of the
footing is 6” below finished grade.
• Using appropriately rated equipment and lifting chains or straps, place the hearth unit
on the prepared footing with the front side facing the the desired location of the firebox
opening. Identify the front side according to the detail below (figure 2.).
• Make sure that the hearth unit is level in both directions, as this will affect the
appearance of the finished fireplace. If the hearth is not level, make adjustments
accordingly.
"
"
Set hearth on prepared base
"
"
"
"
"
!
figure 2.
"
"
Ensure hearth is level both ways
" "
5
Step 3. Install Firebox
• Using the provided mortar, place a thin(approximately 1/4”) bed of mortar uniformly
around the center of the hearth inside the reference lines that are molded into the
hearth. Keep the center 4” at the back clear of mortar to allow for proper drainage(see
figure 2. above).
Place a thin bed of mortar around hearth
inside the reference lines. Leave a gap
in the mortar bed in back per figure 2
• While mortar is still fresh, set the firebox on the hearth. Be sure to center the walls of
the firebox in the center of the reference lines that are molded into the hearth. Check
the firebox for level and make adjustments to the mortar bed as necessary. If the gap
between the firebox and the hearth is greater than 1/4”, your mortar bed is either too
thick, or the mortar was not fresh when the firebox was placed. In this case, remove
the firebox, clean off the existing mortar, reapply the mortar thinner and more
workable, and reset the firebox.
Set firebox on hearth. Center on
reference lines. Check for level.
!
6
Step 4. Install Stainless Insert:
• Prepare the firebox to receive the stainless insert. Clean out excess mortar and debris
from the inside and outside of firebox as this will effect how the inserts sits.
Remove excess mortar and debris
• Set Stainless Insert inside firebox. Use care to ensure that insert is not scratched or
damaged. Center and level insert in opening.
"
"
Carefully set insert in firebox.
Center and level insert in firebox
!
7
• Secure the insert to the concrete firebox with the attached screws. Use the top two
holes on vertical flanges on each side of the insert. The holes for these screws must
be predrilled with the included bit. Prepare chimney opening.
Pre-drill holes
Fasten insert to firebox with screws
Unscrew vent collar
Remove and save the vent collar
Expand chimney opening
Test-fit inner chimney pipe in opening
!
8
Step 5. Install Mantle:
• Place a uniform, thin bed of mortar around the entire upper surface of the firebox.
• Place mantle on firebox with the front face facing the front of the fireplace(the front
face can be identified as it is approximately 8” from the reference line, the back face of
the mantle is approximately 3” from the reference line).
• When placing the mantle on the firebox, align it relative to the firebox in the following
way: centered side-to-side(approximately a 4.5” overhang on each side), 5”(nominal)
overhang in the front, approximately flush in the back.
Place mortar on top surface of firebox
"
"
"
Set mantle on firebox
Center the mantle side-to-side
(approximate 4.5” overhang), leave a 5”
overhang on the front and approximately
flush in the back.
!
9
Step 6. Install Chimney
• Place a very thin bed of mortar inside the reference line on the mantle. Too much
mortar will cause an unsightly gab to be visible between the mantle and the chimney.
Concrete adhesive can be substituted for mortar on this step.
• Set the chimney on the mantle with the front side of the chimney facing the front side
of the fireplace(the front is the cleaner looking of the two sides, the back has a slightly
visible vertically staggered mold seam). Align the chimney so that it is flush with the
outside of the reference lines.
Place a very thin bed of mortar on
mantle inside reference lines
Set chimney on mantle. Align
chimney such that the outside of
the chimney is flush with the
reference line.
!
10
Step 7. Insert Chimney Pipes:
• This kit includes two sections of double-wall chimney pipe.
• Remove the inner wall sections from the outer wall sections and connect the two inner
wall sections together.
• Insert the connected inner wall section into the chimney and connect it to the crimped
open stainless steel insert(Note, this step will be very difficult if the latter part of Step 4
was not properly followed, including crimping the chimney opening and test-fitting the
chimney pipe to the chimney opening).
• Expand the bottom of the outer-wall chimney pipe with pliers.
• Connect the vent collar from Step 4 to the bottom of the outer-wall chimney pipe.
• Connect the two outer wall chimney pipes together.
• Insert the outer-wall chimney pipe and vent collar assembly into the chimney and
around the inner wall(Note, the vent collar does not need to be re-screwed to the
stainless insert).
Insert connected inner-wall sections in
Attach vent collar
!
Expand the bottom of outer-wall section
Insert outer-wall vent collar assembly
11
Step 8. Install Chimney Cap and Spark Arrestor:
• Apply a thin bed of mortar or an appropriate exterior concrete adhesive to the top of
the chimney.
• Safely lift and place chimney cap on chimney with lifting straps that are rated to handle
the weight of the chimney cap safely. Ensure that the straps are attached to the
chimney cap in such a way as to make it impossible for the chimney cap to be
dropped during placement. Be sure that no person is ever below the chimney cap
as it is being lifted.
• Center the chimney cap on the chimney.
• Securely fasten the spark arrestor to the chimney. The easiest way to accomplish is to
perform the following:
a. Back off the attached spark arrestor anchor screws
b. One person lift and hold the outer wall chimney pipe a eight inches above the top
of the chimney cap.
c. With the outer chimney pipe elevated, lower the spark arrestor onto the outer
chimney pipe until the spark arrestor alignment guides are seated on the chimney
pipe.
d. Securely fasten the spark arrestor anchor screws to the chimney pipe, gradually
tightening opposing screws a few turns at a time until all are tightly secured.
Place chimney cap on chimney with
appropriately rated, secured lifting straps
Fasten spark arrestor to outer wall chimney
pipe
!
12
Step 9. Finishing Touches:
• Clean off any excess mortar or drips from mortar that visible.
• Clean out the weep-hole (small drainage cavity at the bottom center of the backside of
the firebox).
• Grade around the hearth in such a way to allow for water to drain away from the
fireplace.
• Install non-combustable patio material in front of the fireplace up to grade such that
only the textured portion of the hearth is exposed.
• Ensure that the owner of the fireplace receives the included User Manual, and firebox
information.
!
13