1
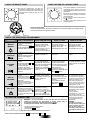
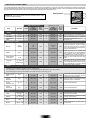
IT
OVENS
USER INSTRUCTIONS
GB
ES
NL
DE
FR
PT
PL
SI
CANDY HOOVER GROUP S.R.L. • Via Privata Eden Fumagalli • 20047 Brugherio Milano Italy
GENERAL WARNINGS
Thank you for choosing one of our products. To get the most out of your oven we recommend that you:
• Read the notes in this manual carefully: they contain important instructions on how to install, use and service this oven safely.
• Keep this booklet in a safe place for easy, future reference.
All accessible parts are hot when the appliance is in operation, take care to not touch these elements.
When the oven is first switched on it may give out acrid smelling fumes. This is because the bonding agent for insulating panels around the oven
has been heated up for the first time.
This is a completely normal, if it does occur you merely have to wait for the fumes to clear before putting the food into the oven.
An oven by its very nature becomes very hot. Especially the glass of the oven door.
Do not allow children to go near the oven when it is hot, especially when the grill is on.
DECLARATION OF COMPLIANCE
IMPORTANT
The parts of this appliance that may come into contact with foodstuffs
comply with the provisions of EEC Directive 89/109.
Appliance complies with European Directives 73/23/EEC and
89/336/EEC, replaced by 2006/95/EC and 2004/108/EC, and
subsequent amendments.
When you have unpacked the oven, make sure that it has not been
damaged in any way. If you have any doubts at all, do not use it:
contact a professionally qualified person. Keep packing materials
such as plastic bags, polystyrene, or nails out of the reach of children
because they are dangerous for children.
If the oven is to work properly, the kitchen housing must be suitable.
The panels of the kitchen unit that are next to the oven must be made
of a heat resistant material. Ensure that the glues of units made of
veneered wood can withstand temperatures of at least 120 °C.
Plastics or glues that cannot withstand such temperatures will melt
and deform the unit. Once the oven has been lodged inside the unit,
the electrical parts must be completely insulated. This is a legal safety
requirement. All guards must be firmly fixed into place so that it is
impossible to remove them without using special tools.
Remove the back of the kitchen unit to ensure an adequate
current of air circulates around the oven. The hob must have a
rear gap of at least 45 mm.
SAFETY HINTS
•The oven must be used only for the purpose for which it was
designed: it must only be used for cooking food. Any other use, e.g. as
a form of heating, is an improper use of the oven and is therefore
dangerous.
•The manufacturers cannot be held responsible for any damage
caused by improper, incorrect or unreasonable use. When using any
electrical appliance you must follow a few basic rules.
– Do not pull on the power cable to remove the plug from the socket.
– Do not touch the oven with wet or damp hands or feet.
– Do not use the oven unless you are wearing something on your feet.
– Do not allow children or irresponsible people to use the oven unless
they are carefully supervised.
– It is not generally a good idea to use adapters, multiple sockets for
several plugs and cable extensions.
– If the oven breaks down or develops a fault switch it off at the mains
and do not touch it.
•If the cable is at all damaged it must be replaced promptly.
When replacing the cable, follow these instructions. Remove the
power cable and replace it with one of the H05RRF, H05VV-F,
H05V2V2-F type. The cable must be able to bear the electrical current
required by the oven. Cable replacement must be carried out by
properly qualified technicians. The earthing cable (yellow-green) must
be 10 mm longer than the power cable.
Use only an approved service centre for repairs and ensure that only
original parts are used. If the above instructions are not adhered to the
manufacturers cannot guarantee the safety of the oven.
•This appliance is not intended for use by persons (including children)
with reduced physical, sensory or mental capabilities, or lack of
experience and knowledge, unless they have been given supervision
or instruction concerning use of the appliance by a person responsible
for their safety.
•Children should be supervised to ensure that they do not play with the
appliance.
CONNECTING TO THE POWER SUPPLY
Plug into the power supply. Ensure first that there is a third contact that
acts as earthing for the oven. The oven must be properly earthed.
If the model of oven is not fitted with a plug, fit a standard plug to the
power cable. It must be able to bear the power supply indicated on the
specifications plate. The earthing cable is yellowgreen. The plug must
be fitted by a properly qualified person. If the socket and the plug are
incompatible the socket must be changed by a properly qualified
person.A properly qualified person must also ensure that the power
cables can carry the current required to operate the oven.
An ON/OFF switch may also be connected to the power supply. The
connections must take account of the current supplied and must
comply with current legal requirements. The yellow-green earthing
cable must not be governed by the ON/OFF switch. The socket or the
ON/OFF switch used for connecting to the power supply must be
easily accessible when the oven has been installed.
Important: During installation, position the power cable in such a way
that it will not be subjected to temperatures of above 50°C at any point.
The oven complies with safety standards set by the regulatory bodies.
The oven is safe to use only if it has been adequately earthed in
compliance with current legal requirements on wiring safety. You must
ensure that the oven has been adequately earthed.
The manufacturers cannot be held responsible for any harm or
injury to persons, animals or belongings caused by failure to
properly earth the oven.
WARNING: the voltage and the supply frequency are showed on
the rating plate (fig. on last page).
The cabling and wiring system must be able to bear the maximum
electric power required by the oven. This is indicated on the
specifications plate. If you are in any doubt at all, use the services of a
professionally qualified person.
INSTALLATION
OVEN EQUIPMENT (according to the model)
Installation is the customer’s responsibility. The manufacturers have
no obligation to carry this out. If the assistance of the manufacturer is
required to rectify faults arising from incorrect installation, this
assistance is not covered by the guarantee.
The installation instructions for professionally qualified personal must
be followed. Incorrect installation may cause harm or injury to people,
animals or belongings. The manufacturer cannot be held responsible
for such harm or injury.
It is necessary to do an initial cleaning of the equipment before
the first use of each of them.Wash them with a sponge. Rinse and
dry off.
The simple shelf can take moulds
and dishes.
The tray holder shelf is especially
good for grilling things. Use it with the
drip tray.
FITTING THE OVEN INTO THE KITCHEN UNIT
The special profile of the shelves
means they stay horizontal even when
pulled right out. There is no risk of a
dish sliding or spilling.
Fit the oven into the space provided in the kitchen unit; it may be fitted
underneath a work top or into an upright cupboard. Fix the oven in
position by screwing into place, using the four fixing holes in the frame.
(Fig.on last page).
To locate the fixing holes, open the oven door and look inside.To allow
adequate ventilation, the measurements and distances indicated in
the diagram on last page must be adhered to when fixing the oven.
Note: For ovens that are combined with a hob unit the instructions
contained in the manual for the hob unit must be followed.
12 GB
The drip tray catches the juices from grilled foods. It is only used with the Grill, Rotisserie, or Fan Assisted Grill ;
remove it from the oven for other cooking methods.
Never use the drip tray as a roasting tray as this creates smoke and fat will spatter your oven making it dirty.
The pizza set is designed for pizza
cooking. In order to obtain the best
results the set must be used together
with Pizza function.
The tray holder
The tray holder shelf is ideal for grilling. Use it in
conjunction with the drip tray. A handle is included
to assist in moving the both accessories safely.
Do no leave the handle inside the oven.
USEFUL TIPS
SHELF SAFETY SYSTEM
COOKING TIME
For recommended cooking times and temperatures the first time you
use the oven, refer to the tables on pages 7, 8. You may then wish to
vary these times and settings in the light of your own experience.
The oven features a new shelf safety
system.
This allows you to pull out the oven
shelves when inspecting the food
without danger of food spillages or
shelves falling accidentally out of the
oven.
To remove the shelves pull out and lift.
SELF-CLEANING OVEN WITH CATALYTIC
Special self-cleaning panels covered in a micro-porous coating are
available as optional extras for all models. If they are fitted, the oven
no longer needs to be cleaned by hand.
The fat that is splattered onto the sides of the oven during roasting is
eliminated by the microporous coating which breaks the fat down by
catalysis and transforms it into gas.
Excessive splattering may nevertheless block the pores and therefore
hinder self-cleaning. The self-cleaning capacity may be restored by
switching on the empty oven to maximum for about 10-20 minutes.
Do not use abrasive products, metal cleaning wads, sharp objects,
rough cloths, or chemical products and detergents that may
permanently damage the catalytic lining.
It is a good idea to use deep roasting trays to roast fatty foods such as
joints of meat etc. and to put a tray underneath the grill to catch surplus
fat.If the walls of the oven are so thickly coated in grease that the
catalytic lining is no longer effective remove surplus grease with a soft
cloth or sponge soaked in hot water.
The lining must be porous for self-cleaning to be effective.
N.B.: All catalytic linings currently on the market have a working life of
about 300 hours. They should therefore be replaced after about 300
hours.
GRILLING
Grilling makes it possible to give food a rich brown colour quickly.
For browning we recommend that you insert the grill onto the
fourth level, depending on the proportions of the food (see fig.
page 7).
Almost all food can be cooked under the grill except for very lean
game and meat rolls.
Meat and fish that are going to be grilled should first be lightly
doused with oil.
The
MODELS
Ovens have an electronic control of the fan speed, called
and patented VARIOFAN. During the cooking, this system changes
automatically the speed of the fan (in multifunction mode) in order to
optimize the air flow and the internal temperature in the cavity of the
oven.
All
ovens feature the
function.
This allows a management of the distribution of moisture
and temperature. It reduces the loss of humidity of the 50
%, which guarantees the food remains tender and tastes
better. This a delicate cooking is recommended for the
baking of the bread and pastry.
CLEANING AND MAINTENANCE
Never use a steam or high pressure spray to clean the appliance.
Never use abrasive cleaners, wire wool or sharp objects to clean the
glass oven door.
Clean the stainless steel and enamelled surfaces with warm, soapy
water or with suitable brand products. On no account use abrasive
powders that may damage surfaces and ruin the oven’s appearance.
It is very important to clean the oven each time that it is used. Melted
fat is deposited on the sides of the oven during cooking. The next time
the oven is used this fat could cause unpleasant odours and might
even jeopardise the success of the cooking. Use hot water and
detergent to clean; rinse out thoroughly.
To make this chore unnecessary all models can be lined with catalytic
self-cleaning panels: these are supplied as an optional extra (see the
section SELF-CLEANING OVEN WITH CATALYTIC LINING).
Use detergents and abrasive metal pads like «brillo pads» for the
stainless steel grills.
The glass surfaces as the top, oven door and warming compartment
door must be cleaned when they are cold. Damage that occurs to
them because this rule was not adhered to are not covered by the
guarantee.
To replace the interior light:
• switch off the mains power supply and unscrew bulb. Replace with an
identical bulb that can withstand very high temperatures
It reduces the time of preheating of ovens: only 8 minutes
to reach 200 degrees Celsius.
It gives the possibility of setting level and intensity of
grilling, up to 50 % more power in comparison with a
traditional multifunction oven.
Some ovens are equipped with the new doorj " WIDE DOOR " which
has a bigger window area, this allows better maintenance and a
improved thermal insulation.
According to the model
Is an illumination system which replaces the traditional « light bulb ».
14 LED lights are integrated within the door. These produce white high
quality illumination which enables to view the inside of the oven with
clarity without any shadows on all the shelves.
Advantages :
System, besides providing excellent illumination inside the
oven, lasts longer than the traditional light bulb its easier and to
maintain and most of all saves energy.
• Optimum view
• Long life illumination
• Very low energy consumption, -95% in
comparison with the traditional
illumination High
“Appliance with white light LED of the 1M Class according to IEC
60825- 1:1993 + A1: 1997 + A2: 2001 (equivalent to EN 60825-1: 1994
+ A1: 2002 + A2: 2001); the maximum light power emitted l 459nm <
150uW.
Not observed directly with optical instruments. “
SERVICE CENTRE
Before calling the Service Centre
If the oven is not working, we recommend that:
you check that the oven is properly plugged into the power supply.
If the cause of the fault cannot be detected:
disconnect the oven from the mains, do not touch the oven and call the
after sales service.
Before calling the Service Centre remember to make a note of the
serial number on the specifications plate (see fig. On last page).
The oven is supplied with a guarantee certificate that ensures that it
will be repaired free of charge by the Service Centre
13 GB
USING THE MINUTE TIMER
USING THE END OF COOKING TIMER
To set the cooking time, turn dial one
complete revolution and then position the
index to the required time. When the time
has lapsed, the signal will ring for a few
seconds.
90
30 40 5
0
100 110 12
20
0
10
This control enables to set the desired
cooking time (max. 120 min.) the oven
will automatically switch off at the end of
the set time.
The timer will count down from the set
time return to the O position and switch
off automatically.
For normal use of oven set the timer to
the
position.
To set the oven ensure the timer is not
on the O position.
60
70 80
Analog Timer Setting
When you push the knob, the minute arrow goes one minute forward. If you keep the knob
pressed, the arrows move quickly forward.
Hours hand
Minutes hand
Push Knob
USE OF THE ELECTRONIC PROGRAMMER
FUNCTION
MINUTE
MINDER
MANUAL
FUNCTION
COOKING
TIME
END OF
COOKING
KEY LOCK
HOW TO ACTIVATE IT HOWTO SWITCH ITOFF
WHAT IT DOES
WHAT IT IS FOR
•Push the central button
1 times
•Press the buttons or
to set the required time
•Release all the buttons
•When the set time as
elapsed an audible alarm
is activated (this alarm will
stop on its own, after
7 minutes however it can be
stopped immediately by
pressing the button) SELECT.
•Sounds an alarm at the
end of the set time.
•During the process, the
display shows the
remaining time: min, sec.
•Allows to use the oven as
alarm clock (could be
activated either with
operating the oven or with
out operating the oven)
•Push the central button
1 times
•Set the cooking function
with the oven function
selector
•Turn the oven function
selector to position O.
•Enables you to operate
the oven.
•For cooking the desired
recipes
•Push the central button
2 times
•Press the buttons or
to set the lenght of
cooking required
•Release all buttons
•Set the cooking function
with the oven function
selector
•When the time is elapsed
the oven will switch off
automatically. Should you
wish to stop cooking earlier
either turn the function
selector to 0, or set time
to 0:00 (SELECT and
buttons)
•It allows to preset the
cooking time required
for the recipe chosen
•To check how long is left
to run press the SELECT
button 2 Times.
•To alter/change the
preset time press SELECT
and
buttons
•Push any button to stop
the signal. Push the central
button to return to the clock
function
•Push the central button
3 times
•Press the buttons
to set the time at which
you wish the oven to
switch off
•Release the buttons
•Set the cooking function
with the oven function
selector
•At the time set, the oven
will switch off. To switch
off manually, turn the oven
function selector to
position O.
•Enables you to set the
end of cooking time
•To check the preset time
push the central button
3 times
•To modify the preset
time press buttons
SELECT +
•Child Lock function is
activated by touching Set (+)
for a minimum of 5 seconds
until the Child Lock symbol
is displayed. From this
moment on all other function
are locked.
•Child Lock function is
deactivated by touching
touchpad Set (+) again for a
minimum of 5 seconds until the
Child Lock symbol
switches
off. From this moment on all
functions are selectable again.
•This function is typically used
with “cooking time” function.
For example if the dish has to
be cooked for 45 minutes and
needs to be ready by 12:30,
simply select the required
function, set the cooking time
to 45 minutes and the end of
cooking time to 12:30.
•At the end of the cooking set
time, the oven will switch off
automatically and an audible
alarm will ring.
•Cooking will start
automatically at 11:45 (12:30
minus 45 mins) and will
continue until the pre-set endof-cooking-time, when the
oven will switch itself off
automatically.
WARNING.
If the END of cooking is
selected without setting the
length of cooking time, the
oven will start cooking
immediately and it will stop
at the END of cooking time
set.
SETTING THE CORRECT TIME
WARNING : the first operation to carry out after the oven has been
installed or following the interruption of power supply (this is
recognizable the display pulsating and showing
)
is setting the correct time. This is achieved as follows
• Push the central button 4 times
• Set time with
buttons
• Release all buttons
ATTENTION the oven only operates if set on manual function or preset time.
N.B.: on some models the symbols
are replaced by + and - .
14 GB
USE OF ANALOGUE CLOCK/PROGRAMMER
SETTING THE TIME OF DAY
Start
indicator
light
Duration
indicator
light
• Press and, for 4 seconds, hold on the setting button pressed. The
display will show "SET". The buzzer emits a signal.
• Set the time of day pressing the button. The rotation movement
advance the minute with 1 minute steps. Maintain it pressed for an
automatic fast advance.
Any operation must be done in the 4 seconds, otherwise it is
cancelled.
Display of the
commands
FUNCTION
MANUAL
FUNCTION
MINUTE MINDER
maxi 90 min.
Setting
button
HOW TO ACTIVATE IT
DISPLAY
"DUR"
FULLY
AUTOMATIC
COOKING
Maxi Pause
Time 24 H
DISPLAY
"PAU"
WHAT IT DOES
WHAT IT IS FOR
• It allows you to operate the
oven.
• For cooking the desired
recipes.
• Press two times the setting
button, the display will show
"BEL" followed by "---".
• Set a time by turning the
setting button.
• During the countdown, the
display shows continuously
the remaining time in minute
and then in seconds. At the
end of the countdown, the
display shows "000" flashing
and the buzzer emits the
end signal. To silence it,
press the setting button. At
any time, it is possible to
modify or to cancel the
minute minder.
• A signal is emitted at the
end of the set time.
• Allows you to use the oven
as alarm even if the oven is
switch off.
• First of all, select the
cooking function and the
temperature required.
• Press one time the
setting button. The display
shows "DUR" and the
Duration indicator light
flashes.
• Set the duration required
by turning the setting
button. The remaining time
is displayed and the
Duration indicator light is lit
up.
• When the countdown
expires, the display shows
"END", the Duration
indicator light flashes and
the oven cuts off
automatically. The buzzer
emits the end of cook
signal. To silence it, press
the setting button. Press a
second time if you want to
restart the cooking, if
necessary.
Turn back to stop
position the control
knobs.
It is possible during the
functionning of the oven to
cancel or to modify the
cooking duration.
• It allows you to preset the
cooking time required for
the recipe chosen.
• At the end of the cooking
time setted, the oven will
switch off automatically
and an audible signal will
emit.
• First of all, select the
temperature and the
cooking function required.
• Press one time to set a
duration. Follow the
instructions above "Cooking
time - Dur”
• Press a second time, the
display shows "PAU"
followed by "---", the Start
indicator light flashes.
- Set the pause time before
starting the oven. During the
pause, the oven does not
cook, the display shows
continuously the remaining
pause length, both the Start
and Stop indicator lights are
lit-up. When the countdown
expires, the oven will start to
cook, only the Stop indicator
light is lit-up.
• At the end of cooking
time, the oven will switch
off automatically. The
buzzer emits the end of
cook signal. To silence it,
press the setting button.
Press a second time, if
you want to restart the
cooking, if necessary.
Turn back to stop position
the control knobs.
It is possible during the
functionning of the oven to
cancel or to modify either
the pause time or the
cooking duration.
• Allows you to programme
the oven so that the recipe
is ready at the desired
time.
Ej : the time of day is 10H.
the recipes ahs to be
cooked for 45 min and
needs to be ready at 12 H.
1. select the requierd
function and the
temperature. 2. set a 45
min duration, 3. set the
time pause 75 min
(10H/11H15). The oven
will be in pause from 10H
to 11H15 ; it will start the
cooking at 11h15 and will
stop automatically at 12H.
"BEL”
maxi 24 H
HOW TO SWITCH IT OFF
• It can be set only with a
• Turn back to the stop
cooking mode. No setting on position the control knobs.
the timer.
DISPLAY
COOKING TIME
A duration or a time can be displayed by default, not take into
account it.
15 GB
USE THE ELECTRONIC PROGRAMMER (Type A)
1. Minute Minder or Auto light
2. Lights
3. Function with fan
4. Function with VARIOFAN
5. Defrost
6. Display for Temperature or Time
7. Setting buttons
8. Function selector knob
9. Function Timer knob
* according to the model
WARNING !
The first operation to carry out after the oven has been installed or following the interruption of power supply
(this is recognizable the display pulsating and showing12:00) is setting the correct time.
The Led “°” of the temperature indicator pulsates until the pre-set temperature is not reached.
HOT : When a cooking program is finished, if the oven is still hot, « HOT » appears on the display, alternately with the time
displays, even if the two function selectors are switched on OFF.
FUNCTION
SILENCE MODE
SET THE TIME
COOKING TIME
DURATION
END OF
COOKING TIME
MINUTEMINDER
CHILD LOCK
WHAT IT DOES ?
WHAT IT IS FOR ?
• Rotate the left function
selector to the position
" Silence mode “
• Rotate the left function
selector to the position
“Set the time”.
• Use the buttons " + " or
" - " to set the time
• Rotate the function
selector to the position
OFF.
• Rotate the function
selector to the position
OFF.
• Enables you to turn off the
sound of the minute
minder
• Enables you to set the
time which appears on the
display
• To turn off the sound of the
minute minder
• Turn the right function
selector to a cooking
function
• Rotate the left function
selector to the position
"Cooking Time Duration"
• Set the time of cooking
by using buttons " + " and
"-"
• Lighting Auto appears
•When the cooking time has
elapsed, the oven switch off
automatically and the alarm
rings for few seconds To stop
the cooking functions early,
turn the function control to
OFF or set the time on 00.00;
by rotating the function
selector to Cooking Time
Duration and by using the
buttons " + " and " - “
• It allows to preset the
cooking time required for
the recipe chosen.
• When the cooking time is
set, turn the function
selector toOFF to go back
to actual time.
• To view the cooking time
selected, turn the left
function selector to
Cooking Time duration.
• For cooking the desired
recipes
• Turn the right function
selector to a cooking
function
• Rotate the left function
selector to the position
"End of cooking"
• Set the end time of
cooking by using buttons
" + " and " - "
• Lighting Auto appears
• When the cooking time
has elapsed, the oven
switch off automatically.
• To stop the cooking
functions early, turn the
function control to OFF
• It allows to preset the end
of cooking time you want.
• When the cooking time is
set, turn the function
selector to OFF to go back
to actual time.
• To view the cooking time
selected, turn the left
function selector to End of
cooking Time
• This function is used for
cooking we want to program
in advance. For example,
your recipe needs to be
cooked 45 min and to be
ready at 12.30pm ; simply
set the cooking time
duration on 45 min and the
end of cooking time on
12.30pm.
The cooking will start
automatically at 11.45
(12.30 minus 45 min) and
will continue until the preset
end of cooking time,
then the oven will switch
itself off automatically
• Turn the left function
selector to the position
Minute Minder
• Set the time of cooking
by using buttons “+”and “-”
• Set the time on 00.00 by
turning the left function
selector to the position
Minute Minder, and using
the button " - “
• Sounds an alarm at a few
seconds at the end of the
set time
• Allow to use the oven as
alarm even if the oven is
switch off
• Turn the left function
selector to the position
Child lock.
Press the button " + "
during 3 seconds
• Child lock is available
when " STOP " appears
on display
• Turn back the left function
selector to Child lock and
press button " + " during 3
seconds
• Indication STOP
disappears
• The oven cannot be used
Useful especially when
children are at home
HOW TO ACTIVATE IT?
HOW TO SWITCH IT OFF?
16 GB
• To set the time
NB : Set the time when
you first install your oven
or just after a black out
(the clock is showing a
pulsating 12.00)
* Tested in accordance with the CENELEC EN 50304.
** Tested in accordance with the CENELEC EN 50304 used for definition of energy class.
17 GB
TABLES OF COOKING TIMES
The overall suggested cooking times set out below are intended as a rough guide only. They may in fact vary according to the quality, the freshness,
the size and the thickness of the food cooked and of course cooking time is also partly a matter of taste. Let the food stand for a few minutes before
serving because the ingredients continue cooking after they have been removed from the oven.
Shelf position
4
3
2
1
HANDY TIP: Lower the temperature so as to avoid the surface of the
food becoming hard and dry.
Electric fan oven
Static electric oven
Quantity
Shelf
Time
of cooking
in minutes
Oven
temperature
Shelf
Time
of cooking
in minutes
Oven
temperature
Lasagne
Kg 3,5
2
70 ÷ 75
220
2
60 ÷ 65
200
Put the lasagne into an unheated oven
Cannelloni
Oven baked
pasta
Kg 1,8
2
50 ÷ 60
220
2
40 ÷ 50
200
Put the cannelloni into an unheated
Kg 2,5
2
55 ÷ 60
220
2
45 ÷ 50
200
Put the oven baked pasta into an
unheated oven
180
Form the dough into a loaf and make a
cross with a knife on top of the dough
leave the dought to rise for at least 2
hours. Grease the baking tin and put the
dough in the middle of it.
Food
Remarks
• Pasta
• Baking (not cakes)
35
10
(pre-heating)
30 ÷ 35
10
(pre-heating)
Bread
Kg 1
di pasta
Pizza
Kg 1
1
25 ÷ 35
190
1
20 ÷ 25
190
Warm the oven for 15 minutes and
place the pizzas on the greased baking
tray. Garnish them with tomatoes,
mozzarella, ham, oil, salt and origano.
Pastry (frozen)
vol au vents
n° 24
1
30 ÷ 35
220
2
25 ÷ 30
200
Place 24 vol au vents in the oven and
bake.
180
Warm the oven for 15 minutes, grease
the baking tray, season the 4 focaccia
with oil and salt and leave them to rise at
room temperature for at least 2 hours
before put ting them in the oven.
Focaccia
(n° 4)
gr. 200 of
dough each
2
2
25 ÷ 30
200
200
2
2
20 ÷ 25
• Meat
All meats can be roasted in shallow or deep roasting trays.
It is advisable to cover the shallow trays to avoid splattering the sides of the oven with grease.
The roasting times are the same whether the meat has been covered up or not.
Whole joint of
beef
Kg 1
3
70 ÷ 80
220
3
50 ÷ 60
200
Put the meat into a deep Pyrex dish and
season with salt and pepper; turn the
meat half way through cooking.
Joint of
deboned
Kg 1
2
100 ÷ 110
220
2
80 ÷ 90
200
Cook the meat in a covered Pyrex dish
with herbs, spice, oil and butter.
Kg 1,3
1
90 ÷ 110
220
2
90 ÷ 100
200
Cook as indicated above
Kg 1
2
80 ÷ 90
220
2
80 ÷ 90
200
Cook as indicated above.
Cover the trout with salt, oil and onions
and cook in a Pyrex dish.
Joint of
deboned veal
Joint of
fillet of beef
•• Fish
Fish
Trout
Salmon
Sole
Bream
3 whole trout
or / Kg 1
700 g
2,5 cm slice
2
40 ÷ 45
220
2
35 ÷ 40
200
2
30 ÷ 35
220
2
30 ÷ 25
200
Kg 1
2
40 ÷ 45
220
2
35 ÷ 40
200
2 whole ones
2
40 ÷ 45
220
2
35 ÷ 40
200
18 GB
Cook the salmon in an open Pyrex dish
with salt, pepper and oil.
Cook the sole with salt and a spoonful
of oil.
Cook the bream in oil and salt in a
covered dish.
TABLES OF COOKING TIMES
Electric fan oven
Static electric oven
Shelf
Time
of cooking
in minutes
Oven
temperature
Shelf
Time
of cooking
in minutes
Oven
temperature
Kg 1-1,3
2
60 ÷ 80
220
2
60 ÷ 70
200
Kg 1,5-1,7
2
110 ÷ 120
220
2
100 ÷ 110
200
Kg 1-1,2
2
55 ÷ 65
220
2
50 ÷ 60
200
Coconut cake
baked in a tin
1
55
180
1
50
160
Sponge cake
1
55
175
1
40 ÷ 45
160
Carrot cake
baked in a tin
1
65
180
1
50 ÷ 60
160
700 gr
1
40
200
2
30 ÷ 35
180
Fennel
800 gr
1
70 ÷ 80
220
1
60 ÷ 70
200
Cut the fennel into four pieces, add
butter, salt and potatoes if required and
place in a Pyrex face up. Cover the dish.
Courgettes
800 gr
1
70
220
1
60 ÷ 70
200
Slice the courgettes, place in a Pyrex
dish and add butter and salt.
Potatoes
800 gr
2
60 ÷ 65
220
2
60 ÷ 65
200
Cut the potatoes into equal parts and
place in a Pyrex dish. Season with salt,
origano and rosemary. Cook in oil.
Carrots
800 gr
1
80 ÷ 85
220
1
70 ÷ 80
200
Slice the carrots, place in a Pyrex dish and
cook.
Whole apples
Kg 1
1
45 ÷ 55
220
2
45 ÷ 55
200
Bake the fruit in an open Pyrex or earthenware dish. Leave it to cool inside the oven.
Pears
Kg 1
1
45 ÷ 55
220
2
45 ÷ 55
200
Follow procedure above.
Peaches
Kg 1
1
45 ÷ 55
220
2
45 ÷ 55
200
Follow procedure above.
Quantity
Food
Remarks
• Rabbits and Poultry
Guinea fowl
Chicken
Rabbit pieces
Place the guinea fowl in a deep Pyrex or
pottery dish with very little oil and
season with herbs and spices.
Follow the procedure for cooking the
guinea fowl.
Put all the pieces of the same size in the
glazed tray.Season with herbs and spices.
Turn the pieces as and when required.
• Cakes
Apricot pie
Use a tin that is 22 cm deep. Pre-heat for
10 mins.
Use a tin that is 22 cm deep. Pre-heat for
10 mins.
Use a tin that is 22 cm deep. Pre-heat for
10 mins.
Use a tin that is 22 cm deep. Pre-heat for
10 mins.
• Vegetable
• Fruit
• Grilling
Place the food to be grilled underneath the infra-red grill. Warning: When the grill is on it takes on a bright red colour. Place the tray underneath the grill to
collect juices and fat from the food being grilled.
Squares of
bread for
toasting
4 pieces
Toasted
sandwiches
4
4
5
(5 to heat up
grill)
Grill
3
10
(10 to heat up
grill)
Grill
4
5
(10 to heat up
grill)
Grill
Lay the bread on the grill tray. When one
side of the bread has been toasted, turn
over and toast the other side. Remember:
keep the toast warm at the bottom of the
oven until you are ready to serve it.
3
5/8
(10 to heat up
grill)
Grill
Lay the bread on the grill tray. When one
side of the sandwich has been toasted, turn
over and toast the other side.
Sausages
n°6 / Kg 0,9
4
25/30
(5 to heat up
grill)
Grill
4
15/20
(10 to heat up
grill)
Grill
Ribs of beef
n°4 / Kg 1,5
4
25 (5 to
heat up grill)
Grill
4
15/20 (10 to
heat up grill)
Grill
Cut the sausages in half and lay them face
down on the grill. Half way through grilling
turn them over. Every so often, check that
they are being cooked equally all over. (If
this is not happening, turn and reposition
the ones being cooked ether less or more
than the others.
Make sure that the ribs of beef are exposed
to the full effect on the main grill.
Chicken legs
n°4 / Kg 1,5
3
50/60 (5 to
heat up grill)
Grill
3
50/60 (10 to
heat up grill)
Grill
Turn them over twice during grilling
This appliance is marked according to the European directive 2002/96/EC on Waste Electrical and Electronic Equipment (WEEE). By
ensuring this product is disposed of correctly, you will help prevent potential negative consequences for the environment and human
health, which could otherwise be caused by inappropriate waste handling of this product.
The symbol on the product indicates that this product may not be treated as household waste. Instead it shall be handed over tothe
applicablecollection point for the recycling of electrical and electronic equipment Disposal must be carried out in accordance with local
environmental regulations for waste disposal. For more detailed information about treatment, recovery and recycling of this product,
please contact your local city office, your household waste disposal service or the shop where you purchased the product.
19 GB
INSTALLAZIONE
IT
INSTALLATION
FR
INSTALLATION
GB
INSTALAÇÂO
PT
INSTALACIÓN
ES
УСТАНОВKА
RU
INSTALLATIE
NL
INSTALACJA
PL
INSTALLATION
DE
VGRADNJA
SI
IT Targhetta matricola
GB Rating plate
ES Tarjeta matrícula
NL Typeplaatje
DE Typenschild
FR Plaque signalitique
PT Plata de características
10.2011 • REV.D • 42804851
4x3.5x25
PL Tabliczka znamionowa
RU Маркировочная табличка
SI Tablica s po datki
IT
La Ditta costruttrice declina ogni responsabilità per eventuali errori di stampa contenuti nel presente libretto. Si riserva inoltre il diritto di apportare le modifiche
che si renderanno utili ai propri prodotti senza compromettere le caratteristiche essenziali.
GB
The manufacturer will not be responsible for any inaccuracy resulting from printing or transcript errors contained in this brochure. We reserve the right to carry
out modifications to products as required, including the interests of consumption, without prejudice to the characteristics relating to safety or function.
ES
La empresa constructora declina toda responsabilidad derivada de eventuales errores de impresión contenidos en el presente libro. Se reserva además el
derecho de realizar las modificaciones que se consideren útiles a los productos sin las características esenciales.
NL
De fabrikant stelt zich niet aansprakelijk voor eventuele drukfouten in deze brochure. Kleine veranderingen en technische ontwikkelingen zijn voorbehouden.
DE
Der Hersteller übernimmt keine Hauftung für eventuelle Druck-oder Übersetzungsfehler dieser Bedienungsanleitung. Der Hersteller behält sich vor,
technische Änderungen zur Verbesserung der Produktqualität im Interesse des Endverbrauchers vorzunehmen.
FR
Le constructeur décline toute responsabilité concernant d'éventuelles Inexacltudes Imputables à des erreurs d'impression ou de transcription contenue dans
cette notice. Le constructeur se réserve le droit de modifier les produits en cas de nécessité, même dans l'intérêt de l'utilisation, sans causer de préjudices
aux caractéristiques de fonctionnement de sécurité des appareils.
PT
O fabricante declina toda e qualquer responsabilidade por gralhas, erros tipográficos ou de transcrição/tradução contidos neste manual. Reservamo-nos o
direito de Introduzir alterações nos nossos produtos, conforme necessário, tendo Inclusive em atenção os Interesses relativos ao respectivo consumo, sem
prejuízo das características associadas à segurança ou ao funcionamento dos electrodomésticos.
RU
Производитель не берет на себя ответственность за ошибки в данной инструкции, возникшие в процессе печати. Производитель имеет право
вносить в свои изделия изменения, которые он сочтет полезными для своих изделий, сохраняя при этом основные характеристики.
PL
Pro ducent nie po no si Żadnej o dpo wiedzialno ści za ewentualne błędy w druku niniejszej instrukcji. Po nadto zastrzega so bie prawo do wpro wadzania zmian
do własnych pro duktów, uznanych przez niego za użyteczne, bez po garszania po dstawo wych parametrów.
SI
Pro izvajalec ne prevzema o dgo vo rno sti za mo rebitne tiskarske napake v tej knjižici. Pridržujemo si pravico do sprememb in izbo ljšav brez predho dnega
o bvestila.