1
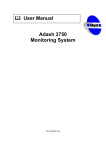
User Manual- Salesforce: MFS S2S Extension
Salesforce: MFS-S2S Extension
Introduction:
Data migration in Salesforce is certainly a sensitive thing and it can be achieved in various ways using
various Data Migration tools. There is another mode of data transfer between two organizations is by
S2S. This is a feature which is present within salesforce.com. It has some advantages as well as some
disadvantages.
S2S Extension-Installation and Configuration
Installation:
I) Click get it now from the application information page.
II) Read the user terms, and select the checkbox. Enter your Salesforce Organizations username
and password, and then Login in your organization.
III) Review the package items and click Continue.
IV) The next step is about Approve Package API Access Step 1. After reviewing all the steps click
next.
All trademarks referenced herein are the properties of their respective owners
[email protected]
www.mindfiresolutions
User Manual- Salesforce: MFS S2S Extension
V) In Enterprise, Unlimited, Performance, and Developer Editions, choose a security option, and
click next.
VI) In Enterprise, Unlimited, Performance, and Developer Editions, if you chose Select security
settings, select the level of access to give users in each profile and click next
VII) Then you have to Click Install.
VIII) Then the package will be installed in your organization.
The package contains both source organization and target organization functionalities. Users
have to install the package both in source organization and target organization and then use it
for their respective functionalities.
After installation an app will be installed in user’s organization which will be displayed in the
top right app section.
All trademarks referenced herein are the properties of their respective owners
[email protected]
www.mindfiresolutions
User Manual- Salesforce: MFS S2S Extension
While clicking on the MFS S2S Extension app, users will find two tabs:
Source Org and Target Org
If the organization in which user installed the app is the source organization I.e. from which
data needs to transfer then users will get the Data Migration functionality in the Source Org
Tab.
If the organization in which user installed the app is the target organization I.e. to which data is
transferred then users will get the Dynamic LookUp Assignment functionalities in the Target
Org Tab.
After installation users can find that the above mentioned field creation step is already done for
Account and Contact object (Sample) for user convenience. Users can find that in Account and
Contact object, fields are created for both source and target organization as we can use this app
in both source and target organization. But for other objects users need to create the Source
org fields in source org and target org fields in target org.
All trademarks referenced herein are the properties of their respective owners
[email protected]
www.mindfiresolutions
User Manual- Salesforce: MFS S2S Extension
Configuration:
I) First of all we need to enable Salesforce to Salesforce connection in both the source and
target organizations by going to Customize > Salesforce to Salesforce > Settings
II) Then we need to enable the Connections tab and click Save.
III) In the connections tab we need to create a new connection by selecting a contact from the
lookup in the source organization and send a new invitation.
All trademarks referenced herein are the properties of their respective owners
[email protected]
www.mindfiresolutions
User Manual- Salesforce: MFS S2S Extension
IV) After that a link will be sent to the contact's email address by clicking which, we open the
target organization and create the connection between the source and target by accepting that.
All trademarks referenced herein are the properties of their respective owners
[email protected]
www.mindfiresolutions
User Manual- Salesforce: MFS S2S Extension
After clicking the link we have to accept the connection in the Target organization.
V) Now that all the connections are ready we can start sharing the objects and fields which we
need to transfer through Publish/Unpublished Section.
VI) First we need to publish the objects in the source organization by checking them in the list.
All trademarks referenced herein are the properties of their respective owners
[email protected]
www.mindfiresolutions
User Manual- Salesforce: MFS S2S Extension
VII) In the target organization we need to go the Subscribe/Unsubscribe section and need to
accept the objects which are shared by the source organization and we can check the autoaccept checkbox which implies that data will be auto-accepted after those will be shared by the
source organization.
VIII) Then in the source organization we need to check the fields of the objects which we want
to share so that those can be visible in the target.
All trademarks referenced herein are the properties of their respective owners
[email protected]
www.mindfiresolutions
User Manual- Salesforce: MFS S2S Extension
IX) Then we can map the fields shared by source organization with those in the target
organization.
Features of S2S Extension Steps of Guidance:
Data Transfer with Lookups:
We can transfer data between two organizations in two modes:
Manually - We can see a button in the list view of all published objects "Forward to
Connections". We can click this button by checking the data we need to transfer from the list
and then select the connection names to which the data needs to be transferred. We can
observe that there are checkboxes present below regarding transfer of the related data. If we
select those the related lookup object data will be transferred as well. In this way we can
transfer related data as well.
For example when transferring accounts, there will be a checkbox below mentioning "Send
Related Contacts". By checking that the related contacts will also be transferred along with the
accounts.
#Note: Manual S2S data transfer is good when the data amount is few.
Dynamically – This is handled by this app.
S2S APP User Manual:
When the data amount is large then manual transfer is not the best option. We have to do that
through Apex Script. Here comes the beginning of our APP to transfer huge amount of records
from one Salesforce organization to another through our custom page where you can get all the
All trademarks referenced herein are the properties of their respective owners
[email protected]
www.mindfiresolutions
User Manual- Salesforce: MFS S2S Extension
Standard functionalities like “Select Connections” to which you need to transfer data. “Select
Child Objects” whose data you need to transfer along with the parent object.
Source Organization Pre-requisites S2S extension:
First the Field Creation Step: Here users need to create formula (text) fields to keep the source
parent and primary key values and transfer them to target organization which will help them to
assign correct lookups in the target organization in each object he needs to transfer.
For example, we are showing how to create fields for one object. In this way users have to
create fields for each object they need to transfer.
For Contact, fields need to be created for standard lookup fields
1) OldPrimaryKeyIdSource__c
2) OldParentAccountIdSource__c
3) OldParentContactReportsToIdSource__c
First one keeps the Record Id of the contact record in source organization.
Second and third one will store the parent Account and Self lookup Contact values of the source
organization. Additionally if users will create any custom lookup field in Contact, then
respective formula fields needs to be created to store that value.
#Note: The above field names mentioned is not constant. Users can give their likely names of
the fields and use those during mapping.
Secondly users have to follow the above mentioned steps to create a S2S connection and things
needed to be done in the source organization.
Target Organization Pre-requisites:
First the Field Creation Step: Here users have to create text fields to keep the old parent and
primary key values of the source organization which will help them to assign correct lookups in
the target organization for each object.
For example, we are showing how to create fields for one object. In this way users have to
create for each objects they needs to transfer. For Contact, fields need to be created
1) OldPrimaryKeyIdTarget__c
2) OldParentAccountIdTarget__c
3) OldParentContactReportsToIdTarget__c
This text fields will be filled up with source organization records primary keys and parent ids
after migration with the help of field mapping between the two organization connections.
All trademarks referenced herein are the properties of their respective owners
[email protected]
www.mindfiresolutions
User Manual- Salesforce: MFS S2S Extension
Secondly users have to follow the steps mentioned above to create a S2S connection and things
needed to be done in the target organization.
For the last point in the above steps i.e. field mapping we needed to do like this.
For e.g. for Contact, field mapping for this fields created by the users in both orgs will be like
this.
1) OldPrimaryKeyIdSource__c -> OldPrimaryKeyIdTarget__c
2) OldParentAccountIdSource__c -> OldParentAccountIdTarget__c
3) OldParentContactReportsToIdSource_c -> OldParentContactReportsToIdTarget__c
See the following snap
#Note: The above field names mentioned are not constant. Users can give their likely names of
the fields and they have to select those fields from the drop down while assigning the lookups
which will be described later.
#Note: The package contains the already created fields for Account and Contact object.
Source Organization Data Transfer:
Users can go to our custom Data Transfer Page where at first they can dynamically SELECT the
Object whose data needs to be transferred. After selection of the object, Connection selection
section will open from where they can select as many Connections as they want to transfer
data of the selected object. Before Object Selection
All trademarks referenced herein are the properties of their respective owners
[email protected]
www.mindfiresolutions
User Manual- Salesforce: MFS S2S Extension
After Object Selection
Related Child Object Transfer All trademarks referenced herein are the properties of their respective owners
[email protected]
www.mindfiresolutions
User Manual- Salesforce: MFS S2S Extension
Then users can select the checkboxes for the child object data you need to transfer along with
the parent selected. Remember here data transfer amount is not limited like the standard S2S
functionality.
Extra Features Compared to Standard S2S transfer a) Data transfer amount is not limited like the standard S2S functionality.
b) Users can transfer related child custom objects along with parent objects unlike as standard
transfer where users can transfer only child standard objects along with the parent. No child
custom object transfer is possible through Standard S2S transfer which is all possible through
this Extension app.
Target Organization Lookup Assignment:
As we can see above that we can transfer child object data along with the parent objects. So
then why this Dynamic Lookup Assignment?
This is because when there is more than two level deep relationships then we cannot transfer
those data through the child transfer and also we cannot assign self-lookups with that. For e.g
Account -> Contact -> Case
Consider a situation where we sent Account records with its related Contact records.
Now if we need to send some child records of Contact as well, then it will not be transferred. So
where there are more than two level deep relationships then it is advisable not to transfer
Contact along with Account. Instead send Account and Contact individually and then assign
lookups in the target organization.
So the custom lookup assignment is very much necessary for that scenario.
Also in addition to that suppose some users do not want to use the S2S Migration i.e the Source
Org functionalities and they want to transfer data through some Migration Tools for e.g Data
Loader. Then this Dynamic Lookup Assignment feature will come into picture as through
DataLoader or in any other Migration Tool, LookUp can't be assigned automatically. There also
All trademarks referenced herein are the properties of their respective owners
[email protected]
www.mindfiresolutions
User Manual- Salesforce: MFS S2S Extension
in DataLoader field Map we have to keep the old org record ID and Parent keys and then map
them during Data Loader data transfer.
Dynamic Lookup Assignment:
Now that we transferred the object records and in the target organization we captured the old
primary key and old parent key values in the text fields by mapping the fields, we have to assign
the correct lookup values based on these old values.
In our app we can get it done most efficiently just by selecting the object names for which users
want to assign lookups.
Users just have to follow the following steps:
a) First select the object from the drop down for which they want to assign lookups.
b) Then the Field Selection Section will open where you have to select old lookup values for
each reference fields you want to assign. There will be two columns “Reference Fields” and
“Select Old Reference Values” e.g. for Contact,
Reference Fields
Select Old Reference Values
Select Old RecordId Value
ReportsToId
(Contact)
Here select the field where
the source org ReportsToId
Parent key value present.
Here select the field where
the source org AccountId
Parent key value present.
Here select the field RecordID
of the parent object is kept.
(In this case Contact).
Here select the field where
the source org RecordID of
the parent object is kept. (In
this object is kept. (In this
case Account).
AccountId
(Account)
All trademarks referenced herein are the properties of their respective owners
[email protected]
www.mindfiresolutions
User Manual- Salesforce: MFS S2S Extension
Now that we selected all the old fields corresponding to which we need to assign lookups, then
we have to click the Add button. There we can check whether the selected values are correct. If
user needs further modification they can click edit and change it as well. Finally they have to
click the Assign Lookups button to assign the lookups.
Dynamic Lookup Assignment for Task/Event
We know that Task/Event has two fields called WHOID(Contact/Lead ID) and
WHATID(Opportunity/Account ID) which are called Polymorphic fields means those fields have
relationship with multiple objects.
For this we cannot proceed like the above selection of OldRecordID because for
WHOID/WHATID field we have to select old record ID for multiple objects (polymorphic field).
So there is a configure button for Task/Event where we can select old record ID for all the
respective referenced objects in those fields. The parent field selection will be same as above
just the Old record ID selection will be done in the Pop Up by clicking the Configure Button.
All trademarks referenced herein are the properties of their respective owners
[email protected]
www.mindfiresolutions
User Manual- Salesforce: MFS S2S Extension
After clicking Configure, the Popup will open to select the Old Record ID of the parent objects
and after selection click the Add/Cancel button.
Here in the above image Old record id for Contact and Account are selected and rest are not
selected. This means the task records whose WHOID field contains contact reference and
WHATID field contains account reference will only be executed and lookup will be assigned and
the rest will be ignored as user didn't selected those. This provides the flexibility to the user to
execute for only the required objects which can save good amount of time.
#Note: This is a batch apex that will run for both the data transfer and lookup assignment.
Based on the volume of data it can take some time. Users can check whether the batch is
Processed/Queued/Completed/Failures in the following path in the salesforce.com.
YourName > SetUp > Administration SetUp > Monitoring > Apex Jobs
OR
YourName > SetUp > Monitor > Jobs > Apex Jobs
All trademarks referenced herein are the properties of their respective owners
[email protected]
www.mindfiresolutions
User Manual- Salesforce: MFS S2S Extension
In the above path users can check whether the assignment is completed and if there occurs any
failure or not.
Advantages and Disadvantages of Salesforce-S2S Extension:
Advantages:
a) It helps to transfer data very quickly around 1000 data/3-4 seconds but still the connection
creation time at the time of transfer varies depending on the Salesforce server.
b) The data which is shared between two organizations are automatically updated in the target
organization if there is some modification in the source organization.
Disadvantages:
a) We know that we can set the value of audit fields of most of the standard objects and all
custom objects only during first insert by enabling the feature from Salesforce.com support. But
S2S feature doesn't expose the audit fields even after enabling it. This is a big fault in S2S.
b) We cannot migrate data of all standard objects through S2S connection. There are some
specific standard objects whose data we can transfer.
c) S2S connection cannot be created between Production and Sandbox organization or between
Developer and Sandbox organization.
Things to Remember:
1) Please make sure that the object and its child objects which are migrating from one org to
another has no active validation rules and triggers in the target organization. It may affect the
process because validation rules and triggers restrict data entry for some special restrictions. So
make sure that you de-activate all the rules and triggers and after migration and lookup
assignment activate them again.
All trademarks referenced herein are the properties of their respective owners
[email protected]
www.mindfiresolutions
User Manual- Salesforce: MFS S2S Extension
2) Please make sure while migrating child objects along with parent, that a particular parent
mustn't have more than 100 child objects. It will also hit the Salesforce governor limit. In case it
happens then first 100 child objects will be considered.
3) Case -> CaseComment. CaseComment is a child object of Case. But you will not find this
object in the child section when user selects Case. This is because S2S automatically handles the
transfer of CaseComment at the time of transfer of Case records without user request. Before
transferring Case just make sure the CaseComment object is published and subscribed and all
the CaseComments are published i.e. public.
4) While transferring child objects, please note that only the values with parents will be
transferred. For e.g Accounts with related contacts will only be transferred during child
transfer. Contacts with no Accounts will not be migrated during child transfer. For that users
have to select Contact Object in the object selection and send contact from there.
5) Please make sure that before executing Dynamic Look Assignment that all the necessary
records are migrated in the target organization. For e.g. user is expecting look assignment for
contact, but the necessary account records are not yet migrated in target, then assignment will
not be done.
6) It is advisable not to send those objects having more than one reference fields through child
sections. Instead transfer those objects individually and then assign lookups in the target
organization from the Dynamic LookUp Assignment Section. For e.g. Case has look up with
Account, Contact etc. So consider a situation where a case record is related to both account and
contact. Then while transferring that case from the child section of account it will be migrated.
Then as that case record is already migrated then it will not be related to contact even if it will
be send from child section of contact. For that we have to assign lookup again from the lookup
assignment section. So it is better to transfer those objects individually and then assign lookups
in the target organization.
Conclusion:
Users can get dual functionality in this app. Users can transfer unlimited number of records from one
Salesforce organization to another through our custom page and also in our dynamic lookup assignment
page users can get it done most efficiently just by selecting the object names for which users want to
assign lookups and selecting the old lookup values for each reference fields you want to assign.
Mindfire Solutions has deep experience in Customizing, developing and migrating Salesforce
application. We will be glad to share our expertise in detail with you. To learn about our
Salesforce expertise and services please visit here. Please provide your feedback to
[email protected] or call 1-248-686-1424.
All trademarks referenced herein are the properties of their respective owners
[email protected]
www.mindfiresolutions