1
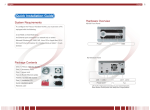
Package Content The following items should be included: • NAS Server unit (including 4 HDD trays) • Power cord • Screws • CD-ROM (includes user’s manual, utilities) • Quick Installation Guide If any of the above items are damaged or missing, please contact your dealer immediately. ESD (Electro-static Discharge) Warning Electro-Static Discharge (ESD) can damage the internal components of the NAS3410. Avoid contact with any component or connector on any adapter card, printed circuit board, or memory module. Perform all unpacking and installation procedures on a ground-connected anti-static mat. Wear an anti-static wristband grounded at the same point as the anti-static mat. You can also use a sheet of conductive aluminum foil grounded through a one-megaohm resistor instead of the anti-static mat. Similarly, a strip of conductive aluminum foil wrapped around the wrist and grounded through a one megaohm resistor serves the same purpose as a wristband. Hardware Installation Procedures Step 1: Pull out a HDD tray from the NAS-3410 mobile rack. Step 2: Configuring the jumper on your hard disk using Cable Select (CS) before installing to the hard disk tray. (Refer to your hard disk's user manual for the instruction) Step 3: Secure and mount a hard disk onto the HDD tray using four screws under the tray. 1 Warning: When connecting the power connector to the HDD, the connector has rounded edges on the top of the connector that should be placed in the proper position to avoid equipment damage or electric shock. Step 4: Insert the HDD tray back in the mobile rack. Make sure the lever of the mobile rack is properly in place. Step 5: Repeat Step 1 to Step 3 if necessary for the other HDD trays. Step 6: Connect your NAS-3410 to the network by attach a LAN cable from the LAN port located at the back of your NAS-3410. (At least one network connection is required) Step 7: Plug the power cord into the power connector on you NAS-3410. Step 8: Make sure the power switch on the power supply is in ON position. Step 9: Press the power button on the lower right hand corner of your NAS-3410. Step 10: Wait for the server to boot up. The boot up process takes approximately 2 minutes and the real-time status will be displayed on the front LCD panel. Setting Up the IP Address with LCD Concole Step 1: After NAS-3410 is boot up, the LCD console shows System Ready. Press the right button. Step 2: The IP address of LAN1 is shown. Press the middle button to configure LAN1 IP address. Note that the 8 symbol at the right hand upper corner indicates that the IP address can be configured using the LCD console. 2 Step 3: Move the cursor to Yes by pressing the left button and then press the middle button to confirm. Step 4: Move the cursor to the correct position using the left or right button. Then press the middle button to change that number. Step 5: After you edit the last digit of the IP address, press the right button and configure the Subnet Mask address. Step 6: Repeat Steps 4 to Steps 5 to configure the Subnet Mask and Gateway address. Step 7: After you edit the last digit of the Gateway address, press the right button. Move the cursor to Save and save the setting or Edit to repeat the above process or Abort to quit the configuration process without saving. Step 8: Repeat the above process to configure the LAN 2. 3 Accessing the Administration Home Page You can configure the detail settings of your NAS-3410 in the administration home page. To access the administration home page, type the IP address of your NAS-3410 in the address field of the web browser: http://192.168.1.1 /admin/ It will prompt for username and password. By factory default, the username is admin and no password is needed. NOTE: It is recommended that user change the admin password immediately to keep your NAS-3410 secure and to protect resources from inappropriate access by other users on the network. Create Volume A volume must be created first before users can access the storage. A volume is a logical storage unit, which holds a separate file-system. A volume can be a single hard disk or a RAID group consisting of two or more hard disks. The volume type includes JBOD (single hard disk), RAID 0, RAID 1, and RAID 5. JBOD: Just a Bunch Of Disks. JBOD means use a single disk to create a Volume. RAID 0: it is disk striping only, which distribute data evenly over multiple disks for better performance. It does not provide safeguards against failure. When you want to create a RAID 0 Volume, you should have at least two or more un-used disks. RAID 1: it uses disk mirroring, which provides 100% duplication of data. It offers high reliability, but doubles storage cost. If you want to create a RAID 1 Volume, you should have at least two un-used disks. RAID 5: it distributes data and parity bits over multiple disks for both performance and fault tolerance. A RAID volume can still work when a hard disk fails. RAID level 5 uses three or more hard disks. Building a RAID-5 volume may take hours depending on capacity. To create a volume, 1. Enter NAS-3410 homepage Volume--> Create page. 2. Input the Volume Name and select the Volume type you want to create. 3. Select or multi-select specific disk from Free Disks list to RAID Members list. 4. Click the Apply button 4 Create Folder 1.Enter NAS-3410 homepage Security -->File/Folder page 2.Enter the volume that you want to add a new folder. 5 3. Click Create Folder button. 4. Enter the folder name and the new folder will be created immediately. Create Share You can share a specific folder in any volume created in the NAS-3410 with others on the network. When you create a share, you can assign the permission to the share that others will be allowed or denied when they access the share over the network. 1. Enter Security -->File/Folder page and get into the volume include the folder you want to share. NOTE: 6 You can share a volume as well. 2. Select the folder you want to share and click the hyper link Create. 3. Enter the share name, share comment and select which protocol you want to share. When done please click the Apply button. 7 4. Click Shared Permissions tab to set the permission to the share. Select or multi-select specific user(s) from unselected list to privileged list. After that, click the Apply button. After the process is done, click Close to go back to previous screen. 5. When a folder or a volume is shared, the icon displays like or . Enter Security -> Share page; the share you just made will also appear here. In this page you can see all shares. 6. Now you have completed the first time installation, and you can start to use the NAS-3410. Further Configuration If you want to configure more settings of NAS-3410, please refer to the user's manual in the CD. If you have any difficulty on resolving the problem while installing or using the NAS-3410, please feel free to contact your local dealer or PLANET Technical Support. 8