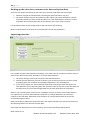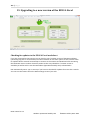
1
User Manual For EPOS 4 Excel v1.5.2 Manual Version: 24/5/2013 2|Page Contents License Agreement ........................................................................................ 9 1. Introduction ............................................................................................. 10 What is EPOS 4 Excel? ....................................................................................................................... 10 System Requirements ....................................................................................................................... 10 2. Opening EPOS 4 Excel and Enabling Macros in Excel................................. 11 Opening the EPOS 4 Excel worksheet ............................................................................................... 11 Enabling macros in Excel ................................................................................................................... 11 Excel 2010 ......................................................................................................................................... 12 Excel 2007 ......................................................................................................................................... 12 3. Customising EPOS 4 Excel for your company ............................................ 13 Customising the logo on the sales screen ......................................................................................... 13 Customising the company logo and company details on the receipts ............................................. 14 Customising payment types, payment autofill and currency ........................................................... 15 Customising the sales data file settings ............................................................................................ 15 Choosing tax settings ........................................................................................................................ 15 Advanced Users: Cell protection and changing the E4E screen background colours ....................... 16 4. Setting up EPOS 4 Excel for use ................................................................ 17 EPOS 4 Excel data file settings (Essential) ......................................................................................... 17 Creating a product list (Essential) ..................................................................................................... 18 Installing the “Free3of9” barcode font (Optional)............................................................................ 19 Create an initial stock levels file (Optional) ...................................................................................... 19 Setting up a printer and printing receipts (Optional) ....................................................................... 19 Setting up E4E Security Settings (Optional) ...................................................................................... 21 Setting up Discount Reasons / Deals (Optional) ............................................................................... 21 5. Making sales with EPOS 4 Excel ................................................................ 22 Starting out ....................................................................................................................................... 22 Adding Products to the Sale.............................................................................................................. 23 Changing an item’s price ................................................................................................................... 24 Discounting an item’s price by a percentage .................................................................................... 25 Manually looking up a product’s code .............................................................................................. 26 Item Autocomplete ........................................................................................................................... 27 Using Quick Products Buttons........................................................................................................... 28 Deleting an Item from the Sale ......................................................................................................... 28 EPOS 4 Excel v1.5.2 Website: epos4excel.weebly.com ©Martin Stokley 2011-2013 3|Page View the full details of an item in the sale........................................................................................ 28 Cancelling a sale ................................................................................................................................ 28 Taking payment and adding monetary / percentage discounts to the sale ..................................... 29 The fast pay window ..................................................................................................................... 29 The full payments window ............................................................................................................ 30 Keyboard shortcut’s when taking payment ...................................................................................... 31 Changing the sales assistant name ................................................................................................... 32 Changing the till number .................................................................................................................. 32 Opening the till cash drawer ............................................................................................................. 32 Locking the sales screen.................................................................................................................... 32 Showing till total sales for the day on the sales screen .................................................................... 32 Refunding Items ................................................................................................................................ 33 Sales training mode........................................................................................................................... 34 Returning to the EPOS 4 Excel options screen .................................................................................. 34 Frequently Asked Questions: ............................................................................................................ 35 How do I find out the total cost of the sale so far in the middle of entering items to be sold? .... 35 What if the customer decides they no longer want an item I’ve already scanned? ..................... 35 I’ve accidently left a blank row in the list of products for the sale, what do I do? ........................ 35 Can I sell an item which is not on the product list? ....................................................................... 35 I want to close the till down for a couple of hours. Do I need to leave EPOS 4 Excel running? .... 35 The computer has crashed and I haven’t saved the file. Have I lost all the data of the sales I have made? ........................................................................................................................................... 35 How do I deal with an item that is to be given away free?........................................................... 35 The printer ran out of paper or jammed in the middle of printing a receipt. How do I reprint the last receipt? ................................................................................................................................... 36 Something disastrous seems to have happened and I cannot continue to use this copy of E4E for making sales. What do I do? ......................................................................................................... 36 The open cash drawer button does not work, why not? ............................................................... 36 On the sales screen the box containing the information / buttons (right hand side) is too big to fit on the screen. ........................................................................................................................... 36 5. Stock Management Functions .................................................................. 37 Showing the current stock levels of all products .............................................................................. 38 Resetting the stock levels ................................................................................................................. 38 Adding a new delivery of a single product ........................................................................................ 38 Importing multiple deliveries in one go / Importing initial stock levels ........................................... 39 Adjusting the quantity in stock for a single item .............................................................................. 39 EPOS 4 Excel v1.5.2 Website: epos4excel.weebly.com ©Martin Stokley 2011-2013 4|Page Adjusting the quantity in stock for multiple items ........................................................................... 39 6. Products................................................................................................... 40 Product descriptions ......................................................................................................................... 40 Manually adding or altering product details .................................................................................... 41 Keyboard shortcut’s when manually adding / altering products ..................................................... 42 Importing products ........................................................................................................................... 43 Quick Products .................................................................................................................................. 44 Deleting a product from the product list .......................................................................................... 46 Clearing the product list.................................................................................................................... 46 Deleting unused products from the product list .............................................................................. 46 Searching for products ...................................................................................................................... 47 Printing product search results ......................................................................................................... 49 Showing all products ......................................................................................................................... 49 Showing all products linked to a deal ............................................................................................... 49 7. Customer orders ...................................................................................... 50 Entering details of a customer order ................................................................................................ 50 Searching customer orders between specified dates ....................................................................... 52 Viewing all orders between specific dates with a specific order status ........................................... 53 Editing a customer order from the list of search results .................................................................. 54 Printing customer orders from the list of search results .................................................................. 54 Editing a specific customer order ..................................................................................................... 55 8. Discounts and deals ................................................................................. 56 Setting up discount reasons .............................................................................................................. 56 Setting up deals................................................................................................................................. 57 Linking a product to a deal code ....................................................................................................... 60 Showing all products linked to a deal ............................................................................................... 61 Removing a link between a single product and a deal code............................................................. 61 Removing links between all products and a specific deal code ........................................................ 61 Removing all links between products and deal codes ...................................................................... 61 9. Reports .................................................................................................... 62 End of day till reconciliation figures.................................................................................................. 63 Reasons why the end of day till reconciliation figures might not match the amounts actually in the till ............................................................................................................................................ 64 Sales total for all tills ......................................................................................................................... 64 EPOS 4 Excel v1.5.2 Website: epos4excel.weebly.com ©Martin Stokley 2011-2013 5|Page Till reconciliation figures by date report........................................................................................... 65 Day full transaction report ................................................................................................................ 66 Products sold report ......................................................................................................................... 67 Products sold sales amount report ................................................................................................... 68 Products refunded report ................................................................................................................. 69 Refunds report .................................................................................................................................. 70 Sales assistant total sales report....................................................................................................... 71 Tax by date report............................................................................................................................. 72 Tax by transactions report ................................................................................................................ 73 Tax by date / tax code report ........................................................................................................... 74 Stock Reorder Report ........................................................................................................................ 75 10. Tax settings ............................................................................................ 76 Product prices include tax vs. product prices exclude tax ................................................................ 76 Editing tax classes / codes................................................................................................................. 78 11. Gift Vouchers ......................................................................................... 79 Setting up gift vouchers .................................................................................................................... 79 Enabling gift vouchers ................................................................................................................... 79 Editing gift voucher expiry time .................................................................................................... 80 Setting the gift voucher item code ................................................................................................ 80 Note on gift voucher codes ........................................................................................................... 80 Customising the gift voucher template ......................................................................................... 81 Selling gift vouchers .......................................................................................................................... 82 Redeeming gift vouchers .................................................................................................................. 83 Printing a gift voucher for a refund .................................................................................................. 84 Giving sale change as a gift voucher ................................................................................................. 84 Showing active gift vouchers ............................................................................................................ 84 Deleting zero balanced and expired gift vouchers ........................................................................... 84 12. Receipt settings ...................................................................................... 85 Accessing the Receipt Settings.......................................................................................................... 85 Changing the active printer............................................................................................................... 85 Setting up narrow receipts for use ................................................................................................... 86 Setting up wide receipts for use ....................................................................................................... 87 Receipt layout settings which apply to both narrow and wide receipts: ......................................... 88 Changing the font used on receipts .............................................................................................. 88 EPOS 4 Excel v1.5.2 Website: epos4excel.weebly.com ©Martin Stokley 2011-2013 6|Page Changing how many characters of the item description are to appear on the receipt ................ 88 Displaying the item code rather than the item description on the receipt ................................... 88 Displaying full tax details on the receipt ....................................................................................... 88 Include a manual reference number on the receipt ...................................................................... 88 Adjusting the sales tax name which appears on a receipt ............................................................ 88 Editing the message at the end of receipt .................................................................................... 89 Printing VAT in UK pounds on the receipt when using a different currency ................................. 90 Printing a test receipt........................................................................................................................ 90 Reprinting receipts ............................................................................................................................ 91 13. The sales data, customer order data and system data ............................ 92 Choosing the sales data file format .................................................................................................. 92 A single sales data file or one for each till? ...................................................................................... 93 Create sales data back-up files ......................................................................................................... 93 Accessing the orders and sales data ................................................................................................. 94 Customising the layout of the sales data .......................................................................................... 95 Understanding the different item prices that appear in the sales data ......................................... 100 Changing the transaction number prefix ........................................................................................ 101 Storing the sales data under a specified date rather than the system date .................................. 101 Customer orders files ...................................................................................................................... 101 Backing up the sales data, customer order data and system data. ................................................ 102 Importing sales data ....................................................................................................................... 102 Importing orders data ..................................................................................................................... 103 14. EPOS 4 Excel Security Settings .............................................................. 104 Enabling the security settings ......................................................................................................... 105 Logging in with a security level password....................................................................................... 106 15. Upgrading to a new version of the EPOS 4 Excel ................................... 107 Checking for updates to the EPOS 4 Excel worksheet .................................................................... 107 Upgrading to a newer version of EPOS 4 Excel ............................................................................... 108 16. Summary of the main EPOS 4 Excel settings / options .......................... 109 Sale Options .................................................................................................................................... 109 Receipt Options............................................................................................................................... 110 Tax Options ..................................................................................................................................... 111 Discount Options............................................................................................................................. 112 Security Options .............................................................................................................................. 112 EPOS 4 Excel v1.5.2 Website: epos4excel.weebly.com ©Martin Stokley 2011-2013 7|Page Sales Data Options .......................................................................................................................... 113 Start Up Options ............................................................................................................................. 113 Currency and Payment Options ...................................................................................................... 114 Product Options .............................................................................................................................. 114 File Settings ..................................................................................................................................... 114 Appendix A – Using EPOS 4 Excel with multiple tills on a network ............. 115 Why use a network? ....................................................................................................................... 115 Example of simple network for use with EPOS 4 Excel ................................................................... 115 Setting up EPOS 4 Excel for use on a network ................................................................................ 117 Appendix B – The full software license for the EPOS 4 Excel workbook ...... 118 Appendix C – Calculations used in the EPOS 4 Excel source code ................ 131 VAT fraction calculation .................................................................................................................. 131 Deals and discounts ........................................................................................................................ 132 % Discount off the whole sale......................................................................................................... 132 Converting a monetary discount off the whole sale to an equivalent % discount ......................... 132 Combining monetary discounts and percentage discounts off the whole sale.............................. 133 Deals: Buy x items for £y ................................................................................................................. 134 Deals: Buy x get cheapest y free ..................................................................................................... 134 Procedure for applying deals and discounts: .................................................................................. 135 Appendix D – Description of the system data files created by EPOS 4 Excel 137 Appendix E – Accessing the visual basic for applications (VBA) source code for EPOS 4 Excel .............................................................................................. 138 Appendix F – Retrieving forgotten security passwords ............................... 139 Appendix G – Troubleshooting ................................................................... 140 Downloading EPOS 4 Excel from epos4excel.weebly.com – Internet Explorer Users .................... 140 Compile Error in Hidden Module 1 ................................................................................................. 140 Runtime Error: 1004 – Method Save of Object Workbook Failed .................................................. 140 ‘Runtime Error: 1004 – Application or object defined error’ when trying to import products ...... 140 Excel Crashed and has recovered the E4E workbook ..................................................................... 140 Repairing your Excel installation ..................................................................................................... 141 Appendix H – EPOS 4 Excel Version History ................................................ 142 EPOS 4 Excel v1.5.2 (25th May 2013) ......................................................................................... 142 EPOS 4 Excel v1.5.1 (30th April 2013) .......................................................................................... 142 EPOS 4 Excel v1.5.2 Website: epos4excel.weebly.com ©Martin Stokley 2011-2013 8|Page EPOS 4 Excel v1.4.4 (21st January 2013)...................................................................................... 143 EPOS 4 Excel v1.4.3 (5th December 2012).................................................................................... 143 EPOS 4 Excel v1.4.2 (13th November 2012) ................................................................................. 143 EPOS 4 Excel v1.4.1 (8th October 2012) ....................................................................................... 144 EPOS 4 Excel v1.3.1 (26th July 2012) ............................................................................................ 145 EPOS 4 Excel v1.2.3 (24th April 2012) ......................................................................................... 146 EPOS 4 Excel v1.1 (26th January 2012) ....................................................................................... 147 EPOS 4 Excel v1.0.1 (14th December 2011) ................................................................................ 148 EPOS 4 Excel v1.0 (8th November 2011) ..................................................................................... 148 EPOS 4 Excel v1.5.2 Website: epos4excel.weebly.com ©Martin Stokley 2011-2013 9|Page License Agreement EPOS4Excel is copyright © 2011-2013 Martin Stokley This Excel macro enabled workbook is free software: you can redistribute it and/or modify it under the terms of the GNU Lesser General Public License as published by the Free Software Foundation, either version 3 of the License, or (at your option) any later version. This program is distributed in the hope that it will be useful, but WITHOUT ANY WARRANTY; without even the implied warranty of MERCHANTABILITY or FITNESS FOR A PARTICULAR PURPOSE. See the GNU Lesser General Public License for more details. You should have received copies of the GNU Lesser General Public License and GNU General Public License along with this program. If not, see http://www.gnu.org/licenses/ The GNU Lesser General Public License version 3 which covers EPOS 4 Excel can be found in Appendix B EPOS 4 Excel v1.5.2 Website: epos4excel.weebly.com ©Martin Stokley 2011-2013 10 | P a g e 1. Introduction What is EPOS 4 Excel? EPOS 4 Excel (E4E) is a Microsoft Excel macro enabled workbook which provides a basic electronic point of sale (EPOS) system. E4E is programmed in Excel VBA and uses Excel worksheets as the basis of its user interface. It incorporates the ability to make sales, print receipts (on a receipt printer or a normal printer), keep track of stock, record customer orders and it can even cope with sales promotions (monetary discounts, % discounts, buy X get Y free, buy X for £ Y, buy X or more of the same product and change item price to £Y). E4E was originally written to be used in conjunction with an internet based computerised accounting / stock management / sales system. In this case E4E enables sales to be made off-line when an internet connection is not available. The sales data is stored in a customisable .CSV (comma separated values) format which can be then uploaded to your separate computerised accounting / stock management system at a later convenient moment. E4E has progressed beyond this original intention and now has becoming a more multipurpose basic EPOS system. Does it work? E4E has been tested extensively by an internet book seller that also sets up temporary bookstalls. They have used it in environments with single tills and multiple tills networked together. System Requirements Essential: Microsoft Excel 2007 or later installed on every computer you wish to use E4E on (E4E will not work on Microsoft Office Starter Editions or the Mac Version of Microsoft Office) Optional: Barcode reader (to use gift vouchers this must be able to read code39 barcodes as well as the barcodes of your products. E4E has been tested with the Datalogic Heron D130 barcode scanner) Receipt printer (NOTE: E4E has been tested with the Star TSP113 USB receipt printer) AND / OR an ordinary printer A computer network to enable the connecting of multiple tills together (See Appendix A for a simple example of how to do this) A separate way of processing credit / debit card payments EPOS 4 Excel v1.5.2 Website: epos4excel.weebly.com ©Martin Stokley 2011-2013 11 | P a g e 2. Opening EPOS 4 Excel and Enabling Macros in Excel Opening the EPOS 4 Excel worksheet 1. Download the E4E worksheet (epos4excel_v1.4.5.xlsm) from the website (epos4excel.weebly.com) and save to a location on your computer. 2. Open the worksheet just by double clicking on it. This will automatically open Excel and load the worksheet 3. Alternatively, open Excel and use the menu File - Open to select and open the worksheet file. NOTE: you need Windows Excel 2007 or later already installed on the machine to be able to use E4E INTERNET EXPLORER USERS: Internet Explorer sometimes downloads an Excel file and changes the file extension to .zip and you won't be able to open the file in Excel. If this happens to then you will need to manually rename the file from epos4excel_v1.4.5.zip to epos4excel_v1.4.5.xlsm (see http://www.mediacollege.com/microsoft/windows/extension-change.html for more details about changing the file extension) Enabling macros in Excel To use E4E macros must be enabled in Excel. When you first open the E4E you may see a security warning that the file indicates that macros which have been disabled OR that some active content has been disabled. Enable macros or the active content for the E4E workbook if you are given the option to. Alternatively you can enable macros manually for all Excel workbooks (not just the E4E workbook) in the follow ways: EPOS 4 Excel v1.5.2 Website: epos4excel.weebly.com ©Martin Stokley 2011-2013 12 | P a g e Excel 2010 First click the Excel File Menu and select Options from the left sidebar. In options, select the Trust Center from the left sidebar and click the Trust Center Settings button on the main window. Now in Trust Center Settings dialog window, select Macro Settings from the left sidebar, choose the Enable All Macros option and hit OK. Excel 2007 Click the Microsoft Office Button , and then click Excel Options. Click Trust Center, click Trust Center Settings, and then click Macro Settings. Click the options that you want ie. Enable all macros (not recommended, potentially dangerous code can run). Clicking this option to allow all macros to run. WARNING: After you have finished using E4E it is important that if you manually enabled macros you disable them again. Follow the instructions above and choose ‘Disable all macros with notification’. Leaving macros enabled can leave your computer with a security vulnerability. No liability will be accepted for any loss or damage caused by you leaving Excel macros enabled on your computer. You have been warned!! EPOS 4 Excel v1.5.2 Website: epos4excel.weebly.com ©Martin Stokley 2011-2013 13 | P a g e 3. Customising EPOS 4 Excel for your company It is possible to customise E4E for your company in the following ways: 1. 2. 3. 4. 5. 6. The logo on the sales screen The logo and company details on the receipt. The currency and payment types The layout and file format of the sales data storage file Choosing tax settings The background colours (Advanced users only) NOTE: These customisation changes only affect the specific E4E workbook they are made on. If you are running E4E on multiple computers over a network it is therefore a good idea to make any customisation changes to the E4E workbook before you place copies of it on all your tills. Otherwise you will need to make the same customisations on all tills individually. WARNING: The more you customise about the E4E worksheet (eg. colours, logos etc.) the more you will have to re-customise if you download a newer version of the worksheet with bug fixes or new features. Therefore it is advisable to keep your customisations a minimum! Customising the logo on the sales screen 1. On the sales screen click the Excel ‘review’ menu (top of screen) and select ‘unprotect sheet’ 2. Click once on the ‘EPOS 4 Excel’ logo and press the ‘delete’ key on your keyboard to delete the logo. 3. Click on the Excel ‘Insert’ menu and select ‘picture’. Choose the file containing your company logo picture and insert it. Move and adjust the size of the new logo as appropriate. 4. Click on the Excel review menu and select ‘protect sheet’. Click ‘ok’ in the pop up box WITHOUT changing any of the other settings in the pop up box. 5. The logo has now been changed. EPOS 4 Excel v1.5.2 Website: epos4excel.weebly.com ©Martin Stokley 2011-2013 14 | P a g e Customising the company logo and company details on the receipts E4E enables you to print either a ‘narrow receipt’ using a specialist USB receipt printer or a ‘wide receipt’ using an ordinary USB A4 printer. You can choose which will be printed using the receipt settings screen which is accessible from the EPOS settings screen. You will need to customise the narrow receipt template and wide receipt template for your company by editing the company logo and company details. These can be found via the receipt settings screen. See editing the receipt settings section of this manual for more details about how to do this. EPOS 4 Excel v1.5.2 Website: epos4excel.weebly.com ©Martin Stokley 2011-2013 15 | P a g e Customising payment types, payment autofill and currency E4E allows payment for products to be made in up to five different ways. To change the available payment types in E4E go to the EPOS settings screen. Payment type 1 will always be fixed as cash and payment type 2 will always be fixed as gift voucher but you can chose payment types 3-5 to be anything you want. Change the names for your payment types by clicking in the relevant boxes. If you want less than five payments simply leave any of the boxes blank. If you regularly only take payment using only one payment type you can assign this payment type to be automatically filled with the sale total on the payments screen. Click the relevant option button under payment autofill for the payment type (1,2, 3, 4, or 5). Click none if you wish no payment type to be autofilled. If you are using E4E in conjunction with a computerised accounting package you can enter the nominal code corresponding to the payment type. There is then the option, by ticking the checkbox, to record the nominal code rather than the description of the payment type in the sales data. To change the currency symbol to the one relevant for your country enter your currency symbol in the EPOS currency symbol box. This currency symbol will be used on the receipts etc. You must make sure the item prices stored in the product list are in this currency. On the receipt settings screen you can also change the abbreviated sales tax name to one appropriate for your country. (See the receipt settings section of this manual for more details) Customising the sales data file settings See the sales data settings section of this user manual if you wish to customise the layout and file format of the sales data file. Choosing tax settings In E4E you can choose whether your product list prices will include sales tax or will exclude sales tax. See the tax settings section of this manual for more details. EPOS 4 Excel v1.5.2 Website: epos4excel.weebly.com ©Martin Stokley 2011-2013 16 | P a g e Advanced Users: Cell protection and changing the E4E screen background colours Background colours: Unprotecting the Excel worksheet that corresponds to a specific E4E screen also allows you to: 1. Change the background colours on E4E screens by changing the cell fill / background colour. 2. Change the colours of any ‘shapes’ which make up part of the user interface of E4E All user editable cells on E4E screens have a white background to indicate that these cells are editable. Do not the change the cell fill / background colour of white cells to keep this continuity in E4E, however feel free to change all other cell fill / background colours as appropriate eg. to your company colours OR a colour scheme that complements your company logo on the sales screen. Note: On the ‘current sale’ worksheet column F stores the deal code related to a product in the sale. This is hidden from the user by setting the font colour to be the same as cell background colour. If you change the cell background colour on the ‘current sale’ worksheet then also set the font colour of column F to be the same colour as the cell background colour, this will keep the deal code information hidden from the user. Cell protection: All worksheet cells in E4E are set to be protected from editing / locked unless they have a white background. Generally cells with a white background are editable and have no protection. EPOS 4 Excel v1.5.2 Website: epos4excel.weebly.com ©Martin Stokley 2011-2013 17 | P a g e 4. Setting up EPOS 4 Excel for use There are various steps you need to complete to set up E4E before it can be used for making sales. Some of these steps are essential and some are optional as indicated below. EPOS 4 Excel data file settings (Essential) You need to choose the folder where the EPOS 4 Excel sales data, customer order data and the system data files will be stored. To choose / change the locations of the files: 1. On the file settings screen (found via the EPOS settings screen) click the ‘browse’ button next to the folder name and change the storage folder location as appropriate. 2. If the old storage folder location exists you will be asked if you want to copy any product lists / system data and any sales / order data to the new storage location. Click ‘yes’ to both if you are just changing your storage location for a previous installation of E4E. Click ‘no’ to both for starting a completely new installation of E4E. 3. If you are connect multiple tills together over a network then the storage folder location will need to point to the same folder location on each individual instance of E4E that is running ie. on every till. EPOS 4 Excel v1.5.2 Website: epos4excel.weebly.com ©Martin Stokley 2011-2013 18 | P a g e Creating a product list (Essential) There are two ways to create a product list. Firstly, by manually adding products one by one. For more details of how to do this see the ‘Add / alter product details’ section of this manual. Secondly, the quickest way to create a product list is to create an excel workbook (.XLS or .XLSX) to import into E4E. The Excel workbook should have the following columns: Column A: Column B: Column C: Column D: Column E: Column F: Column G: Column H: SKU / Item Code / Item Barcode Item Description Product Price Item Tax Class Deal code (You may leave this column blank) Product Description 2 (You may leave this column blank) Product Description 3 (You may leave this column blank) Item Stock Re-order level (You may leave this column blank) NOTE: Columns A-D are essential, all other columns you may leave blank. Column headings should be placed in row 1 of the worksheet. If you place item details in row 1 then this item’s details will not be imported. NOTE: Whether product price includes sales tax or includes sale tax depends on the tax settings you have chosen when setting up E4E. See the ‘Tax Settings’ section of this manual for more details. After you have created this workbook you can then import the product details into E4E. See the ‘Importing Products’ section of this manual for more details. The SKU / Item Code should be a number if you are using a barcode scanner. If you decide to enter item codes manually you can use mixture of numbers and letters for your item codes. This item code cannot be 0 (zero) The Product Price should be the price per individual item (eg. price per book) or unit price (eg. price per kilogram, which would allow you to sell loose items in varying proportions of a kilogram). On the EPOS setting screen you can choose to only allow the selling of whole number quantities of products (ie. you would then not be able to sell varying quantities of loose items) The item tax class is a code which represents the items % tax rate eg. T20 representing a 20% tax rate. These codes and the corresponding % tax rates will need to the stored E4E’s tax settings. See the ‘Tax Settings’ section of this manual for more details. The deal code is a code which indicates the product is linked to a deal which E4E will automatically add to the sale if specific items are in the sale basket. For more details see the ‘deals’ section of this manual. Product Description 2 / Product Description 3 are two extra customisable fields for describing the item. See the ‘products’ section of this manual for more details. The Item Stock Re-order level is a number which if the quantity in stock level for an item equals or drops below then E4E will identify on the stock reorder report that you need to re-order more of this item. If you leave this blank then the Item Stock Re-order level is automatically set to 0 (zero). If you do not want an item to be included in the stock reorder report then set its item stock re-order level to any negative number eg -1. E4E has been successfully tested with over 8,000 products on the product list. Theoretically E4E could hold over 1 million products but it would probably run too slowly!! EPOS 4 Excel v1.5.2 Website: epos4excel.weebly.com ©Martin Stokley 2011-2013 19 | P a g e Installing the “Free3of9” barcode font (Optional) If you want to use the E4E gift voucher functions then you will need to install the Free3of9 true type barcode font. Otherwise the gift voucher functions will automatically be disabled. Download the font file from the E4E website. Right click on the file and select extract all. You will need to install both of the extracted font files ‘Free 3 of 9’ and ‘Free 3 of 9 Extended’. For details about how to install fonts on Windows 7, Windows Vista and Windows XP see the following webpage: http://www.microsoft.com/typography/truetypeinstall.mspx Create an initial stock levels file (Optional) If you wish to have an accurate measure of stock levels, then before using E4E to make sales you will need to generate an Excel workbook (.XLS or .XLSX) containing a list of the levels of stock for each item. Create the file list with the following columns (no column headings): Column A: SKU/ item code Column B: the initial stock levels for each item. NOTE: The initial stock levels can be whole numbers or decimal numbers eg. if you sell items in price per kilogram the initial stock levels would be the number of kilograms you have. The item price on the product list would then be the price per kilogram. This initial stock levels file should then be imported into E4E using the import multiple deliveries button on the stock levels screen (see the ‘stock management’ section of this manual for further details). First clear the stock levels if necessary. Then import the initial stock levels file. This will set the initial stock levels in E4E. NOTE: If you do not import an initial stock levels file E4E will still record the numbers of each item sold but you will not have an accurate record of what you have in stock. Setting up a printer and printing receipts (Optional) To print receipts you will need the do the following: Make sure you have a receipt printer AND / OR an ordinary printer plugged in to every till (NOTE: Some printing operations in E4E will require an ordinary printer) Make sure you set the printer you wish to print receipts on as the default printer on the computer (there is a button to change the active printer for Excel on the sales screen if you forget) When making sales receipts will be generated and printed if the ‘print sales receipts’ checkbox is ticked on the sales screen. If you do not wish to generate receipts make sure you untick this checkbox every time you start up E4E (the default setting on E4E on loading the worksheet is to print receipts). NOTE: If you do not have a printer connected to the computer and you leave the print receipts checkbox ticked then receipts will be generated and stored in your computer’s printer queue. The next time you attach a printer to the computer these stored receipts will then be printed out. It is EPOS 4 Excel v1.5.2 Website: epos4excel.weebly.com ©Martin Stokley 2011-2013 20 | P a g e therefore advisable that the checkbox is unticked if you do not have a printer attached to the computer or if the printer stops working. You can print a test receipt to check the receipt printer is working by clicking on the ‘print test receipt’ button on the receipt settings or receipt templates screens (accessible via the EPOS settings screen). If the receipts don’t print, check that: The ‘Print sales receipts’ check box is ticked on the sales screen The relevant printer drivers are correctly installed The printer is set as the default or active printer (use the button on the sales screen to change the active printer) The printer is connected to the computer correctly The printer is switched on and plugged into the mains electricity The printer has paper in it If this does not solve the printing problem try the following: Unplug the printer. Go to the Windows start menu. Go to the control panel and open ‘Devices and Printers’. Delete any printers with the name of your printer (there may be more than one). Now plug in the printer again. The computer should now recognise / install the printer. Try printing out receipts again. If paper runs out in the middle of printing a receipt you can always re-print the last sales receipt, after loading new paper, by clicking the ‘reprint previous sales receipt’ button on the sales screen. This option is only available if the ‘print sales receipts’ checkbox is ticked on the sales screen. The last receipt generated will be held in memory and you can reprint it even if you leave the sales screen and return later. NOTE: E4E has been run successfully using the Star TSP113 USB receipt printer and the column width of the receipt template on the narrow receipt template screen has been set for this receipt printer. You may need to adjust the column width of the receipt template for E4E to work successfully with another receipt printer. Experimentation for your particular set up may be necessary!! See the editing receipt settings section of this manual for more details. EPOS 4 Excel v1.5.2 Website: epos4excel.weebly.com ©Martin Stokley 2011-2013 21 | P a g e Setting up E4E Security Settings (Optional) If you wish to limit who can do what with E4E then is necessary to enable the E4E security settings and set up security passwords. See the E4E security settings section of this manual for more details. NOTE: The security in E4E would easily be cracked by a person with an advanced knowledge of Excel. However it does provide a basic level of protection. Setting up Discount Reasons / Deals (Optional) With E4E you can force a sales assistant to give a reason for a discount to an item price or sale total from a predefined list. For more information see the deals and discounts section of this manual. NOTE: It is recommended that once you have customised the E4E worksheet that you keep a backup copy. This means that if the worst happens and the customised copy of E4E which you are using to make sales becomes unusable, you can delete it and put in its place a copy of the back-up. This will stop you having to re-customise E4E again before you can make any sales. EPOS 4 Excel v1.5.2 Website: epos4excel.weebly.com ©Martin Stokley 2011-2013 22 | P a g e 5. Making sales with EPOS 4 Excel Important: Whenever manually entering numbers / information on an Excel worksheet always make sure you press the ‘Enter / Return’ key on the keyboard to make the system update properly. Starting out 1. Open EPOS 4 Excel 2. Make sure that Macro’s are enabled in Excel (See the section ‘Enabling Macros in Excel’) and you have added some products 3. Click on the ‘Sales’ button 4. If the E4E option to use a specified date rather than system date for sales is enabled under the sales data setting you will be asked to enter the date. 5. You will be asked for the sales assistant first name. This will be printed on the receipt (‘You were served by: XXXXXXX’) and stored in the sales data so the sales assistant making the sale can be identified at a later date if necessary. NOTE: If the ‘force user to give sales assistant name’ option is ticked in the EPOS setting then you will have to give a sales assistant name. 6. If no sales have been made today using E4E you will be ask to enter a till number. If different people are selling in two different places on the same day you need to make sure that they use different till numbers. NOTE: If you make sales, then enter sales training mode and then return to make sales you will be asked for your till number again. (The sales training mode automatically sets the till number to 1.) EPOS 4 Excel v1.5.2 Website: epos4excel.weebly.com ©Martin Stokley 2011-2013 23 | P a g e Adding Products to the Sale 1. Scan or manually enter the barcode / item code of the first product into the first free cell in the ‘Item Code’ column. The price will automatically be looked up. (Make sure you press the ENTER key if you manually enter the barcode). 2. Alter the quantity in the ‘quantity’ column if there are more than one of the same product. (NOTE: If you are selling loose items by weight, for example, you would enter the weight here eg. how many kilograms the customer wants to buy and your item price would then be the price per kilogram) 3. Check the ‘item price’ column against the price on the product. If it is different, see the changing an item’s price section below. 4. Repeat this for each product by scanning or entering the barcode / item code in the next free cell in the ‘Item Code’ column. (You cannot add more than 97 product rows in a single sale) NOTE: For details about adding an E4E gift voucher to the sale see the gift vouchers section of this manual NOTE: Only the first 25 characters of the item’s description will appear on the sales screen. To see the item’s full description, double click with the left mouse button on the item’s row on the sale screen to bring up the item details box. This will include full details about the item including how many are in stock. NOTE: LINE PRICE = QUANTITY x ITEM PRICE (You will not be able to change the line price amount) NOTE: The sub-total value shown on the current sale screen is the sum of the line prices ie. the sale total before any sale discounts or deals are added EPOS 4 Excel v1.5.2 Website: epos4excel.weebly.com ©Martin Stokley 2011-2013 24 | P a g e Changing an item’s price You can change and item’s price in two ways: Firstly, to change an item’s price you can use the arrow keys to move to the relevant item price and simply change it. If the E4E option to force the user to give reasons for item prices changes is enabled then you will be asked for a reason for the price change. This method of changing an item’s price also gives you the option to update the product list so this item’s price will be changed permanently to this new price. Secondly, to change an item’s price double click with the left mouse button on the item’s row on the sales screen. This will bring up the item details box. To change the item’s price, enter the new price in the ‘change item price to’ box (numbers only). Choose a reason for the price change from the drop down menu. Click apply changes to apply the price change and return to the sales screen. EPOS 4 Excel v1.5.2 Website: epos4excel.weebly.com ©Martin Stokley 2011-2013 25 | P a g e Discounting an item’s price by a percentage To discount an item’s price by a percentage amount double click with the left mouse button on the item’s row on the sales screen. This will bring up the item details box. Enter the percentage discount amount in the ‘discount item price by %‘ box (numbers only). Choose a reason for the price change from the drop down menu. Click apply changes to apply the discount and return to the sales screen. NOTE: If you enter both a price change and percentage discount at the same time, then the item's price will be changed first and then the percentage discount applied to this new price. This order of applying the discounts works in the retailers favour. EPOS 4 Excel v1.5.2 Website: epos4excel.weebly.com ©Martin Stokley 2011-2013 26 | P a g e Manually looking up a product’s code If you find a product without an item code you can always look up the item’s code manually. On the sales screen click the product search button. Enter your search terms and click search. For more details on searching and the search options see the products section of this manual. You will then be shown the product search results screen with a list of products related to your search terms. Click on the item code / SKU for the product you wish to add to the sale. Click the copy SKU to current sale button, you will be asked if this product is for a prepaid order and then you will be returned to the sales screen with the item’s code having been added to the sale basket. If the product is not found, you can always click the new product search button to try searching again. EPOS 4 Excel v1.5.2 Website: epos4excel.weebly.com ©Martin Stokley 2011-2013 27 | P a g e Item Autocomplete If the ‘Hide Item Autocomplete button’ option is unticked on the EPOS settings screen then the sale screen will show the Item Autocomplete button. This button provides an alternative way of entering products into the sale. Clicking the button will bring up a window. 1. Start typing the first few characters of an item code or item description in the box and a list of products that match the beginning of what you have typed will appear. 2. You can choose an item off this list either by double clicking on it or use the arrow keys to move up / down the list and use the enter key to select the item. 3. Enter quantity of this item being sold and item price. The selected item will be added to the sale. If you click cancel on item quantity the item will not be added to the sale, if you click cancel on the item price the item will be added to the sale but the product list price will be used. 4. The Item Auto complete box will remain open until you click the close button. NOTE: The longer your product list, then longer the it will take to compile a list of matching products. EPOS 4 Excel v1.5.2 Website: epos4excel.weebly.com ©Martin Stokley 2011-2013 28 | P a g e Using Quick Products Buttons If you have enabled quick products in E4E (see the products section of this manual for more details) then the sale screen will show the quick products buttons, otherwise these buttons will remain hidden. Click on a quick product button to add that item to the sale. Deleting an Item from the Sale 1. In the ‘Quantity’ box for the item you wish to delete enter the number ‘0’. 2. The item will be deleted from the product list and a box will pop up confirming the item has been deleted. View the full details of an item in the sale To view the full details of an item in the sale, double click on the item’s row on the sales screen using the left mouse button. This will bring up the item details window. Cancelling a sale 1. Click the ‘cancel sale’ button. 2. A box will pop up asking if you ‘really want to CANCEL the sale?’ Click ‘Yes’. 3. Any products already entered will be cleared ready for a new sale. EPOS 4 Excel v1.5.2 Website: epos4excel.weebly.com ©Martin Stokley 2011-2013 29 | P a g e Taking payment and adding monetary / percentage discounts to the sale To take payment click the payments button on the sales screen OR use the keyboard shortcut ‘Alt y’. The fast pay window When taking payment if you have ticked the use fast pay window when taking payments option on the EPOS settings screen you will be presented with the fast pay window: The fast pay enables you complete the sale by clicking on one of the payment methods. E4E will assume the customer has paid in full and therefore there is no change. A receipt will be printed and sale details saved. You can click the more payment options button to bring up the full payments window which will enable you to redeem gift vouchers, add sale discounts etc. NOTE: If the gift voucher functions of E4E are enabled then you will not be able to fast pay using gift vouchers. NOTE: If this is a pre-paid customer order then tick the pre-paid customer order box. After you have completed the sale you will then be asked to select using the mouse which items in the sale are for order and also for the customer details (See picture below). Selecting items allows you to distinguish between the items in the sale which the customer is taking away with them and the items which are on order. The order details will then be stored in E4E’s customer orders. EPOS 4 Excel v1.5.2 Website: epos4excel.weebly.com ©Martin Stokley 2011-2013 30 | P a g e The full payments window When taking payment if you have not selected to use the fast pay window on the EPOS settings screen or you have clicked more payments options on the fast pay window you will be presented with the full payments screen. The full payments window up displays the sale total, balance still and what deals / discounts / tax have been applied to the whole sale. It also allows you to use split payment methods: 1. Enter any monetary discount / percentage discount (numbers only) off the whole sale and choose reasons for the discounts. 2. Enter the payment amounts the customer is paying with in the relevant payment types boxes. If on the EPOS settings screen you have set up a payment autofill then the sale total will automatically be assigned to the relevant payment type. Then you can make any necessary adjustments. If you click in a payment amount box that has an amount zero in it, E4E will automatically put the balance due in the payment amount box. NOTE: If you set up E4E to have less than five payment types then one or more boxes on the take payment window will be disabled. 3. In the memo box you can record any necessary relevant information to the sale eg. ‘problem with card machine – check payment was not taken twice’ OR full details of any coupon discounts added to the sale. 4. If this is a pre-paid customer order then tick the pre-paid customer order box. After you have completed the sale you will then be asked to select using the mouse which items in the sale are for order and also for the customer details (See picture below). Selecting allows you to distinguish between the items in the sale which the customer is taking away with them and the items which are on order. The order details will then be stored in E4E’s customer orders. NOTE: E4E will automatically add to the memo box when saving the sales data a notification that this is pre-paid customer order. 5. Any change necessary will be displayed as a negative balance due. NOTE: E4E always assumes change will be given as cash. 6. Click complete sale to finalise the sale OR click cancel to go back to the sales screen and add more products / cancel the sale completely. 7. After you have completed a sale the change that was due from that sale will be shown in the ‘Previous Sale Change’ box. EPOS 4 Excel v1.5.2 Website: epos4excel.weebly.com ©Martin Stokley 2011-2013 31 | P a g e NOTE: For details about redeeming E4E gift vouchers see the gift vouchers section of this manual. NOTE: The order in which the deals and sale discounts are applied are: Any deals (see the discounts and deals section of this manual for more details) and then sale monetary discount followed by the sale percentage discount. Adding the monetary discount before the % discount works in the retailers favour. Keyboard shortcut’s when taking payment ALT + 1 ALT + 2 ALT + 3 ALT + 4 ALT + 5 ALT + m ALT + n ALT + p ALT + r ALT + e ALT + s ALT + c Enter payment method 1 amount Enter payment method 2 amount Enter payment method 3 amount Enter payment method 4 amount Enter payment method 5 amount More payments options (fast pay window) Enter a monetary discount (full payments window) Enter a reason for monetary discount NOTE: When in the monetary discount reason box: The up and down arrows scroll through the options ALT + down arrow shows the full list of reasons You can also keep pressing a letter on the keyboard to scroll through all the discount reasons that start with that letter Enter a percentage discount Enter a reason for percentage discount NOTE: When in the percentage discount reason box: The up and down arrows scroll through the options ALT + down arrow shows the full list of reasons You can also keep pressing a letter on the keyboard to scroll through all the discount reasons that start with that letter Enter a sale memo Complete Sale Cancel EPOS 4 Excel v1.5.2 Website: epos4excel.weebly.com ©Martin Stokley 2011-2013 32 | P a g e Changing the sales assistant name If you change sales assistant in the midst of using E4E to make sales you can change the sales assistant name by clicking the change assistant button on sales screen. You will be asked for a new sales assistant first name. NOTE: If the ‘force user to give sales assistant name’ option is ticked in the EPOS setting then you will have to give a sales assistant name. Changing the till number You can change the till number on the sales screen by clicking the change till number button. You will be asked for your new till number. If sales have been made on the new till number already today, E4E will automatically pick up the next transaction number and till total. Warning: Each till should have a unique till number or you will get duplication of sale transaction numbers in the sales data Opening the till cash drawer You can open the till cash drawer between sales by clicking the open cash drawer button. This will also print out a short receipt detailing time, date and sales assistant when the cash drawer was opened. NOTE: The open cash drawer function works on the basis that your cash drawer is connected to your receipt printer and the receipt printer is set up to automatically open the cash drawer after a receipt is printed. If this is not how your cash drawer works then this button will not be able to open the cash drawer. Locking the sales screen If you need to leave the till unattended for any reason you can lock the till by clicking the lock screen button on the sales screen. You will then be asked for a password to unlock the screen. You can choose your screen unlock password on the EPOS settings screen. If you forget the password you can always enter ‘EPOS4excel’ when asked for a password and this will override any user chosen password unlocking the screen. If you have E4E security enabled you can also enter a sales, supervisor or administrator password to unlock the screen as well. NOTE: Passwords are case sensitive! Showing till total sales for the day on the sales screen On the EPOS settings screen you can choose whether to show the till total sales for the day on the sales screen. EPOS 4 Excel v1.5.2 Website: epos4excel.weebly.com ©Martin Stokley 2011-2013 33 | P a g e Refunding Items In E4E you cannot refund items at the same time as selling other items (ie. an exchange). If a customer wants to return items and buy different items at the same time, first complete the refund of the items and then sell the other items separately. 1. Scan the barcode of the first product to be refunded into the first free cell in the ‘Item Code’ column. The price and will automatically be looked up. 2. Change the quantity to -1 3. Check the item price is right, if not change the item price. 4. Repeat for any other items to be refunded. 5. Click the payments button and the full payments window will be shown. 6. Add any necessary percentage discount / monetary discount (this must be entered as a positive amount) and give reasons from the drop down menu where applicable. 7. Enter the amount of refund next to the relevant payment type. 8. If the refunded items are not to be returned back to saleable stock (eg. they are damaged) then untick the return items to stock tickbox. NOTE: By default they will be returned to saleable stock. 9. You can use the memo box for recording any other details necessary regarding the refund eg. the reason for the refund such as ‘misprinted book’ / the receipt number of the original sale etc. (NOTE: If you choose the option of forcing the user to give reasons for a refund in the EPOS Settings then you will have to include a reason for the refund in the memo box) 10. Click the complete sale button to complete the refund. EPOS 4 Excel v1.5.2 Website: epos4excel.weebly.com ©Martin Stokley 2011-2013 34 | P a g e Sales training mode E4E has a built in sales training mode. On the main options screen click the sales training mode button to enter the training mode. When you are in sales training mode you can learn how to use the sales screen functions with no sales data, customer order data, product details or stock level changes being saved. This enables new staff to get used to the sales functions without anything they do affecting any of your data. Training mode is displayed clearly at the top of the sales screen to show you are in the sales training mode. You will exit the sales training mode when you click the options button on the sales screen. Returning to the EPOS 4 Excel options screen On the sales screen click the ‘options’ button. EPOS 4 Excel v1.5.2 Website: epos4excel.weebly.com ©Martin Stokley 2011-2013 35 | P a g e Frequently Asked Questions: How do I find out the total cost of the sale so far in the middle of entering items to be sold? If you select the show sub-total option on the EPOS settings screen then the sales screen includes a sub total. However this amount is the sale cost before any sale discounts or deals are added. To find out the total cost including sale discounts / sale deals, click on the payments button. Then the payments window will pop up and tell you the cost of the items in the sale including any deals / discounts. To return to the sale and add more items click the cancel button. What if the customer decides they no longer want an item I’ve already scanned? Change the item quantity to the number ‘0’ and it will be deleted from the sale. I’ve accidently left a blank row in the list of products for the sale, what do I do? Do not worry, you do not need to cancel the sale and start again. Carry on as normal and when you come to complete the sale E4E will automatically remove any blank rows. Can I sell an item which is not on the product list? If the details of the item you wish to sell are not currently held on the product list then when you add the item’s SKU / item code to the sale you will be requested to enter the item details to add it to the product list. Choose cancel if you do not wish to sell the item, otherwise enter the requested item details. I want to close the till down for a couple of hours. Do I need to leave EPOS 4 Excel running? You can simply choose to lock the sales screen and enter the password to unlock it when you return. However you do not need to leave E4E running! Exit the sales screen by clicking on the options button. Click the Exit button on the options screen and the till number will be saved. Close down the computer. Come back later and open E4E. Go to the sales screen. It will recognise that E4E has already been used for sales, so it won’t prompt you for a till number but it will ask you for the sales assistant name. You can continue making sales where you left off. The computer has crashed and I haven’t saved the file. Have I lost all the data of the sales I have made? No! Every time you complete a sale button the E4E file containing the sales data is automatically saved. The most you will have lost is the data you were entering for the current sale. How do I deal with an item that is to be given away free? It is important that any free items are still scanned in as a sale so that stock levels are kept accurate to what is actually in stock. There are two different possible situations when giving away free items: 1. In the midst of paid items there is a free item. In this case still enter the free product’s item code in as normal. Change the item price to zero. Continue and complete the sale as normal. 2. All items in the sale are free. In this case you can enter the item codes of all the free products as normal and change all the item prices to zero. However this could become cumbersome. Alternatively you could enter all the item codes, click the payments button and enter a sale monetary discount equal to the sale total. NOTE: If an item in the sale has a zero price then when you click payments you will be warned of the existence of a zero priced item in the sale and asked if you are sure you want to go ahead with taking payment. If you wish to change the price of the zero priced item, click cancel and alter the price before clicking take payment again. EPOS 4 Excel v1.5.2 Website: epos4excel.weebly.com ©Martin Stokley 2011-2013 36 | P a g e The printer ran out of paper or jammed in the middle of printing a receipt. How do I reprint the last receipt? On the sales screen simply click the reprint previous sales receipt button. This button will only be enabled if you have the print sales receipts box ticked. Something disastrous seems to have happened and I cannot continue to use this copy of E4E for making sales. What do I do? You can open a new copy of the E4E worksheet. Make sure the data file settings in the new E4E file are set up the same as the E4E file you can no longer use. Click the sales button and make sure you enter the same till number as before. E4E should then automatically pick up the last sale number and total amount sold on the till today from the sales data file. You can begin to make sales again. The open cash drawer button does not work, why not? The open cash drawer function works on the basis that your cash drawer is connected to your receipt printer and the receipt printer is set up to automatically open the cash drawer after a receipt is printed. If this is not how your cash drawer works then this button will not be able to open the cash drawer. On the sales screen the box containing the information / buttons (right hand side) is too big to fit on the screen. For some computers with a smaller resolution on the monitor this may be a problem. The way around it is to adjust the ‘zoom’ of the Excel window to less than 100% using the slider or + / buttons at the bottom of the window. EPOS 4 Excel v1.5.2 Website: epos4excel.weebly.com ©Martin Stokley 2011-2013 37 | P a g e 5. Stock Management Functions EPOS 4 Excel includes basic stock management features, which means you can track stock levels of items. For accurate stock levels you must import your initial stock levels into E4E before you start selling. See the section of this manual on setting up E4E for use for further details about importing initial stock levels. To access the stock management functions click the stock levels button on the main options screen. EPOS 4 Excel v1.5.2 Website: epos4excel.weebly.com ©Martin Stokley 2011-2013 38 | P a g e Showing the current stock levels of all products Click the current stock levels button on the stock levels screen. E4E will show a screen containing a list of all products and their stock levels. You can chose to sort the list by quantity in stock (high to low OR low to high) and by description (A to Z). You can also choose to export the current stock levels data as laid out on the screen to an excel workbook. NOTE: An alternative way of showing the current stock levels is on the product screen clicking the show all products button. This will bring up a list of all products stored in E4E and their stock levels. However there is no export function on this screen. Resetting the stock levels You can set the stock levels for all products back to zero by clicking the reset stock levels button on the stock levels screen. This sets quantity delivered, quantity sold and quantity in hand for all products to zero. Warning: You will not be able to retrieve this information if you reset the stock level to zero, so it is advisable to back up your data first. Adding a new delivery of a single product You can record a new delivery of a single product by clicking the single item delivery button on the stock levels screen. 1. Enter the item code that you wish to record a new delivery for. 2. Enter how many or how much (eg. how many kilograms) of that item has been delivered. 3. The stock levels will now be updated to take into account the delivery. EPOS 4 Excel v1.5.2 Website: epos4excel.weebly.com ©Martin Stokley 2011-2013 39 | P a g e Importing multiple deliveries in one go / Importing initial stock levels If you have many items delivered at the same you do not have manually enter the delivery details of each single item. Create an Excel workbook (.XLS or .XLSX) with the following columns (no column headings): Column A: SKU/ item code Column B: quantity of the item delivered Click the import multiple deliveries button on the stock levels screen and choose the file you have created with the delivery details. E4E will now import these multiple deliveries and update the stock levels accordingly. You can use the import multiple deliveries process for setting up the initial stock levels of a shop: 1. Make sure all products in the shop have been added to product list 2. Reset the stock levels to zero 3. Create an Excel workbook containing the item code and initial stock level for that item in the shop (as above). 4. Then using this workbook ‘deliver’ all the items in your shop as above. Your initial stock levels for your shop will have been set up. NOTE: You can only deliver products that already exist on the product list. If you are delivering a new product first you must add the product to product list before adding a delivery. See the alter / add a new product section of this manual for more details on adding new products. NOTE: If you make a mistake with the quantity you can always add a delivery for the same item with a negative quantity to cancel out the number you previously said was delivered. Adjusting the quantity in stock for a single item Sometimes it may be necessary to adjust the quantity in stock of an item to keep the stock levels accurate eg. if items get stolen etc. You can do this by clicking the single adjust qty in stock button on the stock levels screen. Enter the item’s code whose stock level you wish to adjust. Enter the new stock level for this item ie. how many of the item are or how much of the item is (eg. how many kilograms) currently held in stock. This will become the new stock level for this item. Adjusting the quantity in stock for multiple items You can adjust the quantity in stock of multiple items by creating an Excel workbook (.XLS or .XLSX) with the following columns (no column headings): Column A: SKU/ item code Column B: the new stock level for this item ie. how many of the item are or how much of the item is (eg. how many kilograms) currently held in stock Click the multiple adjust qty in stock button on the stock levels screen and choose the file you have created. E4E will now update the quantity in stock levels accordingly. Using this process you can do a stock take for your shop and update the stock levels for all items in your shop thereby keeping them accurate. EPOS 4 Excel v1.5.2 Website: epos4excel.weebly.com ©Martin Stokley 2011-2013 40 | P a g e 6. Products Product descriptions In E4E you have three description fields for your products: 1. Description – This is the main description of your product and should be used to name your product. What you put in this field will appear on your receipts and will be seen by customers. 2. Description 2 and Description 3 – This is a sub-description for your products. What you put in this field will not be seen by customers and will not appear on your receipts. You could use the description 2 and description 3 fields to store various pieces of information: Supplier name Location of the item in the shop ie. split your shop up into areas and label the locations, the location code could then identify where the stock is held If you are selling books you could use them to store publisher or author details The format of the product eg. DVD, Blueray, Hardback, Paperback Organise your products into different departments eg. fruit, stationary, magazines, clothing etc. Alternatively you can leave the description 2 and description 3 fields blank. On the EPOS settings screen you have the ability to change the label of descriptions 2 and 3 to something more intuitive for your staff eg. set the description 2 label to ‘supplier’ and when you search for a product rather than E4E asking for search terms for description 2, it will ask for search terms for ‘supplier’ instead. NOTE: Changes to the description 2 and 3 labels only affect the specific till they are made on. If you are running E4E on multiple tills over a network it is therefore a good idea to make the customisation changes to the description 2 and 3 labels before you place copies of the E4E workbook on all your tills. EPOS 4 Excel v1.5.2 Website: epos4excel.weebly.com ©Martin Stokley 2011-2013 41 | P a g e Manually adding or altering product details 1. Click the alter / add product details button on the products screen 2. In the pop up box enter the item code of item whose details you wish to add / alter and then press enter or click on the find it button 3. If the item is found on the E4E product list then the item details will be shown for you to edit. 4. If the item is not found on the E4E product list you will told this is a new item. You then must enter a description, tax class and item price. Deal code, description 2, description 3 and item stock reorder level are optional (See the importing products section below for more details about what these all mean). 5. Click save to save your edits or cancel to discard them. NOTE: If the item is already on the product list then the alter / add product pop up box will also show you the stock levels for the item. Here Qty Missing = Qty Delivered – Qty in Stock – Qty Sold NOTE: If the item is already on the product list, altering the item code and saving alterations will create a new product with the same product details as the details of original product but different item code / sku. The original item will be kept on the product list and a new item with the changed item code will be added to the product list. To remove the original product you will have to delete this single item manually (see below). NOTE: It may be necessary during a sales session to alter the price of a product eg. if the price of the product needs to be reduced / increased due to mispricing etc. This can be done during a sale by simply altering the item price every time the product is scanned on the sales. However you can also make the price change more permanent by altering the price list using the above method. NOTE: If you wish to edit the details of a product whose item code you don’t know then see the searching for products section below for details about how to find a product by item description. NOTE: If you do not set an item stock reorder level it will be automatically be set to zero. EPOS 4 Excel v1.5.2 Website: epos4excel.weebly.com ©Martin Stokley 2011-2013 42 | P a g e Keyboard shortcut’s when manually adding / altering products ALT + e ALT + f TAB / Enter key ALT + s ALT + c Move cursor to enter item code box Find the item Move to next entry field Save changes / Add new product Cancel EPOS 4 Excel v1.5.2 Website: epos4excel.weebly.com ©Martin Stokley 2011-2013 43 | P a g e Importing products The quickest way to create a product list is to create an excel workbook (.XLS or .XLSX) to import into E4E. The Excel workbook should have the following columns: Column A: Column B: Column C: Column D: Column E: Column F: Column G: Column H: SKU / Item Code / Item Barcode Item Description Product Price Item Tax Class Deal code (You may leave this column blank) Product Description 2 (You may leave this column blank) Product Description 3 (You may leave this column blank) Item Stock Re-order level (You may leave this column blank) NOTE: Columns A-D are essential, all other columns you may leave blank. Row 1 of the worksheet is left for column headings. If you place item details in row 1 then this item’s details will not be imported. The SKU / Item Code should be a number if you are using a barcode scanner. If you decide to enter item codes manually you can use mixture of numbers and letters for your item codes. This item code cannot be 0 (zero) The Product Price should be the price per individual item (eg. price per book) or unit price (eg. price per kilogram, which would allow you to sell loose items in varying proportions of a kilogram). On the EPOS setting screen you can choose to only allow the selling of whole number quantities of products (ie. you would then not be able to sell varying quantities of loose items) The item tax class is a code which represents the items % tax rate eg. T20 representing a 20% tax rate. These codes and the corresponding % tax rates will need to the stored E4E’s tax settings. See the ‘Editing Tax Settings’ section of this manual for more details. The deal code is a code which indicates the product is linked to a deal which E4E will automatically add to the sale if specific items are in the sale basket. For more details see the ‘deals’ section of this manual. Product Description 2 / Product Description 3 are two extra customisable fields for describing the item. See the ‘products’ section of this manual for more details. The Item Stock Re-order level is a number which if the quantity in stock level for an item equals or drops below then E4E will identify on the stock reorder report that you need to re-order more of this item. If you leave this blank then the Item Stock Re-order level is automatically set to 0 (zero). If you do not want an item to be included in the stock reorder report then set its item stock re-order level to any negative number eg -1. You can then import the product details into E4E by clicking the import products button on the products screen. Choose the Excel workbook that contains the product data you wish to import. During the import the progress will be shown at the bottom of the products screen. During a products import if the imported item code is already found on the product list then E4E will use the imported details to update the item description, item tax class, item price, deal code, description 2 and description 3 of the already stored item. (If there is no deal code for an item any existing deal code for that product will be kept.) New products will be added to the already existing items on the product list. EPOS 4 Excel v1.5.2 Website: epos4excel.weebly.com ©Martin Stokley 2011-2013 44 | P a g e E4E has been successfully tested with over 8,000 products on the product list. Theoretically E4E could hold over 1 million products but this would probably run too slowly!! Quick Products E4E includes the ability to define up to eleven quick products buttons on the sales screen. To edit the quick products buttons on the products screen click the edit quick products button. To show the quick products buttons on the sales screen make sure you tick the show quick products on sales screen tickbox. For each quick product you want to define you will need to enter a product description (this will appear on the button) and the corresponding item code. Clicking the exit button will save your changes. Only those quick product buttons which have a description and corresponding item code will be shown on the sales screen eg. EPOS 4 Excel v1.5.2 Website: epos4excel.weebly.com ©Martin Stokley 2011-2013 45 | P a g e EPOS 4 Excel v1.5.2 Website: epos4excel.weebly.com ©Martin Stokley 2011-2013 46 | P a g e Deleting a product from the product list To delete a product from the product on the products screen click the delete a product button. Enter the item code of the product you wish to delete. The product will be deleted from the product list. Warning: If you delete a product then the product data and stock levels will be wiped and you will not be able to retrieve this data, so it is advisable to back up your data first. Clearing the product list Sometimes it may be necessary to clear the product list and start again with a blank one eg. If you take temporary shops to conferences you may take different products to different conferences and so at the start of each conference it would be good to start off with a blank product list. To clear the product list click the clear product list on the products screen. You will be asked if you are sure if you want to do this before the product list is cleared. Warning: If you clear the product list then the product data and stock levels will be wiped and you will not be able to retrieve this data, so it is advisable to backup your data first. Deleting unused products from the product list On the products screen clicking the delete zero products button allows you to delete all products from the product list that have zero price AND zero qty delivered, zero qty in stock, zero qty sold ie. products that have not been used. EPOS 4 Excel v1.5.2 Website: epos4excel.weebly.com ©Martin Stokley 2011-2013 47 | P a g e Searching for products To search for products click the product search button on the products screen. You can search by item code, description, description 2 and description 3. Enter your search terms in the appropriate box and click the search button. The search options are as follows: Item Code search options Exact Match = searches for the item code which exactly matches the search term eg. Searching for 1234 will find the single item with a code of 1234 but it would not find an item with a code of 61234. Loose match = searches for those item codes which include the search term but not necessarily exactly eg. Searching item code for 1234 will find the single item with a code of 1234 and it will also find an item with a code of 61234. Why might the loose match be useful? If you can only partially read the barcode of a product because it has been damaged, then you can search for the partial section of the barcode which you can read to find the product details. Another possible use could be: If the item codes of all products from a single supplier begin with, say, the same 7 digits (eg. 9781365) then a loose match search for these 7 digits will find all items from that single supplier. NOTE: The AND / OR search option is not available when searching for item codes. EPOS 4 Excel v1.5.2 Website: epos4excel.weebly.com ©Martin Stokley 2011-2013 48 | P a g e Description, Description 2 and Description 3 search options AND / OR = when searching in item descriptions you can choose to find all results that contain eg. ‘test’ AND ‘bed’ or all results that contain ‘test’ OR ‘bed’. NOTE: Descriptions are always searched based on a loose match. In other words, searching for those descriptions which include ALL the search terms but not necessarily exactly eg. searching description for ‘test bed’ will find item descriptions with the words ‘test’ AND / OR ‘bed’, however it will also find item descriptions containing the words like ‘testing’ and ‘bedroom’. After clicking search a list of the products relating to your search terms will be shown. You can choose to sort the results list by quantity in stock, description, description 2, description 3 or by deal code. You can also edit an item’s details by clicking on the item code of the item whose details you wish to edit. Then click on the edit item details button. A window will pop up with the item details for you to edit. If you cannot see the product you were looking for you can always search again by clicking the new product search button. EPOS 4 Excel v1.5.2 Website: epos4excel.weebly.com ©Martin Stokley 2011-2013 49 | P a g e Printing product search results On the product search results screen you have the option of sending the results to a printer. This only works with an ordinary printer attached to the computer, sending the results to a receipt printer will not work. 1. Click print button on the product search results screen 2. A window will pop up asking you which columns you wish to print. Tick the relevant columns and the click ok 3. A window will pop up giving you a list of printers available on the computer. From the list of printers click and highlight the printer you wish to send the search results to. 4. If you wish to change printer settings you can click the set up button 5. Click ok to print or cancel if you no longer wish to print. NOTE: Any changes you make to the active printer when printing a product search results will be temporary. Showing all products If you click on the show all products button on the products screen you will be shown a list of all products stored in E4E. Showing all products linked to a deal If you click on the show all products linked to a deal button on the products screen you will be show a list of all products linked to a deal. EPOS 4 Excel v1.5.2 Website: epos4excel.weebly.com ©Martin Stokley 2011-2013 50 | P a g e 7. Customer orders EPOS 4 Excel includes the ability to store customer orders which can then be processed later. NOTE: The customer orders features in EPOS 4 Excel v1.3 are incompatible with the orders features of earlier versions. To avoid any problems it is advisable to move any previous order files created by E4E from the E4E data storage folder to a separate location for archiving when upgrading to E4E v1.3. This way you can be sure all customer orders files in the storage folder will be compatible with this version of E4E. Entering details of a customer order 1. To enter details of a customer order click on the new customer order button which can be found on either the sales screen or the customer orders options screen. 2. A box will pop up asking for details about the order. Enter as much information as is possible. If the delivery details are the same as the customer details then ticking the ‘Delivery address same as customer address’ tickbox will automatically set the delivery address the same as the customer address. 3. Choose an order status. 4. To save the details of the order click the save button. NOTE: You must enter either a customer phone number or a customer email address to be able to save the order details. 5. You can also click the Hold order on draft button to keep the orders details without saving it. Clicking this button will close the pop up box but still keep the order details in the pop up box. The next time you click the new customer order button the pop up box will appear containing the details you have placed on draft. You can then continue editing it before saving. NOTE: Until you press the save button the order details will not be saved. 6. Alternatively you can click the cancel button to exit without saving and the order details will be cleared from the pop up box. EPOS 4 Excel v1.5.2 Website: epos4excel.weebly.com ©Martin Stokley 2011-2013 51 | P a g e EPOS 4 Excel v1.5.2 Website: epos4excel.weebly.com ©Martin Stokley 2011-2013 52 | P a g e Searching customer orders between specified dates On the customer orders options screen click the search orders button: 1. Enter the start date of the orders you wish to search. (Click the today button for today’s date) 2. Enter the end date of the orders you wish to search. (Click the today button for today’s date) NOTE: If you only want to search orders from a single date, set the start date as this and then tick the only show orders from a single date box. If you want to search all customer orders ever made then make the start date eg. 1/1/2010 and choose the end date as today. 3. Enter your search terms in the box: a) The customer order search is a case insensitive search. b) Customer orders are searched on a lose match and not exact match basis ie. searching for ‘bed’ would find orders containing ‘bed’ AND ‘bedroom’. c) If you put item codes in the ‘items ordered’ field of customer orders then entering an item code in the search terms box will find all customer orders containing that item code. 4. Choose the specific order status you want to search for 5. Click ok to search for orders containing your search terms between the specified dates. EPOS 4 Excel v1.5.2 Website: epos4excel.weebly.com ©Martin Stokley 2011-2013 53 | P a g e Viewing all orders between specific dates with a specific order status On the customer orders options screen click the search orders button: 1. Enter the start date of the orders you wish to view. 2. Enter the end date of the orders you wish to view. NOTE: If you only want to show orders from a single date, set the start date as this and then tick the only show orders from a single date box. 3. From the drop down list pick the order status you want to view. (Choosing ‘Any’ will show all orders of whatever status) 4. Leave the search terms box empty. 5. Click ok to view the orders. EPOS 4 Excel v1.5.2 Website: epos4excel.weebly.com ©Martin Stokley 2011-2013 54 | P a g e Editing a customer order from the list of search results 1. On the screen showing customer orders search results use the up / down arrow keys to highlight the order you wish to edit. 2. Click the edit an order button 3. Make any necessary changes and click save. (Cancel discards any changes you have made). 4. The order is now edited Printing customer orders from the list of search results On the screen showing customer orders search results it is possible to print the customer order details that are shown: 1. To print a highlighted order: Use the up / down arrow keys to highlight the order. Click the print highlighted button. Choose which printer you wish to print to (NOTE: You cannot print to a receipt printer). The details of the selected order should now print. 2. To print all orders that are shown: Click the print all button. Choose which printer you wish to print to (NOTE: You cannot print to a receipt printer). The details of all showing orders should now print. EPOS 4 Excel v1.5.2 Website: epos4excel.weebly.com ©Martin Stokley 2011-2013 55 | P a g e Editing a specific customer order If you know the specific date and order number of an order you wish to edit you can edit the order details quickly as follows: 1) 2) 3) 4) 5) 6) Click the edit an order button on the customer orders screen. Choose the date of the order. Enter the order number for order you wish to edit. Click Ok. The order details will be shown and you can edit them. Click save to keep any changes or cancel to discard any changes you have made. EPOS 4 Excel v1.5.2 Website: epos4excel.weebly.com ©Martin Stokley 2011-2013 56 | P a g e 8. Discounts and deals In E4E we distinguish between deals and discounts: Discounts – are added by the sales assistant during a sale. They can be discounts on individual items (percentage off an item price / item price change) or discounts off the whole sale (percentage discount off the whole sale / monetary discount off the whole sale) Deals – are sales promotions that are added automatically by E4E when a specific group of items appear in the sale basket (ie. buy X for Y / by X for £Y) and they only affect the specific items in the deal Setting up discount reasons In the EPOS settings you can define the possible reasons that a user can give for discounts when changing an item’s price or adding a discount to the whole sale. 1. On the EPOS setting screen click the discount reasons button 2. In the left hand column specify all the possible reasons for discounts off item prices or off the sale total. Keep these as short as possible and be aware that what you type here might appear on a receipt (in the case of discounts off the whole sale). 3. Tick the ‘force user to give reason for discounts off sale’ box if you would like the sales assistant to always give a reason for a discount off the sale. 4. Tick the ‘force user to give reason for item price changes’ box if you would like the sales assistant to always give a reason for an individual item price change / discount. NOTE: Changes to the discount reasons only affect the specific till they are made on. If you are running E4E on multiple tills over a network it is therefore a good idea to make the customisation changes to the discount reasons before you place copies of the E4E workbook on all your tills. For more information on adding discounts to a sale see the making sales with EPOS 4 Excel section of this manual. EPOS 4 Excel v1.5.2 Website: epos4excel.weebly.com ©Martin Stokley 2011-2013 57 | P a g e Setting up deals To set up deals click on the deal codes set up button on the deals screen and you will be presented with the following screen. E4E allows the defining of four different types of deal: Buy any X products from a selection and get the cheapest Y free Buy any X products from a selection and get them for £Y Buy X different products from a selection and get them for £Y Buy X or more of the same item and change item price to £Y The way you define the selection of products the deal applies to is by using an alpha-numeric deal code (eg. a, a1, sd3 etc.) EPOS 4 Excel v1.5.2 Website: epos4excel.weebly.com ©Martin Stokley 2011-2013 58 | P a g e 1. In the first column of the first free row enter a deal name (maximum 25 characters, if you type more than 25 characters E4E will reduce it to 25 characters). This deal name will appear on the receipt when the deal is used. 2. In the relevant column enter a deal code to represent the specific deal type eg. enter ‘a1’ in the ‘Buy any X and get the cheapest Y free’ to represent an instance of this deal type. 3. In columns X and Y enter the numeric values for the specific instance of this deal eg. for ‘buy any 3 and get the cheapest 1 free’ enter 3 in column X and 1 in column Y. The deal code is now set up and you now just need to link the products you want the deal to apply to with this deal code (see below). To save the changes you have made click the save changes button. Your changes will not be kept if you do not save the changes. Important things to note about deals are: Only one deal code can be entered per row on the deal codes set up screen. A product can only be linked to one deal code at a time. Deals cannot be used with products which can be sold in non-whole number quantities If you are using E4E on a network, then setting up the deals on one till will set up the deals and deal codes on all tills if you save the changes. NOTE: The order in which the discounts are applied to the sale is as follows: 1. Any deals 2. Then any monetary discount off the sale 3. Then any percentage discount off the sale. (Adding the monetary discount before the percentage discount works in the retailers favour) EPOS 4 Excel v1.5.2 Website: epos4excel.weebly.com ©Martin Stokley 2011-2013 59 | P a g e Examples of how common deals can be set up are: Deal Deal column to use Values for X and Y Notes: Buy one from a selection of products and get one free Buy one and get one of the same product free 3 for 2 on a selection of products Buy any X and get the cheapest Y free X=2 Y=1 Buy any X and get the cheapest Y free Buy any X and get the cheapest Y free X=2 Y=1 X=3 Y=1 3 for 2 on the same product Buy 2 of the same product for £10 Buy any 3 from a selection of products for £15.99 Buy 3 different products from a selection for £20 Buy product 1 AND product 2 for £10.99 Buy <5 of product then item price = £5, Buy 5 or more of product then item price = £4 Buy any X and get the cheapest Y free Buy any X for £Y X=3 Y =2 X=2 Y = 10 X=3 Y = 15.99 Link the deal code to each of the products in the deal Only link the deal code to one product Link the deal code to each of the products in the deal. Cheapest item is given free Only link the deal code to one product Only link the deal code to one product Link the deal code to each of the products in the deal. Link the deal code to each of the products in the deal. Only link the deal code to products 1 and 2 Set pricelist price for the item as £5. You can link a deal code for this deal to as many products as you like but it will only be applied to individual products if enough of that single product (ie. X or more) is being sold. Buy any X for £Y Buy X different for £Y X=3 Y = 20 Buy X different for £Y X=2 Y = 10.99 X=5 Y=4 Buy X or more of an item change item price to £Y EPOS 4 Excel v1.5.2 Website: epos4excel.weebly.com ©Martin Stokley 2011-2013 60 | P a g e Linking a product to a deal code After setting up the deal codes you now have to link these deal codes to the products in the individual deals. You can link individual deal codes to as many products as you like, for example: Imagine you had a selection of 10 products and you wanted the customer to be able to buy any 2 for £10. You would link a ‘buy any 2 for £10’ deal code to all 10 products. Then when the customer buys any two out of the ten items linked to the deal code the deal will be applied to the sale. OR imagine all products from one supplier were on a buy 2 for £10 you could link a buy 2 for £10 deal code to all products from that one supplier. There are two ways to link products to deal codes, firstly individually: 1. On the products screen click the add / alter product button. 2. Search for the product you wish to link to a deal code by entering the item code and clicking the find button 3. In the product deal code box enter the deal code of the deal that you wish to link the product to eg. if the specific deal you want the product to be linked to is represented by the deal code a1 then enter a1 into the deal code box. 4. Click the save alterations button. The product is now linked to this deal code. 5. Repeat the process for any other product linked to this deal code. 6. You deal is now set up completely and when adequate numbers of the products linked to the deal code are sold the deal will be added to the sale. You can also link many products to deal codes in one go. After setting up your deal codes you can produce an Excel workbook file containing: Column A: Item code / SKU Column B: The deal code you wish to link the item code in column A to (NO column headings or blank rows!) On the deals screen click the import product + deal code list button. Choose the Excel workbook you have just created. E4E will then link the chosen products to the respective deal codes. EPOS 4 Excel v1.5.2 Website: epos4excel.weebly.com ©Martin Stokley 2011-2013 61 | P a g e Showing all products linked to a deal Clicking the show all products linked to a deal button on the deals screen will bring a list up the list of all products which have been linked to a deal code, including their stock amounts. Removing a link between a single product and a deal code 1. On the products screen click the add / alter product button. 2. Search for the product you wish to link to a deal code by entering the item code and clicking the find button 3. Delete the contents of the product deal code box. 4. Click the save alterations button. The link between the product the deal code is now cleared. Removing links between all products and a specific deal code On the deals screen click the clear links between products and a specific deal code button. You will be asked to enter the deal code and then all links between it and all products will be cleared. Warning: This information will be unrecoverable, so it is advisable to back up your data before your do this!! Removing all links between products and deal codes Clicking the clear all links between products and ALL deal codes button on the deals screen will remove all links between all products stored in E4E and deal codes. Warning: This information will be unrecoverable, so it is advisable to back up your data before your do this!! EPOS 4 Excel v1.5.2 Website: epos4excel.weebly.com ©Martin Stokley 2011-2013 62 | P a g e 9. Reports E4E offers thirteen reports: Today’s sales total for all tills, End of day till reconciliation figures, Till reconciliation figures by date, Products sold report, Products refunded report, Products sold sales amount report, Refunds report, Tax by date report, Tax by transactions report, Tax by date / tax code report, Day full transaction report, Sales assistant total sales report and Stock reorder report. Those reports which are produced on an Excel worksheet you can always highlight the cells containing the report and cut / paste them to a new blank Excel worksheet. You will then be able to manipulate the report as appropriate. NOTE: The generation of reports assumes that all the sales data files created by E4E over the requested report time period are stored in the E4E storage folder location defined in the E4E files settings. NOTE: If you have swapped between sales data file formats of ASCII and Unicode (see sales data settings of this manual) then this may stop reports being produced from all your sales data due to the way Excel reads files. Setting E4E to ASCII sales data file format to allows E4E to read both ASCII and Unicode sales data files when producing reports. Setting E4E to Unicode sales data format only allows E4E to read Unicode sales data files and any ASCII files will be ignored in the production of report. If you change the sales data file settings back to ASCII then you will be then able to generate reports on all your sales data files again. EPOS 4 Excel v1.5.2 Website: epos4excel.weebly.com ©Martin Stokley 2011-2013 63 | P a g e End of day till reconciliation figures This report details how much was sold on a specific day on a specific till. It breaks the figures down into different payment types. 1. When you have finished selling for the day. On the daily sales report click the end of day till reconciliation button. 2. You will be asked which date and till number you wish to show the till reconciliation figures for. Today’s date is automatically chosen but you can change this if needed. Choose ‘this till’ for the current till number. Alternatively enter the date and the till number you want the reconciliation figures for. 3. A window will now pop up displaying the number of items sold and total amounts of each payment type have been taken for the specified day on the chosen till. 4. If sales were not made on that till number for that day a message will pop up explaining the reconciliation figures are not available 5. To print out the reconciliation totals for the selected till on a receipt click the print totals button. You can access the ‘End of day till reconciliation’ figures in the way detailed above at any point during the sales period of the day. If you do it will just give you a running total of what you have taken on that till until the moment when you view it. NOTE: For the till reconciliation totals to be fully calculated you will need to make sure the sales data stores the following: Payment Amounts 1 to 5, Payment Methods 1 to 5, Sale Total, Sale Total Tax, Transaction Number, Quantity EPOS 4 Excel v1.5.2 Website: epos4excel.weebly.com ©Martin Stokley 2011-2013 64 | P a g e Reasons why the end of day till reconciliation figures might not match the amounts actually in the till 1. Did you take any initial till float amount off the total amount in the till at the end of the day? 2. For payment methods where you do not give change eg. card or cheque then discrepancies are likely due to user error eg. recording the wrong payment method for a sale, not putting a sale through the till. For card sales you should be able to match up transactions marked as card in the E4E sales data with transactions on your card machine provider report for the card transactions for the day. 3. Did the sales assistant put through any coupons off the sale as gift token rather than a monetary discount off the sale? 4. If you are using multiple tills on a network and you have accidentally set two tills to have the same till number this will lead the end of day till reconciliation figures to be wrong (ie. the till reconciliations figures will end up being the sum of the amounts in both tills with the same till number rather than one till) Sales total for all tills On the reports screen you can click on the sales total for all tills. This will show the running total for what has been taken on all tills if you are running E4E on a network. If you are not running E4E on a network it will just display the total for the current till. EPOS 4 Excel v1.5.2 Website: epos4excel.weebly.com ©Martin Stokley 2011-2013 65 | P a g e Till reconciliation figures by date report The till reconciliation figures by date report provides a breakdown of how much of each payment type was taken on a specific till for a time period. 1. On the reports screen click the till reconciliation figures by date button 2. Choose the date perioed you require the report for and and enter the till number you wish to generate the report for. There are no sorting options for this report. To print this report to an ordinary (not receipt) printer click the print report button: 1. A box will pop up giving you a list of printers available on the computer. From the list of printers click and highlight the printer you wish to send the report to. 2. If you wish to change printer settings you can click the set up button 3. Click ok to print or cancel if you no longer wish to print. Any changes you make to the active printer when printing a report will be temporary. NOTE: For the till reconciliation figures by date report to be fully produced you will need to make sure the sales data stores the following: Payment Methods 1-5, Payment Amounts 1-5, Sale Total EPOS 4 Excel v1.5.2 Website: epos4excel.weebly.com ©Martin Stokley 2011-2013 66 | P a g e Day full transaction report The day full transaction report lists all transactions for a specific day and till, showing all the products / quantities in each transaction and also the gross item price after sale deal/disc (see sales data section of this manual for more details about gross item prices). The item column shows item code + item description. The payment methods column details each of the payment methods used in the sale: 3. On the reports screen click the day full transaction report button 4. Choose the date you require the report for and and enter the till number you wish to see the transactions on that date for. Click show transaction report. You can sort your report by time of sale, item, item amount or payment methods. To print this report to an ordinary (not receipt) printer click the print report button: 4. A box will pop up giving you a list of printers available on the computer. From the list of printers click and highlight the printer you wish to send the report to. 5. If you wish to change printer settings you can click the set up button 6. Click ok to print or cancel if you no longer wish to print. Any changes you make to the active printer when printing a report will be temporary. NOTE: For the day full transaction report to be fully produced you will need to make sure the sales data stores the following: Item Code, Item Description, Quantity, Transaction Number, Gross item price after sale deal/disc, Time of Sale and Payment Methods 1-5 EPOS 4 Excel v1.5.2 Website: epos4excel.weebly.com ©Martin Stokley 2011-2013 67 | P a g e Products sold report The products sold report lists all products and quantities sold (excluding refunds) in a user defined period. 1. On the reports screen click the products sold report button 2. Enter the start date for the report and the end date for the report. Click ok to produce the report or cancel to cancel. NOTE: The longer the time period you specify the longer it will take to produce the report. You can sort your report by description, qty sold, descrition 2 or description 3. The No. Txns (number of transactions) tells you in how many separate transactions the quantity of item was sold. This can indicate if your best selling item was in fact not the best selling one because it was only one person who bought that amount. To print this report to an ordinary (not receipt) printer click the print report button: 1. A box will pop up giving you a list of printers available on the computer. From the list of printers click and highlight the printer you wish to send the report to. 2. If you wish to change printer settings you can click the set up button 3. Click ok to print or cancel if you no longer wish to print. Any changes you make to the active printer when printing a report will be temporary. NOTE: For the products sold report to be fully produced you will need to make sure the sales data stores the following: Item Code, Item Description, Item Description 2, Item Description 3, Sale Total, Quantity, Transaction Number EPOS 4 Excel v1.5.2 Website: epos4excel.weebly.com ©Martin Stokley 2011-2013 68 | P a g e Products sold sales amount report The products sold sales amount report lists all products and quantities sold (excluding refunds) in a user defined period. It also shows the total sales amount of each item sold and the average unit price. If your price list includes tax then the total sales amount per item will include tax (Gross). If your price list excludes tax then the total sales amount per item will exclude tax (Net). 1. On the reports screen click the products sold report button 2. Enter the start date for the report and the end date for the report. Click ok to produce the report or cancel to cancel. NOTE: Average unit price = item total sales amount (gross) / qty of item sold NOTE: The longer the time period you specify the longer it will take to produce the report. You can sort your report by description, qty sold, total sale amount or average unit price. The No. Txns (number of transactions) tells you in how many separate transactions the quantity of item was sold. This can indicate if your best selling item was in fact not the best selling one because it was only one person who bought that amount. To print this report to an ordinary (not receipt) printer click the print report button: 1. A box will pop up giving you a list of printers available on the computer. From the list of printers click and highlight the printer you wish to send the report to. 2. If you wish to change printer settings you can click the set up button 3. Click ok to print or cancel if you no longer wish to print. Any changes you make to the active printer when printing a report will be temporary. NOTE: For the products sold report to be fully produced you will need to make sure the sales data stores the following: Item Code, Item Description, Net Item Price After Sale Deal/Disc, Gross Item Price After Sale Deal/Disc, Sale Total, Quantity, Transaction Number EPOS 4 Excel v1.5.2 Website: epos4excel.weebly.com ©Martin Stokley 2011-2013 69 | P a g e Products refunded report The products refunded report lists all products and quantities refunded in a user defined period. 1. On the reports screen click the products refunded report button 2. Enter the start date for the report and the end date for the report. Click ok to produce the report or cancel to cancel. NOTE: The longer the time period you specify the longer it will take to produce the report. You can sort your report by description, qty refunded, descrition 2 or description 3. The No. Txns (number of transactions) tells you in how many separate transactions the quantity of item was refunded. This can indicate if your most refunded item was refunded in one transaction or many and therefore the products refunded report can indicate if there are problems with a certain product. To print this report to an ordinary (not receipt) printer click the print report button: 1. A box will pop up giving you a list of printers available on the computer. From the list of printers click and highlight the printer you wish to send the report to. 2. If you wish to change printer settings you can click the set up button 3. Click ok to print or cancel if you no longer wish to print. Any changes you make to the active printer when printing a report will be temporary. NOTE: For the products refunded report to be fully produced you will need to make sure the sales data stores the following: Item Code, Item Description, Item Description 2, Item Description 3, Sale Total, Quantity, Transaction Number EPOS 4 Excel v1.5.2 Website: epos4excel.weebly.com ©Martin Stokley 2011-2013 70 | P a g e Refunds report The refunds report lists all refunds made in a user defined period. It shows the transaction number for the refund, the refund amount, the sales assistant who was responsible for the refund and any memo about the reason for the refund. This report can indicate if there are patterns of refunds by specific sales assistants. 1. On the reports screen click the refunds report button 2. Enter the start date for the report and the end date for the report. Click ok to produce the report or cancel to cancel. NOTE: The longer the time period you specify the longer it will take to produce the report. You can sort your report by refund amount and sales assistant. To print this report to an ordinary (not receipt) printer click the print report button: 1. A box will pop up giving you a list of printers available on the computer. From the list of printers click and highlight the printer you wish to send the report to. 2. If you wish to change printer settings you can click the set up button 3. Click ok to print or cancel if you no longer wish to print. Any changes you make to the active printer when printing a report will be temporary. NOTE: For the refunds sold report to be fully produced you will need to make sure the sales data stores the following: Sales Assistant Name, Sale Total, Quantity, Transaction Number, Sale Memo EPOS 4 Excel v1.5.2 Website: epos4excel.weebly.com ©Martin Stokley 2011-2013 71 | P a g e Sales assistant total sales report The sales assistant total sales report lists the gross sales (excluding refunds) for each sales assistant in a user defined period. 1. On the reports screen click the products sold report button 2. Enter the start date for the report and the end date for the report. Click ok to produce the report or cancel to cancel. NOTE: The longer the time period you specify the longer it will take to produce the report. You can sort your report by date, sales assistant or gross sales amount. To print this report to an ordinary (not receipt) printer click the print report button: 1. A box will pop up giving you a list of printers available on the computer. From the list of printers click and highlight the printer you wish to send the report to. 2. If you wish to change printer settings you can click the set up button 3. Click ok to print or cancel if you no longer wish to print. Any changes you make to the active printer when printing a report will be temporary. NOTE: For the products sold report to be fully produced you will need to make sure the sales data stores the following: Sales Assistant Name and Sale Total EPOS 4 Excel v1.5.2 Website: epos4excel.weebly.com ©Martin Stokley 2011-2013 72 | P a g e Tax by date report The tax by date report lists dates in a user defined period with total sales amount (gross) made on that day and total tax for that day. (Total sales amount = Total amount sold – Total amount refunded). NOTE: A negative amount indicates a refund. 1. On the reports screen click the tax by date report button 2. Enter the start date for the report and the end date for the report. Click ok to produce the report or cancel to cancel. NOTE: The longer the time period you specify the longer it will take to produce the report. You can sort your report by date, date tax amount and data sales amount. To print this report to an ordinary (not receipt) printer click the print report button: 1. A box will pop up giving you a list of printers available on the computer. From the list of printers click and highlight the printer you wish to send the report to. 2. If you wish to change printer settings you can click the set up button 3. Click ok to print or cancel if you no longer wish to print. Any changes you make to the active printer when printing a report will be temporary. NOTE: For the tax by date report to be fully produced you will need to make sure the sales data stores the following: Sale Total, Sale Total Tax EPOS 4 Excel v1.5.2 Website: epos4excel.weebly.com ©Martin Stokley 2011-2013 73 | P a g e Tax by transactions report The tax by transactions report lists all transactions in a user defined period with transaction number sale amount (gross), sale tax and quantity of items in the sale. A negative sale / sale tax amount indicates a refund. (Total sales amount = Total amount sold – Total amount refunded) 1. On the reports screen click the tax by date report button 2. Enter the start date for the report and the end date for the report. Click ok to produce the report or cancel to cancel. NOTE: The longer the time period you specify the longer it will take to produce the report. You can sort your report by date, tax amount, qty items and sales amount. To print this report to an ordinary (not receipt) printer click the print report button: 1. A box will pop up giving you a list of printers available on the computer. From the list of printers click and highlight the printer you wish to send the report to. 2. If you wish to change printer settings you can click the set up button 3. Click ok to print or cancel if you no longer wish to print. Any changes you make to the active printer when printing a report will be temporary. NOTE: For the tax by date report to be fully produced you will need to make sure the sales data stores the following: Transaction number, Sale Total, Sale Total Tax EPOS 4 Excel v1.5.2 Website: epos4excel.weebly.com ©Martin Stokley 2011-2013 74 | P a g e Tax by date / tax code report The tax by date / tax code report lists all used tax codes in a user defined period with % tax rate, net sales for that tax code, gross sales for that tax code and total tax for that tax code. A negative amount indicates a refund. (Total amount = Total amount sold – Total amount refunded) NOTE: Amount are calculated to 3 decimal places to avoid introducing rounding errors which could lead to the daily figures for each tax code not adding up to the tax by date report figure. 1. On the reports screen click the tax by date report button 2. Enter the start date for the report and the end date for the report. Click ok to produce the report or cancel to cancel. NOTE: The longer the time period you specify the longer it will take to produce the report. You can sort your report by tax code and % tax rate To print this report to an ordinary (not receipt) printer click the print report button: 1. A box will pop up giving you a list of printers available on the computer. From the list of printers click and highlight the printer you wish to send the report to. 2. If you wish to change printer settings you can click the set up button 3. Click ok to print or cancel if you no longer wish to print. Any changes you make to the active printer when printing a report will be temporary. NOTE: For the tax by date report to be fully produced you will need to make sure the sales data stores the following: Net Item Price After Sale Deal/Disc, Gross Item Price After Sale Deal/Disc, Item % Tax, Tax Class EPOS 4 Excel v1.5.2 Website: epos4excel.weebly.com ©Martin Stokley 2011-2013 75 | P a g e Stock Reorder Report The stock reorder report lists all products whose quantity in stock amount is equal to or below their item stock reorder level amount. To generate the stock reorder report, on the reports screen click the stock reorder report button. You can sort your report by description, qty in stock, description 2 and description 3. To print this report to an ordinary (not receipt) printer click the print report button: 1. A box will pop up giving you a list of printers available on the computer. From the list of printers click and highlight the printer you wish to send the report to. 2. If you wish to change printer settings you can click the set up button 3. Click ok to print or cancel if you no longer wish to print. Any changes you make to the active printer when printing a report will be temporary. NOTE: The stock reorder report ignore any items that have item stock reorder level with a negative number. If you wish to stop an product appearin g on the stock reorder report (eg. if it is no longer available) then change its item stock reorder level to a negative number. EPOS 4 Excel v1.5.2 Website: epos4excel.weebly.com ©Martin Stokley 2011-2013 76 | P a g e 10. Tax settings Product prices include tax vs. product prices exclude tax In EPOS 4 Excel you can decide if the product prices stored include or exclude tax. To choose between prices including or excluding tax on the EPOS settings screen click the tax settings button and make the appropriate choice from the options. NOTE: Some functions of E4E will alter depending on the choice you make here. The content of the sales receipt that E4E prints depends on which setting you choose. If your prices include tax then a breakdown of total price excluding tax is shown on the receipt. If your prices exclude tax then a subtotal excluding tax will be shown on the receipt, the amount of tax that is due and then a final total. See example receipts below to see the difference. If your prices include tax then the maximum monetary discount you can take off the sale is full sale total (including tax). If your prices exclude tax then the maximum monetary discount you can take off the sale is the sale subtotal before tax is added. If you try to add more than this then sale monetary discount will default to the maximum possible amount. EPOS 4 Excel v1.5.2 Website: epos4excel.weebly.com ©Martin Stokley 2011-2013 77 | P a g e Receipt for prices including tax Receipt for prices excluding tax EPOS 4 Excel v1.5.2 Website: epos4excel.weebly.com ©Martin Stokley 2011-2013 78 | P a g e Editing tax classes / codes. The tax settings in E4E should be edited so that every tax class / code that appears on your product list also appears in the tax class settings. WARNING: Changing the % tax settings in the middle of a sales session could cause problems with the sales data as the same product could be sold at different % tax rates. To edit the tax class settings, on the EPOS settings screen click the tax settings button. 1. In the first column edit the Tax Class codes 2. In the second column edit % tax rates linked the tax class codes 3. Click the ‘Return to options’ button. The tax class code in the first column can be any combination of characters. This code is used to link products to a specific % tax rate. The % tax rate in the second column must be a percentage to a maximum of two decimal places. If you are using E4E with multiple tills connected over a network then altering the tax class settings on one till will update all tills. EPOS 4 Excel v1.5.2 Website: epos4excel.weebly.com ©Martin Stokley 2011-2013 79 | P a g e 11. Gift Vouchers EPOS 4 Excel enables you to print and redeem gift vouchers. You can also still use E4E with preprinted gift vouchers and add these as a payment method in a sale. The E4E gift voucher functions give you the ability to print and redeem your own gift vouchers as well. On the EPOS settings screen click on the gift vouchers button which will bring up the gift vouchers screen. Setting up gift vouchers Enabling gift vouchers On the main gift vouchers screen you can enable or disable the gift vouchers functions of E4E. Ticking the tick box to disable gift voucher functions means you will not be able to print and redeem active gift vouchers during sale payments. NOTE: You can only enable the gift voucher functions if you have the ‘free3of9’ true type barcode font installed on your computer. See section 4 (Setting up EPOS 4 Excel for use) of this manual for more details about installing the font. EPOS 4 Excel v1.5.2 Website: epos4excel.weebly.com ©Martin Stokley 2011-2013 80 | P a g e Editing gift voucher expiry time On the main gift vouchers screen you can enter a number specifying how may years a gift voucher will remain active before it expires. The expiry date will then be printed on the on the gift voucher. NOTE: You can enter any positive number including decimals eg. 1.5 for one and a half years. NOTE: E4E assumes a year = 365 days. If you want a voucher to expire after a number of days calculate and enter the fraction _D_ 365 where D is the number of days you wish the voucher to remain active for. Setting the gift voucher item code To use gift vouchers you will need to create a product on your product list which will represent gift vouchers. This will be the item you will sell when you sell gift vouchers. Create this product with a price of 0.00 and then when selling the gift voucher you will be able adjust the item price to equal the voucher total you are selling. Also set the tax code of this gift voucher for the relevant tax rate when selling gift vouchers in your country (eg. in the UK gift vouchers sold have 0% VAT).Enter the item code for this gift voucher product you create on the main gift vouchers screen. E4E will then know when it sees this item code in a sale it needs to print and activate a gift voucher. Note on gift voucher codes Gift vouchers in E4E are given a unique random 10 character alphanumeric code, so this gives 36^10 different combinations! To stop repeat gift voucher codes being generated, E4E after it has generated a voucher code checks to see if this one has already been activated. If so, E4E will generate a new one and repeat the process. The only way a gift voucher code could be repeated is if the original activated voucher with this code has expired / been fully redeemed and then deleted from E4E. So there should be no way that two activated gift vouchers with the same voucher codes will ever exist. If a person partially redeems a gift voucher then the balance of the gift voucher is updated and a new gift voucher printed, but the gift voucher code is not altered. It is recommended that when a person redeems a gift voucher you do not give it back to them. Only give them any gift voucher printed as change (which will have the same gift voucher code as one they have redeemed). This stops potentially more than one gift voucher with the same voucher code being in circulation. EPOS 4 Excel v1.5.2 Website: epos4excel.weebly.com ©Martin Stokley 2011-2013 81 | P a g e Customising the gift voucher template Click on the gift voucher template button on the main gift vouchers screen to edit the gift voucher template. 1. On the gift voucher template screen click the Excel ‘review’ menu (top of screen) and select ‘unprotect sheet’ 2. You can click once on the ‘EPOS 4 Excel’ logo at the top of the voucher template and press the ‘delete’ key on your keyboard to delete the logo. Click on the Excel ‘Insert’ menu and select ‘picture’. Choose the file containing your company logo picture and insert it into the empty space which is now at the top of the voucher template. Move and adjust the size of the new logo to make it fit as appropriate. Adjust the logo row height such that the logo fits completely in the first row of the receipt. 3. You can edit the layout of all rows on the voucher template but gift voucher details will appear on rows 9, 11, 12, 14, 17. You can alter the font of rows 9, 12, 14, 17 but not the font in row 11. 4. You can edit template width by hovering the mouse pointer over the boundary between the headings for column A and B. The mouse pointer should change. Click with left mouse button to drag and make the gift voucher template (column A) wider or narrower. Alternatively enter a value in the gift voucher template width box (Note: This value is in centimetres. Default width is 6.62cm and values need to be between 0 and approx. 50cm) 5. Alter the value for barcode font size as appropriate. NOTE: The smaller the barcode size the more difficult it may become for a barcode scanner to read. 6. Click on the Excel review menu and select ‘protect sheet’. Click ‘ok’ in the pop up box WITHOUT changing any of the other settings in the pop up box. 7. The gift voucher template has now been customised. You can print a test voucher to see how it looks by clicking the print test gift voucher button. NOTE: Changes to the gift voucher template only affect the specific till they are made on. If you are running E4E on multiple tills over a network it is therefore a good idea to make the customisation changes to the gift voucher template before you place copies of the E4E workbook on all your tills. NOTE: The gift voucher template layout assumes it will be printed on a receipt printer but you can also print it on an ordinary printer. EPOS 4 Excel v1.5.2 Website: epos4excel.weebly.com ©Martin Stokley 2011-2013 82 | P a g e Selling gift vouchers 1. 2. 3. 4. To sell a gift voucher make sure gift voucher functions in E4E are enabled. On the sale screen enter the item code for the gift voucher Change the item price to equal the total amount of the voucher you are selling You can sell more than one gift voucher at a time therefore add any other gift vouchers to the sale either by changing the quantity of the gift voucher to greater than one or by adding further gift voucher items to the sale. 5. Proceed through making payments as normal. Your gift vouchers will be printed when you complete the sale. NOTE: You will be asked if the gift voucher printed ok. If not click ‘no’ to reprint. YOU WILL NOT BE ABLE TO REPRINT A GIFT VOUCHER LATER. EPOS 4 Excel v1.5.2 Website: epos4excel.weebly.com ©Martin Stokley 2011-2013 83 | P a g e Redeeming gift vouchers To redeem a gift voucher either scan its barcode or manually enter its voucher code into the gift voucher code box. Pressing the enter key in the gift voucher code box automatically redeems the voucher. If you click the balance button you will be told the balance of that gift voucher and it won’t be redeemed. Vouchers are not fully redeemed till you click the complete sale button, cancelling the sale will leave gift vouchers unredeemed. NOTE: When manually entering the voucher code you don’t have to worry about typing capital letters. E4E will automatically transform all lowercase letters to capital letters. NOTE: Some barcode scanners automatically add an enter key press to the end of barcodes they scan and so scanning the barcode into the gift voucher code box will automatically redeem them. In this case if you wish to just check the balance of gift voucher then manually enter the voucher code and click the balance button. NOTE: If the gift voucher has expired then E4E will inform you of this. There is no option to reactivate expired gift vouchers. NOTE: If you are redeeming pre-printed gift vouchers as well as E4E gift vouchers in the same sale. Enter the amount of pre-printed gift vouchers being redeemed in the gift voucher payment box BEFORE redeeming any E4E gift vouchers. After you have redeemed E4E gift vouchers you won’t be able to change the amount in the gift voucher payment box. You can choose to give any sale change as cash or a gift voucher. Any gift voucher generated as change will have a new expiry date determined from the current date and will not have the same expiry date as the voucher that was redeemed. EPOS 4 Excel v1.5.2 Website: epos4excel.weebly.com ©Martin Stokley 2011-2013 84 | P a g e Printing a gift voucher for a refund Proceed through the refund process as normal. After clicking the payment button, if you enter the refund amount in the gift voucher refund amount box you will then be asked when you complete the refund if you want to print a gift voucher. Click yes if you do or no if you don’t. Giving sale change as a gift voucher Proceed through the sale process as normal. After clicking the payment button, if you click the give sale change as gift voucher option then a gift voucher for the sale change will be printed. Showing active gift vouchers On the main gift vouchers screen click the show active gift vouchers to see a report of activated gift vouchers, their values and expiry dates. This will show you your total gift voucher liability Deleting zero balanced and expired gift vouchers E4E stores details of all activated gift vouchers until you delete them. When a gift voucher is fully redeemed E4E still stores details about this gift voucher but with zero balance. E4E does not automatically delete activated gift vouchers when they have passed their expiry date. To delete details of any gift vouchers with zero balance (ie. ones that have been fully redeemed) click the delete zero balance vouchers button on the main gift vouchers screen To delete details of any expired gift vouchers click the delete expired vouchers button on the main gift vouchers screen Warning: You will not be able to retrieve this information after it has been deleted. EPOS 4 Excel v1.5.2 Website: epos4excel.weebly.com ©Martin Stokley 2011-2013 85 | P a g e 12. Receipt settings E4E offers you the option to print two types of receipt, either a ‘narrow receipt’ using a specialist receipt printer or a ‘wide receipt’ using an ordinary printer. In this section we describe how to alter the layout and settings for both narrow receipts and wide receipts. NOTE: The content of the receipt will depend on whether you choose product prices to include or exclude tax in E4E. See the tax settings section of this manual for more details. Accessing the Receipt Settings On the EPOS settings screen click on the receipt settings button which will bring up the following screen: On the receipt settings screen you can choose whether E4E will print narrow or wide receipts. Changing the active printer You can change the active printer to which receipts will be printed by clicking on the change printer button on the receipt settings screen. 1. A box will pop up giving you a list of printers available on the computer. From the list of printers click and highlight the printer you wish to send receipts to. 2. If you wish to change printer settings you can click the set up button. 3. Click ok to change the active printer or cancel if you no longer wish to change the active printer. EPOS 4 Excel v1.5.2 Website: epos4excel.weebly.com ©Martin Stokley 2011-2013 86 | P a g e Setting up narrow receipts for use Customising the company logo and company details on the wide receipt template: 1. On the edit narrow receipt template screen click the Excel ‘review’ menu (top of screen) and select ‘unprotect sheet’ 2. Click once on the ‘EPOS 4 Excel’ logo at the top of the receipt template and press the ‘delete’ key on your keyboard to delete the logo. 3. Click on the Excel ‘Insert’ menu and select ‘picture’. Choose the file containing your company logo picture and insert it into the empty space which is now at the top of the receipt template. Move and adjust the size of the new logo to make it fit as appropriate. 4. Adjust the value for the logo row height such that the logo fits completely in the first row of the receipt. 5. You can edit template width by hovering the mouse pointer over the boundary between the headings for column A and B. The mouse pointer should change. Click with left mouse button to drag and make the narrow receipt template (column A) wider or narrower. Alternatively enter a value in the receipt template width box (NOTE: Value is in centimetres, default value = 6.62cm, values should be between 0 and approx. 50cm). 6. Alter fonts and font sizes on the receipt as appropriate. 7. As appropriate edit the lines of the receipt template containing the company address, company phone number, VAT number and company number. Do not alter the receipt template below row 7 as this part of the receipt will hold the sale details. 8. Alter the value for blank row height as appropriate. The small the blank row height then the less space blank rows on the receipt will take up. This can be useful if you want to save paper usage. 9. Click on the Excel review menu and select ‘protect sheet’. Click ‘ok’ in the pop up box WITHOUT changing any of the other settings in the pop up box. 10. The receipt template has now been changed. You can print a test receipt by clicking the print test receipt button on the narrow receipt template screen. NOTE: Changes to the narrow receipt template only affect the specific till they are made on. If you are running E4E on multiple tills over a network it is therefore a good idea to make the customisation changes to the receipt template before you place copies of the E4E workbook on all your tills. EPOS 4 Excel v1.5.2 Website: epos4excel.weebly.com ©Martin Stokley 2011-2013 87 | P a g e Setting up wide receipts for use Customising the company logo and company details on the wide receipt template: 1. On the edit wide receipt template screen click the Excel ‘review’ menu (top of screen) and select ‘unprotect sheet’ 2. Click once on the ‘EPOS 4 Excel’ logo at the top of the receipt template and press the ‘delete’ key on your keyboard to delete the logo. 3. Click on the Excel ‘Insert’ menu and select ‘picture’. Choose the file containing your company logo picture and insert it into the empty space which is now at the top of the receipt template. Move and adjust the size of the new logo to make it fit as appropriate. 4. As appropriate edit the columns A and B of the wide receipt template which contain the company address, company phone number, VAT number and company number. Do not alter the receipt template below row 8 as this part of the receipt will hold the sale details. 5. Alter fonts and font sizes as appropriate. 6. Click on the Excel review menu and select ‘protect sheet’. Click ‘ok’ in the pop up box WITHOUT changing any of the other settings in the pop up box. 7. The logo and company details on the receipt have now been changed. You can print a test receipt to see how your new logo and company information looks on the wide receipt by clicking the print test receipt button on the wide receipt template screen. NOTE: Changes to the wide receipt template only affect the specific till they are made on. If you are running E4E on multiple tills over a network it is therefore a good idea to make the customisation changes to the receipt template before you place copies of the E4E workbook on all your tills. EPOS 4 Excel v1.5.2 Website: epos4excel.weebly.com ©Martin Stokley 2011-2013 88 | P a g e Receipt layout settings which apply to both narrow and wide receipts: Changing the font used on receipts When you have unprotected the receipt template you can highlight the columns of the wide or narrow receipt template and change the font using the Excel home tab on the ribbon. Remember to protect the receipt template worksheet and save the E4E worksheet to keep changes. Changing how many characters of the item description are to appear on the receipt On the receipt settings screen enter in the appropriate box the number of the characters of the item description you wish to display on the receipt. NOTE: This needs to be a whole number! We recommend about 20 characters if you are printing narrow receipts and if you want to print the whole description on a wide receipt we suggest using a large number such as 9999. Displaying the item code rather than the item description on the receipt You can choose to display only the item code rather than the item description on the receipt by ticking the checkbox on the receipt settings screen. Displaying full tax details on the receipt You can decide whether to print the full tax details of the sale on the receipt by ticking the checkbox on the receipt settings screen. Include a manual reference number on the receipt You can decide whether to ask the sales person to input a reference number to be shown on sale receipt by ticking the checkbox on the receipt settings screen. If this option is enabled then when you complete a sale you will be asked for the reference number before the receipt is printed. NOTE: This reference number is NOT stored in E4E, so if you require it to be stored then it is suggested you input it in the sale memo field on the full payments screen when completed the sale. Adjusting the sales tax name which appears on a receipt On the receipt settings screen you can set the name of the sales tax for your country which will appear on your receipts by entering it in the box. When you download E4E this is by default set as VAT for the UK. Be careful about the length of the sales tax name you input here as it could cause issues with the receipt layout when printing receipts. Use abbreviations where possible for the sales tax name eg. VAT instead of ‘Value Added Tax’ or GST instead of ‘Goods and Services Tax’. For a list of sale tax abbreviations by country see: http://en.wikipedia.org/wiki/Value_added_tax#Tax_rates EPOS 4 Excel v1.5.2 Website: epos4excel.weebly.com ©Martin Stokley 2011-2013 89 | P a g e Editing the message at the end of receipt 1. To change the receipt message on the receipt settings screen click the edit receipt message button. 2. A window will pop up and allow you edit the message. You can insert spaces and carriage returns (enter key on your keyboard) to adjust the layout of the receipt message. The receipt message will always appear centred on the receipt. Click the save & close button to save any changes or the cancel button to discard any changes you have made. 3. Click the print test receipt button to print out a sample receipt containing the new message. 4. The receipt message should now be changed from the next sale onwards. NOTE: If you are running E4E on multiple tills over a network then altering the receipt message on one till will alter it on all tills. EPOS 4 Excel v1.5.2 Website: epos4excel.weebly.com ©Martin Stokley 2011-2013 90 | P a g e Printing VAT in UK pounds on the receipt when using a different currency E4E enables you print both a sale’s VAT in UK pounds (£) and in the current E4E currency on the receipt. You can enable this option on the EPOS settings screen by ticking the checkbox and entering the appropriate exchange rate. For details of why the option is included, see the UK VAT rules for a UK registered company that makes some sales in a foreign currency: http://www.hmrc.gov.uk/vat/managing/international/foreign-currency.htm (Accessed 13/3/2012) Printing a test receipt On the receipt settings screen clicking the print test receipt button will print either a narrow receipt or wide receipt dependent on the current user selection for receipts. This enables you to check your printer is working without having to make a sale OR to check you are happy with any changes to receipt layout that you have made. EPOS 4 Excel v1.5.2 Website: epos4excel.weebly.com ©Martin Stokley 2011-2013 91 | P a g e Reprinting receipts There are two ways you can reprint receipts in E4E: 1. On the current sale screen you can click the ‘reprint last receipt’ button to reprint the last receipt that E4E generated. This button will only be enabled if you have the print sales receipts box ticked. 2. On the main options screen you can click the ‘reprint a receipt’ button. This will ask you for the specific transaction number of the receipt you wish to reprint eg. BS14042013T1N23. Fill out the numbers of the transaction number on the window and the click print. 3. EPOS 4 Excel v1.5.2 Website: epos4excel.weebly.com ©Martin Stokley 2011-2013 92 | P a g e 13. The sales data, customer order data and system data Choosing the sales data file format On the sales data settings you have the option of choosing an ASCII sales data file format or a Unicode sales data file format. The ASCII sales data file format will cope with English letters but not non-English characters. The ASCII sales data file has a COMMA as its delimiter. The Unicode sales data file format will enable you to use non-English characters in the sales data. The Unicode sales data file has a TAB as its delimiter. NOTE: Swapping between sales data file formats may cause issues with generating reports. See the reports section of this manual for more information. This setting will need to be set to be the same on each individual instance of E4E running on your network. EPOS 4 Excel v1.5.2 Website: epos4excel.weebly.com ©Martin Stokley 2011-2013 93 | P a g e A single sales data file or one for each till? If you are using E4E on multiple tills over a network you can choose to store the sales data in individual files for each till or in one file for all tills. To choose this, on EPOS settings screen click the sales data settings button. Then tick / untick the save sales data in a single file rather than a separate file for each till checkbox as appropriate. This setting will need to be set up to be the same on each individual instance of E4E running on your network. Create sales data back-up files If you tick the create sales data back-up files option on the sale data settings screen then E4E will created a back up of the sales data in the same folder that the sales data is stored. The back-up filename will have a file extension *.bak and will be a duplicate of the sales data file. EPOS 4 Excel v1.5.2 Website: epos4excel.weebly.com ©Martin Stokley 2011-2013 94 | P a g e Accessing the orders and sales data The sales data and orders data will be found in the data storage folder for E4E. To find this on the EPOS settings screen click the file settings button. You will find the storage folder details on this screen. Either navigate to this folder manually to access the files or click on the show contents of storage folder button to open a window showing the files in the storage folder.E4E data files are named as follows: If you choose a sales data file for each till: salesDDMMYYYYTX.CSV where DDMMYYYY is the date when the sales were made and X is the Till number upon which the sales were made. This is a comma separated values file. If you choose a single sales data file for all tills: salesDDMMYYYY.CSV where DDMMYYYY is the date when the sales were made. This is a comma separated values file. If you choose to create a back-up sales data file: salesDDMMYYYYTX.bak OR This is a comma separated values file and is a duplicate of salesDDMMYYYY.bak the sales .CSV file. The customer orders data file: ordersDDMMYYYY.XLSX where DDMMYYYY is the date when the customer orders / enquiries were made. This is an Excel workbook file. If you save the sales data under the system date then every day E4E will automatically start new sales data / customer orders data files and name them in the above format. NOTE: When manually processing the sales data files only work on a copy. Copying the file means you don’t destroy the original sales data during processing and therefore the original sales data can always be accessed again. (IMPORTANT: See KNOWN ISSUE 1 box later in this chapter) Also note that generation of reports depends on the sales data files being in the same order / layout as E4E created them – if you wish to change the layout (eg. sorting them) then only do this on a copy of the file which is stored in the storage folder. EPOS 4 Excel v1.5.2 Website: epos4excel.weebly.com ©Martin Stokley 2011-2013 95 | P a g e Customising the layout of the sales data On the sales data settings screen (available through the EPOS settings screen) it is possible to customise the layout of the sales data in the .CSV file that E4E generates. You can choose which piece of data will appear in which column of the sales data file by choosing the column options from the drop down lists and then clicking the save sales data column changes button to complete your changes. This is useful if you will be importing the sales data to an accounting software package. You can layout the sales data in a format identical or near identical to the format you need for importing. NOTE: Changing the column settings will have to be done separately for each till running on a network unless you customise the E4E workbook and then place a new copy of it on each till. The options for what the sales data columns can contain are as follows: Warning: If you do not choose to include a specific option in the sales data then that specific data regarding the sale will not be kept. It is advisable to make sure the sales data records all possible information regarding the sale even if you think you will not need it just in case you do need it in the future. Information regarding the sale not saved in the sales data will be lost irretrievably. Warning: If you do not choose to include a specific option in the sales data then this may stop E4E being able to produce reports from the sales data. To produce reports your sales data will need to include the following: Payment Amounts 1 to 5, Payment Methods 1 to 5, Sale Total, Sale Total Tax, Transaction Number, Quantity, Item Code, Item Description, Item Description 2, Item Description 3, Sales Assistant Name, Sale Memo, Net Item Price After Sale Deal/Disc, Gross Item Price After Sale Deal/Disc, Item % Tax, Tax Class EPOS 4 Excel v1.5.2 Website: epos4excel.weebly.com ©Martin Stokley 2011-2013 96 | P a g e Column Option Transaction Number Description Each individual sale is allocated a unique transaction number in the following format: BS13082011T1N12 Transaction Number can be interpreted as follows: The first section: The next eight numbers: The next letter and numbers: The last letter and numbers: Item Code Item Description Quantity Net Item Price After Sale Deal/Disc Net Item Price Before Sale Deal/Disc Sale Total Tax Payment Method 1 Payment Method 2 Payment Method 3 Payment Method 4 Payment Method 5 The transaction number prefix chosen on the sales data settings screen DDMMYYYY = the date that the sale was made on T = Till and the number following it will be till number N and numbers following it signify the number of the sale on that till for that day The SKU / Item code of a product in the sale. See also the ‘KNOWN ISSUE 1’ box below The description of the product identified by the item code in this row of the sales data How many of the item (identified by the item code in this row of the sales data) was sold The price (excluding tax) of the item identified in this row of the sales data AFTER any deals / discounts have been applied. See also the ‘KNOWN ISSUE 2’ box below The price (excluding tax) of the item identified in this row of the sales data before any deals / discounts have been applied. See also the ‘KNOWN ISSUE 2’ box below The total amount of tax on the whole sale. NOTE: This will only appear on the first row of the sale in the sales data The different payment types the customer used to pay for the sale eg. ‘cash’, ‘card’ etc. Payment Method 1 will be the first payment type the customer used, Payment Method 2 will be the second payment type the customer used. If a customer uses less than five payment types then unused payment methods will be left blank in the sales data. NOTE: If you choose to record the nominal code and not the payment type in the sales data on the EPOS settings screen, then this column will contain the nominal code identifying the payment method and not words describing the payment type EPOS 4 Excel v1.5.2 Website: epos4excel.weebly.com ©Martin Stokley 2011-2013 97 | P a g e Payment Amount 1 Payment Amount 2 Payment Amount 3 Payment Amount 4 Payment Amount 5 Gross Item Price After Sale Deal/Disc Gross Item Price Before Sale Deal/Disc Sale Total Time of Sale Sale Memo Vouchers Tax Class Item % Tax Till Currency Date of Sale Till Number The different payment amounts the customer used to pay for the sale ie. Payment Amount 1 will be the amount the customer paid using Payment Method 1 and so on. For any unused payment methods the payment amount will be left blank in the sales data. NOTE: Payment amounts will only appear on the first row of the sale in the sales data. NOTE: Payment amounts in the sales data are the actual amounts that the sales assistant enters in the payments box. However the cash payment amount will be the cash amount entered in the payments box less any change given. Therefore if a customer pays for a £9 sale with a £10 gift token, the cash payment amount in the sales data will be -£1 signifying £1 was given in change. The price (including tax) of the item identified by the item code in this row of the sales data AFTER any deals and discounts have been applied. See also the ‘KNOWN ISSUE 2’ box below The price (including tax) of the item identified by the item code in this row of the sales data BEFORE any deals or discounts have been applied. See also the ‘KNOWN ISSUE 2’ box below The total price of the whole sale (including tax). NOTE: This will only appear on the first row of the sale in the sales data The time of the sale NOTE: This will only appear on the first row of the sale in the sales data Contains any memo the user entered during the payments process. In addition the sale memo will also contain a notification if the sale is a prepaid customer order. If it is a refund the sale memo will contain the reason the sales assistant gave for the refund NOTE: The sale memo will only appear on the first row of the sale in the sales data. See also the ‘KNOWN ISSUE 3’ box below. Contains information about any E4E gift vouchers that have been redeemed or activated. See also the ‘KNOWN ISSUE 3’ box below. The tax class of the item (NOT of the whole sale!) identified by the item code in this row of the sales data The % tax rate that applies to the item identified by the item code in this row of the sales data. The item % tax is included as in the future you may change the % tax rate linked to a tax code in E4E. Storing the item % tax rate in the sales data means you will always know what the % tax rate for this item was when it was sold even if you changed the % tax rate later. The currency symbol and therefore currency that E4E is currently working in. The date of the sale The number of the till that made the sale EPOS 4 Excel v1.5.2 Website: epos4excel.weebly.com ©Martin Stokley 2011-2013 98 | P a g e Sale Number Sales Assistant Name Sale Deals/Discounts Item Price Change/Disc Item Product List Price Description 2 Description 3 Empty The number of the sale on the till that made the sale NOTE: Sale number will begin again 1 for every new day of sales The first name of the sales assistant who was using the till if this was entered on the sales screen This contains a string listing the deals and discounts (and reasons) applied to the whole sale. This will be the same wording that appears on the sale receipt. See also the ‘KNOWN ISSUE 3’ box below NOTE: This will only appear on the first row of the sale in the sales data This contains a string listing any price changes / discounts applied to item identified by the item code in this row of the sales data. See also the ‘KNOWN ISSUE 3’ box below The price on the product list of the item identified by the item code in this row of the sales data Description 2 of the of the item identified by the item code in this row of the sales data Description 3 of the item identified by the item code in this row of the sales data A blank column NOTE: Each separate sale in the sales data can be identified by the different transaction numbers. All the products from one specific sale will have the same transaction number and are recorded on consecutive rows. The payment amounts, sale total, memo, sale total tax and time of sale will only appear in the row containing the first product in the sale. The rest of the sales data options will appear on every row of the sale. NOTE: Columns AA (Till Number) is the sales data is fixed and you cannot change it. Column AA (Till Number) is used by E4E for calculating the reports from the stored daily sales data. Example Sales data from a sales data .CSV file: EPOS 4 Excel v1.5.2 Website: epos4excel.weebly.com ©Martin Stokley 2011-2013 99 | P a g e KNOWN ISSUE 1: Due to the way Excel imports .CSV files when you open a sales data file the item code column is imported as text and not a number. If you choose to save any changes you make to the sales data .csv file you can lose data about the item code eg. Original item code = 9780830759668 This gets imported as text and is shown in the item code column as 9.78083E+12 At this point in time the full item code is still stored in your Excel worksheet. You save changes to the sales data file .csv file and Excel converts 9.78083E+12 to 9780830000000 Which means you lose the last seven digits of the item code and they become replaced by zeros. This is an issue with the way Excel handles .csv files and not with E4E. To avoid this happening when manually processing a sales data file open the .csv sales data file, save it as an Excel workbook and then make any alterations to this Excel workbook. This means you have your original sales data .csv file which contains the original data with no data lost and you also have the Excel workbook you created containing the full processed data with no data loss. KNOWN ISSUE 2: If you choose item prices to include tax in E4E then:E4E calculates the net item price (excluding tax) from the gross item price using the VAT fraction method (See appendix C). This can introduce an unavoidable rounding error when calculating the net item prices. Therefore sometimes adding up the net prices for a sale in the sales data and then adding the total sale tax does not quite equal the actual sale total. If you choose item prices to exclude tax in E4E then:E4E calculates the individual gross item prices (including tax) from the net item prices using. This could introduce an unavoidable rounding error when calculating the tax due on an item. Therefore sometimes adding up the gross prices for a sale in the sales data may not always quite equal the actual sale total. The tax due on the whole sale is calculated from the sum of tax due in each item in the sale without rounding and only then is it rounded at the end. KNOWN ISSUE 3: Due to the way Excel imports .CSV files the ‘sale memo’, ‘Vouchers’, ‘Sale Deals/Discounts’ and ‘Item Price Change/Disc’ columns in the sales data, cells may contain more text than is visible when you first open the sales data in Excel. If you highlight the whole column and select the ‘wrap text’ option in Excel then any extra text in the cells will become visible. EPOS 4 Excel v1.5.2 Website: epos4excel.weebly.com ©Martin Stokley 2011-2013 100 | P a g e Understanding the different item prices that appear in the sales data E4E enables you to store various different item prices in the sales data. Here we clarify the links between these prices: Prices Include Tax (Gross) Prices Exclude Tax (Net) NOTES: Item Product List Price (which includes tax) Item Product List Price (which excludes tax) This is the item price on the product list in E4E Gross Item Price Before Sale Deal/Disc Net Item Price Before Sale Deal/Disc Gross Item Price After Sale Deal/Disc Net Item Price After Sale Deal/Disc This is the item price after any item price changes or item percentage discounts were made to it BUT before any deals or discounts were applied to the whole sale. If there were no item price changes then this will be the same as the Item Product List Price. This is the final item price after all discounts and deals have been applied. If there were no sale discounts / deals then this will be the same as the Item Price Before Sale Deal/Disc. The ‘Item Price After Sale Deal/Disc’ is the price that the item effectively sold for after all item price changes, deals and discounts have been applied. It is from this price that you would calculate the tax due on this item. If your item prices exclude tax in E4E then the ‘Net Item Price After Sale Deal/Disc’ is the most accurate item price to one to calculate tax from. This avoids rounding errors that E4E introduces by calculating ‘Gross Item Price After Sale Deal/Disc’ from ‘Net Item Price After Sale Deal/Disc’. If your item prices include tax in E4E then the ‘Gross Item Price After Sale Deal/Disc’ is the most accurate item price to one to calculate tax from. This avoids rounding errors that E4E introduces by calculating ‘Net Item Price After Sale Deal/Disc’ from ‘Gross Item Price After Sale Deal/Disc’. If you are using a computerised accounting system alongside E4E then: If your E4E prices include tax then the ‘Gross Item Price After Sale Deal/Disc’ item price is more than likely the one you would have to upload to your accounting system. If your E4E prices exclude tax then the ‘Net Item Price After Sale Deal/Disc’ item price is more than likely the one you would have to upload to your accounting system. For more details about how these different prices are calculated and why it is necessary to do it in this way see Appendix C of this user manual. EPOS 4 Excel v1.5.2 Website: epos4excel.weebly.com ©Martin Stokley 2011-2013 101 | P a g e Changing the transaction number prefix On the sales data setting screen you change the prefix of the transaction number in the sales data by typing in a different prefix in the box. Storing the sales data under a specified date rather than the system date On the sales data screen you can choose to store the sales data for any sales you make under a specified data rather than the system date. If you select this open when you click the sales button on the main EPOS screen you will be asked for the date you want to save the sales data under. The sales data will be stored with a filename: salesDDMMYYYY.CSV or salesDDMMYYYYTX.CSV where DDMMYYYY is the user specified date. The transaction numbers for individual sales will also be generated using the specified date ie. BSDDMMYYYYTXNX Customer orders files The files containing orders are found in the E4E data storage folder. To access the customer orders data files, open the E4E data storage folder. The files containing the customer order data have a file name in the format ordersDDMMYYYY.xlsx where DDMMYYYY is the data on which the order was created. The separate orders appear on separate rows. The layout of the customer orders file is as follows: Column A: Column B: Column C: Column D: Column E: Column F: Column G: Column H: Column I: Column J: Column K: Column L: Column M: Column N: Column O: Column P: Column Q: Column R: Column S: Column T: Column U: Column V: Order date Order number (Determined by E4E – Each day the customer order number starts at 1 and for each further new order on that day it increases by 1) Order ref. (Determined by the user – If it is prepaid customer order this will be the transaction number of the corresponding sale in the sales data, which is also the same as the transaction number on the customer receipt.) Customer name Phone number Email address Customer address 1 Customer address 2 Customer city Customer county / state Customer postcode Customer country Delivery name Delivery address 1 Delivery address 2 Delivery city Delivery county / state Delivery postcode Delivery country Items ordered Order notes Order status If you are working remotely, then at the end of the day the customer orders file could be emailed to your companies head office for processing. EPOS 4 Excel v1.5.2 Website: epos4excel.weebly.com ©Martin Stokley 2011-2013 102 | P a g e Backing up the sales data, customer order data and system data. There are two options for backing up the sales data, customer order data and system data: 1. Manually navigate to the E4E folder containing the data and make a copy of it 2. On the file settings screen click the back up sales, orders and system data button. Choose the folder location you wish to back the data up to. (You will be able to choose to create a new folder here). E4E will then back up the data for you to your chosen location. It is advisable to back up the storage folder at the end of each day of selling. NOTE: For descriptions of the data the system data files contain see Appendix D Importing sales data It is possible to import sales data files into E4E eg. If you make sales at a temporary location and you want to then import these sales data files in your main E4E installation. 1. On the file settings screen click the import sales data files button. 2. Choose the sales data files you want to import. You can select more than one file at a time by holding down the ctrl button and clicking multiple files in the file dialog box. 3. If you want to adjust you main installation stock levels according to what was sold in the sales data files you are importing then click yes when asked. If you click no the sales data will be imported to your main E4E storage folder but the stock levels will not be changed. NOTE: If you are selling away from you main installation it is best to choose a till number which is not replicated on your main E4E installation otherwise you will get duplication of transaction numbers in the sales data. Duplication of till numbers can cause problems with the end of day reconciliation figures report. NOTE: To be able to update the stock levels when you import sales data you will need to make sure the following columns are saved in the sales data: Item Code, Item Description, Tax Class, Quantity, Gross Item Price Before Sale Deal/Disc EPOS 4 Excel v1.5.2 Website: epos4excel.weebly.com ©Martin Stokley 2011-2013 103 | P a g e Importing orders data It is possible to import orders data files into E4E eg. If you make sales at a temporary location take some customer orders and you want to then import these orders data files in your main E4E installation. 1. On the file settings screen click the import orders data files button. 2. Choose the orders data files you want to import. You can select more than one file at a time by holding down the ctrl button and clicking multiple files in the file dialog box. NOTE: The order numbers will be changed in the imported orders if orders were also made on your main E4E installation on that day. EPOS 4 Excel v1.5.2 Website: epos4excel.weebly.com ©Martin Stokley 2011-2013 104 | P a g e 14. EPOS 4 Excel Security Settings Due to the nature of Excel it is impossible for EPOS 4 Excel to give security that is 100% secure, anyone with an advanced level of understanding Excel would be able to crack it. However E4E does includes some basic security options that you can enable. E4E has three built in security levels which, if enabled, you can use to limit what certain people can do by only given them the password for a specific level of access to E4E functions. The security levels are as follows: Sales Security Level Functions Making Sales Supervisor Security Level Functions All Sales Level Functions AND Create / Delete / Edit Customer Orders Product Search Refund (optional) Add / Edit Product Details (optional) Sale / Item discounts (optional) Add / Edit Product Details Reports Deals Functions Stock Level Functions (Except Clear Stock Levels) Change Till Number Sale / Item Discounts Open Till Cash Drawer Customise Quick Products Administrator Security Level Functions All Supervisor Level Functions AND EPOS Settings Clear Stock Levels Delete Products Each security level has one password ie. all sales assistants would use the same password, all supervisors would use the sale password and all administrators would use the same password. E4E does not allow you to define individual usernames and passwords for each member of staff. EPOS 4 Excel v1.5.2 Website: epos4excel.weebly.com ©Martin Stokley 2011-2013 105 | P a g e Enabling the security settings To enable the E4E security settings: 1. Click the security settings button on the EPOS setting screen. 2. Tick the enable security box 3. Tick / untick the optional functions that are allowed for the sale security level as appropriate: Allow the sales assistant to complete refunds Allow the sales assistant to add / edit product details Allow the sales assistant to add discounts to a sale or change the price of an individual item (price change or percentage off an item) If you do not allow the sales assistant to access these functions then they will have to call a supervisor or administrator to enter their password to enable access to these functions. 4. Change the passwords for the different security levels if you desire 5. Clicking the return to options button will save your changes. The default passwords are sales, supervisor and administrator ie. the same as different security levels. NOTE: Passwords should be different for each user level, if not, then entering the password will active the highest user level for that password. This means you can combine the supervisor and administrator security levels by making the passwords the same. NOTE: Changing the security level settings and passwords will have to be done separately for each till running on a network unless you customise the E4E workbook and then place a new copy of it on each till. EPOS 4 Excel v1.5.2 Website: epos4excel.weebly.com ©Martin Stokley 2011-2013 106 | P a g e Logging in with a security level password After you have enabled the security settings the user log in and user log out buttons on the main EPOS options screen will be enabled. To log in click the user log in button and enter your security level password (sales, supervisor or administrator) to enable this level of access to E4E functions. After you have logged in the Excel Status bar will tell you what level of access to the E4E functions you currently have. If you try to access an E4E function which requires a higher level of access than the current one, you will asked to enter the relevant security level password to gain access to that function. 1. If you are on the sales screen or if you are in sales mode (eg. you accessed the product search results screen from the sales screen) and you are prompted for a password to access an E4E function, then entering a password WILL NOT result in a permanent log in for that security level. Once the function has been accessed the security level will drop back to its original level. 2. On every other screen in E4E, logging in to a security level to access a specific function will result in a permanent log in to that security level. For details about what you can do if you forget the sales, supervisor of administrator password for a till see Appendix F EPOS 4 Excel v1.5.2 Website: epos4excel.weebly.com ©Martin Stokley 2011-2013 107 | P a g e 15. Upgrading to a new version of the EPOS 4 Excel Checking for updates to the EPOS 4 Excel worksheet If you are connected to the internet you can check to see if a newer version of the E4E worksheet (containing bug fixes or new features) has been released. On the main options screen click the check for updates button. E4E will now attempt to connect to the internet and download a file containing the latest E4E version number. Please be patient as this may take while. If a newer version is available you will be told to visit the E4E website (epos4excel.weebly.com) to download it. E4E automatically warns you on start-up if you have not checked for updates for more than a month. You can turn this feature off on the EPOS settings screen if you wish. EPOS 4 Excel v1.5.2 Website: epos4excel.weebly.com ©Martin Stokley 2011-2013 108 | P a g e Upgrading to a newer version of EPOS 4 Excel To upgrade to a newer version of E4E you will need to go through the following steps: 1. Download a copy of the new version of the E4E from the website (epos4excel.weebly.com) 2. Set the file’s storage directory in the new version of E4E’s file settings to be the same as in the old version. E4E will then automatically pick up your product list, your receipt message, your tax classes and any deal codes you have set up 3. Manually customise the receipt template on the new version of E4E so that it looks like the template in your old version. If you have the older version of E4E and the newer version open at the same time you should be able to simply copy and paste your receipt layout. 4. In the sales data settings on the new version of E4E make sure that the sales data columns are set up as they were in your old version 5. Customise the logo on the sales screen and any background colours as per your old version of E4E 6. Make sure all other settings and options in the new version of E4E are set up as they were in your old version (eg. payment types, passwords etc.) 7. Familiarise yourself with any new features in the new version of E4E and customise as necessary 8. The new version of E4E is now set up and ready to use. UPGRADE NOTE: If you are using E4E on a network make sure each till is running the same version of E4E. Earlier versions of E4E may be incompatible with later versions! EPOS 4 Excel v1.3.1 AND LATER VERSIONS UPGRADE NOTE: The customer orders features in EPOS 4 Excel v1.3 and later versions are incompatible with the orders features of EPOS 4 Excel v1.2 and earlier. To avoid any problems it is advisable to remove any previous customer order files created by E4E from the E4E data storage folder to a separate location for archiving when upgrading to E4E v1.3 or later version. This way you can be sure all customer orders files in the storage folder will be compatible with this version of E4E. EPOS 4 Excel v1.3.1 AND LATER VERSIONS UPGRADE NOTE: EPOS 4 Excel v1.3 and later enables you to save the sales data files in Unicode format to cope with non-English letters. If you swap to Unicode format from ASCII when upgrading this could affect E4E’s ability to produce reports. See the sales data settings and reports sections of this manual for more information. EPOS 4 Excel v1.5.2 Website: epos4excel.weebly.com ©Martin Stokley 2011-2013 109 | P a g e 16. Summary of the main EPOS 4 Excel settings / options Sale Options Option Print sales receipts Pre-paid order Option Location Current sale screen Payments window / Fast pay window Force user to give sales assistant name EPOS settings screen Only allow selling of whole quantities EPOS settings screen Force user to give reason for refunds EPOS settings screen Screen lock password EPOS setting screen Change till number Current sale screen Change current printer Current sale screen Change sales assistant name Current sale screen Force user to give a reason for item price changes Discount reasons via EPOS settings screen Force user to give a reason for discounts Discount reasons via EPOS settings screen Quick Products Options Quick products via products screen Hide Item Autocomplete button on sales screen EPOS settings screen Notes Option ticked = Print Receipts Option ticked = E4E will ask for customer order details when sale is completed Option ticked = user will always have to give a sales assistant name, it cannot be left blank Option ticked = user can only add whole numbers of quantities to a sale Option ticked = user must give a reason for any refunds in the memo box on the payments window Click the change button to change the password Click the button to change till number Click the button to change the printer which receipts will be sent to Click the button to change the sales assistant name Option ticked = user will have to give a reason for an item price change Option unticked = user can change item prices without giving a reason Option ticked = user will have to give a reason for a sale discount Option unticked = user can add sale discounts without giving a reason Define the quick products and then tick the show quick products on the sales screen box. Otherwise the quick products buttons will be hidden on the sales screen. Option ticked = button hidden and function disabled Option unticked = button show and function enabled EPOS 4 Excel v1.5.2 Website: epos4excel.weebly.com ©Martin Stokley 2011-2013 110 | P a g e Show till total sales for the day on the sales screen EPOS settings screen Show sale sub-total on the sales screen EPOS settings screen Option ticked = till total sales is shown on the sales screen Option unticked = till total sales is not shown on sales screen Option ticked = sale sub-total is shown on the sales screen Option unticked = sale sub-total is not shown on sales screen Receipt Options Option If current EPOS currency is NOT UK £s then include VAT in UK £s on the receipt Option Location EPOS settings screen Print narrow / wide receipts Receipt Settings via EPOS settings screen Number of characters of item description to display on the receipt Receipt Settings via EPOS settings screen Display item code rather than item description on the receipt Receipt Settings via EPOS settings screen Receipt message Receipt Settings via EPOS settings screen Receipt Settings via EPOS Settings screen Sales tax name on the receipt Logo row and blank row heights on the narrow receipt template Include full tax details on receipts Narrow Receipt Template via EPOS settings and the Receipt Settings screen Receipt Settings via EPOS settings screen Include a manual reference number on receipts Receipt Settings via EPOS settings screen Notes Option ticked = VAT is shown on the receipt in both current EPOS currency and in UK £s (exchange rate from current EPOS currency is set on the EPOS settings screen) Choice of one or the other. Receipts printed according the relevant receipt template (narrow or wide) 20 characters recommended for narrow receipts. For showing full description use a large number eg. 9999 Option ticked = show item code Option unticked = show item description Click edit receipt message button to change Enter the sales tax name for your country as you would like it to appear on the receipt. NOTE: Use abbreviations where possible as a too longer name could cause problems with the receipt layout. Allows you to adjust the height of the logo row and any blank rows on narrow receipts Option ticked = full tax details will be shown on receipts Option unticked = no tax details will be shown on receipts Option ticked = you will be asked for a reference number when completing a sale and this will be shown on the receipt Option unitcked = no manual reference number will be used EPOS 4 Excel v1.5.2 Website: epos4excel.weebly.com ©Martin Stokley 2011-2013 111 | P a g e Tax Options Option Stored E4E Product prices include or exclude tax Option Location Tax Settings via EPOS settings screen Notes Choose the relevant options IMPORTANT: This will affect the content of receipts and some other E4E functions. See the tax settings section of this manual for more details EPOS 4 Excel v1.5.2 Website: epos4excel.weebly.com ©Martin Stokley 2011-2013 112 | P a g e Discount Options Option Define discounts reasons Option Location Discount reasons via EPOS settings screen Force user to give a reason for discounts Discount reasons via EPOS settings screen Force user to give a reason for item price changes Discount reasons via EPOS settings screen Notes Add the different reasons for sale or item discounts in the left hand column. These will be chosen on the item price change window or payments window. (NOTE: These may appear on a receipt) Option ticked = user will have to give a reason for a sale discount Option unticked = user can add sale discounts without giving a reason Option ticked = user will have to give a reason for an item price change Option unticked = user can change item prices without giving a reason Security Options Option Enable security Allow sales assistant to complete refunds Option Location Security settings via EPOS settings screen Security settings via EPOS settings screen Allow sales assistant to add / edit product details Security settings via EPOS settings screen Allow sales assistant to add sale discounts / item price changes Security settings via EPOS settings screen Security settings passwords Security settings via EPOS settings screen Notes Restricts access to various functions of E4E Option ticked = sales assistant will be able to complete refunds Option unticked = supervisor or above password will need to be entered to complete refunds Option ticked = sales assistant will be able to add / edit product details Option unticked = supervisor or above password will need to be entered to add / edit product details Option ticked = sales assistant will be able to add sale discounts / change item prices in a sale Option unticked = supervisor or above password will need to be entered to add a sale discount / change an item price in a sale Enter new passwords in relevant boxes EPOS 4 Excel v1.5.2 Website: epos4excel.weebly.com ©Martin Stokley 2011-2013 113 | P a g e Sales Data Options Option Transaction number prefix Option Location Sales data settings via the EPOS settings screen Save the sales data in a single file rather than a separate file for each till Sales data settings via the EPOS settings screen Create sales data back up files Sales data settings via the EPOS settings screen Sales layout Sales data settings via the EPOS settings screen EPOS setting screen Record nominal code rather than payment type in the sales data User a user-defined date (rather than system date) for sales data file name and transaction number Sales data settings via the EPOS settings screen Sale data file format – ASCII or Unicode? Sales data settings via the EPOS settings screen Notes Sets the prefix for sale transaction numbers in the sales data (see section 12 of this manual for more details) Option ticked = sales data from all tills will be saved in a single file when using networked tills Option unticked = sales data for each till will be save in different files when using networked tills Option ticked = sales data back files are created Option unticked = sales data back up files are NOT created See section 12 of this manual for more details Option ticked = nominal code rather than payment type (in words) is recorded as the payment method in the sales data Option ticked = before you start making sales you will be asked to specify a date Option unticked = E4E will use the system date ASCII is sufficient for English only characters in the sales data Unicode will enable you to use non-English characters in the sales data Start Up Options Option Show license screen at start up Option Location EPOS settings screen If user has not checked for updates for more than a month then prompt at start up EPOS settings screen Notes Option ticked = license screen is shown when the E4E worksheet first loads Option ticked = user will be prompted to check for updates to the E4E worksheet if they have not done so in the last month EPOS 4 Excel v1.5.2 Website: epos4excel.weebly.com ©Martin Stokley 2011-2013 114 | P a g e Currency and Payment Options Option Define payment types / nominal codes Option Location EPOS settings screen Payment Autofill EPOS settings screen Current EPOS currency EPOS settings screen Use fast pay window when taking payment EPOS settings screen Notes Payment type 1 will always be cash. Payment types 2 – 4 can be any word(s) describing a payment type. Choose the payment type you wish to automatically assign the sale total to when the payments screen appears OR choose none to not automatically assign the sale total. Enter the currency symbol in the relevant box and make sure the product list prices are in this currency Option ticked = fast pay window will be shown when clicking payments on the sales screen Option unticked = the full payments window will be shown when clicking payments on the sales screen Product Options Option Product description 2 label Option Location EPOS settings screen Product description 3 label EPOS settings screen Notes Enter label in the relevant box. This will appear in the product search window / edit product details screen etc. Enter label in the relevant box. This will appear in the product search window / edit product details screen etc. File Settings Option Change the location of the E4E file storage location Option Location File settings via EPOS settings screen Notes Click the browse button to change the location of the file storage folder EPOS 4 Excel v1.5.2 Website: epos4excel.weebly.com ©Martin Stokley 2011-2013 115 | P a g e Appendix A – Using EPOS 4 Excel with multiple tills on a network Why use a network? To connect multiple tills together over a network all you need is a network drive that all tills can store data on. What are the benefits of networking multiple tills together? You can update the price list once from a single till and it will be updated on all tills automatically. Tax rates can be adjusted on one till and will affect all tills. Receipt message can be adjusted on one till and will affect all tills. The deal settings can be adjusted on one till and will affect all tills. You can have an accurate list of stock based on what all tills have individually sold. You can keep all customer orders / enquiries stored in one place no matter what till they are entered on and at the end of the day this file could be emailed back to the main company office for processing. You can keep the sales data from every till in one place, so it is easy to back the data up. Example of simple network for use with EPOS 4 Excel E4E has been tested on a simple network using a NAS (Network Attached Storage) drive with the following equipment: 1. A Western Digital ‘My Book Live’ NAS drive 2. A gigabit router – a gigabit router enables to network to run at the fastest possible speed 3. 5-port gigabit network switches to allow you to connect as many tills as you need to the network 4. Enough network cables to connect all the equipment together E4E has currently been tested in a setting with up to six tills networked together with no problems. It is unknown how many tills could successfully work together before the network becomes overloaded, however E4E allows you to assign till numbers between 1 and 99. EPOS 4 Excel v1.5.2 Website: epos4excel.weebly.com ©Martin Stokley 2011-2013 116 | P a g e The following diagram shows the basic layout of the network under which E4E has been tested: Router My Book Live 4 3 2 1 Till 1 Network Switch Till 2 Till 3 Till 4 Till 5 Network Switch Ethernet Cables Till 6 Till 7 Till 8 Till 9 Each till consists of a laptop, USB barcode scanner and USB printer. If you have 3 or less tills connected to the network you do not need to worry about connecting the network switches. In this case you can connect the tills directly to ports 2-4 on the router. If you need 4-6 tills you only need to connect one network switch to the router. If you need 7 or more tills you will need to connect both network switches to the router. The maximum number of tills you can network together using this equipment is 9. The following tips apply if you are seeking to set up this example network: 1. You will need to set up ‘My Book Live’ so it can be accessed on each individual till. Use the software CD that came with ‘My Book Live’ to install it on each till if this has not been done before. Follow the on screen instructions for installation and make sure you choose the same drive letter for ‘My Book Live’ when you install it on each till. 2. You need to set up the network and make sure the router, my book live and the network switches are powered on and all the cables are connected before you install the software. 3. If you have previously installed the ‘My Book Live’ software and you are having problems with the computer recognising ‘My Book Live’ then try switching the computer off and restarting it whilst it is connected to the switched on network. 4. You can always check if the ‘My Book Live’ has already been installed by going to My Computer and checking if you can see the network hard drive. EPOS 4 Excel v1.5.2 Website: epos4excel.weebly.com ©Martin Stokley 2011-2013 117 | P a g e Setting up EPOS 4 Excel for use on a network You need to choose the folder where the EPOS 4 Excel sales data, customer order data and the system data files will be stored to be on the network. To choose / change the location of the storage folder: On the file settings screen (found via the EPOS settings screen) click the ‘browse’ button next to the folder name and change the storage folder location as appropriate. You will need to repeat this process on every instance of E4E running on the network (ie. on every till) so that they all point to the same folder. E4E is now set up for use on a network. When you import products etc. these will now be accessible to every instance of E4E running on the network. EPOS 4 Excel v1.5.2 Website: epos4excel.weebly.com ©Martin Stokley 2011-2013 118 | P a g e Appendix B – The full software license for the EPOS 4 Excel workbook GNU LESSER GENERAL PUBLIC LICENSE Version 3, 29 June 2007 Copyright (C) 2007 Free Software Foundation, Inc. <http://fsf.org/> Everyone is permitted to copy and distribute verbatim copies of this license document, but changing it is not allowed. This version of the GNU Lesser General Public License incorporates the terms and conditions of version 3 of the GNU General Public License, supplemented by the additional permissions listed below. 0. Additional Definitions. As used herein, "this License" refers to version 3 of the GNU Lesser General Public License, and the "GNU GPL" refers to version 3 of the GNU General Public License. "The Library" refers to a covered work governed by this License, other than an Application or a Combined Work as defined below. An "Application" is any work that makes use of an interface provided by the Library, but which is not otherwise based on the Library. Defining a subclass of a class defined by the Library is deemed a mode of using an interface provided by the Library. A "Combined Work" is a work produced by combining or linking an Application with the Library. The particular version of the Library with which the Combined Work was made is also called the "Linked Version". The "Minimal Corresponding Source" for a Combined Work means the Corresponding Source for the Combined Work, excluding any source code for portions of the Combined Work that, considered in isolation, are based on the Application, and not on the Linked Version. The "Corresponding Application Code" for a Combined Work means the object code and/or source code for the Application, including any data and utility programs needed for reproducing the Combined Work from the Application, but excluding the System Libraries of the Combined Work. 1. Exception to Section 3 of the GNU GPL. You may convey a covered work under sections 3 and 4 of this License without being bound by section 3 of the GNU GPL. 2. Conveying Modified Versions. If you modify a copy of the Library, and, in your modifications, a facility refers to a function or data to be supplied by an Application that uses the facility (other than as an argument passed when the facility is invoked), then you may convey a copy of the modified version: a) under this License, provided that you make a good faith effort to ensure that, in the event an Application does not supply the function or data, the facility still operates, and performs whatever part of its purpose remains meaningful, or EPOS 4 Excel v1.5.2 Website: epos4excel.weebly.com ©Martin Stokley 2011-2013 119 | P a g e b) under the GNU GPL, with none of the additional permissions of this License applicable to that copy. 3. Object Code Incorporating Material from Library Header Files. The object code form of an Application may incorporate material from a header file that is part of the Library. You may convey such object code under terms of your choice, provided that, if the incorporated material is not limited to numerical parameters, data structure layouts and accessors, or small macros, inline functions and templates (ten or fewer lines in length), you do both of the following: a) Give prominent notice with each copy of the object code that the Library is used in it and that the Library and its use are covered by this License. b) Accompany the object code with a copy of the GNU GPL and this license document. 4. Combined Works. You may convey a Combined Work under terms of your choice that, taken together, effectively do not restrict modification of the portions of the Library contained in the Combined Work and reverse engineering for debugging such modifications, if you also do each of the following: a) Give prominent notice with each copy of the Combined Work that the Library is used in it and that the Library and its use are covered by this License. b) Accompany the Combined Work with a copy of the GNU GPL and this license document. c) For a Combined Work that displays copyright notices during execution, include the copyright notice for the Library among these notices, as well as a reference directing the user to the copies of the GNU GPL and this license document. d) Do one of the following: 0) Convey the Minimal Corresponding Source under the terms of this License, and the Corresponding Application Code in a form suitable for, and under terms that permit, the user to recombine or relink the Application with a modified version of the Linked Version to produce a modified Combined Work, in the manner specified by section 6 of the GNU GPL for conveying Corresponding Source. 1) Use a suitable shared library mechanism for linking with the Library. A suitable mechanism is one that (a) uses at run time a copy of the Library already present on the user's computer system, and (b) will operate properly with a modified version of the Library that is interface-compatible with the Linked Version. e) Provide Installation Information, but only if you would otherwise be required to provide such information under section 6 of the GNU GPL, and only to the extent that such information is necessary to install and execute a modified version of the Combined Work produced by recombining or relinking the Application with a modified version of the Linked Version. (If you use option 4d0, the Installation Information must accompany the Minimal Corresponding Source and Corresponding Application Code. If you use option 4d1, you must provide the Installation Information in the manner specified by section 6 of the GNU GPL for conveying Corresponding Source.) 5. Combined Libraries. EPOS 4 Excel v1.5.2 Website: epos4excel.weebly.com ©Martin Stokley 2011-2013 120 | P a g e You may place library facilities that are a work based on the Library side by side in a single library together with other library facilities that are not Applications and are not covered by this License, and convey such a combined library under terms of your choice, if you do both of the following: a) Accompany the combined library with a copy of the same work based on the Library, uncombined with any other library facilities, conveyed under the terms of this License. b) Give prominent notice with the combined library that part of it is a work based on the Library, and explaining where to find the accompanying uncombined form of the same work. 6. Revised Versions of the GNU Lesser General Public License. The Free Software Foundation may publish revised and/or new versions of the GNU Lesser General Public License from time to time. Such new versions will be similar in spirit to the present version, but may differ in detail to address new problems or concerns. Each version is given a distinguishing version number. If the Library as you received it specifies that a certain numbered version of the GNU Lesser General Public License "or any later version" applies to it, you have the option of following the terms and conditions either of that published version or of any later version published by the Free Software Foundation. If the Library as you received it does not specify a version number of the GNU Lesser General Public License, you may choose any version of the GNU Lesser General Public License ever published by the Free Software Foundation. If the Library as you received it specifies that a proxy can decide whether future versions of the GNU Lesser General Public License shall apply, that proxy's public statement of acceptance of any version is permanent authorization for you to choose that version for the Library. EPOS 4 Excel v1.5.2 Website: epos4excel.weebly.com ©Martin Stokley 2011-2013 121 | P a g e GNU GENERAL PUBLIC LICENSE Version 3, 29 June 2007 Copyright (C) 2007 Free Software Foundation, Inc. <http://fsf.org/> Everyone is permitted to copy and distribute verbatim copies of this license document, but changing it is not allowed. Preamble The GNU General Public License is a free, copyleft license for software and other kinds of works. The licenses for most software and other practical works are designed to take away your freedom to share and change the works. By contrast, the GNU General Public License is intended to guarantee your freedom to share and change all versions of a program--to make sure it remains free software for all its users. We, the Free Software Foundation, use the GNU General Public License for most of our software; it applies also to any other work released this way by its authors. You can apply it to your programs, too. When we speak of free software, we are referring to freedom, not price. Our General Public Licenses are designed to make sure that you have the freedom to distribute copies of free software (and charge for them if you wish), that you receive source code or can get it if you want it, that you can change the software or use pieces of it in new free programs, and that you know you can do these things. To protect your rights, we need to prevent others from denying you these rights or asking you to surrender the rights. Therefore, you have certain responsibilities if you distribute copies of the software, or if you modify it: responsibilities to respect the freedom of others. For example, if you distribute copies of such a program, whether gratis or for a fee, you must pass on to the recipients the same freedoms that you received. You must make sure that they, too, receive or can get the source code. And you must show them these terms so they know their rights. Developers that use the GNU GPL protect your rights with two steps: (1) assert copyright on the software, and (2) offer you this License giving you legal permission to copy, distribute and/or modify it. For the developers' and authors' protection, the GPL clearly explains that there is no warranty for this free software. For both users' and authors' sake, the GPL requires that modified versions be marked as changed, so that their problems will not be attributed erroneously to authors of previous versions. Some devices are designed to deny users access to install or run modified versions of the software inside them, although the manufacturer can do so. This is fundamentally incompatible with the aim of protecting users' freedom to change the software. The systematic pattern of such abuse occurs in the area of products for individuals to use, which is precisely where it is most unacceptable. Therefore, we have designed this version of the GPL to prohibit the practice for those products. If such problems arise substantially in other domains, we stand ready to extend this provision to those domains in future versions of the GPL, as needed to protect the freedom of users. Finally, every program is threatened constantly by software patents. States should not allow patents to restrict development and use of software on general-purpose computers, but in those that do, we wish to avoid the special danger that patents applied to a free program could make it effectively EPOS 4 Excel v1.5.2 Website: epos4excel.weebly.com ©Martin Stokley 2011-2013 122 | P a g e proprietary. To prevent this, the GPL assures that patents cannot be used to render the program non-free. The precise terms and conditions for copying, distribution and modification follow. TERMS AND CONDITIONS 0. Definitions. "This License" refers to version 3 of the GNU General Public License. "Copyright" also means copyright-like laws that apply to other kinds of works, such as semiconductor masks. "The Program" refers to any copyrightable work licensed under this License. Each licensee is addressed as "you". "Licensees" and "recipients" may be individuals or organizations. To "modify" a work means to copy from or adapt all or part of the work in a fashion requiring copyright permission, other than the making of an exact copy. The resulting work is called a "modified version" of the earlier work or a work "based on" the earlier work. A "covered work" means either the unmodified Program or a work based on the Program. To "propagate" a work means to do anything with it that, without permission, would make you directly or secondarily liable for infringement under applicable copyright law, except executing it on a computer or modifying a private copy. Propagation includes copying, distribution (with or without modification), making available to the public, and in some countries other activities as well. To "convey" a work means any kind of propagation that enables other parties to make or receive copies. Mere interaction with a user through a computer network, with no transfer of a copy, is not conveying. An interactive user interface displays "Appropriate Legal Notices" to the extent that it includes a convenient and prominently visible feature that (1) displays an appropriate copyright notice, and (2) tells the user that there is no warranty for the work (except to the extent that warranties are provided), that licensees may convey the work under this License, and how to view a copy of this License. If the interface presents a list of user commands or options, such as a menu, a prominent item in the list meets this criterion. 1. Source Code. The "source code" for a work means the preferred form of the work for making modifications to it. "Object code" means any non-source form of a work. A "Standard Interface" means an interface that either is an official standard defined by a recognized standards body, or, in the case of interfaces specified for a particular programming language, one that is widely used among developers working in that language. The "System Libraries" of an executable work include anything, other than the work as a whole, that (a) is included in the normal form of packaging a Major Component, but which is not part of that Major Component, and (b) serves only to enable use of the work with that Major Component, or to implement a Standard Interface for which an implementation is available to the public in EPOS 4 Excel v1.5.2 Website: epos4excel.weebly.com ©Martin Stokley 2011-2013 123 | P a g e source code form. A "Major Component", in this context, means a major essential component (kernel, window system, and so on) of the specific operating system (if any) on which the executable work runs, or a compiler used to produce the work, or an object code interpreter used to run it. The "Corresponding Source" for a work in object code form means all the source code needed to generate, install, and (for an executable work) run the object code and to modify the work, including scripts to control those activities. However, it does not include the work's System Libraries, or general-purpose tools or generally available free programs which are used unmodified in performing those activities but which are not part of the work. For example, Corresponding Source includes interface definition files associated with source files for the work, and the source code for shared libraries and dynamically linked subprograms that the work is specifically designed to require, such as by intimate data communication or control flow between those subprograms and other parts of the work. The Corresponding Source need not include anything that users can regenerate automatically from other parts of the Corresponding Source. The Corresponding Source for a work in source code form is that same work. 2. Basic Permissions. All rights granted under this License are granted for the term of copyright on the Program, and are irrevocable provided the stated conditions are met. This License explicitly affirms your unlimited permission to run the unmodified Program. The output from running a covered work is covered by this License only if the output, given its content, constitutes a covered work. This License acknowledges your rights of fair use or other equivalent, as provided by copyright law. You may make, run and propagate covered works that you do not convey, without conditions so long as your license otherwise remains in force. You may convey covered works to others for the sole purpose of having them make modifications exclusively for you, or provide you with facilities for running those works, provided that you comply with the terms of this License in conveying all material for which you do not control copyright. Those thus making or running the covered works for you must do so exclusively on your behalf, under your direction and control, on terms that prohibit them from making any copies of your copyrighted material outside their relationship with you. Conveying under any other circumstances is permitted solely under the conditions stated below. Sublicensing is not allowed; section 10 makes it unnecessary. 3. Protecting Users' Legal Rights From Anti-Circumvention Law. No covered work shall be deemed part of an effective technological measure under any applicable law fulfilling obligations under article 11 of the WIPO copyright treaty adopted on 20 December 1996, or similar laws prohibiting or restricting circumvention of such measures. When you convey a covered work, you waive any legal power to forbid circumvention of technological measures to the extent such circumvention is effected by exercising rights under this License with respect to the covered work, and you disclaim any intention to limit operation or modification of the work as a means of enforcing, against the work's users, your or third parties' legal rights to forbid circumvention of technological measures. 4. Conveying Verbatim Copies. EPOS 4 Excel v1.5.2 Website: epos4excel.weebly.com ©Martin Stokley 2011-2013 124 | P a g e You may convey verbatim copies of the Program's source code as you receive it, in any medium, provided that you conspicuously and appropriately publish on each copy an appropriate copyright notice; keep intact all notices stating that this License and any non-permissive terms added in accord with section 7 apply to the code; keep intact all notices of the absence of any warranty; and give all recipients a copy of this License along with the Program. You may charge any price or no price for each copy that you convey, and you may offer support or warranty protection for a fee. 5. Conveying Modified Source Versions. You may convey a work based on the Program, or the modifications to produce it from the Program, in the form of source code under the terms of section 4, provided that you also meet all of these conditions: a) The work must carry prominent notices stating that you modified it, and giving a relevant date. b) The work must carry prominent notices stating that it is released under this License and any conditions added under section 7. This requirement modifies the requirement in section 4 to "keep intact all notices". c) You must license the entire work, as a whole, under this License to anyone who comes into possession of a copy. This License will therefore apply, along with any applicable section 7 additional terms, to the whole of the work, and all its parts, regardless of how they are packaged. This License gives no permission to license the work in any other way, but it does not invalidate such permission if you have separately received it. d) If the work has interactive user interfaces, each must display Appropriate Legal Notices; however, if the Program has interactive interfaces that do not display Appropriate Legal Notices, your work need not make them do so. A compilation of a covered work with other separate and independent works, which are not by their nature extensions of the covered work, and which are not combined with it such as to form a larger program, in or on a volume of a storage or distribution medium, is called an "aggregate" if the compilation and its resulting copyright are not used to limit the access or legal rights of the compilation's users beyond what the individual works permit. Inclusion of a covered work in an aggregate does not cause this License to apply to the other parts of the aggregate. 6. Conveying Non-Source Forms. You may convey a covered work in object code form under the terms of sections 4 and 5, provided that you also convey the machine-readable Corresponding Source under the terms of this License, in one of these ways: a) Convey the object code in, or embodied in, a physical product (including a physical distribution medium), accompanied by the Corresponding Source fixed on a durable physical medium customarily used for software interchange. b) Convey the object code in, or embodied in, a physical product (including a physical distribution medium), accompanied by a written offer, valid for at least three years and valid for as long as you offer spare parts or customer support for that product model, to give anyone who possesses the object code either (1) a copy of the Corresponding Source for all the software in the product that is EPOS 4 Excel v1.5.2 Website: epos4excel.weebly.com ©Martin Stokley 2011-2013 125 | P a g e covered by this License, on a durable physical medium customarily used for software interchange, for a price no more than your reasonable cost of physically performing this conveying of source, or (2) access to copy the Corresponding Source from a network server at no charge. c) Convey individual copies of the object code with a copy of the written offer to provide the Corresponding Source. This alternative is allowed only occasionally and noncommercially, and only if you received the object code with such an offer, in accord with subsection 6b. d) Convey the object code by offering access from a designated place (gratis or for a charge), and offer equivalent access to the Corresponding Source in the same way through the same place at no further charge. You need not require recipients to copy the Corresponding Source along with the object code. If the place to copy the object code is a network server, the Corresponding Source may be on a different server (operated by you or a third party) that supports equivalent copying facilities, provided you maintain clear directions next to the object code saying where to find the Corresponding Source. Regardless of what server hosts the Corresponding Source, you remain obligated to ensure that it is available for as long as needed to satisfy these requirements. e) Convey the object code using peer-to-peer transmission, provided you inform other peers where the object code and Corresponding Source of the work are being offered to the general public at no charge under subsection 6d. A separable portion of the object code, whose source code is excluded from the Corresponding Source as a System Library, need not be included in conveying the object code work. A "User Product" is either (1) a "consumer product", which means any tangible personal property which is normally used for personal, family, or household purposes, or (2) anything designed or sold for incorporation into a dwelling. In determining whether a product is a consumer product, doubtful cases shall be resolved in favor of coverage. For a particular product received by a particular user, "normally used" refers to a typical or common use of that class of product, regardless of the status of the particular user or of the way in which the particular user actually uses, or expects or is expected to use, the product. A product is a consumer product regardless of whether the product has substantial commercial, industrial or non-consumer uses, unless such uses represent the only significant mode of use of the product. "Installation Information" for a User Product means any methods, procedures, authorization keys, or other information required to install and execute modified versions of a covered work in that User Product from a modified version of its Corresponding Source. The information must suffice to ensure that the continued functioning of the modified object code is in no case prevented or interfered with solely because modification has been made. If you convey an object code work under this section in, or with, or specifically for use in, a User Product, and the conveying occurs as part of a transaction in which the right of possession and use of the User Product is transferred to the recipient in perpetuity or for a fixed term (regardless of how the transaction is characterized), the Corresponding Source conveyed under this section must be accompanied by the Installation Information. But this requirement does not apply if neither you nor any third party retains the ability to install modified object code on the User Product (for example, the work has been installed in ROM). The requirement to provide Installation Information does not include a requirement to continue to provide support service, warranty, or updates for a work that has been modified or installed by the recipient, or for the User Product in which it has been modified or installed. Access to a network may be denied when the modification itself materially and adversely affects the operation of the network or violates the rules and protocols for communication across the network. EPOS 4 Excel v1.5.2 Website: epos4excel.weebly.com ©Martin Stokley 2011-2013 126 | P a g e Corresponding Source conveyed, and Installation Information provided, in accord with this section must be in a format that is publicly documented (and with an implementation available to the public in source code form), and must require no special password or key for unpacking, reading or copying. 7. Additional Terms. "Additional permissions" are terms that supplement the terms of this License by making exceptions from one or more of its conditions. Additional permissions that are applicable to the entire Program shall be treated as though they were included in this License, to the extent that they are valid under applicable law. If additional permissions apply only to part of the Program, that part may be used separately under those permissions, but the entire Program remains governed by this License without regard to the additional permissions. When you convey a copy of a covered work, you may at your option remove any additional permissions from that copy, or from any part of it. (Additional permissions may be written to require their own removal in certain cases when you modify the work.) You may place additional permissions on material, added by you to a covered work, for which you have or can give appropriate copyright permission. Notwithstanding any other provision of this License, for material you add to a covered work, you may (if authorized by the copyright holders of that material) supplement the terms of this License with terms: a) Disclaiming warranty or limiting liability differently from the terms of sections 15 and 16 of this License; or b) Requiring preservation of specified reasonable legal notices or author attributions in that material or in the Appropriate Legal Notices displayed by works containing it; or c) Prohibiting misrepresentation of the origin of that material, or requiring that modified versions of such material be marked in reasonable ways as different from the original version; or d) Limiting the use for publicity purposes of names of licensors or authors of the material; or e) Declining to grant rights under trademark law for use of some trade names, trademarks, or service marks; or f) Requiring indemnification of licensors and authors of that material by anyone who conveys the material (or modified versions of it) with contractual assumptions of liability to the recipient, for any liability that these contractual assumptions directly impose on those licensors and authors. All other non-permissive additional terms are considered "further restrictions" within the meaning of section 10. If the Program as you received it, or any part of it, contains a notice stating that it is governed by this License along with a term that is a further restriction, you may remove that term. If a license document contains a further restriction but permits relicensing or conveying under this License, you may add to a covered work material governed by the terms of that license document, provided that the further restriction does not survive such relicensing or conveying. EPOS 4 Excel v1.5.2 Website: epos4excel.weebly.com ©Martin Stokley 2011-2013 127 | P a g e If you add terms to a covered work in accord with this section, you must place, in the relevant source files, a statement of the additional terms that apply to those files, or a notice indicating where to find the applicable terms. Additional terms, permissive or non-permissive, may be stated in the form of a separately written license, or stated as exceptions; the above requirements apply either way. 8. Termination. You may not propagate or modify a covered work except as expressly provided under this License. Any attempt otherwise to propagate or modify it is void, and will automatically terminate your rights under this License (including any patent licenses granted under the third paragraph of section 11). However, if you cease all violation of this License, then your license from a particular copyright holder is reinstated (a) provisionally, unless and until the copyright holder explicitly and finally terminates your license, and (b) permanently, if the copyright holder fails to notify you of the violation by some reasonable means prior to 60 days after the cessation. Moreover, your license from a particular copyright holder is reinstated permanently if the copyright holder notifies you of the violation by some reasonable means, this is the first time you have received notice of violation of this License (for any work) from that copyright holder, and you cure the violation prior to 30 days after your receipt of the notice. Termination of your rights under this section does not terminate the licenses of parties who have received copies or rights from you under this License. If your rights have been terminated and not permanently reinstated, you do not qualify to receive new licenses for the same material under section 10. 9. Acceptance Not Required for Having Copies. You are not required to accept this License in order to receive or run a copy of the Program. Ancillary propagation of a covered work occurring solely as a consequence of using peer-to-peer transmission to receive a copy likewise does not require acceptance. However, nothing other than this License grants you permission to propagate or modify any covered work. These actions infringe copyright if you do not accept this License. Therefore, by modifying or propagating a covered work, you indicate your acceptance of this License to do so. 10. Automatic Licensing of Downstream Recipients. Each time you convey a covered work, the recipient automatically receives a license from the original licensors, to run, modify and propagate that work, subject to this License. You are not responsible for enforcing compliance by third parties with this License. An "entity transaction" is a transaction transferring control of an organization, or substantially all assets of one, or subdividing an organization, or merging organizations. If propagation of a covered work results from an entity transaction, each party to that transaction who receives a copy of the work also receives whatever licenses to the work the party's predecessor in interest had or could give under the previous paragraph, plus a right to possession of the Corresponding Source of the work from the predecessor in interest, if the predecessor has it or can get it with reasonable efforts. You may not impose any further restrictions on the exercise of the rights granted or affirmed under this License. For example, you may not impose a license fee, royalty, or other charge for exercise of EPOS 4 Excel v1.5.2 Website: epos4excel.weebly.com ©Martin Stokley 2011-2013 128 | P a g e rights granted under this License, and you may not initiate litigation (including a cross-claim or counterclaim in a lawsuit) alleging that any patent claim is infringed by making, using, selling, offering for sale, or importing the Program or any portion of it. 11. Patents. A "contributor" is a copyright holder who authorizes use under this License of the Program or a work on which the Program is based. The work thus licensed is called the contributor's "contributor version". A contributor's "essential patent claims" are all patent claims owned or controlled by the contributor, whether already acquired or hereafter acquired, that would be infringed by some manner, permitted by this License, of making, using, or selling its contributor version, but do not include claims that would be infringed only as a consequence of further modification of the contributor version. For purposes of this definition, "control" includes the right to grant patent sublicenses in a manner consistent with the requirements of this License. Each contributor grants you a non-exclusive, worldwide, royalty-free patent license under the contributor's essential patent claims, to make, use, sell, offer for sale, import and otherwise run, modify and propagate the contents of its contributor version. In the following three paragraphs, a "patent license" is any express agreement or commitment, however denominated, not to enforce a patent (such as an express permission to practice a patent or covenant not to sue for patent infringement). To "grant" such a patent license to a party means to make such an agreement or commitment not to enforce a patent against the party. If you convey a covered work, knowingly relying on a patent license, and the Corresponding Source of the work is not available for anyone to copy, free of charge and under the terms of this License, through a publicly available network server or other readily accessible means, then you must either (1) cause the Corresponding Source to be so available, or (2) arrange to deprive yourself of the benefit of the patent license for this particular work, or (3) arrange, in a manner consistent with the requirements of this License, to extend the patent license to downstream recipients. "Knowingly relying" means you have actual knowledge that, but for the patent license, your conveying the covered work in a country, or your recipient's use of the covered work in a country, would infringe one or more identifiable patents in that country that you have reason to believe are valid. If, pursuant to or in connection with a single transaction or arrangement, you convey, or propagate by procuring conveyance of, a covered work, and grant a patent license to some of the parties receiving the covered work authorizing them to use, propagate, modify or convey a specific copy of the covered work, then the patent license you grant is automatically extended to all recipients of the covered work and works based on it. A patent license is "discriminatory" if it does not include within the scope of its coverage, prohibits the exercise of, or is conditioned on the non-exercise of one or more of the rights that are specifically granted under this License. You may not convey a covered work if you are a party to an arrangement with a third party that is in the business of distributing software, under which you make payment to the third party based on the extent of your activity of conveying the work, and under which the third party grants, to any of the parties who would receive the covered work from you, a discriminatory patent license (a) in connection with copies of the covered work conveyed by you (or copies made from those copies), or (b) primarily for and in connection with specific products or compilations that contain the covered work, unless you entered into that arrangement, or that patent license was granted, prior to 28 March 2007. EPOS 4 Excel v1.5.2 Website: epos4excel.weebly.com ©Martin Stokley 2011-2013 129 | P a g e Nothing in this License shall be construed as excluding or limiting any implied license or other defenses to infringement that may otherwise be available to you under applicable patent law. 12. No Surrender of Others' Freedom. If conditions are imposed on you (whether by court order, agreement or otherwise) that contradict the conditions of this License, they do not excuse you from the conditions of this License. If you cannot convey a covered work so as to satisfy simultaneously your obligations under this License and any other pertinent obligations, then as a consequence you may not convey it at all. For example, if you agree to terms that obligate you to collect a royalty for further conveying from those to whom you convey the Program, the only way you could satisfy both those terms and this License would be to refrain entirely from conveying the Program. 13. Use with the GNU Affero General Public License. Notwithstanding any other provision of this License, you have permission to link or combine any covered work with a work licensed under version 3 of the GNU Affero General Public License into a single combined work, and to convey the resulting work. The terms of this License will continue to apply to the part which is the covered work, but the special requirements of the GNU Affero General Public License, section 13, concerning interaction through a network will apply to the combination as such. 14. Revised Versions of this License. The Free Software Foundation may publish revised and/or new versions of the GNU General Public License from time to time. Such new versions will be similar in spirit to the present version, but may differ in detail to address new problems or concerns. Each version is given a distinguishing version number. If the Program specifies that a certain numbered version of the GNU General Public License "or any later version" applies to it, you have the option of following the terms and conditions either of that numbered version or of any later version published by the Free Software Foundation. If the Program does not specify a version number of the GNU General Public License, you may choose any version ever published by the Free Software Foundation. If the Program specifies that a proxy can decide which future versions of the GNU General Public License can be used, that proxy's public statement of acceptance of a version permanently authorizes you to choose that version for the Program. Later license versions may give you additional or different permissions. However, no additional obligations are imposed on any author or copyright holder as a result of your choosing to follow a later version. 15. Disclaimer of Warranty. THERE IS NO WARRANTY FOR THE PROGRAM, TO THE EXTENT PERMITTED BY APPLICABLE LAW. EXCEPT WHEN OTHERWISE STATED IN WRITING THE COPYRIGHT HOLDERS AND/OR OTHER PARTIES PROVIDE THE PROGRAM "AS IS" WITHOUT WARRANTY OF ANY KIND, EITHER EXPRESSED OR IMPLIED, INCLUDING, BUT NOT LIMITED TO, THE IMPLIED WARRANTIES OF MERCHANTABILITY AND FITNESS FOR A PARTICULAR PURPOSE. THE ENTIRE RISK AS TO THE QUALITY AND PERFORMANCE OF THE PROGRAM IS WITH YOU. SHOULD THE PROGRAM PROVE DEFECTIVE, YOU ASSUME THE COST OF ALL NECESSARY SERVICING, REPAIR OR CORRECTION. EPOS 4 Excel v1.5.2 Website: epos4excel.weebly.com ©Martin Stokley 2011-2013 130 | P a g e 16. Limitation of Liability. IN NO EVENT UNLESS REQUIRED BY APPLICABLE LAW OR AGREED TO IN WRITING WILL ANY COPYRIGHT HOLDER, OR ANY OTHER PARTY WHO MODIFIES AND/OR CONVEYS THE PROGRAM AS PERMITTED ABOVE, BE LIABLE TO YOU FOR DAMAGES, INCLUDING ANY GENERAL, SPECIAL, INCIDENTAL OR CONSEQUENTIAL DAMAGES ARISING OUT OF THE USE OR INABILITY TO USE THE PROGRAM (INCLUDING BUT NOT LIMITED TO LOSS OF DATA OR DATA BEING RENDERED INACCURATE OR LOSSES SUSTAINED BY YOU OR THIRD PARTIES OR A FAILURE OF THE PROGRAM TO OPERATE WITH ANY OTHER PROGRAMS), EVEN IF SUCH HOLDER OR OTHER PARTY HAS BEEN ADVISED OF THE POSSIBILITY OF SUCH DAMAGES. 17. Interpretation of Sections 15 and 16. If the disclaimer of warranty and limitation of liability provided above cannot be given local legal effect according to their terms, reviewing courts shall apply local law that most closely approximates an absolute waiver of all civil liability in connection with the Program, unless a warranty or assumption of liability accompanies a copy of the Program in return for a fee. EPOS 4 Excel v1.5.2 Website: epos4excel.weebly.com ©Martin Stokley 2011-2013 131 | P a g e Appendix C – Calculations used in the EPOS 4 Excel source code Sales promotions such as ‘3 for 2’ offers are not as simple as people sometimes think (eg. just setting one item’s price to zero) as you have to take into account the tax due on the sale items. The HMRC has specific VAT rules (in the UK) for promotions on mixed VAT sales.1 The following calculations outline how the E4E program calculates the effect of promotions on item prices and item VAT. They enable you work out the equivalent individual item prices in a promotions after deals and discounts have been applied such that the VAT charged on individual items is correct. NOTE: These calculations have been checked by an accountant to check that they calculate the UK VAT correctly for mixed rate VAT products, however use them at your own risk. No guarantee is given that they are correct and are valid for all countries. If you wish to use them in your own programs you are advised to check that they continue to accurately reflect UK VAT rules or your own countries tax rules before use. No liability will be accepted if they are found to be wrong! VAT fraction calculation How can we calculate the VAT amount from the items gross price (including VAT) and the VAT fraction? N = Net Price; G= Gross Price; V = VAT Rate in %; F = VAT Fraction Gross Price = Net Price + VAT amount which implies (1) which implies (2) Substituting (1) into (2) If V =0 (non-vatable item) then N=G 1 th See http://www.hmrc.gov.uk/vat/managing/charging/discounts-etc.htm, Accessed 19 October 2011 EPOS 4 Excel v1.5.2 Website: epos4excel.weebly.com ©Martin Stokley 2011-2013 132 | P a g e Using the VAT fraction we can therefore calculate the net item price from the gross item price and the amount of VAT due on the item. Deals and discounts In E4E we distinguish between deals and discounts: Discounts – are added by the sales assistant during a sale. They can be discounts on individual items (percentage off an item price / item price change) or discounts off the whole sale (percentage discount off the whole sale / monetary discount off the whole sale) Deals – are added automatically by E4E when a specific group of items appear in the sale basket (ie. buy X for Y / by X for £Y) and only affect the specific items in the deal % Discount off the whole sale How do we work out the effect on individual item prices of a percentage discount off the whole sale? A percentage discount is equivalent to the multiplying the sale price by D% where S = total sale amount without discount; Si = individual item price without discount ∑ Multiplying each item price by D% means we find the actual price each item was sold for. We can then calculate the VAT due on the discounted individual items, using these altered item prices, from the VAT fraction method detailed above. Converting a monetary discount off the whole sale to an equivalent % discount How do we work out the effect on individual item prices of a monetary discount off the whole sale such that the VAT can be calculated correctly for a sale which contains products with different VAT rates? S = total sale amount without discount; Si = individual item price without discount; D£ = monetary discount (amount in pounds to discount sale by) We can consider a monetary discount as equivalent to a percentage discount: (see % discount section above for definition of D%) Where ∑ (sum of the individual item prices) The equivalent percentage discount to the monetary discount is: EPOS 4 Excel v1.5.2 Website: epos4excel.weebly.com ©Martin Stokley 2011-2013 133 | P a g e ∑ ∑ According to HMRC VAT rules for mixed VAT products the monetary discount of a sale must be apportioned amongst the items in the sale in proportion to the original item prices. After this apportionment we can calculate the VAT due on each item using the VAT fraction method detail above. Item price after the appropriate proportion of the monetary discount is applied: ie. the proportion of the monetary discount applicable to an individual item is: Total price after monetary discount is the sum of the individual item prices less their portion of the monetary discount: ∑ ∑ ∑ ( ) ∑ ( ) (3) But above we had ∑ (4) Comparing (3) and (4) we again find that (5) Therefore apportioning the monetary discount across the items of the sale in proportion to the original item price is equivalent to considering a monetary discount as a percentage discount on each individual item price using equation (5). If you multiply each item price by (5) the monetary discount will be apportioned amongst the items correctly according to HMRC guidelines for mixed VAT products. This means we find the actual price each item was effectively sold for. We can then calculate the VAT due on the individual items using these altered item prices and the VAT fraction method outlined above. Combining monetary discounts and percentage discounts off the whole sale When there is both a percentage discount off the sale AND a monetary discount off the sale, we take the monetary discount off first before applying the percentage discount ie. Doing it this way works in the favour of the retailer rather than the customer. If we write a monetary discount as an equivalent percentage then we get: EPOS 4 Excel v1.5.2 Website: epos4excel.weebly.com ©Martin Stokley 2011-2013 134 | P a g e This means we can combine simply a percentage discount and a monetary discount with the monetary discount being apportioned amongst the item prices appropriately according to HMRC guidelines for mixed VAT products. Deals: Buy x items for £y How do we work out the effect on individual item prices of a buy x items for £y deal such that the VAT can be calculated correctly for a sale which contains products with different VAT rates? As a deal only effects the items included in the deal and not any other items in the sale basket, first we assume for our calculation purposes that we only have the x items that are in the deal. Ix = Original item price; I = Sum of original deal item prices; D£ is the monetary discount we need to add to make the deal items cost = £y ∑ (Sum of deal item original prices) ∑ (Total of items in the deal after deal is applied) According to HMRC guidelines for mixed VAT products we need to apportion the deal total (£y) amongst the items in the deal in proportion to their original item prices. Apportioning the deal total across the items in the deal is therefore equivalent to applying a monetary discount of D£ to the x items. Simplifying this further: ( ) (6) We can therefore consider that applying a deal to make x items cost £y is equivalent to multiplying the price of each individual item in the deal by (6). Doing this will apportion the deal price (£y) amongst the items in the deal according to HMRC rules for mixed VAT products. We can then calculate the VAT due on the individual items by using these altered item prices and the VAT fraction method outlined above. Deals: Buy x get cheapest y free How do we work out the effect on the individual item prices of a buy x items get cheapest y free deal such that the VAT can be calculated correctly for a sale which contains products with different VAT rates? As a deal only effects the items included in the deal and not any other items in the sale basket, first we assume for our calculation purposes that we only have the x items that are in the deal. EPOS 4 Excel v1.5.2 Website: epos4excel.weebly.com ©Martin Stokley 2011-2013 135 | P a g e Ix = Original item prices for the x items; Iy = item prices of the y cheapest items; I = Sum of original item prices; D£ is the monetary discount we need to take off to effectively make the y cheapest free ie. the sum of the prices of the y cheapest items. ∑ ∑ ∑ (sum of all item prices) (sum of the cheapest y item prices) ∑ (price of the items after deal has been applied) According to HMRC guidelines for mixed VAT products we need to apportion the monetary discount needed to buy x and get the y cheapest free amongst the items in the deal in proportion to the original item prices. ∑ ∑ ( ) ( ∑ ∑ ) ( ∑ ) (7) Therefore the monetary discount we need to apply to each item price in the deal to give ‘x items with the cheapest y free’ price is equivalent to multiplying each individual item price in the deal by (7). The item prices will then be apportioned appropriately according to HMRC rules for mixed VAT products. Multiplying each item price by (7) means we find the actual price each item was sold for. We can then calculate the VAT due on the individual items in the deal by using these altered item prices and the VAT fraction method outlined above. Procedure for applying deals and discounts: For a complex sale basket we need to combine deals and discounts off the whole sale together. To work out the final effect on the item prices in the whole sale after all discounts and deals have been applied use the following procedure. We can then calculate the VAT due on the individual items by using these altered item prices and the VAT fraction method outlined above. 1) Apply any deals due on the sale basket first Calculate the effect of any deals on individual items prices for each occurrence of a specific deal in the sale basket. ie. Sale basket contains numerous items. X of these items make up an occurrence of a specific deal eg. buy x for 2, buy x for £1 a) Work out what the total value of the X items in the deal ONLY should have been b) Work out what the amount of discount due on these X items EPOS 4 Excel v1.5.2 Website: epos4excel.weebly.com ©Martin Stokley 2011-2013 136 | P a g e c) According to which deal you are applying work out the multiplier calculated above (buy X for £Y OR buy X for Y) d) Apply that multiplier to the prices for the X items in the deal ONLY. e) Repeat this procedure for any other occurrences of deals in the basket ie. if you have two buy 1 get 1 free deals in the basket you go through the procedure for the first 2 items that make up the first occurrence of the buy 1 get 1 free deal and then you go through the procedure for the second 2 items that make up the second occurrence of the buy 1 get 1 free deal You have now calculated how the item prices have been affected by the deals applied to the sale. 2) Next apply any monetary discount that is due off the whole sale basket Make sure any deals have been applied to the item prices first. Now the monetary discount of the whole sale is applied to EVERY item in sale basket as follows: a) Work out sale total after deals have been applied b) Work out what sale total will be after the additional monetary discount has been added to the whole sale c) Work out b) as percentage of a) d) Apply that additional % across all item prices (after deals have been applied) in the sale 3) Lastly apply any percentage discount that is due off the whole sale basket Make sure any deals and any monetary discounts have been applied to the item prices first. Lastly apply any additional percentage discount off the whole sale to EVERY item in the sale basket. This procedure enables us to combine a complex combination of deals and discounts in a sale basket. It calculates the effect on item prices such that you can calculate the VAT due on the sale. The item prices are altered in such a way that the VAT is apportioned according the HMRC rules on mixed VAT products. The customer should only see the original item prices + details of any discount amounts on the receipt. To accurately calculate the VAT on the sale we calculate the VAT due on the altered item prices (after deals, monetary and percentage discounts have been applied) and not the original item prices. This correct VAT (after deals / discounts) is detailed for the customer on their receipt. EPOS 4 Excel v1.5.2 Website: epos4excel.weebly.com ©Martin Stokley 2011-2013 137 | P a g e Appendix D – Description of the system data files created by EPOS 4 Excel These files are used by E4E to store essential information and can be found in the systemdata folder in the place where you store the E4E data (see E4E file settings for more details): Productdata.xlsx = An Excel workbook containing a list of imported / added products. It also contains a copy of the list of tax codes / classes and corresponding % tax rates from the tax settings screen. The file layout is as follows: Column A: Column B: Column C: Column D: Column E: Column F: Column G: Column H: Column I: Column J: Column K: SKU / Item Code Item Description Item Price (either including tax or excluding tax depending on your E4E tax settings) Item tax class code A deal code if the item is linked to a specific deal Quantity of the item delivered Quantity of the item in stock Quantity of the item sold Item Description 2 Item Description 3 Item Stock Reorder level Column L: Column M: Tax class code % tax rate which corresponds to the tax class code NOTE: Row 1 contains column headings Recieptmessage.txt = A text file containing the customisable message that appears at the end receipts Dealsdata.xlsx = An Excel worksheet containing a copy of the data from the deal code setup screen Column A: Column B: Column C: Column D: Column E: Column F: Column G: Deal name (max 20 characters) Buy any X and get the Y cheapest free deal code Buy any X and get for £Y Buy X different for £Y Buy X or more of the same item and change item price to £Y X Y NOTE: Each individual deal is represented by a row on the worksheet. No column headings EPOS 4 Excel v1.5.2 Website: epos4excel.weebly.com ©Martin Stokley 2011-2013 138 | P a g e Appendix E – Accessing the visual basic for applications (VBA) source code for EPOS 4 Excel It is possible to access the source code for EPOS 4 Excel using the developer functions built into Excel. You will need to enter a password to access the VBA source code. The password is: EPOS4excel (password is case sensitive) Only those who have knowledge of programming or VBA should attempt to alter this code. Why have the source code password protected? From experience in the development of E4E, on the rare occasion that E4E has crashed due to a bug, if the source code is not password protected then the user who knows nothing about VBA can accidently make changes to the source code by choosing to ‘debug’ it. These accidental changes in turn can cause E4E to fail completely! Having the source code password protected prevents this error happening whilst still allowing advanced users to access the source code! To access the VBA source code you will need to show the developer tools on the Excel ribbon – see http://www.addintools.com/documents/excel/how-to-add-developer-tab.html On the developer tools ribbon then click the visual basic button When the visual basic environment appears, if you double click on ‘module 1’ (left hand side window) you will then be asked for the password for accessing the source code. EPOS 4 Excel v1.5.2 Website: epos4excel.weebly.com ©Martin Stokley 2011-2013 139 | P a g e Appendix F – Retrieving forgotten security passwords If the security settings in E4E are enabled and you forget the sales, supervisor and administrator passwords for E4E you can retrieve them in the following way. 1. On the main EPOS options screen right click on the options tab at the bottom left of the screen and choose unhide from the menu 2. From the pop up box click on the security worksheet and click ok. 3. The security setting screen will appear and you will be able to see / alter the security passwords. 4. Click the return to options button to return to the options screen. EPOS 4 Excel v1.5.2 Website: epos4excel.weebly.com ©Martin Stokley 2011-2013 140 | P a g e Appendix G – Troubleshooting In this appendix we will detail some solutions to problems that people have had with EPOS 4 Excel: Downloading EPOS 4 Excel from epos4excel.weebly.com – Internet Explorer Users Internet Explorer sometimes downloads an Excel file and changes the file extension to .zip and you won't be able to open the file in Excel. If this happens to then you will need to manually rename the file from epos4excel_v1.2.zip to epos4excel_v1.2.xlsm (see http://www.mediacollege.com/microsoft/windows/extension-change.html for more details about changing the file extension) Compile Error in Hidden Module 1 Possible solution: This error can happen if Excel is not set up right. See Appendix E for how to access the VBA source code. When you are at the screen showing the source code (the VBA development environment) for E4E: 1. Go to the Tools menu, choose References. 2. Make sure that Microsoft Office 14.00 Object Library is ticked (or the highest number of the Microsoft Office Object is ticked if you do not have 14.00) 3. Untick any items that have the word ‘MISSING’ next to them. 4. Click ok. 5. Close the VBA source code / development environment window. 6. Save the worksheet and close Excel. 7. Re-open the worksheet and hopefully the error will be solved Runtime Error: 1004 – Method Save of Object Workbook Failed Possible solution: This can happen if Excel crashes and then recovers your workbook. If you then use this recovered workbook any changes you make to the E4E will not be able to be saved and it will cause this error. You can either: 1. Go to the Excel file menu and choose ‘save as’. Then save your workbook either overwriting the old workbook or with a new filename. This should hopefully rectify the problem 2. OR close Excel without saving and re-open the original E4E workbook that you were working on before Excel crashed. NOTE: This may mean you lose any changes you made to the E4E workbook. ‘Runtime Error: 1004 – Application or object defined error’ when trying to import products Possible solution: Sometimes this can be problem with the Excel worksheet you are trying to import. Open a new blank Excel workbook and copy the product list you are trying to import to sheet1 of this new workbook. Save it under a new name. Now try importing this new workbook which contains your data instead of the original problematic one. Excel Crashed and has recovered the E4E workbook It is best not to use any recovered workbooks as this can lead to other errors (such as the save error detailed above). Close down any recovered workbooks, close Excel and then start again with the original E4E worksheet you were working on before Excel crashed. EPOS 4 Excel v1.5.2 Website: epos4excel.weebly.com ©Martin Stokley 2011-2013 141 | P a g e Repairing your Excel installation Very occasionally repairing your Excel installation can help resolve unexplained errors: You can repair your Office 2010 programs by doing the following: 1. 2. 3. 4. Click the Windows Start button, then click Control Panel. Click Programs and Features. Click the Office 2010 program that you want to repair, then click Change. Click Repair, then click Continue. You might need to restart your computer after the repair is complete. EPOS 4 Excel v1.5.2 Website: epos4excel.weebly.com ©Martin Stokley 2011-2013 142 | P a g e Appendix H – EPOS 4 Excel Version History EPOS 4 Excel v1.5.2 (25th May 2013) New features / changes: 1) Added the option (on receipt settings screen) to choose whether you include the full sale tax details on the receipt or not. 2) Added the ability to include a user defined reference number on the receipt (receipt settings screen). If this option is enabled then when you complete a sale you will be asked for sale reference number when printing the receipt. 3) Added item price to list of items generated with item autocomplete function. Fixes: 1) Fixed a problem with select items to order on pre-paid order screen. If the number of items in sale was too great then some items could end up being missed out of the order details when it was saved due to the maximum number of characters in an excel cell. Made this problem much less likely to happen by combining items with same SKU / item code. 2) Fixed a problem with prepaid orders caused by the select items form not handling alphanumeric item codes properly. 3) The captions for the column headings in the customer order files (ordersDDMMYYYY) were wrong. This is now corrected for consistency. (The wrong column headings did not affect the working of E4E) 4) When using prices excluding tax and completing a refund, that refund amount was reduced by the tax amount rather than added to the tax amount. This was caused by a bug the sales data where the 'Net Item Price After Sale Deal/Disc' and 'Gross Item Price After Sale Deal/Disc' were always positive, even for refunds. The refund issue is now fixed and in the sales data item price after sale deal / disc are now positive for sales and negative for refunds. 5) Fixed an issue when item codes were numeric and contained leading zeros. E4E would drop the leading zeros causing problems finding the product on the product list. This is now fixed and leading zeros in items codes are saved correctly. EPOS 4 Excel v1.5.1 (30th April 2013) New features / changes: 1) Added a 'pre-paid order?' check box to the fast pay window 2) Added new report 'Sales assistant total sales report'. Shows how much each sales assistant sold on each of the selected dates. 3) Added new report 'Day full transaction report'. Show details of each transaction for the specified till and date. 4) Added the option on the EPOS settings screen to disable the showing of the sale sub-total on the sales screen. 5) When creating a customer order you are now forced to include either customer email address or phone number. 6) Changed pre-paid customer order procedure. When taking payment you are now asked to select which items in the sale basket are being ordered. 7) Added new report 'Till reconciliation figures by date'. This gives a breakdown of the amounts of each payment type that were taken on the specified dates. 8) Added the ability to reprint a receipt for any previous sale if you know the transaction number. 9) Added quantity of item in stock to the item autocomplete list. Fixes: EPOS 4 Excel v1.5.2 Website: epos4excel.weebly.com ©Martin Stokley 2011-2013 143 | P a g e 1) Fixed a problem with calculating total sales tax on the end of day till reconciliation totals. Due to a bug it used to always show 0.00 but now it shows the accurate total sales tax for the day. 2) When using the fast pay window, if you chose more payments options and then completed sale you were returned to the fast payments window rather than the sale basket. This has now been fixed. 3) Fixed various problems when choosing report dates if you are using an American date format (mm/dd/yyyy) 4) Fixed a bug which stopped the user being able to print the end of day till reconciliation figures 5) Fixed a problem with printing reports where the longer the report the smaller the print size. Now prints at a size appropriate to page width. 6) Fixed a bug where a sale memo (full payments window) of a previous sale could sometimes be copied into the current sale details when using the fast pay window. 7) Fixed a problem when using a , rather than . as decimal separator in the item price. On the current sale sheet this could cause E4E to be unable to find an item which is on the product list and therefore it not be able to add it to a sale. EPOS 4 Excel v1.4.4 (21st January 2013) New features / changes: 1) Added the option to update the product list price if you change an item's price when you have selected to force the user to give a reason for the discount. Fixes: 1) Fixed various bugs on the payments form which were caused by changes in v1.4.2 to make E4E compatible with regional number formats. 2) Stopped user being able to change item price on the sales screen to a negative amount 3) If you changed a line on the sales screen from a refund (negative quantity) back to a sale (positive quantity) then this still left the item price as negative when it should have swapped to positive. This has now been fixed. EPOS 4 Excel v1.4.3 (5th December 2012) Fixes: 1) Fixed a bug on the add / alter product form which was introduced in v1.4.2. If you tried to enter an item code which was not numeric this caused E4E to crash and report an error. This has been fixed and no errors are now caused for alphanumeric item codes. EPOS 4 Excel v1.4.2 (13th November 2012) New features: 1) Added new report 'products sold sales amount' 2) Added keyboard short cuts on the add / alter product window 3) Altered the wording of the column heading 'date total sales (inc. tax)' on the 'tax by date' report to 'date total sales (gross)'. The old wording could be misleading and imply the figure only included sum of the taxable products gross prices where as it is made up of the sum of gross prices of both taxable and non-taxable products sold. Fixes: 1) Some users had problems on the add / alter products form as it wouldn't recognise what was a valid number for an item price. This has now been fixed and the user is warned as they type in the box if they type an invalid character. 2) When selling items with non-integer quantities the sale price was not always calculated correctly to take into account the fractional part of the quantity. This has now been fixed. EPOS 4 Excel v1.5.2 Website: epos4excel.weebly.com ©Martin Stokley 2011-2013 144 | P a g e 3) Some behind the scenes changes to the code make E4E more compatible with regional number formats EPOS 4 Excel v1.4.1 (8th October 2012) New features / changes: 1) Dates for reports etc. are now chosen via a calendar and not drop down menus 2) Added ability to print and redeem gift voucher. On the EPOS settings screen 'Gift voucher' is now a fixed payment type alongside cash. 3) Added a new sales data column - Vouchers - which details gift vouchers redeemed and activated. 4) In E4E reports changed references to VAT to be Tax. Also changed sale data column "Total Sale VAT" to "Total Sale Tax". This is to make language about sales tax in E4E not UK centred and applicable internationally. 5) Item prices stored in E4E can now be exclusive of sales tax as well as inclusive of sales tax. If item price is exclusive of sales tax the receipt shows exclusive item prices, a sub total, amount of sales tax to be added and then final sales total. This corresponds to standard layout for American receipts. 6) Added a new sales data column - Net Item Price Before Sale Deal/Disc - this is to allow for the fact that item prices in E4E now can include or exclude sales tax 7) Added new sales data column - Item % Tax - so if you change the % tax rate for a tax code your sales data files can record the % tax rate that linked to that tax code and applied to an item when it was sold. 8) Added a new report - tax by date and tax code - it shows the amount of sales sold under each tax code and the amount of tax for each tax code on each date between user specified dates. 9) On the narrow receipt template you can now set the height of any blank rows on the receipt to save paper. You also now set the height of the logo row by entering the row height in the box. It is necessary to set logo row height as this then allows the setting of the height of blank rows. 10) The receipt message can now contain carriage returns which means you can control the layout of the receipt message more adequately. 11) On the sales screen when the item price change box reason box is showing you can now press the enter key to select the reason and hide the box. 12) An alternative way of adding items to a sale is provided by the Item Code Autocomplete button on the sales screen. 13) Added the ability to import sales data files and customer orders data files into your E4E installation. 14) You can now choose on the EPOS settings screen whether or not to show the till total sales on the sales screen. 15) There is now an option to set the width of the narrow receipt template in centimetres by typing in the required number on the template. 16) Added an optional fast pay window to the payments process to make payments where customer usually gives you exact money faster. Fixes: 1) Sometimes closing an E4E window using the close button (X) would cause an error. This has been fixed. 2) There was a bug in the code such that the column / row headings were not shown on the narrow receipt template but were shown on the receipt settings screen instead. This has now been fixed. 3) On the receipt settings screen it was possible to enter a non-numeric value for the number of characters to be shown on receipt template. This has now been fixed and you can only enter a whole number. 4) On the epos settings screen if you tried to change the screen lock password and then clicked cancel the old screen lock password was wiped - this is now fixed. 5) When you cleared the product list it didn't clear the stock re-order levels - this has been fixed EPOS 4 Excel v1.5.2 Website: epos4excel.weebly.com ©Martin Stokley 2011-2013 145 | P a g e 6) Sometimes on the search results screen columns could disappear off the screen and couldn't be viewed even though the data was there. This bug has now been fixed. EPOS 4 Excel v1.3.1 (26th July 2012) New features / changes: 1) Added product re-order levels and product re-order report (a negative product re-order level means that product is not included in the re-order report) 2) Added a new deal 'Buy X or more of one item and change item price to £Y' this enables you to do bulk buy discounts 3) Added the option for user to define date to be used for transaction number and sales data file name rather than using the current system date 4) This version splits the force user to give reasons for discounts option into two - force user to give reasons for sale discounts AND force user to give reasons for item price changes. Changed the way user can give reasons for item price changes can either double click item to change price or using arrow keys change it manually. 5) Added ability to view and edit customer orders from dates other than the current date. 6) When showing customer orders - you now choose which order to edit by highlighting it using arrow keys and then clicking the relevant button 7) Buttons and column headings are now static at the top of the current orders screen when you scroll down 8) Added a button so that it is possible to print out all customer orders shown on the customer orders screen to a user specified printer 9) Added a button to print out the highlighted customer order to a user specified printer on the customer orders screen 10) Added option on payments form so for refunds the items can go back into sellable stock or not previously all refunded items had been returned to stock, but this may not always be appropriate if items are damaged. 11) Added the option to alter the name of the sales tax on the receipt to take account of global differences in names. On the receipt settings screen you can now determine what the sales tax name will be for the receipt eg. VAT, GST etc. 12) In training mode you are now asked for a till number to completely simulate the making sales process. 13) Added order statuses which enable you to determine where orders are in the process of being fulfilled and if they have been cancelled. 14) You can edit an order with a specific date / order number 15) Added the ability to search for customer orders between specific dates by specific terms / order statuses 16) Added optional (customisable) quick product buttons to the sale screen 17) You can now choose if the created sales data file is an ASCII or unicode .csv file. Unicode provides the ability to use characters from non-english languages in the sales data. 18) On the EPOS settings screen you can now assign a payment type to be automatically filled with the sale total on the payments screen. Fixes: 1) Fixed a bug with the screen lock on the sales screen where the cancel button should have been disabled when asking for a password 2) E4E would always default on opening the worksheet to printing the VAT in UK £s on the receipt if EPOS currency was not UK £s. This could be annoying for anyone who is always using a different currency. E4E now keeps the last user setting for this option and does not default to to printing VAT in UK £s on the receipt. EPOS 4 Excel v1.5.2 Website: epos4excel.weebly.com ©Martin Stokley 2011-2013 146 | P a g e 3) If you added 100s of items to a sale basket the payments process could take an inordinate amount of time. Speeded up the payments code and also removed unnecessary code left from previous versions of E4E. 4) When choosing which columns to print on the product search results screen, the user chosen labels for description 2 and description 3 were not used. This has now been rectified. 5) The column headings on the product search results screen were not static and lost when you scrolled down through the search results. This has now been fixed and the column headings are now static. 6) Fixed a problem where if you changed the font size on the narrow or wide receipt templates this would only be retained for one sale and then it would revert back to the old settings. E4E now keeps the font size settings permanently. 7) Fixed a problem of trailing spaces being left on numbers in the sales data. Also removed trailing spaces from the lines in the sale deals/disc field and removed the carriage return that appeared at the end of this field. 8) The cells in column V on the current sales screen were not locked and so were editable / selectable by user. This has now been rectified, cells in column V on the current sale screen are now locked and not editable. 9) The reprint previous sales receipt on the sales screen did not reprint a wide sales receipt if this was being used in E4E. This is now fixed. 10) Fixed a bug with the clear button on the item details window (sales screen) which caused E4E to crash 11) Fixed a problem where if you changed the font on the sales screen where item details are added this would only be retained till the next sale. Font changes are now retained permanently. EPOS 4 Excel v1.2.3 (24th April 2012) New features / changes: 1) Added the ability to choose a specific date for till reconciliation totals, rather than just being able to calculate till reconciliation totals for today. Also added total VAT for the till on the chosen date to the reconciliation totals. 2) Changed the way you alter individual item prices in a sale - Double click on an item line in the sale to bring up a box with item fuller details. This box has the option to discount that item's price by a percentage between 0% and 100%, as well as enabling you to change individual item price. Details of the discount / price change are recorded in a new field in the sales data (Item Price Change/Disc) 3) Added optional user security levels (sales, supervisor and administrator) with each one having a higher amount of access to E4E functions. This enables you to limit refunds, adding / editing products to a supervisor etc. Deleting products and clearing the current stock levels are limited to administrators. 4) If security levels are enabled then screen lock on the sales screen can also be removed using sales, supervisor and administrator passwords 5) Added a new sales data field = Sale Deals/Discounts (same text that appears on the receipt which details sale deals / discounts) Added a new sales data field = Item Product List Price Added a new sales data field = Item Description 2 Added a new sales data field = Item Description 3 Added a new sales data field = Item Price Change/Discount (details changes to individual item prices by sales assistants) Also Column AB in the sales data is now no longer fixed. 6) Changed sale data column headings to reflect deal/discount distinctions (NOTE: Gross item price reflects the item's price after any individual item price changes / percentage discounts are made, not the price of the item on the product list) 7) Sale monetary and percentage discounts are now added when you take payment and you can specify reasons. The reasons are user specified under the EPOS settings screen EPOS 4 Excel v1.5.2 Website: epos4excel.weebly.com ©Martin Stokley 2011-2013 147 | P a g e 8) Added option to force user to give a reason for a discount 9) Current sale screen now shows first 25 characters of item description 10) Added new reports: 1) Produce a list of all products sold between specific dates 2) Produce a list of refunds given between specific dates 3) Produce a list of total tax by date 4) Produce a list of tax by transaction 5) Produce a list of products refunded between specific dates 11) Added a print button to the product search results screen (this prints out to a user chosen printer which is attached to the computer, but not to a receipt printer) 12) Added the option to force the user to give reasons for refunds 13) Made the control buttons at the top of the product search results static so when you scroll down so they can always be seen 14) Added two extra description fields for products 15) Added a button to enable the user to change the active printer on the current sale screen and the receipt setting screen 16) When you change the folder for the storage location of the E4E data in the file settings you are now asked if you wish to copy existing sales / orders data AND existing system data (product list, receipt message, deals list) across to new the new storage location 17) Added option to automatically create back-ups (*.bak) of the sales data files (found on sales data settings screen) 18) You can now use the keyboard shortcut 'Alt y' on the sales screen to 'click' the payments button 19) Sale sub-total (ie. before sale deals and discounts are added) is now displayed on the current sale screen Fixes: 1) Fixed a bug where automatic prompt of checking for updates did not wait at least 31 days between update checks 2) Fixed a bug that occasionally caused an error when trying to export the current sales levels to a file 3) Fixed a bug where when you cancel changing the sales assistant name it deleted the old assistant name anyway 4) Fixed a bug where sometimes when you deleted a product from the product list it also deleted a tax class and corresponding VAT rate 5) Problems can be caused in E4E if you try to add / import a product with an item code of '0' (zero). Fixed the code so you can no longer add / import a product with item code of '0' (zero) 6) Fixed a bug where for refunds the sale total VAT in the sales data was a positive amount and should have been negative. 7) Fixed a bug where if blank rows were left on the current sale they weren't always removed when the payments button was clicked 8) Fixed a bug with the buy X for £Y deal where E4E did not recognise if the total cost of the items in the deal was less than £Y. The deal was still applied therefore increasing the item prices so the total cost of the items in the deal was £Y. The deal is now no longer applied if the total cost of items in the deal is less than £Y. 9) Fixed a bug which could cause errors when taking payments if numbers were formatted as '0,00' rather than '0.00'. Numbers can now be formatted in both ways. EPOS 4 Excel v1.1 (26th January 2012) New features: 1) Added the ability to check for updates to the EPOS4Excel worksheet over the internet 2) Added option on EPOS settings screen to automatically prompt user to check for updates at start up if not done so in the last month EPOS 4 Excel v1.5.2 Website: epos4excel.weebly.com ©Martin Stokley 2011-2013 148 | P a g e 3) Added option to turn off showing the license screen at start up 4) Added a button on the sales screen to allow user to change the till number 5) Added the ability to print wide receipts (for ordinary printers) as well as narrow receipts (for receipt printers) Fixes: 1) Fixed a bug with the 'Buy X different for £Y' deal which meant that EPOS4Excel would sometimes apply the deal even if there were X items but not X DIFFERENT items 2) Fixed a bug where the end of day till reconciliation totals did not show totals for payment type 5 3) Fixed a bug where if you used E4E to make sales continuously over a period that spanned two dates then E4E did not update the date on the sales screen or start a new sales data file EPOS 4 Excel v1.0.1 (14th December 2011) Fixes: 1) Fixed a bug which meant that monetary and percentage discounts were not being calculated properly EPOS 4 Excel v1.0 (8th November 2011) EPOS 4 Excel v1.5.2 Website: epos4excel.weebly.com ©Martin Stokley 2011-2013