1
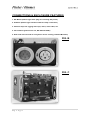
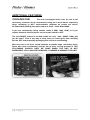
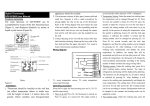
Flicker / Dimmer
2,000 Watt Lighting FX Generator & Dimmer
INSTRUCTION MANUAL
McIntire Enterprises, Inc.
12986 Mapleleaf Ct. NE. Aurora, OR 97002-8418
Phone: 503-678-6236
www.magicgadgets.com
[email protected]
Flicker / Dimmer
Jan.2015 REV.A
TABLE OF CONTENTS
INTRODUCTION
Pg.2
Introduction
Pg.3
Safety first
Pg.4
Control layout & function
Pg.5
Connections & enclosure features
GETTING STARTED / INSTALLATION
Pg.6-7 Getting started
Pg.7
Additional features
TROUBLESHOOTING
Pg.8
Troubleshooting
Pg.9
Warranty
1|Page
Flicker / Dimmer
INTRODUCTION
Thank you for purchasing a Magic Gadgets product! Every unit is
hand assembled to ensure a quality build that will last for years. The use of
high end components on the inside makes a big difference; outlasting
other products many times over. Our company does not participate in
mass marketed ad campaigns; we instead rely on the customer (that’s
you), to let everyone know how cool this gadget really is!
One of the more popular items, this all in one device has two
settings, dim or flicker. We put our best randomized single firelight effect in
and the ability to set a LOWEST output light level & a HIGHEST output light
level. This dual dimming ability lets you set an effect range without
sacrificing the effect quality. Easily control the speed of the effect with a
turn of the knob. Use multiple units & lamps from a single source area to
create extremely realistic and massive firelight effects!
Cooling is passive but we include a fan for extreme conditions or
if silence is not needed. This unit is capable of 2,000 Watts nominal and
2,400 Watts Max power handling from a standard household outlet. With
proper wiring, connectors & fuses these units can easily go up to 3K. It will
also dim or flicker anything that’s dimmable.
This product utilizes industrial grade 5-15 input & output
connectors along with an overrated 40A power device. Protection is
provided by a 20A fuse (fuses are fast) each time you replace them, it’s like
installing a new breaker, at a fraction of the cost. We also use high
temperature Teflon coated wire & the best interconnects. This means your
investment will last through years of use or abuse!
2|Page
Flicker / Dimmer
Jan.2015 REV.A
SAFETY FIRST!
WARNING - TO REDUCE RISK OF FIRE OR ELECTRICAL SHOCK, DO NOT EXPOSE
THIS EQUIPMENT TO RAIN OR MOISTURE. DO NOT REMOVE COVER. NO USERSERVICEABLE PARTS INSIDE. REFER SERVICING TO QUALIFIED TECHNICIAN.
DO NOT EXPOSE UNIT TO DIRECT SUNLIGHT OR EXTREME TEMPERATURES.
REMOVE FROM POWER BEFORE CLEANING & ONLY WITH A DRY OR SLIGHTLY
DAMP CLOTH. A MILD SOLVENT (SUCH AS ISOPROPYL ALCOHOL) MAY BE USED
TO REMOVE HEAVY DEPOSITS.
DO NOT BLOCK ANY VENTILATION OPENINGS. MAITAIN A SIX INCH (152.4mm)
CLEARANCE FROM ANY ITEMS THAT COULD IMPEDE COOLING.
DO NOT MODIFY THE PLUG OR SOCKET IN ANY WAY. THE GROUND PINS ARE
PRIVIDED FOR YOUR SAFETY. CONSULT AN ELECTRITIAN TO REPLACE AN
INADEQUATE WALL OUTLET OR WALL BOX.
CONNECT AC POWER ONLY TO A MAINS SOCKET WITH A PROTECTIVE EARTHING
CONNECTION & SUPPLY CIRCUIT PROTECTION I.E. CIRCUIT BREAKER, FUSE, ETC.
UNPLUG DURING LIGHTNING STORMS OR WHEN NOT BEING USED FOR A LONG
PERIOD OF TIME.
ONLY USE EXTENSION CABLES THAT ARE CAPABLE OF HANDLING CURRENT
REQUIRED FOR YOUR PARTICULAR APPLICATION. PROTECT POWER CORDS
FROM BEING WALKED ON OR PINCHED. AVOID THE USE OF UNGROUNDED
POLARIZED PLUGS; DAMAGE TO THE UNIT MAY RESULT.
3|Page
Flicker / Dimmer
CONTROL LAYOUT AND FUNCTION
1. Low set channel (control lowest light level)
2. High set channel (control highest light level)
3. Mode switch (select Flicker or Dimmer)
4. Mode LED (indicates Flicker or Dimmer)
5. Speed control (sets the speed of the effect)
6. BLF type fuse holder with 20A fast-blow fuse installed
7. NEON output indicator (glows orange with output level)
8. Ground fault indicator (flashing green) *does not indicate a high current ground
FIG. A
4|Page
Flicker / Dimmer
Jan.2015 REV.A
CONNECTIONS & ENCLOSURE FEATURES
1. AC INPUT (Edison type male plug for incoming AC power)
2. OUTPUT (Edison type female socket for lamp connection)
3. Chassis loops for rigging with rope, chain, steel cable, etc.
4. Fan exhaust (pulls hot air out, DO NOT BLOCK!)
5. Heat sink area on back of unit (power device cooling, DO NOT BLOCK!)
FIG. B
FIG. C
5|Page
Flicker / Dimmer
GETTING STARTED
Plug a load up to 2,400 Watts Maximum into the output (fig. B)
Make sure Low set, High set & Speed controls are at ZERO (fig. A)
Set Mode switch to OFF (fig. A)
Using the proper gauge extension cords; apply power to the input (fig. B)
NOTE: The effect in this unit is a firelight based flicker it will also work well
for TV/Film light, even lightning or “bad power” type effects; the unit must
be set based on personal preference. We suggest you take some time
BEFORE the day of the shoot to play with your new toy and get used to
how it operates!
Set mode switch to Flicker
Slowly adjust High set for a more dramatic effect
Slowly adjust Low set for a more subtle effect
THE EFFECT WILL TAKE PLACE BETWEEN THESE TWO LEVELS!
Use the Speed control to adjust how fast your Flicker/Dimmer runs through
its effects
Switch to Dimmer & use the Low set control knob for dimming!
TIP: Use multiple Flicker/dimmers or our other FX devices such as the
Shadowmaker or Flicker 2Digital in combination. This will not only increase
the output power available but provide added realism when creating
firelight effects.
TIP: When using multiple devices, spread the lamps further apart & create a
wider more active shadow motion; when the lamps are clustered together
they will provide a more even effect that’s less dramatic.
TIP: Also try running multiple lamps horizontally and/or vertically.
6|Page
Flicker / Dimmer
Jan.2015 REV.A
ADDITIONAL FEATURES
COOLING FAN
This unit is equipped with a fan, its use is not
necessary; however we do recommend using the it at all times, especially
when operating in HOT environments (ambient air temps are above
80°Fahrenheit) AND @ the rated output of 2,000 - 2,400 Watts MAX.
If you are consistently using smaller loads (1.5kW, 1kW, .5kW) or if you
require absolute silence please set fan mode switch to OFF.
The fan ON/OFF switch is located inside the unit, “wait…WHAT? Why did
you do that?” This is our way to stop users of rented gear from shutting
the fan OFF and potentially damaging the unit from overheating.
We have seen it all from sound blankets to plastic bags, remember these
items will cause overheating and the fan is there to help prevent it! THE
FOLLOWING SHOULD ONLY BE DONE WHEN THE UNIT IS NOT
ENERGIZED! YOU COULD BE SERIOUSLY HARMED & DAMAGE THE UNIT!
7|Page
Flicker / Dimmer
TROUBLESHOOTING
Q. Is there a minimum load?
A. No minimum load is necessary for proper operation.
Q. Will my dimmer work with other loads like LED, Fluorescent, ETC?
A. Although the unit was not designed for use with these types of
loads; their use will not harm the dimmer, and my work
depending on the application.
Q. I keep blowing fuses! What’s wrong?
A. This is happening because there is a short in the electrical
connection, either before or after the unit. Check your cables,
lamps, ETC. You also may be drawing too much current by using
inadequate cabling, check the cord length & capacity chart on
pg.3
NOTE: 25-30A FUSES MAY BE USED IF NECESSARY!
If you are still having trouble with your Flicker/Dimmer please contact us
via e-mail or over the phone. All contact info is at magicgadgets.com
8|Page
Flicker / Dimmer
Jan.2015 REV.A
THE LIMITED LIFETIME WARRANY
Our products will be warranted for the lifetime of the unit & shall be free of any
Manufacturer defects. *The Warranty card must be returned within (30) thirty days to
participate in the program.
PLEASE KEEP THIS PAGE INTACT FOR YOUR RECORDS
Our products are warranted for a period of one (1) year from the date of
delivery, to the original purchaser or lessee, to be free from defects in materials or
workmanship. *We will, at our option, extend this warranty beyond one year. The
warranty terms stated here MUST BE KEPT to validate this extension.
The sole and exclusive remedy for breach of any warranty concerning the
products shall be repair or replacement of defective parts at no charge to the
original purchaser or lessee, at the discretion of McIntire Enterprises, Inc.
These products are designed and intended for use by competent
professionals only. The individual user should determine before use whether these
devices are suitable, adequate, or safe for the use intended. Because individual
applications are subject to great variation, the manufacturer makes no
representation or warranty as to the suitability or fitness of these devices for any
specific application. Direct, incidental, special or consequential damages or losses
resulting from the use, or misuse, of these devices shall be the sole responsibility or
the purchaser or lessee.
(Some states do not allow the exclusion or limitation of incidental or consequential
damages, so the above limitation or exclusion may not apply to you.)
Subjecting the units to excessively rough handling, moisture, high
voltages, overloading the output, operating the unit without proper ventilation,
improper packaging for shipping, damage incurred during shipping, any improper
or negligent use, or any attempt to open & repair or modify the unit, or removal or
obscuring of the serial number label will void the warranty. Warranty may be
limited to original purchaser as shown on original invoice.
PLEASE TAKE A MOMENT AND FILL THIS OUT, YOU MAY NEED IT LATER!
OWNER: ____________________________________________
SERIAL #: _______________ DATE: ______________________
9|Page