1
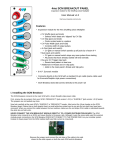
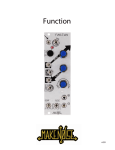
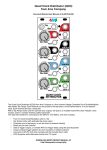
Mutate
Operation Manual Version 1.0
Steven Heath, Matthew Fudge, Daniel Byers
WAVE ALCHEMY
Contents
Introduction ........................................................................................................................... 2
Install Instructions ................................................................................................................. 3
System Requirements ........................................................................................................... 3
Mutate ................................................................................................................................... 4
Raw Waveforms Instrument .................................................................................................. 4
SYNTH Page ................................................................................................................. 4
SEQ Page ...................................................................................................................... 8
FX Page ....................................................................................................................... 13
Designed Presets Instrument .............................................................................................. 15
Credits ................................................................................................................................ 16
Kit List ................................................................................................................................. 17
Introduction
We would like to take this opportunity to thank you for purchasing Mutate - our Kontakt 5
sample-powered hybrid virtual synthesizer, engineered specifically for the creation of
complex and morphing bass sounds.
Mutate was driven by the desire to create a truly unique ‘Bass Machine’ synth capable of
twisting waveforms ‘inside-out’ using extensive modulation and sequencer parameter lock
techniques.
From the start it was our mission to push Kontakt’s scripting capabilities to the limit, to
deliver a synth with an experimental edge, capable of devastating, evolving sounds for the
bass heads.
As the project progressed, it became obvious that although initially designed for bass
sounds, Mutate is capable of a massive range of different tones and colours, which can be
twisted and warped into oblivion to create fresh evolving sounds / sequences which have
never been heard before…
Mutate is powered by an array of raw waveforms and designed preset multi-samples,
recorded directly from a huge hybrid analogue / digital Eurorack modular system, which can
be further shaped and ‘mutated’ using waveform layering, filters, envelopes, extensive
modulation, 32-step parameter locks and FX processing.
Mutate is about twisting, mangling and transforming waveforms into the sounds of
tomorrow…
We hope you enjoy creating new sounds with Mutate as much as we have enjoyed creating
the instrument itself.
The Wave Alchemy Team
Install Instructions
You must have a full registered version of Native Instruments Kontakt 5.2.1 or higher to run
Mutate.
This (non-licenced) Kontakt instrument does NOT work with the free Kontakt player.
1. After purchasing Mutate, fully download the two RAR files named ‘wa_mutate_part1.rar’
and ‘wa_mutate_part2.rar’ to the same location on your hard drive.
2. IMPORTANT - Only double click the first RAR file to unpack the library files. (You cannot
unpack part 2 by itself for example)
You should now have a folder named ‘wa_mutate’. Put this somewhere safe on your hard
drive.
TO LOAD THE INSTRUMENTS IN KONTAKT
1. In Kontakt, open the “Browser” on the left (the folder Icon at the top).
2. Locate the ‘wa_mutate’ folder.
3. Double click any of the .nki files (or drag them into the main Kontakt window) to load the
instruments. You can choose either the ‘Mutate – Designed Presets’ instrument or the
‘Mutate – Raw Waveforms’ instrument.
4. Alternatively, load any of the .nki ‘preset’ files from either the ‘raw waveforms presets’ or
‘designed instrument presets’ folders.
Please note: some of the additional factory presets require Kontakt version 5.5.1 (or higher)
to run.
System Requirements
Full version of Kontakt 5 (this instrument does not work with the free Kontakt player).
4GB free hard disk space.
We recommend a minimum of 4GB of Ram to smoothly run Mutate.
Windows
Windows 7 or Windows 8 (latest Service Pack, 32/64-bit), Intel Core 2 Duo or AMD Athlon
64 X2, 2 GB RAM (4 GB recommended)
Mac
Mac OS X 10.7 or 10.8 (latest update), Intel Core 2 Duo, 2 GB RAM (4 GB recommended)
Mutate
The Mutate instrument comes in two different forms – the ‘Designed Preset Instrument’ and
the ‘Raw Waveforms Instrument’. Both of which are loaded by double clicking the .nki files or
dragging and dropping them into Kontakts main window.
Raw Waveforms Instrument
SYNTH Page
Once you have loaded the ‘Raw Waveforms Instrument’ the first page you will see is the
‘SYNTH’ page. This is the main instrument page that allows you to mix up to four unique
waveforms and a noise source to create complex tones and colours.
The Raw Waveforms instrument is powered by 2730 multi-samples spread across 46
waveform patches. The waveforms are recorded directly from multiple Eurorack modules
and are used (like oscillators) to create unique synthesized sounds.
Start off by selecting the different waveforms you want to mix together by clicking and
holding the different coloured ‘layers’ to show the waveform menu. You can choose from 37
waveforms with 1 waveform selected per layer.
Choose waveforms that contrast each other and balance them nicely using the oscillator
level controls to create a ‘rich’ combination tone.
This is a great starting point, from here you can use filters, modulators and effects to shape
your sound and give it more movement over time.
Here’s a breakdown of all of the controls on the SYNTH page starting with the filter section.
FLT MOD – Sets the level of the Filter LFO modulation.
FREQ – Sets the Frequency of the Low Pass Filter.
RES – Sets the Resonance of the Low Pass Filter.
DRIVE – Sets the Drive of the Low Pass Filter.
FLT ENV – Sets the level of the Filter Envelope Modulation.
AMP ATTACK – Sets the amplifier Attack Envelope
DECAY – Sets the Amplifier Decay Envelope
HOLD – Sets the Amplifier Hold Envelope
SUSTAIN – Sets the Amplifier Sustain Envelope
RELEASE – Sets the Amplifier Release Envelope
LEVEL(s) – Sets the Level for each Oscillator
OSC 1 – Selects the Waveform for Oscillator 1
OSC 2 – Selects the Waveform for Oscillator 2
OSC 3 – Selects the Waveform for Oscillator 3
SUB OSC – Selects the Waveform for the SUB Oscillator
PAN(s) – Sets the Pan Position for each oscillator in the Stereo Field
NOISE – Sets the Level of Noise to be mixed with the other oscillators
FLT ATTACK – Sets the Filter Attack Envelope
DECAY – Sets the Filter Decay Envelope
HOLD – Sets the Filter Hold Envelope
SUSTAIN – Sets the Filter Sustain Envelope
RELEASE – Sets the Filter Release Envelope
ARROW – Switches visibility between the distortion and modulation parameters.
BYPASS – Enables the distortion circuit. Even when all knobs are set to their default value
there will be a subtle coloration of the sound.
INPUT – Sets the Input volume before the distortion circuit.
SMASH – Sets the distortion circuit Smash value.
CRUSH – Sets the distortion circuit Crush value. Middle position is its default position.
BURN – Sets the distortion circuit Burn value.
OUTPUT – Sets the Output volume after the distortion circuit.
The modulation section (accessed by clicking the down arrow just above the CRUSH
control) gives you access to LFO parameters, MOD routings, Effects Sends, Unison,
Velocity and spread.
SEQ Page
The sequencer is the heart of Mutate with 14 lanes that are used to program ‘step locks’ for
the following parameters;
Pitch, Volume, Note Length, Attack, Filter Cutoff, Filter Resonance, LFO Depth, LFO Rate,
Stereo Spread, Smash, Crush, Mod Send, Reverb Send, and Delay Send.
The sequencer can have up to 32 steps, allowing 32 ‘step locks’ per lane. Here is where
Mutate really comes alive!
The sequencer can be a bit tricky to handle at first with so many steps and options available.
Our advice is to keep it simple to start with by using fewer ‘step locks’, or alternatively you
could go all out and twist your sound into oblivion. Either way you will soon get the hang of it
and realise the true power of Mutate.
RATE – Sets the Rate or Speed of the Sequencer.
FREE – When set to ‘Free’ this knob determines the variable speed of the Sequencer.
SHUFFLE – Adds negative or Positive Shuffle to the groove of the Sequencer.
ON – Globally enables and disables the Step Sequencer.
SEQ BUTTON – Displays the SEQ Page.
SYNTH BUTTON – Displays the SYNTH Page.
FX BUTTON – Displays the FX Page
SEQ SELECT – Selects from up to 16 sequences.
COPY – When selected the current Pattern will be copied to the next loaded sequence.
CLEAR – When selected clears the current Sequence.
SEQ SELECTORS – Displays either page 1, 2 or 3 of the Sequence Patterns (lanes).
BUTTONS 1 to 32 – These buttons select the number of steps in the sequence from 1-32.
RESET – Clears the Pitch Sequencer lane
RUN – Enables the Pitch Sequencer lane.
The pitch sequencer is used to sequence the pitch of Mutate with different settings available
for each of the 32 steps. The pitch values for each step are shown numerically at the top of
each step with 0 being original pitch.
The top row of numerical values can show + or – 12 semitones. The bottom row of numerical
values are used to change the Pitch octave of each step.
RESET – Clears the Volume Sequencer lane.
The Volume Sequencer lane is used to sequence the velocity control of Mutate with different
settings available for each of the 32 steps.
BUTTONS 1 to 32 – Creates a rest or stop on the chosen step.
RESET – Clears the Length Sequencer lane.
LENGTH SELECT – Sets the length of each Note to a set value. To use with the table below
set the length to ‘variable’.
The Attack sequencer lane is used to sequence the AMP envelope attack of notes. Works in
conjunction with the Sequencer Length lane.
RESET – Clears the Attack Sequencer lane.
RUN – Enables the Attack Sequencer lane.
The Filter Frequency lane is used to sequence the filter frequency over time.
RESET – Clears the Filter Sequencer lane.
RUN – Enables the Filter Sequencer lane.
The Filter Resonance lane is used to sequence the filter resonance over time.
RESET – Clears the Filter Resonance Sequencer lane.
RUN – Enables the Filter Resonance Sequencer lane.
The Filter LFO Depth lane is used to sequence the Filter LFO depth over time.
RESET – Clears the Filter LFO Depth Sequencer lane.
RUN – Enables the Filter LFO Depth Sequencer lane.
The Filter LFO Rate lane is used to sequence the Filter LFO rate over time.
RESET – Clears the Filter LFO Rate Sequencer lane.
RUN – Enables the Filter LFO Rate Sequencer lane.
The Stereo Spread lane is used to sequence the Stereo Spread over time.
RESET – Clears the Stereo Spread Sequencer lane.
RUN – Enables the Stereo Spread Sequencer lane.
The Smash lane is used to sequence the Smash Control over time.
RESET – Clears the Smash Sequencer lane.
RUN – Enables Smash Sequencer lane.
The Crush lane is used to sequence the Crush Control over time.
RESET – Clears the Crush Sequencer lane.
RUN – Enables the Crush Sequencer lane.
The Mod Send lane is used to sequence the Mod Send Control over time.
RESET – Clears the Mod Send Sequencer lane.
RUN – Enables the Mod Send Sequencer lane.
The Reverb Send lane is used to sequence the Reverb Send Control over time.
RESET – Clears the Reverb Send Sequencer lane.
RUN – Enables the Reverb Send Sequencer lane.
The Delay Send lane is used to sequence the Delay Send Control over time.
RESET – Clears the Delay Send Sequencer lane.
RUN – Enables the Delay Send Sequencer lane.
FX Page
Mutates FX page is where you can add movement to your sound with a modulation effect
(selectable between Flanger, Phaser and Chorus).
You can add further depth and definition using the reverb and delay modules to really bring
your sound to life.
MOD FX SELECT – select the Mod Effect (Chorus, Phaser or Flanger).
EXT OUT – Sets the Mod Send to use the External Out. This is helpful when sequencing the
sends with external effects in your host sequencer.
MOD DEPTH – Sets the Depth for the selected Mod Effect (Chorus, Phaser or Flanger).
MOD RATE – Sets the Speed for the selected Mod Effect (Chorus, Phaser or Flanger).
MAD PHASE – Sets the Phase for the selected Mod Effect (Chorus, Phaser or Flanger).
FEEDBACK – Sets the Feedback for the selected Mod Effect (Phaser or Flanger).
COLOUR – Sets the Colour for the selected Mod Effect (Flanger).
ER/LR – Switches the display between the Early and Late Reflection parameters for the
Reverb.
REVERB SELECT – Select the type of reverb from a list of 20 impulse responses.
EXT OUT – Sets the Reverb Send to use the External Out. This is helpful when sequencing
the sends with external effects in your host sequencer.
PRE-DELAY – Sets the Pre Delay for the Reverb.
SIZE – Sets the Reverb Early Reflection Size.
HI-PASS – Sets the Reverb Early Reflection High Pass Filter.
LOW-PASS – Sets the Reverb Early Reflection Low Pass Filter.
TIME – Sets the Delay Time.
FEEDBACK – Sets the Delay Feedback.
EXT OUT – Sets the Delay Send to use the External Out. This is helpful when sequencing
the sends with external effects in your host sequencer.
WIDTH – Sets the Ping-Pong Intensity of the Delay.
HI-CUT – Sets the Low Pass Filter for the Delay.
SEQ START KEY – Sets the Start Key for the Sequence Patterns.
KEY RANGE – Set the low and High Key to control the key range of Mutate.
RANDOM TUNE – Randomly tunes each note to give a more analogue sound. Lower
settings produce subtle tuning differences while higher settings produce a ‘broken synth’
sound.
RANDOM VOLUME – Randomly changes the volume of each note for subtle (or not so
subtle) analogue variations.
MODE – Sets the play mode between Monophonic, Legato and Polyphonic.
Kontakts keyboard shows the MIDI trigger notes for sequences 1-16 (pink) along with the
MIDI notes that trigger the synth (blue).
Ranges are controlled with the parameters above.
Designed Presets Instrument
The Mutate ‘Designed Presets’ instrument is very similar to the Raw Waveforms version.
The difference is that on the SYNTH page you can edit the sample start of the chosen
waveform using the sample start and random controls.
The Designed Preset Instrument is powered by 6305 perfectly looped multi-samples, spread
across 142 expressive patches which have been synthesized and shaped with an extensive
modular Eurorack system. These sounds are ready to use straight out of the box, with filter
settings, modulation, and envelope settings recorded straight from the Eurorack setup.
Each waveform is unique and evolves over time allowing you to sweep through rich
harmonics to create movement. A ‘de-click’ feature is available on the FX page which
introduces a very short fade to prevent any clicks and pops while the sample start is being
edited.
Everything else including LFO’s, sequencers and effects is exactly the same as the Raw
Waveforms instrument.
S.START – Sets the Sample Start control. Used to sweep through a waveform.
RANDOM – Randomises the Sample Start position each time a different key is played.
Credits
Concept – Wave Alchemy, Rui Peixoto and Matthew Fudge
Sampling / Sound Design – Wave Alchemy and Rui Peixoto
Programming / Scripting – Divergent Audio Group
Graphics Design – Divergent Audio Group
Demo Creators
Donny Walls – ‘Kill the Virus’ Produced by Donny Walls
www.soundcloud.com/donnyw
Nightmusique – ‘Deep Yellow’ Produced by Nightmusique
www.nightmusique.com
Mike Ritchie – ‘Mutate’ Produced by Mike Ritchie
www.mikeritchiemusic.com
Moduler – ‘Mutate’ Produced by Moduler
https://soundcloud.com/moduler
Michael Lovatt – ‘Mutated’ Produced by Michael Lovatt
https://soundcloud.com/michaellovatt
Factory Library Preset Sound Designers
Rui Peixoto
Dan Byers
Kit List
The Eurorack modules used for sound synthesis;
Oscillators
Cylonix cyclebox II, Make noise DPO, Synthesis Tech E350 morphing terrarium, WMD
phase displacement oscillator, Make noise Phonogene
Filters
Macbeth Dual state variable filter, STG Post lawsuit LPF, Make noise Optomix (Low pass
gate), Manhattan analog MA35
VCAs/mixers
Oakley classic VCAs, Make noise optomix (Low pass gate), WMD triple bipolar VCA,
Manhattan analog MA35, Circuit Abbey unify stereo mixer, Fonitronik mh01
Effects
Flight of harmony sound of shadows, Doepfer A-188-1 BBD module, Flight of Harmony
plague bearer
Modulators
Make noise Maths, 4ms pingable envelope generator, Malekko envelator, Doepfer A155,
Acidlab autobot, Synthwerks PGM4x4