1
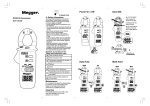
User’s Manual for DM3218 Digital Clampmeter
Distributed by www.FiredragonEnt.com
OVERVIEW
1. SAFETY INFORMATION
This digital clamp meter has been manufactured and tested in accordance with IEC10101 Part 1 (Safety Requirement for Electrical
Equipment for measurement, control and laboratory use, Safety Class II, Overvoltage category II)
Before using the meter please read this manual thoroughly. After reading it, keep it together with the product for reference when
necessary. This manual contains information and WARNINGS which must be observed to assure safe operation and maintain the
meter in safe condition.
1-1.Explanation of safety symbols
The meaning of the symbols used in this manual and attached to the product is as follows.
◙ Very important instruction for safe use.
● The warning massages are intended to prevent accidents to operating personnel such as burns and electrical shocks.
The caution messages are intended to prevent damage to the instrument.
Dangerous voltage. (Take care not to get an electric shock in voltage measurement.)
Ground(Allowable applied voltage range between the input terminal and earth.)
Direct current (DC)
Alternating current (AC)
Double insulation(Protection Class II)
1-2. Warning instructions for safe use: To ensure that the meter is used safely, be sure to observe the instructions when using the
instrument.
1) Never use meter on the electric circuit that exceeds 600V.
2) Never apply an input signal that exceeds the maximum rating input value.
3) Never use meter if the meter or test leads are damaged or broken.
4) Pay special attention when measuring any voltage of over AC 30Vrms (42.4V peak) or DC 60V or more to avoid injury.
5) Never use the meter for measuring line connected equipment (i.e. motors) that generate induced or surge voltage it may exceed
the maximum allowable voltage.
6) Never use a damaged meter.
7) When connecting and disconnecting the test leads, first connect the ground lead (black one).
8) Always keep your fingers behind the finger guards on the probe when making measurements.
9) Be sure to disconnect the test pins from the circuit when changing the meter’s function.
10) Before starting measurements, make sure that the function and range are properly set in accordance with the measurement.
2.GENERAL SPECIFICATIONS
Digital Display: 1-1/4” digital LCD display with maximum reading 1999
Sampling Rate: 3 times/sec
Polarity: When negative signal is applied, the tester will show.
Overload: When the signal is larger than the maximum allowed it will show ‘OL’.
Range: Auto range
Battery discharge indication:
.
Auto Power Off: 15 minutes
Power supply : 2 pcs. AAA7# 1.5V
Dimension : 7 x 2 x 1.5 inches
Weight : 6 ounces (including batteries )
Accessories : This meter comes complete with instruction manual, carry case, test leads, alligator clips, spare batteries and one
copy of WIRING & Fuel Burning Equipment - Volume 2 – Meters.
3. MEASURING SPECIFICATIONS
DCV
Range
200mV
2V
20V
200V
600V
Resolution
100uV
1mV
10mV
100mV
1V
Input Impedance: 10MΩ
Overload Protection: 700Vrms or 1000Vp
ACV
Range
2V
20V
200V
600V
Resolution
1mV
10mV
100mV
1V
Input Impedance: 10MΩ
Overload Protection: 700Vrms or 1000Vp
Frequency Range: 40Hz 400Hz
Response: Average, calibrated in rms of sine wave
DCA
Range
200uA
2000uA
20mA
200mA
Resolution
0.1uA
1uA
10uA
100uA
Overload Protection: F200mA/250V fuse
ACA
Range
200uA
2000uA
20mA
200mA
2A
20A
200A
500A
Resolution
0.1uA
1uA
10uA
100uA
1mA
10mA
100mA
1A
Frequency range:40Hz 400Hz
Response :Average, calibrated in rms of sine wave
Overload Protection :F200mA/250V fuse for 200uA 200mA ranges
NOTE: 2A-500A Range Tests must use clamp.
Resistance
Range
200
2k
20k
200k
2M
20M
Resolution
0.1
1
10
100
1k
10k
Open circuit Voltage: 0.5V
Overload Protection: 250V DC or rms AC
Diode & Continuity
Range
Description
lf continuity exists (about less than 50Ω built-in
buzzer will sound)
Shows the approx. forward voltage drop of the
diode
Overload Protection: 250V DC or rms AC
4.
PUSHBUTTON INSTRUCTIONS
4-1 M-H: (Max Hold) Meter continues working after pushing this button, the display will hold the maximum data.
4-2 F-S: (Function Select) This button is used to change current measurement between Amps AC or DC Amps mode.
4-3 D-H: (Data hold) Push this button to hold the last measuring result, this function remains valid until the button is pushed again.
5. HOW TO TAKE MEASUREMENTS
Start-up inspection:
◙ WARNING:
● Never use meter if the meter or test leads are damaged or broken.
● Make sure that the test leads are not cut or otherwise damaged.
5-1 MEASURING CURRENT
1.
2.
3.
4.
5.
6.
7.
8.
Connect the black test lead to the COM (-) jack and the red test lead to mA jack (+) for a maximum of 200mA.
Set the function switch at uA/mA range to be used and push down the F-S button to select DCA or ACA measuring mode.
Connect leads in series with the load in which the current is to be measured.
Read the LCD display. The polarity of red lead connection (+) will be indicated when making a DCA measurement.
Set the function switch at 20A or 500A range if the test current (ACA) is more than 200mA and press the trigger to open the
transformer jaws and clamp them around a conductor.
Jaws should be completely closed before taking a reading.
The most accurate reading will be obtained by keeping the conductor across center of the transformer jaws.
The reading will be indicated on the display.
5-2 VOLTAGE MEASUREMENTS
● WARNING
Never apply an input signals exceeding the maximum rating input value.
Be sure to disconnect the test pins from the circuit when changing the function.
Always keeps your fingers behind the finger guards on the probe when making measurement. DCV (
input value 600V
ACV (
): Maximum rating
): Maximum rating input value 600V
1) Plug the black test lead into the COM input jack on the meter and connect the test lead tip to a groundpoint (the reference
point for measurement of voltage).
2) Select the desired AC Voltage range (
), or DC Voltage range (
).
3) Plug the red test lead into the V input jack on the meter and connect the circuit where a voltage measurement is required.
Voltage is always measured in parallel across a test point.
5-3 RESISTANCE MEASUREMENTS
1) Turn off any power to the resistance to be measured. Discharge any capacitors. Any voltage present during a resistance
measurement will cause inaccurate readings and could damage the meter if exceeding the overload protection of 600 VDC or
AC.
2) Insert the BLACK and RED test leads into the COM and input terminals respectively.
3) Select the function switch at Ω.
4) Connect the BLACK and RED test probe tips to the circuit or device under test, making sure it is de-energized first.
5) Open circuits will be displayed as an overload ‘OL’ condition.
5-4 TESTING DIODE
position.
1. Set the meter switch at the
2. Voltage range black test lead to the COM jack and the red test lead to the V/mA jack.
3. Push down the F-S button.
4. Connect the red lead to the anode, the black lead to cathode of the diode under test.
5.You can get reading from LCD.
NOTE: 1. The meter will show the approximate forward voltage drop of the diode.
2. If the lead to connection is reversed, only figure ‘OL’ will be display.
5-5 CONTINUITY TEST
1.
2.
3.
4.
5.
Set the meter switch at the
position.
Connect the black test lead to the COM jack and red test lead to the V/ mA jack.
Push down the F-S button.
Connect test leads across two points of the circuit under testing.
If continuity exists (resistance less than about 50 Ω), built in buzzer will sound.
6.
BATTERY REPLACEMENT
● WARNING
TO AVOID ELECTRICAL SHOCK, DISCONNECT THE TEST LEADS AND ANY INPUT SIGNALS BEFORE
REPLACING THE BATTERY ONLY WITH SAME TYPE OF BATTERY.
This meter is powered by 2 pcs. AAA 1.5Vdc.
When the meter displays
the battery must be replaced to maintain proper operation.
Use the following procedure to replacing the battery.
1) Disconnect test leads from any live source, turn the rotary switch to OFF, and remove the test leads from the input
terminals.
2) The battery is secured to the rear case by a screw. Using a screwdriver, remove the screw from the rear case and remove
the rear case.
3) Remove battery and replace with two new batteries. Check the battery polarity.
4) Replace the rear case and reinstall the screw.
7. MAINTENANCE
● WARNING
Before open the case, disconnect both test lead and never uses the meter before the case is closed.
CAUTION
To avoid contamination or static damage, do not touch the circuit board without proper static protection.
REMARKS
*If the meter is not going to be used for a long time, take out the battery and do not store the meter in high temperature or high
humidity environment.
*When taking current measurement, keeping the cable at the center of the clamp will give more accurate test results.
*Repairs or servicing not covered in this manual should only be done by qualified perssonel.
CLEANING
Periodically wipe the case with a dry cloth and detergent. Do not use abrasives or solvents on this instruments.
WARRANTY
Victor warrants this instrument to be free from defects in material and workmanship for a period of one year. This warranty does
not cover expendable items such as batteries or test leads.
If the defect has been caused by a misuse or abnormal operating conditions, the repair will be billed at a nominal cost.
DM-3218-FD